Nilfisk-Advance 2710 Manuel utilisateur
- Catégorie
- Machine à plancher
- Taper
- Manuel utilisateur

Advolution™ 2710
INSTRUCTIONS FOR USE
INSTRUCCIONES DE USO
ADVANCE MODELS 56422000, 56422002
NILFISK MODEL 56422001
3/06 Form No. 56041634
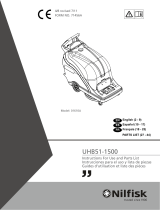
UHR 70-1700
A-English
B-Español

WEEE SYMBOL INFORMATION
English
Correct Disposal of This Product (Waste Electrical & Electronic Equipment)
(Applicable in the European Union and other European countries with separate
collection systems)
This marking shown on the product or its literature, indicates that it should not be disposed with
other household wastes at the end of its working life. To prevent possible harm to the environ-
ment or human health from uncontrolled waste disposal, please separate this from other types
of wastes and recycle it responsibly to promote the sustainable reuse of material resources.
Household users should contact either the retailer where they purchased this product, or their
local government office, for details of where and how they can take this item for environmental-
ly safe recycling.
Business users should contact their supplier and check the terms and conditions of the pur-
chase contract. This product should not be mixed with other commercial wastes for disposal.
Español Eliminación correcta de este producto (material eléctrico y electrónico
de descarte)
(Aplicable en la Unión Europea y en países europeos con sistenmas de recogi-
da selectiva de residuos)
La presencia de esta marca en el producto o en el material informativo que lo acompaña, indi-
ca que al finalizar su vida útil no deberá eliminarse junto con otros residuos domésticos. Para
evitar los posibles daños al medio ambiente o a la salud humana que representa la eliminación
incontrolada de residuos, separe este producto de otros tipos de residuos y recíclelo correcta-
mente para promover la reutilización sostenible de recursos materiales.
Los usuarios particulares pueden contactar con el establecimiento donde adquirieron el pro-
ducto, o con las autoridades locales pertinentes, para informarse sobre cómo y dónde pueden
llevarlo para que sea sometido a un reciclaje ecológico y seguro.
Los usuarios comerciales pueden contactar con su proveedor y consultar las condiciones del con-
trato de compra. Este producto no debe eliminarse mezclado con otros residuos comerciales.

ENGLISH / A-3
FORM NO. 56041634 - Advolution™ 2710 / UHR 70-1700 - A-3
TABLE OF CONTENTS
Page
Introduction ........................................................................................... A-3
Parts and Service ................................................................................. A-3
Nameplate ............................................................................................ A-3
Uncrating the Machine .......................................................................... A-3
Important Safety Instructions ................................................................A-4
Importantes consignes de sécurité .......................................................A-5
Know Your Machine .....................................................................A-6 – A-7
Preparing the Machine for Use
Batteries ............................................................................................... A-8
Installation of the Burnishing Pad ......................................................... A-9
Installation of the Dust Collection Bag ................................................A-10
Operating the Machine
Before Each use ................................................................................. A-11
Plan Your Floor Burnishing ................................................................. A-11
Operating The Machine ...................................................................... A-11
Maintenance
After Use ............................................................................................. A-12
Maintenance Schedule ....................................................................... A-12
Lubricating the Machine .....................................................................A-12
Steering Chain Tension ...................................................................... A-12
Electromagnetic Brake .......................................................................A-12
Charging the Batteries ........................................................................A-13
General Machine Troubleshooting
Error Display .......................................................................................A-14
Swirl Marks ......................................................................................... A-14
Circles on the Floor ............................................................................A-14
Floor Finish Removed ........................................................................ A-14
Machine Wobbles During Operation ................................................... A-14
Machine Does Not Run ......................................................................A-14
Technical Specifi cations ..................................................................... A-15
INTRODUCTION
This manual will help you get the most from your Nilfi sk-Advance Advolution™ 2710 / UHR 70-1700. Read it thoroughly before operating the
machine.
Note: Bold numbers in parentheses indicate an item illustrated on pages A-6 – A-7.
This product is intended for commercial use only.
PARTS AND SERVICE
Repairs, when required, should be performed by Nilfi sk-Advance service personnel using Nilfi sk-Advance original replacement parts and
accessories.
Call Nilfi sk-Advance for repair parts or service. Please specify the Model and Serial Number when discussing your machine.
NAME PLATE
The Model and Serial Number of your machine are shown on the Nameplate on the machine. This information is needed when ordering repair
parts for the machine. Use the space below to note the Model and Serial Number of your machine for future reference.
MODEL ________________________________________________
SERIAL NUMBER ________________________________________
UNCRATING
When the machine is delivered, carefully inspect the shipping packaging and the machine for damage. If damage is evident, save the shipping
carton (if applicable) so that it can be inspected. Contact the Nilfi sk-Advance Customer Service Department immediately to fi le a freight damage
claim. Refer to the unpacking instruction sheet included with the machine to remove the machine from the pallet.

A-4 / ENGLISH
A-4 - FORM NO. 56041634 - Advolution™ 2710 / UHR 70-1700
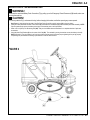
IMPORTANT SAFETY INSTRUCTIONS
This machine is only suitable for commercial use, for example in hotels, schools, hospitals, factories, shops and offi ces other than
normal residential housekeeping purposes.
Read all instructions before using.
WARNING!
To reduce risk of fi re, electric shock, or injury:
• Use only as described in this manual. Use only manufacturer’s recommended attachments.
• This machine shall be used only by properly trained and authorized persons.
• This machine is for dry use only and shall not be used or stored outdoors in wet conditions.
• Do not allow to be used as a toy. Close attention is necessary when used by or near children.
• Keep sparks, fl ame and smoking materials away from batteries. Explosive gases are vented during normal operation.
• Charging the batteries produces highly explosive hydrogen gas. Charge batteries only in well-ventilated areas, away from open
fl ame. Do not smoke while charging the batteries.
• Remove all jewelry when working near electrical components.
• Turn the key switch off (O) and disconnect the batteries before servicing electrical components.
• Never work under a machine without safety blocks or stands to support the machine.
• Do not dispense fl ammable cleaning agents, operate the machine on or near these agents, or operate in areas where fl ammable
liquids exist.
• Do not clean this machine with a pressure washer.
• This machine is not approved for use on public paths or roads.
• Do not put any object into openings. Do not use with any opening blocked; keep free of dust, lint, hair, and anything that may
reduce air fl ow.
* Do not use on surfaces having a gradient exceeding that marked on the machine.
• When operating this machine, ensure that third parties, particularly children, are not endangered.
• Before performing any service function, carefully read all instructions pertaining to that function.
• Do not leave the machine unattended without fi rst turning the key switch off (O) and removing the key. The parking brake is
automatically activated at this time.
* Turn the key switch off (O) and remove the key, before changing the brushes, and before opening any access panels.
• Take precautions to prevent hair, jewelry, or loose clothing from becoming caught in moving parts.
• Do not use without dust bag and / or fi lters in place.
• Do not stand on the pad housing.
• This machine is not suitable for picking up health endangering dust.
• The batteries must be removed from the machine before the machine is scrapped. The disposal of the batteries should be safely
done in accordance with your local environmental regulations.
* All doors and covers are to be positioned as indicated in the instruction manual before using the machine.
* Refer to the battery charger OEM product manual for additional specifi c battery charger warnings.
SAVE THESE INSTRUCTIONS

ENGLISH / A-5
FORM NO. 56041634 - Advolution™ 2710 / UHR 70-1700 - A-5
IMPORTANTES CONSIGNES DE SECURITE
Cette machine ne convient qu´à un usage industriel, par exemple dans les hôtels, les écoles, les hôpitaux, les usines, les boutiques
et les bureaux et autres utilisations que le ménage domestique résidentiel.
Lisez toutes les instructions avant l´utilisation.
ATTENTION!
Pour réduire le risque d´incendie, d´électrocution, ou de blessure:
• Ne l´utilisez que comme décrit dans ce manuel. N´utilisez que des attachements recommandés par le fabricant.
• Cette machine ne doit être utilisée que par des personnes proprement formées et autorisées.
• Cette machine n´est destinée qu´à un usage à sec et ne doit pas être utilisée ou emmagasinée à l´extérieur par des temps
pluvieux.
• Ne permettez pas que l´on l´utilise comme un jouet. Une attention particulière est nécessaire lorsqu´elle est utilisée par ou près
d´enfants.
• Gardez toute étincelle, fl amme ou matériaux fumants éloignés des batteries. Des gaz explosifs sont ventilés pendant un
fonctionnement normal.
• Charger les batteries produit du gaz hydrogène hautement explosif. Ne chargez les batteries que dans des zones bien aérées,
loin de toute fl amme. Ne fumez pas lors de la charge des batteries.
• Retirez tout bijou lorsque vous travaillez près des composants électriques.
• Tournez l´interrupteur à clé sur (O) pour l´éteindre et déconnectez les batteries avant l´entretien des composants électriques.
• Ne travaillez jamais sous une machine sans cale de sécurité ou de socles pour supporter la machine.
• Ne répandez pas d´agents nettoyants infl ammables, n´utilisez pas la machine sur ou près de ces agents, ou ne l´utilisez pas
dans des zones où ces produits existent.
• Ne nettoyez pas cette machine avec un jet à haute pression.
• Cette machine n´est pas destinée à un usage sur les voies publiques.
• Ne mettez aucun objet dans les ouvertures. Ne l´utilisez pas avec une ouverture de bouchée; gardez la à l´abri de la poussière,
de la charpie, des cheveux et de tout ce qui pourrait réduire le fl ux de l´air.
* N’utilisez pas sur des surfaces dont la pente dépasse celle mentionnée sur la machine.
• Lors de l´utilisation de cette machine, assurez - vous que des tiers, particulièrement des enfants, ne soient pas en danger.
• Avant d´entreprendre toute fonction d´entretien, lisez attentivement toutes les instructions se rapportant à cette fonction.
• Do not leave the machine unattended without fi rst turning the key switch off (O) and removing the key. The parking brake is
automatically activated at this time.
* Positionnez la clé de contact sur off (O) avant de remplacer les brosses ou d’ouvrir tout panneau d’accès.
• Prenez les précautions nécessaires pour éviter que les cheveux, bijoux et vêtements amples ne soient pris dans les parties
mobiles.
• Ne l´utilisez pas sans que le sac de poussière et / ou les fi ltres ne soient en place.
• Ne vous appuyez pas sur la chambre du disque.
• Cette machine n´est pas conçue pour le ramassage de poussière dangereuse à la santé.
• Prenez soin d’enlever les batteries de la machine avant de mettre cette dernière au rebut. Pour ce qui est de l’élimination des
batteries, conformez-vous aux réglementations locales en matière d’environnement.
* Toutes les portes et couvercles doivent être dans la position mentionnée dans le manuel d’instruction avant de mettre la
machine en service.
* Consultez le manuel du fabricant du chargeur de batterie pour plus de consignes de sécurité spécifi ques sur le chargeur de
batterie.
CONSERVEZ CES INSTRUCTIONS

A-6 / ENGLISH
A-6 - FORM NO. 56041634 - Advolution™ 2710 / UHR 70-1700
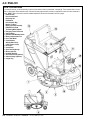
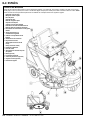
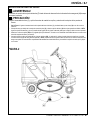
KNOW YOUR MACHINE
As you read this manual, you will occasionally run across a bold number or letter in parentheses - example: (2). These numbers refer to an item
shown on these pages unless otherwise noted. Refer back to these pages whenever necessary to pinpoint the location of an item mentioned in
the text. NOTE: Refer to the service manual for detailed explanations of each item illustrated on the next 2 pages.
1 Pad Drive Deck
2 Dust Control Shroud
3 Burnishing Pad
4 Pad Retainer
5 Dust Collection Bag
6 Machine Tie Down
7 Battery Connector Assembly
8 FWD/REV Drive Pedal
9 Tilt Steering Wheel Adjuster
10 Emergency Power Disconnect
11 Steering Wheel
12 Operator’s Seat W/Safety Switch
13 Battery Compartment Cover
14 Drive / Steer Wheel
15 Circuit Breakers
40 Amp (Wheel Drive)
5 Amp (Control Circuit)
16 Deck Latch
17 Control Panel
18 Spare Dust Bag Storage
19 Beacon (Optional)
20 Headlight (Optional)
21 Active Dust Control (Optional)
22 Onboard Charger (Optional)
23 Charger Plug

ENGLISH / A-7
FORM NO. 56041634 - Advolution™ 2710 / UHR 70-1700 - A-7
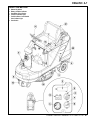
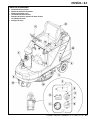
KNOW YOUR MACHINE
A Master Key Switch
B Battery Condition Indicator
C Hour Meter / Error Display
D Pad Drive Indicator Light
E Pad Drive Raise / Lower Switch
F Horn Indicator Light
G Horn Switch

A-8 / ENGLISH
A-8 - FORM NO. 56041634 - Advolution™ 2710 / UHR 70-1700
BATTERIES
If your machine shipped with batteries installed do the following:
• Check that the batteries are connected to the machine (7).
• Turn ON the Key Switch (A) and check the Battery Indicator (B). If the green light is ON, the batteries are ready for use. If the green light is OFF, the
batteries should be charged before use. See the “Charging The Batteries” section.
If your machine shipped without batteries installed do the following:
• Consult your Authorized Nilfi sk-Advance dealer for recommended batteries.
• Install the batteries by following the instructions below.
• DO NOT install three 12 volt batteries in your machine. This affects the stability of the machine.
WARNING!
Use extreme caution when working with batteries. Sulfuric acid in batteries can cause severe injury if allowed to contact the skin
or eyes. Explosive hydrogen gas is vented from the batteries through openings in the battery caps. This gas can be ignited by
any electrical arc, spark or fl ame. Do not install any lead-acid battery in a sealed container or enclosure. Hydrogen gas from
overcharging must be allowed to escape.
When Servicing Batteries...
* Remove all jewelry
* Do not smoke
* Wear safety glasses, rubber gloves and a rubber apron
* Work in a well-ventilated area
* Do not allow tools to touch more than one battery terminal at a time
* ALWAYS disconnect the negative (ground) cable fi rst when replacing batteries to prevent sparks.
* ALWAYS connect the negative cable last when installing batteries.
CAUTION!
Electrical components in this machine can be severely damaged if the batteries are not installed and connected properly. Nilfi sk-
Advance, a qualifi ed electrician, or the battery manufacturer should install batteries.
1 Remove the batteries from their shipping crate and carefully inspect them for cracks or other damage. If damage is evident, contact the carrier that delivered
them or the battery manufacturer to fi le a damage claim.
2 Turn the Master Key Switch (A) OFF and remove the key.
3 Open and prop the Battery Compartment Cover (13). Remove the battery cables from inside the battery compartment.
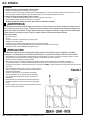
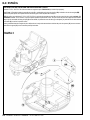
4 Your machine comes from the factory with enough battery cables to install six 6 volt batteries. Carefully lift the batteries into the battery compartment and
arrange them exactly as shown in FIGURE 1. Secure the batteries as close to the back of the machine as possible.
5 Install the battery cables as shown. Position the cables so the battery caps can be easily removed for battery service.
6 Carefully tighten the nut in each battery terminal until the terminal will not turn. Do not over-tighten the terminals, or they will be very diffi cult to remove for
future service.
7 Coat the terminals with spray-on battery terminal coating (available at most auto parts stores).
8 Put one of the black rubber boots over each of the terminals and connect the Battery Connector Assembly (7).
FIGURE 1

ENGLISH / A-9
FORM NO. 56041634 - Advolution™ 2710 / UHR 70-1700 - A-9
INSTALLATION OF THE BURNISHING PAD
WARNING!
Disconnect the machines Battery Pack Connection (7) by pulling up on the Emergency Power Disconnect (10) handle, when ever
servicing the machine.
CAUTION!
Turn the key switch off (O) and remove the key, before changing the brushes, and before opening any access panels.
1 See Figure 2. Grab hold of the right side of the Pad Drive Deck (1) and lift up until it Latches (16) in place as shown.
2 Place your hand underneath the Dust Control Shroud (2) and remove the Pad Retainer (4) from the fl exible pad holder assembly. NOTE:
Grip the retainer fi rmly and turn clockwise (to the right) as the retainer uses a Left Hand thread.
3 Select a 27 inch (68 cm) Dia. Burnishing Pad (AA). See your local Nilfi sk-Advance Distributor for a complete selection of pads and
accessories.
4 Insert the plastic Pad Retainer (4) into the center of the Pad (AA). Then reinstall by turning the retainer counter-clockwise (to the left).
NOTE: Important !!! Turn the retainer in until you hear a clicking ratchet sound, this insures proper tightening of the pad by properly
compressing the pad material and drawing up the retainer so it will not strike the fl oor.
FIGURE 2

A-10 / ENGLISH
A-10 - FORM NO. 56041634 - Advolution™ 2710 / UHR 70-1700
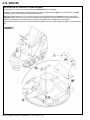
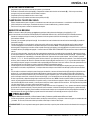
INSTALLATION OF THE DUST COLLECTION BAG
The Advolution™ 2710 / UHR 70-1700 uses dust collection bag PN 56391185 (sold 6 to a Package).
See Figure 3. Unfold the Dust Collection Bag (5) and while holding onto the Card Board Retainer (AA) insert it over the Collection Tube (BB)
found on the top of the Pad Drive Deck (1) on the left side of the machine.
NOTE: Never operate the Advolution™ 2710 / UHR 70-1700 with out a Dust Collection Bag (5) or the optional Active Dust Control Kit (21)
PN56422083 installed. Failure to do so will allow the burnishing dust to become airborne. The Active Dust Control Kit (21) is running whenever
the Master Key Switch (A) is ON, the Pad Drive Deck (1) is down and the FWD/REV Drive Pedal (8) is off the neutral position.
Extra Dust Collection Bags can be stored in the Spare Dust Bag Storage (18) box as shown. Install the Rubber Strap (CC) as shown to secure the
bags.
FIGURE 3

ENGLISH / A-11
FORM NO. 56041634 - Advolution™ 2710 / UHR 70-1700 - A-11
BEFORE EACH USE:
1 Be sure you understand the operator controls and their function.
2 Turn the Master Key Switch (A) ON (l) and check the Battery Condition Indicator (B). If the red light comes on, recharge the battery pack
before using the machine
3 Check that a new or clean pad has been installed.
4 Check that a Dust Collection Bag (5) is installed.
PLAN YOUR FLOOR BURNISHING:
1 Pre-sweep or scrub fl oor area of debris to prevent scratching and poor burnishing performance.
2 Arrange long runs with a minimum of stopping or starting.
3 Avoid bumping into posts or scraping the side of the machine.
OPERATING THE MACHINE
NOTE: Bold numbers or letters in parentheses indicate an item shown on pages A-6 – A-7.
Follow the instructions in PREPARING THE MACHINE FOR USE and the BEFORE EACH USE section of the manual.
1 While seated on the machine adjust the Steering Wheel (11) using the Tilt Steering Wheel Adjuster (9), to a comfortable operating position.
2 Turn the Master Key Switch (A) ON (l). This will display the Battery Condition Indicator Light(s) (B) and Hour Meter / Error Display (C).
3 To transport the machine to the work area, apply even pressure on the front of the FWD/REV Drive Pedal (8) to go Forward or the rear of the
pedal for Reverse. NOTE: The front drive wheel has a built in electromagnetic brake that engages whenever the FWD/REV Drive Pedal (8)
is in the neutral position or when the Master Key Switch (A) is turned OFF. See the ELECTROMAGNETIC BRAKE section for manual over-
ride instructions.
4 Once at the work area, the pad pressure can be adjusted by turning the Master Key Switch (A) off. Hold down the Pad Drive Raise / Lower
Switch (E) while turning on the Master Key Switch (A). The word “Adjust” will scroll on the Display (C) and the Pad Drive Raise/Lower Switch
can be released. Once released, the display will read either “1”, “2”, or “3”. These are the pad pressure settings with “3” being the highest
pad pressure setting. To change pad pressure, press the Pad Drive Raise / Lower Switch (E) to increment between 1, 2, and 3. Once you
have selected the setting that you want to burnish with turn the Master Key Switch (A) off to store the setting in the memory. This setting will
remain in the control panel’s memory until it is changed again using the above procedure.
5 When at the work area press the machine’s FWD/REV Drive Pedal (8) to move the machine in either FWD or REV drive. The machine
should always be moving before lowering the Pad Drive Deck (1).
6 Once the machine is moving, lower the Pad Drive Deck (1) by pressing the Pad Drive Raise / Lower Switch (E). The Pad Drive Indicator
Light (D) on the control panel will light yellow when going down and then turns green to confi rm the lowered position and the pad begins
to turn. To raise the Pad Drive Deck (1) press the Pad Drive Raise / Lower Switch (E). The Pad Drive Indicator Light (D) will be red when
coming up and then turns OFF to confi rm the raised position. NOTE: When the operator’s foot is removed from the Drive Pedal, the pedal
automatically returns to neutral and the pad motor will shut off after about 1 second (the Pad Drive Indicator Light (D) will light yellow). Raise
the Pad Drive Deck before stopping the machine. The fl oor may be damaged if the machine is stopped with the pad down and running.
7 Begin burnishing making long straight line passes, overlap each pass 2-3 inches (5-7 cm). Adjust your machine speed according to the
condition of the fl oor (if the fl
oor is heavily scuffed, drive at a slower rate to ensure proper burnishing). The Active Dust Control Kit (21) if
installed will be running whenever the Master Key Switch (A) is ON, the Pad Drive Deck (1) is down and the FWD/REV Drive Pedal (8) is off
the neutral position.
CAUTION!
The fl oor may be damaged if travel of the machine is stopped with the pad down and running.
8 It may become necessary when burnishing to stop the machine, raise the pad and check to see if the pad is loaded up with fl oor fi nish and
dirt. If it is, turn the pad over to expose the clean side, or install a clean pad.
IMPORTANT NOTE: In the event a fast emergency shutdown of the unit is required push the Emergency Power Disconnect (10).

A-12 / ENGLISH
A-12 - FORM NO. 56041634 - Advolution™ 2710 / UHR 70-1700
AFTER USE
1 Raise the Pad Drive Deck (1), then drive the machine to a service area.
2 Turn the Master Key Switch (A) OFF (O) and remove the key.
3 Remove the burnishing pad, rinse the pad with warm water and hang it up to dry. NOTE: Allow pad to dry completely before using again.
4 Check the Dust Collection Bag (5) if over half full or damaged remove and replace with a new bag.
5 Check the maintenance schedule and perform any required maintenance.
6 Wipe the machine with a damp cloth, then store the machine in a clean, dry place.
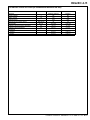
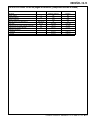
MAINTENANCE SCHEDULE
MAINTENANCE ITEM Daily Weekly Monthly Yearly
Charge Batteries X
Check/Clean/Replace Burnishing Pad X
Check/Replace Dust Collection Bag X
Check Battery Water Level(s) X
Check/Replace Pad Shroud Skirt X
Steering Chain Tension X
Lubrication X
Check Carbon Brush Wear On Pad/Wheel Drive/ Actuator Motors X
NOTE: Refer to the Service Manual for more detail on all maintenance items mentioned in this manual.
LUBRICATING THE MACHINE
Locations requiring periodic oiling are:
Qty 1 - Steering Wheel Shaft Universal Joint (oil hole or port)
STEERING CHAIN TENSION
Inspect once a month and make adjustments if needed (refer to the service manual for detailed instructions).
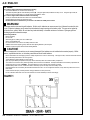
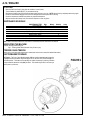
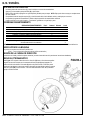
ELECTROMAGNETIC BRAKE
FIGURE 4
See Figure 4. The Drive / Steer Wheel Assembly (14) has a built in electromagnetic brake that
is engaged whenever the Master Key Switch (A) is OFF or the FWD / REV Drive Pedal (8) is in
the neutral position. This brake can be manually over ridden if necessary by inserting a medium
to large screwdriver behind the Yoke (AA) as shown. This should only be done in the event you
need to push or pull the unit.

ENGLISH / A-13
FORM NO. 56041634 - Advolution™ 2710 / UHR 70-1700 - A-13
CHARGING THE BATTERIES
Charge the batteries each time the machine is used for 1 hour or longer, or whenever the Battery Condition Indicator Lights (B) light up red.
To Charge the Batteries...
1 IMPORTANT!: Open the Battery Compartment Cover (13) to provide proper ventilation.
2 Disconnect the Battery Connector Assembly (7) and plug the battery charger into the plug connected to the batteries.
4 Follow the instructions on the battery charger.
5 Check the fl uid level in all battery cells after charging the batteries. Add distilled water, if necessary, to bring the fl uid level up to the bottom of
the fi ller tubes.
WARNING!
Do not fi ll the batteries before charging.
Charge batteries in a well-ventilated area.
Do not smoke while servicing the batteries.
When Servicing Batteries...
* Remove all jewelry
* Do not smoke
* Wear safety glasses, rubber gloves and a rubber apron
* Work in a well-ventilated area
* Do not allow tools to touch more than one battery terminal at a time
* ALWAYS disconnect the negative (ground) cable fi rst when replacing batteries to prevent sparks.
* ALWAYS connect the negative cable last when installing batteries.
CAUTION!
To avoid damage to fl oor surfaces, wipe water and acid from the top of the batteries after charging.
CHECKING THE BATTERY WATER LEVEL
Check the water level of the batteries at least once a week.
After charging the batteries, remove the vent caps and check the water level in each battery cell. Use distilled or demineralized water in a battery
fi lling dispenser (available at most auto parts stores) to fi ll each cell to the level indicator (or to 10 mm over the top of the separators). DO NOT
over-fi ll the batteries!
CAUTION!
Acid can spill onto the fl oor if the batteries are overfi lled.
Tighten the vent caps. Wash the tops of the batteries with a solution of baking soda and water (2 tablespoons of baking soda to 1 liter of water).
Service Note: There is a drain plug in the bottom of the battery compartment.

A-14 / ENGLISH
A-14 - FORM NO. 56041634 - Advolution™ 2710 / UHR 70-1700
GENERAL MACHINE TROUBLESHOOTING
OPERATOR DISPLAY PANEL STATUS LIGHTS:
Hour Meter / Error Display (C): If an error code is displayed on the Hour Meter / Error Display (C) a system error has occurred, the error display
will read “Err” followed by a two digit code(s). Reference the Service Manual for fault code descriptions and corrective action.
SWIRL MARKS
• Floor not clean.
• Area not properly swept - debris in pad or brush.
• Improper pad for the job.
• Moving the machine too fast.
CIRCLES ON THE FLOOR
• Machine standing still while the pad is running.
FLOOR FINISH REMOVED
• Improper pad...too aggressive.
• Moving the machine too slowly.
MACHINE WOBBLES DURING OPERATION
• Defective pad... one side is more dense than the other.
• Pad not “seated” properly into pad holder bristles.
• Padholder out of balance - replace.
MACHINE DOES NOT RUN
• Check Emergency Power Disconnect (10)
• Check operator seat safety switch (12)
• Check for error fault codes in both the main and speed controllers (see service manual)
• Foot Pedal Fault: Caused by the operator activating the FWD / REV Drive Pedal (8) before turning on
the Master Key Switch (A). To Clear: Turn the key switch off, wait until display is off, then turn key switch back on.

ENGLISH / A-15
FORM NO. 56041634 - Advolution™ 2710 / UHR 70-1700 - A-15
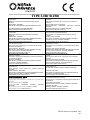
TECHNICAL SPECIFICATIONS (as installed and tested on the unit)
Model Advolution™ 2710 UHR 70-1700
Model No. 56422000 / 56422002 56422001
Voltage, Batteries V 36V 36V
Battery Capacity Ah 395 395
Protection Grade IPX3 IPX3
Sound Pressure Level (IEC 60704-1) dB(A)/20μPa 69 69
Gross Weight lbs. / kg 1,379 / 625 1,379 / 625
Vibrations at the Hand Controls (ISO 5349-1) m/s21.27 m/s21.27 m/s2
Vibrations at the Seat (EN 1032) m/s20.19 m/s20.19 m/s2
Gradeability
Transport 12.3% (70) 12.3% (70)
Cleaning 12.3% (70) 12.3% (70)

B-2 / ESPAÑOL
B-2 - FORM NO. 56041634 - Advolution™ 2710 / UHR 70-1700
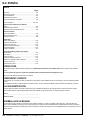
ÍNDICE
Página
Introducción .......................................................................................... B-2
Componentes y servicio ....................................................................... B-2
Placa de identifi cación ..........................................................................B-2
Desembalaje de la máquina ................................................................. B-2
Instrucciones importantes de seguridad ...............................................B-3
Conozca su máquina ...................................................................B-4 – B-5
Preparación de la máquina para su utilización
Baterías ................................................................................................ B-6
Instalación del disco de pulido .............................................................. B-7
Instalación de la bolsa de recogida de polvo ........................................ B-8
Manejo de la máquina
Antes de cada utilización ......................................................................B-9
Planifi que el pulido del suelo ................................................................ B-9
Manejo de la máquina .......................................................................... B-9
Mantenimiento
Después de la utilización ....................................................................B-10
Programa de mantenimiento .............................................................. B-10
Lubricación de la máquina .................................................................. B-10
Tensión de la cadena de dirección .....................................................B-10
Freno electromagnético ......................................................................B-10
Recarga de las baterías ..................................................................... B-11
Solución de problemas generales de la máquina
Pantalla de error ................................................................................. B-12
Marcas de giro ....................................................................................B-12
Círculos en el suelo ............................................................................ B-12
Desaparición del acabado del suelo ................................................... B-12
Oscilación de la máquina durante su utilización ................................. B-12
La máquina no funciona ..................................................................... B-12
Especifi caciones técnicas ...................................................................B-13
INTRODUCCIÓN
Este manual le ayudará a obtener el máximo rendimiento de su Nilfi sk-Advance Advolution™ 2710 / UHR 70-1700. Léalo por completo antes de utilizar la
máquina.
Nota: Los números que aparecen en negrita entre paréntesis indican elementos ilustrados en las páginas B-4 – B-5.
Este producto está destinado exclusivamente a uso comercial.
COMPONENTES Y SERVICIO
Las reparaciones, en caso necesario, deben ser realizadas por el personal de servicio de Nilfi sk-Advance con los repuestos y accesorios originales de Nilfi sk-
Advance.
Llame a Nilfi sk-Advance para lo referente a piezas de repuesto y servicio. Por favor, especifi que el Modelo y Número de Serie cuando hable de su máquina.
PLACA DE IDENTIFICACIÓN
El Modelo y Número de Serie de la máquina se indican en la placa de identifi cación instalada en ella. Esta información es necesaria a la hora de solicitar
repuestos para la máquina. Utilice el siguiente espacio para anotar el Modelo y el Número de Serie de su máquina para futuras consultas.
MODELO _____________________________________________________
NÚMERO DE SERIE ____________________________________________
DESEMBALAJE DE LA MÁQUINA
Cuando reciba la máquina, examine con atención la caja del embalaje y la máquina, con el fi n de comprobar si existe algún daño. Si observa algún daño,
guarde la caja de embalaje (si procede) para que se pueda inspeccionar. Póngase en contacto inmediatamente con el Departamento de Servicio al Cliente de
Nilfi sk-Advance para presentar una reclamación por daños en transporte. Consulte la hoja de instrucciones de desembalaje incluida con la máquina para sacar la
máquina del palet.

ESPAÑOL / B-3
FORM NO. 56041634 - Advolution™ 2710 / UHR 70-1700 - B-3
INSTRUCCIONES IMPORTANTES DE SEGURIDAD
Esta máquina es apta únicamente para su uso comercial, por ejemplo, en hoteles, colegios, hospitales, fábricas, tiendas y ofi cinas,
y no para la limpieza diaria del hogar.
Lea todas y cada una de las instrucciones antes de utilizar el aparato.
¡ADVERTENCIA!
Con el fi n de reducir el peligro de incendio, descarga eléctrica o lesión:
• Utilícelo sólo de la manera descrita en este manual. Utilice sólo los accesorios recomendados por el fabricante.
• Sólo deben utilizar esta máquina las personas autorizadas y con la formación adecuada.
• Esta máquina ha sido diseñada sólo para uso en seco y no debe usarse o guardarse en el exterior en lugares húmedos.
• No permita que se utilice como juguete. Es necesario prestar mucha atención cuando se usa cerca de niños o cuando lo
utilizan éstos.
• Mantenga las chispas, llamas y materiales de fumadores alejados de las baterías. Durante el funcionamiento normal se
desprenden gases explosivos.
• Al recargar las baterías se produce gas de hidrógeno altamente explosivo. Recargue las baterías exclusivamente en zonas
bien ventiladas, lejos de llamas sin proteger. No fume mientras recarga las baterías.
• Quítese todas las joyas cuando trabaje cerca de componentes eléctricos.
• Ponga el conmutador en posición de apagado (O) y desconecte las baterías antes de revisar los componentes eléctricos.
• No trabaje nunca debajo de la máquina sin colocar antes bloques o soportes de seguridad en los que apoyar la máquina.
• No aplique sustancias limpiadoras infl amables ni utilice la máquina sobre estas sustancias, cerca de ellas, ni en zonas en las
que haya líquidos infl amables.
• No lave la máquina con una limpiadora a presión.
• Esta máquina no ha sido aprobada para su uso en vías públicas.
• No coloque ningún objeto en las aberturas. No utilice el aparato con las aberturas obstruidas; manténgalas libres de polvo,
hilos, pelo o cualquier otra sustancia que pueda impedir la circulación del aire.
* No utilice la máquina en superfi cies con pendientes superiores a las indicadas en la máquina.
• Cuando utilice la máquina, asegúrese de que no existe peligro para terceras personas, especialmente niños.
• Antes de proceder a cualquier función de servicio, lea con atención todas las instrucciones relativas a dicha función.
• No deje la máquina sin vigilancia sin antes haber puesto el conmutador en posición de apagado (O) y haber quitado la llave. El
freno de estacionamiento se activa automáticamente en este momento.
* Apague el conmutador de llave (O) y quite la llave antes de cambiar los cepillos y antes de abrir cualquiera de los paneles de
acceso.
• Tome las debidas precauciones para evitar que el pelo, las joyas o las prendas sueltas queden atrapados entre los
componentes móviles.
• No utilizar si la bolsa para el polvo y/o los fi ltros no están en su sitio.
• No pise el alojamiento del disco.
• Esta máquina no es apta para la recogida de polvo peligroso para la salud.
• Retire las baterías de la máquina antes de su desguace. Las baterías deben desecharse de forma segura, de acuerdo con la
reglamentación medioambiental local.
* Antes de utilizar la máquina, todas las puertas y cubiertas deberían estar colocadas como se indica en el manual de
instrucciones.
* Consulte el manual del producto OEM del cargador de batería para obtener advertencias adicionales sobre el cargador de
batería específi co.
GUARDE ESTAS INSTRUCCIONES

B-4 / ESPAÑOL
B-4 - FORM NO. 56041634 - Advolution™ 2710 / UHR 70-1700
CONOZCA SU MÁQUINA
A lo largo de este manual encontrará números o letras en negrita entre paréntesis – por ejemplo: (2). Estos números se refi eren a un objeto que se muestra
en dicha página, a menos que se indique lo contrario. Consulte estas páginas siempre que lo necesite para localizar los elementos citados en el texto. NOTA:
Consulte el manual de servicio para obtener explicaciones más detalladas de cada objeto ilustrado en las siguientes 2 páginas.
1 Platina del motor del disco
2 Mortaja de control de polvo
3 Disco de pulido
4 Sujeción del disco
5 Bolsa de recogida de polvo
6 Sujeción de la máquina
7 Conjunto conector de las baterías
8 Pedal de tracción hacia delante/hacia atrás
9 Botón de ajuste de inclinación del volante
10 Desconexión de la alimentación de emergencia
11 Volante
12 Asiento del operador con
conmutador de seguridad
13 Cubierta de compartimento de las
baterías
14 Volante de tracción / dirección
15 Disyuntores de circuito
40 Amp (motor de la tracción de
rueda)
5 Amp (circuito de control)
16 Pestillo de la plataforma
17 Panel de control
18 Almacenamiento de bolsas de polvo
de repuesto
19 Baliza (opcional)
20 Luz delantera (opcional)
21 Control de polvo activo (opcional)
22 Cargador a bordo (opcional)
23 Enchufe del cargador

ESPAÑOL / B-5
FORM NO. 56041634 - Advolution™ 2710 / UHR 70-1700 - B-5
CONOZCA SU MÁQUINA
A Conmutador de llave principal
B Indicador de situación de las baterías
C Pantalla de cronómetro / error
D Luz indicadora de motor del disco
E Interruptor de elevación / descenso del motor del disco
F Luz indicadora de claxon
G Interruptor de claxon

B-6 / ESPAÑOL
B-6 - FORM NO. 56041634 - Advolution™ 2710 / UHR 70-1700
BATERÍAS
Si su máquina se entrega con baterías instaladas, realice lo siguiente:
• Compruebe que las baterías estén conectadas a la máquina (7 ).
• Encienda el conmutador de llave (A) y compruebe el indicador de batería (B). Si la luz verde está encendida, las baterías están listas para el uso. Si la luz
verde está apagada, las baterías deberían cargarse antes de la utilización. Consulte la sección “Recarga de las baterías”.
Si su máquina se entrega sin baterías instaladas, realice lo siguiente:
• Consulte con su distribuidor autorizado Nilfi sk-Advance en cuanto a las baterías recomendadas.
• Instale las baterías siguiendo las instrucciones indicadas a continuación.
• NO instale 3 baterías de 12 voltios en su máquina. Esto afectará a la estabilidad de la máquina.
¡ADVERTENCIA!
Tome las máximas precauciones cuando trabaje con las baterías. El ácido sulfúrico de las baterías puede causar daños graves si
entra en contacto con la piel o con los ojos. Desde el interior de las baterías se libera gas explosivo de hidrógeno a través de unas
aperturas en las tapas de las baterías. Este gas puede incendiarse con cualquier arco eléctrico, chispa o llama. No instale baterías
de plomo-ácido en un contenedor cerrado. El gas de hidrógeno debido a la sobrecarga debe poder liberarse.
Cuando revise las baterías...
* Quítese todas las joyas
* No fume
* Lleve gafas de seguridad, un delantal de goma y guantes de goma
* Trabaje en una zona bien ventilada
* No permita que las herramientas toquen simultáneamente más de un terminal de batería
* Al sustituir las baterías, desconecte SIEMPRE en primer lugar el cable (de tierra) negativo para evitar chispas.
* Al instalar las baterías, conecte SIEMPRE el cable negativo al fi nal.
¡PRECAUCIÓN!
Los componentes eléctricos de esta máquina pueden dañarse seriamente si las baterías no están instaladas o conectadas
correctamente. Las baterías deben ser instaladas por Nilfi sk-Advance, un electricista cualifi cado o el fabricante de las baterías.
1 Retire las baterías de su caja de embalaje e inspecciónelas para ver si existen grietas u otros daños. Si los daños son evidentes, póngase en contacto
inmediatamente con el transportista que se las entregó para presentar una reclamación por daños en transporte.
2 Apague el conmutador principal de llave (A) y quite la llave.
3 Abra y sostenga la tapa del compartimento de baterías (13). Retire los cables de la batería del interior del compartimento de las baterías.
4 Su máquina viene de fábrica con sufi cientes cables para instalar 6 baterías de 6 voltios. Levante las baterías con cuidado para meterlas en el
compartimento de las baterías y colóquelas exactamente como se muestra en la FIGURA 1. Ponga las baterías tan cerca de la parte trasera de la máquina
como pueda.
FIGURA 1
5 Instale los cables de las baterías como se muestra. Ponga los cables de
forma que las cubiertas de las baterías puedan retirarse fácilmente para el
mantenimiento de las baterías.
6 Apriete con cuidado las tuercas de los terminales de las baterías
hasta que el terminal no gire. No apriete demasiado los terminales;
de lo contrario será muy difícil retirarlos en futuras operaciones de
mantenimiento.
7 Bañe los terminales con revestimiento para terminales de baterías en
pulverizador (disponible en la mayoría de las tiendas de material para
coches).
8 Ponga un manguito de goma negro encima de cada terminal y conecte el
conjunto conector de las baterías (7).
La page est en cours de chargement...
La page est en cours de chargement...
La page est en cours de chargement...
La page est en cours de chargement...
La page est en cours de chargement...
La page est en cours de chargement...
La page est en cours de chargement...
La page est en cours de chargement...
La page est en cours de chargement...
La page est en cours de chargement...
-
 1
1
-
 2
2
-
 3
3
-
 4
4
-
 5
5
-
 6
6
-
 7
7
-
 8
8
-
 9
9
-
 10
10
-
 11
11
-
 12
12
-
 13
13
-
 14
14
-
 15
15
-
 16
16
-
 17
17
-
 18
18
-
 19
19
-
 20
20
-
 21
21
-
 22
22
-
 23
23
-
 24
24
-
 25
25
-
 26
26
-
 27
27
-
 28
28
-
 29
29
-
 30
30


Nilfisk-Advance 2710 Manuel utilisateur
- Catégorie
- Machine à plancher
- Taper
- Manuel utilisateur
dans d''autres langues
- italiano: Nilfisk-Advance 2710 Manuale utente
- English: Nilfisk-Advance 2710 User manual
- español: Nilfisk-Advance 2710 Manual de usuario
- português: Nilfisk-Advance 2710 Manual do usuário
Documents connexes
Autres documents
-
Windsor Chariot 2 iGloss 20 Le manuel du propriétaire
-
Nilfisk UHB 51-1500 Le manuel du propriétaire
-
Clarke Ultra Speed 20T Manuel utilisateur
-
 Nilfisk-Advance America 01610A Manuel utilisateur
-
-
-
-
