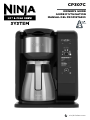
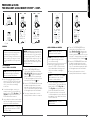
Ninja CP307C Manuel utilisateur
- Catégorie
- Cafetières
- Taper
- Manuel utilisateur

ninjakitchen.com
TM
CP307C
OWNER’S GUIDE
GUIDE D’UTILISATION
MANUAL DEL PROPIETARIO

ENGLISH
1ninjakitchen.com
CONTENTS
THANK YOU
for purchasing the Ninja Hot & Cold Brew System™.
Important Safeguards . . . . . . . . . . . . . . . . . . . . . . 2
Parts . . . . . . . . . . . . . . . . . . . . . . . . . . . . . . . . .4
Using the Control Panel. . . . . . . . . . . . . . . . . . . . . .6
Function Buttons. . . . . . . . . . . . . . . . . . . . . . . . . . 6
Operating Buttons . . . . . . . . . . . . . . . . . . . . . . . . . 6
SCA Certification . . . . . . . . . . . . . . . . . . . . . . . . . 7
Before First Use . . . . . . . . . . . . . . . . . . . . . . . . . . 8
Setting the Clock . . . . . . . . . . . . . . . . . . . . . . . . . 8
Priming Your Ninja Hot & Cold Brew System . . . . . . . . . 9
High-Altitude Calibration. . . . . . . . . . . . . . . . . . . . 10
Preparing & Using the Ninja Hot & Cold Brew System . . . . 11
How Much do You Get in Your Cup? . . . . . . . . . . . . . . . 11
Coee Measurement Chart . . . . . . . . . . . . . . . . . . . . 11
Tea Measurement Chart . . . . . . . . . . . . . . . . . . . . . 11
Filling the Coee Brew Basket . . . . . . . . . . . . . . . . . . 12
Filling the Tea Brew Basket . . . . . . . . . . . . . . . . . . . . 12
Automatic Drip Stop. . . . . . . . . . . . . . . . . . . . . . . . 13
Brewing . . . . . . . . . . . . . . . . . . . . . . . . . . . . . . . 14
Custom Brews: . . . . . . . . . . . . . . . . . . . . . . . . . . .14
Classic & Rich . . . . . . . . . . . . . . . . . . . . . . . . . . 14
Over Ice & Cold Brew . . . . . . . . . . . . . . . . . . . . . . 15
Signature Brew: . . . . . . . . . . . . . . . . . . . . . . . . . . 16
Specialty . . . . . . . . . . . . . . . . . . . . . . . . . . . . . 16
Setting the Delay Brew . . . . . . . . . . . . . . . . . . . . . . 16
Frothing Milk . . . . . . . . . . . . . . . . . . . . . . . . . . . . 17
Care & Maintenance . . . . . . . . . . . . . . . . . . . . . . . 18
Cleaning After a Brew . . . . . . . . . . . . . . . . . . . . . . . 18
Cleaning Your Water Reservoir . . . . . . . . . . . . . . . . . 18
Cleaning Your Carafe . . . . . . . . . . . . . . . . . . . . . . . 18
Cleaning & Descaling Your Brewing System . . . . . . . . . . 19
Troubleshooting Guide . . . . . . . . . . . . . . . . . . . . . 20
Ordering Replacement Parts / Product Registration. . . . 22
Warranty . . . . . . . . . . . . . . . . . . . . . . . . . . . . . 23
PLEASE READ CAREFULLY AND
KEEP FOR FUTURE REFERENCE.
These instructions are designed
to help you get a complete
understanding of your new
Ninja Hot & Cold Brew System™.
If you have any questions, please
call our Customer Service line at
1-877-646-5288.
THIS BOOK COVERS MODEL
NUMBER:
CP307C
TECHNICAL SPECIFICATIONS
Voltage: 120V~, 60Hz
Power: 1500 Watts
Water Reservoir
Capacity: 1,48 l (50 oz.)
TIP: You can find the model and serial
numbers on the QR code label located on the
back of the unit by the power cord.
RECORD THIS INFORMATION
Model Number: ����������������
Serial Number: �����������������
Date of Purchase: ���������������
(Keep receipt)
Store of Purchase: ��������������
REGISTER YOUR PURCHASE
registeryourninja.com
1-877-646-5288
Scan QR code using mobile device

ENGLISH
2 3
1-877-646-5288
ninjakitchen.com
IMPORTANT SAFEGUARDS
READ ALL INSTRUCTIONS BEFORE USE • HOUSEHOLD USE ONLY
Read all instructions before using your NINJA
HOT & COLD BREW SYSTEM™
When using electrical appliances, basic safety precautions should always
be followed, including the following:
WARNING
To reduce the risk of fire, electric shock,
serious injury, death, or damage when
using this appliance, follow these basic
safety precautions.
General Precautions
1 This appliance can be used by
persons with reduced physical,
sensory or mental capabilities or
lack of experience and knowledge
if they have been given supervision
or instruction concerning use of
the appliance in a safe way and
understand the hazards involved.
2 To reduce the risk of electric shock,
this appliance has a polarized plug
(one blade is wider than the other).
As a safety feature, this plug will fit
into a polarized outlet only one way.
If the plug does not fit fully into the
outlet, reverse the plug. If it still does
not fit, contact a qualified electrician.
DO NOT force into outlet or try
to modify to fit.
3 Keep the appliance and its cord out
of reach of children. Do not allow
the appliance to be used by children.
Close supervision is necessary when
used near children.
4 To eliminate a choking hazard for
young children, remove and discard
the protective cover fitted on the
power plug of this appliance.
5 Children shall not play with the appliance.
6 To protect against fire, electric shock,
and injury to persons, DO NOT immerse
cord, plugs, or body of machine in water
or other liquid.
7 NEVER carry the appliance by the
power cord or pull it to disconnect
from electrical socket; instead grasp
the plug and pull to disconnect.
8 DO NOT operate any appliance with
a damaged cord or plug, or after the
appliance malfunctions, or has been
dropped or damaged in any manner.
Contact SharkNinja Operating LLC
for service.
9 For household and work top use only.
DO NOT let the power cord hang
over the edge, or touch hot surfaces
such as the stove.
10 NEVER use socket below counter.
11 To avoid risk of fire, electrical shock,
or damage to the unit, DO NOT store
or use unit in an appliance garage or
under a wall cabinet.
12 Unplug from outlet when not in use
and before cleaning.
13 Turn o and allow to cool before
putting on or taking o parts, and
before cleaning the appliance.
Operating Notice
14 The use of an accessory not
recommended by the manufacturer
may create an overflow condition
and scalding hazard, or result in fire,
electric shock, or personal injury.
15 ALWAYS use appliance on a clean, dry,
level surface.
16 DO NOT place on or near a hot gas or
electric burner or in a heated oven.
17 DO NOT use this appliance for anything
other than its intended use.
18 DO NOT use outdoors.
19 DO NOT touch hot surfaces. Use
handles or knobs.
20 To avoid contact with steam and hot
surfaces, DO NOT reach across top of
brewer to froth.
21 ALWAYS place a vessel beneath the
brew basket to receive the brewed
coee or tea.
22 Scalding may occur if brew basket is
opened during a brew or clean cycle.
23 DO NOT remove the vessel while the
appliance is running without the Drip
Stop in the closed position. Return the
vessel quickly and open the Drip Stop
to continue the brew.
24 DO NOT fill water reservoir with
anything other than water, as other
liquids may damage your brewer.
25 DO NOT overfill the water reservoir.
Fill water only to the Max Fill line.
26 DO NOT run the appliance without
water.
27 Exceeding maximum brew basket
capacity may cause overflow. DO NOT
use fine or espresso ground coee.
Thermal Carafe
28 The carafe is designed for use with this
appliance only. DO NOT place carafe on
or near a hot gas or electrical burner, or
in a heated oven.
29 DO NOT place carafe in dishwasher.
30 DO NOT use a cracked or scratched
carafe or a carafe that has a loose or
weakened handle.
31 DO NOT clean carafe with abrasive
cleaners, steel wool pads, or other
abrasive materials.
32 DO NOT place carafe in microwave.
33 DO NOT drink directly from the carafe.
Liquid from the carafe may be very hot.
34 DO NOT use the carafe to store food
when not in use.
35 Ensure the carafe is completely empty
before starting a cleaning or brewing
cycle. Starting a cycle with water,
coee, or tea in the carafe will cause
an overflow.
Care & Maintenance
36 Allow the appliance to cool before
removing any parts and before cleaning.
37 To prevent illness from bacterial growth
in the appliance, follow all cleaning
instructions in the Care & Maintenance
section of this Owner’s Guide.
38 Clean the system on a weekly basis.
39 If the product is not operating
properly, visit ninjakitchen.com or
contact SharkNinja Operating LLC for
examination, repair, or adjustment.
40 Cleaning and user maintenance shall
not be made by children.
Cord Statement
41 A short power-supply cord is
provided to reduce the risks resulting
from becoming entangled in or
tripping over a longer cord.
42 DO NOT use extension cords with
this product.
WARNING:
Risk of fire or electric shock.
Do not remove bottom cover
Indicates to read and review
instructions to understand operation
and use of product.
Indicates the presence of a hazard that
can cause personal injury, death of sub-
stantial property damage if the warning
include with this symbol is ignored.
Indicates risk of fire or electric shock,
presence of live parts, dangerous voltage.
Take care to avoid contact with hot
surface. Always use hand protection
to avoid burns
For Indoor and household use only.

4
1-877-646-5288
ENGLISH
5ninjakitchen.com
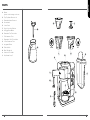
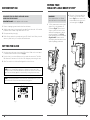
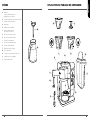
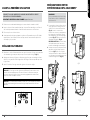
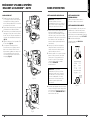
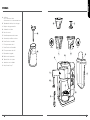
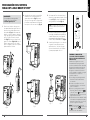
PARTS
A Brewer
(power cord & storage not shown)
B Flip-Top Water Reservoir Lid
C Removable Water Reservoir
D Showerhead
E Control Panel
F Single-Serve Cup Platform
G Swinging Brew Basket
H Removable Tea Filter Holder
I Tea Permanent Filter
J Removable Coee Filter Holder
K Coee Permanent Filter
L Integrated Frother
M Frother Whisk
N Brew-Through Lid
O Stainless Steel Carafe
P Ninja Smart Scoop™
A
B
D
E
F
G
HJ
IK
M
P
L
COFFEE TEA
C
N
O

6
1-877-646-5288
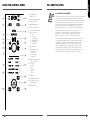
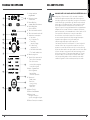
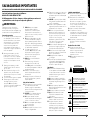
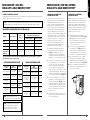
USING THE CONTROL PANEL
1 Programmable
Digital Clock
2 Hour & Minute Buttons
3 Drip Stop Button
4 Delay Brew Button
5 Tea Mode Indicator
6 Coee Mode Indicator
7 Multi-Serve Dial
a Cup
b XL Cup
c Travel Mug
d XL Multi-Serve
e Half Carafe
f Full Carafe
8 Progress Bar
9 Custom Brew Types
Classic Brew
Rich Brew
Over Ice Brew
Cold Brew
10 Ninja® Signature Brew
Specialty Brew
11 Tea Types
Herbal
Black
Oolong
White
Green
12 Tea Button
13 Start/Démarrer Dial
14 Intelligent Clean Cycle
Indicator/Button
15 Power Button
1
3
6
9
10
7a
7b
7c
7
14
4
5
7d
7f
7e
8
12
13
15
2
11
SCA CERTIFICATION
SCA CERTIFIED HOME BREWER
The Specialty Coee Association (SCA) recognizes home brewers
that meet their longstanding rigorous technical requirements.
These requirements are based on decades of industry knowledge
and research by the Coee Brewing Center. All SCA Certified
Home Brewers have met these requirements, which are based
generally on proper water temperature, brewing time, and
ability to brew within the SCA Golden Cup recommendations
If a brewer passes all of the tests in the certification
procedure, as conducted by the SCA, that brewer will be
eligible to be recognized as an exemplary home brewer
and join the short list of SCA Certified Home Brewers.
This coeemaker has been certified by the SCA to meet their
Golden Cup Standard, designed for optimal extraction and
strength. SCA Certification testing was performed using the
Half Carafe and Full Carafe on Classic brew. Testing used
the following ground coee measurements: 55 grams for a
Half Carafe and 77 grams for a Full Carafe. When using the
Ninja Smart Scoop™, this would be 4 heaping big scoops for
a Half Carafe and 6 heaping big scoops for a Full Carafe.
7ninjakitchen.com
ENGLISH

ENGLISH
9ninjakitchen.com
BEFORE FIRST USE
NOTE: If you unplug the brewer or in the event of an extended power loss, you will
need to reset the clock the next time the brewer is plugged in.
NOTE: If the clock stops flashing and does not display the correct time of day,
pressing the hour (H) or minute (M) button at any time will cause the clock to flash
again. You can now reprogram the correct time by following the previous steps.
SETTING THE CLOCK
1 Plug the power cord into an electrical outlet. The clock will flash on the control panel
to indicate that the time has not been set (Fig. 1).
2 Press the hour (H) or minute (M) button until you reach the current time. The AM or
PM indicator will illuminate on the left side of the display as you are setting the time.
3 After 5 seconds, the clock will stop flashing and the clock will be set.
1 Remove all packaging material and stickers from the brewer.
2 Wash the water reservoir, thermal carafe, removable filter holders, and coee and tea
permanent filters in warm, soapy water with a soft cloth.
3 Rinse parts and dry thoroughly.
4 Before first use, prime the system by running two Full Carafe, Classic Brew cycles with
water only. After each cycle is complete, discard the water.
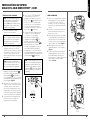
Fig. 1
PRIMING YOUR
NINJA
HOT & COLD BREW SYSTEM™
1 To fill the water reservoir, use the hand
grips to lift it to the right and up o
the brewer (Fig. 2). Flip the reservoir
lid open or remove the entire lid, then
add fresh, filtered water up to, but not
exceeding, the Max Fill line (Fig. 3).
Return the water reservoir to the brewer
(Fig. 4). DO NOT fill water reservoir
with anything other than water, as other
liquids may damage your brewer.
2 Ensure one of the removable filter
holders is nested inside the brew
basket (Fig. 5). Once in place, slide
the brew basket all the way in until
you hear a slight click (Fig. 6).
IMPORTANT:
We recommend fresh, cool, filtered
water. Well water is not recommended.
Fig. 2
Fig. 4
Fig. 6
Fig. 5
Fig. 3
PLEASE KEEP THIS IMPORTANT SAFEGUARD IN MIND
WHEN USING THE APPLIANCE:
IMPORTANT: DO NOT run the appliance without water.
8
1-877-646-5288

ENGLISH
10 11
1-877-646-5288
ninjakitchen.com
COFFEE MEASUREMENT CHART TEA MEASUREMENT CHART
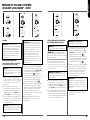
PRIMING YOUR
NINJA
HOT & COLD BREW SYSTEM™ – CONT.
PREPARING & USING
THE NINJA
HOT & COLD BREW SYSTEM™
3 Twist the brew-through lid clockwise
onto the carafe to lock into place
(Fig. 7) and center the carafe below
the brew basket (Fig. 8).
4 Once all parts are securely in place
and the unit is powered on, select the Full
Carafe size and Classic Brew setting, then
press the START/DÉMARRER dial (Fig. 9).
5 When the cycle is complete, discard
the water in the carafe. Repeat,
beginning with step 1. You are now
ready to use your Ninja Hot & Cold
Brew System to brew.
HIGH-ALTITUDE CALIBRATION
(OPTIONAL, BUT RECOMMENDED FOR
USERS IN HIGH-ALTITUDE AREAS)
Because water boils at lower
temperatures at higher altitudes,
running a calibration cycle before your
first brew allows the unit to detect the
boiling point of water at your location.
Running a calibration cycle will help
deliver a consistent brew each time.
1 Fill the water reservoir up to, but not
exceeding, the Max Fill line.
2 Place an empty filter holder into the
brew basket, and an empty vessel in
the machine.
3 Press and hold both the Drip Stop
button and the Tea button until
the clock display begins a two-minute
countdown.
4 A calibration cycle will begin. When
complete, the unit will beep and
End will appear on the clock display.
Discard the water in the vessel.
NOTE: Pressing the Drip Stop button ,
Tea button
,
or Power button will
cancel the calibration cycle.
Fig. 8
Fig. 7
Fig. 9
Size Classic Rich
Over Ice & Cold Brew
coee/tea only filled with ice
Cup 281 ml 257 ml 142 ml 281 ml
XL Cup 340 ml 304 ml 171 ml 340 ml
Travel Mug 414 ml 390 ml 207 ml 414 ml
XL Multi-Serve 532 ml 473 ml 266 ml 532 ml
You don’t need to adjust the size for Specialty Brew—it always yields 118 ml of coee and
177 ml of tea.
Serving Size
Ninja
Smart Scoop
™
Table-
spoons
Cup/XL Cup
2–3 small
scoops
2–3 Tbsp.
Travel Mug/
XL Multi-Serve
3–5 small
scoops
3–5 Tbsp.
Half Carafe
3–4 big
scoops
6–8 Tbsp.
Full Carafe
4–6 big
scoops
8–12
Tbsp.
Specialty (118 ml)
2 big scoops 4 Tbsp.
Serving Size
Ninja
Smart Scoop
™
Loose Leaf Tea
Tea Bags
Cup/XL Cup 1 small scoop 1 tea bag
Travel Mug/
XL Multi-
Serve
1-2 small scoops
2 tea
bags
Half Carafe 2–3 small scoops
4 tea
bags
Full Carafe 3–4 small scoops
6 tea
bags
Specialty
(177 ml)
1 big scoop
3 tea
bags
HOW MUCH DO YOU GET IN YOUR CUP?
Each size and brew type produces a dierent amount of coee and tea to optimize
strength and taste.
NOTE:
The coee grounds and tea will absorb some of the water that is brewed,
resulting in slightly less brewed coee or tea than water used.
APPROXIMATE BREW VOLUMES
NOTE: For Cold Brew coee,
add one extra scoop.
NOTE: Exceeding the recommended
medium grind size for whole beans
may cause the brew basket to
overflow.
NOTE: Do not place any ground coee
or tea in the brew basket for the first
two cycles.

ENGLISH
12 13
1-877-646-5288
ninjakitchen.com
PREPARING & USING
THE NINJA
HOT & COLD BREW SYSTEM™ – CONT.
FILLING THE COFFEE
BREW BASKET
For best results, use the coee
measurement chart to determine how
much ground coee to use for each brew
size. The amount of ground coee for each
size will remain the same for any brew type
you select. For example, if you select Cup
and Classic Brew, you will use the same
amount of coee grounds as if you select
Cup and Over Ice Brew. The only exception
is Cold Brew, which requires one extra
scoop of coee, regardless of the size.
1 Open the brew basket by sliding it
out of the brewer (Fig. 10). Ensure
you have the COFFEE filter holder in
the machine, denoted by the orange
handle with the coee bean icon.
2 Place the coee permanent filter or a
#4 paper cone filter in the COFFEE filter
holder. If using a paper filter, first ensure
the permanent filter is removed from
the filter holder. Then fold the paper
filter along the seams, open it fully,
and firmly press it into the filter holder
making sure it is fully seated (Fig. 11).
3 Use the Ninja Smart Scoop™
and follow the measurements in
the chart to fill the brew basket
(Fig. 12). These measurements are
based on level scoops—adjust to your
preferred taste. We suggest using
a medium-sized grind if grinding
whole beans.
4 Slide the brew basket back into the
brewer until it clicks into place.
FILLING THE TEA BREW BASKET
For best results, use the tea measurement
chart to determine how many tea bags or
how much loose leaf tea to use for each
brew size. The amount of tea for each size
will remain the same for any brew type
you select.
1 Open the brew basket by sliding it
out of the brewer (Fig. 10). Ensure
you have the TEA filter holder in the
machine, denoted by the green handle
with the tea leaf icon.
2 Place the tea permanent filter in the
TEA filter holder (Fig. 11). When
using tea bags, you may remove the
tea permanent filter if more space is
needed in the brew basket.
3 Use the Ninja Smart Scoop™ and follow
the recommended measurements in the
chart to fill the brew basket, adjusting
to your preferred taste (Fig. 12).
4 Slide the brew basket back into the
brewer until it clicks into place.
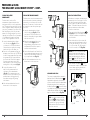
Fig. 10
DRIP STOP TIME SETTTING
After a brew is complete, the drip stop will
automatically close. Some types of coee,
such as finely ground or decaf, can take
a little longer to fully drain from the brew
basket. To extend the amount of time the
drip stop remains open after a brew,
follow these instructions:
1 Press and hold the Drip Stop button
(Fig. 13a) until the clock display flashes
either dFLt (default) or the previously
specified time.
2 Press either the hour (H) or minute (M)
button until the desired extension time is
shown: dFLt (default), :15 (+15 seconds),
:30 (+30 seconds), :45 (+45 seconds), :
60 (+60 seconds), or OFF (Fig. 13b).
3 Press the Drip Stop button
to set
the new time. Or wait 5 seconds, and the
unit will beep, signifying that the new
extension time has been set.
AUTOMATIC DRIP STOP
The system is equipped with an automatic
drip stop. When the Drip Stop button
is
illuminated, the drip stop is closed and no
coee or tea will flow out of the brew basket.
When brewing a half or full carafe, press
the Drip Stop button
to pause the brew
cycle and pour a cup. Promptly replace the
carafe and press the Drip Stop button
again to complete the brew (Fig. 13a).
Fig. 12
Fig. 11
or or
COFFEE TEA
Fig. 13a
Fig. 13b
NOTE: When OFF is selected, the drip
stop will remain open after a brew is
complete. You can close the Drip Stop
at any time by pressing the Drip Stop
button again. dFLt (default) is the
machine’s default time setting.
NOTE: If you forget to press the Drip
Stop button to resume the brew,
the unit will pause the brew, and after
30 seconds it will give you a friendly
audible reminder. After 5 minutes, the
brew will be canceled.

ENGLISH
14 15
1-877-646-5288
ninjakitchen.com
BREWING
CUSTOM BREWS
CLASSIC BREW & RICH BREW
1 After filling the water reservoir, place
either the COFFEE or TEA filter holder
into the brew basket. Add the ground
coee, loose leaf tea, or tea bags
to the filter.
2 Close the brew basket, ensuring it is
securely in place. The control panel will
display either COFFEE (Fig. 14a) or TEA
(Fig. 14b) settings based on the filter
holder that has been inserted.
3 Use the Multi-Serve dial to select the brew
size. Place the empty vessel you would like
to brew into under the brew basket.
4 Turn the START/DÉMARRER dial to
choose either Classic Brew or Rich Brew
(Fig. 15a, Fig. 15b). If brewing tea, press the
Tea button
to toggle to the tea menu,
and use the dial to choose your tea type.
To change your brew style while in the tea
menu, press the Tea button again.
5 Press the START/DÉMARRER dial to start
the brew. A progress bar on the control
panel will show the status of the brewing
cycle. To cancel the brew at any time, press
the dial again or press the Power button.
6 The unit will beep and the clock will
display End when the brew is complete.
NOTE: Some brews have a
pre-infusion cycle with varying times.
The brewing cycle will begin, then
there will be a pause for a short period
before resuming. This process is used
to evenly saturate the coee grounds
or tea.
NOTE: If making a single cup, lower the
Single-Serve Cup Platform and set your
vessel in the center of it. Please ensure
you are using at least a 355 ml cup for
the Cup size, 414 ml cup for the XL Cup
size, 473 ml. travel mug for the Travel
Mug size, and 591 ml travel mug for the
XL Multi-Serve size.
NOTE: Rich Brew will use slightly less
water and yield slightly less brewed
coee or tea than Classic Brew.
NOTE: If the brew basket is closed with
no filter holder in place, both COFFEE
and TEA will flash.
Fig. 15bFig. 15aFig. 14b
Fig. 14a
Fig. 16a Fig. 16b
PREPARING & USING
THE NINJA
HOT & COLD BREW SYSTEM™ – CONT.
4 Turn the START/DÉMARRER dial to
choose either Over Ice Brew or Cold
Brew (Fig. 16a, Fig. 16b). If brewing tea,
press the Tea button to toggle to the
tea menu, and use the dial to choose your
tea type. To change your brew style while
in the tea menu, press the Tea button .
5 Press the START/DÉMARRE
R
dial to start
the brew. A progress bar on the control
panel will show the status of the brewing
cycle. To cancel the brew at any time, press
the dial again or press the Power button.
6 The unit will beep and the clock will
display End when the brew is complete.
OVER ICE BREW & COLD BREW
NOTE: Glassware may be used with
the Cold Brew setting, but not the
Over Ice Brew setting.
1 After filling the water reservoir, insert
either the COFFEE or TEA filter holder
into the brew basket. Add the ground
coee, loose leaf tea, or tea bags to
the filter.
2 Close the brew basket, ensuring it is
securely in place. The control panel will
display either COFFEE (Fig. 14a) or
TEA (Fig. 14b) settings based on the
filter holder that has been inserted.
3 Fill your desired vessel to the top with
ice cubes and place the vessel below the
brew basket. Use the Multi-Serve dial to
select the brew size.
NOTE: For COLD BREW coee ONLY,
add an additional scoop of coee
grounds to the brew basket.
NOTE: Cold Brew takes about
15 minutes for a Full Carafe.
NOTE: DO NOT add ice to the
water reservoir.

ENGLISH
16 17
1-877-646-5288
ninjakitchen.com
PREPARING & USING
THE NINJA
HOT & COLD BREW SYSTEM™ – CONT.
SPECIALTY BREW
1 After filling the water reservoir, insert
either the COFFEE or TEA filter holder
into the brew basket. Add the ground
coee, loose leaf tea, or tea bags to
the filter.
2 Close the brew basket, ensuring it is
securely in place. The control panel will
display either COFFEE (Fig. 14a) or TEA
(Fig. 14b) settings based on the filter
holder that has been inserted.
3 Place the empty vessel you would like to
brew into under the brew basket.
4 Turn the START/DÉMARRER dial to
choose SPECIALTY (Fig. 17). If brewing
tea, press the Tea button
to toggle
to the tea menu, and use the dial to
choose your tea type. To change your
brew style while in the tea menu, press
the Tea button again.
5 Press the START/DÉMARRER dial to start
the brew. A progress bar on the control
panel will show the status of the brewing
cycle. To cancel the brew at any time, press
the dial again or press the Power button.
4 While the clock is flashing, press the
hour (H) or minute (M) button to set the
time that you would like the Delay Brew
to begin. The AM or PM indicator will
illuminate on the left side of the display
as you are setting the desired time.
5 Once the proper time has been set,
select the size of the vessel that you
would like to brew into.
6 Turn the START/DÉMARRER dial to
choose your brew style. If brewing tea,
press the Tea button
to toggle to the
tea menu, and use the bottom dial to
choose your tea type. To change your
brew style while in the tea menu, press
the Tea button again.
7 Once the time, brew size, brew style, and
tea type (if applicable) have been set,
allow DELAY BREW to stop flashing,
or press DELAY BREW to activate.
When activated, the unit will beep and
DELAY BREW and your selected options
will remain illuminated. To cancel,
press DELAY BREW again.
6 The unit will beep and the clock
will display End when the brew
is complete.
SETTING THE DELAY BREW
1 Turn the unit on by pressing the
Power button.
2 After filling the water reservoir and
adding ground coee or tea to the
correct filter holder, be sure the
reservoir, brew basket, and filter are
securely in place. Place the appropriate-
size vessel under brew basket.
3 Press DELAY BREW
. DELAY BREW
will illuminate and the clock will begin
to flash “12:00” or the last Delay Brew time
that was set (Fig. 18).
FROTHING MILK
1 Pour milk into cup, until it is about
1
/3 full. (Use more or less milk depending
on your preference.) Microwave for 45 to
60 seconds for hot milk.
2 Move the frother into the ready position
by swinging the arm toward the front.
3 Hold the cup under the frother and
submerge the whisk just below the
surface of the milk. This allows air to
fold into the milk for the frothiest
results (Fig. 19).
4 Press and hold the frothing button for
30 to 45 seconds (Fig. 20).
5 You can easily remove the frother whisk
by twisting it clockwise. To avoid spills,
keep your cup below the whisk and
carry it to your sink or dishwasher for
cleaning (Fig. 21).
NOTE: The brewing cycle will begin, then
pause for a short period before resuming.
This process is used to evenly saturate
the coee grounds or tea.
NOTE: If you attempt to change your
selections while Delay Brew is set, the
unit will beep and DELAY BREW will
flash. To change your selections, cancel
the Delay Brew.
NOTE: Specialty always yields 4118 ml
of coee and 177 ml of tea.
NOTE: The unit must remain on for the
Delay Brew function to work. DO NOT
power o after setting Delay Brew.
NOTE: If brewing an iced blended drink,
fill the desired vessel with the amount
of ice recommended in the recipe
before brewing.
NOTE: The brew basket must be
securely closed with either the COFFEE
or TEA filter inserted to set Delay Brew.
NOTE: The clock will remain on even if
the unit is turned o. Ensure the unit is
powered on to set Delay Brew.
Fig. 17
Fig. 18
Fig. 19 Fig. 20 Fig. 21

18
1-877-646-5288
ENGLISH
19ninjakitchen.com
CARE & MAINTENANCE
CLEANING & DESCALING
YOUR BREWING SYSTEM
The CLEAN
button will illuminate when
a cleaning cycle is recommended for your
unit, as calcium scale buildup could be
aecting the flavor of your coee or tea.
To clean and descale your Ninja®
Hot & Cold
Brew System™:
1 Select the Full Carafe size and set the
empty carafe beneath the brew basket.
2 Use a descaling solution specifically
formulated for coeemaker cleaning
and follow the directions on the package.
Fill the water reservoir up to, but not
exceeding, the Max Fill line (1,48 L).
OR
Fill the water reservoir to the Travel Mug
line (473 ml) with white vinegar, then fill
the rest of the reservoir with water up to,
but not exceeding, the Max Fill line.
IMPORTANT: Use only white vinegar.
3 Once the water reservoir is filled with
your cleaning solution and water mixture,
press the CLEAN
button (Fig. 22).
IMPORTANT: If you cancel the
clean cycle, your machine will not
be properly descaled.
4 The clock will display and count down the
remaining clean cycle time, which takes
approximately 60 minutes to complete.
Your unit will deliver a small amount of
cleaning solution to distribvute it through
the system. It will then pause, deliver
additional cleaning solution, and continue
for 60 minutes. The extended pauses allow
for maximum cleaning and descaling.
IMPORTANT: DO NOT remove the carafe
at any time throughout the clean cycle.
5 Upon completion, the brewer will beep,
the clock will display End, and the
CLEAN
light will turn o.
6 Empty and thoroughly clean the carafe
and water reservoir with warm, soapy
water to remove any cleaning solution
that could aect the flavor of your
coee or tea.
7 Fill the reservoir with fresh water up to, but
not exceeding, the Max Fill line and set the
empty carafe beneath the brew basket.
8 Flush the system by running a Full Carafe,
Classic Brew cycle with water only. After
the cycle is complete, discard the water
and thoroughly clean the carafe.
NOTE: The clean cycle takes approximately
60 minutes.
NOTE: To cancel the clean cycle, press
the Power button or CLEAN button
once. The unit will beep and stop
brewing through the cleaning mixture.
Continue to follow the instructions
starting at Step 6.
NOTE: If the CLEAN light illuminates
again, then calcium buildup is still
present. Repeat the cleaning cycle
instructions from the beginning, and the
CLEAN light will automatically turn
o when your brewer is clean.
Fig. 22
CLEANING AFTER A BREW
1 After the unit has cooled, remove the
filter holder from the brew basket. If using
a paper coee filter, discard it. If using
either the coee or tea permanent filter,
wash it thoroughly with soap and warm
water or place on top rack of dishwasher.
2 Clean the frother whisk after each use.
Hand-wash thoroughly or place on top
rack of dishwasher.
3 Wash the carafe and brew-through lid
with soap and warm water. Use a bottle
brush or a cloth to wash the inside of the
carafe. DO NOT use a wire brush. The
thermal carafe is NOT dishwasher safe.
4 After the brewer has cooled, wipe down
the main unit, showerhead, and water
reservoir shelf with a cloth and warm
water. DO NOT immerse the brewer
in water.
CLEANING YOUR WATER RESERVOIR
Empty the water reservoir and hand-wash or
place in your dishwasher.
CLEANING YOUR CARAFE
We recommend cleaning your carafe with
warm, soapy water.
If you want to clean the carafe more
thoroughly, we recommend using a soft
foam brush. DO NOT use a wire brush.
The thermal carafe is NOT dishwasher safe.
NOTE: The brew-through lid, coee
and tea permanent filters, removable
filter holders, water reservoir, flip-top
lid, frother whisk, and scoop are
top-rack dishwasher safe.
NOTE: For best results, we
recommend rinsing the reservoir
after brewing and refilling with fresh
water for the next brew.

20
1-877-646-5288
ENGLISH
21ninjakitchen.com
There’s sediment in my coee.
•
If using a permanent filter, the sediment at the bottom of the brewed coee may
be due to using finely ground coee.
•
To reduce the amount of sediment in the brewed coee, use a slightly coarser grind
or use a paper filter.
OVER ICE Brew and COLD BREW are not cold.
• Ensure your cup, travel mug, or carafe is filled all the way to the top with ice
cubes before brewing. Your Ninja Hot & Cold Brew System™ will brew at elevated
temperatures to lock in the best flavor, then the ice will cool the brewed coee or tea to
the perfect temperature.
Coee or tea is too weak.
• COFFEE: For stronger coee, use the RICH brew setting, try darker roast beans, or use
the permanent filter rather than a paper filter. If you want an even bolder flavor, you can
add more coee grinds to the brew basket. Additional grinds do absorb liquid, so you
will have a more concentrated, smaller cup of coee.
• TEA: For stronger tea, use the RICH brew setting, or add more tea to the brew basket.
Coee or tea is too strong.
• COFFEE: For milder coee, use the CLASSIC brew setting, use lighter roast beans, or
use a paper filter rather than the permanent filter. If you want an even milder flavor, you
can put fewer coee grinds in the brew basket.
• TEA: For milder tea, use the CLASSIC brew setting, or use less tea in the brew basket.
Brew cycle is too slow.
• Depending on your settings, your brew time will vary from around 4 minutes
to 18 minutes. The progress bar on the control panel will indicate brew status.
Cup or travel mug overflowed.
• Ensure you are using at least a 355 ml cup for the Cup size, 414 ml cup for the
XL Cup size, 473 ml travel mug for the Travel Mug size, and 591 ml travel mug for the
XL Multi-Serve size.
Brew basket overflowed.
• The bottom of the filter holder may be clogged. This can happen with finely
ground coee or too many coee grinds in the brew basket. Medium-ground coee
is recommended.
There’s water left in my reservoir.
• The water reservoir markings are minimum fill lines that indicate the amount of water
needed for that brew size. However, all brew styles use dierent amounts of water to
create the proper flavor and concentration,
leaving some water to remain.
TROUBLESHOOTING GUIDE
My Ninja Hot & Cold Brew System is leaking.
• After removing the water reservoir, there may be a small amount of water in the
reservoir valve. This can be easily removed with a dry cloth.
• If the leak is coming from the brew basket, make sure all parts are assembled correctly
and securely. If the leak is coming from the bottom of the brewer, call Customer Service
at 1-877-646-5288.
CLEAN
light is on.
• Run a clean cycle. If you have recently completed a clean cycle, you may need to run a
second cycle to remove additional mineral buildup that occurs naturally over time.
There’s no Rooibos or Pu’erh tea type setting.
• Use the Herbal tea setting for Rooibos and the Black tea setting for Pu’erh.
CLOCK DISPLAY MESSAGES:
“Add” “Wtr”
• The system does not have enough water in the reservoir to complete your brew. Add
fresh water to the reservoir and then press the START/DÉMARRER dial to resume.
“CLn”
• The system has detected that a clean cycle needs be run immediately to remove
calcium scale buildup in the boiler. See ‘Cleaning & Descaling Your Brewing System’ for
instructions.
“Hot” “Wtr”
• The system has detected that hot water has been added to the water reservoir. Remove
the reservoir and empty the hot water. Refill the reservoir with fresh, cool water and
return it to the base of the system. Wait until the display no longer shows “Hot” “Wtr”
before using the system again.
ERROR MESSAGES:
“Er”
• If the clock displays “Er” and then a number (ex. “Er 03”),
contact Customer Service at 1-877-646-5288.
NOTE: We DO NOT recommended using a paper filter in conjunction with the
permanent filter, as clogging and backing up of water and/or coee in the filter basket
can occur.
NOTE: When using a paper filter, do not use the permanent filter.

PRODUCT REGISTRATION
REPLACEMENT PARTS
To order additional parts and accessories, visit ninjaaccessories.com
or contact Customer Service at 1-877-646-5288.
Please visit registeryourninja.com or call 1-877-646-5288 to register your new
Ninja® product within ten (10) days of purchase. You will be asked to provide
the store name, date of purchase, and model number along with your name
and address.
The registration will enable us to contact you in the unlikely event of a
product safety notification. By registering, you acknowledge you have
read and understood the instructions for use and warnings set forth in the
accompanying instructions.
ONE (1) YEAR
LIMITED WARRANTY
The One (1) Year Limited Warranty applies to purchases made from authorized
retailers of SharkNinja Operating LLC. Warranty coverage applies to the original
owner and to the original product only and is not transferable.
SharkNinja warrants that the unit shall be free from defects in material and
workmanship for a period of one (1) year from the date of purchase when it is used
under normal household conditions and maintained according to the requirements
outlined in the Owner’s Guide, subject to the following conditions and exclusions:
What is covered by this warranty?
1. The original unit and/or non-wearable components deemed defective, in
SharkNinja’s sole discretion, will be repaired or replaced up to one (1) year from
the original purchase date.
2. In the event a replacement unit is issued, the warranty coverage ends six (6)
months following the receipt date of the replacement unit or the remainder of the
existing warranty, whichever is later. SharkNinja reserves the right to replace the
unit with one of equal or greater value.
What is not covered by this warranty?
1. Normal wear and tear of wearable parts (including filter holder, permanent filter,
frother whisk, carafe and brew-through lid, water reservoir and flip-top lid, and
Ninja Smart Scoop™), which require regular maintenance and/or replacement
to ensure the proper functioning of your unit, are not covered by this warranty.
Replacement parts are available for purchase at ninjaaccessories.com.
2. Any unit that has been tampered with or used for commercial purposes
3. Damage caused by misuse, abuse, negligent handling, failure to perform required
maintenance, or damage due to mishandling in transit.
4. Consequential and incidental damages.
5. Defects caused by repair persons not authorized by SharkNinja. These defects
include damages caused in the process of shipping, altering, or repairing the
SharkNinja product (or any of its parts) when the repair is performed by a repair
person not authorized by SharkNinja.
6. Products purchased, used, or operated outside North America.
How to get service
If your appliance fails to operate properly while in use under normal household
conditions within the warranty period, visit ninjakitchen.com for product care and
maintenance self-help. Our Customer Service Specialists are also available at 1-877-
646-5288 to assist with product support and warranty service options, including
the possibility of upgrading to our VIP warranty service options for select product
categories.
SharkNinja will cover the cost for the customer to send in the unit to us for repair or
replacement. A fee of $19.95 (subject to change) will be charged when SharkNinja
ships the repaired or replacement unit.
How to initiate a warranty claim
You must call 1-877-646-5288 to initiate a warranty claim. You will need the receipt as
proof of purchase.A Customer Service Specialist will provide you with return and packing
instruction information.
How state law applies
This warranty gives you specific legal rights, and you also may have other rights that
vary from state to state. Some states do not permit the exclusion or limitation of
incidental or consequential damages, so the above may not apply to you.
ENGLISH
22 23
1-877-646-5288
ninjakitchen.com

24 25
1-877-646-5288
ninjakitchen.com
FRANÇAIS
TABLE DES MATIÈRES
MERCI
d’avoir acheté le système Ninja Hot & Cold Brew
TM
.
Consignes de sécurité importantes . . . . . . . . . . . . . 26
Pièces . . . . . . . . . . . . . . . . . . . . . . . . . . . . . . . 28
Panneau de commande . . . . . . . . . . . . . . . . . . . . 30
Boutons des fonctions . . . . . . . . . . . . . . . . . . . . . .32
Boutons de commande . . . . . . . . . . . . . . . . . . . . . .32
Utilisation du tableau de commande . . . . . . . . . . . . .31
Certification de la SCA . . . . . . . . . . . . . . . . . . . . . 33
Avant la première utilisation. . . . . . . . . . . . . . . . . . 32
Réglage de l’horloge . . . . . . . . . . . . . . . . . . . . . . 32
Préparation de votre
Système Ninja
Hot & Cold Brew
™
. . . . . . . . . . . . . . . 33
Étalonnage pour la haute altitude . . . . . . . . . . . . . . 36
Préparer et utiliser
le système Ninja Hot & Cold Brew . . . . . . . . . . . . . . . 37
Quelle quantité obtenez-vous dans votre tasse?. . . . . . .37
Tableau des mesures de café recommandées . . . . . . . . 37
Tableau des mesures de thé recommandées . . . . . . . . .37
Remplissage du panier à infusion de café . . . . . . . . . .38
Remplissage du panier à infusion de thé . . . . . . . . . . .38
Drip stop (soupe d’arrêt) d’écoulement automatique . . . .39
Infusion . . . . . . . . . . . . . . . . . . . . . . . . . . . . . 40
Infusions personnalisées: . . . . . . . . . . . . . . . . . . 40
Classic (classique) et Rich (riche) . . . . . . . . . . . . . 40
Over Ice (sur glace) et cold brew (à froid) . . . . . . . . . 41
Infusion Signature: . . . . . . . . . . . . . . . . . . . . . . .42
Specialy (spécialité). . . . . . . . . . . . . . . . . . . . . .42
Réglage de le Delay Brew (infusion diérée) . . . . . . . . .43
Moussage du lait . . . . . . . . . . . . . . . . . . . . . . . . 44
Soins et entretien . . . . . . . . . . . . . . . . . . . . . . . . 45
Nettoyage après une infusion. . . . . . . . . . . . . . . . . . .45
Nettoyage de votre réservoir d’eau . . . . . . . . . . . . . . .45
Nettoyage de votre carafe . . . . . . . . . . . . . . . . . . . .45
Nettoyage et détartrage de votre système d’infusion . . . . .46
Guide de dépannage . . . . . . . . . . . . . . . . . . . . . . 47
Enregistrement du produit . . . . . . . . . . . . . . . . . . 49
Commande de pièces de rechange . . . . . . . . . . . . . . 49
Garantie. . . . . . . . . . . . . . . . . . . . . . . . . . . . . . 48
VEUILLEZ LIRE ATTENTIVEMENT LE
PRÉSENT MODE D’EMPLOI ET
LE CONSERVER À TITRE INFORMATIF.
Ces instructions ont été conçues
pour vous aider à bien comprendre
le fonctionnement de votre nouveau
système Ninja Hot & Cold Brew
MC
.
Pour toute question,
veuillez communiquer avec notre
service à la clientèle au 1877646-5288.
CE GUIDE PORTE SUR LE NUMÉRO
DE MODÈLE:
CP307C
CARACTÉRISTIQUES TECHNIQUES
Tension électrique: 120V~, 60Hz
Puissance: 1500watts
Capacité du
réser voir d’eau: 1,48l
CONSEIL: Le numéro de modèle et le
numéro de série apparaissent sur l’étiquette
de code QR qui est située à l’arrière de
l’appareil, à côté du cordon d’alimentation.
CONSIGNEZ LES RENSEIGNEMENTS
CI-DESSOUS
Numéro du modèle: ��������������
Numéro de série: ����������������
Date d’achat: �������������������
(conservez la facture)
Magasin où l’appareil a été acheté:
��������������������������������
ENREGISTREZ VOTRE ACHAT
registeryourninja.com
1-877-646-5288
Numérisez le code QR
avec votre appareil mobile

26 27
1-877-646-5288
ninjakitchen.com
FRANÇAIS
CONSIGNES DE SÉCURITÉ IMPORTANTES
VEUILLEZ LIRE TOUTES LES INSTRUCTIONS AVANT UTILISATION • POUR USAGE DOMESTIQUE UNIQUEMENT
Lisez toutes les instructions avant d’utiliser votre
SYSTÈME NINJA
HOT & COLD BREW
MC
Lors de l’utilisation d’appareils électriques, des mesures de sécurité de base
doivent toujours être suivies, y compris les suivantes:
AVERTISSEMENT
Pour réduire le risque d’incendie, de
décharges électriques, de blessures
graves, de décès ou de dommages lors de
l’utilisation de cet appareil, respectez ces
précautions de sécurité élémentaires.
Précautions générales
1 Cet appareil peut être utilisé par
des personnes dont les capacités
physiques, sensorielles ou mentales
sont réduites ou qui manquent
d’expérience et de connaissances
seulement si elles ont été supervisées
ou instruites par rapport à l’utilisation
sécuritaire de l’appareil et si elles
comprennent les dangers possibles.
2 Gardez l’appareil et son câble hors
de la portée des enfants. Ne laissez
pas les enfants se servir de l’appareil.
Une surveillance étroite est nécessaire
lorsque l’appareil est utilisé en
présenced’enfants.
3 Gardez l’appareil et son câble hors de la
portée des enfants de moins de 8ans.
4 Pour éliminer un risque de suocation
pour les jeunes enfants, enlevez
et éliminez de façon sécuritaire le
couvercle protecteur de la fiche
d’alimentation de cet appareil.
5 Les enfants ne doivent pas jouer
avec l’appareil.
6 Afin de protéger contre le feu, les
décharges électriques, et les blessures,
VEUILLEZ NE PAS immerger les câbles,
les prises électriques ou les pièces de
machine dans l’eau ou tout autre liquide.
7 NE SOULEVEZ JAMAIS l’appareil par le
cordon d’alimentation et ne tirez pas sur
ce dernier pour le débrancher; tirez
plutôt sur la fiche.
8 N’UTILISEZ PAS un appareil dont le
cordon ou la fiche sont endommagés,
un appareil qui a subi une défaillance
ou un appareil qui a été échappé ou
endommagé de quelque façon que ce
soit. Communiquez avec SharkNinja
Operating LLC pour la réparation.
9 Pour usage domestique et sur un plan
de travail seulement. NE LAISSEZ PAS le
cordon d’alimentation pendre ni toucher
des surfaces chaudes, comme celles
d’une cuisinière.
10 N’UTILISEZ JAMAIS de prise en dessous
du comptoir.
11 Pour éviter tout risque de feu,
d’électrocution ou de dommage
à l’appareil, N’ENTREPOSEZ PAS
ou N’UTILISEZ PAS l’appareil dans
un meuble de rangement pour
électroménagers ou sous une armoire.
12 Débranchez l’appareil de sa source
d’alimentation entre les utilisations et
avant de le nettoyer.
13 Éteignez l’appareil et laissez-le refroidir
avant d’enlever ou d’installer des pièces
et de le nettoyer.
Avis d’utilisation
14 L’utilisation d’un accessoire n’étant pas
recommandé par le fabricant pourrait
causer un débordement et un danger
d’échaudage ou mener à un incendie, à
une électrocution ou à une blessure.
15 UTILISEZ TOUJOURS l’appareil sur une
surface plane, propre et sèche.
16 NE PLACEZ PAS l’appareil sur un élément
de poêle électrique ou de poêle au gaz
chaud ou à proximité de celui-ci ni dans
un four chaud.
16 Utilisez cet appareil UNIQUEMENT aux
fins pour lesquelles il a été conçu.
17 N’UTILISEZ PAS cet appareil à l’extérieur.
18 NE TOUCHEZ PAS aux surfaces chaudes.
Utilisez les poignées ou les boutons.
19 Pour éviter le contact avec la vapeur ou
les surfaces chaudes, NE PASSEZ PAS
la main au-dessus de la machine pour
utiliser la buse à mousser.
20 PLACEZ TOUJOURS un contenant sous
le panier à infusion pour recevoir le café
ou le thé infusé.
21 L’ouverture du panier à infusion pendant
le cycle d’infusion ou de nettoyage peut
causer un échaudage.
22 NE RETIREZ PAS le contenant pendant
que l’appareil fonctionne et que la
soupape d’arrêt d’écoulement est en
position fermée.
23 Replacez rapidement le contenant et
ouvrez la soupape d’arrêt d’écoulement
pour continuer l’infusion.
24 NE REMPLISSEZ PAS le réservoir d’eau
avec des liquides autres que l’eau, car ils
peuvent endommager votre machine.
25 NE REMPLISSEZ PAS trop le réservoir
d’eau. Ajoutez de l’eau uniquement
jusqu’au niveau de la ligne Max Fill
(remplissage maximal).
26 NE FAITES PAS FONCTIONNER
l’appareil sans eau.
27 Le fait de dépasser la capacité maximale
du panier à infusion peut causer un
débordement. N’UTILISEZ PAS de café
moulu finement ou pour espresso.
Carafe thermique
28 La carafe est conçue pour être utilisée
avec cet appareil seulement. NE
PLACEZ PAS la carafe sur un élément
de poêle électrique ou de poêle au gaz
chaud ou à proximité de celui-ci, ou
dans un four chaud.
29 NE METTEZ PAS la carafe dans le
lave-vaisselle.
30 N’UTILISEZ PAS une carafe fêlée ou
égratignée ni une carafe avec une
poignée lâche ou fragilisée.
31 NE NETTOYEZ PAS la carafe avec
des nettoyants abrasifs, des tampons
de laine d’acier ou tout autre matériel
abrasif.
32 NE METTEZ PAS la carafe au four
micro-ondes.
33 NE BUVEZ PAS directement à la carafe.
Le liquide dans la carafe pourrait être
très chaud.
34 N’UTILISEZ PAS la carafe pour stocker
des aliments lorsqu’elle n’est pas utilisée.
35 Assurez-vous que la carafe est
complètement vide avant de
commencer un cycle de nettoyage ou
d’infusion. Commencer un cycle avec de
l’eau, du café ou du thé dans la carafe
causera un débordement.
Soins et entretien
36 Laissez l’appareil refroidir avant de
retirer toute pièce et avant le nettoyage.
37 Afin d’éviter les maladies liées à la
croissance bactérienne dans l’appareil,
suivez toutes les instructions de
nettoyage figurant dans la section
«Soins et entretien» du présent guide
de l’utilisateur.
38 Nettoyez le système toutes les
semaines.
39 Si le produit ne fonctionne pas
correctement, consultez le site
ninjakitchen.com ou communiquez
avec SharkNinja Operating LLC à
des fins d’examen, de réparation ou
d’ajustement.
40 Les enfants ne peuvent pas nettoyer
ni entretenir l’appareil.
Avis sur le cordon
41 Un cordon d’alimentation court est
fourni; un cordon plus long augmente
les risques qu’on s’y empêtre ou qu’on
trébuche sur celui-ci.
42 N’UTILISEZ PAS de rallonge avec
ce produit.
AVERTISSEMENT:
Risque d’incendie ou de
choc électrique. Ne pas
enlever le couvercle inférieur.
Indique qu’il faut lire et vérifier les
instructions afin de comprendre
comment faire fonctionner et utiliser le
produit.
Indique un risque potentiel de
blessures, de mort ou de dommages
matériels importants si l’avertissement
signalé par ce symbole est ignoré.
Indique un risque d’incendie ou
d’électrocution, ainsi que la présence
de pièces sous tension et une tension
électrique dangereuse.
Prenez soin d’éviter de toucher toute
surface chaude. Protégez-vous toujours
les mains pour éviter de vous brûler.
Pour usage intérieur et domestique
seulement.

28
1-877-646-5288
29ninjakitchen.com
FRANÇAIS
PIÈCES UTILISATION DU TABLEAU DE COMMANDE
A Machine
(cordon d’alimentation et
rangement non illustrés)
B Couvercle à bascule du réservoir d’eau
C Réservoir d’eau amovible
D Douchette
E Tableau de commande
F Plate-forme de service
à portion individuelle
G Panier à infusion pivotant
H Porte-filtre à thé amovible
I Filtre à thé permanent
J Porte-filtre à café amovible
K Filtre à café permanent
L Buse à mousser intégrée
M Fouet à mousser
N Couvercle laissant passer l’infusion
O Carafe en acier inoxydable
P Ninja Smart Scoop™
A
B
D
E
F
G
HJ
IK
M
P
L
CAFÉ THÉ
C
N
O

30
1-877-646-5288
PANNEAU DE COMMANDE
1 Horloge numérique
programmable
2 Boutons des heures
et des minutes
3 Bouton Drip Stop
(soupape d’arrêt d’écoulement)
4 Bouton Delay Brew
(infusion diérée)
5 Témoin lumineux du mode thé
6 Témoin lumineux du mode café
7 Cadran à services multiples
a Cup (tasse)
b XL Cup (tasse TG)
c Travel Mug
(tasse de voyage)
d XL Multi-Serve
(multiportion TG)
e Half Carafe (demi-carafe)
f Full Carafe (carafe pleine)
8 Barre de progression
9 Types d’infusion personnalisés
Classic (infusion classique)
Rich (infusion riche)
Over Ice (infusion sur glace)
Cold (infusion à froid)
10 Ninja
MD
Signature Brew
(infusion Signature)
Specialty Brew
(infusion de spécialité)
11 Types de thé
Herbal (tisane)
Black (noir)
Oolong (oolong)
White (blanc)
Green (vert)
12 Bouton Tea (thé)
13 Bouton Start/Démarrer
14 Bouton/voyant
Intelligent Clean Cycle
(cycle de nettoyage intelligent)
15 Bouton Power (mise en marche)
1
3
6
9
10
7a
7b
7c
7
14
4
5
7d
7f
7e
8
12
13
15
2
11
31ninjakitchen.com
FRANÇAIS
SCA CERTIFICATION
MACHINE À CAFÉ POUR USAGE DOMESTIQUE CERTIFIÉE PAR LA SCA
La Specialty Coee Association (SCA) reconnaît les machines
à café pour usage domestique qui répondent à leurs exigences
techniques rigoureuses de longue date. Ces exigences sont basées
sur des décennies de connaissances de l’industrie et de recherche
réalisée par le Coee Brewing Center. Toutes les machines à café
pour usage domestique certifiées par la SCA répondent à ces
exigences, lesquelles sont généralement basées sur la température
adéquate de l’eau, le temps d’infusion et la capacité d’infuser de
manière à respecter les recommandations de Golden Cup de la SCA.
Si une machine à café passe tous les tests de la procédure
de certification, tels que réalisés par la SCA, elle peut être
reconnue comme une machine à café pour usage domestique
exemplaire et peut figurer sur la liste des machines à
café pour usage domestique certifiées par la SCA.
Cette machine à café a été certifiée par la SCA, car elle répond à
sa norme Golden Cup, conçue pour une extraction et une force
optimales. Les essais de certification de la SCA ont été réalisés en
utilisant une demi-carafe et une pleine carafe, en mode Classic Brew
(infusion classique). Les mesures de café moulu suivantes ont été
utilisées pour les essais: 55g pour une demi-carafe et 77g pour
une pleine carafe. Lors de l’utilisation de la Ninja Smart Scoop
MC
,
cela correspond à 4grandes cuillères combles pour une demi-
carafe et à 6grandes cuillères combles pour une pleine carafe.

33n injakitchen.com
FRANÇAIS
AVANT LA PREMIÈRE UTILISATION
REMARQUE: Si vous débranchez la machine à café, ou s’il y a une panne de courant
prolongée, vous devrez régler à nouveau l’horloge lorsque la machine à café sera
rebranchée.
REMARQUE: Si l’horloge cesse de clignoter et n’ache pas l’heure correcte, vous
pouvez à tout moment appuyer sur le bouton H (heure) ou M (minute) pour que
l’horloge se remette à clignoter. Vous pouvez alors programmer à nouveau l’heure
correcte en suivant les étapes ci-dessus.
RÉGLAGE DE L’HORLOGE
1 Branchez le cordon d’alimentation dans une prise électrique. L’horloge sur le panneau
de commande clignotera pour indiquer que l’heure n’a pas été réglée (fig.1).
2 Appuyez sur le bouton H (heure) ou M (minute) jusqu’à ce que vous atteigniez l’heure
actuelle. Le voyant AM ou PM à la gauche de l’achage s’illuminera pendant que vous
réglez l’heure.
3 Après 5secondes, l’horloge cessera de clignoter: elle est alors réglée.
1 Retirez tous les matériaux d’emballage et les autocollants de la machine à café.
2 Lavez le réservoir d’eau, la carafe thermique, les porte-filtres amovibles et les filtres à
café et à thé permanents dans de l’eau tiède savonneuse avec un chion doux.
3 Rincez les pièces et séchez-les bien.
4 Avant la première utilisation, préparez le système en eectuant deux cycles Full Carafe
(carafe pleine), Classic Brew (infusion classique) avec de l’eau seulement. Après la fin
de chaque cycle, jetez l’eau.
Fig. 1
PRÉPARATION DE VOTRE
SYSTÈME NINJA
HOT & COLD BREW
TM
1 Pour remplir le réservoir d’eau, utilisez
les poignées pour le faire glisser vers
la droite et le soulever de la machine
(fig.2). Ouvrez le couvercle du
réservoir ou enlevez-le complètement,
puis ajoutez de l’eau fraîche et filtrée,
sans dépasser la ligne de remplissage
maximal (fig. 3). Replacez le réservoir
d’eau dans la machine (fig. 4).
NE REMPLISSEZ PAS le réservoir avec
des liquides autres que l’eau, car ils
peuvent endommager votre machine.
2 Assurez-vous que l’un des porte-filtres
amovibles soit placé dans le panier
à infusion (fig. 5). Une fois en place,
insérez entièrement le panier à infusion
en le faisant glisser jusqu’à ce que vous
entendiez un léger déclic (fig.6).
IMPORTANT:
Nous recommandons d’utiliser de l’eau
filtrée fraîche et froide. L’eau de puits
est déconseillée.
Fig. 4
Fig. 6
Fig. 5
Fig. 3
VEUILLEZ TOUJOURS GARDER CES CONSIGNES IMPORTANTES À L’ESPRIT
LORSQUE VOUS UTILISEZ L’APPAREIL:
IMPORTANT: NE FAITES PAS FONCTIONNER l’appareil sans eau.
Fig. 2
32
1-877-646-5288

34 35
1-877-646-5288
ninjakitchen.com
FRANÇAIS
TABLEAU DES MESURES DE CAFÉ TABLEAU DES MESURES DE THÉ
PRÉPARATION DE VOTRE
SYSTÈME NINJA
HOT & COLD BREW
™
PRÉPARER ET UTILISER
LE SYSTÈME NINJA
HOT & COLD BREW
TM
3 Tournez le couvercle laissant passer
l’infusion dans le sens des aiguilles d’une
montre sur la carafe pour le verrouiller
(fig. 7) et centrez la carafe en dessous
du panier à infusion (fig. 8).
4 Une fois que toutes les pièces
sont bien fixées et que l’appareil est
allumé, sélectionnez le format Full
Carafe (carafe pleine) et
le réglage Classic Brew (infusion
classique), puis appuyez sur
le bouton START/DÉMARRER (fig. 9).
5 Une fois le cycle terminé, jetez l’eau de
la carafe. Répétez en commençant par
l’étape1. Vous êtes maintenant prêt à
utiliser votre système Ninja Hot & Cold
Brew pour infuser.
Fig. 8
Fig. 7
Fig. 9
Format
Classic
(Classique)
Rich
(Riche)
Over Ice & Cold Brew
(infusion sur glace et à froid)
café/thé seulement
rempli avec de la
glace
Tasse 280ml 257ml 142ml 280ml
Tasse TG 340ml 304ml 171ml 340ml
Tasse de voyage 414ml (14oz) 390ml 207ml 414ml
Multiportion TG 532ml 473ml 266ml 532ml
Vous n’avez pas besoin d’ajuster la quantité pour le mode Specialty Brew (infusion de spécialité),
car celui-ci produit toujours 118ml de café et 177ml de thé.
Format
Ninja
Smart Scoop
MC
Cuillerées à
soupe
Tasse/Tasse TG
2 ou 3petites
cuillerées
2 à 3c. à
soupe
Tasse de voyage/
Multiportion TG
3 à 5petites
cuillerées
3 à 5 c. à
soupe
Demi-carafe
3 ou 4grandes
cuillerées
6 à 8c. à
soupe
Carafe pleine
4 à 6grandes
cuillerées
8 à 12c. à
soupe
Spécialité
(118ml)
2grandes
cuillerées
4c. à
soupe
Format
Ninja
Smart Scoop
MC
Thé en feuilles
Sachets de
thé
Cup/XL Cup
1 petite cuillère
1 sachet
de thé
Travel Mug/
XL Multi-Serve
1 ou 2petites
cuillerées
2 sachets
de thé
Half Carafe
2 ou 3petites
cuillerées
4 sachets
de thé
Full Carafe
3 à 4petites
cuillerées
6 sachets
de thé
Specialty
(177 ml)
1grande
cuillerée
3 sachets
de thé
QUELLE QUANTITÉ OBTENEZ-VOUS DANS VOTRE TASSE?
Chaque format et chaque type d’infusion produisent une quantité diérente de café et de
thé pour optimiser l’intensité et la saveur.
REMARQUE: Le café moulu et le thé absorberont une partie de l’eau servant à l’infusion: il
y aura un peu moins de café ou de thé que d’eau utilisée.
VOLUMES D’INFUSION APPROXIMATIFS
REMARQUE: Pour le café infusé à froid,
ajoutez une cuillère supplémentaire.
REMARQUE: Ne pas respecter la taille
de mouture moyenne recommandée
pour les grains entiers pourrait causer
le débordement du panier à infusion.
ÉTALONNAGE POUR LA HAUTE
ALTITUDE (FACULTATIF, MAIS
RECOMMANDÉ POUR LES
UTILISATEURS EN HAUTE ALTITUDE)
L’eau bout à une plus basse température
en haute altitude, c’est pourquoi
eectuer un cycle d’étalonnage avant
votre première infusion permettra à
votre appareil de détecter le point
d’ébullition de l’eau selon votre
emplacement. Eectuer un cycle
d’étalonnage permettra de toujours
obtenir une infusion constante.
1. Remplissez le réservoir d’eau jusqu’à la
ligne de remplissage maximal, sans la
dépasser.
2. Placez un porte-filtre vide dans le
panier à infusion et un récipient vide
dans la machine.
3. Appuyez et maintenez enfoncé le
bouton Drip Stop (soupape d’arrêt
d’écoulement) et le bouton Tea
(thé) jusqu’à ce que l’horloge
ache une minuterie de deux minutes.
4. Un cycle d’étalonnage commencera.
L’appareil émettra un bip et l’horloge
achera End (fin). Jetez l’eau dans
le contenant.
REMARQUE: Appuyer sur le
bouton Drip Stop (soupape d’arrêt
d’écoulement) , le bouton Tea (thé)
ou le bouton Power (mise en marche)
annulera le cycle.
REMARQUE: Ne placez pas de café
moulu ou de thé dans le panier à infusion
pour les deux premiers cycles.

36 37
1-877-646-5288
ninjakitchen.com
FRANÇAIS
PRÉPARER ET UTILISER LE SYSTÈME
NINJA
HOT & COLD BREW
™
– SUITE
REMPLISSAGE DU PANIER
À INFUSION DE CAFÉ
Pour de meilleurs résultats, servez-vous des
mesures de café recommandées dans le
tableau afin de déterminer quelle quantité
de café moulu vous devriez utiliser pour
chaque format d’infusion. La quantité de café
moulu pour chaque format restera la même
pour n’importe quel type d’infusion que vous
choisissez. Par exemple, si vous sélectionnez
Tasse et Classic Brew (infusion classique), vous
utiliserez la même quantité de café moulu
que si vous sélectionnez Tasse et Infusion sur
glace. La seule exception est pour la fonction
Cold Brew (infusion à froid), qui nécessite une
cuillère supplémentaire de café, quelle que soit
la taille.
1 Ouvrez le panier à infusion en le faisant
glisser hors de la machine (fig. 10). Assurez-
vous que le porte-filtre à café (avec une
poignée orange et une icône de grain de
café) soit dans la machine.
2 Placez le filtre à café permanent ou un
filtre en papier conique nº4 dans le porte-
filtre à café amovible. Si vous utilisez un
filtre en papier, assurez-vous d’abord que
le filtre permanent est retiré du porte-
filtre. Puis, pliez le filtre papier le long
des coutures, ouvrez-le complètement et
enfoncez-le fermement dans le panier à
infusion en vous assurant qu’il est bien
en place (fig. 11).
3 Utilisez la cuillère Ninja Smart Scoop
MC
et suivez les mesures du tableau pour
remplir le panier à infuser (fig. 12). Ces
mesures sont basées sur des cuillerées
rases – ajustez-les selon vos goûts. Nous
suggérons d’utiliser une mouture moyenne
si vous moulez des grains entiers.
4 Remettez le panier à infusion dans la
machine à café en le faisant glisser
jusqu’au déclic.
REMPLISSAGE DU PANIER À INFUSION
DE THÉ
Pour de meilleurs résultats, servez-vous des
mesures recommandées dans le tableau afin
de déterminer combien de sachets de thé
ou la quantité de feuilles de thé vous devriez
utiliser pour chaque format d’infusion. La
quantité de thé pour chaque format restera
la même pour n’importe quel type d’infusion
que vous choisissez.
1 Ouvrez le panier à infusion en le faisant
glisser hors de la machine (fig. 10). Assurez-
vous que le porte-filtre à THÉ (avec une
poignée verte et une icône de feuille de thé)
soit dans la machine.
2 Placez le filtre à thé permanent dans le
porte-filtre à THÉ (fig. 11). Lorsque vous
utilisez des sachets de thé, vous pouvez
retirer le filtre à thé permanent si vous avez
besoin de plus d’espace dans le panier à
infusion.
3 Utilisez la cuillère Ninja Smart Scoop
MC
et suivez les mesures recommandées du
tableau pour remplir le panier à infuser
en les ajustant pour obtenir votre saveur
désirée (fig. 12).
4 Remettez le panier à infusion dans la
machine à café en le faisant glisser
jusqu’au déclic.
Fig. 10
RÉGLAGE DU TEMPS DE DRIP STOP
(SOUPE D’ARRÊT)
Après l’infusion, l’écoulement s’arrêtera
automatiquement. Certains types de café,
comme le café finement moulu ou décaféiné,
peuvent nécessiter plus de temps pour
s’écouler du panier d’infusion. Pour augmenter
la durée de l’ouverture de la soupape d’arrêt
d’écoulement, suivez ces instructions:
1 Appuyez et maintenez enfoncé le
bouton Drip Stop (soupape d’arrêt
d’écoulement)
(fig. 13a) jusqu’à ce
que l’horloge ache dFLt (défaut) ou
l’heure précédemment réglée.
2 Appuyez sur le bouton heure (H) ou
minute (M) jusqu’à ce que la durée
désirée soit sélectionnée: dFLt (défaut),
:15 (+15 secondes), :30 (+30 secondes),
:45 (+45 secondes), :60 (+60 secondes),
ou OFF (arrêt) (fig. 13b).
3 Appuyez sur le bouton Drip Stop
(soupape d’arrêt d’écoulement)
pour régler une nouvelle durée. Ou alors,
attendez cinq secondes et l’appareil
émettra un bip, ce qui signifie qu’une
nouvelle durée soit réglée.
DRIP STOP (SOUPE D’ARRÊT)
AUTOMATIQUE
Le système est équipé d’un dispositif
automatique d’arrêt d’écoulement. Lorsque
le bouton Drip Stop (soupape d’arrêt
d’écoulement)
est allumé, l’arrêt
d’écoulement est fermé et aucun café
ou thé ne coulera du panier à infusion.
Lorsque vous préparez une carafe pleine ou
à demi remplie, appuyez sur le bouton Drip
Stop (soupape d’arrêt d’écoulement)
pour
mettre le cycle d’infusion en pause et verser
une tasse. Replacez rapidement la carafe et
appuyez sur le bouton Drip Stop (soupape
d’arrêt d’écoulement) une nouvelle fois
pour terminer l’infusion (fig. 13a).
REMARQUE: Lorsque vous sélectionnez
OFF (arrêt), la soupape d’arrêt
d’écoulement restera ouverte après la
fin de l’infusion. Vous pouvez fermer la
soupape d’arrêt d’écoulement à tout
moment en appuyant une nouvelle fois
sur le bouton Drip Stop (soupape d’arrêt
d’écoulement) . dFLt (défaut) est le
réglage par défaut de la machine.
REMARQUE: Si vous oubliez d’appuyer
sur Drip Stop (soupape d’arrêt
d’écoulement) pour reprendre l’infusion
, l’appareil mettra l’infusion en pause
et, après 30secondes, il émettra un
signal sonore servant de rappel amical.
Après 5minutes, l’infusion sera annulée.
ou ou
CAFÉ THÉ
Fig. 12
Fig. 11
Fig. 13a
Fig. 13b
La page charge ...
La page charge ...
La page charge ...
La page charge ...
La page charge ...
La page charge ...
La page charge ...
La page charge ...
La page charge ...
La page charge ...
La page charge ...
La page charge ...
La page charge ...
La page charge ...
La page charge ...
La page charge ...
La page charge ...
La page charge ...
La page charge ...
-
 1
1
-
 2
2
-
 3
3
-
 4
4
-
 5
5
-
 6
6
-
 7
7
-
 8
8
-
 9
9
-
 10
10
-
 11
11
-
 12
12
-
 13
13
-
 14
14
-
 15
15
-
 16
16
-
 17
17
-
 18
18
-
 19
19
-
 20
20
-
 21
21
-
 22
22
-
 23
23
-
 24
24
-
 25
25
-
 26
26
-
 27
27
-
 28
28
-
 29
29
-
 30
30
-
 31
31
-
 32
32
-
 33
33
-
 34
34
-
 35
35
-
 36
36
-
 37
37
-
 38
38
-
 39
39


Ninja CP307C Manuel utilisateur
- Catégorie
- Cafetières
- Taper
- Manuel utilisateur
dans d''autres langues
- English: Ninja CP307C User manual
- español: Ninja CP307C Manual de usuario
