
Steen Mølsted
Quality Manager
Søren Strunge
Managing Director
FEIN Service
USA
FEIN Power Tools Inc.
1030 Alcon Street
Pittsburgh, PA 15220
Telephone: (412) 922-8886
Toll Free: 1-800-441-9878
www.fein.us
Canada
FEIN Canadian Power Tool
Company
323 Traders Boulevard East
Mississauga, Ontario L4Z 2E5
Telephone.: (905) 8901390
Toll Free: 1-800-265-2581
FEIN Canadian Power Tool
Company
2810 De Miniac
St. Laurent, Quebec H4S 1K9
Telephone: (514) 331-7390
Toll Free: 1-800-789-8181
www.fein.com
Headquarter:
C. & E. FEIN GmbH
Hans-Fein-Straße 81
D-73529 Schwäbisch Gmünd/Bargau
www.fein.com
3 94 10 009 12 0 • 08.04 • Illustrations not binding. Subject to technical modifications. © C. & E. FEIN GmbH • Printed in Germany.
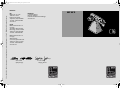
GRIT GX 75
GX75 (US) - Titel Seite 1 Montag, 21. April 2008 3:24 15

2
GX 75
us
Table of Contents.
1. For your safety................................................................................................................................. 3
1.1 General Safety Notes........................................................................................................................... 3
1.2 Electrical Safety Notes .........................................................................................................................4
1.3 Specific Safety Notes for Belt Grinders. ...........................................................................................4
2. Symbols.............................................................................................................................................5
3. Technical Description and Specifications ........................................................................................7
4. Mounting instructions ......................................................................................................................9
5. Electrical connection (see appendix)...............................................................................................9
6. Intended use of the machine..........................................................................................................10
7. Adjustments....................................................................................................................................10
7.1 Adjusting the incline........................................................................................................................... 10
7.2 Adjusting the grinding rest................................................................................................................ 10
7.3 Adjusting the face- grinding rest ...................................................................................................... 11
7.4 Adjusting the belt tracking ................................................................................................................ 11
8. Changing the grinding belt.............................................................................................................11
9. Operating instructions....................................................................................................................12
9.1 Switching ON...................................................................................................................................... 12
9.2 Switching OFF..................................................................................................................................... 12
9.3 Emergency OFF pushbutton............................................................................................................. 12
9.4 Changing the speed (models 2H)..................................................................................................... 12
9.5 Overload protection.......................................................................................................................... 12
9.6 Contact grinding ................................................................................................................................. 13
9.7 Face grinding........................................................................................................................................ 13
9.8 Suction device..................................................................................................................................... 13
10. Maintenance...................................................................................................................................14
10.1 Service.................................................................................................................................................. 14
10.2 Cleaning................................................................................................................................................ 14
11. Warranty and liability.....................................................................................................................14
12. Environmental protection, disposal................................................................................................14
13. Electrical connection......................................................................................................................15
GX75.book Seite 2 Freitag, 18. April 2008 11:14 11

GX 75
3
us
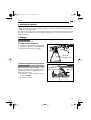
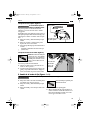
1. For your safety.
Read all safety warnings and all
instructions.
Failure to follow
the warnings and instructions may result in elec-
tric shock, fire and/or serious injury.
Save all warnings and instructions for future refe-
rence.
Do not use this machine before you have
thoroughly read and completely under-
stood this Instruction Manual, including the fig-
ures, specifications, safety regulations and the
signs indicating DANGER, WARNING and
CAUTION.
Only carry out such operations with this
machine as intended for by FEIN. Only use appli-
cation tools and accessories that have been
released by FEIN.
Please also observe the relevant national indus-
trial safety regulations.
Non-observance of the safety instructions in the
said documentation can lead to an electric shock,
burns and/or severe injuries.
This Instruction Manual should be kept for later
use and enclosed with the machine, should it be
passed on or sold.
SAVE THESE INSTRUCTIONS.
1.1 General Safety Notes.
Pull out the mains plug for main-
tenance and repair!
Switching
the machine on unintentionally can lead to seri-
ous injuries. Avoid accidental starting by making
sure the switch is in the off-position before plug-
ging in or wiring up the machine.
Always wear protective eye wear
when operating machinery. Eye
wear shall be impact resistant, protective safety
glasses with side shields which comply with
ANSI Z87.1 specifications.
Use of eye wear which
does not comply with ANSI Z87.1 specifications
could result in severe injury from breakage of
eye protection.
Always use safety glasses.
Also
use face or dust mask if cutting
operation is dusty. Everyday eye-
glasses only have impact resistant
lenses, they are NOT safety
glasses.
Wear appropriate safety clothing.
Wear leather safety gloves, arm
guards, leather aprons and safety
shoes. Wear dust mask and ear
protection.
Wear proper apparel.
Do not wear loose cloth-
ing, gloves, neckties, rings, bracelets, or other
jewelry which may get caught in moving parts.
Nonslip footwear is recommended. Wear pro-
tective hair covering to contain long hair.
Keep guards in place and in working order.
Do
not operate the machine with any guards
removed. Keep hands in sight and clear of all
moving parts and rotating cutting tools or sur-
faces.
Remove adjusting keys and wrenches.
Form habit
of checking to see that keys and adjusting
wrenches are removed from machine before
turning it on.
Keep work area clean.
Cluttered areas and
benches invite accidents.
Don’t use in dangerous environment.
Don’t use
power tools in damp or wet locations, or
expose them to rain. Keep work area well
lighted. Special electrics should be used when
working on flammable materials.
Keep children away.
All visitors should be kept
safe distance from work area.
Make workshop kid proof
with padlocks or mas-
ter switches.
Don’t force machine.
It will do the job better and
safer at the rate for which it was designed.
Use right machine.
Don’t force machine or
attachment to do a job for which it was not
designed.
Do not overreach.
Keep proper footing and bal-
ance at all times. Failure to maintain proper
working position can cause you to slip and fall
into machine or cause your clothing to get
caught, pulling you into the machine.
WARNING
WARNING
GX75.book Seite 3 Freitag, 18. April 2008 11:14 11

4
GX 75
us
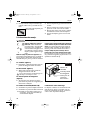
Maintain machine with care.
Keep machine clean
for best and safest performance. Follow instruc-
tions for lubricating and changing accessories.
Disconnect machine
before servicing and chang-
ing accessories.
Reduce the risk of unintentional starting.
Make
sure switch is in off-position before plugging in.
Use recommended accessories.
Consult the
owner’s manual for recommended accessories.
The use of improper accessories may cause risk
of injury to persons.
Never stand on machine.
Serious injury could
occur if the machine is tipped or if the grinding
belt is unintentionally contacted.
Check damaged parts.
Before further use of the
machine, a guard or other part that is damaged
should be carefully checked to determine that it
will operate properly and perform its intended
function – check for alignment of moving parts,
binding of moving parts, breakage of parts,
mounting, and any other conditions that may
affect its operation. A guard or other part that is
damaged should be properly repaired or
replaced.
Direction of feed.
Feed work against the direction
of rotation of grinding tool only.
Never leave the machine running while unat-
tended. Turn power off.
Don’t leave machine until
it comes to a complete stop.
1.2 Electrical Safety Notes.
The mains plug of the machine
may be mounted only by a quali-
fied electrician.
The protective conductor in the
mains socket outlet must be connected with the
protective earthing of the mains supply.
Check the rotation direction of the motor before
starting the operation of the machine for the first
time.
If the rotation direction of the motor is
incorrect, the workpiece can be thrown from
the machine and cause an accident. The rotation
direction may be changed only by a qualified
electrician.
When wiring this machine make sure it is prop-
erly grounded in accordance with National Elec-
tric code and local codes and ordinances. This
work should be done by a qualified electrician.
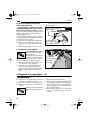
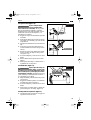
1.3 Specific Safety Notes for Belt Grinders.
Make sure that the undercar-
riage stands securely and has a
level setup position. Fasten the undercarriage to
the ground.
If the undercarriage tips over during
operation, serious injuries can result.
Use appropriate fastening material when mount-
ing the machine to the undercarriage.
When
mounted incorrectly, the machine can come
loose from the undercarriage and cause serious
accidents.
Always use the protective devices of the machine.
The protective devices must be securely mounted
to the machine and positioned for maximum
safety.
The protective devices help to protect
the operator from flying grinding particles and
unintentional contact with the grinding belt.
Pay attention that persons are not harmed by
sparking.
Remove combustible materials in the
direct area. Sparks develop when grinding met-
als.
When grinding metals (e. g. alu-
minium or magnesium), dust
develops that can be combustible or explosive. Do
not operate the machine in the vicinity of combus-
tible materials.
Sparks can ignite such materials.
When grinding metals, red hot metal and grinding
belt particles develop and are collected in the dust
collector.
Before emptying, the contents of the
dust collector must have cooled sufficiently and
may be disposed only in suitable containers.
Never brush away any dust while the machine is
in operation.
All clean up should be done when
the machine is stopped.
Additional precautions may be necessary for
grinding materials which are flammable or have
other hazardous properties.
You should always
consult the manufacturers of such material for
instructions on grinding and handling.
Make sure that you or other persons are not
standing directly next to the grinding belt when
switching the machine on.
The grinding belt can
tear apart and cause serious injuries.
WARNING
CAUTION
DANGER
GX75.book Seite 4 Freitag, 18. April 2008 11:14 11

GX 75
5
us
Do not use worn, torn or heavily clogged grinding
belts. Handle grinding belts with care and store
them in accordance with the instructions of the
manufacturer. Do not bend or crease grinding
belts!
Damaged grinding belts can tear apart and
be thrown from the machine resulting in possi-
ble personal injury.
All abrasive belts, prior to use, should be stored in
a controlled environment area. Relative humidity
should be 35 to 50 % and temperature should be
between 60 to 80 ° F.
Failure to do so could cause
premature belt failure.
Never use an abrasive belt with a nicked or cut
edge, a crease or handling damage.
If used the
belt could fail.
Check with the abrasive belt supplier for informa-
tion on speeds to be used with various types of
material being ground.
The operator must make
certain the spindle speed of the grinder does not
exceed the maximum RPM recommendations
for use with the abrasive cutting belt.
Do not use grinding belts or other accessories
which are not specifically designed and recom-
mended by the power tool manufacturer.
Safe
operation is not ensured merely because a
grinding belt or accessory fits your machine.
Make sure the arasive belt fully covers the surface
of the contact wheel.
A partially uncovered con-
tact wheel face will cause snagging and the
throwing of the work piece.
Track by turning the belt by hand. Then, jog the
motor to fine tune abrasive belt tracking.
A sud-
den full power start could cause the belt to track
off the machine.
Check the sound of the running abrasive belt.
If a
ticking sound or bumping noise occurs, stop the
machine and check for possible belt or machine
damage. Before grinding, the grinder shall be
checked for spindle runout, any signs of exessive
vibration or wobble and worn or unbalanced
contact wheels.
Press the emergency-off switch immediately in
danger situations.
The machine runs on for up to
50 seconds.
Clean the ventilation slots of the machine regu-
larly. The motor fan draws dust into the housing.
Excessive accumulation of metal dust can cause
electrical dangers.
2. Symbols.
Symbol Term, meaning Explanation
➤
Action Action to be taken by the user
General mandatory sign Follow the instructions in the adjacent text!
Read documentation Be absolutely sure to read the enclosed documen-
tation such as the Instruction Manual and the Gen-
eral Safety Instructions.
Use eye-protection Use eye-protection during operation.
(ANSI Z87.1, category 2)
Wear ear protection Use ear protection during operation.
(ANSI Z87.1, category 2)
Use dust mask Use a dust mask during operation.
(ANSI Z87.1, category 2)
Use protective gloves Use protective gloves during operation.
(ANSI Z87.1, category 2)
It is forbidden to dispose of
the product in the unsorted
household waste.
Worn out power tools and other electrotechnical
and electrical products should be sorted sepa-
rately for environment-friendly recycling.
GX75.book Seite 5 Freitag, 18. April 2008 11:14 11

6
GX 75
us
Symbol Term, meaning Explanation
DANGER This sign warns of a directly imminent, dangerous
situation. A false reaction can cause a severe or
fatal injury.
WARNING This sign indicates a possible dangerous situation
that could cause severe or fatal injury.
CAUTION This sign warns of a possible dangerous situation
that could cause injury.
Hazardous Voltage Contact may cause electric shock or burn.
Belt tracked Indicates text which explains belt adjustment.
Belt tensioned Indicates text which explains belt adjustment.
Belt released Indicates text which explains belt adjustment.
Lubricate Lubricate machine at marked locations.
Compressed air Clean machine with compressed air at marked
locations.
Class of protection I Product with basic insulation and exposed (touch-
able), conductive parts additionally connected to
the protective earth conductor.
mm Millimeter Unit of measure for length, width, height or depth
kg Kilogram Unit of measure for the mass
V Volt Unit of measure for the electric voltage
A Ampere Unit of measure for the electric current intensity
W Watt Unit of measure for the output
min Minutes Unit of measure for the time
°
Degree Unit of measure for the angle width
~ or a. c. Current type Alternating current
1 ~ Power supply type Alternating current single-phase
n
0
No-load speed
Revolution speed at no-load
1/min per minute Unit of measure for number of revolutions,
strokes, impacts or oscillations per minute
Ø
Diameter Diameter of a round part
DANGER
WARNING
CAUTION
GX75.book Seite 6 Freitag, 18. April 2008 11:14 11

GX 75
7
us
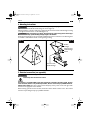
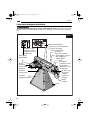
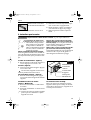
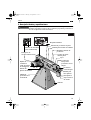
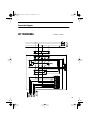
3. Technical Description and Specifications.
Before mounting or replacing application tools or accessories, pull the power plug.
This
preventive safety measure rules out the danger of injuries through accidental start-
ing of the machine.
WARNING
Instruction label
Fig. 1
Star-knob
bolt for adjusting
the tracking of the
grinding belt
Tension lever,
undercarriage
Emergency OFF
pushbutton
Ventilation
slots
On/Off switch
Speed switch
(only for 2H models)
Protective cover, top
Belt tension lever
Star-knob bolt for
protective cover
Adjustment screw
for face- grinding rest
Stop
Spark guard
wing bolts
Spark guard
Star-knob bolt,
grinding rest
Grinding rest
Dust collector
Undercarriage
GX75.book Seite 7 Freitag, 18. April 2008 11:14 11

8
GX 75
us
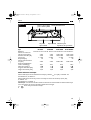
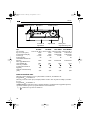
Noise emission values.
Measured A-weighted sound power level L
wA
(re 1 pW), in decibels: 85
Measuring uncertainty K
wA
, in decibels: 3
A-weighted emission pressure power level measured at the workplace L
pA
(re 20 µPa), in decibels: 74
Measuring uncertainty K
pA
, in decibels: 3
REMARK: The sum of the measured emission value and respective measuring inaccuracy represents
the upper limit of the values that can occur during measuring.
Wear ear protection!
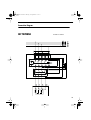
Contact wheel Face- grinding rest Drive wheel
Screw for
side cover
Side cover
Connection sleeve
for dust extraction
Fig. 2
Type GX 75USA GX 75VUSA GX 75 2HUSA GX 75 2H2VUSA
Reference number 7 901 01 12 44 3 7 901 01 12 23 3 7 901 02 12 44 3 7 901 02 12 23 3
No-load speed
[
rpm
]
3 450 3 450 1 725/3 450 1 725/3 450
Power input
[
W
]
3 000 3 000 1 500/2 000 1 500/2 000
Voltage
[
V
]
3 x 440 3 x 220 3 x 440 3 x 220
Frequency
[
Hz
]
60 60 60 60
Grinding-belt speed
[
m/s
]
7 084 7 084 3 542/6 691 3 542/6 691
Weight according to
EPTA-Procedure 01/2003
[
kg
]
143.1 143.1 147.5 147.5
Class of protection I/ I/ I/ I/
Grinding-belt length
[
inch
]
78.7 78.7 78.7 78.7
Grinding-belt width
[
inch
]
2.95 2.95 2.95 2.95
GX75.book Seite 8 Freitag, 18. April 2008 11:14 11

GX 75
9
us
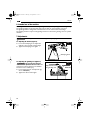
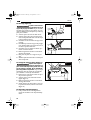
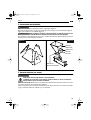
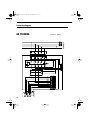
4. Mounting instructions.
Before any work on the machine itself, pull the power plug from the socket outlet.
Assemble the undercarriage as shown. (Figure 3)
Place the machine on the floor with the top side facing down and mount the undercarriage according
to the figure and instructions on the DVD. (Figure 4)
Due to the danger of accidents, this work must be carried out by persons that are phys-
ically capable of lifting the high weight of the machine.
Fasten the undercarriage to the ground with suitable anchor/screw connections. The fastening must
be suitable to withstand the forces occurring during working.
5. Electrical connection (see appendix).
Hazardous Voltage
Contact may cause electric shock or burn.
The machine is not equipped with a mains plug and must be connected to the power supply. The elec-
trical connection, which is to be provided by customer, must be carried out by a qualified electrician.
Observe mains voltage:
The mains voltage and the frequency of the power source must agree with
the data on the type plate of the machine.
Before starting operation for the first time, check the rotation direction of the motor. The rotation
direction may be changed only by a qualified electrician.
WARNING
WARNING
Under-
carriage
Tension lever,
undercarriage
Tension lever,
undercarriage
Screw
Fig. 3
Fig. 4
WARNING
GX75.book Seite 9 Freitag, 18. April 2008 11:14 11

10
GX 75
us
6. Intended use of the machine.
The belt grinder GX is a multi-functional grinding machine specifically designed for metal grinding.
The grinding machine can be integrated with extra modules for special grinding operations.
The grinding machine is designed for industrial indoor use in moisture free surroundings.
The grinding machine is only for metal grinding and must not be used for grinding of wood or plastic
materials.
7. Adjustments.
Before any work on the machine itself, pull the power plug from the socket outlet.
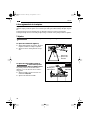
7.1 Adjusting the incline (Figure 5).
➤
Loosen both clamping levers. Adjust the
machine to the required working height.
➤
Tighten both clamping levers again.
7.2 Adjusting the grinding rest (Figure 6).
The gap size must always be
adjusted to the correct size.
Thin
workpieces could be pulled into the machine
and cause severe or fatal injury.
➤
Loosen star-knob bolt and adjust the gap
size to
2 mm (max.)
.
➤ Tighten the star-knob bolt again.
WARNING
Fig. 5
Clamping lever
WARNING
Fig. 6
Adjustment knob
for grinding rest max 2 mm
WARNING
GX75.book Seite 10 Freitag, 18. April 2008 11:14 11

GX 75
11
us
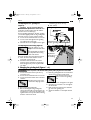
7.3 Adjusting the face- grinding rest
(Figure 7).
The gap size must always be
adjusted to the correct size. Thin
workpieces could be pulled into the machine
and cause severe or fatal injury.
For face grinding applications, the face- grinding
rest must be aligned parallel to the grinding belt
and must touch it over the complete surface.
➤ Loosen screw and fold the side cover down.
➤ Loosen screws and align the face-grinding
rest. Tighten the screw again.
➤ Shut the side cover and tighten screw again.
Check the gap size at the stop
(max. 2 mm).
7.4 Adjusting the belt tracking (Figure 8).
Switch the machine on only
briefly and check the belt track-
ing.
If the grinding belt moves left or
right, adjust the belt tracking
with the star-knob bolt until centred.
If the belt tracking cannot be adjusted centred:
➤ Clean the drive wheel and the contact
wheel with compressed air.
➤ Check the drive wheel and the contact
wheel for wear, deformation and damage.
Have damaged components replaced with-
out delay!
8. Changing the grinding belt (Figures 1 + 2).
Before any work on the machine itself, pull the power plug from the socket outlet.
➤ Loosen star-knob bolt and open the top
protective cover.
➤ Loosen screw and fold the side cover down.
➤ Loosen star-knob bolt and remove the dust
collector.
Push belt tension lever down
to release the clamping device.
➤ Remove the old grinding belt.
➤ Before attaching the new grinding belt,
observe the information concerning the run-
ning direction on the inner side of the grind-
ing belt! It must correspond with the running
direction of the drive wheel.
➤ Place the grinding belt both around the drive
wheel and around the contact wheel.
Push the belt tension lever up
again to tension the grinding
belt.
➤ Shut the side cover and tighten screw again.
➤ Close the top protective cover and tighten
star-knob bolt.
➤ Remount the dust collector and check the
gap size at the grinding rest.
➤ Switch the machine on and adjust the belt
run.
WARNING
Fig. 7
Adjustment screw
for face- grinding rest
Stop
Face- grinding rest
max 2 mm
WARNING
Fig. 8
Adjustment
knob bolt for
belt tracking
WARNING
GX75.book Seite 11 Freitag, 18. April 2008 11:14 11

12
GX 75
us
9. Operating instructions.
Never touch the running grinding belt. Danger of injury.
Always use safety glasses. Also
use face or dust mask if cutting
operation is dusty. Everyday eye-
glasses only have impact resistant
lenses, they are NOT safety
glasses.
Wear appropriate safety clothing.
Wear leather safety gloves, arm
guards, leather aprons and safety
shoes. Wear dust mask and ear
protection.
Present the workpiece to the abrasive belt below
the horizontal centerline of the contact wheel.
Above the centerline, the workpiece will chatter
and it is diffficult to hold, with the possibility the
work piece could be pulled away.
Always use an upward stroke to present the work
piece to the abrasive belt. This method both
improves the cuting and increases safety by
drawing hands away from the abrasive belt.
9.1 Switching ON: (Figure 9)
➤ Release the emergency OFF pushbutton and
lift it up. Press the “I” button.
9.2 Switching OFF: (Figure 9)
➤ Lift up the emergency OFF pushbutton.
Press the “0” button.
After switching off, the machine runs on
for approx. 50 seconds.
9.3 Emergency OFF pushbutton: (Figure 9)
➤ In emergency situations, press the red emer-
gency OFF pushbutton to switch the
machine off.
9.4 Changing the speed (Figure 9 – models 2H).
➤ Switch position 1: Low speed
➤ Switch position 2: High speed
Change the speed of the machine only
when the machine is at a complete stop
with the speed switch.
9.5 Overload protection.
In case of continuous high load over a longer
period of time, the machine is switched off. After
a cooling-down period of approx. 15 minutes,
the machine is ready for operation again.
CAUTION
Fig. 9
Speed-switch
Emergency OFF
pushbutton
On/Off-switch
GX75.book Seite 12 Freitag, 18. April 2008 11:14 11

GX 75
13
us
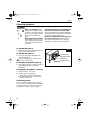
9.6 Contact grinding (Figure 10).
The workpiece must always lie
securely on the grinding rest and
the stop. Workpieces that are too small or too thin
may not be worked. Danger of injury from work-
pieces pulled into the machine.
➤ Check if the star-knob bolt is firmly tight-
ened.
➤ Ensure that the top protective cover is
secured with star-knob bolt and that the
side cover is shut.
➤ Check the gap size of the grinding rest.
➤ Check the position of the face-grinding rest.
The adjustment screws must be in the bot-
tom position.
➤ Check if the screws of spark guard are prop-
erly tightened.
➤ Switch the machine on and check the belt
run.
➤ Place the workpiece firmly onto the grinding
rest.
➤ Guide the workpiece with both hands or
fasten it in a fixture.
9.7 Face grinding (Figure 11).
Hold the workpiece with both
hands. The workpiece must
always lie securely on the face grinding rest and
the stop. Workpieces that are too small or too thin
may not be worked. Danger of injury from work-
pieces being pulled in or thrown from the
machine.
➤ Loosen the star-knob bolts and remove the
top protective cover.
➤ Make sure that the gap size is correctly
adjusted. (Figure 7)
➤ Switch the machine on and check the belt
run.
➤ Guide the workpiece with both hands and
remove it to upward after the working pro-
cedure. (Figure 11)
9.8 Suction device (Figure 2)
➤ The machine can be connected via the
sleeve to a dust extraction system.
WARNING
Fig. 10
WARNING
WARNING
Fig. 11
WARNING
GX75.book Seite 13 Freitag, 18. April 2008 11:14 11

14
GX 75
us
10. Maintenance.
Hazardous Voltage
Contact may cause electric shock or
burn.
Pull out the mains plug for maintenance
and repair! Switching the machine on
unintentionally can lead to serious inju-
ries.
10.1 Service.
Have maintenance carried out
only through qualified personnel.
Incorrectly mounted leads and components can
cause serious injuries. Have the required service
carried out only through a FEIN customer serv-
ice agent.
For repairs, we recommend our FEIN customer
service centre, the FEIN authorised service cen-
tres and FEIN agencies.
When the machine’s power cable is dam-
aged, it must be replaced by a qualified per-
son using a specially prepared power cable,
available from your FEIN customer service
agent.
10.2 Cleaning.
Prior to any cleaning or mainte-
nance, disconnect the machine
from the power supply in order to avoid accidents.
It is best to clean the machine with dry com-
pressed air. When cleaning machines with com-
pressed air, always wear safety goggles.
Cooling-air openings and operating elements
must be clean and may not be obstructed
through other objects. Do not attempt to clean
the openings with pointed objects.
Carry out the following maintenance regularly:
Blow out the ventilation slots at the motor
housing and the marked locations with
compressed air (see Instruction label).
Lubricate the machine daily (when in use)
with machine oil at the locations marked
(see Instruction label).
➤ Check the drive wheel and the contact
wheel for wear and damage each time when
changing the grinding belt. Have damaged
parts replaced.
11. Warranty and liability.
The warranty for the product is valid in accordance with the legal regulations in the country where
it is marketed.
In addition, FEIN also provides a guarantee in accordance with the FEIN manufacturer’s guarantee.
For further details on this, please contact your specialist dealer, your national FEIN representative,
or the FEIN customer service centre.
12. Environmental protection, disposal.
The machine should be sorted for environment-friendly recycling in accordance with national laws.
WARNING
WARNING
WARNING
GX75.book Seite 14 Freitag, 18. April 2008 11:14 11

GX 75
15
us
13. Electrical connection.
Hazardous Voltage
Contact may cause electric shock or burn.
When wiring this machine make sure it is properly grounded in accordance with National Electric
code and local codes and ordinances. This work should be done by a qualified electrician.
This machine should be grounded while in use to protect the operator from electrical shock. The
tool is equipped with an approved three-conductor cord three-prong grounding type plug to fit the
proper grounding type receptacle. The green (or green and yellow) conductor in the cord is the
grounding wire. Never connect the green (or green and yellow) wire to a liive terminal. If your unit
is a 220/440 V 3-phase system, the connection to the power source should be done by a four wire
cable as shown in figure. When making the connections, check the motor for proper rotation. To
change the motor rotation, switch two of the live leads. The green wire is always the ground wire
and is never to be connected to a live terminal. This work should be done by a qualified electrician.
WARNING
GX75.book Seite 15 Freitag, 18. April 2008 11:14 11

16
GX 75
fr
Table des matières
1. Pour votre sécurité.........................................................................................................................17
1.1 Instructions générales de sécurité.................................................................................................... 17
1.2 Consignes de sécurité relatives à l’électricité................................................................................. 18
1.3 Consignes de sécurité pour ponceuses à bande............................................................................ 18
2. Symboles.........................................................................................................................................20
3. Description technique et spécification ..........................................................................................22
4. Indications de montage..................................................................................................................24
5. Branchement électrique (voir annexes).........................................................................................24
6. Utilisation de l’appareil..................................................................................................................25
7. Réglages .........................................................................................................................................25
7.1 Régler l’inclinaison.............................................................................................................................. 25
7.2 Ajuster le support de ponçage ......................................................................................................... 25
7.3 Ajuster le supporte de ponçage pour surfaces planes.................................................................. 26
7.4 Centrage de la bande ......................................................................................................................... 26
8. Changement de la bande................................................................................................................26
9. Instructions pour le service ...........................................................................................................27
9.1 Mise en fonctionnement.................................................................................................................... 27
9.2 Arrêt ..................................................................................................................................................... 27
9.3 Touche Arrêt d’urgence.................................................................................................................... 27
9.4 Modifier la vitesse de rotation (Modèles 2H) ................................................................................27
9.5 Protection contre surcharge............................................................................................................. 27
9.6 Dressage (Figure 10) .......................................................................................................................... 28
9.7 Ponçage de surfaces planes ............................................................................................................... 28
9.8 Dispositif d’aspiration ........................................................................................................................ 28
10. Entretien .........................................................................................................................................29
10.1 Service après-vente............................................................................................................................ 29
10.2 Nettoyage ............................................................................................................................................ 29
11. Garantie ..........................................................................................................................................29
12. Protection de l’environnement, élimination...................................................................................29
13. Branchement électrique.................................................................................................................30
GX75.book Seite 16 Freitag, 18. April 2008 11:14 11

GX 75
17
fr
1. Pour votre sécurité.
Lire tous les avertisse-
ments de sécurité et tou-
tes les instructions. Ne pas suivre les
avertissements et instructions peut donner lieu à
un choc électrique, un incendie et/ou une bles-
sure sérieuse.
Conserver tous les avertissements et toutes les
instructions pour pouvoir s’y reporter ultérieure-
ment.
Ne pas utiliser cet outil électroportatif,
avant d’avoir soigneusement lu et complè-
tement compris cette notice d’utilisation y com-
pris les figures, les spécifications, les règles de
sécurité ainsi que les indications marquées par
DANGER, AVERTISSEMENT et ATTENTION.
N’effectuer avec cet outil électrique que des tra-
vaux pour lesquels il a été conçu par FEIN. N’uti-
liser que des outils de travail et accessoires
autorisés par FEIN.
De même, respecter les dispositions concernant
la prévention des accidents du travail en vigueur
dans le pays en question.
Le non-respect des instructions de sécurité se
trouvant dans la documentation mentionnée
peut entraîner un choc électrique, un incendie
et/ou de graves blessures.
Bien garder cette notice d’utilisation en vue
d’une utilisation ultérieure ; elle doit être jointe
à l’appareil en cas de cession ou de vente à une
tierce personne.
GARDER PRECIEUSEMENT CES INSTRUC-
TIONS DE SECURITE.
1.1 Instructions générales de sécurité.
Avant les travaux d’entre-
tien et de réparation, reti-
rer la fiche de la prise de courant ! Une mise en
marche accidentelle de l’appareil par mégarde
peut entraîner de graves blessures. Evitez tout
démarrage intempestif, assurez-vous que l’inter-
rupteur est effectivement en position « Arrêt »
avant de brancher ou de raccorder l’appareil.
Portez toujours des lunettes de
protection, si vous travaillez avec
des machines. Les lunettes de protection doivent
être résistantes aux chocs et être équipées d’une
couverture latérale suivant ANSI Z87.1. Les lunet-
tes de protection qui ne correspondent pas à la
ANSI Z87.1, peuvent se casser et causer de bles-
sures graves.
Portez toujours des lunettes de
protection. Utilisez également une
protection faciale ou une protec-
tion anti-poussière, si la coupe
génère de la poussière. Les lunettes
normales ont des lentilles qui résis-
tent aux chocs, mais ne sont PAS
des lunettes de protection.
Utilisez un équipement de protection approprié.
Portez des gants de sécurité en cuir, un tablier en
cuir et des chaussures de sécurité. Portez un mas-
que antipoussière ainsi qu’une protection acousti-
que.
Habillez-vous de manière adaptée. Ne portez pas
de vêtements amples, des gants, cravates,
anneaux, bracelets ou autres bijoux qui pour-
raient être happés par les parties en rotation.
Des chaussures antidérapantes sont recomman-
dées. Attachez les cheveux longs et contenez-les
dans un bonnet de protection.
Assurez-vous du bon fonctionnement des couver-
cles de protection et ne les déplacez pas. N’utili-
sez pas la machine si un couvercle de protection
quelconque est enlevé. Faites attention à vos
mains et gardez-les à distance de toute surface
ou de tout outil tranchant en rotation.
Enlevez les outils de réglage et les clés. Prenez
l’habitude de vous assurer que les outils de
réglage et les clés ont été enlevés avant de met-
tre en marche l’appareil.
Maintenez la zone de travail propre. Les surfaces
et tables de travail en désordre provoquent des
accidents.
Ne pas utiliser dans des environnements dange-
reux. Ne pas utiliser les outils électriques dans un
environnement humide ou mouillé, et ne pas
exposer l’outil électrique à la pluie. Eclairez bien
la zone de travail. Utilisez une installation élec-
trique spéciale lorsque vous travaillez avec un
matériau inflammable.
AVERTISSEMENT
AVERTISSEMENT
GX75.book Seite 17 Freitag, 18. April 2008 11:14 11

18
GX 75
fr
Ne laissez pas les enfants s’approcher. Tous les
visiteurs doivent se maintenir à une distance suf-
fisante de la zone de travail.
Faites en sorte que votre atelier ne présente aucun
danger pour les enfants ; utilisez des cadenas et
des interrupteurs généraux.
N’imposez pas de contraintes excessives à la
machine. Il sera plus efficace et plus sûr si vous la
faites fonctionner au régime pour lequel elle a
été conçue.
Employez la machine qui convient. N’employez
pas une machine ou un accessoire pour des tra-
vaux autres que ceux pour lesquels elle a été
conçue.
Ne vous penchez pas trop en avant. Maintenez un
bon appui et restez en équilibre en tout temps.
Une mauvaise position de travail peut entraîner
une chute, vos vêtements pourraient être hap-
pés par la machine et vous y entraîner.
Prenez soin de votre machine et entretenez-la
bien. Maintenez votre machine propre pour
obtenir le rendement maximum dans des condi-
tions de sécurité optimales. Suivez les indica-
tions relatives au graissage et au remplacement
d’outils.
Déconnectez la machine avant tout travail
d’entretien ou de changement d’accessoire.
Réduisez le risque de toute mise en marche acci-
dentelle. Assurez-vous avant de brancher la
machine que l’interrupteur est en position arrêt.
N’utilisez que les accessoires recommandés.
Consultez les instructions d’utilisation pour
savoir quels sont les accessoires recommandés.
L’utilisation d’accessoires non appropriés pré-
sente un risque d’accidents.
Ne montez jamais sur la machine. L’utilisateur
s’expose à de graves blessures s’il renverse la
machine ou s’il entre accidentellement en con-
tact avec la bande de ponçage.
Assurez-vous qu’aucune pièce n’est endommagée.
Avant de poursuivre votre travail, examinez soi-
gneusement tout dispositif de protection ou
toute autre pièce pouvant être endommagé afin
de vous assurer que cette pièce remplit toujours
la fonction prévue. Vérifiez l’alignement et
l’assujettissement des pièces mobiles, leur degré
d’usure, leur assemblage et toute autre condi-
tion pouvant affecter leur fonctionnement.
Sens de la coupe. Faites avancer l’ouvrage contre
l’outil de coupe uniquement dans le sens opposé
au sens de rotation de ce dernier.
Ne vous éloignez jamais de la machine sans l’arrê-
ter. Mettez la machine hors tension. Ne vous éloi-
gnez pas de la machine avant qu’il n’ait atteint un
arrêt complet.
1.2 Consignes de sécurité relatives à
l’électricité.
La prise de secteur de la
machine ne doit être mon-
tée que par un électricien qualifié. Le conducteur
de protection dans la prise du secteur doit être
connecté au conducteur de terre de protection
de l’alimentation secteur.
Avant la première mise en service, contrôler le
sens de rotation du moteur. Si c’est le mauvais
sens de rotation, la pièce à travailler peut être
projetée et causer des accidents. Seul un électri-
cien professionnel a le droit d’inverser le sens de
rotation.
Assurez-vous lors du raccordement de la
machine qu’elle est mise à la terre conformé-
ment aux prescriptions nationales et locales en
vigueur. Ce travail ne doit être effectué que par
un électricien qualifié.
1.3 Consignes de sécurité pour ponceuses à
bande.
Veiller à placer le socle dans une
position stable et à l’horizontale.
Fixer le socle sur le sol. Au cas où le socle se ren-
verserait pendant le travail, ceci pourrait entraî-
ner de graves blessures.
Utiliser des dispositifs de fixation appropriés pour
monter l’appareil sur le socle. Un montage incor-
rect peut provoquer de graves accidents causés
par un appareil qui s’est détaché du socle pen-
dant l’opération de travail.
Toujours utiliser les dispositifs de protection se
trouvant sur l’appareil. Les dispositifs de protec-
tion doivent être bien montés sur l’appareil de
façon à obtenir une sécurité maximale. Les dispo-
sitifs de protection doivent protéger l’utilisateur
contre les particules qui se détachent et contre
un contact accidentel avec la bande abrasive.
AVERTISSEMENT
ATTENTION
GX75.book Seite 18 Freitag, 18. April 2008 11:14 11

GX 75
19
fr
Veiller à ce que personne ne soit exposé à un dan-
ger en raison des projections d’étincelles. Enlever
les matériaux inflammables se trouvant à proxi-
mité. L’usinage des métaux génère des étincel-
les.
Lors du ponçage de métaux (par
ex. aluminium ou magnésium),
de la poussière est générée qui peut être inflam-
mable ou explosive. N’utilisez donc pas la machine
à proximité de matériaux inflammables. Les étin-
celles pourraient enflammer de tels matériaux.
Lors du ponçage de métaux, des particules brûlan-
tes et incandescentes de métal et de la feuille
abrasive sont générées qui sont récupérées dans
la boîte de récupération des poussières. Avant de
vider le collecteur de poussières, assurez-vous
que les particules ont suffisamment refroidi. Ces
dernières ne peuvent être éliminées que dans
des conteneurs spéciaux.
Ne pas retirer la poussière pendant que la
machine est en marche. Tout travail de nettoyage
ne doit être effectué que lorsque la machine est
en état d’arrêt.
D’autres mesures de sécurité pourraient être
nécessaires pour des matériaux de ponçage qui
présentent des caractéristiques inflammables ou
autres caractéristiques dangereuses. Informez-
vous auprès du fabricant de tels matériaux quant
aux instructions de ponçage et d’entretien.
Lors de la mise en marche de l’appareil, veiller à
ce que l’utilisateur ou d’autres personnes ne se
tiennent pas directement à côté de la bande abra-
sive. La bande abrasive peut se déchirer et
entraîner de graves blessures.
Ne pas utiliser de bandes abrasives usées, fen-
dues sur les bords ou fortement encrassées.
Manier avec précaution les bandes abrasives et
les ranger conformément aux instructions du
fabricant. Ne pas plier les bandes abrasives ! Les
bandes abrasives endommagées peuvent se
déchirer ou être projetées par l’appareil et bles-
ser des personnes.
Avant leur utilisation, toutes les bandes de pon-
çage doivent être stockées dans des conditions
environnementales contrôlées. L’humidité relative
de l’air doit être entre 35 et 50 % et la tempéra-
ture entre 60 et 80 ° F. Le non respect de ces con-
ditions peut provoquer l’usure prématurée des
bandes.
Ne jamais utiliser de bandes de ponçage dont les
bords sont entaillés, fendus ou repliés ou des ban-
des présentant des dommages. L’utilisation de
telles bandes pourrait entraver l’opération de
ponçage.
S’informer auprès du distributeur de la bande
quant aux instructions relatives à la vitesse utili-
sée lors du ponçage de différents matériaux.
L’utilisateur doit veiller à ce que la vitesse du
rouleau d’entraînement ne dépasse pas la vitesse
de rotation max. recommandée en fonction de
la bande de ponçage.
Ne pas utiliser de bandes abrasives ou d’autres
accessoires qui n’ont pas été spécialement conçus
ou acceptés par le fabricant. Le seul fait qu’une
bande abrasive ou un accessoire aille sur votre
appareil ne garantit pas une utilisation dépour-
vue de risque.
Assurez-vous que la bande de ponçage recouvre
complètement la surface de la roue de contact.
Une roue de contact partiellement recouverte
provoque le coincement et l’expulsion de la
pièce à usiner.
Vérifiez manuellement l’alignement de la bande de
ponçage. Ensuite, faites brièvement fonctionner le
moteur par à-coups pour un réglage fin de la
bande. Un démarrage soudain et à fond du
moteur peut provoquer le détachement de la
bande.
Contrôlez le bruit produit par la bande de ponçage.
Si vous entendez un cliquetis ou un bruit sourd,
éteignez la machine et assurez-vous que la bande
ou la machine ne présentent pas un endomma-
gement. Avant l’opération de ponçage, assurez-
vous de l’alignement de la broche, contrôlez
toute vibration excessive ainsi que l’usure et
l’équilibre des roues de contact.
En cas de danger, appuyez immédiatement sur
l’interrupteur d’arrêt d’urgence. La machine
s’arrête au bout de 50 secondes environ.
Nettoyer régulièrement les ouïes de ventilation de
appareil. La ventilation du moteur aspire de la
poussière dans le carter. Une trop grande quan-
tité de poussière de métal accumulée peut cons-
tituer des dangers électriques.
DANGER
GX75.book Seite 19 Freitag, 18. April 2008 11:14 11

20
GX 75
fr
2. Symboles.
Symbole Terme, signification Explication
➤
Action Action de l’utilisateur
Signal d’obligation géné-
ral
Suivre les indications données dans le texte ci-
contre !
Lire la documentation Lire impérativement les documents ci-joints
tels que la notice d’utilisation et les instruc-
tions générales de sécurité.
Porter une protection
oculaire
Lors des travaux, porter une protection ocu-
laire. (ANSI Z87.1, catégorie 2)
Porter une protection
acoustique
Lors des travaux, porter une protection
acoustique. (ANSI Z87.1, catégorie 2)
Porter une protection
anti-poussière
Lors des travaux, porter une protection anti-
poussière. (ANSI Z87.1, catégorie 2)
Utiliser un protège-main Lors des travaux, utiliser un protège-main.
(ANSI Z87.1, catégorie 2)
Il est interdit de jeter le
produit dans les ordures
ménagères non triées.
Trier les outils électriques ainsi que les autres
produits électrotechniques et électriques et
les rapporter à un centre de recyclage respec-
tant les directives concernant la protection de
l’environnement.
DANGER Cette indication met en garde contre une
situation dangereuse imminente. Une mau-
vaise manipulation peut entraîner de graves
blessures ou la mort.
AVERTISSEMENT Cette indication indique une situation poten-
tiellement dangereuse qui peut entraîner de
graves blessures ou la mort.
ATTENTION Cette indication met en garde contre une
situation potentiellement dangereuse qui peut
entraîner des blessures.
Tension dangereuse Toucher un tel câble peut provoquer un choc
électrique ou des brûlures.
Ajustage de la bande de
ponçage
Donne des informations relatives au réglage
de la bande.
Bande de ponçage tendue Donne des informations relatives au réglage
de la bande.
Bande de ponçage déten-
due
Donne des informations relatives au réglage
de la bande.
DANGER
AVERTISSEMENT
ATTENTION
GX75.book Seite 20 Freitag, 18. April 2008 11:14 11
La page est en cours de chargement...
La page est en cours de chargement...
La page est en cours de chargement...
La page est en cours de chargement...
La page est en cours de chargement...
La page est en cours de chargement...
La page est en cours de chargement...
La page est en cours de chargement...
La page est en cours de chargement...
La page est en cours de chargement...
La page est en cours de chargement...
La page est en cours de chargement...
La page est en cours de chargement...
La page est en cours de chargement...
La page est en cours de chargement...
La page est en cours de chargement...
La page est en cours de chargement...
La page est en cours de chargement...
La page est en cours de chargement...
La page est en cours de chargement...
La page est en cours de chargement...
La page est en cours de chargement...
La page est en cours de chargement...
La page est en cours de chargement...
La page est en cours de chargement...
La page est en cours de chargement...
La page est en cours de chargement...
La page est en cours de chargement...
La page est en cours de chargement...
-
 1
1
-
 2
2
-
 3
3
-
 4
4
-
 5
5
-
 6
6
-
 7
7
-
 8
8
-
 9
9
-
 10
10
-
 11
11
-
 12
12
-
 13
13
-
 14
14
-
 15
15
-
 16
16
-
 17
17
-
 18
18
-
 19
19
-
 20
20
-
 21
21
-
 22
22
-
 23
23
-
 24
24
-
 25
25
-
 26
26
-
 27
27
-
 28
28
-
 29
29
-
 30
30
-
 31
31
-
 32
32
-
 33
33
-
 34
34
-
 35
35
-
 36
36
-
 37
37
-
 38
38
-
 39
39
-
 40
40
-
 41
41
-
 42
42
-
 43
43
-
 44
44
-
 45
45
-
 46
46
-
 47
47
-
 48
48
-
 49
49


FEIN Power Tools Grit GX75 Series Manuel utilisateur
- Taper
- Manuel utilisateur
- Ce manuel convient également à
dans d''autres langues
Documents connexes
Autres documents
-
Greenworks 2937002 Mode d'emploi
-
GYS ELECTRIC SANDER / POLISHER Fiche technique
-
FEIN WSG 7-115 PT Manuel utilisateur
-
FEIN GSZ4-90EL Manuel utilisateur
-
FEIN WPO 14-25 E Manuel utilisateur
-
 MK Diamond Products HD-101R Pro24 JCS Le manuel du propriétaire
-
 MK Diamond Products HD-101R Pro24 JCS Le manuel du propriétaire
-
Makita EK7651H-XAG04T Mode d'emploi
-
Husqvarna RG 2112 Manuel utilisateur
-

