Roper YREX4634KQ1 Le manuel du propriétaire
- Catégorie
- Sèche-linge électriques
- Taper
- Le manuel du propriétaire
Ce manuel convient également à

BY WHIRLPOOL CORPORATION
ELECTRICAND GAS
DRYERS
For questions about features, operation/performance,
parts, accessories or service call: 1-800-447-6737
In Canada, for assistance call: 1-800-461-5681,
for installation and service call: 1-800-807-6777
or visit our website at
www.roperappliances.com or
www.roperappliances.com/canada
f
SECHEUSES
ELECTRIQUESETA GAZ
_+=x2,F_t//,,g4_'>,,,S_ 1=,_t4 _J(!/l//,l*_<,,/+/_i_/@,izf I
_i ,,, , = _ = =
_d:?!t_I@Yt_t;!@YIt
Pour assistance, installation ou service composer le
1-800-807-6777 ou visitez notre site web
www.roperappliances.com/canada
Table of Contents/Table des matieres ........................2
3978913

TABLEOF CONTENTS
DRYER SAFETY .................................................................. 3
PARTS AND FEATURES .................................................... 5
CHECKING YOUR VENT .................................................... 6
DRYER USE ......................................................................... 7
Starting Your Dryer ........................................................... 7
Stopping and Restarting ................................................... 7
Loading Clothes ................................................................ 7
Drying, Cycle, and Temperature Tips ............................... 8
CYCLE DESCRIPTIONS ..................................................... 8
Automatic Cycle ................................................................ 8
Timed Dry Cycle ................................................................ 8
No Heat/Fluff Cycle ........................................................... 9
Additional Features ........................................................... 9
Drying Rack (optional purchase) ....................................... 9
DRYER CARE .................................................................... 10
Cleaning the Lint Screen ................................................. 10
Cleaning the Dryer Interior .............................................. 10
Removing Accumulated Lint
from Inside the Dryer Cabinet ......................................... 10
Changing the Drum Light ................................................ 11
TROUBLESHOOTING ....................................................... 11
ASSISTANCE OR SERVICE ............................................. 13
WARRANTY ....................................................................... 14
TABLE DES MATIERES
SI_CURIT¢: DE LA SI_CHEUSE ........................................ 16
PII_CES ET CARACTI_RISTIGUES .................................. 18
VITRIFICATION DU CONDUIT D'C:VACUATION ............. 19
UTILISATION DE LA SI_CHEUSE .................................... 20
Mise en marche de la sCcheuse ..................................... 20
ArrCt et remise en marche .............................................. 21
Chargement des vCtements ........................................... 21
Conseils pour sCchage, programmes et temp@ature ... 21
DESCRIPTION DES PROGRAMMES .............................. 21
Programme automatique ................................................ 22
Programme de sCchage minut6 (Timed Dry).................. 22
Programme de sCchage sans chaleur (No Heat/Fluff) ... 22
Caract@istiques supplCmentaires .................................. 22
Grille de sCchage (disponsible en option) ...................... 23
ENTRETIEN DE LA SI_CHEUSE ...................................... 23
Nettoyage du filtre & charpie .......................................... 23
Nettoyage de I'int@ieur de la sCcheuse ......................... 24
Comment enlever la charpie accumulCe
de I'int@ieur de la sCcheuse ........................................... 24
Changement de I'ampoule d'Cclairage du tambour ....... 24
DI_PANNAGE ..................................................................... 25
ASSISTANCE OU SERVICE ............................................. 26
GARANTIE ......................................................................... 27

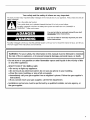
DRYERSAFETY
Your safety and the safety of others are very important.
We have provided many important safety messages in this manual and on your appliance. Always read and obey all
safety messages.
This is the safety alert symbol.
This symbol alerts you to potential hazards that can kill or hurt you and others.
All safety messages will follow the safety alert symbol and either the word "DANGER" or
"WARNING." These words mean:
You can be killed or seriously injured if you don't
immediately follow instructions.
You can be killed or seriously injured if you don't
follow instructions.
All safety messages will tell you what the potential hazard is, tell you how to reduce the chance of injury, and tell you
what can happen if the instructions are not followed.
I WARNING: For your safety, the information in this manual must be followed to minimize I
I
the risk of fire or explosion, or to prevent property damage, personal injury, or death. I
- Do not store or use gasoline or other flammable vapors and liquids in the vicinity of this
or any other appliance.
- WHAT TO DO IF YOU SMELL GAS:
• Do not try to light any appliance.
• Do not touch any electrical switch; do not use any phone in your building.
• Clear the room, building, or area of all occupants.
• Immediately call your gas supplier from a neighbor's phone. Follow the gas supplier's
instructions.
• If you cannot reach your gas supplier, call the fire department.
- Installation and service must be performed by a qualified installer, service agency, or
the gas supplier.

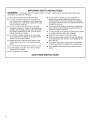
IMPORTANT SAFETY INSTRUCTIONS
WARNING: To reduce the risk of fire, electric shock, or injury to persons when using the dryer, follow basic
precautions, including the following:
• Read all instructions before using the dryer.
• Do not place items exposed to cooking oils in
your dryer. Items contaminated with cooking oils
may contribute to a chemical reaction that could
cause a load to catch fire.
• Do not dry articles that have been previously
cleaned in, washed in, soaked in, or spotted with
gasoline, dry-cleaning solvents, other flammable,
or explosive substances as they give off vapors
that could ignite or explode.
• Do not allow children to play on or in the dryer.
Close supervision of children is necessary when
the dryer is used near children.
• Before the dryer is removed from service or dis-
carded, remove the door to the drying compart-
ment.
• Do not reach into the dryer if the drum is moving.
• Do not install or store the dryer where it will be
exposed to the weather.
• Do not tamper with controls.
• Do not repair or replace any part of the dryer or
attempt any servicing unless specifically recom-
mended in this Use and Care Guide or in published
user-repair instructions that you understand and have
the skills to carry out.
• Do not use fabric softeners or products to eliminate
static unless recommended by the manufacturer of
the fabric softener or product.
• Do not use heat to dry articles containing foam rubber
or similarly textured rubber-like materials.
• Clean lint screen before or after each load.
• Keep area around the exhaust opening and adjacent
surrounding areas free from the accumulation of lint,
dust, and dirt.
• The interior of the dryer and exhaust vent should be
cleaned periodically by qualified service personnel.
• See Installation Instructions for grounding require-
ments.
SAVE THESE INSTRUCTIONS

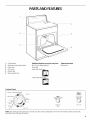
PARTS AND FEATURES
1. Control panel
2. Model and serial number label
3. Dryer drum
4. Lint screen
5. Exhaust grill
6. Wide-opening door
Additional features your dryer may have
End of Cycle Signal selector
Drum light
Large side-swing door
Optional purchase
Drying rack
Super wide-swing door
Control Panel
HEAVY DUTY SUPER CAPACITY PLUS
MAX
o_ D,_Y 70 TIMED DRY
WRINKLE pr_FVENT _ * 40
= WBINKL_ FREE
COOL DOWN _ 2o
LESS =
D_¥ COOL DOWN
.........oo Y\X Iol
F
NO HEAT/FLUFF
PERM P_ESS
MEDIUM
KNITS OO_ON
LO_IGH
TEMPERATURE
FABRIC
TEMP
O
ENB O_ CYCLE SIGNAL
NOTE: The drawings in this book may vary from your dryer. They are designed to show all of the models covered by this book.
Your dryer may not include all features.

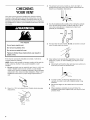
CHECKING
YOUR VENT
Your dryer must be properly installed and vented to achieve
maximum drying efficiency and shorten drying times. Use the
minimum recommended installation clearances (found in your
Installation Instructions) to avoid blocking the flow of combustion
and ventilation air. Refer to your Installation Instructions for more
information.
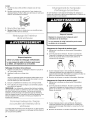
Fire Hazard
Use a heavy metal vent.
Do not use a plastic vent.
Do not use a metal foil vent.
Failure to follow these instructions can result in
death or fire.
3.
The exhaust vent can be routed up, down, left, right, or
straight out the back of the dryer. Space requirements are
listed in your Installation Instructions.
4. Use the straightest path possible when routing the exhaust
vent. Use the fewest number of elbows and turns. Allow
room when using elbows or making turns. Bend vent
gradually to avoid kinking.
bet!__
5. Use duct tape to seal all joints. Do not use screws to secure
vent. Lint may catch on screws.
If the dryer is not properly installed and vented, it will not be
covered under the warranty.
NOTE: Service calls caused by improper venting will be paid for
by the customer, whether it was a paid installation or self-
installed.
1. Do not use plastic vent or metal foil vent. Use 4 in. (10.2 cm)
metal or flexible metal vent. Do not kink or crush flexible
metal vent. It must be completely extended to allow adequate
exhaust air to flow. Check vent after installation. Refer to your
Installation Instructions for proper length requirements of
vent.
(10 2 era)
2. Use a 4 in. (10.2 cm) exhaust hood. Smaller hoods increase
drying times.
(10.2 cm)
6.
Clean exhaust vent periodically, depending on use, but at
least every 2 years, or when installing your dryer in a new
location.
• Disconnect vent from the dryer and clean one section at a
time until you reach the exhaust hood.
• To clean out lint, use the hose attachment on your
vacuum, or a pole or wire with a feather duster or rag
attached.
• Be sure the flapper on the outside end of vent moves
freely.
• When cleaning is complete, be sure to follow the
Installation Instructions supplied with your dryer for final
product check.

DRYERUSE
Explosion Hazard
Keep flammable materials and vapors, such as
gasoline, away from dryer.
Do not dry anything that has ever had anything
flammable on it (even after washing).
Failure to follow these instructions can result in
death, explosion, or fire.
Fire Hazard
No washer can completely remove oil.
Do not dry anything that has ever had any type of
oil on it (including cooking oils).
Items containing foam, rubber, or plastic must be
dried on a clothesline or by using an Air Cycle.
Failure to follow these instructions can result in
death or fire.
Before using your dryer, wipe the dryer drum with a damp cloth to
remove dust from storing and shipping.
1. Load clothes loosely into the dryer and close the door. Do not
pack the dryer. Allow space for clothes to tumble freely.
i
2.
Turn the Cycle Control knob to the recommended cycle for
the type of load being dried. Use the Energy Preferred
Automatic Setting (,) to dry most heavyweight and medium
weight loads. See "Drying, Cycle, and Temperature Tips."
3.
4.
5.
6.
Select a temperature setting on models with a Temp/Fabric
selector. The cycle descriptions include temperature setting
suggestions.
NOTE: The temperature selector is part of the Cycle Contol
knob on some models.
Select the End of Cycle Signal, if available. The signal is
helpful when drying permanent press or synthetics. Promptly
remove these items from the dryer at the end of the cycle to
prevent wrinkles.
On some models
• The End of Cycle Signal can be adjusted. Turn the
selector to the desired volume.
OR
• The End of Cycle Signal is part of the START button. Turn
the START button to ON or OFR
Select the desired option. See "Additional Features."
Push the START button.
,: topp r i and :t
You can stop your dryer any time during a cycle.
To stop your dryer
Open the dryer door or turn the Cycle Control knob to OFF.
NOTE: The Cycle Control knob should point to an Off area when
the dryer is not in use.
To restart your dryer
1. Close the door.
2. Select a new cycle and temperature (if desired).
3. Push START.
Load clothes loosely into the dryer. Do not pack the dryek Allow
space for clethes to tumble freely. The following chart shows
examples ef balanced loads that would allow for proper tumbling.
Heavy work 3 pair of pants, 4 pair of jeans, 2 pair of
clothes overalls, 3 shirts
Delicates 3 camisoles, 1 robe, 4 slips,
6 undergarments, 2 sets of sleepwear,
1 child's outfit
Towels 10 bath towels, 10 hand towels, 14 wash
cloths, 1 bath mat
Mixed Load 3 double sheets, 4 pillowcases,
8 T-shirts, 6 pair of shorts, 2 blouses,
8 handkerchiefs

Selectthecorrectcycleandtemperatureforyourload.
CoolDowntumblestheloadwithoutheatduringthelastfew
minutesofallcyclestomaketheloadeasiertohandle.
Drying tips
• Follow care label directions when they are available.
• If you use fabric softener sheets, use only those labeled
"dryer safe." Follow package instructions.
• Remove the load from the dryer as soon as tumbling stops, to
reduce wrinkling. This is especially important for permanent
press, knits, and synthetic fabrics.
Cycle and temperature tips
• Dry most loads using the Energy Preferred Automatic
Setting (.), if available on your dryer.
• Use a High Heat setting for drying heavyweight items such as
towels and work clothes.
• Use a Medium Heat setting for drying medium weight items,
such as sheets, underwear, permanent press fabrics, and
some knits.
• Use a Low Heat setting for drying lightweight items such as
lingerie, blouses, dresses, and some knits.
• Use a no-heat (air) setting for rubber, plastic, or heat-sensitive
fabrics.
• Line dry bonded or laminated fabrics.
NOTE: If you have questions about drying temperatures for
various loads, refer to the care label directions. If you are unsure
of the temperature to select for a load, select a lower setting
rather than a higher setting.
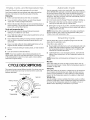
CYCLE DESCRIPTIONS
This manual covers several different models. Your dryer may vary
from the model shown and may not have all of the cycles and
features described.
Cycle Control knob
MAX
OFF DRY 70
60
THMED DRY
WRmNKLE PREVENT
OOOLDOWN
LESS
DRY
AUTO SENSE
DRY
DRY
_ENERGYPREFERRED
OFF
WRNNKLE FREE
O00LDOWN
OFF
lO
NO HEAT/FLUFF
Use the automatic cycle to dry most loads. Your dryer uses the
AUTO SENSE DRY automatic control that senses the moisture in
the load and shuts off the dryer when the selected dryness is
reached. The Cycle Control knob does not move until the load is
almost dry. After the cool down, the knob automatically turns to
an Off area and tumbling stops.
Dry most loads using the Energy Preferred Automatic Setting (,).
• If the load is drier than you like, select a setting closer to
Less Dry the next time you dry a similar load.
• If the load is not as dry as you like, complete drying using the
Timed Dry cycle. The next time you dry a similar load, select a
setting closer to Very Dry.
NOTE: Drying time with an automatic cycle varies according to
the type of fabric, size of load, and temperature setting. See
"Drying, Cycle and Temperature Tips."
Use the Timed Dry cycle to complete drying if items are still
damp after the automatic cycle.
Timed Dry is also useful for:
• Heavyweight and bulky items, such as bedspreads and work
clothes and large loads that require a long drying time. Set
the Temperature selector to High heat or to a setting that
matches the care label directions.
• Lightweight items, such as lingerie, blouses, and knits that
require a short drying time. Set the Temperature selector at
Low heat.
NOTE: Drying time and temperature will depend on your dryer
model.
Max Dry
Select this setting to evenly dry large or heavy items, such as
thick cotton bath towels or robes. Set the Temperature selector, if
available, to High heat.
Damp Dry
Select this setting to dry items to a damp level or dry items that
do not require an entire drying cycle. Damp dry items such as
jeans (to prevent stiffness) or cotton clothes (to make pressing
easier). Set the Temperature selector, if available, to High heat.
Wrinkle Free
Use this setting to remove wrinkles from items, such as clothes
packed in a suitcase or items wrinkled from being left in the dryer
too long. Set the Temperature selector, if available, at Low or
Medium heat, depending on the fabrics in your load.

UsetheNoHeat/Fluffcycleforitemsthatrequiredryingwithout
heat,suchasrubber,plasticandheat-sensitivefabrics.Seethe
chartforexamplesofitemsthatcanbedriedusingtheNoHeat/
Fluffcycle.
Type of Load No Heat/Fluff
cycle*
Foam rubber - pillows, padded bras,
stuffed toys 20 - 30
Plastic - shower curtains, tablecloths 20 - 30
Rubber-backed rugs 40 - 50
Olefin, polypropylene, sheer nylon 10 - 20
*(Minutes). Reset cycle to complete drying, if needed.
When using No Heat/Fluff
• Check to see that coverings are securely stitched.
• Shake and fluff pillows by hand periodically during cycle.
• Dry item completely. Foam rubber pillows are slow to dry.
£ddto a eatutes
WRINKLE PREVENT TM feature
When you are unable to remove a load of clothes from the dryer
as soon as it stops, wrinkles can form. The WRINKLE PREVENT
feature periodically tumbles, rearranges and fluffs the load
without heat for up to 45 minutes. During this cycle, the dryer
stops tumbling and then begins to tumble again. This stop and
start process is repeated until the end of the cycle. A signal will
sound periodically when the WRINKLE PREVENT feature is on, if
the End of Cycle Signal is selected. The signal and the tumbling
will end when you open the dryer door, or turn the Cycle Control
knob to Off.
• On some models, the WRINKLE PREVENT feature is
automatic and activates at the end of the cycle if you do not
open the dryer door within a few minutes after the cycle ends.
• On some models, you can turn the WRINKLE PREVENT
feature On or Off.
End of Cycle Signal
If the End of Cycle Signal is On, the signal sounds when a cycle is
complete. Ifthe WRINKLE PREVENTfeature is on, the signal sounds
every few minutes. The signal stops when you open the door.
END OF CYCLE SIGNAL
PUSH TO STARr
You can order a drying rack by calling 1-800-447-6737 (U.S.A.) or
1-800-807-6777 (Canada) or by contacting the dealer from whom
you purchased your dryer. The rack is useful for machine drying
items you would not necessarily want to tumble dry or that you
would normally line dry (for example, tennis shoes, pillows,
stuffed toys).
To use the drying rack
1. Slide rear pegs into the dimples on the back wall of the dryer.
Lower the front legs to rest on the dryer opening.
2. Put the wet items on top of the rack. Leave space between
the items so air can reach all the surfaces. Close the door.
NOTE: Do not allow items to hang over the edge of the rack.
3. Select the Timed Dry or No Heat/Fluff cycle. Items containing
foam, rubber, or plastic must be dried on a clothesline or by
using an air cycle.
4. Push the START button.
NOTE: You must remove rack for normal tumbling. Do not use
the automatic cycle with the drying rack.
This chart shows examples of items that can be rack dried and
the suggested cycle, temperature setting and drying time. Actual
drying time will depend on the amount of moisture items hold.
Rack Dry Cycle Temp Time*
Wool Sweaters Timed Low 60
Block to shape and lay flat on Dry
the rack
Stuffed toys or pillows Timed Low 60
Cotton or polyester fiber filled Dry
Stuffed toys or pillows No None 90
Foam rubber filled Heat/
Fluff
Sneakers or canvas shoes No None 90
Heat/
Fluff
*(Minutes). Reset cycle to complete drying, if needed.

DRYER CARE
Every load cleaning
The lint screen is located on the top of the dryen Clean it before
each load. A screen blocked by lint can increase drying time.
To clean
1. Pull the lint screen towards you. Roll lint off the screen with
your fingers. Do not rinse or wash screen to remove lint. Wet
lint is hard to remove.
2. Push the lint screen firmly back into place.
IMPORTANT:
• Do not run the dryer with the lint screen loose, damaged,
blocked, or missing. Doing so can cause overheating and
damage to both the dryer and fabrics.
• Some towels made of synthetic fibers and natural fibers
(polyester and cotton blends) may shed more lint than other
towels, causing your dryer's lint screen to fill up faster. Be
sure to remove lint from the lint screen before and after drying
new towels.
If lint falls off the screen into the dryer during removal, check
the exhaust hood and remove the lint. See "Checking Your
Vent."
As needed cleaning
Laundry detergent and fabric softener residue can build up on the
lint screen. This buildup can cause longer drying times for your
clothes, or cause the dryer to stop before your load is completely
dry. The screen is probably clogged if lint falls off the screen.
Clean the lint screen with a nylon brush every six months, or
more frequently if it becomes clogged due to a residue buildup.
To wash
1. Wet both sides of lint screen with hot water.
2. Wet a nylon brush with hot water and liquid detergent. Scrub
lint screen with the brush to remove residue buildup.
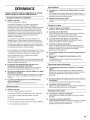
Explosion Hazard
Use nonflammable cleaner.
Failure to do so can result in death, explosion,
or fire.
To clean dryer drum
1. Make a paste with powdered laundry detergent and very
warm water.
2. Apply paste to a soft cloth.
OR
Apply a liquid, non-flammable household cleaner to the
stained area and rub with a soft cloth until all excess dye is
removed.
3. Wipe drum thoroughly with a damp cloth.
4. Tumble a load of clean cloths or towels to dry drum.
NOTE: Garments which contain unstable dyes, such as denim
blue jeans or brightly colored cotton items, may discolor the
dryer interior. These stains are not harmful to your dryer and will
not stain future loads of clothes. Dry unstable dye items inside-
out to prevent dye transfer.
Lint should be removed every two years, or more often,
depending on dryer usage. Cleaning should be done by a
qualified person.
3. Rinse screen with hot water.
4. Thoroughly dry lint screen with a clean towel. Insert lint
screen back into dryer.
10

The dryer light automatically turns on inside the dryer drum when
you open the door.
Fire Hazard
Replace light bulb cover before operating dryer.
Failure to do so can result in death or fire.
To change drum light type 1
1. Unplug dryer or disconnect power.
2. Open the dryer door. Locate the light bulb cover on the back
wall of the dryer. Turn the cover clockwise. Remove cover
from dryer.
3. Turn bulb counterclockwise. Replace the bulb with a 40-watt
appliance bulb only. Replace the cover and lock in place by
turning counterclockwise.
4. Plug in dryer or reconnect power.
To change drum light type 2
1. Unplug dryer or disconnect power.
2. Open the dryer door. Locate the light bulb cover on the back
wall of the dryer. Remove the screw located in the lower right
corner of the cover. Remove the cover.
3. Turn bulb counterclockwise. Replace the bulb with a 10-watt
appliance bulb only. Replace the cover.
4. Plug in dryer or reconnect power.
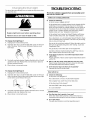
TROUBLESHOOTING
Firsttry the solutions suggested hers and possibly avoid
the cost of a service call...
Clothes are not drying satisfactorily
• Checkthe following:
Is the lint screen clogged with lint?
Is the exhaust vent or outside exhaust hood clogged with lint,
restricting air movement? Run the dryer for 5-10 minutes.
Hold your hand under the outside exhaust hood to check air
movement. If you do not feel air movement, clean exhaust
system of lint or replace exhaust vent with heavy metal or
flexible metal vent. See "Installation Instructions."
Is the exhaust vent crushed or kinked? Replace with heavy
metal or flexible metal vent. See "Installation Instructions."
Has a fuse blown, or a circuit breaker tripped? Electric dryers
use 2 household fuses or breakers. The drum may be turning,
but you may not have heat.
Has an air dry cycle been selected? Select the right cycle for
the types of garments being dried. See "Drying, Cycle and
Temperature Tips."
For gas dryers, is the valve open on the supply line?
Are fabric softener sheets blocking the grill? Use only one
fabric softener sheet, and use it only once.
Is the dryer located in a room with temperature below
45°F (7°C)?
Proper operation of dryer cycles requires temperatures above
45°F (7°C).
Was a cold rinse water used? Was the load very wet?
Expect longer drying times with items rinsed in cold water
and with items that hold moisture (cottons).
Is the load too large and heavy to dry quickly?
Separate the load to tumble freely.
Dryer will not run
• Checkthe following:
Is the power cord plugged in?
Has afuse blown, or has a circuit breaker tripped?
Was a regular fuse used? Use a time-delay fuse.
Is the dryer door firmly closed?
Was the START button firmly pressed?
Is a cycle selected?
Unusual sounds
• Has the dryer had a period of non-use?
If the dryer hasn't been used for a while, there may be a
thumping sound during the first few minutes of operation.
• Is it a gas dryer?
The gas valve clicking is a normal operating sound.
11

Lint on load
• Is the lint screen clogged?
Clean lint screen. Check for air movement.
Is the load properly sorted?
Sort lint givers (towels, chenille) from lint takers (corduroy,
synthetics). Also sort by color.
Is the load too big or too heavy?
Dry smaller loads so lint can be carried to the lint screen.
Was the load overdried?
Use correct dryer settings for load type. Overdrying can
cause lint-attracting static electricity. See "Drying, Cycle, and
Temperature Tips."
Was paper or tissue left in pockets?
Is pilling being mistaken for lint?
Pilling (surface fuzz) is caused by normal wear and
laundering.
Stains on load or color change
Was dryer fabric softener properly used?
Add dryer fabric softener sheets at the beginning of the cycle.
Fabric softener sheets added to a partially-dried load can
stain your garments.
Were items soiled when placed in the dryer?
Items should be clean before being dried.
Were items properly sorted?
Sort light colors from dark colors. Sort colorfast items from
noncolorfast items.
Items shrinking
• Was thedryer overloaded?
Dry smaller loads that will tumble freely.
• Did the load overdry?
Check the manufacturer's care label. Match dryer setting to
load type. See "Drying, Cycle, and Temperature Tips."
Loads are wrinkled
• Was the load removed from dryer at the end of the cycle?
• Was thedryer overloaded?
Dry smaller loads that will tumble freely.
• Did the load overdry?
Check the manufacturer's care label. Match dryer setting to
load type. See "Drying, Cycle, and Temperature Tips."
Odors
• Have you recently been painting, staining or varnishing in
the area where your dryer is located?
If so, ventilate the area. When the odors or fumes are gone
from the area, re-wash and dry the clothing.
• If the dryer is electric, is it being used for the first time?
The new electric heating element may have an odor. The odor
will be gone after the first cycle.
• If the dryer is gas, there may be a gas leak.
Turn off the gas supply line, leave your house, and then call
your local gas company.
Garment damage
• Checkthe following:
Were zippers, snaps, and hooks left open?
Were strings and sashes tied to prevent tangling?
Were care label instructions followed?
Were items damaged before drying?
12

ASSISTANCE OR SERVICE
Before calling for assistance or service, please check
"Troubleshooting." It may save you the cost of a service call, If
you still need help, follow the instructions below.
When calling, please know the purchase date and the complete
model and serial number of your appliance. This information will
help us to better respond to your request.
If you need replacement parts
If you need to order replacement parts, we recommend that you
only use FSPc_factory specified parts. These parts will fit right and
work right because they are made with the same precision used
to build every new ROPER® appliance.
To locate FSP replacement parts in your area:
In the U.S.A., call the Customer Interaction Center at
1-800-447-6737, or your nearest Whirlpool designated service
center.
In Canada, call 1-800-807-6777, or your nearest Inglis Limited
designated service center.
Call the Inglis Limited Customer Interaction Center toll free:
1-800-461-5681 8:30 a.m. - 5:30 p.m. (EST)
Our consultants provide assistance with:
• Features and specifications on our full line of appliances
• Referrals to local dealers
For service in Canada
Call 1-800-807-6777. Inglis Limited designated service
technicians are trained to fulfill the product warranty and provide
after-warranty service anywhere in Canada.
For further assistance
If you need further assistance, you can write to us with any
questions or concerns at:
Customer Interaction Center
Inglis Limited
1901 Minnesota Court
Mississauga, Ontario L5N 3A7
Please include a daytime phone number in your correspondence.
Call the Customer Interaction Center toll free at
1-800-44-ROPER (1-800-447-6737).
Our consultants provide assistance with:
• Features and specifications on our full line of appliances
• Installation information
• Use and maintenance procedures
• Accessory and repair parts sales
• Specialized customer assistance (Spanish speaking, hearing
impaired, limited vision, etc.)
• Referrals to local dealers, repair parts distributors, and
service companies
Whirlpool designated service technicians are trained to fulfill the
product warranty and provide after-warranty service, anywhere in
the United States
Tolocate the Whirlpool designated service company in your area,
you can also look in your telephone directory Yellow Pages.
For further assistance
If you need further assistance, you can write to Roper with any
questions or concerns at:
Roper Brand Home Appliances
Customer Interaction Center
c/o Correspondence Dept.
MD 8020
553 Benson Road
Benton Harbor, M149022-2400
Please include a daytime phone number in your correspondence.
13

ROPER®DRYERWARRANTY
ONE-YEAR FULL WARRANTY
For one year from the date of purchase, when this dryer is operated and maintained according to instructions attached to or furnished
with the product, Whirlpool Corporation will pay for FSP®replacement parts and repair labor to correct defects in materials or
workmanship. Service must be provided by a Whirlpool designated service company.
Whirlpool Corporation will not pay for:
1. Service calls to correct the installation of your dryer, including venting. Heavy 4 in. (10.2 cm) metal exhaust vent must be used. Refer
to the venting section of this manual and your Installation Instructions.
2. Service calls to instruct you how to use your dryer, to replace house fuses or correct house wiring or reset circuit breakers, or to
replace owner accessible light bulbs.
3. Repairs when your dryer is used in other than normal, single-family household use.
4. Damage resulting from accident, alteration, misuse, abuse, fire, floods, acts of God, improper installation (including, but not limited
to, venting with plastic or flexible foil), installation not in accordance with local electrical and plumbing codes, or use of products not
approved by Whirlpool Corporation.
5. Replacement parts or repair labor costs for units operated outside the United States and Canada.
6. Pickup and delivery. This product is designed to be repaired in the home.
7. Repairs to parts or systems resulting from unauthorized modifications made to the appliance.
8. In Canada, travel or transportation expenses for customers who reside in remote areas.
WHIRLPOOL CORPORATION AND INGLIS LIMITED SHALL
NOT BE LIABLE FOR INCIDENTAL OR CONSEQUENTIAL
DAMAGES.
Some states or provinces do not allow the exclusion or limitation
of incidental or consequential damages, so this exclusion or
limitation may not apply to you. This warranty gives you specific
legal rights and you may also have other rights which vary from
state to state or province to province.
Outside the 50 United States and Canada, this warranty does
not apply. Contact your authorized Roper dealer to determine
if another warranty applies.
If you need service, first see "Troubleshooting." Additional help
can be found by checking "Assistance or Service," or by calling
our Customer Interaction Center at 1-800-447-6737, from
anywhere in the U.S.A. or write: Roper Brand Home Appliances,
Customer Interaction Center, c/o Correspondence Dept., MD
8020, 553 Benson Road, Benton Harbor, M149022-2400. For
service in Canada, call Inglis Limited at 1-800-807-6777.
9/00
Keep this book and your sales slip together for future
reference. You must provide proof of purchase or installation
date for in-warranty service.
Write down the following information about your dryer to better
help you obtain assistance or service if you ever need it. You will
need to know your complete model number and serial number.
You can find this information on the model and serial number
label/plate, located on your appliance as shown in "Parts and
Features."
Dealer name
Address
Phone number
Model number
Serial number
Purchase date
14


SECURIE DE LA SECHEUSE
Votre s6curite et celle des autres est tres importante.
Nous donnons de nombreux messages de s6curite importants dans ce manuel et sur votre appareil menager.
Assurez-vous de toujours lire tousles messages de securite et de vous y conformer.
_ oici le symbole d'alerte de securit&
Ce symbole d'alerte de securite vous signale les dangers potentiels de deces et de blessures graves
vous eta d'autres.
Tousles messages de securite suivront le symbole d'alerte de securite et le mot "DANGER" ou
"AVERTISSEMENT". Ces mots signifient "
Risque possible de decks ou de blessure grave si
vous ne suivez pas immediatement les instructions.
Risque possible de decks ou de blessure grave
si vous ne suivez pas les instructions.
Tousles messages de securite vous diront quel est le danger potentiel et vous disent comment reduire le risque de
blessure et ce qui peut se produire en cas de non-respect des instructions.
AVERTISSEMENT : Pour votre s6curit6, les renseignements dans ce manuel doivent
_tre observes pour reduire au minimum les risques d'incendie ou d'explosion ou pour
eviter des dommages au produit, des blessures ou un d6c_s.
- Ne pas entreposer ou utiliser de I'essence ou d'autres vapeurs ou liquides
inflammables & proximite de cet appareil ou de tout autre appareil electromenager.
- QUE FAIRE DANS LE CAS D'UNE ODEUR DE GAZ :
• Ne pas tenter d'allumer un appareil.
• Ne pas toucher & un commutateur 61ectrique; ne pas utiliser le telephone se trouvant
sur les lieux.
• Evacuer tousles gens de la piece, de I'edifice ou du quartier.
• Appeler immediatement le fournisseur de gaz d'un telephone voisin. Suivre ses
instructions.
• A d6faut de joindre votre fournisseur de gaz, appeler les pompiers.
- L'installation et I'entretien doivent _tre effectues par un installateur qualifi6, une
agence de service ou le fournisseur de gaz.
16

IMPORTANTES INSTRUCTIONS DE SI CURITI
AVERTISSEMENT : Pour r6duire le risque d'incendie, de choc 61ectrique ou de blessure Iors de I'utilisation
de la s6cheuse, il convient d'observer certaines pr6cautions 616mentaires dont les suivantes :
• Lire toutes les instructions avant d'utiliser la
s6cheuse.
• Ne pas placer des articles expos6s aux huiles de
cuisson dans votre s6cheuse. Les articles
contamin6s par des huiles de cuisson peuvent
contribuer & une r6action chimique qui pourrait
causer & la charge de s'enflammer.
• Ne pas faire s6cher dans la machine des articles qui
ont d6j& 6t6 nettoy6s, lav6s, imbib6s, ou tach6s
d'essence, de solvants pour nettoyage & sec,
d'autres substances inflammables, ou de substances
explosives puisqu'elles d6gagent des vapeurs qui
peuvent provoquer un incendie ou une explosion.
• Ne pas permettre & des enfants de jouer sur ou
I'int6rieur de la s6cheuse. Une surveillance 6troite
est n6cessaire Iorsque la s6cheuse est utilis6e pros
d'eux.
Avant d'enlever la s6cheuse du service ou la jeter,
enlever la porte du compartiment de s6chage.
Ne pas mettre la main dans la s6cheuse si le tambour
est en mouvement.
Ne pas installer ni entreposer la s6cheuse oQ elle sera
expos6e aux intemp6ries.
Ne pas jouer avec les commandes.
• Ne pas r6parer ni remplacer une pi6ce de la s6cheuse
ou essayer d'en faire I'entretien & moins d'une
recommandation sp6cifique dans le guide d'utlilisation
et d'entretien, ou publi6e dans les instructions de
r6paration par I'utilisateur que vous comprenez et
pouvez ex6cuter avec comp6tence.
• Ne pas utiliser un produit assouplissant de tissu ou
des produits pour 61iminer la statique & moins qu'ils
ne soient recommand6s par le fabricant du produit
assouplissant de tissu ou du produit.
• Ne pas utiliser la chaleur pour faire s6cher des articles
fabriqu6s avec du caoutchouc mousse ou des
mat6riaux semblables.
• Nettoyer le filtre & charpie avant et apr_s chaque
charge.
• Ne pas laisser la charpie, la poussi_re, ou la salet6
s'accumuler autour du syst_me d'6vacuation ou
autour de I'appareil.
• Un nettoyage p6riodique de I'int6rieur de la s6cheuse
et du conduit d'6vacuation doit 6tre effectu6 par une
personne qualifi6e.
• Voir les instructions d'installation pour les exigences
de liaison de I'appareil & la terre.
CONSERVEZ CES INSTRUCTIONS
17

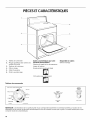
PIECESEl CARACTERISTIOUES
2
1. Tableau de commande
2. Plaque signaletique des numeros de
modele et de serie
3. Tambour de la secheuse
4. Filtre & charpie
5. Grille d'evacuation
6. Porte a ouverture large
Autres caract_ristiques que votre
s_cheuse peut poss_der
Selecteur de signal de fin de programme
Lampe du tambour
Grande porte a pivotement lateral
Porte extra-large a pivotement
Disponsible en option
Grille de sechage
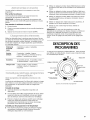
Tableau de commande
HEAVY DUTY SUPER CAPACrP_" PLUSi
M_
OFF DRY 70 TIMED DRy
WRINKLE PREVENT MEDIUM
TEMPERATURE
FABRIC
TEMP
O
REMARQUE : Les illustrations de ce guide peuvent ne pas correspondre exactement & la secheuse achetee. La fonction de ces
illlustrations est de montrer les diverses caracteristiques de tousles modeles couverts par ce guide. Le modele achete peut ne pas
comporter toutes les caracteristiques.
18

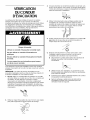
VERIFICATION
DU CONDUIT
D'EVACUATION
La secheuse doit _tre bien installee et munie d'un systeme
adequat d'evacuation de I'air pour donner une efficacite
maximale de sechage et un temps de sechage plus court. Utiliser
les degagements minimums recommandes pour I'installation
(voir Instructions d'installation) pour eviter le blocage du debit de
combustion et d'air de ventilation. Voir les instructions
d'installation pour plus de renseignements.
Risque d'incendie
Utiliser un conduit d'_vacuation en m_tal Iourd.
Ne pas utiliser un conduit d'_vacuation en
plastique.
Ne pas utiliser un conduit d'_vacuation en feuille
de m_tal.
Le non-respect de ces instructions peut causer
un d_c_s ou un incendie.
Si la secheuse n'est pas bien installee et munie d'un systeme
adequat d'evacuation de I'air, elle n'est pas couverte en vertu de
la garantie.
REMARQUI= : Les visites de service necessitees par une
evacuation inadequate seront aux frais du client peu importe s'il
a fait faire I'installation ou s'il I'a faite lui-mdme.
1. Ne pas utiliser un conduit flexible en plastique ou en feuille
de metal. Utiliser un conduit de 4 po (10,2 cm) en metal Iourd
ou flexible. Ne pas deformer ni ecraser le conduit
d'evacuation en metal flexible. II doit _tre completement
deploye pour permettre I'evacuation adequate de I'air. Verifier
le systeme d'evacuation apres I'installation. Se referer aux
instructions d'installation pour la bonne Iongueur du conduit
d'evacuation.
(10 2 cm)
3=
On peut acheminer le conduit d'evacuation vers le haut, vers
le bas, vers la gauche, vers la droite, ou en ligne droite depuis
I'arriere de la secheuse. L'espace de degagement est indique
dans les instructions d'installation.
4. Utiliser I'acheminement le plus rectiligne possible Iors de
I'installation du conduit d'evacuation. Utiliser le moins
possible de coudes et de virages. Accorder de I'espace Iors
de I'utilisation de coudes ou de virages. Plier le conduit
graduellement pour eviter de le deformer.
rneilleur J
5. Sceller chaque joint avec du ruban adhesif pour conduits. Ne
pas utiliser de vis pour fixer le conduit d'evacuation. La
charpie risque de s'accrocher aux vis.
6. Nettoyer periodiquement le conduit d'evacuation, selon
I'utilisation, mais au moins a tousles 2 ans ou Iors de
I'installation de la secheuse a un nouvel endroit.
• Deconnecter le conduit d'evacuation de la s_cheuse et
nettoyer une section a la fois jusqu'au clapet
d'evacuation.
Utiliser le tuyau d'un aspirateur, ou un manche (ou une
broche) auquel vous aurez fixe un chiffon ou un plumeau,
pour enlever la charpie.
S'assurer que le clapet a I'extremite exterieure du conduit
d'evacuation fonctionne librement.
Apres le nettoyage, veuillez suivre les instructions
d'installation fournies avec la secheuse pour une
verification finale de I'appareil.
2.
Utiliser un clapet d'evacuation de 4 po (10,2 cm). Les clapets
plus petits augmentent la duree requise de sechage.
(10.2 cm)
19

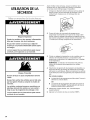
UTILISATIONDE LA
SECHEUSE
Risque d'explosion
Garder les mati_res et les vapeurs inflammables,
telle que I'essence, loin de la s_cheuse.
Ne pas faire s_cher un article qui a d_j_ _t_
touch_ par un produit inflammable (m_me apr_s
un lavage).
Le non-respectde ces instructionspeut causer
un d_c_s,une explosionou un incendie.
Risque d'incendie
Aucune laveuse ne peut compl_tement enlever
I'huile.
Ne pas faire secher des articles qui ont _t_ sails
par tout genre d'huile (y compris les huiles de
cuisson).
Les articles contenant mousse, caoutchouc ou
plastique doivent (_tre s_ch_s sur une corde
linge ou par le programme de s_chage & Fair.
Le non-respect de ces instructions peut causer
un d_c_s ou un incendie.
Avant d'utiliser votre secheuse, essuyer le tambour de la
secheuse avec un linge humide pour enlever la poussiere
accumulee durant I'entreposage et I'expedition.
1. Charger les v_tements dans la s_cheuse sans les tasser et
fermer la porte. Ne pas surcharger la secheuse. Prevoir
suffisamment d'espace pour un culbutage libre des
v_tements.
2.
Tourner le bouton de commande de programme au
programme recommande pour le type de la charge a faire
secher. Utiliser le reglage automatique econergique (,) pour
faire secher la plupart des charges Iourdes et moyennes. Voir
"Conseils pour sechage, programmes et temperature".
3.
4,
5,
6.
Choisir un reglage de temp@ature sur les modeles avec un
selecteur de temperature/tissus. Les descriptions des
programmes comprennent des suggestions pour le reglage
de la temperature.
REMARQUE : Le selecteur de temperature fait pattie du
bouton de commande des programmes sur certains
modeles.
Selectionner le signal de fin de programme si disponible. Le
signal est utile Iors du sechage de v@ements de pressage
permanent ou synthetiques. Retirer promptement ces articles
de la secheuse a la fin du programme pour emp_cher les faux
plis.
Sur certains modules
• Le signal de fin de programme peut _tre ajuste. Tourner le
selecteur au volume desire.
OU
• Le signal de fin de programme fait partie du bouton de
mise en marche (START). Tourner le bouton de mise en
marche a marche (ON) ou arr_t (OFF).
Selectionner I'option desiree. Voir "Caracteristiques
supplementaires".
Appuyer sur le bouton de mise en marche (START).
20
La page est en cours de chargement...
La page est en cours de chargement...
La page est en cours de chargement...
La page est en cours de chargement...
La page est en cours de chargement...
La page est en cours de chargement...
La page est en cours de chargement...
La page est en cours de chargement...
-
 1
1
-
 2
2
-
 3
3
-
 4
4
-
 5
5
-
 6
6
-
 7
7
-
 8
8
-
 9
9
-
 10
10
-
 11
11
-
 12
12
-
 13
13
-
 14
14
-
 15
15
-
 16
16
-
 17
17
-
 18
18
-
 19
19
-
 20
20
-
 21
21
-
 22
22
-
 23
23
-
 24
24
-
 25
25
-
 26
26
-
 27
27
-
 28
28


Roper YREX4634KQ1 Le manuel du propriétaire
- Catégorie
- Sèche-linge électriques
- Taper
- Le manuel du propriétaire
- Ce manuel convient également à
dans d''autres langues
- English: Roper YREX4634KQ1 Owner's manual
Documents connexes
Autres documents
-
Inglis IS72000 Le manuel du propriétaire
-
Inglis IV87000 Le manuel du propriétaire
-
Whirlpool 3XKER5437 Manuel utilisateur
-
-
Whirlpool 3XWED5705SW0 Manuel utilisateur
-
-
Crosley CEDS663SB0 Le manuel du propriétaire
-
-
-