Toro Lower Shroud Replacement Kit, 2002 and After CCR2450 and CCR3650 Snowthrowers Guide d'installation
- Catégorie
- Kits de voiture
- Taper
- Guide d'installation

2005—The Toro Company
8111 Lyndale Ave., Bloomington, MN 55420, USA
Printed in the USA
All Rights Reserved
Original Instructions (EN)
Register your product at www.Toro.com
Lower Shroud Replacement Kit
2002–2005 CCRt 2450 and 3650 GTS
North American Snowthrowers
Part No. 108-7338
Form No. 3353-673 Rev B
Installation Instructions
Contents of the Kit
DESCRIPTION QUANTITY
Lower shroud 1
Heat shield cover 1
Choke shield 1
Rubber spring cover 1
Spring 1
Cable 1
Cable adjuster 1
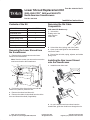
Removing the Lower Shroud from
the Snowthrower
1. Remove the 2 screws that secure the lower
shroud to the snowthrower.
Note: Save the screws you removed to secure the
new lower shroud to the snowthrower.
A
2. Pull the top of the shroud to the rear until the
choke lever (A above) clears the slot.
3. Remove the shroud and discard it.
4. Remove the rubber choke shield from the choke
lever and discard the shield (if applicable).
Removing the Old Cable
Components
CCR 3650 GTS Models only
1. Unhook the
Z-fitting end of the
cable from the
control bar.
2. Unhook the other (spring) end of the cable.
3. Open up the cable guide on the handle and
remove the cable.
4. Discard the old cable, spring, adjuster, and rubber
spring cover.
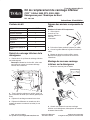
Installing the New Lower Shroud
onto the Snowthrower
1. Install the new choke seal.
1.
2.
2. As you install the new lower shroud onto the
snowthrower, guide the choke lever through the slot.

2
3. Secure the new lower shroud with the 2 screws
you previously removed.
Note: Ensure that the lip of the new lower shroud
(A) rests on top of cross tube (B) of the
snowthrower.
A
B
Installing the New Cable
Components
CCR 3650 GTS Models only
1. Install the Z-fitting end of the new cable in the
hole where you removed the spring (at the bottom of
the snowthrower) in step 2 of Removing the Old
Cable Components.
2. Insert the cable into the cable guide and install
the cable guide.
3. Attach the new adjuster to the cable.
Note: Insert the Z-fitting into the third hole from
the lower end of the adjuster.
4. Attach the new spring to the end of the adjuster.
5. Adjust the cable according to the instructions in
the Operator’s Manual.
6. Install the rubber cover over the new spring and
adjuster.
7. Hook the cable spring into the bottom hole of the
control bar.
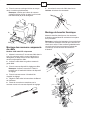
Installing the Heat Shield Cover
Install the heat shield cover over the vent openings as
shown and carefully snap the cover into place.
Note: Insert the tabs of the cover into the vent
openings so that the cover is up and back, then
gradually slide the cover down and forward as you
insert the hooks (B) on the cover into the vent
openings.
1.
2.
3.
A
B
B

2005 – The Toro Company
8111 Lyndale Ave., Bloomington, MN 55420, États-Unis
Imprimé aux États-Unis
Tous droits réservés
Enregistrez votre produit sur www.Toro.com
Traduction de l’original (FR)
Kit de remplacement de carénage inférieur
CCRt 2450 et 3650 GTS, 2002–2005
Déneigeuses pour l’Amérique du Nord
Réf. 108-7338
Form No. 3353-673 Rév. B
Instructions d’installation
Contenu du kit
DESCRIPTION QUANTITÉ
Carénage inférieur 1
Bouclier thermique 1
Déflecteur de starter 1
Couvercle de ressort en
caoutchouc
1
Ressort 1
Câble 1
Dispositif de réglage du
câble
1
Retrait du carénage inférieur de la
déneigeuse
1. Retirez les 2 vis qui fixent le carénage inférieur
sur la déneigeuse.
Remarque : Mettez les vis de côté ; elles vous
serviront pour monter le nouveau carénage
inférieur sur la machine.
A
2. Tirez le haut du carénage en arrière jusqu’à ce
que la manette de starter (A ci-dessus) passe par la
fente.
3. Déposez le carénage et mettez-le au rebut.
4. Déposez le déflecteur en caoutchouc de la
manette de starter et mettez-le au rebut (le cas
échéant).
Dépose des anciens composants du
câble
Modèles CCR 3650 GTS uniquement
1. Décrochez le
raccord en Z au
bout du câble de la
barre de
commande.
2. Décrochez l’autre extrémité (ressort) du câble.
3. Ouvrez le guide-câble sur le guidon et retirez le
câble.
4. Mettez au rebut les anciens câble, ressort,
dispositif de réglage et couvercle de ressort en
caoutchouc.
Montage du nouveau carénage
inférieur sur la déneigeuse
1. Montez le nouveau joint de starter.
1.
2.
2. Quand vous montez le nouveau carénage
inférieur sur la déneigeuse, faites passer la manette
de starter dans la fente.

4
3. Fixez le nouveau carénage inférieur au moyen
des 2 vis retirées précédemment.
Remarque : Vérifiez que la lèvre du nouveau
carénage inférieur (A) est en appui sur le haut du
tube transversal (B) de la déneigeuse.
A
B
Montage des nouveaux composants
du câble
Modèles CCR 3650 GTS uniquement
1. Montez le raccord en Z du nouveau câble dans le
trou d’où vous avez retiré le ressort (au bas de la
déneigeuse) à l’étape 2 de la section Dépose des
anciens composants du câble.
2. Insérez le câble dans son guide et montez le
guide-câble.
3. Fixez le nouveau dispositif de réglage au câble.
Remarque : Insérez le raccord en Z dans le
troisième trou à l’extrémité inférieure du dispositif
de réglage.
4. Fixez le nouveau ressort à l’extrémité du
dispositif de réglage.
5. Réglez le câble selon les instructions du Manuel
de l’utilisateur.
6. Placez le couvercle en caoutchouc sur le
nouveau ressort et le nouveau dispositif de réglage.
7. Accrochez le ressort de câble dans le trou
inférieur de la barre de commande.
Montage du bouclier thermique
Montez le bouclier thermique sur les ouvertures
d’aération comme illustré et enclenchez-le en place
avec précaution.
Remarque : Insérez les languettes du couvercle dans
les ouvertures d’aération de sorte que le bouclier est
relevé et en arrière. Faites coulisser graduellement le
couvercle vers le bas et en avant en insérant les
crochets (B) du bouclier dans les ouvertures
d’aération.
1.
2.
3.
A
B
B
-
 1
1
-
 2
2
-
 3
3
-
 4
4


Toro Lower Shroud Replacement Kit, 2002 and After CCR2450 and CCR3650 Snowthrowers Guide d'installation
- Catégorie
- Kits de voiture
- Taper
- Guide d'installation
dans d''autres langues
Documents connexes
-
Toro Replacement Shroud Kit, 2002 and After CCR 2450 and 3650 North American Snowthrower Guide d'installation
-
-
-
-
-
-
-
-