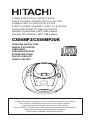
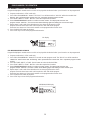
Hitachi CX86MP3 Operating Instructions Manual
- Catégorie
- Lecteur CD
- Taper
- Operating Instructions Manual
Ce manuel convient également à

CX86MP3/CX86MP3UK
Before operating please read these instructions thoroughly.
Avant de faire fonctionner l'appareil, lisez bien toutes les instructions de ce manuel.
Deze intructies aandachtig doorlezen alvorens het toestel te gebuiken.
Leggere attentamente le istruzioni prima di usare l'apparecchio.
Lesen Sie bitte vor Inbetriebsnahme diese Gebrauchsanweisung aufmerksam durch.
3ĜHGSRX]LWtPVLSURVtPSHþOLYHSURVWXGXMWHW\WRSRN\Q\
3UHGSRX]LWtPVLG{NODGRQHSUHþLWDMWHWLHWRSRN\Q\
Portable Radio/CD Player with MP3 & USB
Radio/CD portable compatible MP3 avec port USB
Draagbare radio CD speler met MP3 & USB
Radio/CD portatile compatibile con MP3 con porta USB
Tragbarer MP3 Radio CD Player mit USB Slot
3ĜHQRVQt&'SĜHKUiYDþV0386%DUiGLHP
3UHQRVQê&'SUHKUiYDþV0386%DUiGLRP
OPERATING INSTRUCTIONS
MANUEL D'UTILISATION
HANDLEIDING
ISTRUZIONI OPERATIVE
BETRIEBSANLEITUNG
POKYNY K OBSLUZE
NÁVOD K OBSLUZE

1
SOME DOS AND DON’TS ON THE SAFE USE OF EQUIPMENT
This equipment has been designed and manufactured to meet international safety standards
but, like any electrical equipment, care must be taken if you are to obtain the best results and
safety is to be assured.
**************
DO read the operating instructions before you attempt to use the equipment.
DO ensure that all electrical connections (including the mains plug, extension leads and
inter-connections between the pieces of equipment) are properly made and in
accordance with the manufacturer’s instructions. Switch off and withdraw the mains
plug before making or changing connections.
DO consult your dealer if you are ever in doubt about the installation, operation or safety
of your equipment.
DO be careful with glass panels or doors on equipment.
DO route the mains lead so that it is not likely to be walked on, crushed, chafed, or
VXEMHFWHGWRH[FHVVLYHZHDUDQGWHDURUKHDW
**************
DON’T UHPRYHDQ\¿[HGFRYHUDVWKLVPD\H[SRVHGDQJHURXVYROWDJHV
DON’T obstruct the ventilation openings of the equipment with items such as
newspapers, tablecloths, curtains, etc. Overheating will cause damage and
shorten the life of the equipment.
DON’T DOORZHOHFWULFDOHTXLSPHQWWREHH[SRVHGWRGULSSLQJRUVSODVKLQJRUREMHFWV
¿OOHGZLWKOLTXLGVVXFKDVYDVHVWREHSODFHGRQWKHHTXLSPHQW
DON’T SODFHKRWREMHFWVRUQDNHGÀDPHVRXUFHVVXFKDVOLJKWHGFDQGOHVRUQLJKWOLJKWV
RQRUFORVHWRHTXLSPHQW+LJKWHPSHUDWXUHVFDQPHOWSODVWLFDQGOHDGWR¿UHV
DON’T XVHPDNHVKLIWVWDQGVDQG1(9(5¿[OHJVZLWKZRRGVFUHZVWRHQVXUH
FRPSOHWHVDIHW\DOZD\V¿WWKHPDQXIDFWXUHU¶VDSSURYHGVWDQGRUOHJVZLWKWKH
¿[LQJVSURYLGHGDFFRUGLQJWRWKHLQVWUXFWLRQV
DON’T use equipment such as personal stereos or radios so that you are distracted
IURPWKHUHTXLUHPHQWVRIWUDI¿FVDIHW\,WLVLOOHJDOWRZDWFKWHOHYLVLRQZKLOVW
driving.
DON’T listen to headphones at high volume, as such use can permanently damage your
hearing.
DON’T OHDYHHTXLSPHQWVZLWFKHGRQZKHQLWLVXQDWWHQGHGXQOHVVLWLVVSHFL¿FDOO\VWDWHG
that it is designed for unattended operation or has a stand-by mode. Switch off
using the switch on the equipment and make sure that your family know how to
GRWKLV6SHFLDODUUDQJHPHQWVPD\QHHGWREHPDGHIRULQ¿UPRUKDQGLFDSSHG
people.
DON’T continue to operate the equipment if you are in any doubt about it working
normally, or if it is damaged in any way - switch off, withdraw the mains plug and
consult your dealer.
ABOVE ALL
— NEVER let anyone especially children push anything into holes, slots or any
other opening in the case - this could result in a fatal electrical shock;
— NEVER guess or take chances with electrical equipment of any kind
— it is better to be safe than sorry!
*************

The mains lead on this equipment may be supplied with a moulded plug in-
corporating a fuse, the value of which is indicated on the pin face of the plug.
Should the fuse need to be replaced,an ASTA or BSI approved BS 1362
fuse must be used of the same rating. If the fuse cover is detachable, never
use the plug with the cover omitted. If a replacement fuse cover is required,
ensure it is of the same colour as that visible on the pin face of the plug. Fuse
covers are available from your dealer.
IMPORTANT ( FOR UK ONLY )
'2127FXWRIIWKHPDLQVSOXJIURPWKLVHTXLSPHQW,IWKHSOXJ¿WWHGLVQRW
suitable for the power points in your home or the cable is too short to reach
a power point, then obtain an appropriate safety approved extension lead
or consult your dealer.
Should it be necessary to change the mains plug, this must be carried out by
DFRPSHWHQWSHUVRQSUHIHUDEO\DTXDOL¿HGHOHFWULFLDQ
If there is no alternative to cutting off the mains plug, ensure that you dispose
RILWLPPHGLDWHO\KDYLQJ¿UVWUHPRYHGWKHIXVHWRDYRLGDSRVVLEOHVKRFN
hazard by inadvertent connection to the mains supply.
IMPORTANT
As these colours may not correspond to the coloured markings identifying
the terminals in your plug, proceed as follows:
The wire coloured BLUE must be connected to the terminal marked with
the letter N or coloured BLUE or BLACK. The wire coloured BROWN must
be connected to the terminal marked with the letter L or coloured BROWN
or RED.
Alternatively, this equipment may be supplied with a rewireable plug already
¿WWHGZKLFKPD\EHUHPRYHGLIQRWVXLWDEOHDQGDQDOWHUQDWLYH¿WWHGLQDF-
cordance with the preceding instructions.
On no account connect either of these wires to the terminal marked E or by
the earth symbol or coloured green or green and yellow.
Blue: NEUTRAL
Brown: LIVE
The wires in this mains lead are coloured in accordance with the following
code:
2

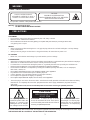
WARNING
CLASS 1 LASER PRODUCT
This product contains a low power laser device.
CLASS 1 LASER PRODUCT
APPAREIL Á LASER DE CLASSE 1
PRODUCTO LASER DE CLASE 1
CAUTION
INVISIBLE LASER RADIATION
WHEN OPEN AND INTERLOCKS DEFEATED.
AVOID EXPOSURE TO BEAM
PRECAUTIONS
Follow the advice below for safe and appropriate operations.
PLACEMENT
• Do not use the unit in places which are extremely hot, cold, dusty, or humid.
3ODFHWKHXQLWRQDÀDWDQGHYHQVXUIDFH
'RQRWUHVWULFWWKHDLUÀRZRIWKHXQLWE\SODFLQJLWLQDSODFHZLWKSRRUDLUÀRZE\FRYHULQJLWZLWKDFORWK
or by placing it on a carpet.
SAFETY
• When connecting and disconnecting the AC cord, grip the plug and not the cord itself. Pulling the cord may damage
it and create hazard.
• When you are not going to use the unit for a long period of time, disconnect the AC power cord.
AC VOLTAGE
• Before use, check that the rated voltage of your unit matches your local voltage.
CONDENSATION
• When left in a heated room where it is warm and damp, water droplets or condensation may form inside the CD player.
• When there is condensation inside the unit, the unit may not function normally.
• Let it stand for 1 to 2 hours before turning the power on, or gradually heat the room up and dry the unit before use.
(QVXUHDPLQLPXPGLVWDQFHRIFPDURXQGWKHDSSDUDWXVIRUVXI¿FLHQWYHQWLODWLRQ
* Ensure that the ventilation is not impeded by covering the ventilation openings with items, such as newspapers,
table-cloths, curtains, etc..
'RQRWSODFHQDNHGÀDPHVRXUFHVVXFKDVOLJKWHGFDQGOHVRQWKHDSSDUDWXV
* Pay attention to the environmental aspects of battery disposal.
* Use the apparatus only in moderate climates (not in tropical climates).
* Do not expose the apparatus to dripping or splashing.
'RQRWSODFHREMHFWV¿OOHGZLWKOLTXLGVVXFKDVYDVHVRQWKHDSSDUDWXV
• The mains plug is used as the disconnect device. It shall remain readily operable and should not be obstructed during
intended use. To completely disconnect this equipment from the mains supply, withdraw the plug from the mains
wall socket.
6KRXOGDQ\WURXEOHRFFXUGLVFRQQHFWWKH$&SRZHUFRUGDQGUHIHUVHUYLFLQJWRTXDOL¿HGSHUVRQQHO
:DUQLQJ 'RQRWWRXFKWKHOHQV
DO NOT THROW BATTERIES IN FIRE !
ATTENTION : To reduce the risk of electric
shock, do not remove the cover. There are no
user serviceable parts inside the unit. Refer all
VHUYLFLQJWRTXDOL¿HGSHUVRQQHO
The exclamation point within
the triangle is a warning sign
alerting the user of important
instructions accompanying
the product.
7KH OLJKWHQLQJ ÀDVK ZLWK DU-
rowhead symbol within the
triangle is a warning sign
alerting the user of "danger-
ous voltage" inside the unit.
CAUTION
RISK OF ELECTRIC SHOCK
DO NOT OPEN
In case of misfunction due to electrostatic discharge the apparatus has to be reset by disconnecting it from mains supply.
7+(5$7,1*3/$7(,6/2&$7('$77+(%277202)7+($33$5$786
3

• This instruction manual should be retained for your future reference.
• This unit contains a muting circuit and it takes about 2 -4 seconds until this unit
reaches stable operation after switching the STANDBY/ON.
1HYHURSHQWKHFRYHUVRUWRXFKWKHLQVLGHRULQVHUWPHWDOREMHFWVDVWKHVHFRXOG
cause an electric shock or a fault.
• When thunder starts, unplug the power cord .
The apparatus shall not be exposed to dripping or splashing.
• To clean cabinet and panels when dirty, clean off dirt on the surfaces with a dry cloth.
1HYHUXVHWKLQQHUEHQ]HQHRUDOFRKRODVWKHVHZLOOGDPDJHWKHVXUIDFH¿QLVK
• Protect the unit against excessive heat (e.g. direct sunlight and heating appliances),
dust and moisture.
• Discs that can be played on the CD player have the Compact Disc Digital Audio
mark on them.
• Be careful not to damage the power supply cord. Be sure to hold the plug when
pulling it out; do not pull the cord.
'RQRWLQVWDOOWKHVHWLQDFRQ¿QHGORFDWLRQRWKHUZLVHKHDWGLVVLSDWLRQZLOOEHSRRU
and malfunctions may occur.
'RQRWSODFHIRUHLJQREMHFWVLQWKHGLVFFRPSDUWPHQW,WPD\FDXVHGDPDJHWRWKH
mechanism.
• Do not move the sound system suddenly from a very cold room into a warm room.
When a chilled CD player is moved suddenly to a warm location, condensation may
form on the pickup lens, preventing proper operation. In this case, wait 1 -2 hours
before resuming play.
'XULQJSOD\EDFNLIWKH&'SOD\HULVVXEMHFWHGWRDVXGGHQVKRFNRUMROWVRPHQRLVH
may be produced. This is not a malfunction.
7KH&'SOD\HUKDVZLGHG\QDPLFUDQJH$VDUHVXOWLI\RXWXUQ\RXUDPSOL¿HU¶V
volume up too high during soft (low volume) parts of a program, your speakers may
be damaged when the dynamic range of a sudden loud passage is produced.
• Do not store discs in high-temperature, high-humidity locations. The discs may
develop warps and become unable to play. Also, discs with moisture on them may
be unplayable. Wipe any moisture off with a soft, dry cloth, and be sure discs are
fully dry before using.
• Do not leave a disc inside the CD player when it is not used for a long period.
• CDs with special shapes (heart-shaped CDs, octagonal CDs etc.) cannot be played
on this set. Attempting to do so may damage the set. Do not use such CDs.
SAFEGUARDS
Electrical energy can perform many useful functions. This unit has been engineered and
manufactured to assure your personal safety. Improper use can result in potential electrical
VKRFNRU¿UHKD]DUGV,QRUGHUQRWWRGHIHDWWKHVDIHJXDUGVREVHUYHWKHLQVWUXFWLRQVIRU
its installation, use and servicing.
PRECAUTIONS
4

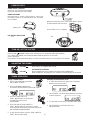
1. SPEAKER
2. MENU BUTTON
3. PLAY/PAUSE BUTTON
4. BAND / FOLDER BUTTON
5. STOP BUTTON
6. PROGRAM/MEMORY BUTTON
7. RANDOM / P - BUTTON
8. PLAY MODE/P+ BUTTON
9. CD DOOR
10. OPEN / CLOSE CD AREA
11. TELESCOPIC ANTENNA
12. ON/ STANDBY BUTTON
13. FUNCTION BUTTON
14. VOLUME CONTROL +
15. VOLUME CONTROL -
16. TUNE + / NEXT BUTTON
17. TUNE - / BACK BUTTON
18. REMOTE SENSOR INDICATOR
19. CD DISPLAY
20. CARRYING HANDLE
21. USB PORT
22. PHONES JACK
23. BATTERY COMPARTMENT
24. AC SOCKET
CONTROLS
REMOTE CONTROL UNIT
MENU BUTTON
ON/ STANDBY BUTTON
PLAY/PAUSE BUTTON
TUNE + NEXT BUTTON
FUNCTION BUTTON
STEREO / MONO BUTTON
RANDON / P - BUTTON
STOP BUTTON
PRESET EQ BUTTON
BAND / FOLDER BUTTON
INTRO BUTTON
PLAY MODE / P + BUTTON
BBS BUTTON
PROGRAM / MEMORY BUTTON
VOLUME + BUTTON
VOLUME - BUTTON
TUNE - BACK BUTTON
MUTE BUTTON
5

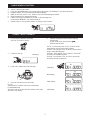
POWER SUPPLY
USING HOUSE CURRENT
Before use, check that the rated voltage
of your unit matches your local voltage.
USING BATTERIES
Disconnect the AC power cord from the AC inlet of the
unit. Battery power is cut automatically by the cord while
it is connected.
Insert 8 UM-2 ( size C ) batteries.
battery door
When the volume decrease, or the sound distorts, replace
all of the batteries with new ones.
To AC socket
To AC outlet
6
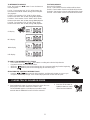
ADJUSTING THE SOUND
3UHVVYROXPHWRDGMXVWYROXPHOHYHO
FOR PRIVATE LISTENING
3OXJLQKHDGSKRQHVPPVWHUHRPLQLSOXJWRWKH3+21(6MDFN
When headphones are plugged in, the speakers are automatically disconnected.
VOLUME
VOLUME
Press the ON/ STANDBY button to turn the audio on. To change the audio mode between,
CD , U DISK and TUNER press FUNTION button while the power is on. the audio
mode is displayed.
Power will be cut off automatically when CD, MP3 and USB functions are in stop mode for 15 minutes.
TURN ON / OFF THE SYSTEM
FOR BETTER RECEPTION
FM
AM
Tuning a RADIO Station
1. Press FUNCTION button repeatedly
until “TUNER” is shown.
2. Press the BAND/FOLDER button
to select the desired frequency band (FM or AM).
TUNER OPERATION
4. Press and hold the TUNE +/NEXT or
TUNE - /BACK button for more than 1 second,
scanning starts automatically and tuner stops at the
¿UVWUHFHLYDEOHEURDGFDVWVWDWLRQ
5. To stop the auto tuning, press the TUNE +/NEXT or
TUNE - /BACK button again.
3. Press the TUNE + /NEXT or
TUNE - /BACK button as many times
as required to tune in to the
desired station.
2. The "STEREO” icon will be displayed when receiving
a stereo broadcast.
3. To select mono mode, press ST.MONO button again.
4. The “STEREO” icon will never turn on in
FM MONO mode.
Selecting FM Stereo/Mono mode
1. To select FM stereo/mono mode, press ST/MONO
button on the remote control.

RADIO MEMORY FUNCTION
1. Tune to a desired radio station.
2. Press PROGRAM/MEMORY Key to enter tuning saving mode. The “MEMORY” icon will be turned on.
3URJUDPQXPEHU³´RQWKHOHIWKDQGVLGHZLOOEHÀDVKLQJ
4. Within 10 seconds, press P+ or P- button to select the desired program number.
3UHVV3URJUDP.H\WRFRQ¿UPWKHPHPRU\
6. If there is no key pressed within 10 seconds, it will exit tuning save
mode and the “MEMORY” icon will be turned off.
7. Repeat steps 2 to 5 to set other stations, or change a preset station.
COMPACT DISC PLAYBACK
1. Press FUNCTION button repeatedly
until “CD” is shown on display.
2. Lift the CD door up.
3. Insert a disc with the label side facing up.
4. Close the CD door, the disc will rotate.
For CD :
The total tracks of the disc will show on the display.
For MP3/WMA/USB :
The total tracks of the disc and total number of the folder
will show on the display.
CD display
7
$IWHUGLVFUHDGLQJLV¿QLVKHGWKHGLVFZLOOSOD\
automatically.
In stop mode, press the Play/Pause
button to play the track.
For CD : Track number "001" & "CD" & "00:00" will be
shown,during normal compact disc playback.
For MP3 : Track number "F01" & "MP3" & "00:00" will be
shown, during MP3 playback.
For WMA : Track number "F01" & "WMA" & "00:00" will
be shown, during WMA playback.
For USB : Track number "F01" & "USB" & "00:00" will
be shown, during USB playback.
CD display
MP3 display
WMA display
USB display

8
PLAYING TRACKS IN RANDOM ORDER
1. If the RANDOM/P- button is pressed, the tracks on the discs are
not played in consecutive order but in random order.
The word RAND appears on the display to provide a visual
reminder that the RANDOM function has been activated. .
2. Press the STOP button or
RANDOM button to switch
off the function RANDOM.
TO SKIP TO THE BEGINNING OF A TRACK
• Press either one of the skip buttons according to the desired skip direction.
• Play/back resumes from the selected track.
• When the button is pressed once during play, the current track will play from the beginning.
• When the button is pressed once during play, the next track plays.
SEARCHING FOR A PASSAGE WITHIN A TRACK
• Keep the or button pressed during playback, and release the button as soon as you
recognise the desired passage. Then normal CD playback will resume from this point.
TO STOP PLAYBACK
Press the STOP button.
For CD : Total number of tracks and time will be shown.
For MP3 : Total number of tracks and folder will be shown.
For WMA : Total number of tracks and folder will be shown.
For USB : Total number of tracks and folder will be shown.
For CD : Track number "001" & "CD" will be shown, the
WLPHRIWKHWUDFNLQÀDVKGXULQJQRUPDOFRPSDFW
disc playback.
For MP3 : Track number "F01" & "MP3" will be shown,
WKHWLPHRIWKHWUDFNLQÀDVKGXULQJ03SOD\EDFN
For WMA : Track number "F01" & "WMA" will be shown,
WKHWLPHRIWKHWUDFNLQÀDVKGXULQJ:0$SOD\EDFN
For USB : Track number "F01" & "USB" will be shown,
WKHWLPHRIWKHWUDFNLQÀDVKGXULQJ86%SOD\EDFN
TO INTERRUPT PLAYBACK
Press the Play/Pause button. Press the button to
resume playback.
CD display
MP3 display
WMA display
USB display

FOR MP3 / WMA / USB PLAYBACK
Mode sequence REPEAT >> A REPEAT >>
A-B REPEAT >> REPEAT ALL >> FOLDER >> CLEAR.
FOR NORMAL COMPACT DISC PLAYBACK
Mode sequence REPEAT >> A REPEAT >>
A-B REPEAT >> REPEAT ALL >> CLEAR.
FOR MP3 / WMA / USB PLAYBACK
Mode sequence REPEAT >> REPEAT ALL >> FOLDER
>> CLEAR.
FOR NORMAL COMPACT DISC PLAYBACK
Mode sequence REPEAT >> REPEAT ALL >> CLEAR.
REPEAT , REPEAT ALL , REPEAT AB AND REPEAT FOLDER PLAYBACK
MP3/WMA/USB display
CD display
3UHVV3/$<02'(3EXWWRQGXULQJVWRSPRGH
For CD: Total number of tracks & time will be shown.
For MP3/WMA/USB: Total number of tracks & folder will be shown.
3UHVV3/$<02'(EXWWRQGXULQJSOD\EDFN
For CD: The folder tracks number & time will be shown.
For MP3/WMA/USB: The folder tracks number & folder will be shown.
CD display
During Repeat 4 mode,
display shows
During Repeat 1 mode,
display shows
During Repeat 2 mode,
display shows
During Repeat 3 mode,
display shows
During Repeat 1 mode,
display shows
During Repeat 2 mode,
display shows
During Repeat 3 mode,
display shows
During Repeat 4 mode,
display shows
During Repeat 1 mode,
display shows
During Repeat 2 mode,
display shows
During Repeat 3 mode,
display shows
During Repeat 1 mode,
display shows
During Repeat 2 mode,
display shows
During Repeat 3 mode,
display shows
During Repeat 4 mode,
display shows
During Repeat 5 mode,
display shows
During Repeat 5 mode,
display shows
During Repeat 6 mode,
display shows
MP3/WMA/USB display
Note on CD-R/RW discs
%HFDXVHRIQRQVWDQGDUGL]HGIRUPDWGH¿QLWLRQSURGXFWLRQRI&'55:SOD\EDFNTXDOLW\DQGSHUIRUPDQFHDUHQRW
guaranteed.
- Manufacturer is not responsible for the playability of CD-R/RW due to recording conditions, such as PC performance,
writing software, media ability, etc.
- Do not attach a seal or label to either side of the CD-R/RW disc. It may cause a malfunction.
9

10
FOR MP3/WMA/USB PLAYBACK
Programmed playback enables tracks on a disc to be played in the desired order. Up to 20 tracks can be programmed.
1. Program mode works in STOP mode only.
2. Press “PROGRAM/MEMORY” button for 2 seconds to enter program mode. The “PROG” icon will be turned on.
³3´ZLOOEHVKRZQZLWK³´ÀDVKLQJ³´UHSUHVHQWVWUDFNQXPEHUDQG³3´UHSUHVHQWVSURJUDPORFDWLRQ
number.
3. Press the TUNE +/NEXT or TUNE - /BACK button to select the desired folder.
4. Press TUNE +/NEXT or TUNE - /BACK to select the required track number.
3UHVV352*5$00(025<EXWWRQWRFRQ¿UPWKHWUDFNQXPEHU7KHGLVSOD\ZLOOVKRZWKHQH[W
SURJUDPQXPEHU³3´7KHWUDFNQXPEHUZLOOEHÀDVKLQJDJDLQDQGZDLWLQJIRUWUDFNQXPEHULQSXW
6. Repeat steps 3 and 4 until all the desired tracks has been programmed or all the
program memories have been used. It will loop back to P01 after all the program
memories have been used. Same track number can be programmed more than once.
7. Press PLAY/PAUSE button to playback.
8. Press STOP key to clear all the programmed memories.
MP3/WMA/USB display
PROGRAMMED CD OPERATION
FOR NORMAL COMPACT DISC PLAYBACK
Programmed playback enables tracks on a disc to be played in the desired order. Up to 20 tracks can be programmed.
1. Program mode works in STOP mode only.
2. Press “PROGRAM/MEMORY” button. The “PROG” icon will be turned on. “000 P01” will be shown with “000”
ÀDVKLQJ³´UHSUHVHQWVWUDFNQXPEHUDQG³3´UHSUHVHQWVSURJUDPORFDWLRQQXPEHU
3. Press TUNE +/NEXT or TUNE - /BACK to select the required track number.
3UHVV352*5$00(025<EXWWRQWRFRQ¿UPWKHWUDFNQXPEHU7KHGLVSOD\ZLOOVKRZWKHQH[W
SURJUDPQXPEHU³3´7KHWUDFNQXPEHUZLOOEHÀDVKLQJDJDLQDQGZDLWLQJIRUWUDFNQXPEHULQSXW
5. Repeat steps 3 and 4 until all the desired tracks have been programmed or all the
program memories have been used. It will loop back to P01 after all the program
memories have been used. Same track number can be programmed more than once.
6. Press PLAY/PAUSE button to playback.
7. Press STOP key to clear all the programmed memories.
CD display

11
MUTE
PRESET EQ
1. Press MENU button until EQ shown on the display.
2. Press PLAY/PAUSE to enter EQ setting mode.PLAY/PAUSE to enter EQ setting mode. to enter EQ setting mode.
3. Press MENU button to select of the EQ effect will be :
- FLAT -> ROCK -> JAZZ -> CLASSIC -> POP -> FLAT.
3UHVV3/$<3$86( EXWWRQ WR FRQ¿UP WKH VHWWLQJ3/$<3$86( EXWWRQ WR FRQ¿UP WKH VHWWLQJEXWWRQWRFRQ¿UPWKHVHWWLQJ
5. Press STOP button to clear the EQ setting mode.
6. Alternatively the PRESET EQ button on the remote control can be utilised.
Press the button repeatedly to change the settings.
The mute on/ off is changed cyclically by pushing MUTE button.
The “mute” mark is on during mute is on.
The mute on is cancelled in case as shown below.
a. The power is off/on
E 7KH9ROXPHLVDGMXVWHGE\WKH92/EXWWRQ
MUTE ON/OFF
PROGRAMMED USB OPERATION
Program mode works in Stop mode
3UHVV352*5$00(025<EXWWRQ7KHQWKH³3´ZLOOEHVKRZQRQWKHGLVSOD\DQGWKH¿UVWGLJLWVZLOO
EHÀDVKLQJ
3UHVV³781(1(;7RU781(%$&.´WRVHOHFWWKHGHVLUHGIROGHU$IWHUSUHVV³352*´EXWWRQWRFRQ¿UPWKHIROGHU
WKHUGWRWKGLJLWVZLOOEHÀDVKLQJ
3UHVV³781(1(;7RU781(%$&.´WRVHOHFWWKHGHVLUHGWUDFN7KHQSUHVV³352*´EXWWRQWRFRQ¿UPWKHWUDFN
number.
3UHVV³352*5$00(025<´EXWWRQDJDLQWRFRQ¿UPWKHVHWWLQJ7KHGLVSOD\ZLOOVKRZQH[WSURJUDPQXPEHU
5. Repeat the sequence as indicated in 2 to 4 for next program.
6. After all the desired programs have been selected, Press “PLAY/PAUSE” button for playback.
USB display
USB OPERATION
1. Connect USB device into the USB input of the system.
2. Press “FUNCTION” button repeatedly until “UDISK” is shown on the display. the USB icon will be illuminated.
3. The unit will start to read the media and to start the playback automatically.
4. ID3 function can be enable/disable in the “MENU” function.
USB connector does not support connection with USB extension cable and it is not designed for communication
ZLWKFRPSXWHUGLUHFWO\

12
CLEANING CD
If the CD skips or will not play , the disc may need cleaning .
Before playing, wipe the disc from the centre out with a cleaning
cloth. After playing, store the disc in its case.
CLEANING THE UNIT
Do not use volatile chemicals on this unit. Clean by lightly wiping
with a soft cloth.
IMPORTANT NOTE
If an abnormal display indication or an operating problem
occurs, disconnect the AC power cord and remove the batteries.
Wait at least 5 seconds, then reconnect the AC power cord or
reinstall the batteries.
WARNING
Should the CD door be opened before the reading of the CD
FRPSOHWHG D MDPPLQJ QRLVH PD\ RFFXU 7KLV LV UHVROYHG E\
closing the CD door.
MAINTENANCE
CLEANING THE CD LENS
If the CD lens is dusty, clean it with a brush-blower. Blow several
times on the lens and remove the dust with the brush. Finger prints
may be removed with a cotton swab moistened with alcohol.
BBS
1. Press MENU button repeatedly
unit BASS shown on the display.
2. Press PLAY/PAUSE to enter
Bass Boost setting mode.
3. Press MENU to select
" BASS ON " or " BASS OFF ".
3UHVV3/$<3$86(WRFRQ¿UP
The bass boost on / off is changed cyclically by pushing
BBS button on remote control.
INTRO
In CD and USB mode, press the intro button on the remote control to
SOD\RQO\WKH¿UVWVHFRQGVRIHDFKWUDFNRQWKHGLVF
Press the INTRO button again to switch off intro.
FOLDER SELECTION
1. In STOP mode, press BAND/FOLDER button will skip to the next folder.
2. This operation valid for all media of MP3,WMA and USB operation.
ID3 Display
1. Press MENU button repeatedly unit ID3 shown on the display.
2. Press PLAY/PAUSE to enter ID3 setting mode.
3. Press MENU to select " ID3 ON " or " ID3 OFF ".
3UHVV3/$<3$86(WRFRQ¿UP

13
Where to place the item :
Today’s furniture is coated with a wide variety of lacquers and synthetic-coatings that are treated with an extensive range
of cleaning products. Therefore, the possibility that some of these substances contain components that react adversely to
the rubber feet of the item and soften them, cannot be completely excluded. The rubber feet of the appliance can cause
discoloring to furniture surfaces. If necessary, place the appliance on a non-slide surface.
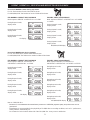
SPECIFICATIONS
CD SECTION
Channels: 2 channels
S / N ratio: 60 dB
Wow & Flutter: undetectable
Sampling frequency: 44.1 kHz 8 x over sampling
Quantization: 1 bit DA converter
Pick up light source: Semi - conductor laser
Pick up wave length
790 nm
RADIO SECTION
Tuning ranges : FM 87.5 - 108 MHz
AM 522 - 1620 kHz
Antennas : AM Built - in ferrite bar
FM telescopic antenna
GENERAL
Output power: 1.2 W + 1.2 W (RMS)
Power consumption: 16 W
Speaker: 3" 8 OHM
3KRQHVMDFN 00
Power source: AC: 230V / 50Hz
(INDICATED ON THE REAR OF THE UNIT)
DC: 12V 1.5 x 8 UM2 / R14 / "C" SIZE
Dimensions: 345 (L) x 262 (D) x 130 (H) mm
Weight 1.83 KGS
'XHWRFRQWLQXLQJLPSURYHPHQWWKHIHDWXUHVDQGWKHGHVLJQDUHVXEMHFWWRFKDQJHZLWKRXWQRWLFH
This symbol on the product or on its packaging means that your electrical and electronic equipment should
be disposed at the end of life separately from your household wastes. There are separate collection systems
for recycling in EU.
For more information, please contact the local authority or the dealer where you purchased the product.
Information for users applicable in European Union countries

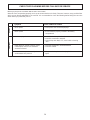
CHECK THE FOLLOWING BEFORE CALLING FOR SERVICE
%HIRUH\RXMXPSWRWKHFRQFOXVLRQWKDWWKHXQLWLVRXWRIRUGHU
When the set is not operating properly, one is apt to assume that the set is faulty. There are, however, many possible faults
which are not directly attributable to the set itself. It is recommended to check the following before taking the set to the
dealer where you purchased your set.
Symptom Cause / Method of solution
No AC power. • Is the power cord connected properly?
No DC power. • Are the batteries properly inserted in the battery
compartment?
Disc is not played. • Is the disc loaded upside down?
• Is the disc scratched or warped?
• Is the pick-up lens dirty? If so, clean it with a cleaning
stick.
3OD\HUGRHVQRWRSHUDWHFRUUHFWO\VRXQG ,VWKHGLVFVFUDWFKHGRURWKHUZLVHÀDZHG"
is interrupted, noise occurs and tracks • Is the disc solled?
cannot be selected.
Player does not operate normally when • First press the Stop button then play the disc
control buttons are pressed. again.
PowerCD player
14
-
 1
1
-
 2
2
-
 3
3
-
 4
4
-
 5
5
-
 6
6
-
 7
7
-
 8
8
-
 9
9
-
 10
10
-
 11
11
-
 12
12
-
 13
13
-
 14
14
-
 15
15


Hitachi CX86MP3 Operating Instructions Manual
- Catégorie
- Lecteur CD
- Taper
- Operating Instructions Manual
- Ce manuel convient également à
dans d''autres langues
- English: Hitachi CX86MP3
Documents connexes
Autres documents
-
Pioneer PD-50AE Le manuel du propriétaire
-
Philips DVP3560/F7 Manuel utilisateur
-
Bowflex Max Trainer M5 Le manuel du propriétaire
-
-
-
-
-
-
ProScan PSP288-PL Manuel utilisateur
-
Pioneer PD-70AE Manuel utilisateur