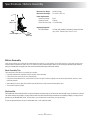
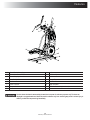
Bowflex Max Trainer M5 Le manuel du propriétaire
- Taper
- Le manuel du propriétaire

M5
OWNER’S / ASSEMBLY MANUALOWNER’S / ASSEMBLY MANUAL
Manual en Español
Latino Americano:
www.support.nautilus.com

Assembly / Owner’s Manual
2
Important Safety Instructions 3
Safety Warning Labels / Serial Number 5
6SHFL¿FDWLRQV
%HIRUH$VVHPEO\
Parts 7
Hardware 8
Tools 8
Assembly 9
Moving the Machine 18
Leveling the Machine 18
Features 19
Console Features 20
Fitness Basics 25
Operations 31
Mounting / Dismounting 31
Getting Started 32
Power Up / Idle Mode 32
Manual (Quick Start) Program 33
MAX Workout Program 33
Workout Programs 34
3DXVHG5HVXOWV0RGH
(GLWD8VHU3UR¿OH
&XVWRPL]H0$;3URJUDP
Customize the Workout Goals 37
Console Setup Mode 38
Maintenance 39
Maintenance Parts 40
Troubleshooting 42
Body Weight Loss Plan 45
Warranty 55
To validate warranty support, keep the original proof of purchase and record the following information:
Serial Number __________________________
Date of Purchase _______________________
7RUHJLVWHU\RXUSURGXFWZDUUDQW\JRWRZZZERZÀH[FRPUHJLVWHURUFDOO±
,I\RXKDYHTXHVWLRQVRUSUREOHPVZLWK\RXUSURGXFWSOHDVHFDOO±
Table of Contents / Registration
1DXWLOXV,QF1$87,/86ZZZ1DXWLOXV,QFFRP&XVWRPHU6HUYLFH1RUWK$PHULFDFVQOV#QDXWLOXVFRP
| outside U.S. www.nautilusinternational.com | Printed in China | © 2013 Nautilus, Inc. | ® indicates trademarks registered in the United States.
7KHVHPDUNVPD\EHUHJLVWHUHGLQRWKHUQDWLRQVRURWKHUZLVHSURWHFWHGE\FRPPRQODZ%RZÀH[WKH%ORJR%RZÀH[0D[7UDLQHU0D[7UDLQHU
6HOHFW7HFK%RZÀH[&RQQHFW%RZÀH[7UDLQHU1DXWLOXV6FKZLQQDQG8QLYHUVDODUHWUDGHPDUNVRZQHGE\RUOLFHQVHGWR1DXWLOXV,QF*RRJOH3OD\
is a trademark of Google Inc. App Store is a service mark of Apple Inc. The Bluetooth
®
word mark and logos are registered trademarks owned by
Bluetooth SIG, Inc., and any use of such marks by Nautilus, Inc. is under license. Polar, OwnCode, MyFitnessPal, and Nut Thins are trademarks of
their respective owners.

Assembly / Owner’s Manual
3
Important Safety Instructions
When using an electrical appliance, basic precautions should always be followed, including the following:
This icon means a potentially hazardous situation which, if not avoided, could result in death or serious injury.
Obey the following warnings:
Read and understand all warnings on this machine.
Carefully read and understand the Assembly instructions.
Carefully read and understand the Assembly instructions. Read and understand the complete Manual. Keep the Manual
for future reference.
To reduce the risk of electrical shock or unsupervised usage of the equipment, always unplug this machine from the
electrical outlet immediately after using and before cleaning.
To decrease the risk of burns, electric shock, or injury to persons, read and understand the complete Owner’s Manual.
Failure to follow these guidelines can cause a serious or possibly fatal electrical shock or other serious injury.
• Keep bystanders and children away from the product you are assembling at all times.
• Do not connect power supply to the machine until instructed to do so.
• The machine should never be left unattended when plugged in. Unplug from outlet when not in use and before cleaning, maintaining or repairing
the machine.
%HIRUHHDFKXVHH[DPLQHWKHPDFKLQHIRUGDPDJHWRSRZHUFRUGORRVHSDUWVRUVLJQVRIZHDU'RQRWXVHLIIRXQGLQWKLVFRQGLWLRQ&RQWDFW
Nautilus Customer Service for repair information.
• Not intended for use by persons with medical conditions where those conditions may impact the safe operation of the machine or pose a risk of
injury to the user.
• Do not drop or put objects into any opening of the machine.
• Never operate this machine with the air openings blocked. Keep the air openings free of lint, hair and the like.
• Do not assemble this machine outdoors or in a wet or moist location.
0DNHVXUHDVVHPEO\LVGRQHLQDQDSSURSULDWHZRUNVSDFHDZD\IURPIRRWWUDI¿FDQGH[SRVXUHWRE\VWDQGHUV
• Some components of the machine can be heavy or awkward. Use a second person when doing the assembly steps involving these parts. Do
not do steps that involve heavy lifting or awkward movements on your own.
• Set up this machine on a solid, level, horizontal surface.
• Do not try to change the design or functionality of this machine. This could compromise the safety of this machine and will void the warranty.
• If replacement parts are necessary, use only genuine Nautilus replacement parts and hardware. Failure to use genuine replacement parts can
cause a risk to users, keep the machine from operating correctly and void the warranty.
• Do not use until the machine has been fully assembled and inspected for correct performance in accordance with the Manual.
5HDGDQGXQGHUVWDQGWKHFRPSOHWH0DQXDOVXSSOLHGZLWKWKLVPDFKLQHEHIRUH¿UVWXVH.HHSWKH0DQXDOIRUIXWXUHUHIHUHQFH
• Do all assembly steps in the sequence given. Incorrect assembly can lead to injury or incorrect function.
• SAVE THESE INSTRUCTIONS.

Assembly / Owner’s Manual
4
Before using this equipment, obey the following warnings:
Read and understand the complete Manual. Keep the Manual for future reference.
Read and understand all warnings on this machine. If at any time the Warning stickers become loose, unreadable or dislodged,
contact Nautilus Customer Service for replacement stickers.
To reduce the risk of electrical shock or usage of the equipment, always unplug the power cord from the wall outlet and
the machine and wait 5 minutes before cleaning, maintaining or repairing the machine. Place the power cord in a secure location.
• Children must not be let on or near to this machine. Moving parts and other features of the machine can be dangerous to children.
• Not intended for use by anyone under 14 years of age.
&RQVXOWDSK\VLFLDQEHIRUH\RXVWDUWDQH[HUFLVHSURJUDPRUDQHZKHDOWKDQGGLHWSODQ6WRSH[HUFLVLQJLI\RXIHHOSDLQRUWLJKWQHVVLQ\RXU
chest, become short of breath, or feel faint. Contact your doctor before you use the machine again. Use the values calculated or measured
E\WKHPDFKLQH¶VFRPSXWHUIRUUHIHUHQFHSXUSRVHVRQO\7KHKHDUWUDWHGLVSOD\HGRQWKHFRQVROHLVDQDSSUR[LPDWLRQDQGVKRXOGEHXVHGIRU
reference only.
%HIRUHHDFKXVHH[DPLQHWKLVPDFKLQHIRUORRVHSDUWVRUVLJQVRIZHDU'RQRWXVHLIIRXQGLQWKLVFRQGLWLRQ0RQLWRUWKH3HGDOVDQG&UDQN
Arms closely. Contact Nautilus Customer Service for repair information.
0D[LPXPXVHUZHLJKWOLPLWOEVNJ'RQRWXVHLI\RXDUHRYHUWKLVZHLJKW
• This machine is for home use only.
'RQRWZHDUORRVHFORWKLQJRUMHZHOU\7KLVPDFKLQHFRQWDLQVPRYLQJSDUWV'RQRWSXW¿QJHUVRURWKHUREMHFWVLQWRPRYLQJSDUWVRIWKHH[HUFLVH
equipment.
• Set up and operate this machine on a solid, level, horizontal surface.
• Make the Pedals stable before you step on them. Use caution when you step on and off the machine.
• Do not operate this machine outdoors or in moist or wet locations.
.HHSDWOHDVW´PRQHDFKVLGHRIWKHPDFKLQHFOHDU7KLVLVWKHUHFRPPHQGHGVDIHGLVWDQFHIRUDFFHVVDQGSDVVDJHDURXQGDQG
emergency dismounts from the machine. Keep third parties out of this space when machine is in use.
'RQRWRYHUH[HUW\RXUVHOIGXULQJH[HUFLVH2SHUDWHWKHPDFKLQHLQWKHPDQQHUGHVFULEHGLQWKLVPDQXDO
• Perform all regular and periodic maintenance procedures recommended in the Owner’s Manual.
• Keep the Pedals and Handlebars clean and dry.
([HUFLVHRQWKLVPDFKLQHUHTXLUHVFRRUGLQDWLRQDQGEDODQFH%HVXUHWRDQWLFLSDWHWKDWFKDQJHVLQVSHHGDQGUHVLVWDQFHOHYHOFDQRFFXUGXULQJ
workouts, and be attentive in order to avoid loss of balance and possible injury.
• This machine cannot stop the Pedals or Upper Handlebars independently of the Resistance Fan. Reduce the pace to slow the Resistance Fan,
Upper Handlebars and Pedals to a stop. Do not dismount the machine until the Pedals and Upper Handlebars have come to a complete stop.
• Do not drop or put objects into any opening of the machine.
• Prior to use read and understand the Owner’s Manual. The appliance is not to be used by persons with functional limitations and impairments,
UHGXFHGSK\VLFDOVHQVRU\RUPHQWDOFDSDELOLWLHVRUODFNRIH[SHULHQFHDQGNQRZOHGJH
Important Safety Instructions

Assembly / Owner’s Manual
5
FCC Compliance
&KDQJHVRUPRGLÀFDWLRQVWRWKLVXQLWQRWH[SUHVVO\DSSURYHGE\WKHSDUW\UHVSRQVLEOHIRUFRPSOLDQFHFRXOGYRLGWKHXVHU·V
authority to operate the equipment.
The machine and power supply comply with part 15 of the FCC rules. Operation is subject to the following two conditions: (1) This device may not
cause harmful interference, and (2) this device must accept any interference received, including interference that may cause undesired operation.
Note: This machine and power supply have been tested and found to comply with the limits for a Class A digital device, pursuant to Part 15 of
the FCC Rules. These limits are designed to provide reasonable protection against harmful interference in a residential installation. This
equipment generates, uses and can radiate radio frequency energy and, if not installed and used in accordance with the instructions, may
cause harmful interference to radio communications.
However, there is no guarantee that interference will not occur in a particular installation. If this equipment does cause harmful interference to radio
or television reception, which can be determined by turning the equipment off and on, the user is encouraged to try to correct the interference by one
or more of the following measures:
• Reorient or relocate the receiving antenna.
• Increase the separation between the equipment and receiver.
• Connect the equipment into an outlet on a circuit different from that to which the receiver is connected.
&RQVXOWWKHGHDOHURUDQH[SHULHQFHGUDGLR79WHFKQLFLDQIRUKHOS
Safety Warning Labels and Serial Number
8011889_B
• Injury or death is possible if caution is not used while
using this machine.
• Keep children and pets away.
• Read and follow all warnings on this machine.
• Refer to the Owner's Manual for additional warnings and
safety information.
• The heart rate displayed is an approximation and should
be used for reference only.
• Not intended for use by anyone under 14 years of age.
• The maximum user weight for this machine is 300 lbs
(136 kg.).
• This machine is for home use only.
• Consult a physician prior to using any exercise equipment.
• Une imprudence lors de l'utilisation de cet appareil
pourrait être dangereuse, voire mortelle.
• Éloignez les enfants et les animaux de compagnie de
l'appareil.
• Lisez et assimilez tous les avertissements apposés sur
cet appareil.
• Consultez le Guide du propriétaire pour prendre
connaissance des consignes de sécurité et
avertissements supplémentaires.
• La fréquence cardiaque affichée est approximative et
doit être utilisée uniquement à titre indicatif.
• Non destiné à des personnes âgées de moins de 14 ans.
• Le poids maximum de l'utilisateur pour cette machine est
136 kg (300 lbs).
• Cet appareil est à usage domestique uniquement.
• Consulter un médecin avant d'utiliser tout équipement
d'exercice physique.
ADVERTISSEMENT
3URGXFW6SHFL¿FDWLRQ
Label
Serial Number Label

Assembly / Owner’s Manual
6
Before Assembly
Select the area where you are going to set up and operate your machine. For safe operation, the location must be on a hard, level surface. Allow
DZRUNRXWDUHDRIDPLQLPXP´FP[´FP%HVXUHWKDWWKHZRUNRXWVSDFH\RXDUHXWLOL]LQJKDVDGHTXDWHKHLJKWFOHDUDQFH
WDNLQJLQWRFRQVLGHUDWLRQWKHKHLJKWRIWKHXVHUDQGWKHPD[LPXPSHGDOKHLJKWRIWKH¿WQHVVPDFKLQH
Basic Assembly Tips
Follow these basic points when you assemble your machine:
• Read and understand the “Important Safety Instructions” before assembly.
• Collect all the pieces necessary for each assembly step.
• Using the recommended wrenches, turn the bolts and nuts to the right (clockwise) to tighten, and the left (counterclockwise) to loosen, unless
instructed otherwise.
• When attaching 2 pieces, lightly lift and look through the bolt holes to help insert the bolt through the holes.
• The assembly requires 2 people.
Machine Mat
7KH%RZÀH[0D[7UDLQHU
®
0DFKLQH0DWLVDQRSWLRQDODFFHVVRU\WKDWKHOSVNHHS\RXUZRUNRXWDUHDFOHDUDQGDGGVDOD\HURISURWHFWLRQWR\RXUÀRRU
7KHUXEEHUPDFKLQHPDWSURYLGHVDQRQVOLSUXEEHUVXUIDFHZKLFKOLPLWVVWDWLFGLVFKDUJHDQGUHGXFHVWKHSRVVLELOLW\RIGLVSOD\RUUXQQLQJHUURUV,I
SRVVLEOHSXW\RXU%RZÀH[0$;7UDLQHU
™
Machine Mat in your selected workout area before you begin assembly.
7RRUGHUWKHRSWLRQDOPDFKLQHPDWJRWRZZZERZÀH[FRPRUFDOO±
0D[LPXP8VHU:HLJKW OEVNJ
0D[LPXP3HGDO+HLJKW 19.1 inches ( 48.5 cm)
Power Requirements:
Operational Voltage: 9VDC
Operating Current: 1500 mA
Heart Rate Chest Strap: 1 CR2032 battery
Regulatory Approvals:
$&3RZHU$GDSWHU 8/OLVWHG&6$FHUWL¿HGRUHTXLYDOHQW5DWHG9+]
Input, 9VDC, 1500mA Output. Class 2 or LPS.
63.5”
(161.3 cm)
49”
(124.5 cm)
26.5”
(67.3 cm)
Specifications / Before Assembly

Assembly / Owner’s Manual
7
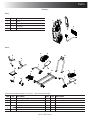
Parts
A decal has been applied to all right (“ R ”) and left (“ L ”) parts to assist with assembly.
Item Qty Description Item Qty Description
5 1 Upper Handlebar, Right 11 1 Rail Assembly
1 Upper Handlebar, Left 12 1 Stabilizer Assembly
7 2 Leg 13 1 Static Handlebar Assembly
8 2 Foot Pad 14 2 Cap
9 2 Foot Pad Insert 15 1 Heart Rate Chest Strap
10 2 Pedal 1 Manual Kit
( 2 Boxes )
Box 1
Item Qty Description
1 1 Frame
2 1 Shroud, Rear
3 1 AC Adapter
4 1 Hardware Card
5
10
7
9
11
10
7
6
13
14
12
9
8
8
15
16
3
1
2
4
Box 2

Assembly / Owner’s Manual
8
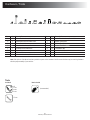
To ol s
Included Not Included
#2
5 mm
PP
8 mm
(recommended)
ABC D E F
GH
IJ K LMNO
13 mm
Item Qty Description Item Qty Description
A86RFNHW+HDG+H[6FUHZ0[[ I46RFNHW+HDG+H[6FUHZ0[[
B46RFNHW+HDG+H[6FUHZ0[[ J 4:DVKHU)ODW0[
C12:DVKHU)ODW0[ K2:DVKHU)ODW0[
D 6RFNHW+HDG+H[6FUHZ0[[ L4:DVKHU)ODW0[
E13DQ3KLOOLSV6FUHZ0[[ M10/RFN:DVKHU0
F2Cap N Lock Washer, M8
G 4 Lock Nut, M8 O 2 :DYH:DVKHU[
H106RFNHW+HDG+H[6FUHZ0[[
Note: Select pieces of Hardware have been provided as spares on the Hardware Card. Be aware that there may be remaining Hardware
after the proper assembly of your machine.
Hardware / Tools

Assembly / Owner’s Manual
9
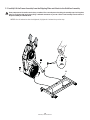
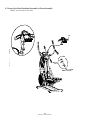
1. Attach Rail Assembly to Frame and then Release the Frame from the Shipping Plate
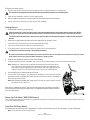
6RPHFRPSRQHQWVRIWKHPDFKLQHFDQEHKHDY\RUDZNZDUG8VHDVHFRQGSHUVRQZKHQGRLQJWKHDVVHPEO\VWHSVLQYROYLQJWKHVH
parts. Do not do steps that involve heavy lifting or awkward movements on your own.
NOTICE: Hand tighten hardware.
13mm
X2
C
11
X4
N
D
1
Assembly

Assembly / Owner’s Manual
10
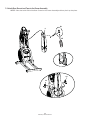
2. Carefully Lift the Frame Assembly from the Shipping Plate and Attach to the Stabilizer Assembly
6RPHFRPSRQHQWVRIWKHPDFKLQHFDQEHKHDY\RUDZNZDUG8VHDVHFRQGSHUVRQZKHQGRLQJWKHDVVHPEO\VWHSVLQYROYLQJWKHVH
SDUWV'RQRWGRVWHSVWKDWLQYROYHKHDY\OLIWLQJRUDZNZDUGPRYHPHQWVRQ\RXURZQ/LIWWKH)UDPH$VVHPEO\IURPWKHH[WHULRURI
the pivot assembly as indicated below.
NOTICE: Once all hardware has been hand tightened, fully tighten ALL hardware from previous steps.
I
J
X4
12

Assembly / Owner’s Manual
11
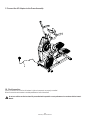
3. Attach Rear Shroud and Caps to the Frame Assembly
NOTICE: Place the inside hook of the Rear Shroud on the Frame Assembly and then pivot it up into place.
14
14
2
#2
X1
E

Assembly / Owner’s Manual
12
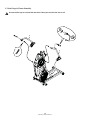
4. Attach Legs to Frame Assembly
Be aware that the Legs are connected and when either of these parts move the other does as well.
K
X2
N
D
F
6mm
7
7
X2
O

Assembly / Owner’s Manual
13
5. Attach Pedals to Frame Assembly
In order to avoid possible serious injury, when inserting the tube ends into the Leg Assemblies be careful to avoid fingers or hands
being caught or pinched.
B
X4
6mm
C
G
X4
C
10
10
13mm

Assembly / Owner’s Manual
14
6. Connect the Foot Pads and then the Foot Pad Inserts
9
X2
X8
5mm
8
8
A

Assembly / Owner’s Manual
15
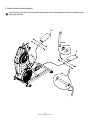
7. Attach the Upper Handlebars to Frame Assembly
%HDZDUHWKDWWKH3HGDOVDQGWKH8SSHU+DQGOHEDUVDUHFRQQHFWHGDQGZKHQHLWKHURIWKHVHSDUWVPRYHWKHRWKHUGRHVDVZHOO
6RPHFRPSRQHQWVRIWKHPDFKLQHFDQEHKHDY\RUDZNZDUG8VHDVHFRQGSHUVRQZKHQGRLQJWKHDVVHPEO\VWHSVLQYROYLQJWKHVH
parts. Do not do steps that involve heavy lifting or awkward movements on your own.
NOTICE: Be sure to attach the Upper Handlebars so that they are in the range of operation for the User.
5
6
H
M
X6
5mm

Assembly / Owner’s Manual
16
8. Connect the Static Handlebar Assembly to Frame Assembly
NOTICE: Do not crimp the Console Cable.
13
5mm
X4
L
M
H

Assembly / Owner’s Manual
17
9. Connect the AC Adapter to the Frame Assembly
3
10. Final Inspection
Inspect your machine to ensure that all hardware is tight and components are properly assembled.
%HVXUHWRUHFRUGWKHVHULDOQXPEHULQWKH¿HOGSURYLGHGDWWKHIURQWRIWKLVPDQXDO
Do not use until the machine has been fully assembled and inspected for correct performance in accordance with the Owner’s
Manual.

Assembly / Owner’s Manual
18
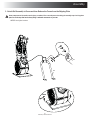
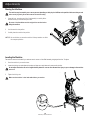
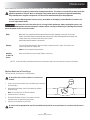
Moving the Machine
The machine may be moved by one or more persons depending on their physical abilities and capacities. Make sure that you and
RWKHUVDUHDOOSK\VLFDOO\ÀWDQGDEOHWRPRYHWKHPDFKLQHVDIHO\
1. Grasp the inner, unmoving part of the Pivot Assembly to carefully tilt the
machine toward you onto the transport rollers.
%HDZDUHRIWKH+DQGOHEDUVDQGWKHZHLJKWRIWKHPDFKLQHEHIRUH
tilting the machine.
2. Push the machine into position.
3. Carefully lower the machine into position.
NOTICE: Be careful when you move the machine. All abrupt motions can affect
the computer operation.
Leveling the Machine
7KHPDFKLQHQHHGVWREHOHYHOHGLI\RXUZRUNRXWDUHDLVXQHYHQRULIWKH5DLO$VVHPEO\LVVOLJKWO\RIIWKHÀRRU7RDGMXVW
1. Place the machine in your workout area.
/RRVHQWKHORFNLQJQXWVDQGDGMXVWWKHOHYHOHUVXQWLOWKH\DUHHYHQO\EDODQFHGLQFRQWDFWZLWKWKHÀRRU
Do not adjust the levelers to such a height that they detach or unscrew from the machine. Injury to you or damage to the machine
can occur.
3. Tighten the locking nuts.
0DNHVXUHWKHPDFKLQHLVOHYHODQGVWDEOHEHIRUH\RXH[HUFLVH
Adjustments

Assembly / Owner’s Manual
19
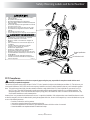
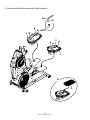
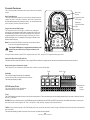
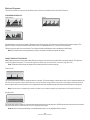
A Console Button Assembly I Roller
B Contact Heart Rate (CHR) Sensors J Rail Assembly
C Console Display K Pedal
D Water Bottle Holder L Storage Bin
E Resistance Fan M Static Handlebar
F Power Connector N Upper Handlebar
G Transport Roller O Bluetooth
®
Connectivity (not shown)
H Leveler
8VHWKHYDOXHVFDOFXODWHGRUPHDVXUHGE\WKHPDFKLQH·VFRPSXWHUIRUUHIHUHQFHSXUSRVHVRQO\7KHKHDUWUDWH
GLVSOD\HGLVDQDSSUR[LPDWLRQDQGVKRXOGEHXVHGIRUUHIHUHQFHRQO\2YHUH[HUFLVLQJPD\UHVXOWLQVHULRXVLQMXU\RU
GHDWK,I\RXIHHOIDLQWVWRSH[HUFLVLQJLPPHGLDWHO\
F
E
G
H
H
J
I
K
B
C
A
M
N
L
D
Features

Assembly / Owner’s Manual
20
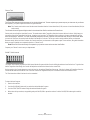
During an Interval workout, the ACTIVE segment will be red LEDs, and the REST segment will be green LEDs.
Maximum Burn Rate LED Marker
7KH0D[LPXP%XUQ5DWH/('0DUNHULVDQRUDQJH/('WKDWVKRZVWKHKLJKHVWUDWHRIFDORULHEXUQDFKLHYHGGXULQJWKHFXUUHQWZRUNRXW
Bluetooth
®
Synced Indicator Light
The Bluetooth
®
Synced Indicator Light shows when a device is paired with the App.
Calories
7KH&DORULHVGLVSOD\¿HOGVKRZVWKHHVWLPDWHG
calories that have been burned during the workout.
7KHPD[LPXPGLVSOD\LV
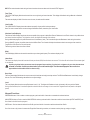
LCD Display Data
The console display shows the workout
measurements and current options.
Time
7KH7,0(GLVSOD\¿HOGVKRZVWKHWLPHFRXQWIRUWKHDFWLYHZRUNRXW7KHUHDUHWKUHHW\SHVRIWLPHGLVSOD\GHSHQGLQJRQWKHVW\OHRIZRUNRXW,QWHUYDO
Manual, or Standard.
ACTIVE:'XULQJDQ,QWHUYDOZRUNRXWWKH7,0(GLVSOD\ZLOOVKLIWEHWZHHQWKH$&7,9(DQG5(67LQWHUYDOVZLWKDQDXGLEOHFRQ¿UPDWLRQFRXQWLQJWKH
time down for the current segment. ACTIVE is the sprint, or high Intensity, segment of the Interval workout.
TOTAL: During a Manual workout, the TIME display will count up until the workout is ended. During a Standard workout, the total time of the workout
will count down.
7KHPD[LPXPGLVSOD\LV,IWKHWLPHFRXQWLVPRUHWKHZRUNRXWZLOOEHHQGHG
USER
TOT AL
ACTIVE
REST
TOT AL
Workout
Profile
Display
Time
Total Time
PAUSE/END
START
/ENTER
MAX
Interval
PROGRAMS
USER
USER
TOTAL
ACTIVE
REST
TOTAL
BURN
RATE
RESISTANCE
LEVEL
0
10
20
40
30
Target Burn Rate
LED Range
Bluetooth
®
Synced Indicator
Light
Calories
Burn Rate
Display
Console Features
The Console provides information about your workout on the display
screen.
Burn Rate Display
The Burn Rate Display shows the level of calories being burned per
minute. This rate is a function of Intensity, which is the current level
RI530SHGDOVSHHGDQGUHVLVWDQFHOHYHO$VHLWKHURIWKRVH
values increase, the Burn Rate will increase.
Target Burn Rate LED Range
The Target Burn Rate LED Range is a workout coach based on
WKHVHWWLQJVRIWKHVHOHFWHG8VHU3UR¿OH$UDQJHRI¿YH/('¶VDUH
DFWLYDWHGGXULQJDZRUNRXW7KH¿UVWRIWKH/('VLQWKHUDQJHLVD
suggested beginner level, with the higher LEDs being for a more
DGYDQFHG¿WQHVVXVHU7KH,QWHQVLW\RIWKHUDQJHLVEDVHGRQWKH
:RUNRXW3UR¿OH'LVSOD\
Note: %HVXUHWKH8VHU3UR¿OHLVFXUUHQWIRUDPRUHH[DFWFDORULH
burn rate and suggested target range.
The Target LED Range is a suggested workout level, and
VKRXOGRQO\EHIROORZHGLI\RXUSK\VLFDOÀWQHVVOHYHO
allows.
La page est en cours de chargement...
La page est en cours de chargement...
La page est en cours de chargement...
La page est en cours de chargement...
La page est en cours de chargement...
La page est en cours de chargement...
La page est en cours de chargement...
La page est en cours de chargement...
La page est en cours de chargement...
La page est en cours de chargement...
La page est en cours de chargement...
La page est en cours de chargement...
La page est en cours de chargement...
La page est en cours de chargement...
La page est en cours de chargement...
La page est en cours de chargement...
La page est en cours de chargement...
La page est en cours de chargement...
La page est en cours de chargement...
La page est en cours de chargement...
La page est en cours de chargement...
La page est en cours de chargement...
La page est en cours de chargement...
La page est en cours de chargement...
La page est en cours de chargement...
La page est en cours de chargement...
La page est en cours de chargement...
La page est en cours de chargement...
La page est en cours de chargement...
La page est en cours de chargement...
La page est en cours de chargement...
La page est en cours de chargement...
La page est en cours de chargement...
La page est en cours de chargement...
La page est en cours de chargement...
La page est en cours de chargement...
-
 1
1
-
 2
2
-
 3
3
-
 4
4
-
 5
5
-
 6
6
-
 7
7
-
 8
8
-
 9
9
-
 10
10
-
 11
11
-
 12
12
-
 13
13
-
 14
14
-
 15
15
-
 16
16
-
 17
17
-
 18
18
-
 19
19
-
 20
20
-
 21
21
-
 22
22
-
 23
23
-
 24
24
-
 25
25
-
 26
26
-
 27
27
-
 28
28
-
 29
29
-
 30
30
-
 31
31
-
 32
32
-
 33
33
-
 34
34
-
 35
35
-
 36
36
-
 37
37
-
 38
38
-
 39
39
-
 40
40
-
 41
41
-
 42
42
-
 43
43
-
 44
44
-
 45
45
-
 46
46
-
 47
47
-
 48
48
-
 49
49
-
 50
50
-
 51
51
-
 52
52
-
 53
53
-
 54
54
-
 55
55
-
 56
56


Bowflex Max Trainer M5 Le manuel du propriétaire
- Taper
- Le manuel du propriétaire
dans d''autres langues
Documents connexes
Autres documents
-
Nautilus E514 Le manuel du propriétaire
-
Hitachi CX86MP3UK Operating Instructions Manual
-
Microsoft Xbox One Manuel utilisateur
-
BodyCraft SPR Guide d'installation
-
Saeco RI9829/11 Manuel utilisateur
-
Tennant M-S680 Mode d'emploi
-
-
Kenmore 796.41393 Le manuel du propriétaire
-
GEAppliances PFE28RSH Technical Service Manual
-
LG 41262 Le manuel du propriétaire