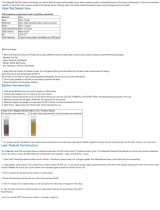
PurTest® Home Water Analysis Kit Instructions
Instructions: Chlorine/Copper/Nitrate/Nitrite Labeled(CL/CU/NA/NI)
4 Test Pads
1) Rinse out test vial and fill to 1/4” from top with water sample.
2) Take one CL/CU/NA/NI strip from foil pack, dip in water, swirl strip 3 times and remove.
DO NOT shake off excess water. Hold level for 2 seconds.
3) IMMEDIATELY read Chlorine pad by comparing to chart below. Next, read the Copper
test and after a total of 45 seconds has elapsed from when the test strip was first dipped
read the Nitrate/Nitrite tests.
NOTE: 1) Chlorine test colors will fade within minutes, therefore reading the
test immediately and as instructed is important.
2) If either the Nitrate or Nitrite test turn gray or light brown that test
should be interpreted as 0 ppm.
1. Rinse out test vial and fill to 1/4” from top with water sample.
2. Remove test strip from packet labeled ALK/pH/Hard. Pick up strip on end
with no pads.
3. Dip the Alk/pH/Hard strip in water for one second and remove.
4. Hold test strip level and wait ten (10) seconds. Compare to color chart below
in order starting with alkalinity, then pH, and hardness.
0 ppm 40 ppm 80 ppm 120 ppm 180 ppm 240 ppm 0 3 grains 6 grains 12 grains 24 grains
50 ppm 100 ppm 200 ppm 400 ppm
(Hold Test Strip)
4 5 6 6.5 7 8 9 10 12
pH
0 ppm .3 ppm .5 ppm 1 ppm 3 ppm 5 ppm
Iron Reagent Tablet
CONTAINS SULFITE
*DO NOT EAT*
(Hold Test Strip Here)
0 ppm .5 ppm 1 ppm 3 ppm 5 ppm 10 ppm 0 ppm 5 ppm 10 ppm 25 ppm 50 ppm
Total Chlorine Nitrate Nitrogen
(Hold Test Strip
Copper Nitrite Nitrogen
Test pads
Do Not Touch
Lead Test Instructions
PurTest® * Email Results For Free Advice * [email protected] * 1-800-788-4825 * www.purtest.com * Laboratory Certified P1211TC23
Test pad
Do Not Touch
Total ColiformTest Instructions
Coliform Indicator Color Chart
NEGATIVE
TEST
Note: Some water samples with a pH below 6.8 will cause the color indicator to
turn prematurely. This is not indicative of a positive result. Both the yellow color
and gas bubbles must be evident in order to establish a positive test result. Gel will
float to surface of sample indicating gas formation, sample below should be cloudy.
Disposal: Remove cap and add approximately 1 ml, (1/3 teaspoon) of household
bleach (chlorine bleach) to the tube and recap. Let the tube stand for about 4 hours.
Dispose of closed tube in trash. Do not open or reuse tube.
**Keep out of the reach of small children. Children should not use without adult
supervision.
**For MSDS information on this product call 1-800-788-4825.
PurTest® Coliform test is a screening test and cannot be used to certify water as
safe or unsafe for drinking. This test provides approximate results ONLY when used
in strict accordance with instructions. American Water Service LLC expressley
disclaims any liability resulting from the use of this product, or failure to follow
instructions or reliance of test results.
Alkalinity Hardness
Test Kit Includes:
1 Bacteria Test, 1 Lead Test, 2 Test each for Chlorine, Copper, Nitrate, Nitrite, Alkalinity, pH, Hardness, Iron,
2 Iron Reagent Tablets (USE WITH IRON TEST ONLY) 1 Test sample vial (use for test samples, rinse after performing each test)
Perform Iron test last as reagent tablets will discolor the test vial.
Testing Tips: 1) Carefully read each set of instructions before performing the tests. 2) Draw a fresh sample of water for each test.3) Exposure of the test strips to
any water, even moisture in the air can activate the test once removed from the protective packaging.
0 ppm 1.3 ppm 3 ppm 0 ppm .5 ppm 1 ppm 5 ppm 10 ppm
Test Vial
POSITIVE
TEST
Instructions: Iron Test (labeled Iron Test) 1 test pad on strip
1) Rinse out test vial and fill to 1/4” from top with water.
2) Remove iron reagent tablet (DO NOT EAT) from foil packet and place
in test vial.
3) Place cap on test vial and shake until tablet completely disintegrates.
4) Remove the iron test strip from foil package. DO NOT TOUCH PAD
5) Immerse test pad in sample for 2 seconds.
6) Remove test strip from sample with pad face up.
7) SHAKE ONCE TO REMOVE EXCESS WATER
8) Wait 60 seconds and compare to color chart.
PERFORM IRON TEST LAST
Instructions: Alkalinity/pH/Hardness Labeled (ALK/pH/Hard)
3 Test Pads
The Coliform Test is an easy-to-use method to indicate the presence
of Total Coliform Bacteria in a drinking water supply.
Chlorine Residual Precautions
Water samples with chlorine residual (tap water) tend to
suppress the growth of coliform bacteria when used with this test.
A sterile sampling bag containing a declorinating agent is provided
to collect the sample and neutralize any chlorine which may be
present in the water.
Sample Collection
1) Determine source and collect water sample or if from tap
(cold water) allow to run for 2 to 3 minutes or until the line is flushed.
2) Reduce tap water flow to a rate that will fill the water sampling bag slowly
without splashing. Tear off top of bag at scored line and pull tabs outward to
open bag. Do not touch bag opening or inner surface.
3) Fill bag to 4 oz. fill line, pull wire ends to close and whirl bag 3 complete
revolutions. Shake bag to dissolve tablet.
Caution: Do not allow tablet to fall out of the bag
4) Unwhirl sample bag and pull tabs outward to open bag. Fold one tape wire
inward to form a spout.
Test Procedure
1) Stand glass test tube upright and remove cap. Do not remove tablet from tube.
Do not touch the inner surface of the cap, tube, or handle tablet.
2) Carefully fill the test tube to the 10 ml line with water
sample and replace cap tightly. Do not mix or shake tube.
3) Store test tube at room temperature (between 70° - 85° F), out of direct sunlight,
for 48 hours. Do not disturb, handle, or shake tube during the designated
incubation period. If the storage conditions are not followed precisely, the
results of the test may vary and may not be valid.
4) Must observe test tube at 48 hours and compare to color chart below.
Sterile Sample Bag
Test Vial
1. Open Lead test pouch packet and take out all contents. The Pouch
contains a test vial, a dropper pipette, one PurTest® test strip and a
desiccant (to be discarded)
2. Using the dropper, place exactly seven drops of water sample into the test
vial.
3. SWIRL GENTLY FOR ONE (1) MINUTE. This is essential for the best
detection mixture to be properly dissolved. Then place the test tube on a
flat surface.
4. Place test strip into the test vial, with arrows pointing DOWN.
5. Waiting 10 minutes. Do not disturb the test strip or vial during this time.
Red lines appear on the strips.
6. Take test trip out of the vial and lay it on a flat surface with the arrows
pointing to the LEFT. Read results.
Negative: LEFT line (Next to the number 1) is darker than the RIGHT line (next
to the number 2)
Positive: RIGHT line (next to the number 2) is darker than LEFT line (next to the
number 1) or lines are equally as dark (both LEFT and RIGHT lines are dark)
7. NOTE: If no lines appear, or both lines are very light, the test did not work
properly, and the result is not valid.
If the test shows a positive result, your water sample may contain lead at a toxic
level.
Please not that PurTest® is a screening test and cannot be used to certify water
as safe or unsafe for drinking. PurTest® provides approximate results ONLY
when used in a strict accordance with instructions. American Water Service LLC
expressly disclaims any liability resulting from use of this product, failure to
follow instructions, or reliance on test results.
If you only
see one line
next to
number 1,
the test is
negative.
gel rises
to surface
many gas
bubbles
present
liquid below
gel is cloudy
indicator
turns yellow
liquid above
gel is clear
gel remains at
bottom of tube
indicator
remains red
or turns yellow
with few
gas bubbles
Test pads →
Do Not Touch
→
The PurTest® Lead Test can detect dissolvable below the EPA Action Level of 15
parts per billion (ppb).

Instrucciones para la prueba de plomo
La prueba PurTest de plomo puede detectar disueltos por debajo de la EPA
¡Nivel de acción! I de 15 partes por billón (ppb).
1. Abra el paquete de la bolsa de prueba de plomo y saque todo el
contenido. La bolsa contiene un vial de prueba, una pipeta cuentagotas,
un PurTest® tira reactiva y un desecante (para desechar).
2. Usando un cuentagotas, coloque exactamente siete gotas de muestra de
agua. en el vial de prueba.
3. GIRE SUAVEMENTE DURANTE UN (1) MINUTO. Esto es esencial para
el la mezcla de detección se disuelva correctamente. Luego coloque la
prueba
Negativo: la línea IZQUIERDA (junto al número 1) es más oscura y la línea
DERECHA {s iguiente al número 2}
Positivo: la línea DERECHA {junto al número 2} es más oscura que la línea
IZQUIERDA {junto al número 1}, o las líneas son igualmente oscuras {Ambas
líneas IZQUIERDA y DERECHA son oscuras}
7. NOTA: Si no aparecen líneas, o ambas líneas son muy claras, la prueba
no funcionó correctamente y el resultado no es válido. Si la prueba muestra un
resultado positivo, su muestra de agua puede contener plomo. a un nivel tóxico.
Tenga en cuenta que Purtest® es una prueba de detección y no se puede
utilizar para certificar agua como segura o no segura para beber. PurTest®
proporciona resultados aproximados SOLAMENTE cuando se usa estrictamente
de acuerdo con las instrucciones. Servicio de agua estadounidense LLC
renuncia expresamente a cualquier responsabilidad que resulte del uso de este
producto, la falla seguir instrucciones o confiar en los resultados de las pruebas.
Yo solo veo
uno
línea ne:rt m
número
1, la prueba es
negativa.
0 ppm 40 ppm 80 ppm 120 ppm 180 ppm 240 ppm 0 3 grains 6 grains 12 grains 24 grains
50 ppm 100 ppm 200 ppm 400 ppm
4 5 6 6.5 7 8 9 10 12
pH
0 ppm .3 ppm .5 ppm 1 ppm 3 ppm 5 ppm
0 ppm .5 ppm 1 ppm 3 ppm 5 ppm 10 ppm 0 ppm 5 ppm 10 ppm 25 ppm 50 ppm
0 ppm 1.3 ppm 3 ppm mpp 01 mpp 5 mpp 1 mpp 5. mpp 0
vial de la
prueba
Instrucciones: Alcalinidad/pH/dureza (ALK/pH/Hard) 3 adaptadores de prueba
1. Enjuague test vial y llenar de 1/4" de la parte superior con muestra de agua.
2. Tome una ALK/pH/Disco Duro tira de prueba de la bolsa de aluminio y
sumergir en agua para (1) segundo y quitar.
3. Mantenga tira de prueba y espere diez (10) segundos.
4. Comparar con carta de colores a continuación en orden, a partir de
alcalinidad, pH y terminando con dureza. Registrar los resultados de prueba.
Instrucciones: Test fer (étiqueté le fer) 1 Tampon de test sur le strip.
1) Rincer la fiole d'essai et le remplir au 1/4" de haut avec échantillon d'eau.
2) Retirez 1 fer réactif tablette de papillote et placer dans le flacon d'essai.
3) Placez un capuchon sur test flacon et agiter jusqu'à comprimé se désintègre
complètement puis retirer le bouchon du flacon d'essai.
4) Déposer (1) bande de test de film de fer package. Ne touchez pas le Pad
5) Immerger test pad dans l'échantillon pendant 2 secondes.
6) Retirer bande de test à partir de l'échantillon avec tampon face vers le haut.
7) Agiter une fois pour enlever l'excès d'eau.
8) Attendez 60 secondes et comparer à tableau de couleurs. Consigner les
résultats, tester à nouveau pour vérifier.
Test electrodos
no toque
Test
electrodos
Test electrodos
no toque
Tableta de reactivo
Hierro
CONTIENE sulfito
Tira de prueba (aquí)
Tira de prueba (aquí)
Tira de prueba (aquí)
Cloro Total Nitrato Nitrógeno
Nitrito NitrógenoCobre
Alcalinidad Durez
PurTest® Home Water Analysis Kit Instructions
Puntas de prueba: 1) Lea atentamente cada conjunto de instrucciones antes de realizar las pruebas. 2) Sacar una muestra de agua fresca para
cada prueba.3) Exposición de las tiras reactivas al agua, incluso la humedad en el aire puede activar la prueba una vez retirado del embalaje
de protección.
Instrucciones del kit ColiformTest total
Nota: Algunas muestras de agua con un pH inferior a 6,8 hará que el indicador de
color paraactivar prematuramente. Esto no es indicativo de un resultado positivo.
Tanto el color amarillo y burbujas de gas debe ser evidente para establecer un
resultado positivo de la prueba. Gel flotan hasta la superficie de la muestra que
indica la formación de gas, el ejemplo siguiente debe ser turbia.
Disposición: Retirar el tapón y añadir aproximadamente 1 ml (1/3 de cucharadita) de lejía
(cloro) al tubo y recapitular. Deje que el tubo en posición durante aproximadamente 4 horas.
Deseche el tubo cerrado en la basura. No abra o reutilizar el tubo.
**Mantener fuera del alcance de los niños pequeños. Los niños no deben utilizar sin la
supervisión de un adulto.
**Para MSDS información sobre este producto, llame al 1-800-788-4825.
PurTest Coliformes® es una prueba de detección y no pueden ser utilizados para certificar
como seguro o agua para beber. Esta prueba proporciona resultados aproximados únicamente
cuando se usa en estricta conformidad con las instrucciones. American Water Service LLC
declina expresamente cualquier responsabilidad derivada de la utilización de este producto, o
no seguirlas instrucciones o la dependencia de los resultados de la prueba.
PurTest® * Email Results For Free Advice * [email protected] * 1-800-788-4825 * www.purtest.com * Laboratory Certified
Indicador coliformes Color Chart
Encima del
gel líquido es claro
indicador permanece
roja o amarilla
con ningún
gel de burbujas de gas
permanece en la
parte inferior del tubo
Muchas
burbujas de gas
sube a la
superficie de gel
líquido por debajo de
gel está nublado el
indicador se vuelve de
color amarillo
Prueba
positiva
Prueba
negativa
Realizar la última prueba de hierro
Bolsas de muestreo estériles
La prueba de coliformes es un sencillo método para indicar la
presencia de bacterias coliformes totales en agua potable.
Cloro Residual precauciones
las muestras de agua con cloro residual (agua del grifo) tienden a
inhibir el crecimiento de bacterias coliformes cuando se utiliza con esta prueba.
Una bolsa estéril que contiene un agente declorinating es proporcionada
para recolectar la muestra y neutralizar todo el cloro que pueden estar
presentes en el agua.
1) determinar el origen y recoger muestras de agua del grifo o si
(agua fría) permiten ejecutar durante 2 a 3 minutos o hasta que la línea se lava.
2) Reducir el flujo de agua del grifo a un ritmo que va a llenar la bolsa de muestreo de agua l
entamente sin salpicaduras. Cortar la parte superior de la bolsa en línea rayada y tire de
las lengüetas hacia afuera paraabrir la bolsa. No toque la apertura de la bolsa o la
superficie interior.
3) Llene la bolsa a 4 oz. de la línea de llenado, tire de los extremos de cables para cerrar y
torbellino bolsa 3 vueltas completas. Agite la bolsa para disolver la tableta.
Precaución: No deje que la tableta a la caída de la bolsa
4) Unwhirl bolsa de muestreo y tire de las lengüetas hacia afuera para abrir la bolsa. Plegar
un cable de cintahacia adentro para formar un tubo.
Procedimiento de prueba
1) Soporte tubo de ensayo de vidrio vertical y retire la tapa. No retire tablet de tubo.
No toque la superficie interior de la tapa, el tubo, o manejar el tablet.
2) Rellenar con cuidado el tubo de ensayo hasta la línea de 10 ml con la
muestra de agua y sustituir la tapa herméticamente. No mezclar o agitar el tubo.
3) Guardar el tubo de ensayo a temperatura ambiente (entre 70° - 85° F), fuera de la luz
directa del sol, durante 48 horas. No molestar, manejar, o agitar el tubo durante el
periodo de incubación designado. Si las condiciones de almacenamiento no son seguidas
con precisión, los resultados de la prueba pueden variar y pueden no ser válidos.
4) Debe observar el tubo de ensayo a las 48 horas y comparar con el gráfico en color debajo.
† NOTA: Tanto el color amarillo como las burbujas de gas deben estar presentes para obtener un resultado positivo.
NOTA:
1. Los colores de la prueba de cloro se desvanecerán en minutos, por lo
tanto, es importante leer la prueba de inmediato y según las instrucciones.
2. Si la prueba de Nitrato o Nitrito se vuelve gris o marrón claro, esa prueba
debe interpretarse como 0 ppm.
1. Enjuague el vial de prueba y llénelo hasta 1/4 ”desde la parte superior con
muestra de agua.
2. Tome un CL / CU / NA / NI tirar del paquete de aluminio, sumergir en agua,
agitar la tira 3 veces y retirar. NO sacuda el exceso de agua. Mantenga el nivel
por 2 segundos.
3. INMEDIATAMENTE lea la almohadilla de cloro comparando con la tabla a
continuación. Luego, lea la prueba de cobre y después de que hayan transcurrido
un total de 45 segundos desde la primera vez que se sumergió la tira de prueba,
lea las pruebas de nitrato / nitrito.
Instrucciones: Cloro/Cobre/Nitrato/Nitrito Etiquetado (CL/CU/NA/NI)
4 Almohadillas de prueba
Kit de prueba Incluye: 1 prueba de bacterias, 1 prueba de plomo, 2 pruebas de cada uno para cloro, cobre, nitrato, nitrito, alcalinidad, pH,
dureza, hierro, 2 tabletas reactivas de hierro (UTILICE SOLO CON LA PRUEBA DE HIERRO) DESPUÉS DE REALIZAR CADA PRUEBA).
REALICE LA PRUEBA DE HIERRO AL ÚLTIMO YA QUE LAS TABLETAS DE REACTIVO DECOLORARÁN EL FRASCO DE PRUEBA
-
 1
1
-
 2
2
dans d''autres langues
- English: PurTest 777 Operating instructions
- español: PurTest 777 Instrucciones de operación
Documents connexes
Autres documents
-
Lamotte 3587 Manuel utilisateur
-
API API Aquarium Test Kit Mode d'emploi
-
 WaterSafe WATERSAFE-WS-425SPT Mode d'emploi
-
Watts 7100104 Guide d'installation
-
 RainSoft HDINSTIUDWS Manuel utilisateur
-
GE GXRV10ABL01 Manuel utilisateur
-
GE GXRM10RBL Manuel utilisateur
-
GE GXRM10RBL Manuel utilisateur
-
 Red Sea pH/Alkalinity Le manuel du propriétaire
-
 Red Sea Phosphate Manuel utilisateur


