Lamotte 3587 Manuel utilisateur
- Catégorie
- Imprimer
- Taper
- Manuel utilisateur
Ce manuel convient également à

W aterLink
n
F
Touch
F
For Code/ Para los código / Pour les code
3587
Instruction Manual
Manual de Instrucción
Instruction Manuel

2

3
SETUP
BEFORE FIRST USE
¬ Fully charge battery using the Spin Touch USB cable and adapter plug in AC
outlet.
¬ Ensure your Spin Touch has latest fi rmware
1. Download and install WaterLink® Connect Application for Windows at
http://softwarecenter.lamotte.com/. Select WaterLink® Connect Software
for Windows FREE Download.
2. Plug meter into the computer with the provided USB cable and launch
WaterLink Connect Application from the Start Menu.
3. Any fi rmware updates will automatically be applied to the meter.
METER
1. The meter can be powered from an AC outlet, a computer or the internal battery.
2. Use the USB cable and the adapter to plug the meter into an AC outlet.
3. Use the USB cable to connect the meter to the USB port of a computer.
CHARGE THE BATTERY
1. Use the USB cable and the adapter to plug the meter into an AC outlet or use the
USB cable (included) with a car charger (not included) to charge the battery. (Anker
PowerDrive 2, DC 12/24V, 5V = 4.8A, Part Number A2310 recommended.)
2. The battery icon on the screen will show the battery status. Charge the battery until
the battery indicator is full.
FIRMWARE UPDATES
Occasionally, the fi rmware in the Spin Touch will require updates. To do so:
1. Visit
http://softwarecenter.lamotte.com/ and download the WaterLink
®
Connect
application for Windows.
2. Plug the Spin Touch into the computer using the included USB cable.
3. Open the WaterLink
®
Connect desktop application and wait for the update to
complete.
Once the update is complete, it is safe to close WaterLink
®
Connect and unplug the lab.
After updating fi rmware it is recommended that the LED and Calibration Procedure on
page 18 be performed.
NOTE: When a prompt to update the fi rmware is received, the options Update Now or
Remind Me Later will be displayed. If Remind Me Later is chosen, the update prompt will
be displayed again in 23 hours. Or, to update the fi rmware at any time, open WaterLink
Connect, go to Settings>Service Settings>Get Updates.
PC CONNECTION
When the WaterLink
®
Spin Touch
®
is connected to a computer via USB, the onboard
touchscreen becomes disabled and operation of the lab is performed using the WaterLink
®
Connect application for Windows
®
. This application is available for free at http://
softwarecenter.lamotte.com/
. Via the WaterLink
®
Connect desktop application, results
from the Spin Touch can be transferred to a water analysis program such as WaterLink
®
Solutions
™
.
SETUP PC CONNECTION

4
DEVICE CONNECTION
The WaterLink
®
Spin Touch
®
supports connections to a Windows
®
based PC (over USB) and
to Android and iOS mobile devices (via Bluetooth).
CONNECTING VIA USB
Using the provided USB cable, the WaterLink
®
Spin Touch
®
can be connected to a Windows
®
based PC. Before connecting a meter via USB, download and install the free WaterLink
®
Connect Windows
®
application from http://softwarecenter.lamotte.com. When the
WaterLink
®
Spin Touch
®
is connected to the PC via USB, the onboard touch screen controls
will be disabled and operation of the meter is performed using the WaterLink
®
Connect
application. LaMotte off ers robust water analysis programs as well, such as WaterLink
®
Solutions
™
, to collect test results and off er detailed treatment recommendations. Learn
more about LaMotte software products at
http://softwarecenter.lamotte.com.
CONNECTING VIA BLUETOOTH
The WaterLink
®
Spin Touch
®
is capable of connecting to a Bluetooth enabled device, such
as a phone or tablet. The Spin Touch is also compatible with a LaMotte Bluetooth Printer
[Code 5-0066]. Other Bluetooth printers are not supported.
Transferring results over Bluetooth to a mobile device requires that a mobile app is
installed on the device and an active account for the associated software program. For
example, with an active WaterLink
®
Solutions
™
account and the WaterLink
®
Solutions
™
mobile app on a phone or tablet, results can be transferred from the meter into the
application. Mobile apps for LaMotte software products are available from iTunes (for
iOS devices) and Google Play (for Android devices). Learn more about LaMotte software
products at
http://softwarecenter.lamotte.com.
To transfer results from the WaterLink
®
Spin Touch
®
to a LaMotte software product mobile
app:
1. Log into the LaMotte software product mobile app.
2. Search for a customer or Site record. You may need to create one before you can
begin testing.
3. Start a Water Test in the mobile app.
4. Perform a water test from the Spin Touch onboard touchscreen normally. The Spin
Touch and the Bluetooth enabled mobile device will connect automatically.
5. When the connection is available the
will light on the touch screen. When the
is dim, the meter and device are not connected. Tap the
to transfer results to the
mobile app.
Whenever the
appears on the touch screen the Spin Touch is capable of connecting
to the Mobile Bluetooth Printer (Code 5-0066). The
button will be highlighted when
connected and dim when not connected.
The Spin Touch cannot connect to both mobile device and the printer at one time. (See the
Save, Print and Send, page 8)
USING BLUETOOTH LOW ENERGY
The WaterLink
®
Spin Touch
®
will automatically connect to the nearest Bluetooth enabled
phone or tablet or printer. It is not necessary to pair the Spin Touch to the Bluetooth
enabled device. Barriers to wireless signals can reduce the range of wireless devices.
The WaterLink Spin Touch will work best if there are no walls between it and the receiving
devices.
DEVICE CONNECTION

5
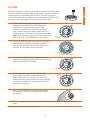
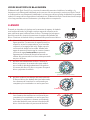
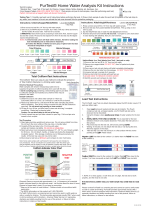
FILLING
When the syringe is placed in the water sample, and the plunger
is pulled all the way up, the syringe will hold more than enough
sample water to adequately fi ll the disk. The syringe is held
vertically and the tip is inserted into the fi ll hole on the disk. The
plunger is pressed slowly and smoothly to fi ll the disk.
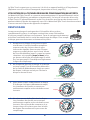
1. Fill the disk using slow, even pressure. The
sample water will fi ll the spaces between
the baffl es in a counterclockwise order.
Each space will fi ll from the bottom to the
top. Sample water should be added until the
sample water in the fourth chamber fi lls to the
top of the chamber slightly past the embossed
fi ll line. It is OK to fi ll slightly past the fi ll line.
Correct Fill
(Fill line)
2. Do not overfi ll the disk. If the disk is overfi lled,
sample water will fl ow out of the overfl ow
hole in the center of the disk. The disk is not
leaking. Dry the disk and run the test.
Overfilled
(Dry disk before placing in meter)
3. Do not under fi ll the disk. If the disk is under
fi lled, the reagent chambers will not fi ll entirely
and results will be inaccurate.
Underfilled
4. Do not introduce air bubbles into the disk.
The reagent chambers will not fi ll entirely
and results will be inaccurate. As soon as a
bubble starts to form, pull back on the plunger
to draw the bubble out of the disk. Begin the
fi lling process again.
Air
Bubble
5. Wet disks should be dried thoroughly with a
lint free wipe. The disk should be handled by
the edges.
6. Disks should be fi lled and used within 10 minutes. They cannot be fi lled ahead of
time.
For fi lling and troubleshooting tips go to:
www.lamotte.com/spin_support/
FILLING

6
GENERAL OPERATING PROCEDURES
METER
When a fi lled disk is placed in the chamber and the lid is closed, the meter spins at high
speed to distribute the sample to the test wells. Next the meter slows to maximize the
pumping action of the stainless steel mixing beads as the reagents mix with the sample
water. Each reaction is then read at the proper time and wavelength for that reagent
system.
The button located in the lower center of the top of the meter turns the
instrument on and off .
The Blue indicator light of the on/off button indicates the status of the instrument.
Steady blue light – the blue LED will remain steady to indicate that the meter is on and
ready to run a test.
Blinking blue light (three blinks/second) – a test is in progress and the disk is spinning. Do
not open the lid when the disk is spinning.
Care should be taken when closing the lid. Do not slam the lid. Wiring between the lid and
the body of the photometer passes through the hinge. The meter will not run with the lid
open.
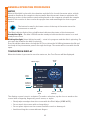
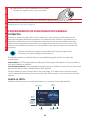
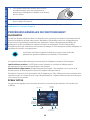
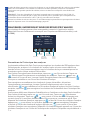
TOUCHSCREEN DISPLAY
When the button is pressed to turn the meter on, the Test Screen will be displayed.
07:11 AM
16-Apr-20
Water type
Disk Series
Fresh
FF104
Tap to
Start Test
Water Type
Start
Test
Disk
Type
Power/
Battery
Status
Date &
Time
Test
History
Settings
The display screen is touch-activated. To make a selection, tap the icon or word on the
screen with a fi ngertip, fi ngernail, pencil eraser, or stylus.
¬ Gently wipe smudges from the screen with the Cloth Wipe (3580-WIPE).
¬ Do not touch the screen with a sharp object.
¬ Do not place objects on the screen that will scratch or damage it.
¬ Avoid touching the screen with wet fi ngers.
GENERAL OPERATING PROCEDURES

7
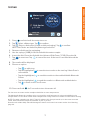
TESTING
07:11 AM
16-Apr-20
Water type
Disk Series
Fresh
FF104
Tap to
Start Test
1. Press and hold until the meter turns on.
2. Tap
. Select a Water type. Tap to confi rm.
3. Tap
. Select a disk series (found on disk packaging). Tap to confi rm.
NOTE: Disk Series are limited by Water type selection.
4. Remove a disk from the packaging.
5. Use the syringe (1189) to fi ll the disk with the water sample.
6. Insert the disk. Cover the disk with the Universal Disk Cover (1719). Close the lid.
7. Tap
to start test. Tap to cancel the test. If the test is cancelled discard the
disk.
8. The results will be displayed.
9. Choose an option.
¬ Tap
to add a tag.
¬ Tap the highlighted
to save the test results to the test log if Auto Save is
not enabled.
¬ Tap the hightlighted
to send the results to the enabled Mobile Bluetooth
Printer.
¬ Tap the highlighted
to send the results to a Bluetooth enabled device.
¬ Tap
to return to the Test Screen.
10. Press and hold
for 2 seconds to turn the meter off .
For the most accurate results samples should be at room temperature.
The blank well allows the readings to be corrected for small amounts of color and turbidity in the
sample water. For the best results allow samples with a large amount of solids to settle before testing.
NOTE: For water samples over 100 °F (38 °C) subtract 0.3 from pH result or, for the most accurate
result, wait until water sample is below 90 °F (32 °C) to test.
Remove salt residue daily. Salt will damage the meter and cause inaccurate results. See Cleaning,
page 20.
GENERAL OPERATING PROCEDURES

8
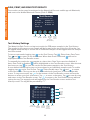
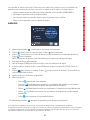
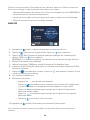
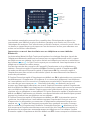
SAVE, PRINT, AND SEND TEST RESULTS
Test results can be saved, transferred to the WaterLink Connect mobile app via Bluetooth,
and sent to the Mobile Bluetooth Printer (Code 5-0066).
Test Time 07:11:34 16-Apr-2020
ALK 133
G HARD 77
pH 5.7
PHOS 0.6
AMMO 0.5
NITRITE 1.1
NITRATE 23
Transfer
Results
via
Bluetooth
(Not Available)
Return
to Test
Screen
Save
Results
Print
Results
Test Results
Tagging
Test History Settings
The WaterLink Spin Touch can log test results for 250 water samples in the Test History.
The results for the most recent sample will be located at the top of the list. All results can
be logged automatically or results for an individual sample can be logged after the sample
has been tested.
To turn on automatic logging, tap
on the Test Screen. Tap . Select Auto-Save Tests.
Tap
and
ut
t
t
o
to return to the test screen. When Auto Save is selected will not be
highlighted on the Test Results screen.
To manually log results for one sample at a time, Auto-Save Tests must be disabled. If
Auto-Save Tests is disabled
will be highlighted on the Test Results screen. After the test
has been run, tap
to save the results for that water sample to the Test History.
A user defi ned identifi cation tag can be assigned to an individual sample result. To enable
tagging, tap
on the Test Screen. Tap . Select Enable tags. Tap and
su
u
u
u
u
lt
to return
to the test screen. The tag can be up to 4 hexadecimal characters. It cannot begin with
a zero. To tag a test result, tap
on the bottom of the Test Results screen and use the
buttons to enter up to four characters. Tap
to erase a character. Tap to save the tag
and return to the Test Results screen. Tap
to return to the Test Results screen without
saving the tag. The tagged result will appear on the Test Results screen and the Test
History screen. The tag will be preceded by “T-“.
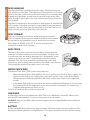
06:46 16-Apr Fresh FF104
00:22 16-Apr Fresh FF104
21:44 16-Apr Fresh FF104
21:43 16-Apr Fresh FF104
20:41 16-Apr Fresh FF104
20:36 16-Apr Fresh FF104
Select All/
De-Select All
Test History
View
Selected
Results
Delete
Selected
Results
History
Settings
Select
Auto Save
Go to Top
Go to Bottom
Scroll up
or down
the test
list by 5
entries
Home
GENERAL OPERATING PROCEDURES

9
Logged results are viewed in Test History. Controls for viewing and managing single or
multiple test records are located on the Test History screen. Tap the checkbox next to a
test record to select it, then tap one of the buttons along the bottom to perform an action
with the selected records.
Print or Send Results to a Bluetooth Phone or Tablet
The WaterLink Spin Touch can print to the Mobile Bluetooth Printer or send test results to a
Bluetooth-enabled device such as a phone or a tablet. The highlighted
or will show
which function is active. The Spin Touch cannot connect to the printer and connect to a
phone or tablet at the same time.
There are two modes of operation for connecting to the printer and a phone or tablet – Fast
Printer Connect ON and Fast Printer Connect OFF. The default mode is Fast Printer Connect
ON. Fast Printer Connect can be turned on or off from the Bluetooth Menu that is located in
the Settings Menu.
If Fast Printer Connect is ON, the meter will connect immediately to the printer upon
recognizing it. It will also connect to a phone or tablet but priority is given to the printer
connection. The printer will start printing immediately when
is tapped. The will dim
in intensity while the printer is printing. Fast Printer Connect should be ON if results will
be printed more frequently than results will be sent to a phone or tablet. It can remain
selected if results will only be sent to a phone or tablet. If Fast Print Connect is ON, and the
printer is on, the printer will have to be turned off before results can be sent to a phone or
tablet.
If Fast Printer Connect is OFF, the meter has the opportunity to connect to a phone or
tablet at all times other than when the printer is actually printing a test. The meter will
connect to the printer only after
has been tapped so printing will be delayed a few
seconds while the connection to the printer is being established. The
will dim in
intensity while the printer is printing. After printing, the meter will automatically reconnect
to the phone or tablet. Fast Printer Connect should be OFF if results will be sent to a phone
or tablet most frequently and printed less often.
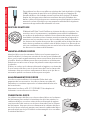
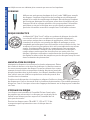
SYRINGE
A plastic 3 mL syringe (Code 1189) is used to fi ll the disks. A
precision tip on the syringe fi ts into the fi ll hole on the disk. The
syringe tip should not be removed from the syringe. Syringes should
be cleaned between water samples. Pump air in and out of the
syringe a few times to clear the previous sample or rinse the syringe
with a small amount of the next water sample before fi lling it with
the next sample.
REAGENT DISK
The WaterLink
®
Spin Touch
®
uses a disk reagent system. The dried
reagents are packaged in single test amounts in a sealed, polystyrene
disk. Stainless steel mixing beads in the reaction chambers mix the
sample water and the dried reagents. Tests for all factors in the series
are performed at one time. It is not possible to isolate the well for a
single factor and perform a test for one test factor only. Single-use
disks contain reagents for a single series. Disks should not be fi lled in
the meter chamber.
GENERAL OPERATING PROCEDURES

10
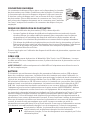
DISK HANDLING
The disk should be handled only by the edges. Avoid touching the
top or bottom of the disk. The light passes through the non-frosted
areas of the disk so these areas must be kept free of smudges and
fi ngerprints. Wet disks should never be placed in the meter. Wet
disks should be dried with a lint free cloth before placing them into
the chamber.
The disk is positioned in the chamber by aligning the D-shaped hole
in the center of the disk over the D-shaped hub in the photometer
chamber. The disk should be placed gently on the hub. There is no
need to fi rmly press the disk down onto the hub.
DISK STORAGE
Disks are sensitive to moisture. Avoid opening more packs
than are needed. Disks have a limited shelf life and should not
be exposed to the humidity in the air more than necessary.
Store disks at 70-80 °F/21-27 °C. Do not transport the
meter with a disk in the chamber.
DISK COVER
The black disk cover is placed over the disk in the photometer
chamber to reduce interference from stray light. The disk cover
is positioned over the disk by aligning the D-shaped hole in the
center of the disk over the D-shaped hub in the photometer
chamber. The disk cover should be placed gently on the hub.
There is no need to fi rmly press the disk cover down onto the hub.
The test will be aborted if the disk cover is not used.
METER CHECK DISK
The Meter Check Disk (1705) serves two purposes:
¬ When the Meter Check Disk (MCD) is run as an option from the Disk Series menu, the
values on the display are compared to the values on the chart on the Meter Check
Disk package to determine whether the meter is reporting results in the expected
ranges.
¬ If the Meter Check Disk is inserted in the meter and Rotary Calibration is chosen from
the Settings Menu, the alignment of the hub and disk is evaluated. The results are
analyzed and reported as Pass or Fail.
For use of the Meter Check Disk see page 18.
USB CABLE
A USB cable connects the WaterLink
®
Spin Touch
®
to a Windows
®
-based PC. When used
with the AC Power Adapter, it connects the meter to an AC outlet.
WARNING: only use the USB cable and wall adapter that are supplied with the kit. Make no
substitutions.
BATTERY
A fully charged battery will last for approximately 150 tests under average conditions. The
battery life will vary based on usage patterns. The meter should be turned off after testing
GENERAL OPERATING PROCEDURES

11
to prolong the battery life. The standard life cycle of a lithium ion battery is 500 cycles.
The battery will fully charge in approximately 10-12 hours. The battery is designed to be
charged overnight and should be charged indoors only. The battery is rated at 12 V and 8.1
AH capacity. Power the meter from the battery pack or from AC power. The USB cable and
AC adapter are used to plug the meter into an AC outlet. WARNING: only use the AC adapter
supplied with this equipment. Do not substitute.
The battery charge status is indicated by the battery icon on the display. The battery icon
will indicate when the battery charge is full, partial, low, empty or charging. The empty
battery icon will fl ash to indicate that meter should be connected to AC power source. If the
meter continues to be used at low battery power without connecting it an AC power source,
the meter will go into an auto-shutdown mode. In this mode the meter will be locked until
meter is connected to an AC source and the battery is charged to a suffi cient voltage. While
charging, the charging battery icon will be displayed. The meter should
remain plugged in until the battery is fully charged. When the battery is
completely charged, the charging icon will change to the full battery
icon.
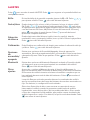
SETTINGS
Tap to enter the SETTINGS menu. Tap to return to the test screen at any time.
Brightness
The brightness level of the display can be adjusted from 00 to 10. Tap
and to adjust the brightness. Tap to exit to the Settings menu.
Date/Time
The Year, Month, Day, Format, Hour, Minute, AM/PM can be set. Tap or
to adjust the displayed value. Tap to move to the next value. After
the last value has been chosen (minutes for 24 hour format, AM/PM for
12 hour format) tap
to return to the Settings menu. Tap to exit to
the Settings menu at any time.
Set
Language
There are ten language options – English, French, Spanish, German,
Dutch, Swedish, Portuguese, Italian, Turkish, Chinese. Tap selection. Tap
to exit to the Settings menu.
Calibration
Tap to run an angle calibration to evaluate the alignment of the hub and
disk. Tap
to exit to the Settings menu.
Power
Options
There are three power options: Auto Dim Time, Auto Off Time, and Power.
Tap the options then tap a selection. Tap selection. Tap
to exit to the
Settings menu.
Bluetooth
There are two Bluetooth options: Bluetooth Enabled and Fast Printer
Connect that are used to print test results. Tap
to exit to the Settings
menu.
GENERAL OPERATING PROCEDURES

12
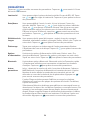
Other
Settings
About… lists the Serial Number, Firmware Version, Bluetooth MAC address,
Bluetooth Version and Test Count. The Test Count shows the number of
complete tests that have been performed over the lifetime of the meter.
Tap
to return to the Settings menu.
Ranges Enabled allows the option of having test results that are out of the
range of the reagent system displayed in red. The default setting is on.
Select Disk Detection to display an error message and abort the test when
improper testing conditions, such as No Disk, No Disk Cover, Used Disk or
Meter Check Disk, are present that would result in inaccurate or no test
results. The default setting is OFF. Tap
to return to the Settings menu.
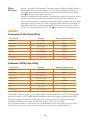
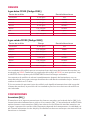
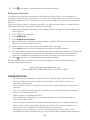
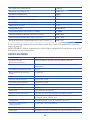
RANGES
Freshwater FF104 (Code 4351)
Test Factor Range Display Abbreviation
Alkalinity 0-250 ppm ALK
Ammonia 0.0-4.0 ppm AMMO
Hardness 0-500 ppm G HARD
Nitrate 0-250 ppm NITRATE
Nitrite 0.0-2.0 ppm NITRITE
pH 4.5-10.0 pH
Phosphate 0.0 - 2.0 ppm PHOS
Saltwater FF203 (Code 4352)
Test Factor Range Display Abbreviation
Alkalinity 0-350 ppm ALK
Ammonia 0.0-4.0 ppm AMMO
Calcium 200-800 ppm Ca
Magnesium 500-2200 ppm Mg
Nitrate 0-60 ppm NITRATE
Nitrite 0.0-2.0 ppm NITRITE
pH 6.5-10.0 pH
Phosphate 0.0 - 2.0 ppm PHOS
Test results that are out of range of the reagent system wil be RED. RED test results may
not be accurate. Go SETTINGS>Other Settings to turn the Ranges Enabled feature OFF.
Testing samples for Nitrate immediately after treatment with a chlorine neutralizer
containing sodium thiosulfate will give low results. Retest in 2-3 days.
If the concentration for one test factor is signifi cantly out of the range for the reagent
system, the accuracy of the results for the other test factors may be aff ected.

13
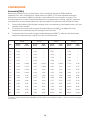
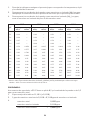
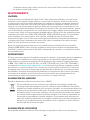
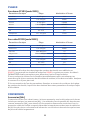
CONVERSIONS
Ammonia (NH
3
)
Ammonia in water occurs in two forms: toxic unionized ammonia (NH
3
) and the
relatively non-toxic ionized form, ammonium ion (NH
4
+
). This test method measures
both forms as ammonia (NH
3
) to give the total ammonia
concentration in water. The
actual proportion of each compound depends on temperature,
salinity, and pH. A greater
concentration of unionized ammonia is present when the pH value and salinity increase.
1. Consult the table to fi nd the percentage that corresponds to the temperature, pH, and
salinity of the sample.
2. To express the test result as ppm Unionized Ammonia (NH
3
), multiply the Total
Ammonia test result by the percentage from the table.
3. To express the test result as ppm Ionized Ammonia (NH
4
+
), subtract the Unionized
Ammonia determined in step 2 from the Total Ammonia.
10°C
15°C 20°C
25°C
pH
Fresh
water
1
Salt
water
2
Fresh
water
Salt
water
Fresh
water
Salt
water
Fresh
water
Salt
water
7.0 0.19 — 0.27 — 0.40 — 0.55 —
7.1 0.23 — 0.34 — 0.50 — 0.70 —
7.2 0.29 — 0.43 — 0.63 — 0.88 —
7.3 0.37 — 0.54 — 0.79 — 1.10 —
7.4 0.47 — 0.68 — 0.99 — 1.38 —
7.5 0.59 0.459 0.85 0.665 1.24 0.963 1.73 1.39
7.6 0.74 0.577 1.07 0.836 1.56 1.21 2.17 1.75
7.7 0.92 0.726 1.35 1.05 1.96 1.52 2.72 2.19
7.8 1.16 0.912 1.69 1.32 2.45 1.90 3.39 2.74
7.9 1.46 1.15 2.12 1.66 3.06 2.39 4.24 3.43
8.0 1.83 1.44 2.65 2.07 3.83 2.98 5.28 4.28
8.1 2.29 1.80 3.32 2.60 4.77 3.73 6.55 5.32
8.2 2.86 2.26 4.14 3.25 5.94 4.65 8.11 6.61
8.3 3.58 2.83 5.16 4.06 7.36 5.78 10.00 8.18
8.4 4.46 3.54 6.41 5.05 9.09 7.17 12.27 10.10
8.5 5.55 4.41 7.98 6.28 11.18 8.87 14.97 12.40
1
Freshwater data from Trussel (1972).
2
Seawater values from Bower & Bidwell (1978). Salinity for Seawater values = 34% at an ionic strength
of 0.701 m.

14
FOR EXAMPLE:
A fresh water sample at 20°C has a pH of 8.5 and the test result is 1.0 ppm as Total
Ammonia.
1. The percentage from the table is 11.18% (or 0.1118).
2. 1 ppm Total Ammonia x 0.1118 = 0.1118 ppm Unionized Ammonia
3.
Total Ammonia 1.0000 ppm
Unionized Ammonia
_
0.1118 ppm
Ionized Ammonia = 0.8882 ppm
To convert Ammonia (NH
3
) to Ammonia-Nitrogen (NH
3
-N) multiply by 0.823
To convert Nitrite (NO
2
) to Nitrite-Nitrogen (NO
2
-N) multiply by 0.304
To convert Nitrate (NO
3
) to Nitrate-Nitrogen (NO
3
-N) multiply by 0.226
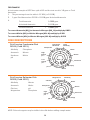
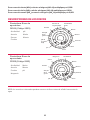
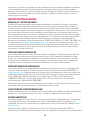
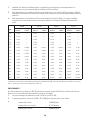
DISK DESCRIPTIONS
Fish Farming Freshwater Disk
FX104 (Code 4351)
Alkalinity
Ammonia
Hardness
pH
Phosphate
Nitrate
Nitrite
pH
Nitrite
To ta l
Alkalinity
Low
Range
pH
Blank
Low Range
Hardness
High
Range
pH
Empty
Nitrate
Phosphate
Ammonia
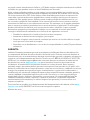
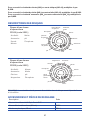
Fish Farming Saltwater Disk
FX203 (Code 4352)
Alkalinity
Ammonia
Calcium
Magnesium
Nitrate
Nitrite
pH
Phosphate
pH
Nitrite
Alkalinity
High
Range
pH
Blank
Magnesium
Phosphate
Empty
Nitrate
Calcium
Ammonia
NOTE: Colored reagents may be visible in the disk before adding sample water.

15
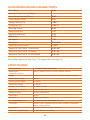
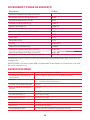
ACCESSORIES AND REPLACEMENT PARTS
Description Code
WaterLink
®
Spin Touch
®
FF Meter
Water Sample Bottle (60 mL) 0688
Plastic Beaker, 50 mL 0944
Syringe with tips (3) 1189-3
Syringe tips (3) 1189-TIP
Cleaning Tissues 0669
Meter Check Disk 1705
Universal Disk Cover 1719
USB Cable 1712
AC Adapter 1715
Cloth Wipe 3580-WIPE
Mobile Bluetooth Printer 5-0066
WaterLink
®
Spin Touch
®
Counter Mat 3580-MAT
WaterLink
®
Spin Touch
®
FF Manual 3587-MN
WaterLink
®
Spin Touch
®
FF Quick Guide 3587-QG
For available WaterLink
®
Spin Touch
®
FF reagent disks, see page 14.
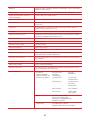
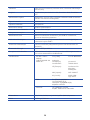
SPECIFICATIONS
Instrument Type Centrifugal Fluidics Photometer
Wavelengths
(interference fi lters)
390 nm, 428 nm, 470 nm, 525 nm, 568 nm, 635 nm
Display Color Capacitive Touchscreen, 3.5 in, 320 x 240 pixel resolution
Wavelength Accuracy ±2 nm
Wavelength Bandwidth 10 typical
Photometric Range -2 to 2 AU
Photometric Precision ±0.01 AU at 1.0 AU
Photometric Accuracy ±0.01 AU at 1.0 AU
Sample Chamber Accepts prefi lled disk
Light Source 6 LEDS
Detectors 6 silicon photodiodes
Pre-Programmed Tests Yes, with automatic wavelength selection
Languages English, French, Spanish, German, Dutch, Swedish, Portuguese,
Italian, Chinese, Turkish
Temperature Operation: 0-50 °C; storage – 40-60 °C
Operation Humidity Range 0- 90 % RH, non-condensing

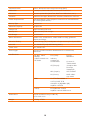
16
Communication USB-C, Bluetooth low energy technology (BLE)
Calibration Factory set, fi eld calibration via internet connection
Firmware Internet updateable (New Test, New Test Calibrations, etc.)
Software Android & iOS Apps, WaterLink® Solutions, WaterLink® Connect
Power Requirements USB wall adapter, USB computer connection or internal lithium
ion rechargeable battery
Battery Type Lithium ion
Minimum Capacity 12 V/2.6 AH
Charge Life Approximately 150 tests
Battery Life Approximately 500 charges
Full Charge 10-12 hours
Water Resistance Rubber over-molded base, rubber USB Port Plug, gasketed
display and hinge.
Electrical Rating Rated voltage (5V), Rated power of input current (1.6 A) at USB C
Auto Off Yes, default 15 (only with battery power)
Power Save Yes, default OFF
Data Logger 250 test results stored for download to PC or transfer by
Bluetooth
Certifi cations
EZ-BLE
™
PRoC
™
Module,
CYBLE-022001-00
RF Radio:
FCC (USA):
Industry
Canada (IC)
Certifi cation:
FCC ID:
WAP2001
License IC:
7922A-2001
CE (Europe): Complies with
Directive
1999/5/EC
MIC (Japan): 005-101007
KC (Korea): MSIP-CRM-
Cyp-2001
EMC: EU: ETSI EN 301489-1
US: FCC PART 15 B
CAN ICES-3 (B)/NMB-3(B)
AS/NZS: CSPR 22
Safety: EU: EN61010-1:2010
AS/NZS: national diff erences
Dimensions 21.6 X 12.4 X 10.4 cm (L X W X H)
8.5 X 4.9 X 4.2 in
Weight 0.79 Kg, 1.74 lb

17
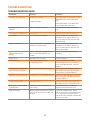
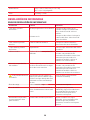
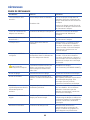
TROUBLESHOOTING
TROUBLESHOOTING GUIDE
Problem Reason Solution
“No Disk, Test Aborted” No disk in chamber
Empty chamber
Place fi lled disk in chamber. Cover
with disk cover. Select OK. Start
test.
Insert fi lled disk. Cover with disk
cover. Select OK. Start test.
“No Disk Cover, Test
Aborted”
Disk cover was not used Use disk cover. Select OK. Start
test.
“Lid Open, Test Aborted” Lid opened Close lid. Select OK. Start test.
“Used Disk” Reacted disk in chamber Select “Continue” to go to Test
Results screen. Select “Abort” to
go to Testing screen and run test
with new disk.
Meter Check Disk Meter Check Disk in chamber
instead of reagent disk
Select “Continue” to go to Test
Results screen. Select “Abort” to
go to Testing screen and run test
with reagent disk.
!
on Test History
screen
Meter is using the default blank
due to under fi lled disk or air
bubble.
Solution: Fill disk correctly (see
FILLING)
Range Error Raw data out of range Contact Support
Output Error Decreased light intensity.
Possibly dirty lens
Clean lens (see CLEANING).
Follow Range Check Procedure. If
error message persists, contact
Support.
Consistently unexpected
high results for metals
Metals may actually be present Repeat test with distilled water. If
the results still show that metals
are present, contact Support.
Alkalinity result of 0 ppm Usually due to an underfi lled disk. Review the disk fi lling procedures
and test again. If problem persists,
contact Support.
Unexpected results Dirty disk cover Gently clean disk cover apertures
with pipe cleaner or lint free cloth.
Disk type is not an option
in Disk Series
Software or meter fi rmware is
out of date.
Update WaterLink Connect at
softwarecenter.lamotte.com
High pH results Water sample temperature above
100 °F (38 °C) interferes with pH
reagent
For water samples over 100 °F
(38 °C) subtract 0.3 from pH result
or, for the most accurate result,
wait until water sample is below 90
°F (32 °C) to test

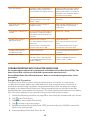
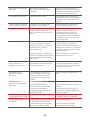
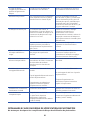
18
Disc not spinning Lid open, meter not powered on,
low battery, disk or disk cover
pressed down too tightly on hub
Close lid, power on meter, charge
the battery or plug meter into a
stable power source, remove the
disk/disk cover and place back in
the meter more gently
Fast electrical transients may
disrupt operation of the Spin
Touch
™
meter
Restart the test to resume normal
operation
Test result value on the
display is red
Results are out of range of
reagent system
Dilute sample. Retest for out of
range test factor. (All factors
except pH.)
Low Nitrate or Nitrate-N
results
Recent treatment with chlorine
neutralizer containing sodium
thiosulfate interferes with test
reaction
Retest in 2 – 3 days
Trouble connecting to
Bluetooth device
Bluetooth not enabled
Too many Bluetooth devices near
the meter
Printer power is ON and Fast
Printer Connection is ON
Enable Bluetooth
Have only one device near the
meter
Turn printer power OFF. Or turn
Past Printer Connection OFF.
Trouble connecting to
computer by USB
Broken connection Press and hold power button for
1 second.
Results not printing Printer not on
The Spin Touch
™
will only print
to the Mobile Bluetooth Printer
(Code 5-0066)
Turn printer on
Connect to Mobile Bluetooth
Printer (Code 5-0066)
TROUBLESHOOTING WITH THE METER CHECK DISK
Do not attempt to separate the components of the Meter Check Disk (Code 1705). The
Meter Check Disk consists of a disk with a permanently attached cover.
Do not fi ll the Meter Check Disk with water. Water is not used during the meter check
procedure.
Range Check Procedure
The Meter Check Disk is used to verify the performance of a meter. It is not used to
recalibrate the meter. Meters are calibrated at the time of manufacture. The meter is
performing satisfactorily if readings using the Meter Check Disk are within the ranges
provided on the Meter Check Disk pouch. Range specifi cations are specifi c to the disk
identifi ed by the serial number on the pouch. The range specifi cations will vary from disk to
disk. The exact readings from a specifi c disk may vary from meter to meter.
1. Follow the Cleaning procedure on page 20 to clean the light chamber and optic lenses.
2. Tap
select Disk Series.
3. Tap MCD to select Meter Check Disk.
4. Tap
to return to the test screen.
5. Remove the Meter Check Disk (Code 1705) from the foil pouch. DO NOT remove the
black cover from the disk.
6. Insert the Meter Check Disk. Close the lid.

19
7. Tap
to start test.
8. Results will be displayed.
9. Compare the results on the display to the values on the chart shown on the pouch. If
the results are not within the range shown on the pouch, contact Support.
10. Replace the Meter Check Disk in the foil pouch for storage.
LED Calibration
The LED Calibration is performed to set the brightness of the individual LEDs.
1. Follow the Cleaning procedure on page 20 to clean the light chamber and optic lenses.
2. Tap
to go to settings.
3. Tab Calibration.
4. Tap LED Cals.
5. Remove the Meter Check Disk (Code 1705) from the foil pouch. DO NOT remove the
black cover from the disk.
6. Insert the Meter Check Disk. Close the lid.
7. Tap
Start to begin the meter check procedure.
8. When the calibration is complete the message “LED Calibration Complete” will appear.
9. Tap
to return to the Testing Menu and resume testing.
Angle Calibration
Angle Calibration checks the alignment of the hub and disk. The results are analyzed and
reported as pass or fail. If the measurements pass the settings will be saved. If the analysis
fails, contact Support.
If performing the LED Calibration and the Angle Calibration, the LED Calibration should be
performed before the Angle Calibration.
1. Follow the Cleaning procedure on page 20 to clean the light chamber and optic lenses.
2. Tap
to go to settings.
3. Tab Calibration.
4. Tap Angle Cals.
5. Remove the Meter Check Disk (Code 1705) from the foil pouch. DO NOT remove the
black cover from the disk.
6. Insert the Meter Check Disk. Close the lid.
7. Tap
Start to begin the meter check procedure.
8. If the meter is performing satisfactorily, “Angle Calibration Successful” will be
displayed and the settings will be saved. If the meter is not performing satisfactorily,
“Angle Calibration Unsuccessful. Contact Support” will be displayed.
9. Tap
g
to return to the Testing Menu and resume testing.
email: [email protected]
phone: 800-344-3100 option 3 | Mon-Fri 9am-5pm EST

20
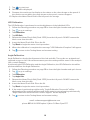
HELPFUL HINTS
¬ Do not touch top or bottom of disk. Handle disk by the edge.
¬ Do not fi ll disk while in the meter. Fill disk on clean, dry surface.
¬ Fill the disk on a dark surface to more easily see the sample water.
¬ The disk should not contain any large air bubbles. Air bubbles will result in erroneous
results.
¬ Always use the disk cover.
¬ Only the Universal Disk Cover (Code 1719) can be used with the WaterLink
®
Spin
Touch
®
.
¬ Empty syringe of old sample before fi lling with next sample.
¬ Remove fi lled disk from meter after testing. Do not travel with fi lled disks in meter.
They may leak.
¬ Keep the chamber clean and dry. Gently swab LED and photodiode lenses located
around the hub with a cotton swab dampened with streak-free window cleaner. Do
not use alcohol. It will leave a thin fi lm over the lenses when dry.
MAINTENANCE
CLEANING
The optical system of the WaterLink
®
Spin Touch
®
must be kept clean and dry for optimal
performance. Dry the disk with a lint-free wipe before placing it into the chamber to avoid
introducing moisture. For best results, store the instrument in an area that is dry and free
from aggressive chemical vapors. Clean the exterior housing with a damp, lint-free cloth.
Do not allow water to enter the light chamber or any other parts of the meter. To clean the
light chamber and optic lenses, point a can of compressed air into the light chamber and
the lid and blow the pressurized air into the light chamber and lid. Focus the pressurized
air around the LEDs which are the small round lenses positioned at 2:00, 4:00, 6:00, 8:00,
10:00 and 12:00 in the lid. The photodiodes are located on the bottom of the chamber
around the hub. This area must be kept clean and dry. Use a cotton swab dampened with
streak-free window cleaner to gently swab the LED and photodiode lenses. Do not use
alcohol; it will leave a thin residue over the optics when dry.
Remove smudges due to routine use from the touchscreen with the Cloth Wipe
(Code
3580-WIPE). Use a cloth dampened with alcohol for more thorough cleaning when
necessary. Do not use Windex
®
window cleaner, or similar cleaners, on the touchscreen.
REPAIRS
Should it be necessary to return the meter for repair or servicing, pack the meter carefully
in a suitable container with adequate packing material. A return authorization number
must be obtained from LaMotte Company by calling 800- 344-3100, ext. 3 (US only) or
410-778-3100, ext. 3, faxing 410-778-6394, or emailing
softwaresupport@lamotte.
com. Often a problem can be resolved over the phone or by email. If a return of the meter
is necessary, attach a letter with the return authorization number, meter serial number, a
brief description of problem and contact information including phone and FAX numbers
to the shipping carton. This information will enable the service department to make the
required repairs more effi ciently.
La page est en cours de chargement...
La page est en cours de chargement...
La page est en cours de chargement...
La page est en cours de chargement...
La page est en cours de chargement...
La page est en cours de chargement...
La page est en cours de chargement...
La page est en cours de chargement...
La page est en cours de chargement...
La page est en cours de chargement...
La page est en cours de chargement...
La page est en cours de chargement...
La page est en cours de chargement...
La page est en cours de chargement...
La page est en cours de chargement...
La page est en cours de chargement...
La page est en cours de chargement...
La page est en cours de chargement...
La page est en cours de chargement...
La page est en cours de chargement...
La page est en cours de chargement...
La page est en cours de chargement...
La page est en cours de chargement...
La page est en cours de chargement...
La page est en cours de chargement...
La page est en cours de chargement...
La page est en cours de chargement...
La page est en cours de chargement...
La page est en cours de chargement...
La page est en cours de chargement...
La page est en cours de chargement...
La page est en cours de chargement...
La page est en cours de chargement...
La page est en cours de chargement...
La page est en cours de chargement...
La page est en cours de chargement...
La page est en cours de chargement...
La page est en cours de chargement...
La page est en cours de chargement...
La page est en cours de chargement...
La page est en cours de chargement...
La page est en cours de chargement...
La page est en cours de chargement...
La page est en cours de chargement...
La page est en cours de chargement...
La page est en cours de chargement...
La page est en cours de chargement...
La page est en cours de chargement...
-
 1
1
-
 2
2
-
 3
3
-
 4
4
-
 5
5
-
 6
6
-
 7
7
-
 8
8
-
 9
9
-
 10
10
-
 11
11
-
 12
12
-
 13
13
-
 14
14
-
 15
15
-
 16
16
-
 17
17
-
 18
18
-
 19
19
-
 20
20
-
 21
21
-
 22
22
-
 23
23
-
 24
24
-
 25
25
-
 26
26
-
 27
27
-
 28
28
-
 29
29
-
 30
30
-
 31
31
-
 32
32
-
 33
33
-
 34
34
-
 35
35
-
 36
36
-
 37
37
-
 38
38
-
 39
39
-
 40
40
-
 41
41
-
 42
42
-
 43
43
-
 44
44
-
 45
45
-
 46
46
-
 47
47
-
 48
48
-
 49
49
-
 50
50
-
 51
51
-
 52
52
-
 53
53
-
 54
54
-
 55
55
-
 56
56
-
 57
57
-
 58
58
-
 59
59
-
 60
60
-
 61
61
-
 62
62
-
 63
63
-
 64
64
-
 65
65
-
 66
66
-
 67
67
-
 68
68


Lamotte 3587 Manuel utilisateur
- Catégorie
- Imprimer
- Taper
- Manuel utilisateur
- Ce manuel convient également à
dans d''autres langues
- English: Lamotte 3587 User manual
- español: Lamotte 3587 Manual de usuario
Documents connexes
Autres documents
-
 UEi COA1 Le manuel du propriétaire
-
Hach TitraLab AT1222 Basic User Manual
-
 PurTest 777 Mode d'emploi
-
-
-
Lovibond Single Method M261 - Nitrate MR PP Manuel utilisateur
-
Seitron Novo Le manuel du propriétaire
-
 Hach NX7500 Manuel utilisateur
-
-
 PurTest 777 Mode d'emploi


