Duux Bora Le manuel du propriétaire
- Catégorie
- Humidificateurs
- Taper
- Le manuel du propriétaire

1
Bora
smart dehumidier
user manual | gebruikershandleiding | manuel d’utilisation
manual de usuario | Bedienungsanleitung

32
Thank you for
choosing Duux.
We’re so glad you decided to read the instructions to your new Duux dehumidier! Many users casually
dismiss instructions and seek to gure it out on their own. But studies show that people who read
instructions will get up to speed more quickly and eciently than those who poke around with trial and
error.
At Duux we believe in the importance of a comfortable and healthy living environment. Enhancing your
wellbeing by designing appealing, functional and eective products is the passion that drives us every day.
With our range of innovative air treatment products we aim to provide you the best possible indoor air
quality.
The perfect climate for any room with excessive humidity. Bora is a stylish dehumidier with a capacity
of 20 liters a day, preventing the growth of contaminants like mold and bacteria. The compressor draws
in air and extracts moisture from it, which is caught in a 4-liter water tank. The built-in hygrostat ensures
automatic regulation of the room humidity while the carbon lter removes unwanted odors. You can use
the Duux app for convenient remote operation anytime, anywhere.
Read this manual carefully to get the most out of your Bora dehumidier.
1. Product overview 4
2. Installation & use 5
3. Maintenance 9
4. Functions 11
5. Technical specications 15
6. FAQ 16
Table of
contents
EN

54
into the dehumidier in case that error and
damage occur.
• If the supply cord is damaged, it must be replaced
by the manufacturer, its service agent or similarly
qualied persons in order to avoid a hazard.
• In the event of an abnormality (such as a burning
smell), turn o the machine and unplug the
power cord.
• The appliance should be installed in accordance
with the corresponding national wiring
regulations and ensure reliable grounding.
• Never operate the appliance if it has been
damaged or dropped.
• The appliance should only be repaired by a
qualied engineer.
• Ensure the mains plug has been disconnected
before transporting or cleaning the appliance.
• Operate the appliance only at the voltage
specied on the rating label.
• Do not use an extension cable to power this
appliance.
• Please do not place this dehumidier close to
heating devices (ame or heaters, etc.).
• Use the internal drying function, if the device has
not been used for a long time. This will prevent
the formation of mildew or unpleasant smells
inside the unit.
• Do not hang curtains or wet clothes in front of
the dehumidier or air outlet.
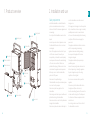
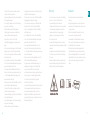
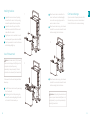
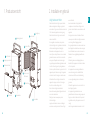
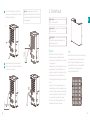
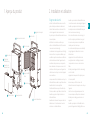
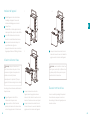
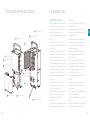
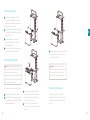
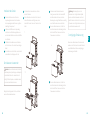
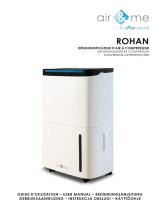
1. Product overview 2. Installation and use
Safety requirements
• Install this dehumidier on a stable at surface
place to reduce vibration and noise. Keep a
distance of at least 50cm between appliances and
surroundings.
• Do not place this dehumidier in water or other
liquids.
• In order to prevent accidents, please do not use
this dehumidier if wires or other connections
are damaged.
• Users of this appliance must be at least 8 years
old. Those who are weak, those with poor
sensory ability, or those with low mental quality
must supervise their use with an understanding
of the correct use and harm. Children are
prohibited from playing. Children need to clean
and maintain the appliance under supervision.
• When stop, reset or clean this dehumidier,
please cut o the power.
• Please use at the specied voltage.
• This dehumidier can only be used indoor, please
do not use for other purposes.
• Please do not place heavy objects on this
dehumidier.
• Please empty water tank to prevent overow and
spill before restarting this dehumidier.
• Please do not incline in case that the spilled water
damages this dehumidier.
• Please do not place waste rods and hard objects
EN
Water tank
Filter holder
frame
Carry handle
Air outlet
5
10
7
2
Control panel
1
Power cord
12
Caster wheels
6
Water tank cover
4
Water tank handle
3
Carbon lter
9
Air inlet
8
Drain outlet
11

76
EN
• The end of the drain hose should not be fed
outdoors in low temperatures.
• To prevent spillages, empty the water tank before
relocating the appliance.
• Do not tip the appliance on its side as escaping
water may cause damage.
• Children shall not play with the appliance.
• Cleaning and user maintenance shall not be
made by children without supervision.
• Please do not turn on or turn o this
dehumidier by plugging in or pulling out the
plug.
• Do not use insecticide spray or other ammable
substances in the vicinity of this dehumidier.
• Do not scratch appearance of this dehumidier
with sharp matters.
• Do not splash oil or water into this dehumidier.
• Do not clean this dehumidier with water, please
wipe it with sub humid soft cloth.
• Do not wipe this dehumidier with chemical
solvents such as benzene, gasoline and alcohol,
etc. If this dehumidier is indeed dirty, please
wipe with neutral detergent.
• Please do not incline this dehumidier over 45°or
place this dehumidier upside down.
• The end of the drain hose should not be fed
outdoors in low temperatures.
• To prevent spillages, empty the water tank before
relocating the appliance.
• Do not tip the appliance on its side as escaping
water may cause damage.
• Children shall not play with the appliance.
• Cleaning and user maintenance shall not be made
by children without supervision.
• Please do not turn on or turn o this dehumidier
by plugging in or pulling out the plug.
• Do not use insecticide spray or other ammable
substances in the vicinity of this dehumidier.
• Do not scratch appearance of this dehumidier
with sharp matters.
• Do not splash oil or water into this dehumidier.
• Do not clean this dehumidier with water, please
wipe it with sub humid soft cloth.
• Do not wipe this dehumidier with chemical
solvents such as benzene, gasoline and alcohol,
etc. If this dehumidier is indeed dirty, please wipe
with neutral detergent.
• Please do not incline this dehumidier over 45°or
place this dehumidier upside down.
• Any person who is involved with working on or
breaking into a refrigerant circuit should hold
a current valid certicate from an industry-
accredited assessment authority, which authorises
their competence to handle refrigerants safely
in accordance with an industry recognised
assessment specication.
• Servicing shall only be performed as recommended
by the equipment manufacturer. Maintenance
and repair requiring the assistance of other
skilled personnel shall be carried out under the
supervision of the person competent in the use of
ammable refrigerants.
Warnings
• Do not use means to accelerate the defrosting
process or to clean, other than those
recommended by the manufacturer.
• The appliance shall be stored in a room without
continuously operating ignition sources (for
example: open ames, an operating gas
appliance or an operating electric heater.)
• Do not pierce or burn.
• Be aware that refrigerants may be odourless.
• Compliance with national gas regulations shall be
observed.
• The appliance must be installed, operated and
stored in a room which has a oor area larger
than 4 m2.
• Maximum refrigerant charge amount (M): 52g
• Keep ventilation openings clear of obstruction.
• Children shall not play with the appliance.
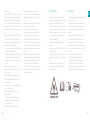
Installation
• Please drain water from water tank before
running.
• During running please do not open doors and
windows as much as possible since this can save
energy resources.
• When the dehumidier is installed, a certain
space must be reserved around this
dehumidier, the minimum distance above is
50cm, and the minimum distance in front/rear
and left/right is 20cm as required.
• When big noise is found during operation of
this dehumidier it is recommended inserting
pads or damping rubber sheets, etc. below this
dehumidier, this can reduce vibration and noise,
and can also reduce sinking of wood oor or
carpet.

98
EN
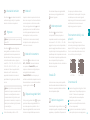
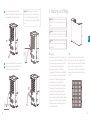
When the water tank is released from the
device, turn the water tank handle upright,
remove the cover and gently pour out the
water in a sink or container
When the water tank is empty, close the water
tank with the cover and turn down the handle
before reinserting it back in the device.
When the water tank is empty, close the water
tank with the cover and turn down the handle
before reinserting it back in the device.
Attention: Before putting the water tank back in
the devices, please check whether the oater is in its
default position. If not, push it into position before
reinserting the water tank.
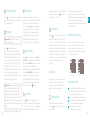
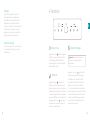
Continuous drainage
If you do not want to frequently drain water from
the water tank, you can connect a drain tube on
the back of the device for continuous drainage.
1
2
3
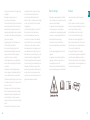
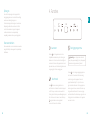
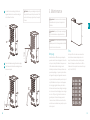
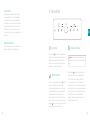
Installing the device
Unpack the device and remove the packing
materials from the device. Store the packing
materials for possible future transportation.
Unpack the carbon lter, put it in the lter
holder frame and install the lter frame with
carbon lter in the air inlet.
Plug the power cord in a wall outlet. You will
hear a beep and the power indicator will blink.
Press the power button to switch on the device
and the display will light up.
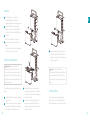
Use of the water tank
Note: when the water tank is full, the full water
tank icon on the display will start ashing and the
compressor and fan will stop running
automatically. A beep will sound for 10 times to
remind the user to drain water from the water tank.
To drain water from the water tank, please follow
below steps:
Turn o the device and remove the power plug
from the wall outlet
When facing the front of the product, gently
take out the water tank by pulling the handles
on the side of the tank towards you.
1
2
3
4
5
4
1.
3.
4.

1110
EN
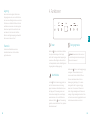
Locate the drain outlet on the back of the
device, unscrew the drain cover and pull out
the water plug.
Connect the drain tube to the drain outlet.
Place the other end of the drain tube in a sink
or container.
Attention: the drain tube may not be extended
and must always be placed at least 10cm below the
water outlet to ensure water can ow through.
1
2
3
Important: Be sure to remove the power plug
from the outlet before carrying out maintenance.
Important: Do not soak or immerse the power
plug or the device in water.
Important: We recommend daily maintenance
to prevent the growth of bacteria and scale inside
the water tank.
Cleaning
• Please use a soft cloth to wipe the dust on the
body; If the surface is too dirty, it is recommended
to wipe it clean with a damped cloth mixed with
neutral detergent.
• Do not use chemical solvents, gasoline, polishing
powder, etc. to clean the surface of the device.
Do not place the device or any of its parts in the
dishwasher to clean. It is best to clean it with
clean water.
• If the regular cleaning can’t remove the scale on
the inside of the water tank, mix some lemon
vinegar with lukewarm water (water and lemon
vinegar ratio 10ml:1g) Pour everything into a
large container and let it soak for 5 minutes. Then
gently scrub the scale surface with a soft brush
until the scale is removed.
3. Maintenance
Filter
Clean the lter and the frame at least once per two
weeks simply by simply rinsing with cold or warm
water, do not use chemical solvents or hot water.
The carbon lter should be replaced at least once a
year (art. no. DXDHF01)
X
> 10 cm
1+2
3.

1312
EN
Storage
Before storing the device, use the cleaning mode
to completely dry the humidier from the inside to
prevent the growth of contaminants like mold and
bacteria. See chapter 4 for instructions. Once clean
and dry, put the device and all its components into
the original box and store them in a dry place.
Spare parts
Spare parts and accessories can be requested at
the point of purchase or local distributor.
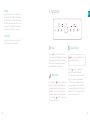
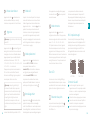
4. Functions
Power
Press the key to switch on the device. The
corresponding indicator will light up on the display.
The display screen will show the actual humidity.
When device is in standby mode, the ambient
humidity will be shown on the display.
Night mode
Press and hold the key for 3 second to activate
night mode. The indicator will start blinking and
light up brightly before the whole display will be
dimmed after 10 seconds. Press any button to
reactivate the display. To deactivate night mode,
press and hold the again for 3 seconds or press
the ‘Operation Mode’ button.
NIGHT
Cleaning mode
Note: only use this mode before storage or
long period without operation.
Press this key to start the dry cleaning
procedure. This prevents the growth of
contaminants like mold and bacteria inside the
device. Once activated, the display will show
“CL” and the indicator will illuminate. The whole
procedure takes approximately 1 hour of which
30 minutes in high fan speed and 20 minutes in
low fan speed. Press this key again to cancel the
procedure and resume operation.

1514
EN
Fan speed
Press the key to switch between low (I) or
high (II) fan speed. The corresponding indicator
on the display will illuminate.
Hygrostat
Note: the hygrostat can only be used in AUTO
mode.
Press the key to activate the self-regulating
hygrostat. The extraction intensity will now
self-regulate according to the ambient
humidity. Press multiple times to change the
desired humidity in the following order: 80% > 75%
> 70% > 65% > 60% > 55% > 50% > 45% > 40% >
35% > 30% > ... and so on.
Each press will decrease with 5%. Once released,
the selected humidity on the display will blink 3
seconds to conrm your choice.
Note: When the hygrostat is set below the
actual humidity, the compressor will start to extract
moisture at the set speed until the desired humidity
has been reached. When the hygrostat is set above
the actual humidity, the compressor will stop but
the fan will remain to run at the set speed.
The default set humidity value is 50%
WiFi mode
Important: WiFi mode can only be activated in
stand-by mode. Please connect to WiFi before
turning on the device with the power button. Press
and hold the key for 3 seconds to activate WiFi
mode. The indicator will start ashing rapidly to
search for devices to pair. Please refer to “WiFi and
app operation” paragraph further in this chapter
for pairing instructions.
Operation mode
Press the key to switch between AUTO and
CONTINUOUS mode. The corresponding indicator
will illuminate.
AUTO mode can used in combination with the
hygrostat to self-regulate the ambient humidity.
CONTINUOUS mode will activate the compressor
and fan at high speed, regardless of the ambient
humidity. The fan speed can be regulated with the
key.
Child lock
Press and hold the key for 3 seconds to
activate child lock. The display will show “LC” once it
is activated. In child lock, all buttons on the display
are disabled until the lock is removed.
To remove child lock, press and hold the
for 3 seconds again.
Timer mode
Press the key to activate the timer setting. With
every press the timer will increase with one hour in
the following sequence: 1h > 2h > 3h > 4h > … 23h
> 24h > OFF. Once the timer is activated, the device
will automatically shut down after the set timer has
been completed. With every press the display will
show the selected timer. To deactivate the timer,
shortly press twice after setting the timer. As long
as the timer is active, the indicator will illuminate
on the display.
LED display
In auto, continuous and drying mode, the display
indicates the ambient room humidity. When using
the timer function, it also indicates the set timer
hours
Full water tank
When the water tank is full, the icon on the
display will start ashing and the LED display will
show “FL”
The compressor and fan will stop running
automatically. A beep will sound for 10 times to
remind the user to drain water from the water
tank. When the emptied water tank is placed
back in the product, it will automatically resume
operation.
WIFI and APP operation
Scan below QR code to download the Duux APP
or search DUUX APP in the App Store or Google
Play Store to start the procedure to download the
APP. Once installed, enter your e-mail address and
complete the registration
APP STORE PLAY STORE
Connect to WIFI
Once registered, click “add duux device” on the
main screen or use the “+” button in the top
right corner to add a new device.,
Search for “Bora” and press to continue
Connect to your preferred WiFi network and
enter the corresponding password
Follow the instructions in the app to complete
the pairing process.
1
2
3
4

1716
5. Technical specications
The appearance
and specication of
the device may be
changed without
notice.
EN
Power consumption:
400 Watt
Weight:
15 kg
Water tank capacity:
4L
Eective area:
up to 40m²
33,5 cm
51 cm
24,5 cm
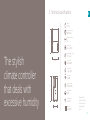
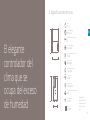
The stylish
climate controller
that deals with
excessive humidity
51 cm
Model no.:
DXDH02
Main materials:
ABS
WiFi frequency:
2.4Ghz
Air circulation:
230 CBM/h
Dehumidifying capacity:
20L / day
Timer Modes:
1-24 hours
Noise Level:
46dBA
Hygrostat range:
30-80% RH

1918
6. FAQ
Why is less water extracted in water tank
during winter?
In winter, temperatures are low and the air
is relatively dry. Compared to summer, the
moisture extraction is much lower.
Why the device cannot run or stops
running suddenly?
Please check if the water tank is full or if the
water tank is not properly installed. Drain the
water from the water tank or reinsert water
tank correctly.
The ambient temperature may be too low
or high to be able to extract moisture.
Dehumidication cannot be performed when
the ambient temperature is below 5⁰C or above
32⁰C.
Why is hot air blown out from the air
outlet?
This device extracts moisture from the air by
cooling the air inside the compressor below
the condensation point which allows the
air to condense into water drops that are
captured in the water tank. The dry air that
is released through the air outlet is heated
by the temperature returning unit. This
reduces energy consumption and accelerates
extraction.
Q.
Q.
Q.
A.
A.
Why is there an abnormal sound during
operation?
Please check if the device is placed properly on
a at surface (not inclined or unstable)
Please check if nothing is blocking the air in- or
outlet.
The “owing” sound is caused by the
refrigerant. This sound is normal during
operation.
There is water leaking from the device.
What’s wrong?
Please check if the drain tube is properly
connected.
The drainage system may be blocked due to
a deformed drain tube. Please straighten the
drain tube.
Why does frosting occur?
The ambient temperature is low and the device
is awaiting defrosting. Please wait until the
device is defrosted to remain operation.
A.
A.
A.
Q.
Q.
A.
Q.
A.
Disposal
The European directive 2012 / 19 / CE on Waste
Electrical and Electronic Equipment (WEEE),
requires that old household electrical appliances
must not be disposed in the normal unsorted
municipal waste stream. Old appliances must
be collected separately in order to optimize the
recovery and recycling of the materials they
contain and reduce the impact on human health
and the environment. The crossed out “wheeled
bin” symbol on the product reminds you of your
obligation, that when you dispose of the appliance
it must be separately collected. Consumers
should contact their local authority or retailer for
information concerning the correct disposal of
their old appliance.
A.
A.
A.
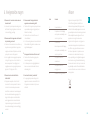
Display
code
FL
E1
E2
P1
CL
LC
Cause
The water tank is full
The coil sensor detects anomaly,
repair is required contact Duux
The room temperature sensor
detects anomaly, repair is
required contact Duux
The unit is in the defrosting state
The unit is in the cleaning mode
state
Child lock function activated

2120
Notes/notities/les notes/notas/Notitzen Notes/notities/les notes/notas/Notitzen

2322
NL
Bedankt dat je voor
Duux hebt gekozen.
We zijn blij dat je hebt besloten de handleiding bij je nieuwe luchtontvochtiger van Duux door te lezen!
Veel gebruikers laten de handleiding links liggen en proberen er zelf achter te komen. Uit onderzoek
blijkt echter dat mensen die de handleiding lezen sneller en beter snappen hoe een apparaat werkt dan
mensen die er met vallen en opstaan achterkomen.
Bij Duux geloven we in het belang van een comfortabele, gezonde leefomgeving. Jouw welzijn verhogen
door aantrekkelijke, functionele en eectieve producten te ontwikkelen: dat is de passie die ons iedere
dag opnieuw drijft. Met ons aanbod aan innovatieve luchtbehandelingsproducten willen we je de best
denkbare luchtkwaliteit binnenshuis bieden.
Het ideale klimaat voor ruimtes met overmatige luchtvochtigheid. Bora is een stijlvolle luchtontvochtiger
met een capaciteit van 20 liter per dag die vorming van schimmel en bacteriën voorkomt. De compressor
zuigt lucht aan en onttrekt hier vocht aan. Het vocht wordt in de watertank met een inhoud van 4 liter
opgevangen. De ingebouwde hygrostat regelt de luchtvochtigheid in de ruimte automatisch en bovendien
verwijdert de koolstolter nare geurtjes. Je kunt de Duux-app gebruiken voor eenvoudige bediening op
afstand, altijd en overal.
Lees deze handleiding zorgvuldig door om optimaal van je Bora luchtontvochtiger te kunnen proteren.
1. Productoverzicht 22
2. Installatie en gebruik 23
3. Onderhoud 27
4. Functies 29
5. Technische specicaties 33
6. Veelgestelde vragen 34
Inhouds-
opgave

2524
NL
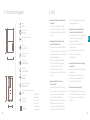
1. Productoverzicht 2. Installatie en gebruik
Watertank
Frame van de
lterhouder
Handgreep
Luchtuitlaat
5
10
7
2
Bedieningspaneel
1
Stroomkabel
12
Zwenkwielen
6
Deksel watertank
4
Handgreep watertank
3
Koolstolter
9
Luchtinlaat
8
Waterafvoer
11
weer inschakelt.
• Houd de watertank rechtop tijdens het
verwijderen uit de luchtontvochtiger, omdat
gemorst water schade kan veroorzaken aan het
apparaat.
• Steek geen losse staven of stokken of harde
voorwerpen in de luchtontvochtiger wanneer er
een storing of beschadiging optreedt.
• Om gevaarlijke situaties te voorkomen dient een
beschadigde stroomkabel te worden vervangen
door de fabrikant, een servicemonteur van de
fabrikant of een vergelijkbaar gekwaliceerde
persoon.
• Schakel in geval van een afwijking (zoals een
brandlucht) het apparaat uit en haal de stekker
uit het stopcontact.
• Het apparaat moet worden geïnstalleerd in
overeenstemming met de desbetreende
nationale voorschriften voor de bekabeling
en een veilige aarding moet in acht worden
genomen.
• Schakel het apparaat niet meer in nadat het is
beschadigd of gevallen.
• Het apparaat mag uitsluitend door een
gekwaliceerde technicus worden gerepareerd.
• Zorg ervoor dat de stekker uit het stopcontact
is gehaald voordat je het apparaat vervoert of
reinigt.
• Laat het apparaat uitsluitend werken met het
Veiligheidsvoorschriften
• Plaats deze luchtontvochtiger op een stabiele
vlakke ondergrond om trillingen en geluid te
verminderen. Zorg voor een afstand van minstens
50cm tussen de apparaten en de omgeving.
• Plaats deze luchtontvochtiger niet in water of
andere vloeistoen.
• Om ongevallen te voorkomen, dien je deze
luchtontvochtiger niet te gebruiken als er kabels
of andere aansluitingen beschadigd zijn.
• Gebruikers van dit apparaat moeten ten
minste 8 jaar oud zijn. Mensen met een zwakke
gezondheid, mensen met slechte sensorische
vermogens of beperkte mentale vermogens
mogen dit apparaat uitsluitend gebruiken onder
toezicht of na uitleg over het juiste gebruik en
het risico op letsel. Kinderen mogen niet met het
apparaat spelen. Kinderen mogen het apparaat
niet zonder toezicht reinigen en onderhouden.
• Schakel de luchtontvochtiger uit alvorens het
apparaat te stoppen, resetten of te reinigen.
• Neem het vermelde voltage in acht.
• Deze luchtontvochtiger kan uitsluitend
binnenshuis worden gebruikt, gebruik deze niet
voor andere doeleinden.
• Plaats geen zware voorwerpen op deze
luchtontvochtiger.
• Leeg de watertank om morsen en lekkage te
voorkomen voordat je deze luchtontvochtiger

2726
EN
voltage dat overeenkomt met het voltage op het
voltagelabel.
• Gebruik geen verlengsnoer voor de
stroomtoevoer van dit apparaat.
• Plaats deze luchtontvochtiger niet in de buurt van
verwarmingstoestellen (vlammen, kachels, enz.).
• Gebruik de interne droogfunctie wanneer het
apparaat gedurende langere tijd niet is gebruikt.
Dit voorkomt schimmelvorming of onaangename
geurtjes in het apparaat.
• Hang geen gordijnen of natte kleding voor de
luchtontvochtiger of luchtuitlaat.
• Het eind van de afvoerslang mag zich niet
buitenshuis bevinden bij lagere temperaturen.
• Leeg de watertank voordat je het apparaat
verplaatst, om morsen te voorkomen.
• Laat het apparaat niet naar een zijkant hellen,
want dan kan er water uitlopen dat schade kan
veroorzaken.
• Laat kinderen niet met het apparaat spelen.
• Laat de reiniging en het gebruikersonderhoud
niet door kinderen uitvoeren zonder toezicht.
• Schakel deze luchtontvochtiger niet in of uit door
de stekker in het stopcontact te steken of uit het
stopcontact te halen.
• Gebruik geen insecticide of andere brandbare
stoen in de buurt van deze luchtontvochtiger.
• Maak geen krassen op het oppervlak van deze
luchtontvochtiger met scherpe voorwerpen.
• Laat geen olie of water in deze luchtontvochtiger
spatten.
• Reinig deze luchtontvochtiger niet met water,
maar gebruik een licht vochtige, zachte doek.
• Neem deze luchtontvochtiger niet af met
chemische oplosmiddelen zoals benzeen,
benzine, alcohol, enz. Indien de luchtontvochtiger
te vuil is, neem deze dan af met een neutraal
reinigingsmiddel.
• Laat deze luchtontvochtiger niet meer dan 45°
hellen en plaats deze niet ondersteboven.
• Iedereen die werkzaamheden uitvoert aan
een koelcircuit of een koelcircuit onderbreekt,
dient in het bezit te zijn van een actueel geldig
certicaat van een door de branche erkende
beoordelingsinstantie, ter verklaring van zijn of
haar vakbewaamheid om veilig om te gaan met
koelmiddelen in overeenstemming met een door
de branche erkende beoordelingsspecicatie.
• Onderhoud mag uitsluitend worden uitgevoerd
in overeenstemming met de aanbevelingen van
de fabrikant. Onderhoud en reparaties die de
ondersteuning van ander geschoold personeel
vereisen, dienen te worden uitgevoerd onder
toezicht van een persoon die bevoegd is tot het
gebruik van brandbare koelmiddelen.
Waarschuwingen
• Gebruik geen reinigingsmiddelen of middelen
om het ontdooiproces te versnellen die niet zijn
aanbevolen door de fabrikant.
• Het apparaat moet worden opgeborgen in
een ruimte waar geen continu werkende
ontstekingsbronnen aanwezig zijn (bijvoorbeeld:
open vuur, een werkende gasinstallatie of een
werkende elektrische verwarming).
• Niet doorboren en niet in brand steken.
• Denk eraan dat koelmiddelen geurloos kunnen
zijn.
• De nationale gasregelgeving dient te worden
nageleefd.
• Het apparaat moet geïnstalleerd, bediend en
opgeborgen worden in een ruimte met een
vloeroppervlak groter dan 4m2.
• Maximale vulhoeveelheid koelmiddel (M): 52g
• Houd de ventilatieopeningen vrij van obstakels.
Installatie
• Leeg de watertank voordat je het apparaat
inschakelt.
• Als je het product in een ruimte met gesloten
deuren en ramen gebruikt, bespaar je stroom en
levert het product betere prestaties.
• Bij de installatie van de luchtontvochtiger
moet er rondom deze luchtontvochtiger
voldoende ruimte worden vrijgehouden. Er
geldt een minimumafstand van 50cm boven de
luchtontvochtiger en een minimumafstand van
20cm voor/achter en links/rechts.
• In het geval dat het product te veel geluid
veroorzaakt, wordt aangeraden om bijvoorbeeld
pads of dempende rubberplaten onder deze
luchtontvochtiger te plaatsen. Dit kan trillingen en
geluid verminderen en ook het wegzakken in een
houten vloer of tapijt verminderen.

2928
NL
Klap bij het verwijderen van de watertank
de handgreep van de watertank uit, haal het
deksel eraf en giet het water voorzichtig in een
gootsteen of een bak.
Zodra de watertank is geleegd, plaats je het
deksel weer op de watertank en klap je de
handgreep in en plaats je de watertank weer
terug in het apparaat.
Zodra de watertank is geleegd, plaats je het
deksel weer op de watertank en klap je de
handgreep in en plaats je de watertank weer
terug in het apparaat.
Let op: controleer of de vlotter in de
standaardpositie staat vóór je de watertank weer
in het apparaat plaatst. Als dat niet het geval is,
duw deze dan op zijn plaats vóór je de watertank
terugzet.
Constante afvoer
Als je de watertank niet regelmatig wil legen,
kun je aan de achterkant van het apparaat een
afvoerslang aansluiten voor een constante afvoer.
1
2
3
Installatie
Pak het apparaat uit en verwijder al
het verpakkingsmateriaal. Bewaar het
verpakkingsmateriaal voor toekomstig vervoer.
Haal het koolstolter uit de verpakking,
plaats het in het frame van de lterhouder
en monteer het frame met koolstolter in de
luchtinlaat.
Steek de stroomkabel in een stopcontact.
Je hoort een piepje en de stroomindicator
knippert.
Druk op de aan/uit-knop om het apparaat aan
te zetten. Het scherm is nu verlicht.
Gebruik van de watertank
Opmerking: wanneer de watertank vol is,
knippert het pictogram 'watertank vol' op het
scherm en vallen de compressor en de ventilator
automatisch stil. Er klinkt tien keer een piepje om
de gebruiker eraan te herinneren dat de watertank
moet worden geleegd.
Volg de onderstaande stappen om de watertank
te legen:
Schakel het apparaat uit en haal de stekker uit
het stopcontact.
Ga recht voor het product staan en verwijder
de watertank voorzichtig door de handgrepen
aan de zijkant van de tank naar je toe te
1
2
3
4
5
4
1.
3.
4.

3130
NL
Schroef het afvoerdeksel van de afvoer aan
de achterzijde van het apparaat los en haal de
afsluitdop uit het apparaat.
Sluit de afvoerslang aan op de wateruitlaat.
Plaats het andere uiteinde van de afvoerslang
in een gootsteen of een bak.
Let op: de afvoerslang kan niet worden
uitgetrokken en moet altijd minstens 10cm onder
de wateruitlaat worden geplaatst zodat het water
goed kan weglopen.
1
2
3
Belangrijk: verwijder vóór ieder onderhoud de
stekker uit het stopcontact.
Belangrijk: dompel de stekker of het apparaat
nooit onder in water.
Belangrijk: we adviseren dagelijks onderhoud
om de groei van bacteriën en kalkaanslag in de
watertank te voorkomen.
Reinigen
• Gebruik een zachte doek om stof van de
behuizing te vegen. Is de buitenkant te vuil,
gebruik dan een vochtige doek met een neutraal
reinigingsmiddel.
• Gebruik geen chemische oplosmiddelen, benzine,
polijstmiddel, enz. om de buitenkant van het
apparaat te reinigen. Plaats het apparaat of enig
onderdeel ervan niet in de afwasmachine. Je
kunt het apparaat het beste reinigen met schoon
water.
• Lukt het niet om met regelmatig reinigen de
kalkaanslag in de watertank te verwijderen, meng
dan wat citroenazijn met lauw water (verhouding
water en citroenazijn 10ml:1g). Giet het mengsel
in een grote bak en laat vijf minuten weken.
Borstel dan voorzichtig het oppervlak met de
kalkaanslag totdat deze is verdwenen.
3. Onderhoud
Filter
Maak het lter en het frame minstens één keer per
twee weken schoon door ze met koud of warm
water af te spoelen. Gebruik geen chemische
oplosmiddelen of heet water. Het koolstolter
moet minstens één keer per jaar worden
vervangen (artikelnr. DXDHF01).
X
> 10cm
1+2
3.

3332
NL
Opbergen
Voer vóór het opbergen van het apparaat het
reinigingsprogramma uit om de luchtontvochtiger
van binnenuit volledig te drogen om
schimmelvorming en bacteriegroei te voorkomen.
Raadpleeg hoofdstuk 4 voor instructies. Plaats
na het schoonmaken en drogen het apparaat
en alle onderdelen in de oorspronkelijke
verpakking en bewaar deze op een droge plaats.
Reserveonderdelen
Reserveonderdelen en accessoires kunnen worden
aangeschaft bij het verkooppunt of de plaatselijke
distributeur.
4. Functies
Aanzetten
Druk op om het apparaat aan te zetten.
De bijbehorende indicator op het scherm gaat
branden. Het scherm toont de luchtvochtigheid
in de ruimte. Wanneer het apparaat in de stand-
bymodus staat, wordt de luchtvochtigheid van de
omgeving op het scherm weergegeven.
Nachtstand
Houd drie seconden ingedrukt om de
nachtstand in te schakelen.De indicator knippert
en licht fel op en na tien seconden wordt het
scherm gedimd. Druk op een willekeurige knop om
het scherm weer te activeren. Houd of de knop
nogmaals drie seconden ingedrukt
om de nachtstand uit te schakelen.
NIGHT
Reinigingsprogramma
Opmerking: voer dit programma alleen uit
voor je het apparaat opbergt of als je het apparaat
gedurende een lange periode niet gebruikt.
Druk op om het droog-reinigingsprogramma
uit te voeren. Dit voorkomt schimmelvorming
en bacteriegroei in het apparaat. Eenmaal
ingeschakeld verschijnt 'CL' op het scherm en
gaat de indicator branden. Het hele programma
duurt ongeveer één uur, waarvan 30 minuten op
hoge ventilatorsnelheid en 20 minuten op lage
ventilatorsnelheid. Druk deze knop nogmaals in om
het programma te onderbreken en het apparaat
weer aan te zetten.

3534
NL
Ventilatorsnelheid
Druk op om te schakelen tussen lage (I) en hoge
(II) ventilatorsnelheid. De bijbehorende indicator op
het scherm gaat branden.
Hygrostat
Opmerking: de hygrostat kan alleen in de
automodus worden gebruikt.
Druk op om de zelfregulerende
hygrostat te activeren. De ontvochtiging is nu
zelfregulerend naargelang de luchtvochtigheid van
de omgeving. Druk meerdere malen voor het
aanpassen van de gewenste luchtvochtigheid in
deze volgorde: 80% > 75% > 70% > 65% > 60% >
55% > 50% > 45% > 40% > 35% > 30% > ... etc.
Met elke keer drukken wordt de uitstoot met 5%
verlaagd. Als je de knop loslaat, knippert de
geselecteerde luchtvochtigheid op het scherm drie
seconden ter bevestiging van je keuze.
Opmerking: als de hygrostat lager is ingesteld
dan de luchtvochtigheid in de ruimte, begint de
compressor op de ingestelde snelheid vocht af
te voeren totdat de gewenste luchtvochtigheid is
bereikt. Als de hygrostat hoger is ingesteld dan de
luchtvochtigheid in de ruimte, stopt de compressor,
maar blijft de ventilator op het ingestelde toerental
draaien.
De standaard ingestelde luchtvochtigheid is 50%.
Wi-modus
Belangrijk: de wi-modus kan alleen worden
geactiveerd in de stand-bymodus. Maak verbinding
met wi vóór je het apparaat inschakelt met de
aan/uit-knop. Houd drie seconden ingedrukt
om de wi-modus te deactiveren. De indicator
knippert vervolgens snel en gaat op zoek naar
apparaten om mee te verbinden. Raadpleeg
de paragraaf 'Bediening van wi en app' in dit
hoofdstuk voor instructies over het koppelen.
Bedrijfsmodus
Druk op om te schakelen tussen de AUTO- en
CONTINU-modus. De bijbehorende LED-lampjes
gaan branden. De AUTO-modus kan in combinatie
met de hygrostat worden gebruikt om de
luchtvochtigheid van de omgeving zelfregulerend
te maken. In de CONTINU-modus worden de
compressor en de ventilator op hoge snelheid
ingeschakeld, ongeacht de luchtvochtigheid van
de omgeving. De snelheid van de ventilator kan
worden ingesteld met de sleutel.
Kinderslot
Houd drie seconden ingedrukt om het
kinderslot in te schakelen. Eenmaal ingeschakeld
verschijnt 'LC' op het scherm. Als het kinderslot is
ingeschakeld, zijn alle knoppen op het scherm
uitgeschakeld totdat het slot wordt uitgeschakeld.
Houd opnieuw drie seconden ingedrukt om
het kinderslot uit te schakelen.
Timerstand
Druk op om de timerinstelling te activeren. Per
druk neemt de timer als volgt met één uur toe: 1u
> 2u > 3u > 4u > ... 23u > 24u > UIT. Als de timer is
geactiveerd, schakelt het apparaat automatisch uit
nadat de ingestelde duur is verstreken. Elke keer
dat de knop wordt ingedrukt, toon het scherm de
selecteerde timer. Druk kort na het instellen van de
timer twee keer om de timer te deactiveren. Zolang
de timer actief is, brandt de indicator op
het scherm.
LED-scherm
In de automatische, continu- en droog-modus
toont het scherm de luchtvochtigheid van
de omgeving. In de timerstand wordt ook de
ingestelde duur van de timer getoond.
Volle watertank
Wanneer de watertank vol is, knippert het
pictogram op het scherm en verschijnt 'FL' op
het LED-scherm.
De compressor en ventilatormotor vallen
automatisch stil. Er klinkt tien keer een piepje om
de gebruiker eraan te herinneren dat de watertank
moet worden geleegd. Zodra de geleegde
watertank weer in het product is geplaatst, schakelt
het apparaat weer in.
Bediening via wi en app
Scan de onderstaande QR-code om de Duux-
app te downloaden of zoek de Duux-app in de
App Store of Google Play Store om de app te
downloaden. Voer na de installatie je e-mailadres
in en rond de registratie af.
APP STORE PLAY STORE
Verbinden met wi
Klik na de registratie op 'add duux device' op het
hoofdscherm of gebruik de knop '+' rechtsboven
om een nieuw apparaat toe te voegen.
Zoek naar 'Bora' en klik hierop om door te gaan.
Maak verbinding met het gewenste wi-netwerk
en voer het bijbehorende wachtwoord in.
Volg de instructies in de app om de
verbindingsprocedure te voltooien.
1
2
3
4

3736
NL
5. Technische specicaties
Het uiterlijk en de
specicaties van het
apparaat kunnen
zonder voorafgaande
kennisgeving worden
gewijzigd.
Stroomverbruik:
400W
Gewicht:
15kg
Inhoud watertank:
4L
Eectieve ruimte:
tot 40m²
33,5cm
51cm
24,5cm
De stijlvolle
klimaatregelaar
die overmatige
luchtvochtigheid
aanpakt.
51cm
Modelnr.:
DXDH02
Hoofdmaterialen:
ABS
Wi-frequentie:
2,4Ghz
Luchtcirculatie:
230CBM/uur
Ontvochtigingscapaciteit:
20L/dag
Timerstanden:
1-24 uur
Geluidsniveau:
46dBA
Bereik hygrostat:
30-80% RV

3938
NL
6. Veelgestelde vragen
Waarom zit er 's winters minder water in
de watertank?
In de winter zijn de temperaturen laag en is de
lucht relatief droog. Vergeleken met de zomer
is de ontvochtiging veel lager.
Waarom werkt het apparaat niet of werkt
het plotseling niet meer?
Controleer of de watertank vol is en of deze op
de juiste manier is geïnstalleerd. Leeg indien
nodig de watertank en/of plaats de watertank
op de juiste manier in het apparaat.
Het is mogelijk dat de omgevingstemperatuur
te laag of te hoog is om vocht uit de lucht te
kunnen verwijderen. Ontvochtiging is niet
mogelijk wanneer de omgevingstemperatuur
lager dan 5⁰C of hoger dan 32⁰C is.
Waarom komt er hete lucht uit de
luchtuitlaat?
Dit apparaat verwijdert vocht uit de lucht
door de lucht in de compressor af te koelen
tot onder het condensatiepunt, waardoor
de lucht kan condenseren tot waterdruppels
die in de watertank worden opgevangen. De
droge lucht die vrijkomt via de luchtuitlaat
wordt opgewarmd door de eenheid die de
temperatuur terugvoert. Hierdoor wordt het
stroomverbruik verlaagd en de ontvochtiging
versneld.
V.
V.
V.
A.
A.
Waarom maakt het ingeschakelde
apparaat een abnormaal geluid?
Controleer of het apparaat op de juiste manier
op een vlakke ondergrond is geplaatst (niet
hellend of onstabiel).
Controleer of er niets de luchttoevoer of
-afvoer blokkeert.
Het 'stromende' geluid wordt veroorzaakt door
het koelmiddel. Dit geluid is normaal voor een
ingeschakeld apparaat.
Het apparaat lekt water. Wat is er mis?
Controleer of de afvoerslang op de juiste
manier is aangesloten.
Het afvoersysteem is mogelijk geblokkeerd
door een vervormde afvoerbuis. Draai de
afvoerslang recht.
Hoe komt het dat er ijs ontstaat?
De omgevingstemperatuur is laag en het
apparaat moet worden ontdooid. Wacht tot
het apparaat is ontdooid vóór je het weer
inschakelt.
A.
A.
A.
V.
V.
A.
V.
A.
Afvoer
Volgens de Europese richtlijn 2012/19/
EU betreende afgedankte elektrische en
elektronische apparatuur (AEEA) mogen oude
elektrische huishoudelijke apparaten niet via de
gemeentelijke diensten als normaal ongesorteerd
huishoudelijk afval worden afgevoerd. Oude
apparaten moeten gescheiden worden
ingezameld om hergebruik en recycling van de
materialen in de apparaten te optimaliseren en
de eecten op de gezondheid van mensen en
het milieu te beperken. Het symbool van een
container met een kruis erdoor herinnert je
aan je verplichting om het afgedankte apparaat
aan te bieden voor gescheiden afvalinzameling.
Consumenten dienten contact op te nemen met
de plaatselijke overheid of hun detailhandelaar
voor meer informatie over de correcte afvoer van
oude apparaten.
A.
A.
A.
Code
FL
E1
E2
P1
CL
LC
Oorzaak
De watertank is vol
De spoelsensor stelt afwijking
vast, reparatie noodzakelijk, neem
contact op met Duux
De sensor voor
kamertemperatuur stelt afwijking
vast, reparatie noodzakelijk, neem
contact op met Duux
Het apparaat staat in de
ontdooistand
Het apparaat staat in de
reinigingsmodus
Kinderslot-functie geactiveerd
La page est en cours de chargement...
La page est en cours de chargement...
La page est en cours de chargement...
La page est en cours de chargement...
La page est en cours de chargement...
La page est en cours de chargement...
La page est en cours de chargement...
La page est en cours de chargement...
La page est en cours de chargement...
La page est en cours de chargement...
La page est en cours de chargement...
La page est en cours de chargement...
La page est en cours de chargement...
La page est en cours de chargement...
La page est en cours de chargement...
La page est en cours de chargement...
La page est en cours de chargement...
La page est en cours de chargement...
La page est en cours de chargement...
La page est en cours de chargement...
La page est en cours de chargement...
La page est en cours de chargement...
La page est en cours de chargement...
La page est en cours de chargement...
La page est en cours de chargement...
La page est en cours de chargement...
La page est en cours de chargement...
La page est en cours de chargement...
La page est en cours de chargement...
La page est en cours de chargement...
La page est en cours de chargement...
La page est en cours de chargement...
-
 1
1
-
 2
2
-
 3
3
-
 4
4
-
 5
5
-
 6
6
-
 7
7
-
 8
8
-
 9
9
-
 10
10
-
 11
11
-
 12
12
-
 13
13
-
 14
14
-
 15
15
-
 16
16
-
 17
17
-
 18
18
-
 19
19
-
 20
20
-
 21
21
-
 22
22
-
 23
23
-
 24
24
-
 25
25
-
 26
26
-
 27
27
-
 28
28
-
 29
29
-
 30
30
-
 31
31
-
 32
32
-
 33
33
-
 34
34
-
 35
35
-
 36
36
-
 37
37
-
 38
38
-
 39
39
-
 40
40
-
 41
41
-
 42
42
-
 43
43
-
 44
44
-
 45
45
-
 46
46
-
 47
47
-
 48
48
-
 49
49
-
 50
50
-
 51
51
-
 52
52


Duux Bora Le manuel du propriétaire
- Catégorie
- Humidificateurs
- Taper
- Le manuel du propriétaire
dans d''autres langues
- English: Duux Bora Owner's manual
- español: Duux Bora El manual del propietario
- Deutsch: Duux Bora Bedienungsanleitung
Documents connexes
Autres documents
-
Princess 01.353120.01.001 Manuel utilisateur
-
Eurom 370874 Manuel utilisateur
-
Amcor SC 100 Manuel utilisateur
-
 Stylies Pavo Le manuel du propriétaire
-
 Air And Me Rohan connecté avec pompe intégrée Le manuel du propriétaire
-
Stadler Form Albert Mode d'emploi
-
Stadler Form Albert little Mode d'emploi
-
-
-
 Pro Breeze PB-08-UK-FBA Manuel utilisateur


