Kichler Lighting 380911ANS Manuel utilisateur
- Taper
- Manuel utilisateur

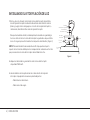
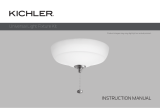
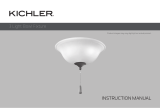
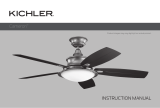
INSTRUCTION MANUAL
Product images may vary slightly from actual product.
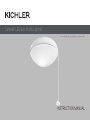
Canfield
™
LED Slim-Profile Light Kit

KICHLER.COM

TABLE OF CONTENTS
SAFETY RULES .................................................................4
PACKAGE CONTENTS ....................................................5
INSTALLING THE LIGHT KIT .....................................6-7
INSTALLING THE LAMP & GLASS SHADE ............. 8
FCC WARNING ....................................................................9
3
Canfield
™
LED Slim-Profile Light Kit |

SAFETY RULES
SPECIAL NOTICE: This light fixture is designed for the Canfield
™
model ONLY.
WARNING! RISK OF ELECTRIC SHOCK
All electrical connections must be made in accordance with local codes, ordinances, or national codes. If you are unfamiliar with
installing electrical wiring, secure the services of a qualified electrician. Before starting this installation, disconnect the power by
turning o the circuit breaker at your main panel or removing the fuse at the fuse block. Turning the power o using the ceiling fan
switch (speed control on/o) is not sucient to prevent electrical shock.
NOTE: The important safeguards and instructions appearing in this manual are not meant to cover all possible conditions and
situations that may occur. It must be understood that common sense, caution and care are factors which cannot be built into any
product. These factors must be supplied by the person (s) caring for and operating the unit.
SPECIAL NOTICE: This appliance is equipped with a “Wattage Limiting Device” required by the United States Department of
Energy. The device has been installed at the factory and can not be removed.
Installing Lamps in excess of 75 total watts will disable the units light fixture. If this should happen, you will need to reset the
lighting fixture by turning the power o to the ceiling fan and/or light fixture, reinstalling lamps totaling less that 75 watts and then
turning the power back on.
“CAUTION-RISK OF FIRE”
CONSULT A QUALIFIED ELECTRICIAN TO ENSURE
CORRECT BRANCH CIRCUIT CONDUCTOR.
4 | KICHLER.COM

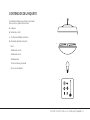
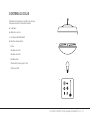
PACKAGE CONTENTS
Unpack your light fixture and check the contents.
You should have the following items:
a. Light Fixture
b. Glass Shade
c. (1) 9 Watt E26 LED lamp
d. Part bag contents:
Nut
Spring Washer
Metal Washer
Flat Washer
Pull Chain and Fob
(2) Wire Nuts
c
d
b
a
5
Canfield
™
LED Slim-Profile Light Kit |

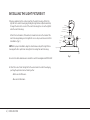
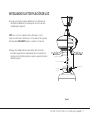
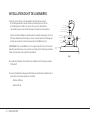
INSTALLING THE LIGHT FIXTURE KIT
1. Remove and discard the center plug from the switch housing. Attach the
light kit to the switch housing by feeding the light kit wires (black and white)
through the hole in the center of the switch housing, then screw the light kit
onto the switch housing.
Attach the metal washer, flat washer, lock washer & nut on the inside of the
switch housing making sure the light kit is secure to prevent movement after
installation. (Fig. 1)
NOTE: For proper installation, align the small arrow on top of the light fixture
housing with either pull chain coming from the ceiling fan switch housing.
2. Locate the white and blue wires inside the switch housing labeled FOR LIGHT.
3. Attach the wires from the light kit to the wires inside the switch housing by
pushing the polarized connections together.
- White wire to White wire
- Blue wire to Black wire
Fig. 1
Switch
housing
Center
plug
Lock washer
Flat washer
Metal washer
Nut
Light kit
Arrow
6 | KICHLER.COM

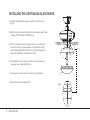
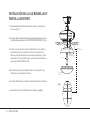
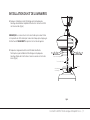
INSTALLING THE LIGHT FIXTURE KIT
4. Raise and hold the light kit assembly close to the mounting plate of
the ceiling fan. Push the square wire connectors together. (Fig. 2)
NOTE: The square connectors are color coded. Match the color coded
sides of each plug and push. They will attach ONLY when matched
correctly.
5. Carefully push all wires back into the switch housing, then install the
light kit assembly onto the mounting plate with 3 screws provided.
Be sure to tighten all screws. (Fig. 2)
Fig. 2
Mounting plate
Square connectors
Light kit
assembly
Screws
7
Canfield
™
LED Slim-Profile Light Kit |

1. Install the 9 watt E26 LED lamp (provided) to the fixture socket.
(Fig. 3)
2. Attach the glass shade to the light fixture by turning the glass shade
clockwise. DO NOT OVER TIGHTEN. (Fig. 3)
3. From the ceiling fan switch housing, feed each control pull chain
through the slot in the opposing sides of the light fixture. Make
sure to align and MATCH the label on the switch housing with the
label on the light fixture showing FAN or LIGHT.
4. Your installation is now complete. Restore electrical power and
enjoy your new ceiling fan light fixture.
Turn the power on and check the operation of your light fixture.
The pull chain controls the light On-O.
Pull chain
control
Lamp
Glass
shade
Lamp
holders
INSTALLING THE LIGHT BULB & GLASS SHADE
Fig. 3
8 | KICHLER.COM

FCC INFORMATION:
This device complies with part 15 of the FCC Rules. Operation is subject to the following two conditions:
1) This device may not cause harmful interference, and
2) This device must accept any interference received, including interference that may cause undesired operation.
Note: This equipment has been tested and found to comply with the limits for a Class B digital device, pursuant to part 15 of the FCC
Rules.These limits are designed to provide reasonable protection against harmful interference in a residential installation. This equipment
generates, uses and can radiate radio frequency energy and, if not installed and used in accordance with the instructions, may cause
harmful interference to radio communications. However, there is no guarantee that interference will not occur in a particular installation.
If this equipment does cause harmful interference to radio or television reception, which can be determined by turning the equipment
o and on, the user is encouraged to try to correct the interference by one or more of the following measures:
• Reorient or relocate the receiving antenna.
• Increase the separation between the equipment and receiver.
• Connect the equipment into an outlet on a circuit dierent from that to which the receiver is connected.
• Consult the dealer or an experienced radio/TV technician for help.
9
Canfield
™
LED Slim-Profile Light Kit |

KICHLER LIGHTING
7711 EAST PLEASANT VALLEY ROAD
CLEVELAND, OHIO 44131
CUSTOMER SERVICE 866-558-5706
8:00 AM TO 5:00 PM EST, MONDAY - FRIDAY

MANUAL DE INSTRUCCIONES
Las imágenes del producto pueden variar ligeramente
del producto real.
Canfield
™
CLIMAS
™
Kit de luces LED de perfil delgado

KICHLER.COM

TABLA DE CONTENIDO
REGLAS DE SEGURIDAD ...........................................4 4
CONTENIDOS DEL PAQUETE ..................................5 5
INSTALANDO EL KIT DE ILUMINACIÓN ..............6-7
INSTALANDO LAS LÁMPARAS Y
SOMBRA DE VIDRIO ........................................................8
ADVERTENCIA FCC ..................................................... 9 9
3
Canfield
™
CLIMAS
™
Kit de luces LED de perfil delgado |

REGLAS DE SEGURIDAD
AVISO ESPECIAL: Esta luminaria está diseñada para Canfield
™
CLIMAS
™
modelo SOLO.
¡ADVERTENCIA! RIESGO DE SHOCK ELÉCTRICO
Todas las conexiones eléctricas deben realizarse de acuerdo con los códigos locales, las ordenanzas o los códigos nacionales. Si no
está familiarizado con la instalación del cableado eléctrico, asegure los servicios de un electricista calificado. Antes de comenzar
esta instalación, desconecte la alimentación apagando el interruptor de circuito en su panel principal o quitando el fusible en el
bloque de fusibles. Apagar la alimentación con el interruptor del ventilador de techo (control de velocidad activado / desactivado)
no es suficiente para evitar descargas eléctricas.
NOTA: Las importantes garantías e instrucciones que aparecen en este manual no están destinadas a cubrir todas las condiciones
y situaciones posibles que puedan ocurrir. Debe entenderse que el sentido común, la precaución y el cuidado son factores que no
pueden integrarse en ningún producto. Estos factores deben ser proporcionados por las personas que cuidan y operan la unidad.
AVISO ESPECIAL: Este aparato está equipado con un "Dispositivo de limitación de potencia" requerido por el Departamento de
Energía de los Estados Unidos. El dispositivo se instaló en la fábrica y no se puede quitar.
La instalación de lámparas de más de 75 vatios totales deshabilitará la lámpara de las unidades. Si esto sucede, deberá
restablecer el dispositivo de iluminación apagando el ventilador de techo y / o el dispositivo de iluminación, reinstalando las
lámparas por un total de menos de 75 vatios y luego volviendo a encenderlo.
"PRECAUCIÓN-RIESGO DE INCENDIO"
CONSULTE A UN ELECTRICISTA CALIFICADO PARA ASEGURAR
EL CONDUCTOR CORRECTO DEL CIRCUITO DE LA RAMA.
4 | KICHLER.COM

CONTENIDOS DEL PAQUETE
Desembale su lámpara y verifique el contenido.
Debe tener los siguientes elementos:
a. Lámpara
b. Sombra de cristal
c. (1) Lámpara LED E26 de 9 vatios
d. Contenido de la bolsa de parte:
Nuez
Arandela de resorte
Arandela de metal
Arandela plana
Tire de la cadena y el mando
(2) tuercas de alambre
c
d
b
a
5
Canfield
™
CLIMAS
™
Kit de luces LED de perfil delgado |

INSTALANDO EL KIT DE FIJACIÓN DE LUZ
1. Retire y deseche el tapón central de la carcasa del interruptor. Una el kit de
luz a la caja del interruptor mediante la alimentación de los hilos kit de la luz
(blanco y negro) a través del agujero en el centro de la caja del interruptor, a
continuación, atornillar el kit luz sobre la caja del interruptor.
Coloque la arandela de metal, la arandela plana, la arandela de seguridad y la
tuerca en el interior de la carcasa del interruptor asegurándose de que el kit de
luces esté seguro para evitar movimientos después de la instalación. (Figura 1)
NOTA: Para una instalación adecuada, alinee la flecha pequeña en la parte
superior de la carcasa de la lámpara con cualquiera de las cadenas de extracción
que provienen de la carcasa del interruptor del ventilador de techo.
2. Ubique los cables blanco y azul dentro de la carcasa del interruptor
etiquetados PARA LUZ.
3. Una los alambres del conjunto de luz a los cables dentro de la caja del
interruptor empujando las conexiones polarizadas juntos.
- Cable blanco a cable blanco
- Cable azul a cable negro
Figura 1
Interruptor
de vivienda
Enchufe
central
Arandela de seguridad
Arandela plana
Arandela de metal
Nuez
Kit de
luces
Flecha
6 | KICHLER.COM

INSTALANDO EL KIT DE FIJACIÓN DE LUZ
4. Levante y sostenga el conjunto del kit de luz cerca de la placa de
montaje del ventilador de techo. Empuje los conectores de cable
cuadrado juntos. (Figura 2)
NOTA: Los conectores cuadrados están codificados por colores.
Haga coincidir los lados codificados por color de cada enchufe y empuje.
Ellos adjuntarán SOLAMENTE cuando se combina correctamente
5. Empuje con cuidado todos los cables dentro de la carcasa del
interruptor, luego instale el conjunto del kit de luces en la placa de
montaje con los 3 tornillos provistos. Asegúrese de apretar todos los
tornillos. (Figura 2)
Figura 2
Placa de montaje
Conectores cuadrados
Conjunto de
kit de luz
Empulgueras
7
Canfield
™
CLIMAS
™
Kit de luces LED de perfil delgado |

1. Instale la lámpara LED E26 de 9 vatios (incluida) en el zócalo del
accesorio. (Fig. 3)
2. Fije la pantalla de vidrio a la lámpara girando la pantalla de vidrio en
el sentido de las agujas del reloj. NO APRIETE DEMASIADO. (Fig. 3)
3. Desde la carcasa del interruptor del ventilador de techo, alimente
cada cadena de tracción del control a través de la ranura en los
lados opuestos de la lámpara. Hacer asegúrese de alinear y unir la
etiqueta de la carcasa del interruptor con la etiqueta de la lámpara
que muestra VENTILADOR o LUZ.
4. Su instalación ya está completa. Restaure la energía eléctrica y
disfrute de su nueva lámpara de techo.
Encienda la alimentación y verifique el funcionamiento de su lámpara.
La cadena de tracción controla la luz de encendido y apagado.
Tirar de la
cadena controlar
Lámpara
Pantalla
de vidrio
Portalámparas
INSTALACIÓN DE LA LUZ BOMBILLAS Y
PANTALLA DE VIDRIO
Fig. 3
8 | KICHLER.COM

INFORMACIÓN DE LA FCC:
Este dispositivo cumple con la parte 15 de las Reglas de la FCC. La operación está sujeta a las siguientes dos condiciones:
1) Este dispositivo no puede causar interferencias perjudiciales, y
2) Este dispositivo debe aceptar cualquier interferencia recibida, incluida la interferencia que pueda causar un funcionamiento no deseado.
Nota: Este equipo ha sido probado y cumple con los límites para un dispositivo digital de Clase B, de conformidad con la parte 15 de
la FCC Reglas. Estos límites están diseñados para proporcionar una protección razonable contra interferencias perjudiciales en una
instalación residencial. Este equipo genera, usa y puede irradiar energía de radiofrecuencia y, si no se instala y usa de acuerdo con las
instrucciones, puede causar interferencia perjudicial para las comunicaciones por radio. Sin embargo, no hay garantía de que no se
produzcan interferencias en una instalación en particular. Si este equipo causa interferencias perjudiciales en la recepción de radio o
televisión, lo cual puede determinarse girando el equipo de vez en cuando, se recomienda al usuario que intente corregir la interferencia
mediante una o más de las siguientes medidas:
• Reorientar o reubicar la antena receptora.
• Aumente la separación entre el equipo y el receptor.
• Conecte el equipo a una toma de corriente en un circuito diferente al que está conectado el receptor.
• Consulte al distribuidor oa un técnico experimentado de radio / TV para obtener ayuda.
9
Canfield
™
CLIMAS
™
Kit de luces LED de perfil delgado |

KICHLER LIGHTING
7711 EAST PLEASANT VALLEY ROAD
CLEVELAND, OHIO 44131
CUSTOMER SERVICE 866-558-5706
8:00 AM TO 5:00 PM EST, MONDAY - FRIDAY
La page est en cours de chargement...
La page est en cours de chargement...
La page est en cours de chargement...
La page est en cours de chargement...
La page est en cours de chargement...
La page est en cours de chargement...
La page est en cours de chargement...
La page est en cours de chargement...
La page est en cours de chargement...
La page est en cours de chargement...
-
 1
1
-
 2
2
-
 3
3
-
 4
4
-
 5
5
-
 6
6
-
 7
7
-
 8
8
-
 9
9
-
 10
10
-
 11
11
-
 12
12
-
 13
13
-
 14
14
-
 15
15
-
 16
16
-
 17
17
-
 18
18
-
 19
19
-
 20
20
-
 21
21
-
 22
22
-
 23
23
-
 24
24
-
 25
25
-
 26
26
-
 27
27
-
 28
28
-
 29
29
-
 30
30


Kichler Lighting 380911ANS Manuel utilisateur
- Taper
- Manuel utilisateur
dans d''autres langues
Documents connexes
-
 Kichler Lighting 380010ANS Manuel utilisateur
-
 Kichler Lighting 380011MUL Manuel utilisateur
-
 Kichler Lighting 380015MUL Manuel utilisateur
-
 Kichler Lighting 339501AP Manuel utilisateur
-
Kichler Lighting 330016SNB Manuel utilisateur
-
Kichler Lighting 330174MWH Guide d'installation
-
 Kichler Lighting 310204WCP Manuel utilisateur
-
 Kichler Lighting 330019SNB Manuel utilisateur
-
 Kichler Lighting 330017SNB Manuel utilisateur
-
Kichler Lighting 8T1001S27WH Manuel utilisateur


