Dirtdevil M088300B Le manuel du propriétaire
- Catégorie
- Aspirateurs
- Taper
- Le manuel du propriétaire

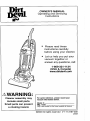
OWNER'S MANUAL
Operating and Servicing
Instructions
Please read these
instructions carefully
before using your cleaner.
Let us help you put your
vacuum together or
answer any questions, call:
1-800-321 -1 134
(USA
&
Canada)
www.dirtdevil.com
AWARNING:
1
Cleaner assembly may
include small Darts.
02003
All
rights reserved
#
1
-1 1 31 67-000
2/03
For quick reference, please record your
vacuum information below.
Small parts can present
a choking hazard.
Model
#:
~f~. Code:
(Mfg.
code located on the lower backside of cleaner)

THIS CLEANER IS INTENDED FOR HOUSEHOLD USE ONLY.
IMPORTANT SAFETY INSTRUCTIONS
When you use an appliance, basic precautions should be followed,
including the following:
READ ALL INSTRUCTIONS BEFORE USING THE APPLIANCE.
ALWAYS FOLLOW THESE SAFETY INSTRUCTIONS.
BRING CLEANER TO UPRIGHT POSITION WHEN USING THE HOSE AND
ATTACHMENTS.
DO NOT LEAVE CLEANER UNATTENDED WHEN PLUGGED IN.
REGULARLY CHECK THE FILTERS TO CLEAN OR REPLACE.
WARNING:
DO NOT USE SHARP OBJECTS TO CLEAN OUT THE HOSE SINCE
THEY COULD CAUSE DAMAGE.
OCCASIONALLY REMOVE BRUSH AND CLEAN DEBRIS FROM END CAPS TO
KEEP BRUSH ROTATING SMOOTHLY.
WARNING: THE CORDS, WIRES, AND/OR CABLES SUPPLIED WITH THIS
PRODUCT CONTAINS CHEMICALS, INCLUDING LEAD OR LEAD COMPOUNDS,
KNOWN TO THE STATE OF CALIFORNIA TO CAUSE CANCER AND BIRTH
DEFECTS OR OTHER REPRODUCTIVE HARM. WASH HANDS AFTER USING.
READ ALL INSTRUCTIONS BEFORE USING THE APPLIANCE.
WARNING: TO REDUCE THE RISK OF FIRE,
ELECTRIC SHOCK OR INJURY:
Do not leave appliance when plugged in. Unplug from outlet when not in use
and before servicing.
ii
Do not use outdoors or on wet surfaces. Electrical shock could occur.
Do not allow to be used as a toy. Close attention is necessary when used by
or near children.
Use only as described in this manual. Use only manufacturer's recom-
mended attachments.
Do not use with damaged cord or plug. If appliance is not working as it
should, has been dropped, damaged, left outdoors, or dropped into water,
return it to a service center for inspection. Call 1-800-321
-1
134 for the near-
est service center.
Do not pull or carry by cord, use cord as handle, close a door on cord, or
pull cord around sharp edges or corners. Do not run appliance over cord.
Keep cord away from heated surfaces.
Do not unplug by pulling on cord. To unplug, grasp the plug, not the cord.
Do not handle plug or appliance with wet hands.
Do not put any objects into openings. Do not use with any opening blocked;
keep free of dust, lint, hair, and anything that may reduce air flow.
2

Keep hair, loose clothing, fingers, and all parts of body away from openings
and moving parts.
Do not pick up anything that is burning or smoking, such as cigarettes,
matches, or hot ashes.
Do not use without dirt container and filters in place.
Turn off all controls before unplugging.
Use extra care when cleaning on stairs.
Do not use to pick up flammable or combustible liquids, such as gasoline,
or use in areas where they may be present.
Keep the vacuum cleaner on the floor. Only the hand-held vacuum cleaners
may be set on furniture.
Cleaner must be in the upright position to lift the rotating brush off the car-
pet when doing above' floor cleaning.
Do not use an extension cord with this vacuum cleaner.
Store the vacuum cleaner indoors. Put the vacuum cleaner away after use
to prevent tripping accidents.
Using improper voltage may result in damage to the motor and possible
injury to the user. Proper voltage is listed on the cleaner plate.
Unplug before connecting Turbo Tool.
SAVE THESE INSTRUCTIONS
WARNING:
To reduce the risk of electric shock, this appliance has a polarized plug (one blade
wider than the other). This plug will fit in a polarized outlet only one way. If the plug
does not fit fully in the outlet, reverse the plug. If
it
still does not fit, contact a quali-
fied electrician to install the proper outlet. Do not change the plug in any way.

CONGRATULATIONS
You are now the proud owner of a Dirt Devilm. We trust your new pur-
chase will bring you many years of satisfaction.
Our company designed and developed this product with you in
mind.
We are very proud of our products and hope that you are equally
satisfied with their quality and performance.
Thank you for your support of Dirt Devil" products.
Visit our
website at www.dirtdevil.com
TABLE OF CONTENTS
Safety Instructions
............................................
Page 2,
3
Feature Descriptions
........................................
Page
5
How to Assemble
.............................................
Page 6,
7
Body to Nozzle Assembly
...........................
Page 6
Tool Caddy Assembly
.................................
Page 6
Handle to Body Assembly
...........................
Page
6
How To Operate
...............................................
Page
7,
8
FloorICarpet Cleaning
................................
Page
7
Above Floor Cleaning
................................
Page
8
Dirt Container & Filtration: Removal
......................................
and Replacement Page
9
Belt or Brush: Removal
&
Replacement
..........
Page 10, 11
Lightbulb: Removal
&
~eplacement
.................
page 11
.....................................
General Maintenance ..Page 11,12
Troubleshooting Guide
.....................................
Page 12
111
LIMITED WARRANTY
To the consumer, Royal Appliance Mfg. Co. warrants this vacuum cleaner to be free of defects in materi-
al or workmanship commencing upon the date of the original purchase. Refer to your vacuum cleaner
carton for the length of warranty and save your
origmal sales receipt to val~date start of warranty period.
If the vacuum cleaner should become defective within the warranty period, we will repair or replace any
defective parts free of charge. The complete machine must be delivered
DreDaid
to any ROYALe
Authorized Sales
&
Warranty Sewice Station. Please include complete description of the problem, day
of purchase, copy of original sales receipt and your name, address and telephone number. If you are
not near a Warranty Station, call the factory for assistance at USA
&
Canada:
1-800-321-1134. Use only genuine Royale replacement parts.
The warranty does not include unusual wear, damage resulting from accident or unreasonable use of
the vacuum cleaner. This warranty does not cover brushes, flat belts, filters and bulbs. This warranty
does not cover unauthorized repairs. This warranty gives you specific legal rights and you may
also
have other rights (Other rights may vary from state to state in the USA).

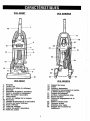
FRONT
VlEW
BACK
VlEW
FRONT
VlEW
1.
Handle
2.
Turbo Tool
3.
Crevice Tool (inside extension wand)
4. Extension Wand
5.
Dirt Cuo Lid
6.
See ~hiough Dirt Cup
7.
Dirt CUD Filter
8. Headlight
9.
Height Adjust Lever
10. Bumper
11.
Clear Dirt Path Window
12. Lower Hose Cuff
13.
Lower Hose
14. Hose Wand
15. Dirt Cup Release Latch
16. Cord Guide
BACK
VIEW
17. Hose Caddy
18.
Hose
19. Dust Brush
20. Cord Wrap with Quick Cord Release
21. Carrying Handle
22. Long Power Cord
23. Swivel Casters"
24. Handle Release Pedal
25.
OnIOff Pedal
26. Back Panel
27. Hose Clip
28. Upper Tool Caddy

I
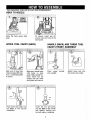
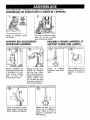
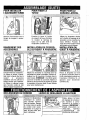
TOOL REQUIRED: PHILLIPS OR FLAT HEAD SCREWDRIVER
BODY TO NOZZLE
Slide the back panel onto
To
secure, insert two
(2)
base. screws into the front of the
back panel.
UPPER TOOL CADDY (BACK)
Slide end of long hose
Align carry handle holes
onto back panel dirt tube. with holes on back
Turn counterclockwide panel. Slide handle for-
to secure. ward. Insert two
(2)
screws into the holes
and tighten until secure.
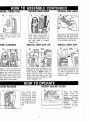
HANDLE (BACK) AND TURBO TOOL
CADDY (FRONT) ASSEMBLY
Place upper handle Attach turbo tool clip
..
onto upright. into turbo tool caddy.
Place turbo tool caddy onto Insert the two
(2)
screws
the
front
of the vacuum into the
back
of the handle
midsection. and tighten, making sure
the tool caddy is attached.

Clip turbo tool onto the Wrap hose around back of
Align tabs on clear dirt passage
front of the turbo tool
hose caddy (Diagram
1).
window with the slots on the
caddy. Push hose wand down into
lower hose cuff. Push and turn
the right side of cleaner
hose clockwise until secure.
(Diagram la).
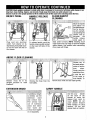
TOOL STORAGE INSTALL DIRT CUP LID INSTALL DIRT CUP
~tt~~h tools: (a) slide the
Align slots on lid with tabs on cup
Set aligning tab on bottom of
dust brush onto post
on
the
(Diagram
4).
Push the lid down and
dirt cup into rectangular slot
upper tool caddy with bris-
twist clockwise. NOTE:
There is a
on cleaner (Diagram
5),
and
ties
facing out,
(b)
Slide the
guide arrow on back of lid. Align
push to snap into place
extension wandlcrevice tool
arrow with right edge of dirt cup
(Diagram 5a).
into round slot on the front
handle and turn clockwise until
right side of tool caddy.
secure (Diagram 4a).
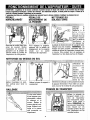
CORD RELEASE HEIGHT ADJUST LEVER
Release for easv
cord removal. store
cord in cord guide
(see Features
-
pg.
5) to keep out of the
way while vacuum-
ing.
match the surface
being cleaned.
IMPORTANT: FOR
EASIEST ADJUST-
-
MENT, PLACE
CLEANER IN FULL
UPRIGHT
I
I
POSITION.

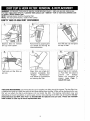
CAUTION:
Brush agifafor continues to mfate while hose is removed or in use and at all times while cleaner is on.
Keep hair, loose clothing, fingers, and all parts of body away fmm brush area while cleaner is on,
Cleaner
must
be in the upright position to
lift
the rotation blush off the calpet when cleaning above the floor.
ONIOFF PEDAL HANDLE RELEASE
PEDAL
Plug cord into electrical
To release handle, push the
outlet. Turn cleaner on by
handle release pedal located
depressing foot pedal locat-
on the lower left side of the
ed on the back left side of
cleaner.
the cleaner.
\BOVE FLOOR CLEAN
FLOORICARPET
CLEANING
:lean under furniture.
NOTE:
Rotating brush
could cause area rug fringe to become tangled
within cleaner. Use caution when vacuuming
throw rugs with fringe.
I
I
hose handle. To
Cleaner must be in its Remove the hose from the remove tool, twist and pull apart gently.
upright position to raise tool caddy.
brushroll.
EXTENSION WAND
is needed, use the
extension wand
and crevice tool.
Pull crevice tool
out of extension
wand. Use exten-
sion wand and
crevice tool togeth-
er or separately.
Use the carry handle
on the back of the
cleaner to move the
cleaner from room to
room.
NOTE:
Do not
push cleaner forward
while leaning on back
casters. Do not pull
cleaner back on casters.

WAR~NG:
TO
REDUCE
THE
RISK
OF
INJURY
FROM
MOVING
PARTS
-
UNPLUG
BEFORE
SERVICING.
For filter reDlacement (Part
#
2-JC0280-000)
please call
1-800-321-1134
or visit www.dirtdevil.com
.
.
to locate a dealer nearest you.
NOTE:
Unplug cleaner before changing,filter.
NOTE:
For best performance, replace filter yearly.
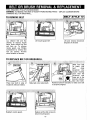
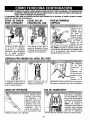
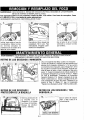
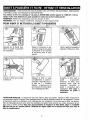
EMPTY AND CLEAN DIRT CONTAINER
Depress latch to remove Remove lid by grasping dirt
Hold the dirt cup and grasp
dirt cup from cleaner. cup handle and turning lid
the top of filter.
counterclockwise.
Twist and pull the filter up
t
Clean filter and empty dirt
Return filter to dirt contain-
and out. container completely. See
er. Push filter into place to
"Regular Maintenance" prevent dirt leakage.
note below for instructions Return dirt container to
on cleaning the filter. cleaner
(see Page
7,
Install Dirt
Cup).
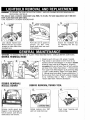
*REGULAR MAINTENANCE:
Each time the dirt cup is emptied, the filter should be cleaned. Tap the filter firm-
ly
against the inside of a trash can until the dirt stops falling from the filter. (Filter will be discolored after use,
this will not affect the filter's performance.) Do not brush the filter. The cleaning instructions may vary
depending on the dirt conditions. In some cases, more or less cleaning of the filter may be required.
It is rec-
ommended that the HEPA filter Part
#
2-JC0280-000
be replaced once per year. Please use reminder
label located on filter cap to record replacement date.

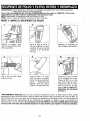
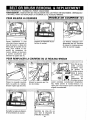
TOOL REQUIRED: PHILLIPS SCREWDRIVER
WARNING:
TO REDUCE THE RISK OF INJURY FROM MOVING PARTS
-
UNPLUG CLEANER BEFORE
CHANGING BELT OR BRUSHROLL.
Lay cleaner flat and flip Lift nozzle guard off.
Lift and remove brushroll
cleaner to expose nozzle Dispose of old belt.
base. Base should lay flat
and face up. To remove
nozzle guard, use Phillips
screwdriver to remove the
five (5) screws. Arrows
show location of screws.
TO REPLACE BELT OR BRUSHROLL
Place new belt in area of
brushroll without bristles.
Slide belt onto motorshaft.
Rotate brushroll manually to make sure belt
is properly aligned.
I
I
I
I
Reattach nozzle guard. Replace all five (5) screws to
secure nozzle guard.

WARNING: TO REDUCE THE RlSK OF ELECTRIC SHOCK
-
UNPLUG CLEANER BEFORE REMOVING OR
REPLACING LIGHTBULB.
This cleaner uses a common automotive lamp #906,13.0 volts. For bulb replacement call 1-800-321-
1134 or your local auto parts store.
TOOL REQUIRED: FLATHEAD SCREWDRIVER
Lean cleaner handle back.
Pull bulb out of socket to Secure the headlight lens
Remove the two (2) screws remove. Do NOT twist. by replacing the two
(2)
located on either side of the Gently push bulb into sock-
screws.
headlight lens. et to replace.
WARNING: TO REDUCE THE RISK OF INJURY FROM MOVING PARTS
-
UNPLUG BEFORE SERVICING.
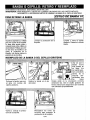
DEBRIS REMOVALIHOSE
1.
Check to see if dirt cup is full; empty if needed.
2.
Plug cleaner in and check to see if there is any
suction at end of hose (Diagram 1). If there is suction
at end of hose, move on to Diagram
4.
If there is
no suctionat the end of hose. Clear dirt path window
and lower hose. Follow these steps:
1.
Remove hose
from upper hose inlet (Diagram
2)
by reversing Step
1,
Page
6,
under heading "Upper Tool Caddy (Back)."
2.
Unwrap hose from caddy. Remove obstruction. 3.
Remove hose from clear dirt path window (Diagram
3) by reversing Step 2, Page
7,
under heading
"Secure Side Hose". Remove obstruction.
DEBRIS REMOVAL1
NOZZLE GUARD DEBRIS REMOVAL/TURBO TOOL
Remove nozzle guard (see
Rotate locking ring 180" Pivot lower housing and
Diagram
1)
by removing the
and turn turbo tool over. remove clog.
five
(5)
screws. Look for any
obstructions and remove.
11

To reassemble, be sure
tabs are engaged and prvot
the lower housrng closed
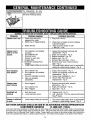
Cleaner won't run
1. Power cord not firmly
plugged into outlet.
2. Blown fuse or tripped breaker.
13. Needs service.
Cleaner won't
1.
Dirt container not installed
pick-up or low
correctly.
suction
2. Dirt container full.
3. Brushroll worn.
4.
Broken or worn belt.
5.
Clogged filter.
6.
Nozzle/dirt passage hose
.
.
clogged.
7.
Carpet height setting is incorrect.
from cleaner
2. Dirt container not installed
correctly.
3. Hose not installed correctly.
4.
Filter not installed
Cleaner tools
1. Hose clogged.
won't pick-up
2. Dirt container full.
3. Filter clogged.
Headlight not
1. Bulb burnt out.
working
2. Loose electrical wires.
Cleaner is difficult
1. Carpet height setting is incorrect.
to push
1. Plug unit in firmly.
2.
Check fuse or breaker in home. Replace
fuselreset breaker.
3. Take to service center or call
1-800-321 -1 134.
1. Review dirt container removal and
replacement
-
Pg.
9.
2. Empty dirt container
-
Pg.
9.
3. Replace brushroll
-
Pg. 10.
4.
Replace belt
-
Pg. 10.
5.
Remove filter and clean
-
Pg.
9.
6.
Remove lower hose: remove obstru-
ction
-
Pg.
7.
7.
Set carpet height adjust lever to appropriate
setting for carpet being cleaned
-
Pg. 8.
1. Empty dirt container
-
Pg.
9.
2. Review dirt container removal and
replacement
-
Pg.
9.
3. Review hose installation
-
Pg.
7.
4.
Review filter Removal and
Replacement
-
Pg.
9.
1. Remove hose and tools; remove
obstruction
-
Pg.
7.
2.
Empty dirt container
-
Pg.
9.
3. Clean filter
-
Pg.
9.
1. Replace bulb
-
Pg. 11.
2.
Call 1-800-321-1 134 for nearest authorized
Royal" Dealer.
1. Set carpet height adjust lever to appropriate
setting for carpet being cleaned
-
Pg. 8.
ANY OTHER SERVICING SHOULD BE DONE BY AN AUTHORIZED SERVICE REPRESENTATIVE
CUSTOMER SERVICE
(1 -800-321
-1
134)
In the event that further assistance is required, see your Yellow Pages for an authorized Royal" Dealer. Costs of any transporta-
tion to and from any place of repair are to be paid by the owner. The service parts used in this unit are easily replaced and read-
ily available from an authorized
Royal' Dealer or retailer. Always identify your cleaner by the model number and manufacturing
code when requesting information or ordering replacement parts. (The model number appears on the bottom of the cleaner.)

MANUAL DEL PROPlETARlO
lnstrucciones de
Funcionamiento y Sewicio
ADVERTENCIA:
3
ensamble de la aspiradora
~uede incluir partes pequeiias.
-as partes pequeiias pueden pre-
;entar riesgo de ahogamiento.
Por favor lea estas
instrucciones con cuidado
antes de usar su aspiradora.
Permitanos ayudarle a
ensamblar su aspiradora
o
a contestar sus
preguntas, llame al:
1-800-321 -1
134
(EE.UU.
y
Canada)
www.dirtdeviI.com
Para tener una referencia rapida, anote por
favor la informacion de su aspiradora aqui.
No. de Modelo:
Codigo del Fabricante:
(El
codigo del fabricante aparece en la parte posterior e
~nferior de la aspiradora).
02002
Todos 10s derechos reservados

ESTA ASPIRADORA
ESTA
DISENADA
PARA US0
DOMESTICO
SOLAMENTE.
INSTRUCCIONES DE SEGURIDAD IMPORTANTES
Cuando use un electrodom6stico se deben seguir precauciones basi-
cas, incluyendo las siguientes:
LEA TODAS LAS INSTRUCCIONES ANTES DE USAR EL APARATO.
SIEMPRE SlGA ESTAS INSTRUCCIONES DE SEGURIDAD.
PONGA LA ASPIRADORA EN POSICION VERTICAL CUANDO USE LA
MANGUERA Y LOS ACCESORIOS.
NO DEJE LA ASPIRADORA SIN VIGILANCIA CUANDO ESTE CONECTADA.
REVISE CON FRECUENCIA LOS FILTROS PARA LlMPlARLOS
0
REEMPLAZARLOS.
ADVERTENCIA: NO UTlLlCE OBJETOS CON FlLO PARA LlMPlAR LA
MANGUERA, DEBIDO A QUE PUEDEN CAUSAR
DANO.
DE VEZ EN CUANDO RETIRE EL CEPILLO Y LlMPlE LOS RESIDUOS DE LAS
TAPAS FINALES PARA PERMlTlR LA
ROTACION
UNIFORME DEL CEPILLO.
ADVERTENCIA: LOS CORDONES, ALAMBRES Y/O CABLES SUMINISTRADOS
CON ESTE PRODUCT0 CONTIENEN PRODUCTOS
QU~MICOS
QUE INCLUYEN
PLOMO
0
COMPUESTOS DE PLOMO ACERCA DE LOS CUALES SE HA SABIDO
EN EL ESTADO DE CALIFORNIA, PRODUCEN
CANCER,
DEFECTOS DE
NAClMlENTO U OTROS
DANOS
REPRODUCTIVOS. LAVESE LAS MANOS
DESPUES
DE SU USO.
LEA TODAS
LAS
INSTRUCCIONES ANTES DE USAR EL APARATO
ADVERTENCIA: PARA REDUCIR EL RIESGO DE
INCENDIO, CHOQUE
ELECTRICO
0
LESIONES:
-
No deje solo el aparato cuando este conectado. Desconectelo de la toma de
corriente cuando no lo use
y
antes de darle servicio.
No lo utilice en exteriores o en superficies mojadas. Puede ocurrir un
choque electrico.
No permita que la aspiradora se use como juguete. Ponga mucha atencion
cuando la use un niiio o cerca de niiios.
usela solamente como se indica en este manual. Use solamente 10s acce-
sorios recomendados por el fabricante.
No la utilice con el cordon electrico o la clavija daiiados. Si el aparato no tra-
baja como debiera, se ha caido, daiiado, dejado en exteriores o caido en
agua, regreselo a un centro de servicio para su inspeccion. Llame al 1-800-
321-1 134 para encontrar el centro de servicio mas cercano a su domicilio.
No tire ni lo transporte tomandole del cordon electrico, no utilice el cordon
electrico como asa, no cierre la puerta sobre el cordon electrico, ni tire del
mismo alrededor de esquinas o rebordes agudos. No pase el aparato sobre el
cordon electrico. Mantenga el cordon electrico lejos de superficies calientes.

No lo desconecte tirando del cordon electrico. Para desconectarlo, tome la
clavija, no el cordon electrico.
No tome la clavija
o
el aparato con las manos mojadas.
No coloque objetos en las aberturas. No lo use con una abertura bloquea-
da; mantengalo libre de polvo, pelusa, pelo
y
cualquier cosa que pueda
reducir el flujo de aire.
Mantenga lejos de las aperturas
y
partes moviles, el pelo, ropa suelta, dedos
y
todas las partes del cuerpo.
No aspire objetos que esten quemandose o emitiendo humo, tales como
cigarrillos,
cerillos o cenizas calientes.
No lo use sin tener en su sitio el recipiente de polvo
y
10s filtros.
Apague todos 10s controles antes de desconectar.
Tenga mas cuidado cuando aspire escaleras.
No lo use para aspirar liquidos inflamables o combustibles, tales como
gasolina, ni lo use en areas donde pudieran estar presentes.
Mantenga la aspiradora en el
suelo. Solamente las aspiradoras de mano
pueden ser colocadas sobre muebles.
La aspiradora debe estar en
posicion vertical para levantar de la alfombra a1
cepillo giratorio cuando haga limpieza por encima del nivel del piso.
No use una extension electrica a1 usar esta aspiradora.
Guarde la aspiradora en interiores. Guardela despues de su uso para evitar
accidentes de tropiezos.
Usar el voltaje inapropiado puede resultar en
dafio a1 motor
y
posibles lesiones
al usuario. El voltaje apropiado esta listado en la placa de la aspiradora.
Unplug before connecting Turbo Tool.
GUARDE ESTAS INSTRUCCIONES
ADVERTENCIA:
Para reducir el riesgo de choque ektrico, este aparato tiene una clavija polarizada
(una hoja mas ancha que la otra.) Esta clavija encajara en una toma de corriente
polarizada de una
manera solamente. Si la clavija no encaja totalmente en la toma de
corriente, invierta la clavija. Si ah no encaja, pongase en contact0 con un electricista
calificado para instalar la
toma de corriente apropiada. No modifique la clavija de
ninguna manera.

FELICITACIONES
Usted
es
ahora el orgulloso propietario de una Dirt Devile. Confiamos
en que su nueva adquisicidn le ofrecerii muchos afios de satisfacci6n.
Nuestra compafiia disefi6 y desarroll6 este product0 teniindolo a
usted en mente.
Estamos muy orgullosos de nuestros productos
y
esperamos que
usted estC igualmente satisfecho con su calidad y rendimiento.
Gracias por su apoyo a 10s productos Dirt Devilm.
Visite nuestro sitio Web en www.dirtdevil.com
lnstrucciones de Seguridad
..............................
Pagina
E2, E3
Descripcion de las Caracteristicas
..................
Pagina
E5
Como Ensamblar
..............................................
Pain E6
Ensamblaje del Cuerpo a la Boquilla
..........
Pagina
E6
Ensamblaje del Contenedor de Accesorios..
.
Pagina E6
Ensamblaje del Asa al Cuerpo
...................
Pagina
E6
Como Funciona
................................................
Pagina
E7,
E8
Limpieza de alfombras
/
piso
......................
Pagina
E7
Limpieza por encima del nivel del piso
.......
Pagina E8
Recipiente de Polvo
y
Filtro: Retiro
v
Reem~lazo
...............................................
Paaina
E9
aha
o cepillo: Retiro
y
Reemplazo
..............
~aiina
El
0,
Ell
Foco: Retiro
y
Reemplazo..
..............................
Pagina
El 1
Mantenimiento General
....................................
Pagina
Ell, El2
Guia de Solucion de Problemas
......................
Pagina
El2
Al consurnidor, Royal Appliance Mfg. Co. le garantiza que esta aspiradora no tiene defectos ni de rnateri-
al ni de rnano de obra, la garantia cornienza en la fecha de cornpra original. Vea la caja para inforrnacion
de la
duration
de la garantia y guarde el recibo de cornpra original para hacer valido el inicio del periodo
de garantia.
En
caso que la aspiradora rnuestre alglin defecto dentro del periodo de garantia, repararernos o reern-
plazarernos de rnanera gratuita cualquier parte defectuosa. La rnaquina cornpleta debe ser enviada con
porte pagado, a cualquier Estacion Autorizada ROYALm de Ventas y Servicio de Garantia. Por favor incluya
una descrlpc16n cornpleta del problerna, fecha de cornpra, copla del rec~bo de cornpra orlgmal y su norn-
bre, dornicilio y nlirnero de telefono. Si no se encuentra cerca de
una Estacion de Garantia, llarne a la
fabrica para pedir asistencia en 10s EE.UU. y Canada: 1-800-321-1134. Use solarnente partes de repuesto
genuinas Royalm.
La garantia no incluye el desgaste anorrnal,
daRo corno resultado de un accidente o del uso no ade-
cuado de la aspiradora. Esta garantia no
cubre 10s cepillos, bandas planas, filtros nl focos. Esta garan-
tia no cubre reparaciones no autorizadas. Esta garantia le confiere derechos legales especificos y
podria tener tarnbien otros derechos, 10s que varian de estado a estado en 10s EE.UU.

VISTA DE LA
PARTE FRONTAL
VISTA DE LA PARTE FRONTAL
1.
Asa
2.
Turbo Tool
3.
Accesorio para Hendiduras (en la
lanza de extension)
4.
Lanza de Extension
5.
Tapa del Recipiente de Polvo
6.
Recipiente de Polvo Transparente
7.
Filtro del Recipiente de Polvo
8.
Luz Frontal
9.
Palanca de Ajuste de Altura
10.
Tope
11.
Ventana de Paso del Polvo
Transparente
12.
Yugo de la Manguera Inferior
13.
Manguera Inferior
14.
Lanza de la Manguera
15.
Seguro de Liberacion del Recipiente
de Polvo
16.
Guia del Cordon Electrico
VISTA DE
LA
PARTE POSTERIOR
VISTA DE LA PARTE POSTERIOR
17.
Contenedor de la manguera
18.
Manguera
19.
Cepillo para Polvo
20.
Gancho con Liberacion Rapida del
Cordon Electrico
21.
Asa de Transporte
22.
Cordon Electrico Largo
23.
Swivel Casters"
24.
Pedal de Liberacion del Asa
25.
Pedal de Encendido
/
Apagado
26.
Cubierta Posterior
27.
Abrazadera de la Manguera
28.
Contenedor de Accesorios
Superior

CUERPO A LA BOQUILLA
Deslice la cubierta posterior
Para asegurar inserte dos (2)
en la base.
tornillos en la
seccion frontal
de la cubierta ~osterior.
CONTENEDOR DE ACCESORIOS
SUPERIOR (FRENTE)
Deslice el extrerno de la
Alinee 10s orificios del
rnanguera larga en el
asa de transporte con
tubo de polvo de la
10s orificios de la cubier-
cubierta posterior. ta posterior. Deslice el
asa
hacia delante.
lnserte dos (2) tornillos
en
10s orificios
y
apriete-
10s hasta asegurarlos.
ENSAMBLAJE DEL CONTENEDOR
DE LA TURBOBOQUILLA (FRENTE)
Coloque el asa superior
en la aspiradora.
Fije la abrazadera de IL
turboboquilla en e
contenedor de
I:
rnisrna.
Coloque el contenedor de la
lnserte 10s dos (2) tornillos
turboboquilla en la parte
en la parte trasera del asa
y
frontal de la seccion media aprietelos, asegurandose
de la aspiradora.
que el contenedor de acce-
sorios esta asegurado.
E6

FlJAClON DE
LA
MAN- FlJAClON DE LA
TURBOBOQUILLA GUERA POSTERIOR MANGUERA LATERAL
Sujete la turboboquilla en la
parte frontal de su contenedor.
ALMACENAMIENTO
DE ACCESORIOS
Para fijar 10s accesorios: (a)
Deslice el cepillo para polvo en el
contenedor de accesorios supe-
rior con
las cerdas hacia afuera.
(b) Deslice el accesorio para
hendidurasl la lanza de exten-
sion en la ranura redonda del
lado derecho frontal del contene-
dnr
fie
accnsnrinq
Enrolle la rnanguera alrededor
de la parte posterior del con-
tenedor (Diagrarna
1).
Ernpuje
la lanza de la rnanguera hacia
abajo en el lado derecho de la
aspiradora (Diagrarna la).
INSTALE LA TAPA DEL
RECIPIENTE DE POLVO
Alinee las lengiietas del recipiente con las
ranuras en la tapa (Diagrarna
4).
Ernpuje la
tapa hacia abajo
y
girela en sentido de las
rnanecillas del reloj.
NOTA:
Hay una flecha
de guia en la parte posterior de la tapa.
Alinee la flecha con el borde derecho delasa
del recipiente de
polvo
y
gire en el sentido
de /as manecillas del reloj basta asegurarlo
(Diagrama 4a).
Alinee las lengiietas de la tapa
con las ranuras en el recipi-
ente. Ernpuje la tapa hacia
abajo
y
girela en sentido de las
rnanecillas del reloj.
INSTALACION DEL
REClPlENTE DE POLVO
Fijelo alineando la lengiieta
en la parte inferior del recip-
iente de polvo en la ranura
rectangular de la aspiradora
(insercion)
y
ernpujelo para
que entre en su sitio
(Diagrarna 5a).
racion raoida del
cordbn electrico
para retirarlo mas
facilrnente. Guardelo
en la guia del cordon
electrico.
Deslice la palanca de
ajuste de altura para
que corresponda con
la superficie que se va
a lirnpiar.
IMPOR-
TANTE:
Para un ajuste
mas facil, coloque la
aspiradora en posi-
cion completamente
vertical
POSITION.

PRECAUCION:
Elagitadw del cepillo continu'a girnndo cuando usted usa o &in la manpuern o sila aspinlorn
RFti
funcionando. hlantenga lejos del area del cepillo el pelo, la mpa suelta, 10s dedos
y
otras paries del
cuetpo cuando la aspiradon
este'
funcionando.
La as~iradora debe estar en nosicion vertical oara levantar de la alfombra el cepillo giratorio cuando
limpik por encima del nivel del piso.
PEDAL DE ENCEN-
PEDAL DE LIB-
DIDO
/
APAGADO
ERACION
DEL ASA
Conecte el cordon electric0
Para liberar el
ass,
pise el
en la toma de corriente.
pedal de
liberation
del asa
Encienda la aspiradora localizado en la parte inferior
pisando el pedal localizado
izquierda de la aspiradora.
en la
park posterior
izquierda de la aspiradora.
nuevarnente para lirnpiar debajo de 10s rnue-
bles.
NOTA:
El cepillo en rotacian podrfa hacer
que 10s flecos de la alfombra se enredaran den-
tro de la aspiradora. Sea precavido cuando
aspire alfombras con flecos.
.IMPIEZA POR ENCIMA DEL NlVEL DEL PIS0
1
firrneza en el
La aspiradora debe estar en
Retire la rnanguera de[ con-
extrern0 de la lanza o del asa de la rnanguera.
su
posicion vertical para lev-
tenedor
&
accesorios.
Para quitar el accesorio, gire
y
tire suavernente.
antar el cepillo giratorio.
longitud, use la l&za
de extensibn
y
el
accesorio para hen-
diduras. Saque la her-
rarnienta para hen-
diduras de la lanza de
extension. Use la
lanza de extension
y
la herrarnienta para
iendiduras juntas o por separado.
ASA DE TRANSPORTE
bre /as ruedas traseras.
cuando bta iste solamente sobre /as ruedas traseras.
La page est en cours de chargement...
La page est en cours de chargement...
La page est en cours de chargement...
La page est en cours de chargement...
La page est en cours de chargement...
La page est en cours de chargement...
La page est en cours de chargement...
La page est en cours de chargement...
La page est en cours de chargement...
La page est en cours de chargement...
La page est en cours de chargement...
La page est en cours de chargement...
La page est en cours de chargement...
La page est en cours de chargement...
La page est en cours de chargement...
La page est en cours de chargement...
-
 1
1
-
 2
2
-
 3
3
-
 4
4
-
 5
5
-
 6
6
-
 7
7
-
 8
8
-
 9
9
-
 10
10
-
 11
11
-
 12
12
-
 13
13
-
 14
14
-
 15
15
-
 16
16
-
 17
17
-
 18
18
-
 19
19
-
 20
20
-
 21
21
-
 22
22
-
 23
23
-
 24
24
-
 25
25
-
 26
26
-
 27
27
-
 28
28
-
 29
29
-
 30
30
-
 31
31
-
 32
32
-
 33
33
-
 34
34
-
 35
35
-
 36
36


Dirtdevil M088300B Le manuel du propriétaire
- Catégorie
- Aspirateurs
- Taper
- Le manuel du propriétaire
dans d''autres langues
Documents connexes
-
Dirtdevil M086940K Le manuel du propriétaire
-
Dirt Devil Vacuum Cleaner Manuel utilisateur
-
-
-
-
-
-
-
-