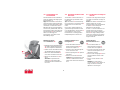
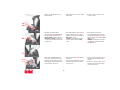
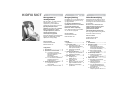
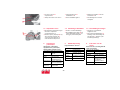
Britax Kidfix Sict Le manuel du propriétaire
- Catégorie
- Sièges de voiture
- Taper
- Le manuel du propriétaire

KIDFIX SICT
RÖMER KIDFIX SICT
Gebrauchsanleitung
User Instructions
Mode d'emploi
Instrucciones de uso
Manual de instruções
Istruzioni per l’uso
Инструкция по эксплуатации
Brugsvejledning
Gebruiksaanwijzing
15 - 36 kg

Mode d'emploi
Nous sommes heureux que notre
KIDFIX SICT puisse accompagner
votre enfant en toute sécurité pendant
un nouveau chapitre de sa vie.
Pour protéger efficacement votre
enfant, le KIDFIX SICT doit
impérativement être utilisé et
installé de la manière décrite dans
le présent mode d’emploi.
Pour toute question complémentaire,
ne pas hésiter à nous contacter.
BRITAX RÖMER
Kindersicherheit GmbH
Britax Excelsior Ltd.
Table des matières
1. Habilitation......................................2
2. Utilisation dans le véhicule...........3
2.1 avec les bras d'enclenchement
KIDFIX sur les points de fixation
ISOFIX dans le véhicule (semi-
universel)..................................4
2.2 avec la ceinture à 3 points du
véhicule (universel)..................5
3. Réglage du siège enfant................6
3.1 Réglage en hauteur de
l'appui-tête................................7
3.2 Position de couchage du
dossier......................................8
4. Montage dans le véhicule..............9
4.1 Fixation des bras
d'enclenchement KIDFIX .......10
4.2 Démontage des bras
d'enclenchement KIDFIX .......13
4.3 Montage correct de votre siège
enfant avec les bras
d'enclenchement KIDFIX .......14
4.4 Fixation avec la ceinture à
3 points du véhicule ...............14
User instructions
We are pleased that our KIDFIX SICT
may accompany your child safely
through a new stage of his or her life.
In order to protect your child
correctly, the KIDFIX SICT must
always be used and installed as
described in these instructions.
If you have any further questions
regarding its use, please feel free to
contact us.
BRITAX RÖMER
Kindersicherheit GmbH
Britax Excelsior Ltd.
Contents
1. Suitability........................................2
2. Use in the vehicle...........................3
2.1 with the KIDFIX locking arms
into the ISOFIX fastening points
in the vehicle (semi-universal)..4
2.2 with the vehicle's 3-point
seatbelt (universal)...................5
3. Adjusting the child seat.................6
3.1 Adjusting the height of the
headrest...................................7
3.2 Reclining position of the
backrest ...................................8
4. Installation in the vehicle ..............9
4.1 Fastening with the KIDFIX
locking arms...........................10
4.2 Removal with KIDFIX locking
arms.......................................13
4.3 Making sure that the child seat
with the KIDFIX locking arms is
installed correctly ...................14
4.4 Fastening with the vehicle's
3-point seatbelt ......................14
Gebrauchsanleitung
Wir freuen uns, dass unser
KIDFIX SICT
Ihr Kind sicher durch einen
neuen Lebensabschnitt begleiten darf.
Um Ihr Kind richtig schützen zu
können, muss der KIDFIX SICT
unbedingt so verwendet und
eingebaut werden, wie wir es Ihnen
in dieser Anleitung beschreiben.
Wenn Sie noch Fragen zur Benutzung
haben, wenden Sie sich bitte an uns.
BRITAX RÖMER
Kindersicherheit GmbH
Britax Excelsior Ltd.
Inhalt
1. Eignung...........................................2
2. Verwendung im Fahrzeug .............3
2.1 mit den KIDFIX-Rastarmen an
den ISOFIX -
Befestigungspunkten im
Fahrzeug (semi universal) .......4
2.2 mit dem 3-Punkt-Gurt des
Fahrzeuges (universal)............5
3. Anpassen des Kindersitzes ..........6
3.1 Höhen-Verstellung der
Kopfstütze................................7
3.2 Ruhestellung der Rückenlehne..8
4. Einbau im Fahrzeug.......................9
4.1 Befestigung mit den
KIDFIX-Rastarmen.................10
4.2 Ausbau mit
KIDFIX-Rastarmen.................13
4.3 So ist Ihr Kindersitz mit den
KIDFIX-Rastarmen richtig
eingebaut...............................14
4.4 Befestigen mit dem 3-Punkt-
Gurt Ihres Fahrzeuges...........14
KIDFIX SICT

2
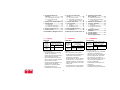
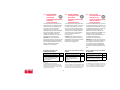
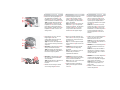
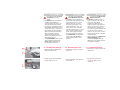
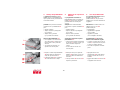
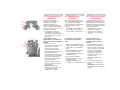
1. Habilitation
Homologation
*ECE = norme européenne pour les
équipements de sécurité
• Le siège auto est conçu, contrôlé et
homologué conformément aux
exigences de la norme européenne
pour les équipements de sécurité
pour enfants (ECE R 44/04). Le
signe de contrôle E (dans un cercle)
et le numéro d’homologation se
trouvent sur l’étiquette
d’homologation (autocollant sur le
siège auto).
•Le
KIDFIX SICT
est testé et
homologué en tant que combinaison
Britax/
RÖMER
Siège auto
Examen et homologation
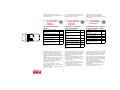
selon ECE* R 44/04
Groupe Poids
KIDFIX
SICT
ll+lll 15 à 36 kg
1. Suitability
Certification
*ECE = European Standard for Safety
Equipment
• The child safety seat has been
designed, tested and certified to the
requirements of the European
Standard for Child Safety
Equipment (ECE R 44/04). The seal
of approval E (in a circle) and the
approval number are located on the
approval label (sticker on the child
safety seat).
•The KIDFIX SICT has been tested
and approved as a combination of
Britax/
RÖMER
Child safety
seat
Tested and certified
according to
ECE* R 44/04
Group Body weight
KIDFIX
SICT
ll+lll 15 to 36 kg
1. Eignung
Zulassung
*ECE = Europäische Norm für
Sicherheitsausrüstung
• Der Auto-Kindersitz ist ausgelegt,
geprüft und zugelassen
entsprechend den Anforderungen
der europäischen Norm für
Kindersicherheits-Einrichtungen
(ECE R 44/04). Das Prüfzeichen E
(in einem Kreis) und die
Zulassungsnummer befinden sich
auf dem Zulassungsetikett
(Aufkleber am Auto-Kindersitz).
•Der KIDFIX SICT ist als
Kombination aus Sitzkissen und
Britax/
RÖMER
Auto-
Kindersitz
Prüfung und Zulassung
nach ECE* R 44/04
Gruppe Körpergewicht
KIDFIX
SICT
ll+lll 15 bis 36 kg
5. Protection de votre enfant
dans le véhicule ...........................15
5.1 Attacher votre enfant..............16
5.2 Voici comment votre enfant
est bien protégé .....................18
6. Utilisation du porte-gobelet ........19
7. Consignes d’entretien .................20
7.1 Nettoyage...............................20
7.2 Retrait de la housse...............21
7.3 Remise en place de la
housse....................................22
8. Remarques relatives à
l’élimination ..................................22
9. 2 ans de garantie..........................23
10. Carte de garantie /
Procès-verbal de remise..............27
5. Securing your child in the
vehicle...........................................15
5.1 Securing your child ................16
5.2 Checklist to ensure that your
child is buckled up correctly...18
6. Using the drink holder.................19
7. Care instructions..........................20
7.1 Cleaning.................................20
7.2 Re-fitting the cover.................22
7.3 Re-fitting the cover.................22
8. Notes regarding disposal............22
9. 2-year warranty ............................23
10. Warranty Card / Transfer Check...26
5. Sichern Ihres Kindes im
Fahrzeug.......................................15
5.1 Anschnallen Ihres Kindes ......16
5.2 So ist Ihr Kind richtig
gesichert ................................18
6. Gebrauch des Getränkehalters...19
7. Pflegeanleitung ............................20
7.1 Reinigung...............................20
7.2 Abziehen des Bezuges..........21
7.3 Aufziehen des Bezuges.........22
8. Hinweise zur Entsorgung............22
9. 2 Jahre Garantie...........................23
10. Garantiekarte / Übergabe-Check .25

de coussin d'assise et de dossier.
Attention !
Aucun des deux
éléments ne doit être utilisé en
association avec d'autres coussins
d'assise ou dossiers.
• Le siège auto perd son
homologation dès que vous réalisez
des modifications. Toute
modification doit exclusivement être
réalisée par le fabricant.
•Le
KIDFIX SICT
est exclusivement
réservé à l’installation sécuritaire de
votre enfant dans votre véhicule. Il
ne convient en aucun cas à un
usage domestique en tant que
chaise ou jouet.
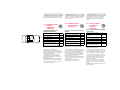
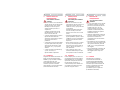
2. Utilisation dans le
véhicule
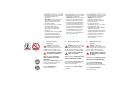
Danger !
Si l'enfant est
seulement attaché dans le siège
enfant à l'aide d'une ceinture à 2
points, il risque d'être gravement
blessé, voire tué, en cas d'accident.
Ne jamais utiliser ce siège en
association avec une ceinture
à 2 points !
Le
KIDFIX SICT
est homologué pour
deux types de montage différents:
avec les
bras d'enclenchement
KIDFIX
15
sur les points de fixation
ISOFIX dans le véhicule (semi universel).
avec la
ceinture à 3 points
du
véhicule (universel)
seat cushion and backrest.
Caution! Neither of these two parts
may be used in combination with
other seat cushions or backrests.
• This approval shall be invalidated if
you make any modifications to the
child safety seat. No modifications
may be made to the child safety seat
other than by the manufacturer.
• Use the KIDFIX SICT exclusively
for securing your child in your
vehicle. It is in no way suitable as a
seat or toy in the home.
2. Use in the vehicle
Danger!
If you secure your child
in the child seat with only a 2-point
belt, then in the event of an
accident this may cause serious injuries
to your child, possibly resulting in death.
Never use it in combination
with a 2-point belt!
The KIDFIX SICT is approved for two
different methods of installation:
with the KIDFIX locking arms 15 into
the ISOFIX fastening points in the
vehicle (semi-universal).
with the vehicle's 3-point seatbelt
(universal)
Rückenlehne geprüft und
zugelassen.
Vorsicht! Keines der beiden Teile
darf in Verbindung mit anderen
Sitzkissen oder Rückenlehnen
verwendet werden.
• Die Zulassung erlischt, sobald Sie
am Auto-Kindersitz etwas
verändern. Änderungen darf
ausschließlich der Hersteller
vornehmen.
•Der KIDFIX SICT darf ausschließlich
zur Sicherung Ihres Kindes im
Fahrzeug verwendet werden. Er
eignet sich keinenfalls zuhause als
Sitzgelegenheit oder Spielzeug.
2. Verwendung im
Fahrzeug
Gefahr! Wird Ihr Kind im
Kindersitz nur mit einem 2-
Punkt-Gurt gesichert, kann es
dadurch bei einem Unfall schwer
verletzt oder sogar getötet werden.
Nie in Verbindung mit einem
2-Punkt-Gurt verwenden!
Der KIDFIX SICT ist für zwei
unterschiedliche Einbauarten
zugelassen:
mit den KIDFIX-Rastarmen 15 an den
ISOFIX-Befestigungs-punkten im
Fahrzeug (semi universal).
mit dem 3-Punkt-Gurt des
Fahrzeuges (universal)

4
2.1 avec les bras
d'enclenchement
KIDFIX sur les
points de fixation ISOFIX
dans le véhicule
(semi-universel)
La fixation supplémentaire avec les bras
d'enclenchement
KIDFIX
se fait via une
homologation semi-universelle. Le siège
ne doit être utilisé que dans les véhicules
figurant dans la liste des types de
véhicules en annexe. Cette liste des
types est constamment complétée. Pour
obtenir la version la plus récente,
veuillez nous contacter directement ou
consulter notre site Internet
www.britax.eu / www.roemer.eu
.
Attention !
Pour les véhicules figurant
dans cette liste, il peut arriver que nous
ne puissions pas assurer la fixation
avec bras d'enclenchement
KIDFIX
pour toutes les tailles. Veuillez prêter
attention aux remarques portées sur la
liste.
Voici comment vous pouvez utiliser
le siège auto:
(Veuillez respecter les directives en
vigueur dans votre pays)
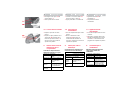
1) L'utilisation sur un siège dirigé dos à la route
(p. ex. van, minibus) n'est autorisée que si celui-
ci convient également au transport d'adultes. Ce
siège ne doit pas être protégé par un airbag.
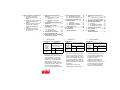
dans le sens de la marche oui
dans le sens contraire de la marche non 1)
sur les sièges avec: points de
fixation ISOFIX (entre la
surface d'assise et le dossier)
oui 3)
2.1 with the KIDFIX
locking arms into
the ISOFIX
fastening points in the
vehicle
(semi-universal)
The additional fastening system with
the KIDFIX locking arms is based on
semi-universal approval. The seat
may be used only in those vehicles
cited in the enclosed vehicle type list.
This type list is constantly updated.
The latest version can be obtained
from us or from
www.britax.eu /
www.roemer.eu
.
Caution! In the listed vehicles we
cannot always guarantee fastening
with KIDFIX locking arms for all body
heights. Please observe the
instructions in the type list.
You can use your child car seat as
follows:
(Please observe the regulations
applicable to your particular country).
1) Use is permitted on a rearward-facing vehicle
seat (e.g. in a van or minibus) only if the vehicle
seat is also approved for use by adults. The seat
may not be in the area of effect of an airbag.
in the direction of travel yes
against the direction of travel no 1)
on seats featuring:
ISOFIX fastening points
(between seat surface and
backrest)
yes 3)
2.1 mit den KIDFIX-
Rastarmen an
den ISOFIX -
Befestigungspunkten im
Fahrzeug
(semi universal)
Die zusätzliche Befestigung mit den
KIDFIX-Rastarmen erfolgt durch eine
semi universale Genehmigung. Der
Sitz darf nur in den Fahrzeugen
verwendet werden, die in der
beigelegten Kfz-Typenliste aufgeführt
sind. Die Typenliste wird laufend
ergänzt. Die aktuellste Version
erhalten Sie direkt bei uns oder auf
www.britax.eu / www.roemer.eu
.
Vorsicht! Bei den aufgelisteten
Fahrzeugen kommt es vor dass wir die
Befestigung mit KIDFIX-Rastarmen
nicht für alle Körpergrößen zusichern
können. Bitte beachten Sie die
Hinweise in der Typenliste.
So können Sie Ihren Auto-
Kindersitz verwenden:
(Bitte beachten Sie die Vorschriften Ihres
Landes.)
1) Verwendung ist nur auf einem
rückwärtsgerichteten Fahrzeugsitz (z.B. Van,
Minibus) zulässig, der auch für den Transport
von Erwachsenen zugelassen ist. Es darf kein
Airbag auf den Sitz wirken.
in Fahrtrichtung ja
entgegen der Fahrtrichtung nein 1)
auf Sitzen mit:
ISOFIX-Befestigungspunkten
(zwischen Sitzfläche und
Rückenlehne)
ja 3)

3) Avec un airbag frontal : reculez le siège le
plus possible. Le cas échéant, respectez les
consignes contenues dans le manuel de votre
véhicule.
2.2 avec la ceinture
à 3 points du
véhicule
(universel)
Voici comment vous pouvez utiliser
le siège auto :
(Veuillez respecter les directives en
vigueur dans votre pays)
1) L'utilisation sur un siège dirigé dos à la route
(p. ex. van, minibus) n'est autorisée que si celui-
ci convient également au transport d'adultes. Ce
siège ne doit pas être protégé par un airbag.
2) La ceinture doit être homologuée selon ECE
R 16 (ou une norme comparable) ce qui est par
exemple signalé par la lettre "E", "e" insérée
dans un cercle et figurant sur l’étiquette de
contrôle de la ceinture.
3) Avec un airbag frontal : reculez le siège le
plus possible. Le cas échéant, respectez les
consignes contenues dans le manuel de votre
véhicule.
4) Utilisation impossible lorsqu’il n'existe qu'une
ceinture à 2 points.
dans le sens de la marche oui
dans le sens contraire de la
marche
non 1)
avec ceinture à 2 points non
avec ceinture à 3 points 2) oui
sur le siège passager oui 3)
sur les sièges arrière latéraux oui
sur le siège arrière central
(avec ceinture à 3 points)
oui 4)
3) If there is a front airbag: slide back all the way
or nearly so, observe any instructions in vehicle
owner's manual.
2.2 with the vehicle's
3-point seatbelt
(universal)
You can use your child car seat as
follows:
(Please observe the regulations
applicable to your particular country)
1) Use is permitted on a rearward-facing vehicle
seat (e.g. in a van or minibus) only if the vehicle
seat is also approved for use by adults. The seat
may not be in the area of effect of an airbag.
2) The safety belt must be approved to ECE R
16 or a comparable standard (see test label on
belt with an "E" or "e" in a circle).
3) If there is a front airbag: slide back all the way
or nearly so, observe any instructions in vehicle
owner's manual.
4) Cannot be used if the vehicle seat is
equipped with only a 2-point belt.
in the direction of travel yes
against the direction of travel no 1)
with 2-point belt no
with 3-point belt 2) yes
on front passenger seat yes 3)
on outer rear seat yes
on centre rear seat (with 3-
point belt)
yes 4)
3) bei Front-Airbag: weit nach hinten schieben,
ggf Hinweis im Fahrzeug-Handbuch beachten.
2.2 mit dem 3-Punkt-
Gurt des
Fahrzeuges
(universal)
So können Sie Ihren Auto-
Kindersitz verwenden:
(Bitte beachten Sie die Vorschriften Ihres
Landes)
1) Verwendung ist nur auf einem
rückwärtsgerichteten Fahrzeugsitz (z.B. Van,
Minibus) zulässig, der auch für den Transport
von Erwachsenen zugelassen ist. Es darf kein
Airbag auf den Sitz wirken.
2) Der Gurt muss nach ECE R 16 (oder
vergleichbarer Norm) genehmigt sein, z.B.
erkennbar am umrandeten "E", "e" auf dem
Prüfetikett am Gurt.
3) bei Front-Airbag: weit nach hinten schieben,
ggf Hinweis im Fahrzeug-Handbuch beachten.
4) Verwendung ist nicht möglich, wenn nur ein
2-Punkt-Gurt vorhanden ist.
in Fahrtrichtung ja
entgegen der Fahrtrichtung nein 1)
mit 2-Punkt-Gurt nein
mit 3-Punkt-Gurt 2) ja
auf Beifahrersitz ja 3)
auf äußeren Rücksitzen ja
auf mittlerem Rücksitz (mit 3-
Punkt-Gurt)
ja 4)

6
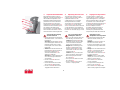
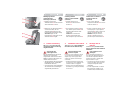
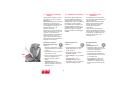
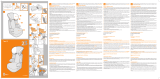
3. Réglage du siège enfant
Le siège enfant se compose d'un
coussin d'assise 1 et d'un dossier 2 à
appuie-tête réglable 3. L'association
des deux éléments offre à votre enfant
la protection et le confort souhaités.
Le dossier
2
est relié au coussin d'assise
1
au moyen d'un axe d'articulation
4
. Le
dossier
2
s'adapte en continu à
l'inclinaison du siège du véhicule. Le
dossier
2
est maintenu en position
verticale par un petit enclenchement
lorsqu'il n'est pas monté dans le véhicule.
Protection lors de la
manipulation d'un siège enfant
• Le siège enfant ne doit jamais être
utilisé non installé, même pour
l’essayer.
Attention ! Le dossier 2 risque de
basculer vers l’arrière. Placez
toujours le siège enfant sur le siège
du véhicule avant d’y installer votre
enfant.
• Danger ! Lors du redressement du
dossier 2, aucun objet ne doit se
trouver dans la zone de l’axe
d'articulation 4 entre le dossier 2 et
le coussin d’assise 1.
Attention ! Vous ou votre enfant
risquez par ex. de vous coincer les
doigts ou de vous blesser.
• L’Air Cushion 27 ne doit subir
aucune contrainte.
• Le siège enfant ne doit pas être
posé sur l’Air Cushion 27.
• L’Air Cushion 27 ne doit pas être
utilisé comme poignée de transport.
3. Adjusting the child seat
The child seat consists of a seat
cushion 1 and a backrest 2 with an
adjustable headrest 3. This
combination gives your child the
desired protection and comfort.
The backrest 2 is connected to the
seat cushion 1 by an articulated
axis 4. The backrest 2 of the child seat
can be adjusted to any inclination of
the vehicle seat. Outside of the car the
backrest 2 is held vertically by a small
notch.
For your protection when
handling the child seat
• Do not use the child seat when it is
free standing, even to test it out.
Caution! The backrest 2 may tip
backward. Always place the child
seat on the vehicle seat before
having your child sit down in it.
• Danger! When swivelling up the
backrest 2, nothing must come
between the backrest 2 and the
seat cushion 1 in the area of the
articulated axis 4.
Caution! You or your child could
pinch your fingers, injuring them.
• No load may be placed on the
Air Cushion 27.
• Do not place the child seat on the
Air Cushion 27.
•The Air Cushion 27 may not be
used as a carrying handle.
3. Anpassen des Kindersitzes
Der Kindersitz besteht aus einem
Sitzkissen 1 und einer Rückenlehne 2
mit verstellbarer Kopfstütze 3. Die
Kombination bietet Ihrem Kind den
gewünschten Schutz und Komfort.
Die Rückenlehne 2 ist durch eine
Gelenkachse 4 mit dem Sitzkissen 1
verbunden. Die Rückenlehne 2 passt
sich stufenlos der Neigung des
Fahrzeugsitzes an. Ausserhalb des
Autos wird die Rückenlehne 2 durch
eine kleine Raste senkrecht gehalten.
Zum Schutz beim Umgang
mit dem Kindersitz
• Der Kindersitz darf nie freistehend
verwendet werden - auch nicht zum
Probesitzen.
Vorsicht! Die Rückenlehne 2 kann
nach hinten kippen. Stellen Sie den
Kindersitz immer zuerst auf den
Fahrzeugsitz, bevor sich Ihr Kind
hineinsetzt.
• Gefahr! Beim Hochschwenken der
Rückenlehne 2 darf sich nichts im
Bereich der Gelenkachse 4
zwischen Rückenlehne 2 und
Sitzkissen 1 befinden.
Vorsicht! Sie oder Ihr Kind können
sich z.B. die Finger einklemmen
und verletzen.
• Der Air Cushion 27 darf nicht
belastet werden.
• Der Kindersitz darf nicht auf den
Air Cushion 27 gelegt werden.
• Der Air Cushion 27 darf nicht als
Tragegriff verwendet werden.

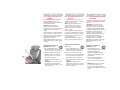
3.1 Réglage en hauteur de
l'appui-tête
Un réglage correct de l'appuie-tête 3
garantit le positionnement optimal de
la ceinture diagonale 6 et offre à votre
enfant la protection et le confort
souhaités. Vous pouvez enclencher la
hauteur de l'appuie-tête 3 dans onze
positions différentes :
• L'appuie-tête 3 doit être réglé de
façon à ce que l'on puisse passer
deux doigts entre les épaules de
votre enfant et l'appuie-tête 3.
Procédez comme suit pour adapter
la hauteur de l'appuie-tête 3 à la
taille de votre enfant :
Saisissez la poignée de réglage 8
sur la face arrière de l'appuie-tête 3
et tirez-la légèrement vers le haut.
L'appui-tête est à présent
déverrouillé.
Il est à présent possible de placer
l'appui-tête déverrouillé 3 à la
hauteur souhaitée. Dès que la
poignée de réglage 8 est relâchée,
l'appuie-tête 3 se bloque.
Placez le siège enfant sur le siège
du véhicule.
Faites s'asseoir votre enfant et
contrôlez la hauteur.
Attention ! Renouvelez cette
opération autant de fois que
nécessaire jusqu’à ce que le
réglage de l’appui-tête 3 soit
optimal.
3.1 Adjusting the height of
the headrest
A correctly adjusted headrest 3
ensures that the diagonal seat belt
section 6 is optimally positioned, and
gives your child the desired protection
and comfort. You can engage the
height of the headrest 3 in eleven
positions.
• The headrest 3 must be adjusted so
that there is a space two fingers
wide between the headrest 3 and
your child's shoulders.
To adjust the height of the
headrest 3 to fit your child:
Reach into the adjustment handle 8
on the back of the headrest 3 and
pull it upwards a bit. This unlocks
the headrest.
You can now move the unlocked
headrest 3 to the desired height.
As soon as you release the
adjustment handle 8, the headrest 3
will lock into place.
Place the child seat on the vehicle
seat.
Have your child sit down in the child
seat and check the height.
Caution! Repeat this process until
the headrest 3 is at the optimal
height.
3.1 Höhen-Verstellung der
Kopfstütze
Eine richtig angepasste Kopfstütze 3
gewährleistet den optimalen Verlauf
des Diagonalgurtes 6, und bietet
Ihrem Kind den gewünschten Schutz
und Komfort. Sie können die Höhe der
Kopfstütze 3 in elf Stellungen
einrasten.
•Die Kopfstütze3 muss so
eingestellt sein, dass zwischen den
Schultern Ihres Kindes und der
Kopfstütze 3 noch zwei Finger breit
Platz ist.
So können Sie die Höhe der
Kopfstütze 3 der Körpergröße Ihres
Kindes anpassen:
Fassen Sie in den Verstellgriff 8 an
der Rückseite der Kopfstütze 3 und
ziehen Sie ihn etwas nach oben.
Nun ist die Kopfstütze entriegelt.
Jetzt können Sie die entriegelte
Kopfstütze 3 in die gewünschte
Höhe verstellen. Sobald Sie den
Verstellgriff 8 loslassen, rastet die
Kopfstütze 3 ein.
Stellen Sie den Kindersitz auf den
Fahrzeugsitz.
Lassen Sie Ihr Kind im Kindersitz
Platz nehmen und kontrollieren Sie
die Höhe.
Vorsicht! Wiederholen Sie dies so
oft, bis die Kopfstütze 3 optimal
eingestellt ist.

8
3.2 Position de couchage du
dossier
Le dossier 2 du siège enfant s'adapte
en continu à l'inclinaison du siège du
véhicule.
Astuce ! Le dossier 2 est maintenu en
position verticale par un petit
enclenchement. Poussez légèrement
le dossier 2 vers l'arrière pour
débloquer l'enclenchement.
À noter : La sécurité maximale n'est
garantie que lorsque le siège du
véhicule est en position verticale. Le
dossier 2 du siège enfant peut être
incliné vers l'arrière dans la position
de couchage, indépendamment du
siège du véhicule.
Fixation des bras
d'enclenchement KIDFIX
15:
Fixez le KIDFIX SICT aux
points de fixation ISOFIX 20,
comme décrit au chapitre 4.1.
Sur l'assise du siège, passez votre
main dans la fente prévue à cet
effet dans la housse.
Tirez le levier de réglage 21 vers le
haut et maintenez-le dans cette
position.
Tirez le coussin d'assise 1 vers
l'avant.
Attention ! La fente entre le
coussin d'assise 1 et le dossier du
siège du véhicule ne doit pas
dépasser 8 cm de largeur.
3.2 Reclining position of the
backrest
The backrest 2 of the child seat can
be adjusted to any inclination of the
vehicle seat.
Tip! The backrest 2 is held vertically
by a small notch. Press the backrest 2
slightly to the rear to release the
notch.
Please note: Optimal protection is
guaranteed only if the vehicle seat is
in an upright position. The backrest 2
of the child seat can be moved
backwards into a reclining position
independently of the vehicle seat.
Fastening with the KIDFIX
locking arms 15:
Fasten the KIDFIX SICT into the
ISOFIX fastening points 20, as
described in Chapter 4.1.
Grasp the seat surface though the
access slot in the cover.
Pull the adjusting lever 21 upwards
and hold it.
Pull the seat cushion 1 forward.
Caution! The gap between the seat
cushion 1 and the backrest of the
vehicle seat must not be more than
8cm.
3.2 Ruhestellung der
Rückenlehne
Die Rückenlehne 2 des Kindersitzes
passt sich stufenlos der Neigung des
Fahrzeugsitzes an.
Tipp! Die Rückenlehne 2 wird durch
eine kleine Raste senkrecht gehalten.
Drücken Sie die Rückenlehne 2 etwas
nach hinten, um die Raste zu lösen.
Bitte beachten Sie: Der bestmögliche
Schutz ist nur gewährleistet, wenn der
Fahrzeugsitz in aufrechter Position ist.
Die Rückenlehne 2 des Kindersitzes
läßt sich, unabhängig vom
Fahrzeugsitz, nach hinten in eine
Ruhestellung neigen.
Befestigung mit den
KIDFIX-Rastarmen 15:
Befestigen Sie den KIDFIX SICT an
den ISOFIX-Befestigungspunkten
20, wie in Kapitel 4.1 beschrieben.
Greifen Sie auf der Sitzfläche durch
den Eingriffschlitz des Bezuges.
Ziehen Sie den Einstellhebel 21
nach oben und halten Sie ihn fest.
Ziehen Sie das Sitzkissen 1 nach
vorne.
Vorsicht! Der Spalt zwischen
Sitzkissen 1 und Fahrzeugsitz-
Rückenlehne darf nicht breiter als
8cm sein.

Fixation avec la ceinture à
3 points du véhicule
(universel)
Pour ce faire, déployez
l'équerre d'écartement 9 sur la face
arrière du dossier 2.
Inclinez à présent le dossier 2 vers
l'arrière jusqu'à ce que l'équerre
d'écartement 9 repose à plat sur le
dossier du siège du véhicule.
Attention ! Ne pas incliner le
dossier 2 davantage que ne le
permet l'équerre d'écartement 9.
4. Montage dans le
véhicule
Le KIDFIX SICT peut être monté
dans le véhicule de deux manières
différentes.
Pour protéger tous les
passagers
En cas de freinage d’urgence ou
d’accident, les objets et personnes
non attachés risquent de blesser
d’autres passagers. Veuillez donc
toujours veiller à ce que…
• les dossiers des sièges de voiture
soient verrouillés (enclenchez par
exemple la banquette arrière
rabattable),
• tous les objets lourds ou à bords
tranchants (par exemple sur la
lunette arrière) soient bien fixés,
Fastening with the
vehicle's 3-point seatbelt
(universal)
Fold the out the spacer
bracket 9 on the back of the
backrest 2.
Then incline the backrest 2 to the
rear until the spacer bracket 9 lies
flat against the backrest of the
vehicle seat.
Caution! Do not incline the
backrest 2 beyond the point
indicated by the spacer bracket 9.
4. Installation in the vehicle
The KIDFIX SICT can be installed in
the vehicle in two different ways.
For the protection of all
vehicle occupants
In the case of an emergency stop or
an accident unsecured persons or
objects may cause injury to other
vehicle occupants. Please always
check that...
• the backrests of the vehicle seats
are locked (i.e. that a foldable rear
seat bench latch is engaged).
• all heavy or sharp-edged objects in
the vehicle (e.g. on the parcel shelf)
are secured.
Befestigung mit dem
3-Punkt-Gurt des
Fahrzeuges (universal)
Klappen Sie dazu den
Abstandswinkel 9 auf der Rückseite
der Rückenlehne 2 heraus.
Neigen Sie nun die Rückenlehne 2
so weit nach hinten, bis der
Abstandswinkel 9 flächig an der
Fahrzeugsitz-Rückenlehne anliegt.
Vorsicht! Neigen Sie die
Rückenlehne 2 nicht weiter, als der
Abstandswinkel 9 vorgibt.
4. Einbau im Fahrzeug
Der KIDFIX SICT kann auf zwei
verschiedene Arten im Fahrzeug
eingebaut werden.
Zum Schutz aller
Fahrzeuginsassen
Bei einer Notbremsung oder einem
Unfall können ungesicherte
Gegenstände und Personen andere
Mitfahrer verletzen. Bitte achten Sie
deshalb stets darauf, dass...
• die Rückenlehnen der Fahrzeugsitze
festgestellt sind (z.B. umklappbare
Rücksitzbank einrasten).
• im Fahrzeug (z.B. auf der Hutablage)
alle schweren oder scharfkantigen
Gegenstände gesichert sind.

10
• toutes les personnes aient mis leur
ceinture,
• le siège auto soit toujours fixé dans
la voiture même si aucun enfant ne
l’occupe,
• l‘Air Cushion 27 ne repose pas
contre la porte ou la paroi intérieure
du véhicule.
Pour protéger votre véhicule
• Sur certaines housses de siège de
véhicule recouvertes d’une matière
délicate (p. ex. velours, cuir, etc.),
l’utilisation de sièges auto risque de
laisser des traces. Pour éviter cela,
vous pouvez recouvrir le siège du
véhicule d'une couverture ou une
serviette, par exemple.
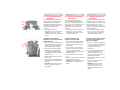
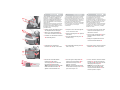
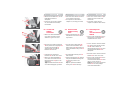
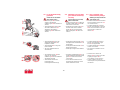
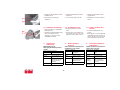
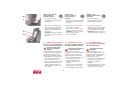
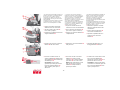
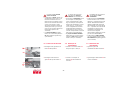
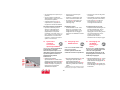
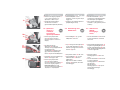
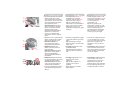
4.1 Fixation des bras
d'enclenchement
KIDFIX
Le KIDFIX SICT se monte de manière
fixe dans le véhicule à l'aide des bras
d'enclenchement KIDFIX.
Ensuite, votre enfant est attaché
dans le siège auto au moyen de la
ceinture à 3 points de votre voiture:
Enclenchez les deux guides
d'insertion 16*, en dirigeant
l'évidement vers le haut, sur les
deux points de fixation ISOFIX 20.
Astuce ! Les points de fixation
ISOFIX 20 se trouvent entre la
surface d'assise et le dossier du
siège du véhicule.
• all persons in the vehicle have their
seat belts fastened.
• the child safety seat is always
secured when it is in the vehicle,
even if no child is being transported.
• Air Cushion 27 does not rest
against the vehicle door or the
interior wall of the vehicle
To protect your vehicle
• Some vehicle seat covers of
sensitive materials (e.g. velour,
leather, etc.) may develop wear
marks when child seats are used.
This can be avoided by placing a
blanket or towel under the child
seat.
4.1 Fastening with
the KIDFIX
locking arms
The KIDFIX SICT is installed
permanently in the vehicle with the
KIDFIX locking arms.
Your child is then buckled into the
child seat with the vehicle's 3-point
seatbelt.
Clip the two insert guides 16*,
recess facing upwards, to the two
ISOFIX fastening points 20.
Tip! The ISOFIX fastening points
20 are located between the surface
and the backrest of the vehicle seat.
• alle Personen im Fahrzeug
angeschnallt sind.
• der Auto-Kindersitz im Auto immer
gesichert ist, auch wenn kein Kind
transportiert wird.
• der Air Cushion 27 nur leicht an der
Fahrzeugtür oder der Fahrzeug-
innenwand anliegt ohne den Air
Cushion zu verformen.
Zum Schutz Ihres Fahrzeuges
• An einigen Auto-Sitzbezügen aus
empfindlichem Material (z.B.
Velours, Leder etc.) können durch
die Benutzung von Auto-
Kindersitzen Gebrauchsspuren
auftreten. Um das zu vermeiden,
können Sie z.B. eine Decke oder
ein Handtuch unterlegen.
4.1 Befestigung mit
den KIDFIX-
Rastarmen
Der KIDFIX SICT wird mit den
KIDFIX-Rastarmen fest im Auto
eingebaut.
Ihr Kind wird anschließend mit dem
3-Punkt-Gurt des Fahrzeuges im
Kindersitz angeschnallt.
Clipsen Sie die beiden Einführhilfen
16* mit der Aussparung nach oben
auf die beiden ISOFIX-
Befestigungspunkte 20.
Tipp! Die ISOFIX-Befestigungs-
punkte 20 befinden sich zwischen
Sitzfläche und Rückenlehne des
Fahrzeugsitzes.

* Les guides d'insertion facilitent le montage
avec l'adaptateur ISOFIX et évitent
d'endommager la housse de siège. Il est
recommandé de retirer ces guides d'insertion et
de bien les ranger. Dans les véhicules à dossier
rabattable, les guides d'insertion doivent être
retirés avant de rabattre le dossier.
Les dysfonctionnements sont généralement dus
à la présence de saletés au niveau des guides
d'insertion et des crochets. Pour y remédier,
éliminez les saletés.
Sur l'assise du siège, passez votre
main dans la fente prévue à cet
effet dans la housse.
Tirez le levier de réglage 21 vers le
haut et maintenez-le dans cette
position.
Déployez complètement les bras
d'enclenchement KIDFIX 15.
Basculez les bras d'enclenchement
KIDFIX 15 de 180° vers l'arrière.
Sur les deux bras d'enclenchement
KIDFIX 15, appuyez le bouton de
sécurité vert 22 contre le bouton de
désengagement rouge 23.
Astuce ! Vous garantissez ainsi
que les deux crochets des bras
d'enclenchement KIDFIX 15 sont
ouverts et prêts à l'emploi.
* The insert guides make it easier to install the
seat using ISOFIX and prevent the seat cover
from becoming damaged. When not in use, they
should be removed and kept in a safe place. If
your vehicle has folding backrests, remove the
insert guides before folding them down.
Most malfunctions are caused by contamination
in the insert guides and on the hooks. Remedy
such malfunctions by removing this
contamination.
Grasp the seat surface though the
access slot in the cover.
Pull the adjusting lever 21 upwards
and hold it.
Push the KIDFIX locking arms 15
out all the way.
Pivot the KIDFIX locking arms 15
180° to the rear.
Push the green safety button 22
and the red release button 23 on
both KIDFIX locking arms 15
towards each other.
Tip! This ensures that both hooks
on the KIDFIX locking arms 15 are
open and ready to use.
* Die Einführhilfen erleichtern den Einbau mit
ISOFIX und vermeiden Beschädigungen des
Sitzbezuges. Sie sollten bei Nichtgebrauch
entfernt und sorgfältig aufbewahrt werden. Bei
Fahrzeugen mit umklappbarer Rückenlehne
müssen die Einführhilfen vor dem Umklappen
entfernt werden.
Auftretende Funktionsstörungen sind meist auf
Verunreinigungen in den Einführhilfen und an
den Haken zurückzuführen. Abhilfe kann durch
Beseitigung dieser Verunreinigungen
geschaffen werden.
Greifen Sie auf der Sitzfläche durch
den Eingriffschlitz des Bezuges.
Ziehen Sie den Einstellhebel 21
nach oben und halten Sie ihn fest.
Schieben Sie die KIDFIX-Rastarme
15 vollständig heraus.
Schwenken Sie die KIDFIX-
Rastarme 15 um 180° nach hinten.
Drücken Sie an beiden
KIDFIX
-
Rastarmen
15
den grünen
Sicherungsknopf
22
und den roten
Löseknopf
23
gegeneinander.
Tipp!
So stellen Sie sicher, dass beide
Haken der
KIDFIX
-Rastarme
15
geöffnet und einsatzbereit sind.

12
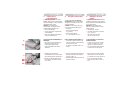
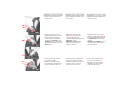
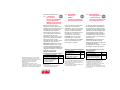
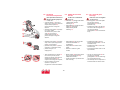
Prenez le coussin d'asise 1 dans
vos deux mains.
Faites glisser les deux bras
d'enclenchement KIDFIX 15 dans
les guidages d'insertion 16, jusqu'à
ce qu'ils 15 s'enclenchent des deux
côtés. "CLIC !"
Attention ! Le bouton de sécurité
vert 22 doit à présent être visible
des deux côtés.
Tirez le levier de réglage 21 vers le
haut et maintenez-le dans cette
position.
Poussez le coussin d'assise 1 vers
l'arrière contre le dossier du siège
du véhicule (voir 3.2).
Take hold of the seat cushion 1 with
both hands.
Push both KIDFIX locking arms 15
into the insert guides 16, until the
KIDFIX locking arms 15 engage on
both sides. "CLICK!"
Caution! The green safety button
22 must now be visible on both
sides.
Pull the adjusting lever 21 upwards
and hold it.
Push the seat cushion 1 to the rear
against the backrest of the vehicle
seat (see 3.2).
Fassen Sie das Sitzkissen 1 mit
beiden Händen.
Schieben Sie beide KIDFIX-
Rastarme 15 in die Einführhilfen 16,
bis die KIDFIX-Rastarme 15 auf
beiden Seiten einrasten. „KLICK!“
Vorsicht! Auf beiden Seiten muss
nun der grüne Sicherungsknopf 22
sichtbar sein.
Ziehen Sie den Einstellhebel 21
nach oben und halten Sie ihn fest.
Schieben Sie das Sitzkissen 1 nach
hinten gegen die Rückenlehne des
Fahrzeugsitzes (siehe 3.2).

Tirez sur le coussin d'assise 1 pour
vérifier que les deux côtés sont
enclenchés.
Poursuivez comme décrit au
chapitre 5.1 (Attacher votre enfant).
4.2 Démontage des
bras
d'enclenchement
KIDFIX
Tirez le levier de réglage 21 vers le
haut et tirez le coussin d'assise 1
complètement vers l'avant.
Sur les deux bras d'enclenchement
15, appuyez le bouton de sécurité
vert 22 contre le bouton de
désengagement rouge 23. Les bras
d'enclenchement KIDFIX 15 se
débloquent.
Basculez les bras d'enclenchement
KIDFIX 15 de 180° vers l'avant.
Tirez le levier de réglage 21 vers le
haut et poussez les bras
d'enclenchement KIDFIX 15 à fond
dans le coussin d'assise 1.
Astuce ! Les bras d'enclenchement
KIDFIX 15 sont ainsi protégés
contre toute détérioration.
Pull on the seat cushion 1 to ensure
it is engaged on both sides.
Then proceed as described in
Chapter 5.1 (Securing your child).
4.2 Removal with
KIDFIX locking
arms
Pull the adjusting lever 21 upwards
and pull the seat cushion 1 all the
way forward.
Push the green safety button 22
and the red release button 23 on
both locking arms 15 towards each
other. The KIDFIX locking arms 15
release.
Pivot the KIDFIX locking arms 15
180° forward.
Pull the adjusting lever 21 upwards
and push the KIDFIX locking arms
15 all the way into the seat
cushion 1.
Tip! This protects the KIDFIX
locking arms 15 from damage.
Ziehen Sie am Sitzkissen 1, um das
beidseitige Einrasten zu
überprüfen.
Fahren Sie nun fort wie in Kapitel
5.1 (Anschnallen Ihres Kindes)
beschrieben.
4.2 Ausbau mit
KIDFIX-
Rastarmen
Ziehen Sie den Einstellhebel 21
nach oben und ziehen Sie das
Sitzkissen 1 ganz nach vorne.
Drücken Sie an beiden Rastarmen
15 den grünen Sicherungsknopf 22
und den roten Löseknopf 23
gegeneinander. Die KIDFIX-
Rastarme 15 lösen sich.
Schwenken Sie die KIDFIX-
Rastarme 15 um 180° nach vorne.
Ziehen Sie den Einstellhebel 21
nach oben und schieben Sie die
KIDFIX-Rastarme 15 ganz in das
Sitzkissen 1.
Tipp! Die KIDFIX-Rastarme 15 sind
so vor Beschädigungen geschützt.

14
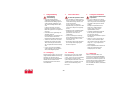
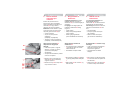
4.3 Montage correct
de votre siège
enfant avec les
bras d'enclenchement
KIDFIX
Vérifiez, pour la protection de
votre enfant, que...
• le coussin d'assise est sécurisé des
deux côtés par fixation des bras
d'enclenchement 15 dans les points
de fixation ISOFIX 20 et que les
deux boutons de sécurité verts 22
sont visibles.
4.4 Fixation avec la
ceinture à 3
points du
véhicule
Le KIDFIX SICT n'est pas monté
fixement dans le véhicule. Il est
simplement sécurisé,
conjointement à votre enfant, au
moyen de la ceinture à 3 points de
votre véhicule.
Placez le siège enfant sur le siège
du véhicule. Veillez à ce que le
dossier 2 repose à plat sur le
dossier du siège du véhicule (voir
3.2).
Astuce ! Si l'appuie-tête du
véhicule gêne, il suffit de le tourner.
Poursuivez comme décrit au
chapitre 5.1 (Attacher votre enfant).
4.3 Making sure that
the child seat
with the KIDFIX
locking arms is installed
correctly
For the safety of your child,
please check that...
• the seat cushion is engaged on
both sides with the KIDFIX locking
arms 15 into the ISOFIX fastening
points 20 and that both green safety
buttons 22 are visible,
4.4 Fastening with
the vehicle's 3-
point seatbelt
The KIDFIX SICT is not installed
permanently in the vehicle. It is
simply secured together with your
child using the vehicle's 3-point
seatbelt.
Place the child seat on the vehicle
seat. Make sure that the backrest 2
lies flat against the backrest of the
vehicle seat (see 3.2).
Tip! If the headrest of the vehicle
seat gets in the way, simply turn it
the other way.
Then proceed as described in
Chapter 5.1 (Securing your child).
4.3 So ist Ihr
Kindersitz mit
den KIDFIX-
Rastarmen richtig
eingebaut
Prüfen Sie zur Sicherheit
Ihres Kindes, dass...
•das Sitzkissen beidseitig mit den
KIDFIX-Rastarmen 15 in den
ISOFIX-Befestigungspunkten 20
eingerastet ist und beide grüne
Sicherungsknöpfe 22 sichtbar sind,
4.4 Befestigen mit
dem 3-Punkt-
Gurt Ihres
Fahrzeuges
Der KIDFIX SICT wird nicht fest im
Auto eingebaut. Er wird einfach
zusammen mit Ihrem Kind durch
den 3-Punkt-Gurt des Fahrzeuges
gesichert.
Stellen Sie den Kindersitz auf den
Fahrzeugsitz. Achten Sie darauf,
dass die Rückenlehne 2 flächig an
der Rückenlehne des
Fahrzeugsitzes anliegt (siehe 3.2).
Tipp! Wenn die Kopfstütze des
Fahrzeugsitzes dabei stört, drehen
Sie sie einfach um.
Fahren Sie nun fort wie in Kapitel
5.1 (Anschnallen Ihres Kindes)
beschrieben.

5. Protection de votre
enfant dans le véhicule
Pour protéger votre enfant
• Les principes suivants sont à
respecter : Plus la ceinture de
sécurité est proche du corps de
votre enfant, plus celui-ci est en
sécurité.
• Ne laissez pas votre enfant dans le
siège auto dans la voiture sans
surveillance.
• Utilisation sur le siège arrière :
Avancez le siège avant de manière
à ce que les pieds de votre enfant
ne touchent pas le dossier de celui-
ci (risques de blessures).
• Les parties en matière plastique du
siège auto se réchauffent en plein
soleil.
Attention ! Votre enfant risque de se
brûler. Protégez le siège auto des
rayons du soleil lorsque vous ne
l'utilisez pas.
• Ne faites monter ou descendre
votre enfant que du côté du trottoir.
• Lors des longs trajets, aménagez
des pauses afin que votre enfant
puisse se dégourdir les jambes.
• Veillez à ce que le siège enfant ne
repose pas contre la porte ou la
paroi intérieure du véhicule.
Astuce ! Un espace vide doit être
conservé entre le siège enfant et la
porte ou la paroi intérieure du
véhicule.
5. Securing your child in
the vehicle
For the protection of your
child
• As a general rule: The more snugly
the safety belt fits over your child's
body, the safer your child will be.
• Please do not leave your child
unattended in the child safety seat
in the vehicle.
• Installation on the rear seat: Move
the front seat forward far enough
that you child's feet cannot hit the
back rest of the front seat (to
prevent risk of injury).
• The plastic parts of the child safety
seat can heat up in the sun.
Caution! Your child may get burnt.
Protect the child seat against
intensive solar radiation when it is
not actually in use.
• Allow your child to enter and exit the
vehicle only on the side away from
traffic.
• Make stops during longer journeys
to give your child an opportunity to
run about and play.
• Ensure that the child seat is not
located by the vehicle door or the
interior wall of the vehicle.
Tip! There must be space between
the child seat and the vehicle door
or the interior vehicle wall.
5. Sichern Ihres Kindes im
Fahrzeug
Zum Schutz Ihres Kindes
• Grundsätzlich gilt: Je enger der
Sicherheitsgurt am Körper Ihres
Kindes anliegt, desto größer ist die
Sicherheit.
• Bitte lassen Sie Ihr Kind im Auto-
Kindersitz nie unbeaufsichtigt im
Fahrzeug zurück.
• Benutzung auf dem Rücksitz:
Stellen Sie den Vordersitz so weit
nach vorne, dass Ihr Kind mit den
Füssen nicht an der Rückenlehne
des Vordersitzes anstößt
(Verletzungsgefahr).
• Die Kunstoffteile des Kindersitzes
heizen sich in der Sonne auf.
Vorsicht! Ihr Kind kann sich daran
verbrennen. Schützen Sie den
Kindersitz, wenn er gerade nicht
gebraucht wird, vor intensiver
Sonneneinstrahlung.
• Lassen Sie Ihr Kind nur auf der
Gehwegseite ein- und aussteigen.
• Lockern Sie längere Reisen durch
Pausen auf, in denen Ihr Kind
seinen Bewegungsdrang ausleben
kann.
• Beachten Sie, dass der Kindersitz
nicht an der Fahrzeugtür oder der
Fahrzeuginnenwand anliegt.
Tipp! Zwischen dem Kindersitz und
der Fahrzeugtür bzw. der
Fahrzeuginnenwand muss ein
Freiraum sein.

16
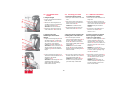
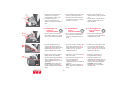
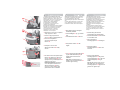
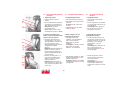
5.1 Attacher votre enfant
1. Positionnez la ceinture.
Faites asseoir votre enfant dans le
siège auto.
Tirez sur la ceinture et passez-la
devant votre enfant jusqu'au fermoir
de la ceinture de votre véhicule 10.
Attention ! Ne pas torsader la
ceinture.
Enclenchez la languette dans le
fermoir de la ceinture 10 du
véhicule. CLIC !
2. Insérez la ceinture du véhicule
dans les guidages de ceinture
rouges sur le siège enfant.
Placez la ceinture diagonale 6 et la
ceinture ventrale 11, situées du
côté du fermoir de la ceinture du
véhicule 10, sous l'accoudoir sur le
guidage rouge clair 12 du coussin
d'assise 1.
Attention ! Le fermoir de la
ceinture du véhicule 10 ne doit pas
se trouver entre le guidage rouge
clair 12 et le dossier.
Introduisez la ceinture ventrale 11
dans le guidage de ceinture rouge
clair 12 situé sur l'autre côté du
coussin d'assise 1.
Attention ! Des deux côtés, la
ceinture ventrale 11 doit passer le
plus bas possible au-dessus de
l’aine de votre enfant.
5.1 Securing your child
1. Fasten the vehicle seat belt
Have your child sit down in the child
seat.
Pull out the vehicle seat belt and
guide it in front of your child to the
vehicle seat buckle 10.
Caution! Do not twist the belt.
Engage the buckle tongue in the
vehicle seat buckle 10. CLICK!
2. Place the vehicle seat belt in the
red belt guides on the child seat.
Place the diagonal seat belt
section 6 and lap belt section 11 on
the side of the vehicle seatbelt
buckle 10 under the armrest and
into the light red belt guide 12 of the
seat cushion 1.
Caution! The vehicle seatbelt
buckle 10 must not be positioned
between the light red belt guide 12
and the armrest.
Also place the lap belt section 11 on
the other side of the seat cushion 1
in the light red belt guide 12.
Caution! The lap belt section 11
must lie as low as possible over
your child's hips on both sides.
5.1 Anschnallen Ihres
Kindes
1. Autogurt anlegen
Lassen Sie Ihr Kind im Kindersitz
Platz nehmen.
Ziehen Sie den Autogurt heraus
und führen Sie ihn vor Ihrem Kind
zum Auto-Gurtschloss 10.
Vorsicht! Gurt nicht verdrehen.
Rasten Sie die Schlosszunge im
Auto-Gurtschloss 10 ein. KLICK!
2. Autogurt in die roten
Gurtführungen am Kindersitz
einlegen.
Legen Sie den Diagonalgurt 6 und
den Beckengurt 11, auf der Seite
des Auto-Gurtschlosses 10, unter
die Armlehne, in die hellrote
Gurtführung 12 des Sitzkissens 1.
Vorsicht! Das Auto-Gurtschloss 10
darf nicht zwischen der hellroten
Gurtführung 12 und der Armlehne
liegen.
Legen Sie den Beckengurt 11 auf
der anderen Seite des Sitzkissens 1
ebenfalls in die hellrote
Gurtführung 12.
Vorsicht! Der Beckengurt 11 muss
auf beiden Seiten so tief wie
möglich über die Leistenbeuge
Ihres Kindes verlaufen.

Insérez la ceinture diagonale 6
dans le support de sangle rouge
foncé 7 de l'appui-tête 3 jusqu'à ce
qu'elle repose complètement et
sans être torsadée dans le support
de sangle 7.
Astuce ! Si le dossier 2 cache le
support de sangle 7, vous pouvez
bouger l'appui-tête 3 vers le haut.
Maintenant, la ceinture diagonale 6
s'insère facilement. Replacez à
présent l'appui-tête 3 à la bonne
hauteur.
Vérifiez que la ceinture diagonale 6
passe sur le sternum de votre
enfant et non sur son cou.
Astuce ! Vous pouvez maintenant
placer l'appui-tête 3 du véhicule à la
hauteur souhaitée.
Attention ! La ceinture diagonale 6
doit être positionnée en biais vers
l'arrière.
Astuce ! Vous pouvez modifier la
direction de la ceinture à l'aide du
dispositif de réglage de la ceinture
de votre véhicule.
Attention ! La ceinture diagonale 6
ne doit jamais être dirigée vers
l'avant vers le dispositif de réglage
de la ceinture du véhicule.
Astuce ! Dans ce cas, utilisez le
siège enfant uniquement sur le
siège arrière.
Tendez la ceinture en tirant sur la
ceinture diagonale 6.
Guide the diagonal seat belt
section 6 into the dark red belt
holder 7 of the headrest 3 until it
lies completely in the belt holder 7
and is not twisted.
Tip! If the backrest 2 conceals the
belt holder 7, you can adjust the
headrest 3 upwards. The diagonal
seat belt section 6 can now be
easily inserted. Now return the
headrest 3 to the proper height.
Make sure that the diagonal seat
belt section 6 runs over your child's
shoulder bone, and not in front of
his or her neck.
Tip! You can still adjust the height
of the headrest 3 again here in the
vehicle.
Caution! The diagonal seat belt
section 6 must run diagonally
backward.
Tip! You can adjust the course of
the belt with your vehicle's
adjustable belt deflector.
Caution! The diagonal seat belt
section 6 must never lead forward
to the vehicle's belt deflector.
Tip! In this case, only use the child
seat on the rear seat.
Tighten the vehicle seat belt by
pulling on the diagonal seat belt
section 6.
Führen Sie den Diagonalgurt 6 in
den dunkelroten Gurthalter 7 der
Kopfstütze 3 ein, bis er vollständig
und unverdreht im Gurthalter 7 liegt.
Tipp! Verdeckt die Rückenlehne 2
den Gurthalter 7, können Sie die
Kopfstütze 3 nach oben verstellen.
Jetzt läßt sich der Diagonalgurt 6
leicht einführen. Stellen Sie nun die
Kopfstütze 3 wieder zurück in die
richtige Höhe.
Vergewissern Sie sich, dass der
Diagonalgurt 6 über das
Schlüsselbein Ihres Kindes läuft
und nicht am Hals anliegt.
Tipp! Sie können die Kopfstütze 3
auch noch im Fahrzeug in der Höhe
anpassen.
Vorsicht! Der Diagonalgurt 6 muss
schräg nach hinten verlaufen.
Tipp! Sie können den Gurtverlauf
mit dem verstellbaren Gurtumlenker
Ihres Fahrzeuges regulieren.
Vorsicht! Der Diagonalgurt 6 darf
nie nach vorn zum Gurtumlenker
am Auto führen.
Tipp! Verwenden Sie in diesem Fall
den Kindersitz nur auf dem
Rücksitz.
Straffen Sie den Autogurt, indem
Sie am Diagonalgurt 6 ziehen.

18
5.2 So ist Ihr Kind richtig
gesichert
Prüfen Sie zur Sicherheit
Ihres Kindes, dass...
• der Beckengurt 11 auf beiden
Seiten in den hellroten
Gurtführungen 12 des Sitzkissens
verläuft,
• der Diagonalgurt 6 auf der Seite
des Auto-Gurtschlosses 10
ebenfalls in der hellroten
Gurtführung 12 des Sitzkissens
verläuft,
• der Diagonalgurt 6 durch den
dunkelroten Gurthalter 7 der
Kopfstütze verläuft,
• der Diagonalgurt 6 schräg nach
hinten verläuft,
• die Gurte gestrafft und nicht
verdreht sind,
• das Autogurt-Schloss 10 nicht
zwischen der hellroten
Gurtführung 12 und der Armlehne
des Sitzkissens liegt,
• der Kindersitz nicht an der
Fahrzeugtür oder
Fahrzeuginnenwand anliegt.
5.2 Voici comment votre
enfant est bien protégé
Vérifiez, pour la protection de
votre enfant, que...
• la ceinture ventrale 11 traverse bien
les deux guidages rouges vifs 12
du coussin d'assise,
• la ceinture diagonale 6 traverse
bien les deux guidages rouges vifs
12 du coussin d'assise sur le côté
du fermoir de la ceinture du
véhicule 10,
• la ceinture diagonale 6 traverse
bien les deux guidages rouges
foncés 7 de l'appuie-tête,
• la ceinture diagonale 6 est dirigée
en biais vers l'arrière,
• les ceintures sont tendues et non
torsadées,
• le fermoir de la ceinture du
véhicule 10 ne se trouve pas entre
le guidage rouge vif 12 et
l'accoudoir du coussin d'assise,
• le siège enfant ne repose pas
contre la porte ou la paroi intérieure
du véhicule.
5.2 Checklist to ensure that
your child is buckled up
correctly
For the safety of your child,
please check that...
• the lap belt section 11 runs through
the light red belt guides 12 on both
sides of the seat cushion,
• the diagonal seat belt section 6 on
the side of the vehicle seatbelt
buckle 10 also runs through the
light red belt guide 12 of the seat
cushion,
• the diagonal seat belt section 6 runs
through the dark red belt holder 7 of
the headrest,
• the diagonal seat belt section 6 runs
diagonally backward,
• the straps are tight and not twisted,
• the vehicle seatbelt buckle 10 is not
positioned between the light red belt
guide 12 and the armrest of the
seat cushion,
• ensure that the child seat is not
located by the vehicle door or the
interior wall of the vehicle.

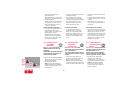
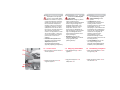
6. Utilisation du porte-
gobelet
La gamme d'accessoires de Britax/
RÖMER comprend un porte-gobelet
24, qui peut être monté ultérieurement
sur le siège enfant.
Attention ! Afin d'éviter toute
blessure, n'utilisez jamais le porte-
gobelet 24 pour
• des boissons chaudes
• des objets tranchants ou pointus
(p. ex. crayons)
• des objets durs et lourds
(par ex. canette en alu).
Le porte-gobelet 24 se fixe de la
manière suivante:
• à droite ou à gauche du coussin
d'assise 1. Toujours sur le côté
opposé à la porte du véhicule,
• sur des sièges de véhicule dotés
d'une surface d'assise plane.
Faites coulisser le bras du porte-
gobelet 24 vers le bas derrière la
face latérale du coussin d'assise 1.
Accrochez le bouton 25 dans
l'orifice 26 et poussez-le vers le
bas.
6. Using the drink holder
The Britax/RÖMER accessories
programme includes a drink holder
24, which can be fitted on the child
seat subsequently.
Caution! In order to prevent injury,
never use the drink holder 24 for...
• hot liquids
• sharp or pointed objects
(e.g. pencils)
• hard or heavy objects
(e.g. aluminium drink cans)
How to fasten the drink holder 24 :
• on the left or right side of the seat
cushion 1. Always on the side away
from the vehicle door.
• on vehicle seats with a level seat
surface.
Push the arm of the drink holder 24
upwards behind the side flange of
the seat cushion 1.
Hook the button 25 into the hole 26
and push it down.
6. Gebrauch des
Getränkehalters
Im Zubehörprogramm von Britax/
RÖMER gibt es einen Getränkehalter
24, der nachträglich an den Kindersitz
angebracht werden kann.
Vorsicht! Um Verletzungen
vorzubeugen, verwenden Sie den
Getränkehalter 24 bitte nie für...
• heisse Flüssigkeiten
• scharfe oder spitze Gegenstände
(z.B. Bleistifte)
• harte und schwere Gegenstände
(z.B. Alu-Trinkflaschen).
So lässt sich der Getränkehalter 24
befestigen:
• links oder rechts am Sitzkissen 1.
Immer auf der Seite, die der
Fahrzeugtür abgewandt ist.
• auf Fahrzeugsitzen mit ebener
Sitzfläche.
Schieben Sie den Arm des
Getränkehalter 24 von unten hinter
die Seitenwange des Sitzkissens 1.
Hängen Sie den Knopf 25 in das
Loch 26 ein und schieben Sie ihn
nach unten.
La page est en cours de chargement...
La page est en cours de chargement...
La page est en cours de chargement...
La page est en cours de chargement...
La page est en cours de chargement...
La page est en cours de chargement...
La page est en cours de chargement...
La page est en cours de chargement...
La page est en cours de chargement...
La page est en cours de chargement...
La page est en cours de chargement...
La page est en cours de chargement...
La page est en cours de chargement...
La page est en cours de chargement...
La page est en cours de chargement...
La page est en cours de chargement...
La page est en cours de chargement...
La page est en cours de chargement...
La page est en cours de chargement...
La page est en cours de chargement...
La page est en cours de chargement...
La page est en cours de chargement...
La page est en cours de chargement...
La page est en cours de chargement...
La page est en cours de chargement...
La page est en cours de chargement...
La page est en cours de chargement...
La page est en cours de chargement...
La page est en cours de chargement...
La page est en cours de chargement...
La page est en cours de chargement...
La page est en cours de chargement...
La page est en cours de chargement...
La page est en cours de chargement...
La page est en cours de chargement...
La page est en cours de chargement...
La page est en cours de chargement...
La page est en cours de chargement...
La page est en cours de chargement...
La page est en cours de chargement...
La page est en cours de chargement...
La page est en cours de chargement...
La page est en cours de chargement...
La page est en cours de chargement...
La page est en cours de chargement...
La page est en cours de chargement...
La page est en cours de chargement...
La page est en cours de chargement...
La page est en cours de chargement...
La page est en cours de chargement...
La page est en cours de chargement...
La page est en cours de chargement...
La page est en cours de chargement...
La page est en cours de chargement...
La page est en cours de chargement...
La page est en cours de chargement...
La page est en cours de chargement...
La page est en cours de chargement...
La page est en cours de chargement...
La page est en cours de chargement...
La page est en cours de chargement...
La page est en cours de chargement...
La page est en cours de chargement...
-
 1
1
-
 2
2
-
 3
3
-
 4
4
-
 5
5
-
 6
6
-
 7
7
-
 8
8
-
 9
9
-
 10
10
-
 11
11
-
 12
12
-
 13
13
-
 14
14
-
 15
15
-
 16
16
-
 17
17
-
 18
18
-
 19
19
-
 20
20
-
 21
21
-
 22
22
-
 23
23
-
 24
24
-
 25
25
-
 26
26
-
 27
27
-
 28
28
-
 29
29
-
 30
30
-
 31
31
-
 32
32
-
 33
33
-
 34
34
-
 35
35
-
 36
36
-
 37
37
-
 38
38
-
 39
39
-
 40
40
-
 41
41
-
 42
42
-
 43
43
-
 44
44
-
 45
45
-
 46
46
-
 47
47
-
 48
48
-
 49
49
-
 50
50
-
 51
51
-
 52
52
-
 53
53
-
 54
54
-
 55
55
-
 56
56
-
 57
57
-
 58
58
-
 59
59
-
 60
60
-
 61
61
-
 62
62
-
 63
63
-
 64
64
-
 65
65
-
 66
66
-
 67
67
-
 68
68
-
 69
69
-
 70
70
-
 71
71
-
 72
72
-
 73
73
-
 74
74
-
 75
75
-
 76
76
-
 77
77
-
 78
78
-
 79
79
-
 80
80
-
 81
81
-
 82
82
-
 83
83


Britax Kidfix Sict Le manuel du propriétaire
- Catégorie
- Sièges de voiture
- Taper
- Le manuel du propriétaire
dans d''autres langues
- italiano: Britax Kidfix Sict Manuale del proprietario
- English: Britax Kidfix Sict Owner's manual
- español: Britax Kidfix Sict El manual del propietario
- Deutsch: Britax Kidfix Sict Bedienungsanleitung
- русский: Britax Kidfix Sict Инструкция по применению
- Nederlands: Britax Kidfix Sict de handleiding
- português: Britax Kidfix Sict Manual do proprietário
- dansk: Britax Kidfix Sict Brugervejledning
Documents connexes
-
Britax KIDFIX Le manuel du propriétaire
-
-
Britax Kid Le manuel du propriétaire
-
-
-
Britax-Römer Safefix Plus Le manuel du propriétaire
-
Britax VERSAFIX Le manuel du propriétaire
-
-
Autres documents
-
 Britax Romer BRITAX ADVENTURE CAR SEAT Manuel utilisateur
-
 Teamtex FC74ELLXT Car Seat Manuel utilisateur
-
Römer Duo Plus Le manuel du propriétaire
-
Römer King Plus Le manuel du propriétaire
-
 Britax Romer DUO PLUS COSMOS BLACK Manuel utilisateur
-
Hartman 9905 Le manuel du propriétaire
-
 Handybar M14674 Mode d'emploi
-
Porsche Junior Plus Seat Operating Instructions Manual
-
 SIERRA COMFORT Sierra Mode d'emploi
-
 JBM 52542 Mode d'emploi


