4
1
2
5
3
6
7
1
2
3
6
4
5
7
4
1
2
5
3
6
7
1
2
3
6
4
5
7
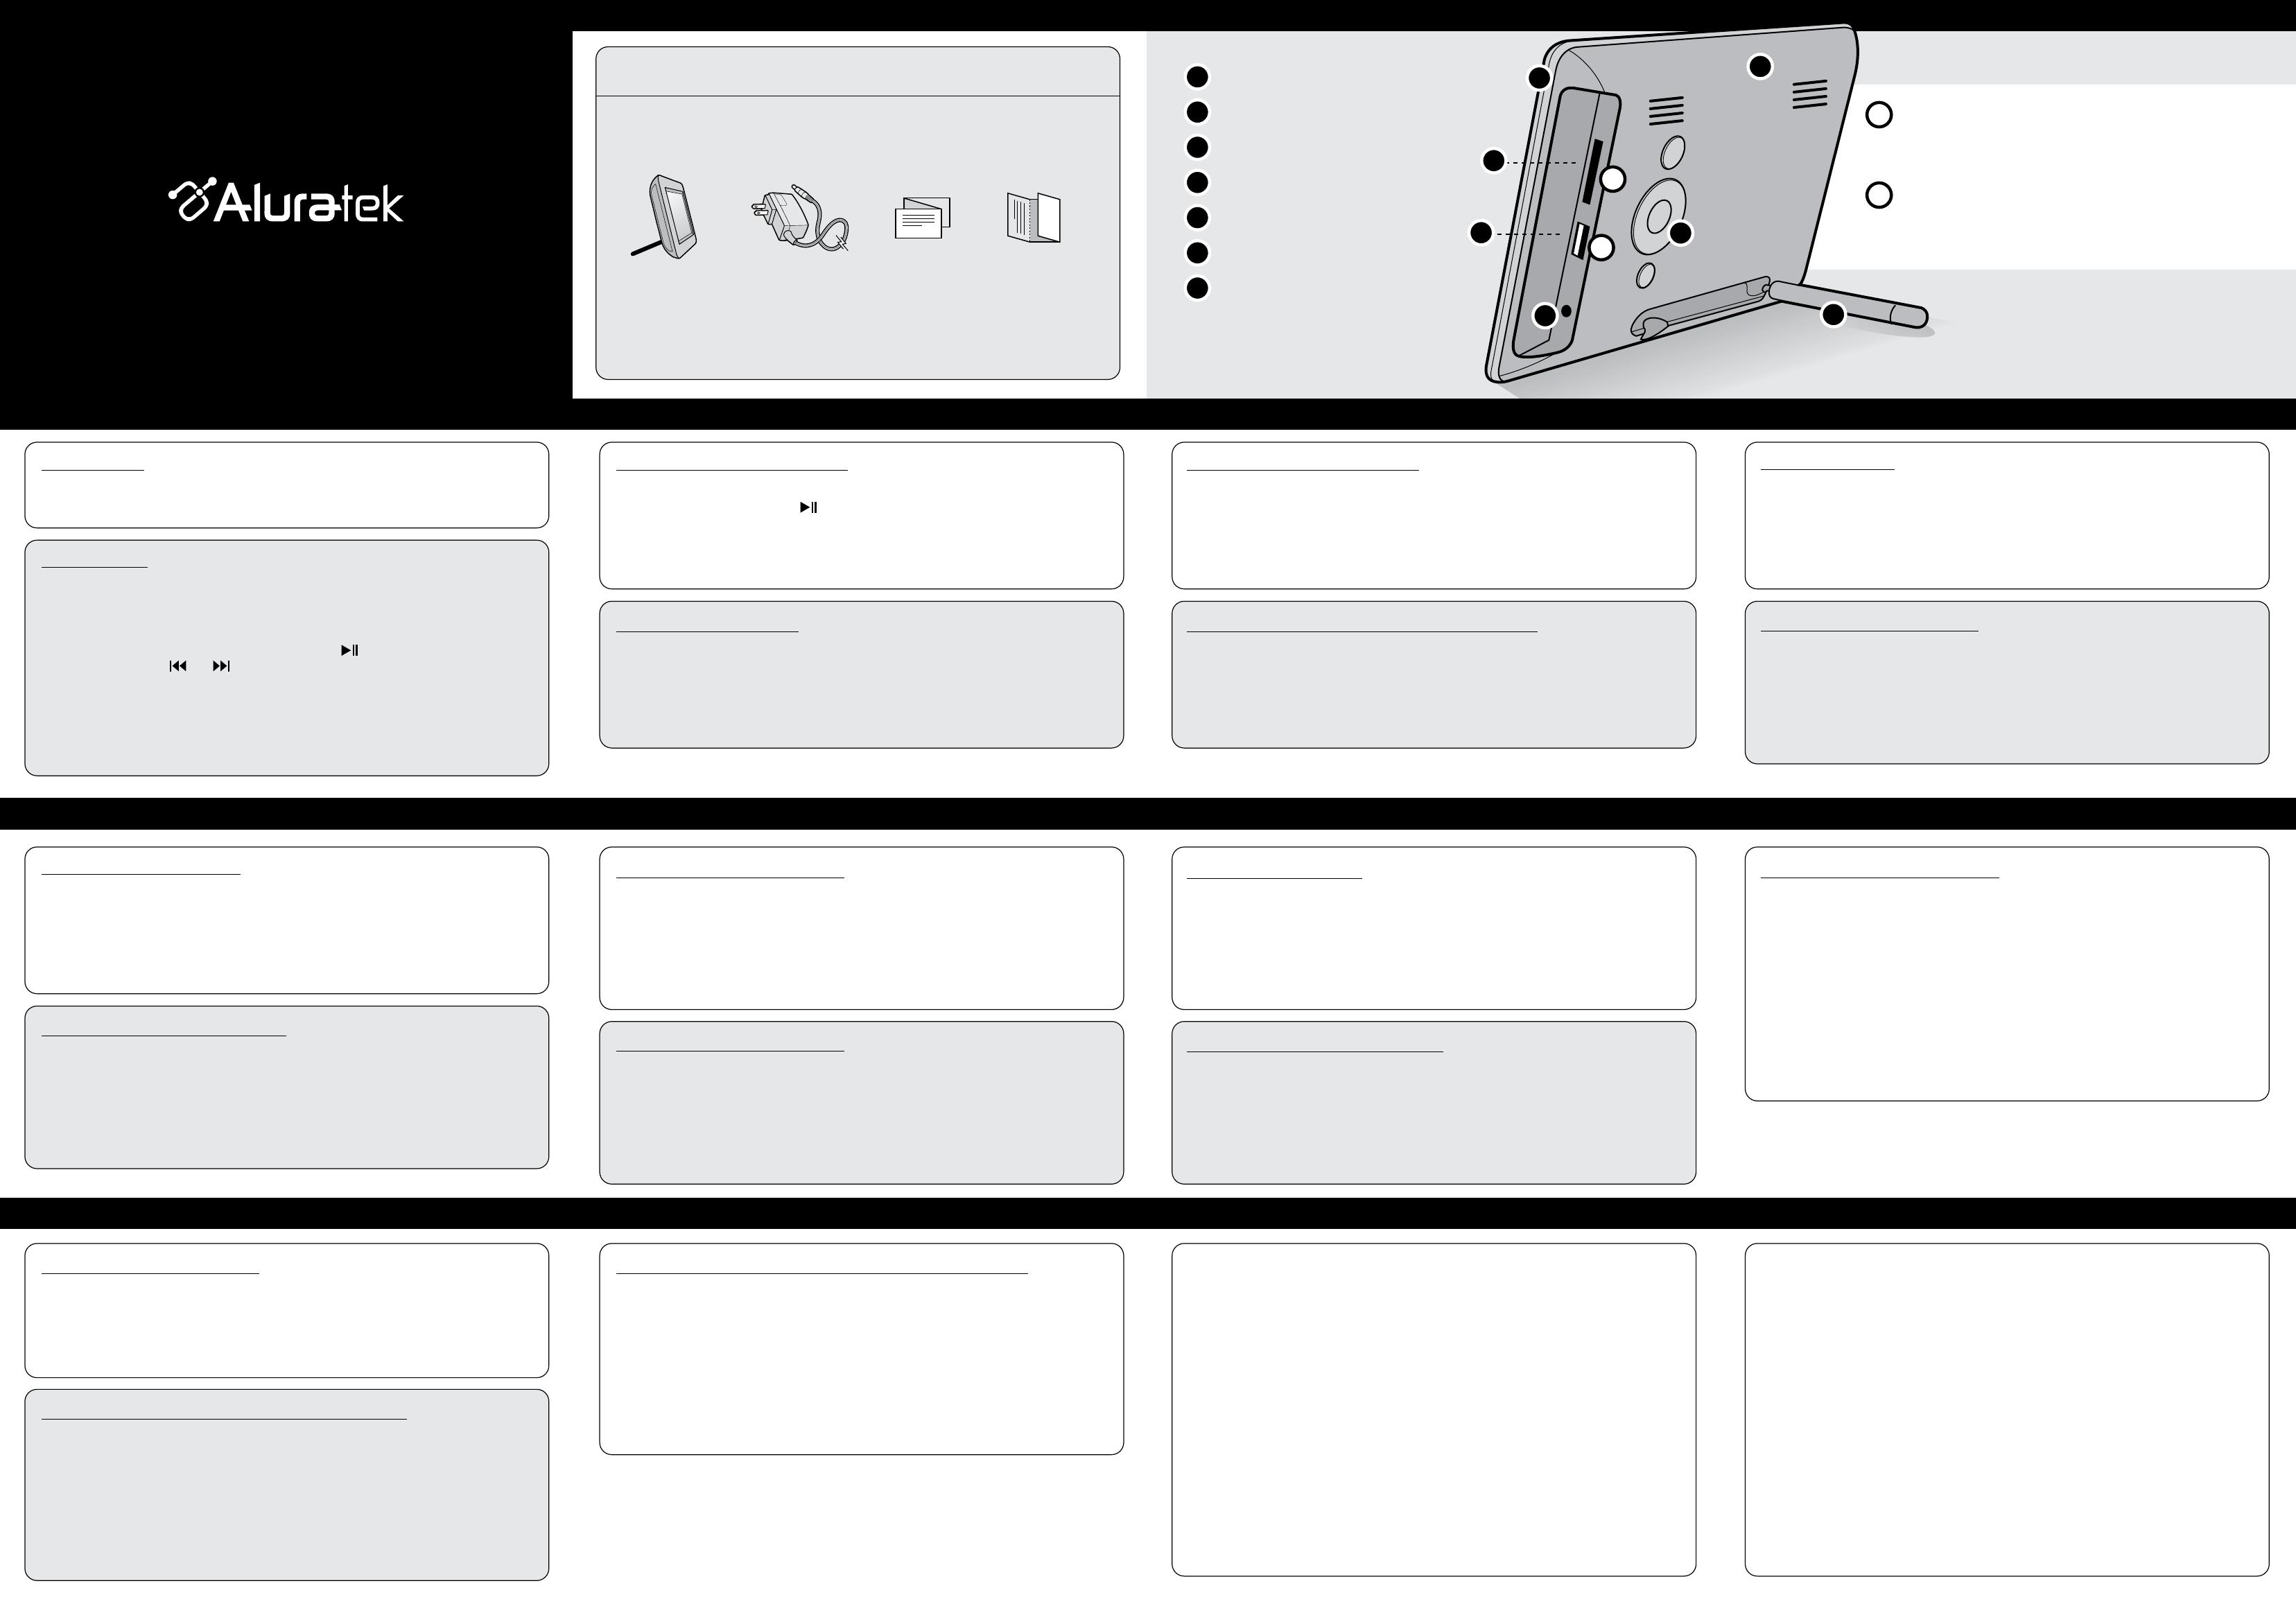
7” TFT true color LCD
Quality black glossy frame
Menu selection buttons
USB port
Card reader slot
Power adapter port
Frame stand (adjustable
for vertical orientation)
Highlights and Application
Operating Instructions
Getting Started:
Step 1: Remove the protective film covering the LCD.
Step 2: Plug in the power adapter to power on the photo frame.
7” Digital Photo Frame
Your order has been carefully packaged and inspected. The following should be included in your package. Please
inspect the contents of the package to ensure that you have received all items and that nothing has been damaged.
If you discover a problem, please contact us immediately for assistance.
Quick Start Guide Warranty / Registration
Card
Power Adapter
Package Contents
Radio and TV Interference Statement
If you need further assistance, please contact the Aluratek support department for
troubleshooting prior to returning this device.
WARNING!!! This equipment has been tested and found to comply with the limits of a
Class B digital device, pursuant to part 15 of the FCC rules. These limits are designed to
provide reasonable protection against harmful interference in a residential installation.
This equipment generates, uses and can radiate radio frequency energy and, if not
installed and used in accordance with the instruction, may cause harmful interference to
radio communications. However, there is no guarantee that interference will not occur in
a particular installation. If this equipment does cause harmful interference to radio or
television reception, which can be determined by turning the equipment off and on, the
user is encouraged to try to correct the interference by whatever measures may be
required to correct the interference.
Aluratek warrants this product against defect in material or workmanship for 120 Days
from the date of purchase.
This warranty becomes invalid if the factory-supplied serial number or "warranty void"
sticker has been removed or altered on the product.
This warranty does not cover:
A) Cosmetic damage or damage due to acts of God
B) Accident, misuse, abuse, negligence or modification of any part of the product.
C) Damage due to improper operation or maintenance, connection to improper equipment,
or attempted repair by anyone other than Aluratek.
D) Products sold AS IS or WITH FAULTS.
IN NO EVENT SHALL ALURATEK'S LIABILITY EXCEED THE PRICE PAID FOR THE
PRODUCT FROM DIRECT, INDIRECT, SPECIAL, INCIDENTAL, OR CONSEQUENTIAL
DAMAGES RESULTING FROM THE USE OF THE PRODUCT, IT'S ACCOMPANYING
SOFTWARE, OR IT'S DOCUMENTATION.
Aluratek makes no warranty or representation, expressed, implied, or statutory, with
respect to it's products, contents or use of this documentation and all accompanying
software, and specifically disclaims it's quality, performance, merchantability, or fitness for
any particular purpose. Aluratek reserves the right to revise or update it's product, software
or documentation without obligation to notify any individual or entity.
Viewing Photos:
• Please insert your memory card (SDHC, SD) at this time.
• The frame will start slideshow automatically when the card is inserted.
• The slideshow can be stopped by pressing the button on the frame. You
can then press the or button to see the next or previous picture
respectively. The slideshow will resume automatically.
• It is not recommended to insert both a memory card and a USB drive as only
the USB drive will be recognized.
Adjust Slideshow Transition Effect:
• Press the Menu button to the main menu.
• Select Setup and press the button.
• Press the “►” button and use “▲” and “▼” to select Transition effect.
• Press the “►” button and use “▲” and “▼” to select the desired effect and
press “►||” to confirm.
• Press the Menu button to exit.
Adjust Speed of Slideshow:
• Press the Menu button to the main menu.
• Select Setup and press the ►|| button.
• Press the “►” button and use “▲” and “▼” to select Interval Time.
• Press the “►” button and use ““▲” and “▼” to select the desired interval time
and press “►||” to confirm.
• Press the Menu button to exit.
Warranty
Connect your USB hard drive / thumb
drive through the unit’s USB port
OR
To easily view your favorite pictures:
7” Digital Photo Frame
qsg Q10084 Copyright © 2011 Aluratek, Inc. All Rights Reserved.
aluratek.com
Quick Start Guide
ADPF07SF
Set Display Type (Fit / Full Screen):
• Press the Menu button to the main menu.
• Select Setup and press the ►|| button.
• Press the “►” button and use “▲” and “▼” to select Show Type.
• Press the “►” button and use “▲” and “▼” to select the desired display type
and press “►||” to confirm.
• Press the Menu button to exit.
Set File Browsing Method (Thumbnail / File Manager):
• Press the Menu button to the main menu.
• Select Setup and press the ►|| button.
• Press the “►” button and use “▲” and “▼” to select Browse.
• Press the “►” button and use ““▲” and “▼” to select the desired browse mode
and press “►||” to confirm.
• Press the Menu button to exit.
Set Auto-Play Mode:
• Press the Menu button on the main menu.
• Select Setup and press the ►|| button.
• Use “▲” and “▼” to select Auto-Play.
• Press the “►” button and use ““▲” and “▼” to select auto play mode and
press “►||” to confirm.
• Press the Menu button to exit.
Adjust Brightness of the Screen:
• Press the Menu button to the main menu.
• Select Setup and press the ►|| button.
• Use “▲” and “▼” to select Display Setup.
• Press the “►” button and use “▲” and “▼” to select Brightness.
• Press the “►” button and use ““▲” and “▼” to select the desired display
brightness and press “►||” to confirm.
• Press the Menu button to exit.
Adjust Contrast of the Screen:
• Press the Menu button to the main menu.
• Select Setup and press the ►|| button.
• Press the “►” button and use “▲” and “▼” to select Contrast.
• Press the “►” button and use ““▲” and “▼” to select the desired contrast and
press “►||” to confirm.
• Press the Menu button to exit.
Adjust TFT Brightness of the Screen:
• Press the Menu button to the main menu.
• Select Setup and press the ►|| button.
• Use “▲” and “▼” to select Display Setup.
• Press the “►” button and use “▲” and “▼” to select TFT Brightness.
• Press the “►” button and use ““▲” and “▼” to select the desired TFT brightness
and press “►||” to confirm.
• Press the Menu button to exit.
Adjust TFT Contrast of the Screen:
• Press the Menu button to the main menu.
• Select Setup and press the ►|| button.
• Use “▲” and “▼” to select Display Setup.
• Press the “►” button and use “▲” and “▼” to select TFT Contrast.
• Press the “►” button and use ““▲” and “▼” to select the desired TFT contrast
and press “►||” to confirm.
• Press the Menu button to exit.
Adjust TFT Saturation of the Screen:
• Press the Menu button to the main menu.
• Select Setup and press the ►|| button.
• Use “▲” and “▼” to select Display Setup.
• Press the “►” button and use “▲” and “▼” to select TFT Saturation.
• Press the “►” button and use ““▲” and “▼” to select the desired TFT saturation
and press “►||” to confirm.
• Press the Menu button to exit.
Adjust the OSD Language:
• Press the Menu button to the main menu.
• Select Setup and press the ►|| button.
• Use “▲” and “▼” to select Custom Setup.
• Press the “►” button and use “▲” and “▼” to select OSD Language.
• Press the “►” button and use ““▲” and “▼” to select the desired language
and press “►||” to confirm
• Press the Menu button to exit.
Adjust the Color of the Menu Interface:
• Press the Menu button to the main menu.
• Select Setup and press the ►|| button.
• Use “▲” and “▼” to select Display Setup.
• Press the “►” button and use “▲” and “▼” to select Style.
• Press the “►” button and use ““▲” and “▼” to select the desired style (color of
the menu interface) and press “►||” to confirm.
• Press the Menu button to exit.
Set the Photo Display Repeat Mode:
• Press the Menu button to the main menu.
• Select Setup and press the ►|| button.
• Use “▲” and “▼” to select Custom Setup.
• Press the “►” button and use “▲” and “▼” to select Repeat Mode.
• Press the “►” button and use ““▲” and “▼” to select the desired repeat mode
and press “►||” to confirm.
Select One to repeat one particular picture for the slideshow.
Select Folder to repeat pictures from the current folder.
Select All to repeat all pictures from the memory card or USB disk
Select Off to turn off repeat.
• Press the Menu button to exit.
To Remove Pictures from the Internal Memory (Favorite folder):
• Press the Menu button to the main menu.
• Select Edit and press the ►|| button.
• Select Delete and press the ►|| button.
• Use “◄” and “►” button to select Delete icon and press the ►|| button.
• Use “◄” and “►” to select the desired image and press ►|| button to confirm.
Repeat above step if you want to delete more pictures or you can select
Delete All to delete all pictures in the Favorite folder.
• Press the Menu button to exit.
Reset Frame to Factory Settings:
• Press the Menu button to the main menu.
• Use “▲” and “▼” to select Custom Setup.
• Press the “►” button and use “▲” and “▼” to select Default.
• Press the “►” button and press “►||” to confirm
• Press the Menu button to exit.
To Add Pictures to the Internal Memory (Favorite folder)
• Press the Menu button to the main menu.
• Select Edit and press the ►|| button.
• Select Copy and press the ►|| button.
• Use “▲” and “▼” to select the desired image and press ►|| button to confirm.
• Use “◄” and “►” button to select Save icon and press ►|| button to confirm.
• Press the Menu button to exit.
Note: The internal memory can only store 15 pictures due to the limitation of the
memory size.
Insert any of the following memory cards:
Secure Digital High Capacity (SDHC);
Secure Digital (SD)
A
B
A
B
Local (Tustin, CA): 714-586-8730 Toll free: 1-866-580-1978
Écran ACL TFT de 7 po
Cadre haute qualité
Touches de sélection par menu
Port USB
Carte mémoire avec fente
Port d’adaptateur de courant
Support sur pied
(réglable pour une
orientation verticale)
Caractéristiques et Fonctionnement
Directives d’Opération
Pour vous aider à démarrer:
Étape 1: Enlever le film protecteur recouvrant l’affichage ACL.
Étape 2: Enlever isolant en plastique de la batterie de la télécommande.
Cadre de photo numérique
de 7 po
Votre commande a été emballée et inspectée avec soin. Voici les articles contenus dans l’emballage. Veuillez
vérifier le contenu de l’emballage pour vous assurer que vous avez reçu tous les articles, et qu’aucune pièce n’est
endommagée. En cas de problèmes, veuillez communiquer avec nous immédiatement.
Guide de démarrage
rapide
Carte de garantie et carte
d’enregistrement
Adaptateur de courant
Contenu
Énoncé d’interférence avec la réception radio et télévisée
Pour toutes autres questions, veuillez communiquer avec le service de soutien
Aluratek avant de retourner votre appareil.
AVERTISSEMENT!!! Cet appareil a été testé et est conforme aux limites d’un appareil
numérique de Classe B, en vertu de la Section 15 des règles CFC. Ces limites ont été
conçues pour assurer une protection raisonnable contre de telles interférences néfastes
dans une installation résidentielle.
Cet équipement génère, utilise et peut émettre de l’énergie de fréquence radio. S’il n’est
pas correctement installé et utilisé, il peut causer des interférences nuisibles dans les
communications radio. Toutefois, il est impossible de garantir que de telles interférences
ne surviendront pas dans une installation particulière. Si cet équipement cause des
interférences nuisibles à la réception radio ou télévisée, laquelle peut être déterminée en
éteignant et allumant l’équipement, on suggère à l’utilisateur d’essayer de corriger
l’interférence par quelques mesures que ce soit afin d’éliminer les interférences.
Aluratek garantit se produit contre les défauts de matériel et de fabrication pour une
période de 120 jours, à compter de la date d’achat.
Cette garantie devient invalide si le numéro de série de l’entreprise ou l’étiquette «
garantie annulée » a été retirée ou modifiée sur le produit.
Cette garantie ne couvre pas :
A) Dommages de fabrication apparente ou dommages à la suite de cas imprévus
B) Accident, mauvaise utilisation, abus, négligence ou modification de toute pièce du produit.
C) Dommages résultant d’un fonctionnement ou entretien inadéquat, connexion à un
équipement inadéquat, ou tentative de réparation par une personne, autre que Aluratek.
D) Les produits sont venus TELS QUELS ou SANS DÉFAUT.
EN AUCUN CAS, LA RESPONSABILITÉ D’ALURATEK N’EXCÈDE LE PRIX PAYÉ POUR
LE PRODUIT À LA SUITE D’UN DOMMAGE DIRECT, INDIRECT, PARTICULIER OU
CONSÉCUTIF RÉSULTANT DE L’UTILISATION DU PRODUIT, DE SES LOGICIELS
D’ACCOMPAGNEMENT OU DE SA DOCUMENTATION.
Aluratek ne fait aucune déclaration et ne donne aucune garantie expresse, implicite ou
légale relative à ses produits, son contenu ou son utilisation de la documentation et de tous
ses logiciels d’accompagnement, et renonce spécifiquement à la qualité, au rendement, à la
qualité marchande et à la convenance. Aluratek se réserve le droit de réviser ou de mettre à
jour son produit, logiciel ou documentation sans l’obligation d’aviser tout individu ou entité.
Visionner des Photos:
• Veuillez insérer votre carte mémoire (SDHC, SD).
• Le cadre commencera à afficher le diaporama automatiquement au moment
que la carte est insérée.
• Le diaporama peut être arrêté en appuyant sur le bouton sur le cadre.
Vous pouvez aussi appuyer sur le bouton ou sur le cadre pour voir la
prochaine image ou l’image précédente respectivement.
• Il n'est pas recommandé pour insérer une carte mémoire et un lecteur USB
comme seulement le lecteur USB sera reconnu.
Ajuster l'Effet de Transition de Diaporama:
• Appuyer le bouton Menu au menu principal.
• Choisir Setup et appuyer le bouton.
• Appuyer le “►” bouton et l'usage “▲” et “▼” pour choisir Transition effect.
• Appuyer le “►” bouton et l'usage “▲” et “▼” pour choisir l'effet désiré et
appuie “►||” pour confirmer.
• Appuyer le bouton Menu pour sortir.
Ajuster Vitesse de Diaporama:
• Appuyer le bouton Menu au menu principal.
• Choisir Setup et appuyer le bouton.
• Appuyer le “►” bouton et l'usage “▲” et “▼” pour choisir Interval Time.
• Appuyer le “►” bouton et l'usage “▲” et “▼” pour choisir le temps désiré
d'intervalle et appuie “►||” pour confirmer.
• Appuyer le bouton Menu pour sortir.
Garantie
Se branche à votre carte mémoire ou
lecteur USB
OU
Facilement regarder vos images préférées :
Cadre de photo numérique de 7 po
qsg Q10084 Copyright © 2011 Aluratek, Inc. All Rights Reserved.
aluratek.com
Guide de démarrage rapide
ADPF07SF
Le Type fixe d'Affichage (Fit / Full Screen):
• Appuyer le bouton Menu au menu principal.
• Choisir Setup et appuyer le ►|| bouton.
• Appuyer le “►” bouton et l'usage “▲” et “▼” pour choisir Show Type.
• Appuyer le “►” bouton et l'usage “▲” et “▼” pour choisir le type désiré
d'affichage et appuie “►||” pour confirmer.
• Appuyer le bouton Menu pour sortir.
Le Dossier fixe Broutant Méthode (Thumbnail / File Manager):
• Appuyer le bouton Menu au menu principal.
• Choisir Setup et appuyer le ►|| bouton.
• Appuyer le “►” bouton et l'usage “▲” et “▼” pour choisir Browse.
• Appuyer le “►” bouton et l'usage “▲” et “▼” pour choisir le désiré brouter le
mode et appuie “►||” pour confirmer.
• Appuyer le bouton Menu pour sortir.
Mode fixe d'Auto-Jeu:
• Appuyer le bouton Menu au menu principal.
• Choisir Setup et appuyer le ►|| bouton.
• Usage “▲” et “▼” pour choisir Auto-Play.
• Appuyer le “►” bouton et l'usage “▲” et “▼” pour choisir mode auto de jeu et
appuie “►||” pour confirmer.
• Appuyer le bouton Menu pour sortir.
Ajuster Eclat de l'Ecran :
• Appuyer le bouton Menu au menu principal.
• Choisir Setup et appuyer le ►|| bouton.
• Usage “▲” et “▼” pour choisir Display Setup.
• Appuyer le “►” bouton et l'usage “▲” et “▼” pour choisir Brightness.
• Appuyer le “►” bouton et l'usage “▲” et “▼” pour choisir l'éclat désiré d'affichage
et appuie “►||” pour confirmer.
• Appuyer le bouton Menu pour sortir.
Ajuster Constraste de l'Ecran :
• Appuyer le bouton Menu au menu principal.
• Choisir Setup et appuyer le ►|| bouton.
• Appuyer le “►” bouton et l'usage “▲” et “▼” pour choisir Contrast.
• Appuyer le “►” bouton et l'usage “▲” et “▼” pour choisir le constraste désiré
et appuie “►||” pour confirmer.
• Appuyer le bouton Menu pour sortir.
Ajuster l'Eclat de TFT de l'Ecran :
• Appuyer le bouton Menu au menu principal.
• Choisir Setup et appuyer le ►|| bouton.
• Usage “▲” et “▼” pour choisir Display Setup.
• Appuyer le “►” bouton et l'usage “▲” et “▼” pour choisir TFT Brightness.
• Appuyer le “►” bouton et l'usage “▲” et “▼” pour choisir l'éclat désiré de TFT
et appuie “►||” pour confirmer.
• Appuyer le bouton Menu pour sortir.
Ajuster le Constraste de TFT de l'Ecran:
• Appuyer le bouton Menu au menu principal.
• Choisir Setup et appuyer le ►|| bouton.
• Usage “▲” et “▼” pour choisir Display Setup.
• Appuyer le “►” bouton et l'usage “▲” et “▼” pour choisir TFT Contrast.
• Appuyer le “►” bouton et l'usage “▲” et “▼” pour choisir le constraste désiré de
TFT et appuie “►||” pour confirmer.
• Appuyer le bouton Menu pour sortir.
Ajuster la Saturation de TFT de l'Ecran :
• Appuyer le bouton Menu au menu principal.
• Choisir Setup et appuyer le ►|| bouton.
• Usage “▲” et “▼” pour choisir Display Setup.
• Appuyer le “►” bouton et l'usage “▲” et “▼” pour choisir TFT Saturation.
• Appuyer le “►” bouton et l'usage “▲” et “▼” pour choisir la saturation désirée
de TFT et appuie “►||” pour confirmer.
• Appuyer le bouton Menu pour sortir.
Ajuster la Langue d'OSD :
• Appuyer le bouton Menu au menu principal.
• Choisir Setup et appuyer le ►|| bouton.
• Usage “▲” et “▼” pour choisir Custom Setup.
• Appuyer le “►” bouton et l'usage “▲” et “▼” pour choisir OSD Language.
• Appuyer le “►” bouton et l'usage “▲” et “▼” pour choisir la langue désirée
et appuie “►||” pour confirmer.
• Appuyer le bouton Menu pour sortir.
Ajuster la Couleur de l'Interface de Menu :
• Appuyer le bouton Menu au menu principal.
• Choisir Setup et appuyer le ►|| bouton.
• Usage “▲” et “▼” pour choisir Display Setup.
• Appuyer le “►” bouton et l'usage “▲” et “▼” pour choisir Style.
• Appuyer le “►” bouton et l'usage “▲” et “▼” pour choisir le style désiré (la
couleur de l'interface de menu) et appuie “►||” pour confirmer.
• Appuyer le bouton Menu pour sortir.
Régler l'Affichage de Photo Répète Mode:
• Appuyer le bouton Menu au menu principal.
• Choisir Setup et appuyer le ►|| bouton.
• Usage “▲” et “▼” pour choisir Custom Setup.
• Appuyer le “►” bouton et l'usage “▲” et “▼” pour choisir Repeat Mode.
• Appuyer le “►” bouton et l'usage “▲” et “▼” pour choisir le mode répété désiré
et appuie “►||” pour confirmer.
Choisir One pour répéter une image particulière pour le diaporama.
Choisir Folder pour répéter des images du dossier actuel.
Choisir All pour répéter toutes les images de la carte mémoire ou du disque USB.
Choisir Off pour éteindre répété.
• Appuyer le bouton Menu pour sortir.
Pour Enlever des Images de la Mémoire Interne (Favorite folder):
• Appuyer le bouton Menu au menu principal.
• Choisir Edit et appuie le ►|| bouton.
• Choisir Delete et appuie le ►|| bouton.
• Usage “◄” et “►” pour choisir Delete icône et appuie “►||” pour confirmer.
• Usage “▲” et “▼” pour choisir l'image désirée et appuie “►||” pour confirmer.
Répéter au-dessus de l'étape si vous voulez effacer plus d'images ou choisir
Delete All pour effacer toutes les images dans le dossier Préféré.
• Appuyer le bouton Menu pour sortir.
Remettre à l'état initial Cadre aux Paramètres d'Usine:
• Appuyer le bouton Menu au menu principal.
• Usage “▲” et “▼” pour choisir Custom Setup.
• Appuyer le “►” bouton et l'usage “▲” et “▼” pour choisir Default.
• Appuyer le “►” bouton et appuie “►||” pour confirmer.
• Appuyer le bouton Menu pour sortir.
Pour Ajouter des Images à la Mémoire Interne (Favorite folder):
• Appuyer le bouton Menu au menu principal.
• Choisir Edit et appuie le ►|| bouton.
• Choisir Copy et appuie le ►|| bouton.
• Usage “▲” et “▼” pour choisir l'image désirée et appuie “►||” pour confirmer.
• Usage “◄” et “►” pour choisir Save icône et appuie “►||” pour confirmer.
• Appuyer le bouton Menu pour sortir.
Note: La mémoire interne peut emmagasiner seulement 15 images en raison de
la limitation de la taille de mémoire.
Insérer l’une des cartes mémoires suivantes:
Secure Digital High Capacity (SDHC);
Secure Digital (SD)
A
B
A
B
Local (Tustin, CA): 714-586-8730 Toll free: 1-866-580-1978
