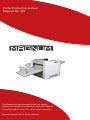
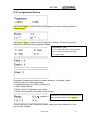
Magnum MC-35A Product Instruction Manual
- Taper
- Product Instruction Manual

Product instruction manual
Magnum MC-35A
The Magnum has been designed to be user friendly,
however we strongly recommend you take a few minutes
to read through this manual to ensure correct operation.
Keep this manual safe for future reference.

Auto creaser
2
MC-35A
Index
INTRODUCTION ............................................................................................. 1
1.1 Preface ................................................................................................. 1
1.2 Specification ......................................................................................... 2
2 SAFETY ......................................................................................................... 3
2.1 Environment .......................................................................................... 3
2.2 Do’s and Don’ts .................................................................................... 3
2.3 Operating Instructions ................................................................................. 4
3 MAIN PARTS AND ACESSORIES ................................................................ 6
4 INSTALLATION .............................................................................................. 8
4.1 Uninstall the protection bar ................................................................... 8
4.2 Set the balance bracket ........................................................................ 8
4.3 Output tray, stops and guides ............................................................... 8
4.4 Feeding extension ................................................................................ 9
4.5 Power socket and switch ...................................................................... 9
5 QUICK START ............................................................................................. 10
6 OPERATION ................................................................................................ 11
6.1 Control panel ...................................................................................... 11
6.2 Operation Screen ................................................................................ 12
6.3 Sniper Patent Technology .................................................................. 22
6.4 Hardware Settings .............................................................................. 23
7OPTIONAL PARTS ....................................................................................... 26
7.1 Slid-in Tools ........................................................................................ 26
7.2 Linear blade ........................................................................................ 27

MC-35A
Auto creaser
1
1 INTRODUCTION
1.1 Preface
This manual only applies to MC-35A Auto Creaser machine.
Before using the machine, please read the instruction manual carefully first.
Please keep the manual properly so that consulting it at any time in the future.
Any question while operating please contact our technicians.

Auto creaser
2
MC-35A
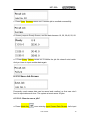
1.2 Specification
Paper thickness
60-400 gsm
Paper length 150-650mm
Paper width 140-330mm
Speed (One crease on A4): 75pcs/min (high)
Sniper Speed (One crease on A4): 50pcs/min (high)
Min crease gap 1mm
Min gap from leading edge to first crease +/-0.2mm
Crease qty in one pass 0 -32
Max program qty 30
Crease counting reversible counter
Total counter for crease qty and paper qty
Skew adjustment Standard
Crease depth adjustment Standard
Feeding extension table Standard
Output tray Standard
Language
/EN
Linear perforating max 8 set, min gap between 2 is 30mmOption
Linear scoring max 8 sets, min gap between 2 is 30mmOption
Linear half cutter max 8 sets, min gap between 2 is 30mmOption
Linear Slitter max 8 set, min gap between 2 is 40mmOption
Stand Option
Power 220V/50HZ/150W
Fuse rating 3.15A
Air blast Infinity adjustable
Weight 63kg (NG) 70kg(GW)

MC-35A
3
2 SAFETY
Before or while operating this machine, you should pay great attention to
the safety features.
2.1 Environment
Temperature:10°C to 35°C
Humidity: 30% to 70%
Altitude: Below elevation 1000m
There is no corrosiveness gas, flammable gas, oil mist and so on in room
Auto creaser

Auto creaser
4
MC-35A
2.3 Operating Instructions
English
Please read these operation instructions before putting the machine into operation
and observe the safety precautions.
Model: MC-35A
Input: 110V/220V
1. Children must not operate the machine!
2. Do not reach into the machine!
3. Long hair can become entangled in cutting head!
4. Take care of ties and other loose pieces of clothing!
5. Remove any paper clips!
6. Components which may endanger the operator are covered!
7. Connect the power cord to a single phase socket 230 V / 10 A.
8. Ensure free access to mains.
9. Disconnect from the mains if not used for a long period.

Auto creaser
5
MC-35A
10. Top fold plate must lock into position correctly.
11. Remove the plug before cleaning the machine! Do not perform any repairs on
the paper folding machine!
12.the socket-outlet shall be installed near the equipment and shall be easily
accessible.
– this equipment is not intended for use by children (the product is not a toy);
– avoid touching the document/media feed opening with the hands;
– avoid clothing touching the document/media feed opening;
– avoid hair touching the document/media feed opening; and
– keep aerosol products away [for equipment incorporating a universal (brush)
motor only].
Be careful of any metal or flammable thing in internal machine, or it may cause fire
or electronic shock. If it happens, first shut down the power, disconnect the cord,
and then contact the technician.
If machine becomes heat, smoke, or smelly, shutdown at once, disconnecting the
cord, and contact the maintenance staff.
Franch
Veuillez lire ces instructions d'utilisation avant de mettre la machine en marche et
respectez les consignes de sécurité.
Modèle:
MC-35A
Entrée: 110 V / 220 V
1. Les enfants ne doivent pas utiliser la machine!
2. Ne pas atteindre dans la machine!
3. Les cheveux longs peuvent s'emmêler dans la tête de coupe!
4. Prenez soin des cravates et des autres vêtements amples!
5. Retirez tous les trombones!
6. Les composants pouvant mettre en danger l'opérateur sont couverts!
7. Connectez le cordon d'alimentation à une prise monophasée 230 V / 10 A.
8. Assurer un accès libre au secteur.
9. Débranchez du secteur s'il n'est pas utilisé pendant une longue période.
10. La plaque de pliage supérieure doit se verrouiller correctement.
11. Retirez la prise avant de nettoyer la machine! N'effectuez aucune réparation sur
la machine à plier le papier!
12.la prise de courant doit être installée à proximité de l'équipement et doit être
facilement accessible.
- cet équipement n'est pas destiné à être utilisé par des enfants (le produit n'est pas
un jouet);
- évitez de toucher l'ouverture du document / support d'alimentation avec les mains;
- éviter que les vêtements ne touchent l'ouverture du flux de documents / supports;
- éviter que les cheveux ne touchent l'ouverture du flux de documents / supports; et
- conserver les produits aérosols à l'écart [pour les équipements intégrant
uniquement un moteur (à brosse) universel].
Faites attention à tout objet métallique ou inflammable dans la machine interne, ou
cela pourrait provoquer un incendie ou un choc électrique. Si cela se produit,
coupez d'abord l'alimentation, débranchez le cordon, puis contactez le technicien.
Si la machine devient chaude, fume ou malodorante, arrêtez-la immédiatement,
débranchez le cordon et contactez le personnel de maintenance.

Auto creaser
6
MC-35A
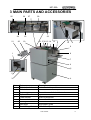
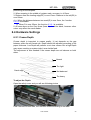
3 MAIN PARTS AND ACCESSORIES
25 26
27
28
24 23
22
21
20
19
18 1716 15
14
13
10
11
12
9
1 8
7
6
5
2
3 4
No.
Parts
Description
1
Slide-in bar lock Locks the tool in position
2
Slide-in bar
Could be crease bar or perforate bar
3
Screw
To assist user slid in/out the tool
4
Optional Stand
Option with caster
5
Power socket
Mains lead socket
6
Power switch
Power On/off
7
Loading table
To load sheets
8
Back Stop Rear paper guide
9
Fixed Side guide
With skew adjustment

Auto creaser
7
MC-35A
10
Air gate
Infinity adjust to control air flow
11
Front guide
sheet feed with double sheet detector
12
Skew adjust wheel
To change the angle of fixed side guide
13
Press wheel
To press the paper tail
14
Stack height sensor
To trigger the feeding job after loading table rise
15
Vacuum feed system
Blow to make vacuum and feeder
16
Front guide knob
To adjust the height of front guide
17
Blower knob
To adjust the air flow
18
Press plate
To press the paper when it is feeding
19
Control panel
To input and display
20
Side guide -exit tray
21
Output tray
Sheet collection tray
22
Clip
Release to uninstall the shaft
23
Outfeed shaft
Clip for rear shafts
24
Outfeed counter roller
Work together with Linear tools
25
Depth adjust screw
To adjust the depth or crease or perforate
26
Roller screw
To adjust the depth of linear tools
27
Linear tools
Roller, scorer, kiss cutter,slitter or perfoater
28
Installing bar
To install the slid-in tool

Auto creaser
8
MC-35A
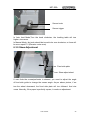
4 INSTALLATION
4.1 Uninstall the protection bar
Protection
bar
The first thing after unpacking and putting machine on table is to uninstall
the protection bar.
4.2 Set the balance bracket
Balance bracket
Please be careful of the bracket from your hand when you are moving it to the
stand. Inset screw drive through the hole in red cycle, release the bracket to
fall, and then set them again.
4.3 Output tray, stops and guides
Unpack it , install the parts as per above illustration.
Note:!Set! guide!and!stops!according!to!the!paper!format.!
The!capacity!of!the!tray!should!always!less!than!30mm(A3!)!to!keep!machine!balance.!
Side guide R/H Side guide L/H
Joint of tray
and machine
Output tray
Back stop
Extensio
n tray

Auto creaser
9
MC-35A
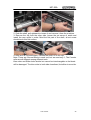
4.4 Feeding extension
We can see there are 2 screws on rear of feeding table, and there are 2
holes on side of extension table.
4.5 Power socket and switch
Switch
(Press
“O” is off,
press
“|” is On)
Socket
Before the operation, please connect the socket to the electricity with attached
cord, press the switch (when the red point is down, the machine is power on.)
Fuse under the socket is to protect the system in case the current is over
3.15A, to replace the Fuse, we firstly un-clip the cartridge with a straight
screw driver. Secondly remove the broken fuse from the cartridge and load a
new one back. At last, we reload the cartridge.
Fuse

Auto creaser
10
MC-35A
5 QUICK START
Paper must be flat and not curled ,not hooked, cut straight and square
1. Turn on machine,
2. To lower tray feed, press
STOP
3. Put paper in the tray,against the fixed guide, front and side.
4. Fit tray and outfeed tray extensions as required if over A3 , Pile must be
even and square.
5. Position side guides close to the side and the end with enough gap to let
the paper move freely.(Ca. 0.5 mm gap) Never put the guides under the
feed head or they may get trapped when the tray lifts and destroy the
feed head, and invalidate the warranty
6. Set the guides on the output tray to catch the paper
7. Adjust front air blast by left knob according to paper weight.
Heavy=>more =anti clockwise ,light=>less=clockwise
8. Adjust pile height limiter as needed, clockwise = higher, anti-
clockwise =lower
9. Adjust front separator by right knob according to paper caliper, thick=
down= clockwise, thin=up=anti-clockwise.
10. As necessary, adjust crease steps, using the 4 screws on crease
bar, clockwise=down, anti-clockwise= up, adjust max 1/4 turn evenly on all 4
at a time.
11. Adjust skew as needed to correct front cut errors, knob down =paper to
the right, knob up =paper to the left
12. For thin paper you may need to use 1 or 2 magnetic deflectors to stop
the paper lifting.
13. Input line position from front edge from 0-32 lines, min 1mm max 650,
min
spacing 0.5mm.Press M enter 1st line value, press enter 2
nd
line value……
press enter twice to quit.
14. Input quantity max value 999, counter will count down and stop at 0,
15.For test press gray button once,=1 cycle, tray will lift and fans will run up.
16.Check the result, and compensate as needed.
17. Press green button to run, tray will lift and fan will run.
18. Press red to stop, or the machine will stop when preset is reached, tray will
drop.

Auto creaser
11
MC-35A
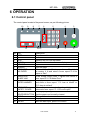
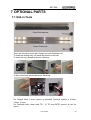
6 OPERATION
6.1 Control panel
The control panel consist of keys and screen, as per following picture.
10
9
8
7
6 5
4 3
11
12
13
14
1 2
No
Key
Description
1
STOP
Stop the machine.
2
START
Run the machine.
3
TEST
Machine will run one test sheet
4
CLEAR
Clear the data or clear the error display
5
KEY PAD
Input data
6
SCROLL
Turn the page
7
INDICATOR-
NO PAPER
If the machine didn’t find a paper for ca. 20s while it
is running, it lit and return a error report.”C-4 No
paper or Jam”
8
INDICATOR-
BLADE JAM
If the crease motor locks, it lighten and return a
error report”E-1 CR Motor Error”
9
INDICATOR-
PAPER JAMMED
If the paper is jammed inside the machine, it lighten
and return a error report. ”C-2 Jam at infeed” or
“C-3 Jam at outfeed”
10
INDICATOR-
SAFETY COVER
If the safety cover is not well setting, it lighten and
returned a error report.”C-1 CR cover open”
11
UNJAM FORWARD/
REVERSE BUTTON
When paper jams, press them to move rollers, so
that the paper can be easily cleared.
12
MODE
Change the modes
13
SCREEN
Display information.
14
ENTER
After the data input, press it to confirm.

Auto creaser
12
MC-35A
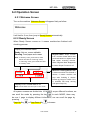
6.2 Operation Screen
6.2.1 Welcome Screen
Turn on the machine, Welcome Screen will appear firstly as follow.
It will last for 2 sec, then jump to Ready Screen automatically
6.2.2 Ready Screen
When Ready Screen comes on it means machine has finished self-
checking process.
Display the machine states:
Ready: Not run, screen editable.
Running: Feed paper and crease
Note:!In!“Ready”!state,!press!RUN!or!TEST!
button!will!shift!to!“Runni ng”!state;!
In!“Runn ing”!state,!press!STOP!will!shift!
to!“Ready”!state.!
Register Mark: Sniper function
is on. And the crease data is also
produced based on register mark
with sniper scanning function.
When Register Mark disappears
it means Sniper Function is off
.
Display First 2 crease data of 32
Note:!Crease!data!can’t!be!input!in!t his!mode.!
Machine Counting/Preset QTY
0 means machine has finished 0
sheets, 5 means machine will
stop after finishing 5 sheets.
Preset qty range is 0~999. If it is
0, machine will keep running
until press Stop Key.
All system screens are divided into 10 MODES as per different functions, we
can scroll the mode by pres
sing the key .In each MODE, there may
be over 1 page to display different information, we can scroll the page by
pressing
Page Up Key or Page Down Key to browse.

Auto creaser
13
MC-35A
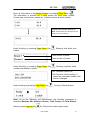
Scan all information of the Ready Screen by pressing Page Down Key .
The information is divided into 4 kinds except the main ready screen:
Crease data, total sheets, crease qty., software version & serial number.
Display rest crease data in 32.
Note:!Crease!data!can’t!be!input!in!this!
mode,!just!for!browsing.!
Keep Scrolling by pressing Page Down Key , Showing total sheet and
crease.
Total counter of sheet
Total counter of crease
Keep Scrolling by pressing Page Down Key , Showing machine serial
number and software version.
Ver.: Software version Nr,
S/N: Serial Nr, factory setting, it
cannot be overwritten unless main
board is changed
Keep Scrolling by pressing Page Down Key ,turning to Ready Screen.
Note: As for the Warranty and Maintenance, the following information is
essential: Machine S/N, Software Version, Total Crease and Total Sheets.
Namely, press Page Up Key for 2 times from main ready screen.

Auto creaser
14
MC-35A
6.2.3 input Crease Data Screen
Initially in this Mode, cursor flashes in Line 1), (which means data can be
input), input the data , from 0-650.0,accurate to one decimal place.
Press ENTER, cursor turns from 1) to the next line, namely line 2) and flashes
in line 2).Input a data, press ENTER. cursor turns from 2) to the next page,
namely line 3) and flashes in line 3). The rest can be done in the same manner.
Note: 1. Each value has to be greater than last value.
2. If all 6 lines are needed, after we Enter the 6th data, screen will
automatically jump to MODE 1, page 1. Input finished.
If less than 6 line is needed, after we finish the last data (say, the 3rdline ),
Enter, Line[4] flash, press ENTER again when line[4] is 0, screen will
jump to main operation mode, input finished.
6.2.4 read Crease Data Screen
Press TEST Key and feed one sheet. Machine will read the data by
scanning the mark. Then go back to Ready Screen.
Note: In this mode, machine only read data as per register mark not creasing.
6.2.5 Read and Test Screen
Press TEST Key and feed one sheet. Machine will read the data by
scanning the mark and Crease at the same time. Then go back to Ready
Screen.
Note: In this mode, you can check the crease position is correct.

Auto creaser
15
MC-35A
6.2.6 cover Hinge Screen
This is a mode specially for book covers make. Following are 2 pages of
this mode, in which you can input 2 parameters. SPINE and THK, Spine
means the first spine line to the leading edge, THK means the thickness
of the book, namely the spine width.
Then it will go back to Ready Screen:
2 parameters leads to 4 line, the other 2 is 8mm outside of 2 spine lines as
hinge lines. Following drawing illustrates:
10
200
Feeding Direction

Auto creaser
16
MC-35A
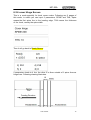
6.2.7 progressive Screen
Input 1 and Enter, it means turning off progressive function and goes back to
Ready Screen:
0 0
Input 2 and Enter, it means active progressive function. Screen will jump as
following to setting for the progressive crease:
Progressive Type
Inc: Increase Type; Dec: Decrease Type
I &D: Increase and Decrease Type
V: V-shape Type
Progressive crease performance is shown as above, it contains 4 types.
And each job has 4 basic parameters:
1. Progressive type: Inc(+)/Dec(-)/I&D(±)/V(V).
2. Initial: Initial Position
3. Depth: Unit for Progressive type crease.
4. Sheet: Total sheets for Progressive type crease
Total sheets in one batch. But machine will
keep running unless pressing Stop Key
It means job is Inc type Progressive crease, starts from 1mm increase by 1mm
and runs for 2 sheets.

Auto creaser
17
MC-35A
Feeding Direction
If all the sheets creased on
same position, the
bounded book cannot be
turned over lay flat like this
drawing.
With 3 kinds of crease
mode, even thick paper
can be turned over very
easily and lay flat after
binding.
The illustration for V-shape is as following
Define the first position and crease gap and the qty in one
batch, the first page will be one line as reference, and following
sheets will be 2 creases that goes further successively to the
reference line.

Auto creaser
18
MC-35A
In this way the book can be folded with a square back after saddle
stitched Affection of above 4 parameters are as above drawings
6.2.8 feed Mode Screen
User can choose Auto feeding mode or Manual feeding mode,
Press 1 to choose Auto or 2 to choose Manual, the chosen has a * symbol
beside, Press , it is selected.
In Auto Mode,user put a thick stack on loading table, after press START button,
loading table rise, after the top paper touch the Stack height sensor, feeding
system work.
In Manual Mode.user does not put stack on loading table, after press start
button, table will rise,and it stops after the stack height sensor is triggered.
User could feed paper one by one into the machine under the friction of the
belt.
6.2.9 recall Job Screen
Recall a job, you have already save a job inside firstly. About how to save job
referred to 6.2.10.1.
6.2.9.1!How!to!Recall!Job?!
a. Press Mode Key 7 times to go to Recall Job Screen, seeing following
screen.
b. Input a number between 1-30 (10 as per following example.).
La page est en cours de chargement...
La page est en cours de chargement...
La page est en cours de chargement...
La page est en cours de chargement...
La page est en cours de chargement...
La page est en cours de chargement...
La page est en cours de chargement...
La page est en cours de chargement...
La page est en cours de chargement...
La page est en cours de chargement...
La page est en cours de chargement...
La page est en cours de chargement...
-
 1
1
-
 2
2
-
 3
3
-
 4
4
-
 5
5
-
 6
6
-
 7
7
-
 8
8
-
 9
9
-
 10
10
-
 11
11
-
 12
12
-
 13
13
-
 14
14
-
 15
15
-
 16
16
-
 17
17
-
 18
18
-
 19
19
-
 20
20
-
 21
21
-
 22
22
-
 23
23
-
 24
24
-
 25
25
-
 26
26
-
 27
27
-
 28
28
-
 29
29
-
 30
30
-
 31
31
-
 32
32


Magnum MC-35A Product Instruction Manual
- Taper
- Product Instruction Manual
dans d''autres langues
- English: Magnum MC-35A
Autres documents
-
Martin Yale Martin Yale 1611 AutoFolder Paper Folding Machine Manuel utilisateur
-
Duplo DocuCutter CC-228 Operational Manual
-
-
Miller KH339697 Le manuel du propriétaire
-
Miller JK721125 Le manuel du propriétaire
-
-
-
-
Miller PROHEAT 35 CE 907271, 907298, 907432 Le manuel du propriétaire
-