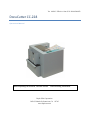
Duplo DocuCutter CC-228 Operational Manual
- Taper
- Operational Manual

Ver. 042013 Effective from S/N 881041304078
DocuCutter CC-228
Operational Manual
Before operating the machine, read this manual. Follow all safety precautions.
Duplo USA Corporation
3050 S. Daimler St, Santa Ana, CA 92705
www.duplousa.com

Page 2
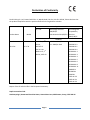
Declaration of Conformity
PrintFinishing Co. Ltd., located at 625 Sec. II, Wende Road, Hsin-Pu, Hsin-Chu 30500, Taiwan declares that
the product compliances with the provision defined in the regulations as below.
Product Name
Model
Regulation
UL / CSA Low Voltage Directive
2006/95/EC
RoHs Directive 2011/65/EU
Electromagnetic
Compatibility
Directive
2004/108/EC
Standard
DocuCutter
Ultra Cut
CC-228
UC-1`30
UL60950-1, 2
nd
Edition,
2007-03-27
CSA 22.2 No
60950-1-07, 2
nd
Edition, 2007-03
EN60950-1: 2006/
A11: 2009/A1:2010
EN61000-3-2
EN61000-3-3
EN61000-6-2
EN61000-6-4
IEC61000-4-2
IEC61000-4-3
IEC61000-4-4
IEC61000-4-5
IEC61000-4-6
IEC61000-4-8
IEC61000-4-11
EN60950-1
IEC60950-1
EN50581
CISPR 16-2-3
CISPR 16-2-1
CISPR 16-2-2
Keeper of the CE technical file in the European Community:
Duplo International Ltd.
Hanskampring 6, Automated Precision House, Hamm Moor Lane, Addlestone, Surrey, KT15 2SD UK

Page 3
Table of Contents
Declaration of Conformity. ……………………………………………………………………………………………………………………………………..3
Safety Pecaution ………………………………………………………………………………………………………………………………………………4
Introduction……………………………………………………………………………………………………………………………………………………….……6
Specifications…………………………………………………………………………………………………………………………………………………….…….6
Accessories……………………………………………………………………………………………………………………………………………………………..6
Major Components and Assemblies…………………………………………………………………………………………………………………….….7
Control Panel……………………………………………………………………………………………………………………………………………………………9
Installation……………………………………………………………………………………………………………………………………………………………….10
Setting Up Procedure……………………………………………………………………………………………………………………………………………….11
The Job Selection…………………………………………………………………………………………………………………………………………………....12
Job Layout………………………………………………………………………………………………………………………………………………………………..13
Selecting a Job………………………………………………………………………………………………………………………………………………………….14
Batch Count……………………………………………………………………………………………………………………………………………………………..14
User Define Job………………………………………………………………………………………………………………………………………………………..15
Cut Mark………………………………………………………………………………………………………………………………………………………………….16
Turbo Mode……………………………………………………………………………………………………………………………………………………………..16
Empty the Waste Bin………………………………………………………………………………………………………………………………………………..16
Reset Counter…………………………………………………………………………………………………………………………………………………………..16
Clear Jam………………………………………………………………………………………………………………………………………………………………….16
Error Message and Trouble Shooting Guide……………………………………………………………………………………………………………...17

Page 4
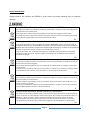
SAFETY PRECAUTIONS
Always observe the cautions and wBatch s given below to prevent personal injury or property
damage.
Disposal of Waste Electrical and Electronics Equipment (WEEE)
This symbol (the symbol of the crossed out wheeled bin) indicates that in European countries this product should
not be disposed of as household waste.
Please recycle where facilities exist by checking with your local authority or supplier for recycle advice.
By ensuring this product is disposed of correctly through proper treatment, recovery and recycling, you will help
prevent potential negative effects on the environment and human health.
En
Entsorgung von alten elektrischen und elektronischen Ausrüstungsteilen
Dieses symbol (das Symbol mit dem durchgekreuzten fahrbaren Müllbehälter) zeigt an, dass dieses Produkt in
europäischen Länden nicht als Haushaltsmüll entsorgt werden, darf, Bitte informieren Sie sich bei lhren örtlichen
Behörden oder bei Ihren Händler hinsichtlich einer Empfehlung fü
r die Entsorgung und führen Sie die betreffenden
Teile dort, wo solche Einrichtungen vorhanden sind, einem Recycling-Prozess zu.
Indem sie sicherstellen, dass das betreffende Produkt durch richtige Behandlung, Rückführung und Recycling
entsorgt wird, tragen Sie dazu bei, möglichen negativen Auswirkungen auf die Umwelt und die menschliche
Gesundheit vorzubeugen.
Ge
Elimination du matériel électronique et électrique usagé
Ce symbole (une poubelle marquée d’une croix) indique que dans les pays européens, ce produit ne doit pas étre
éliminé comme des ordures ménagéres.
Recyclez-le dans les sites adaptés qui vous seront indiqués par les autorités locales ou reseignez-vous auprés de
votre fournisseur.
En veillant à ce que ce produit soit éliminé correctement avec un traitement, une collecte et un recyclage adaptés,
vous contributez à éviter son action nocive potentielle sur I’ environnement et santé humaine.
Fr
Smaltimento di attrezzature elettriche ed elettroniche consummate
Questo simbolo (il simbolo della pattumiera con rotelle barrata) indica che nei paesi europei questo prodotto non
deve essere buttato nei rifiuti domestici.
Per favore smaltire in luogo addetto al riciclo, dove esistente, chiedendo informazioni alle autorità locali o a chi
fornisce consulenza a proposito.
Garantendo uno smaltimento adeguato di questo prodotto (trattamento, recupero e riciclo correto), aiuterete a
prevenire effetti negativi sull’ambiente e sulla salute dell’uomo.
It
Eliminación de residuos de aparatos eléctricos y electrónicos
Este símbolo (un cubo de basura tachado) indica que en los paises europeos este producto no deberá eliminarse
como si se tratara de un residuo doméstico. Solicite asesoramiento sobre reciclaje a las autoridades locales o a su
distribuidor, y siga la normativa en materia de gestión medioambiental y reciclaji de este tipo de residuos.
Si toma las medidas pertinentes para que este producto se elimine mediante un tratamiento, recuperación y
reciclaji adecuados, contribuirá a evitar posibles efectos negativos en el medio ambiente y la salud humana.
SP

Page 5
WEEE information (for Europe)
As a minimum the following substances, preparations and components has to be removed from any
separately collected WEEE (Waste Electrical and Electronics Equipment).
In this parts catalogue, these WEEE symbols are appended to corresponding parts in this parts catalogue.
WEEE Symbol Meaning
ABS
(Poly Acrylonitrile Butadiene Styrene) Plastic Material
LCD
LCD Displays
Cables
Electric Cables
Battery
Batteries
PCBA
PCB’s over 10 square centimeters in size
Bromides
Plastic Containing Bromides
In considering of separate collection, plastics are subdivided into the following categories.
In this parts catalogue, these abbreviations are appended to corresponding parts in the parts catalogue.
Abbreviation Category
ABS
(Poly Acrylonitrile Butadiene Styrene) Plastic Material
NBR
Nitrile Rubber (Acrylonitrile-Butadiene Rubber)
PC
Polycarbonate
POM
Polyoxymethylene
PVC
Polyvinyl Chloride
PU
Polyurethane
EPDM
Synthetic Rubber
Mar
Marprene
Nylon
Nylon 6
IXEF
Fiber Glass
TEF
Teflon
POA
PolyAcetal

Page 6
INTRODUCTION
The Docucutter CC-228 is designed to simplify business card, photo and post card cutting in letter size
which printed by digital press, color laser printer or inkjet image printer in one pass.
SPECIFICATIONS
Paper Size LT / Legal Size/ 9” x 14” (Max)
Paper Weight 120gsm ~ 350gsm
Feeder Capacity
75 sheets (200gsm)
Receiving Tray 500 business cards
Speed Up to 130 business cards per min
Accuracy ± 0.3 mm
Dimension 13.8” (W) x 15.4” (D) x 13” (H)
Net Weight 60 lbs (27Kgs)
Power 115/23D0V Selectable, 50/60Hz, 1.2A
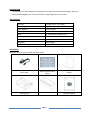
ACCESSORIES
Make sure all accessories provided with the machine.
Power Cord
Advance Control Panel
Sticker
Divider
Stacking Tray
Waste Bin
Operation Manual

Page 7
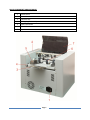
MAJOR COMPONENTS AND ASSEMBLIES
1 Power Switch
2 Control Panel
3 Extended Tray
4 Slitting Registration Adjustment
5 Paper Feed Guide
6 Feed Rollers
7 Top Cover

Page 8
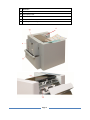
8 Waste Bin
9 Stack Tray
10
Rear Safety Cover
11
Slitter Thumb Release Knob
12
Slitter Module
13
Feed Tray Pressure Adjustment
13

Page 9
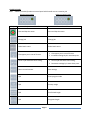
CONTROL PANEL
Note: A label is provided for advance control panel which enable user to customize job.
Simple Control Panel Advance Control Panel
Keys Simple Control Panel Advance Control Panel
Start and Stop the cutter Start and Stop the cutter
Change job Change job
Select batch count Select batch count
Clear paper jam in case of S3 error.
1. Clear paper jam in case of S3 error.
2. Increment settings by 0.1 mm when press.
Confirm job and batch count setting.
1. Confirm job and batch count setting.
2. Decrement settings by 0.1mm when press.
Rest error and counter. Save settings
N/A Enter program mode
N/A Set top margin
N/A Set finished length
N/A Set gutter length

Page 10
INSTALLATION
Note: No tool is required for installation.
Waste Bin
Slide the waste bin into the slot. Make sure waste
bin is all the way inside.
Stack Tray
Hook the tray onto the mounting slot on the
machine. Refer to the picture.
Power Cord
Use caution when plug in power cord. Plug power
cord to the machine and plug the other end into the
wall outlet.
Advance Control Panel
The CC-228 has 6 predefine job. The advance
control panel is for custom program. If needed,
peel of the sticker and stick to the control panel as
shown.
Mounting
Slot

Page 11
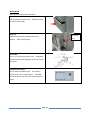
SETTING UP PROCEDURE
1
To set the width of paper,
loosen thumbscrew knob
on the side guide and slide
to position. Use marking
as reference point.
2
Fan paper before loading.
This will reduce static and
toner adhesion due to
printing. For best result,
the paper stack should be
flat.
3
Push the feed tray down
and load the paper.
Readjust paper guide if
needed.
4
Adjust tray pressure. For
thinner paper, the number
should be higher. For
heavier paper the number
should be lower.
Thumbscrew knob
Paper feed guide
Markings

Page 12
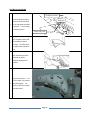
5
Use slitter registration
adjustment knob to
compensate for printing
registration. The knob will
allow ± 2mm of adjustment.
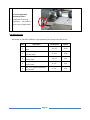
THE JOB SELECTION
DocuCutter CC-228 offers 6 different types predefined job selection from #01 to # 05
Job #
Description Finished Size Layouts
1
#01, 2” x 3.5” business card with
mark
2” x 3.5” 10 up
2
#02, 2” x 3.5” gutter cut business
card with mark
2” x 3.5” 10 up
3
#04, 3.5” x 5” gutter cut business
card no mark
3.5” x 5” 4 up
4
#05, 8” x 4” gutter cut business
card no mark
8” x 4” 3 up
5
#06, 7” x 5” gutter cut business
card no mark
7” x 5” 2 up

Page 13
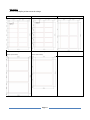
JOB LAYOUT
Job 1-5 are predefine job that cannot be change.
Job#1 - Business card with or without cut mark. Job#2 - Business card with or without cut mark. Job#3 - 3.5 x 5 card with gutter cut.
Job#4 – 8 x 4 card with gutter
(Require Optional Slitter).
Job#5 – 7 x 5 card with gutter cut
(Require Optional Slitter).

Page 14
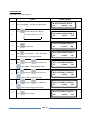
SELECTING A JOB
Actions Display Example
1 Turn on the power. Previous job will appear.
2
Press until the desire job is display.
01 → 02 → 03 → 04 … 12
3
Press to select job
4
Press to start operation.
BATCH COUNT FUNCTION
Batch count function is use to automatically stop the machine after a set count of paper has been fed.
Actions Display Example
1
Press until the desire batch count
number appears. The batch count will
increment by 10 every time the button is
pressed. Set “OFF” for no batch count.
OFF → 10 → 20 → 30 → 40 → 50
2
Press to select batch count.
3
Press to start operation.
# 1 L 50.8M19.0G00.0
(
N
)
count 23
# 4 L127.0M12.7G 6.3
(
N
)
count 23
# 4 L127.0M12.7G 6.3
(
N
)
count 23
# 4 L127.0M12.7G 6.3
(
N
)
count 23
# 4 L127.0M12.7G 6.3
(
N
)
batch
50
# 4 L127.0M12.7G 6.3
(
N
)
batch
50
# 4 L127.0M12.7G 6.3
(
N
)
count 23

Page 15
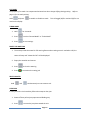
USER DEFINE JOB
Only job# 7 – 12 can be program.
Actions Display Examples
1 Turn on the power. Previous job will appear.
2
Press until the desire job is display.
01 → 02 → 03 → 04 … 12
3
Press to select job.
4
Hold for 4 seconds. “Edit” will appear
indicating machine in “Program Mode”.
5
Hold and press to increment or
to decrement change finished length.
6
Hold and press to increment or
to decrement change top margin.
7
Hold and press to increment or
to decrement change gutter length.
8
Press to save settings.
# 4 L127.0M12.7G 6.3
(
N
)
batch
50
#10 L000.0M00.0G00.0
(N) count 89
#10 L000.0M00.0G00.0
(N) count 89
#10 L000.0M00.0G00.0
(E) count 89
#10 L127.0M00.0G00.0
(E) count 89
#10 L127.0M12.7G00.0
(E) count 89
#10 L127.0M12.7G06.0
(E) count 89
#10 L127.0M12.7G06.0
(N) count 89

Page 16
CUT MARK
The purpose of cut mark is to compensate horizontal cut due to image shifting during printing. Refer to
page 11 for cut mark printing.
Hold and press to enable or disable cut mark. This will toggle (M) for mark and (N) for not
mark on the display.
TURBO MODE
1. Hold for 4 seconds.
2. Press to select “Normal Mode” or “Turbo Mode”.
3. Press to save settings.
EMPTY THE WASTE BIN
1. The cutter provide the waste bin full warning feature when cutting count is reached to 150, the
cutter will stop and “ Waste Bin Full” will be displayed.
2. Empty the waste Bin and restore.
3. Press to clear the warning.
4. Press to continue the cutting job.
RESET COUNTER
Hold and simultaneously to reset counter to 0.
CLEAR JAM
In case jam occurs in the machine follow these steps to clear jam.
1. Power off then pull out jam paper toward feeding tray.
2. Press to move the jam piece toward the exit.

Page 17
3. If necessary, depending on location of jam occurs, open the corresponding cover or covers. If jam
persists, refer to “Error Message and Trouble Shooting Guide”.
4. After clearing the jams, press to clear all errors.
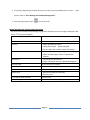
ERROR MESSAGE AND TROUBLE SHOOTING GUIDE
Any error occur the beeper keep beeping to remind the operator, the error message is displayed in low
box on 2
nd
line of the LCD display.
Error Message Displayed
Trouble Shooting
Out of paper Feed tray empty
miss feed 1. Adjust the feed tray tension
2. Side guide too tight. Adjust side guide.
3. Fan the paper and re load the paper into hopper
jam sensor 2 1. Remove the paper jam by pulling toward stacking tray.
2. Adjust the feed hopper tension, if double feed
happens
jam sensor 3 1. Use JOG key to clear the jam
2. Adjust feed hopper tension, if double feed happens
check top cover Put the top cover in position
check rear cover Put the rear cover in position
check waste bin Put the waste bin in position
waste bin full 1. Remove and empty the waste bin
2. Reset the error
Finish card not clean and neat Call for service
Error message cannot reset Check covers, waste bins and paper jam
-
 1
1
-
 2
2
-
 3
3
-
 4
4
-
 5
5
-
 6
6
-
 7
7
-
 8
8
-
 9
9
-
 10
10
-
 11
11
-
 12
12
-
 13
13
-
 14
14
-
 15
15
-
 16
16
-
 17
17


Duplo DocuCutter CC-228 Operational Manual
- Taper
- Operational Manual
dans d''autres langues
- English: Duplo DocuCutter CC-228