Watts A2C-SC, A2C-SC-WB Guide d'installation
- Taper
- Guide d'installation

IS-A2C-SC-IntelliFlow
Installation Instructions
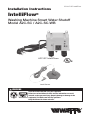
IntelliFlow
®
Washing Machine Smart Water Shutoff
Model A2C-SC / A2C-SC-WB
Leak Sensor
A2C-SC IntelliFlow
®
Read this Manual BEFORE using this equipment.
Failure to read and follow all safety and use information can result
in death, serious personal injury, property damage, or damage to the
equipment. Visit Watts.com with any questions.
Keep this Manual for future reference.
WARNING
!

2
IS-A2C-SC-IntelliFlow 2102 © 2021 Watts
NOTICE
This unit is not compatible with 240VAC powered washing machines or combination wash-
er/dryers that are 240VAC powered. A Watts A2-IntelliTimer (purchased separately)
may be used with the IntelliFlow
®
with washing machines or washer/dryers that are
240VAC powered. (See page 5).
*This valve requires a 120VAC, 60 Hz,
20 amp ground fault protected circuit.
*Ground Fault Interrupter – A GFI circuit is not required for proper
operation of the IntelliFlow
®
, but is strongly recommended as a safety device.
Surge Protection – Although a surge protector is not required for proper
operation of the IntelliFlow, it is strongly recommended, especially in areas
where power surges or lightning strikes frequently occur.
WARNING
!
Table of Contents
Operating Instructions ...................................................... 3
Setting Up and Registering your Connected IntelliFlow
®
............................ 4
Operating Specifications .................................................... 5
Installing the A2C-SC IntelliFlow
®
.............................................6-7
Installing the IntelliFlow
®
Wall Box Unit (A2C-SC-WB) .............................8-9
Installing the Watts Model A2-LS Leak Sensor ................................... 10
Troubleshooting Guide ..................................................... 11
Accessories: Watts A2-IntelliTimer ............................................ 12
Front Panel Status Indicators ................................................ 13
IntelliFlow
®
Retrofit Kit Options ............................................... 14

3
IS-A2C-SC-IntelliFlow 2102 © 2021 Watts
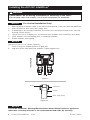
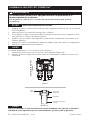
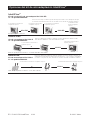
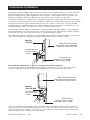
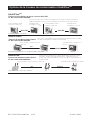
Model
A2C-SC
From
washing
machine
Electrical
power source
ground fault
protected
Water supply
One for cold
One for hot
Model
A2C-SC-WB
From
washing
machine
Electrical
power source
ground fault
protected
Water supply
One for cold
One for hot
1
⁄2" solder connectors for exposed piping
Standardly furnished with
1
⁄2" solder copper adapters. Either connection may be used for
the hot or cold water supply.
Includes wall mount box. Wall mount box has water inlet connection holes spaced 2
3
⁄8"
center to center. Furnished with
1
⁄2" solder connectors. Either connection may be used for
the hot or cold water supply.
Operating Instructions
The Series A2C-SC IntelliFlow® Washing Machine Smart Water Shutoff senses your wash-
ing machine’s current flow and shuts off the water supply if an inlet hose bursts. It can also
connect to your local WiFi network to send you real-time text and email alerts in the event of
a leak.
The IntelliFlow is equipped with a state-of-the-art electric current sensing device. When
a wash cycle is started, the IntelliFlow senses the electric current flowing to the washing
machine and opens the supply of water to the washing machine. Once the full wash cycle is
complete, the device senses the low current and closes the water inlet valves, which remain
closed until the machine is used again.
The floor-mounted leak sensor provides additional protection from water damage while the
washing machine is in use. When water is detected at the sensor, water flow to the washing
machine hose is immediately shut off.
By installing an IntelliFlow, you’re helping to protect your home from potential major water
damage from a burst or leaking washing machine inlet hose.

4
IS-A2C-SC-IntelliFlow 2102 © 2021 Watts
Setting Up and Registering your Connected IntelliFlow
®
Before beginning this procedure, ensure that there is both power and WiFi available to the
IntelliFlow unit. In the event that no WiFi is enabled, your IntelliFlow unit will still protect from
leaks as long as it is powered on. It can be registered at a later time.
Install the IntelliFlow unit in accordance with the installation instructions previously listed.
First, power the device on and wait for the blue light to start blinking. To
begin the connection process, on your device, scan for new WiFi networks
and select SSID WattsDeviceSetup-xxxxx. In order to connect to the net-
work, enter password “intelliflow”.
Next, scan the QR code on the product hang tag / outlet sticker. If these
are missing or removed, visit http://10.10.0.1/ to proceed with set up.
The set up process is a 4-step procedure.
These steps must be completed sequentially.
1. Product Registration – This step registers your Connected IntelliFlow.
a. Required Information: Full name, States/Province, ZIP/Postal Code
b. Optional Information: Full address
2. Washing Machine – This step sets up your washing machine profile.
a. Select the voltage supplied to your washing machine.
b. Optionally, enter the Brand and Model Number for your washing machine.
3. Notifications – This step will enable the Connected IntelliFlow to send notifications in the
event a leak is detected.
a. Required information: Email address
b. Optional information: Mobile phone number
4. Connect – This step will connect your Connected IntelliFlow to the WiFi network of your
choosing.
a. Select the WiFi network you wish to connect to. Please ensure that the WiFi is 2.4
Ghz. IntelliFlow doesn’t support 5 Ghz networks.
i. If your network does not appear, it can be entered manually by selecting “Other
Network.”
ii. Enter WiFi network name.
b. Enter your WiFi network password.
Upon completion of the 4th step, your Connected IntelliFlow will send a test notification to
the email address and optional mobile phone number specified in step 3.
To reset your Connected IntelliFlow and clear all stored WiFi network and notification infor-
mation, hold down the black button on the front of the unit for 10 seconds. The above
set-up procedure can then be completed to re-register your Connected IntelliFlow.
If you do not want to connect the IntelliFlow to a WiFi network, press and hold the
black reset button for 3 seconds to disable WiFi connectivity. WiFi can be re-en-
abled by holding the reset button for 3 seconds. If the IntelliFlow has been registered
prior to disabling WiFi, the device will automatically re-connect upon re-enabling WiFi if the
registered WiFi network is active with same password.

5
IS-A2C-SC-IntelliFlow 2102 © 2021 Watts
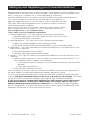
Operating Specifications
Electrical Rating: 120VAC, 60 Hz
Circuit Breaker Requirements: 20A GFI*
Max. Appliance Current Rating: 15A
Current Draw: 20mA (with appliance off)
Electrical Cord: 6 ft. type SJT 14 AWG
Max. Temperature: 180°F (82°C)
Max. Pressure: 150psi (10.3 bar)
Max. Operating Pressure Differential: 80 psi (5.5 bar)
Valve Body: Reinforced Polysulfone
Rubber Goods: Buna-N, EPDM
*Ground Fault Interrupter – A GFI circuit is not required for proper operation of the IntelliFlow,
but is strongly recommended as a safety device. In accordance with National Electric Code,
NFPA 70, Section 210.11 Branch Circuits Required, at least one 20-ampere branch circuit shall
be provided to supply the laundry receptacle outlets(s) required by Section 210.52(F). This circuit
shall have no other outlets.
WARNING
!
*Surge Protection – Although a surge protector is not required for proper operation of the
IntelliFlow, it is strongly recommended, especially in areas where power surges or lightning strikes
frequently occur.

6
IS-A2C-SC-IntelliFlow 2102 © 2021 Watts
Power MUST be off during installation or servicing of the valve!
Do not plug valve into supply circuit until completion of assembly.
Installing the A2C-SC IntelliFlow
®
1. Shut off electrical power supply to the electrical receptacle to be used with the IntelliFlow.
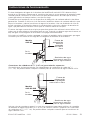
2. Shut off both hot and cold water supply lines.
3. If retrofitting to an existing installation, disconnect the washing machine hoses from the
existing shutoff valve(s).
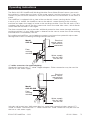
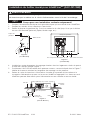
4. Loosen the two (2) adapter nuts and remove both adapters from IntelliFlow valve body.
5. Place adapter nuts over piping prior to soldering adapters.
6. Solder adapters onto piping.
NOTICE
Piping must be 2
3
⁄8" on center (Figure 3).
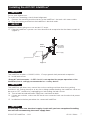
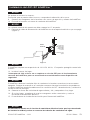
7. Place O-rings on adapter grooves (Figure 3A).
8.
Align and slip the valve body over adapters. Tighten adapter nuts.
NOTICE
For Vertical Installation Only!
Figure 3
2
1
⁄2"
Install Upright
Figure 3A
O-Ring
Adapter Nut
Adapter
Water Supply Piping
NOTICE
Use of the IntelliFlow
®
Washing Machine Smart Water Shutoff outlet for appliances
other than a washing machine is not recommended and voids the warranty.
WARNING
!

7
IS-A2C-SC-IntelliFlow 2102 © 2021 Watts
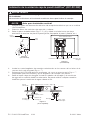
Installing the A2C-SC IntelliFlow
®
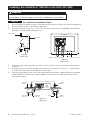
Figure 4
Power supply
ground fault
protected
Water supply
Washer
Watts
A2C-SC
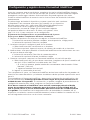
NOTICE
Do not plug valve into electrical supply circuit until you have completed installing
the unit and reconnecting the water supply lines.
NOTICE
Do not over-tighten nuts.
To avoid cross threading, check thread alignment.
9. Connect the washing machine hoses to the IntelliFlow’s hot and cold water outlets.
10. Plug the washing machine into the IntelliFlow’s electrical outlet.
NOTICE
Appliance current rating must not exceed 15 amps.
11. Plug the IntelliFlow’s power cord into the electrical receptacle that has been turned off
(Figure 4).
NOTICE
The IntelliFlow requires a 120VAC, 60Hz, 15 amp ground-fault protected receptacle.*
12. Install leak sensor.
*Ground Fault Interrupter – A GFI circuit is not required for proper operation of the
IntelliFlow, but is strongly recommended as a safety device.
NOTICE
The IntelliFlow will detect any current flow to the washing machine when the washing
machine is off. During startup or at any time during troubleshooting, the IntelliFlow valve can
be reset to OFF condition by unplugging and reinstalling the leak sensor.
13.
Turn on both hot and cold water supply lines, and check for leaks.
14. If there are no leaks, make sure the hoses are connected and turn the electrical power
back on.
15. Installation/activation procedure for connected IntelliFlow.

8
IS-A2C-SC-IntelliFlow 2102 © 2021 Watts
Power MUST be off during installation or servicing of the valve!
Do not plug valve into supply circuit until completion of assembly.
NOTICE
For Vertical Installation Only!
Installing the IntelliFlow
®
Wall Box Unit (A2C-SC-WB)
1. Shut off electrical power supply to the electrical receptacle to be used with the IntelliFlow.
2. Shut off both hot and cold water supply lines.
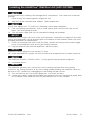
3. Remove trim plate (Fig. Nos. 5 & 6) and set aside until you’ve completed wall finishing
(painting, wall papering, paneling, etc.).
4. Install the four mounting tabs provided in slots on the sides of the wall box enclosure
(Fig. No. 7).
5. Position the A2C-SC-WB between the wall studs as shown in Fig. No. 7. Check that it
is level and fasten the mounting tabs to the studs.
6. Remove drain plug knock out. Install drain piping and water supply piping to the appro-
priate IntelliFlow connection. Either IntelliFlow connection may be used for the hot or
cold water supply.
Figure 6
(front view)
Trim Plate
Water supply connections Drain connection
U
L
R
LISTED
3P47
Figure 7
(top view)
Finished
Wall
Wall
Studding
Drain
Knockout
Drain
Trim Plate
Mounting
Slots (4)
Mounting
Tabs (4)
16" on center – Typical
WARNING
!
Figure 5
(side view)
Trim Plate
Wall Box

9
IS-A2C-SC-IntelliFlow 2102 © 2021 Watts
Installing the IntelliFlow
®
Wall Box Unit (A2C-SC-WB)
NOTICE
Excessive heat from soldering can damage plastic components. Use a heat sink to prevent
damage.
7. Place O-rings on adapter grooves (Figure No. 3A).
8.
Align and slip the valve body over adapters. Tighten adapter nuts.
NOTICE
Do not over tighten nuts. To avoid cross threading, check thread alignment.
9. Prior to installing wall materials, turn on water supply (both hot and cold) and test for
leaks. Test drain piping for leaks.
10. Turn off water supply until you’ve completed installing wall materials.
NOTICE
Installation must comply with local codes and ordinances. Inspection and approval of installa-
tion by local authorities may be required prior to installation of wall material. Check with local
plumbing authorities for requirements.
11. Once you’ve finished the wall, install trim plate, connect washing machine water supply
hoses to the IntelliFlow valve and to the washing machine.
12. Plug washing machine into the IntelliFlow’s electrical outlet.
NOTICE
Appliance current rating must not exceed 15 amps.
13. Insert the IntelliFlow’s power cord into the electrical receptacle that has been turned off
NOTICE
The IntelliFlow requires a 120VAC, 60Hz, 15 amp ground-fault protected receptacle.*
14. Install leak sensor.
NOTICE
The IntelliFlow will detect any current flow to the washing machine when the washing
machine is off. During startup or at any time during troubleshooting, the IntelliFlow valve can
be reset to OFF condition by unplugging and reinstalling the leak sensor.
15. Turn on both hot and cold water supply lines, and check for leaks.
16. If there are no leaks, make sure the hoses are connected and turn the electrical power back
on. Installation of the IntelliFlow A2C-SC-WB Wall Box Unit is now complete.

10
IS-A2C-SC-IntelliFlow 2102 © 2021 Watts
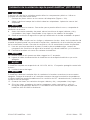
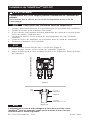
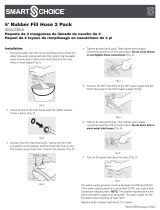
Installing the Watts Model A2-LS Leak Sensor
Description
The Watts Model A2-LS Leak Sensor plugs into the receptacle on the front panel of the
Watts IntelliFlow Series A2C-SC / A2C-SC-WB. The base of the sensor is placed on the
floor close to the washing machine. Upon detection of water at the sensor, the IntelliFlow
immediately shuts off the water supply to the washing machine hoses in order to prevent
catastrophic water damage.
Installation
1. Insert the leak sensor contacts into the two holes on the top of the sensor base until the
plug comes to a stop (Figure 2).
2. Place the sensor base on the floor behind the washing machine as close to the fill hoses as
possible. Ensure that the sensor base is lying flat with all feet in contact with the floor sur-
face.
3. Insert the leak sensor plug (Figure 1) into the leak sensor receptacle on front panel
(Figure 2).
Note: Some washing machine models include circuitry that causes a slight current draw at all
times. These models when connected to the IntelliFlow can cause the water supply to
be energized continuously (Yellow LED: ON). The IntelliFlow can be reset by unplugging
and reinstalling the leak sensor.
Sensor Base
Sensor Contacts
Figure 1
Sensor Plug
Figure 2

11
IS-A2C-SC-IntelliFlow 2102 © 2021 Watts
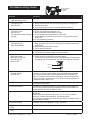
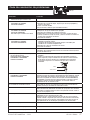
PROBLEM SOLUTION
1. No water flow from either hot or
cold water supply hose:
1a. MULTI COLOR LED: Green/Blue
YELLOW LED: OFF
RED LED: OFF
1. Plug washing machine into IntelliFlow and turn on washing machine.
2. Unplug the leak sensor, wait for the blinking red light and replug it in.
3. Start the wash cycle.
4. If not working, confirm that the washing machine is working
1b. MULTI COLOR LED: Green/Blue
YELLOW LED: OFF
RED LED: ON
This indicates that the valve did
not open
1. Leak sensor has detected water.
2. Ensure that the washing machine is off
3. Unplug IntelliFlow from the electrical outlet
4. Check for broken or leaking hoses or water leaks
5. Correct problem, dry off the sensor, then re-insert plug into outlet to
reset valve.
6 Turn on the washing machine.
1c. MULTI COLOR LED: Green/Blue
YELLOW LED: OFF
RED LED: BLINKING
1. IntelliFlow/IntelliTime internal timing circuit has timed out.
When the Yellow LED is Off, turn off the washing machine to reset the
timing circuit.
2. Unplug and then plug back in sensor.
3. Turn on washing machine.
1d. ALL LEDs OFF 1. Plug IntelliFlow into electrical outlet.
2. Check electrical outlet for power (reset ground fault).
2. No water flow from one hose -
(either Hot or Cold):
MULTI COLOR LED: ON
YELLOW LED: ON
RED LED: OFF
1. Service strainers on washing machine hoses.
2. Service strainers on IntelliFlow (see figure below).
Caution prior to servicing strainers, first remove power to IntelliFlow by
unplugging, then shut off both hot and cold water supply to IntelliFlow.
3. MULTI COLOR LED: ON
YELLOW LED: ON
RED LED: OFF
Some washing machine models include circuitry that causes a slight cur-
rent draw at all times. These models when connected to the IntelliFlow
can cause the water supply to be energized continuously (Yellow LED:
ON). The IntelliFlow can be reset by unplugging and reinstalling the leak
sensor. If this does not resolve this issue, the use of the A2 IntelliTimer is
required with the system in use.
4. Unit feels warm This condition is normal. Internal operating temperatures may cause unit
to feel warm to the touch.
5. Unit cycles ON/OFF Installation in a horizontal position can cause abnormal overheating of
the unit which causes this cycling condition. Unit must be installed in an
upright position as shown on pages 2 and 3.
6. Can’t connect to WiFi Network Check if WiFi is 2.4 GHz. IntelliFlow is not compatible with
5 GHz WiFi.
Make sure that the Multicolor LED is Blue. If it isn’t, press & hold the
button for 3 seconds to enable Wi-Fi (Blue/blinking blue).
Ensure there is sufficient WiFi signal strength, and for any firewall issues
blocking communication.
7. RED LED Blinking Indicates sensor is not plugged in. Plug in the sensor.
8. MULTI COLOR LED Blinking
BLUE
Check internet connectivity on your router.
9. MULTI COLOR LED Blinking
RED
Call Watts Technical support.
Troubleshooting Guide
Strainer
O-Ring
Multi color LED
Yellow LED
Red LED

12
IS-A2C-SC-IntelliFlow 2102 © 2021 Watts
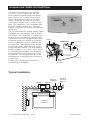
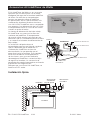
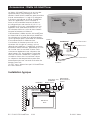
Accessories: Watts A2-IntelliTimer
The Watts A2-IntelliTimer is an optional
accessory used in conjunction with the
Watts IntelliFlow Washing Machine Smart
Water Shutoff. It is a remote timer which
allows the IntelliFlow to be used in appli-
cations where the washing machine or a
combination washer/dryer is 240VAC pow-
ered. (The IntelliFlow is not compatible with
240VAC powered appliances). The timer
initiates a two-hour cycle when the button is
depressed.
The A2-IntelliTimer low-voltage power supply
is plugged into the IntelliFlow power outlet.
The remote solid-state timer is installed in a
location that is convenient to the user and
connected to the low-voltage power supply.
Activation of the push button on the timer
causes current flow, which is detected by
the IntelliFlow. The IntelliFlow then actuates
the solenoid valves, allowing water to flow
to the washing machine. This also begins a
timing sequence of two hours, which, upon
its completion de-energizes the IntelliFlow,
shutting off the flow of water to the wash-
ing machine. The timing sequence can be
interrupted by activating the push button a
second time.
A Green LED is illuminated whenever the
A2-IntelliTimer is energized.
Push On
Push Off
Power Lamp
Power Jack
Low Voltage
Power Supply
IntelliFlow
Power Outlet
IntelliFlow
Power Cord
IntelliTimer
Typical Installation
IntelliFlow
Washer Hoses
Washing
Machine
Low Voltage
Power Supply
IntelliTimer
Wall Box
Power to
IntelliFlow
Power to
Washing
Machine
120
VAC
240
VAC

13
IS-A2C-SC-IntelliFlow 2102 © 2021 Watts
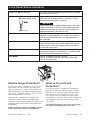
GREEN LED: ON: Unit powered This lamp is illuminated whenever the IntelliFlow is plugged
into a powered wall outlet.
YELLOW LED: ON: Water supply open
OFF: Water supply closed
This lamp is illuminated whenever the IntelliFlow
senses
current flow (the washing machine is turned on). It is off
when the washing machine is turned off.
NOTICE
Some washing machine models include circuitry that causes
a slight current draw at all times. These models when con-
nected to the IntelliFlow can cause the water supply to be
energized continuously (YELLOW LED: ON).
RED LED: ON: Leak sensed This lamp is illuminated when the leak sensor is installed
and water has been detected at the sensor. The water sup-
ply to the washing machine hoses are interrupted when a
leak is detected.
BLINKING: Unit timed out This lamp blinks whenever the internal timing circuit has
timed out and has shut off the water supply to the washing
machine hoses. Turning the washing machine Off then On
will reset the timing circuit.
FAINT BLINK: (3-5 seconds) This condition indicates the leak sensor is unplugged. To
provide the maximum level of protection, it is recommended
that the leak sensor be installed at all times.
User Button Press for 3 seconds to turn WiFi on or off.
Press for 10 seconds to factory reset the IntelliFlow and
erase all user information.
Sensor Plug
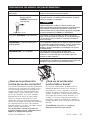
What is Surge Protection?
In many locations, changes in the AC volt-
age supply to the home by the electrical
utility company can occur. Both lower-volt-
age (brownouts) and high-voltage (surges)
can occur. Lightning strikes can also cause
high-voltage spikes to occur.
All electronic equipment is designed to
operate properly within a voltage range.
However, high-voltage surges or spikes can
damage sensitive circuitry within electronic
equipment.
Surge protectors prevent voltage spikes
from reaching electronic equipment.
What is Ground Fault
Protection?
In many locations, an electrical differential
between an electrical ground and a water
pipe ground can exist. A person touching
both grounds could receive a shock that
may cause injury or death. A ground fault
interrupter circuit (GFI) detects the differential
and removes electrical power before injury
can occur.
The IntelliFlow does not cause or change
the electrical differential that exists.
Front Panel Status Indicators

14
IS-A2C-SC-IntelliFlow 2102 © 2021 Watts
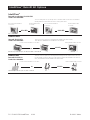
IntelliFlow
®
Retrofit Installation Kit KA2-BD
Order No. 0004800
These mounting kits are specifically used to install the Watts model A2C-SC IntelliFlow
Washing Machine Smart Water Shutoff to existing drain valves.
This kit is used to replace the following Watts washing machine shutoff valves: the wall
mounted Watts models #2 Duo-Cloz valve and the wall mounted IntelliFlow models: A2,
A2C, A2C-M with the Watts IntelliFlow model A2C-M1.
Final Installation Will Look Like:
If Your Current Installation Looks Like:
or
KA2-A
This kit is used to replace the following Watts IntelliFlow models: A2-WB,
A2C-WB, A2C-WB-M with the IntelliFlow model A2C-M1.
or
KA2-R
KA2-BD
KA2-BD
left or right drain
IntelliFlow
®
Retrofit Kit KA2-R
Order No. 0004805
IntelliFlow
®
Retrofit Kit KA2-A
Order No. 0004804
A2C-M1
Final Installation Will
Look Like:
Wall box style with #2 Style, A2, A2C or A2C-M
Wall box style with #2 Style, A2-WB, A2C-WB or A2C-WB-M
If Your Current Installation
Looks Like:
Final Installation Will
Look Like:
If Your Current Installation
Looks Like:
Final Installation Will Look Like:
If Your Current Installation Looks Like:
A2C-M1
IntelliFlow
®
Retrofit Kit Options
center drain

15
IS-A2C-SC-IntelliFlow 2102 © 2021 Watts

Limited Warranty: Watts (the “Company”) warrants each product to be free from defects in material and workmanship
under normal usage for a period of one year from the date of original shipment. In the event of such defects within the
warranty period, the Company will, at its option, replace or recondition the product without charge.
THE WARRANTY SET FORTH HEREIN IS GIVEN EXPRESSLY AND IS THE ONLY WARRANTY GIVEN BY THE COMPANY
WITH RESPECT TO THE PRODUCT. THE COMPANY MAKES NO OTHER WARRANTIES, EXPRESS OR IMPLIED. THE
COMPANY HEREBY SPECIFICALLY DISCLAIMS ALL OTHER WARRANTIES, EXPRESS OR IMPLIED, INCLUDING BUT
NOT LIMITED TO THE IMPLIED WARRANTIES OF MERCHANTABILITY AND FITNESS FOR A PARTICULAR PURPOSE.
The remedy described in the first paragraph of this warranty shall constitute the sole and exclusive remedy for breach
of warranty, and the Company shall not be responsible for any incidental, special or consequential damages, including
without limitation, lost profits or the cost of repairing or replacing other property which is damaged if this product does not
work properly, other costs resulting from labor charges, delays, vandalism, negligence, fouling caused by foreign material,
damage from adverse water conditions, chemical, or any other circumstances over which the Company has no control.
This warranty shall be invalidated by any abuse, misuse, misapplication, improper installation or improper maintenance
or alteration of the product.
Some States do not allow limitations on how long an implied warranty lasts, and some States do not allow the exclusion
or limitation of incidental or consequential damages. Therefore the above limitations may not apply to you. This Limited
Warranty gives you specific legal rights, and you may have other rights that vary from State to State. You should consult
applicable state laws to determine your rights. SO FAR AS IS CONSISTENT WITH APPLICABLE STATE LAW, ANY IMPLIED
WARRANTIES THAT MAY NOT BE DISCLAIMED, INCLUDING THE IMPLIED WARRANTIES OF MERCHANTABILITY AND
FITNESS FOR A PARTICULAR PURPOSE, ARE LIMITED IN DURATION TO ONE YEAR FROM THE DATE OF ORIGINAL
SHIPMENT.
IS-A2C-SC-IntelliFlow 2104 EDP# 1927264 © 2021 Watts
USA: T: (978) 689-6066 • F: (978) 975-8350 • Watts.com
Canada: T: (888) 208-8927 • F: (905) 332-7068 • Watts.ca
Latin America: T: (52) 55-4122-0138 • Watts.com

IS-A2C-SC-IntelliFlow
Instrucciones de instalación
IntelliFlow
®
Cierre inteligente del agua de la lavadora
ModeloA2C-SC/A2C-SC-WB
Sensor de fugas
A2C-SC IntelliFlow
®
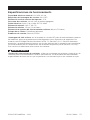
Lea este manual ANTES de usar el equipo.
El hecho de no leer y seguir toda la información de seguridad y de uso,
puede provocar la muerte, lesiones serias, daños materiales o daños
en el equipo. Visite Watts.com si tiene alguna pregunta.
Conserve este manual como referencia en el futuro.
PIENSE
PRIMERO EN
LA SEGURIDAD
ADVERTENCIA
!

18
IS-A2C-SC-IntelliFlow 2102 © 2021 Watts
AVISO
Esta unidad no es compatible con lavadoras eléctricas de 240VCA ni con lavadoras/
secadoras combinadas con alimentación de 240VCA. Se puede utilizar A2-IntelliTimer
de Watts (adquirido por separado) con el IntelliFlow
®
con lavadoras o lavadoras/
secadoras con alimentación de 240VCA. (Consulte la página5).
*Esta válvula requiere un circuito protegido de falla
a tierra de 120VCA, 60Hz, 20amperios.
*Interruptor de falla a tierra: no se requiere un circuito GFI para el
funcionamiento correcto del IntelliFlow
®
, pero se recomienda encarecidamente
como dispositivo de seguridad.
Protección contra picos de corriente: si bien no se requiere un protector
contra picos de corriente para el funcionamiento correcto de IntelliFlow,
se recomienda encarecidamente, especialmente en áreas en las que se
producen con frecuencia picos de corriente o rayos.
ADVERTENCIA
!
Tabla de contenido
Instrucciones de funcionamiento .............................................. 3
Configuración y registro de su Connected IntelliFlow
®
.............................. 4
Especificaciones de funcionamiento ............................................ 5
Instalación del A2C-SC IntelliFlow
®
...........................................6-7
Instalación de la unidad de caja de pared IntelliFlow
®
(A2C-SC-WB) ..................8-9
Instalación del sensor de fugas modelo A2-LS de Watts ........................... 10
Guía de resolución de problemas ............................................. 11
Accesorios: A2-IntelliTimer de Watts .......................................... 12
Indicadores de estado del panel delantero ...................................... 13
Opciones del kit de retroadaptación IntelliFlow
®
.................................. 14

19
IS-A2C-SC-IntelliFlow 2102 © 2021 Watts
Modelo
A2C-SC
De la
lavadora
Fuente de
alimentación
eléctrica
protegida
contra falla a
tierra
Suministro de agua
Uno para el agua fría
Otro para el agua caliente
Modelo
A2C-SC-WB
De la
lavadora
Fuente de
alimentación
eléctrica protegida
contra falla a tierra
Suministro de agua
Uno para el agua fría
Otro para el agua caliente
Conectores de soldadura de
1
⁄2" (1.27cm) para tuberías expuestas
Se suministran de forma estándar con adaptadores de soldadura de cobre de
1
⁄2"
(1.27cm). Se puede utilizar cualquier conexión para el suministro de agua caliente o fría.
Incluye caja de montaje en pared. La caja de montaje en pared tiene orificios de conexión
de entrada de agua espaciados 2
3
⁄8" (6cm) de centro a centro. Equipado con conectores
de soldadura de
1
⁄2" (1.27cm). Se puede utilizar cualquier conexión para el suministro de
agua caliente o fría.
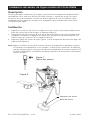
Instrucciones de funcionamiento
El cierre inteligente del agua de la lavadora de IntelliFlow® serie A2C-SC detecta el flujo
actual de su lavadora e interrumpe el suministro de agua si una manguera de entrada estalla.
También puede conectarse a su red wifi local para enviarle alertas en mensaje de texto y
correo electrónico en tiempo real en caso de una fuga.
El IntelliFlow está equipado con un dispositivo de detección de corriente eléctrica de última
generación. Cuando se inicia un ciclo de lavado, IntelliFlow detecta la corriente eléctrica que
fluye a la lavadora y abre el suministro de agua a la lavadora. Una vez finalizado el ciclo de
lavado completo, el dispositivo detecta la corriente baja y cierra las válvulas de entrada de
agua, que permanecen cerradas hasta que se vuelve a utilizar la máquina.
El sensor de fugas montado en el piso proporciona protección adicional contra daños cau-
sados por el agua mientras la lavadora está en uso. Cuando se detecta agua en el sensor, el
flujo de agua a la manguera de la lavadora se apaga inmediatamente.
Al instalar un IntelliFlow, ayuda a proteger su hogar de posibles daños importantes por agua
causados por una rotura o una fuga en la manguera de entrada de la lavadora.

20
IS-A2C-SC-IntelliFlow 2102 © 2021 Watts
Configuración y registro de su Connected IntelliFlow
®
Antes de comenzar este procedimiento, asegúrese de que la unidad IntelliFlow dispone
de alimentación y wifi. En caso de que no haya wifi activado, la unidad IntelliFlow seguirá
protegiendo contra fugas mientras esté encendida. Se puede registrar más tarde.
Instale la unidad IntelliFlow de acuerdo con las instrucciones de instalación indicadas
anteriormente.
En primer lugar, encienda el dispositivo y espere a que la luz azul comience
a parpadear. Para comenzar el proceso de conexión, en su dispositivo,
busque nuevas redes wifi y seleccione SSID WattsDeviceSetup-xxxxx.
Para conectarse a la red, ingrese la contraseña “intelliflow”.
A continuación, escanee el código QR de la etiqueta colgante
del producto/adhesivo de la toma. Si faltan o se quitaron, visite
http://10.10.0.1/ para continuar con la configuración.
El proceso de configuración es un procedimiento de 4pasos.
Estos pasos deben completarse de forma secuencial.
1. Registro del producto: en este paso se registra su Connected IntelliFlow.
a. Información necesaria: Nombre completo, estado/provincia, código postal
b. Información opcional: Dirección completa
2. Lavadora: este paso configura el perfil de su lavadora.
a. Seleccione la tensión suministrada a su lavadora.
b. De forma opcional, ingrese la marca y el número de modelo de su lavadora.
3. Notificaciones: este paso permitirá a Connected IntelliFlow enviar notificaciones en caso
de que se detecte una fuga.
a. Información necesaria: Dirección de correo electrónico
b. Información opcional: Número de teléfono celular
4. Conectar: este paso conectará su Connected IntelliFlow a la red wifi que elija.
a. Seleccione la red wifi a la que desea conectarse. Asegúrese de que la conexión wifi
sea de 2.4Ghz. IntelliFlow no admite redes de 5Ghz.
i. Si su red no aparece, puede introducirla manualmente seleccionando “Other
Network” (Otra red).
ii. Ingrese el nombre de la red wifi.
b. Ingrese su contraseña de red wifi.
Tras completar el 4ºpaso, su Connected IntelliFlow enviará una notificación de prueba a la
dirección de correo electrónico y al número de teléfono celular opcional especificados en el
paso3.
Para restablecer el Connected IntelliFlow y borrar toda la información de notificación y de
red wifi almacenada, mantenga pulsado el botón negro de la parte delantera de la
unidad durante 10segundos. A continuación, se puede completar el procedimiento de
configuración anterior para volver a registrar su Connected IntelliFlow.
Si no desea conectar el IntelliFlow a una red wifi, mantenga pulsado el botón
negro de restablecimiento 3segundos para desactivar la conectividad wifi. El
wifi se puede volver a activar manteniendo pulsado el botón de restablecimiento
3segundos. Si el IntelliFlow se ha registrado antes de deshabilitar la conexión wifi, el
dispositivo se volverá a conectar automáticamente al volver a habilitar la conexión wifi si la
red wifi registrada está activa con la misma contraseña.
La page est en cours de chargement...
La page est en cours de chargement...
La page est en cours de chargement...
La page est en cours de chargement...
La page est en cours de chargement...
La page est en cours de chargement...
La page est en cours de chargement...
La page est en cours de chargement...
La page est en cours de chargement...
La page est en cours de chargement...
La page est en cours de chargement...
La page est en cours de chargement...
La page est en cours de chargement...
La page est en cours de chargement...
La page est en cours de chargement...
La page est en cours de chargement...
La page est en cours de chargement...
La page est en cours de chargement...
La page est en cours de chargement...
La page est en cours de chargement...
La page est en cours de chargement...
La page est en cours de chargement...
La page est en cours de chargement...
La page est en cours de chargement...
La page est en cours de chargement...
La page est en cours de chargement...
La page est en cours de chargement...
La page est en cours de chargement...
-
 1
1
-
 2
2
-
 3
3
-
 4
4
-
 5
5
-
 6
6
-
 7
7
-
 8
8
-
 9
9
-
 10
10
-
 11
11
-
 12
12
-
 13
13
-
 14
14
-
 15
15
-
 16
16
-
 17
17
-
 18
18
-
 19
19
-
 20
20
-
 21
21
-
 22
22
-
 23
23
-
 24
24
-
 25
25
-
 26
26
-
 27
27
-
 28
28
-
 29
29
-
 30
30
-
 31
31
-
 32
32
-
 33
33
-
 34
34
-
 35
35
-
 36
36
-
 37
37
-
 38
38
-
 39
39
-
 40
40
-
 41
41
-
 42
42
-
 43
43
-
 44
44
-
 45
45
-
 46
46
-
 47
47
-
 48
48


Watts A2C-SC, A2C-SC-WB Guide d'installation
- Taper
- Guide d'installation
dans d''autres langues
Documents connexes
-
Watts 0004640 Guide d'installation
-
Watts LFN223M2-B-G 2 1/2 Guide d'installation
-
-
-
-
Watts LFUSG-B Guide d'installation
-
-
Watts 800M4FR Guide d'installation
Autres documents
-
 SMARTCHOICE 5304473845 Guide d'installation
-
Bulldog Security 2030 Le manuel du propriétaire
-
Samsung MH050FXEA2C Le manuel du propriétaire
-
Miller JC601876 Le manuel du propriétaire
-
Digitus DC OC12 Fiche technique
-
-
Samsung ACCUVIX A30 Manuel utilisateur
-
-
Honeywell 32313117NGC Series Limit Switch Guide d'installation
-
Samsung MYSONO U6 Manuel utilisateur
