BLACK DECKER CS1216 Manuel utilisateur
- Catégorie
- Outils électroportatifs
- Taper
- Manuel utilisateur

INSTRUCTION MANUAL
CHAIN SAW
CATALOG NUMBER
CS1216
Thank you for choosing BLACK+DECKER!
PLEASE READ BEFORE RETURNING THIS PRODUCT FOR ANY REASON.
If you have a question or experience a problem with your BLACK+DECKER
purchase, go to http://www.blackanddecker.com/instantanswers
If you can’t find the answer or do not have access to the Internet, call 1-800-544-
6986 from 8 a.m. to 5 p.m. EST Mon. - Fri. to speak with an agent. Please have the
catalog number available when you call.
SAVE THIS MANUAL FOR FUTURE REFERENCE.
VEA EL ESPANOL EN LA CONTRAPORTADA. INSTRUCTIVO DE OPERACIÓN, CENTROS DE SERVICIO Y PÓLIZA DE
GARANTÍA.
ADVERTENCIA: LÉASE ESTE INSTRUCTIVO ANTES DE USAR EL PRODUCTO.
To register your new product, visit
www.BlackandDecker.com/NewOwner
KEY INFORMATION YOU SHOULD KNOW:
READ INSTRUCTIONS THOROUGHLY
BEFORE OPERATING!
• DO NOT OVER-TENSION CHAIN. Refer to “Adjusting Chain
Tension” for proper method of tensioning chain.
• Retighten chain frequently during first two hours of use.

2
GENERAL POWER TOOL
SAFETY RULES
WARNING:
Read all safety
warnings and all instructions. Failure to
follow the warnings and instructions may result
in electric shock, fire and/or serious injury.
SAVE ALL WARNINGS AND
INSTRUCTIONS FOR FUTURE REFERENCE
The term “power tool” in the warnings
refers to your mains-operated (corded)
power tool or battery-operated (cordless)
power tool.
1) WORK AREA SAFETY
a) Keep work area clean and well
lit. Cluttered or dark areas invite
accidents.
b) Do not operate power tools in explosive
atmospheres, such as in the presence
of flammable liquids, gases or dust.
Power tools create sparks which may
ignite the dust or fumes.
c) Keep children and bystanders
away while operating a power tool.
Distractions can cause you to lose control.
2) ELECTRICAL SAFETY
a) Power tool plugs must match the
outlet. Never modify the plug in
any way. Do not use any adapter
plugs with earthed (grounded)
power tools. Unmodified plugs and
matching outlets will reduce risk of
electric shock.
b) Avoid body contact with earthed or
grounded surfaces such as pipes,
radiators, ranges and refrigerators.
There is an increased risk of electric
shock if your body is earthed or
grounded.
c) Do not expose power tools to rain
or wet conditions. Water entering
a power tool will increase the risk of
electric shock.
d) Do not abuse the cord. Never use
the cord for carrying, pulling or
unplugging the power tool. Keep
cord away from heat, oil, sharp
edges or moving parts. Damaged or
entangled cords increase the risk of
electric shock.
e) When operating a power tool
outdoors, use an extension cord
suitable for outdoor use. Use of a
cord suitable for outdoor use reduces
the risk of electric shock.
f)
If operating a power tool in a damp
location is unavoidable, use a
ground fault circuit interrupter
(GFCI) protected supply. Use of a
GFCI reduces the risk of electric shock.
3) PERSONAL SAFETY
a) Stay alert, watch what you are
doing and use common sense
when operating a power tool. Do
not use a power tool while you
are tired or under the influence of
drugs, alcohol or medication. A
moment of inattention while operating
power tools may result in serious
personal injury.
b) Use personal protective equipment.
Always wear eye protection.
Protective equipment such as dust
mask, nonskid safety shoes, hard
hat, or hearing protection used for
appropriate conditions will reduce
personal injuries.
c) P
revent unintentional starting.
Ensure the switch is in the off
position before connecting to power
source and/ or battery pack, picking
up or carrying the tool. Carrying
power tools with your finger on the
switch or energizing power tools that
have the switch on invites accidents.
d
) Remove any adjusting key or
wrench before turning the power
tool on. A wrench or a key left
attached to a rotating part of the power
tool may result in personal injury.
e) Do not overreach. Keep proper
footing and balance at all times.
This enables better control of the
power tool in unexpected situations.
f)
Dress properly. Do not wear loose
clothing or jewelry. Keep your hair,
clothing and gloves away from moving
parts. Loose clothes, jewelry or long hair
can be caught in moving parts.
g) If devices are provided for the
connection of dust extraction and
collection facilities, ensure these
are connected and properly used.
SAFETY GUIDELINES - DEFINITIONS
It is important for you to read and understand this manual. The information it contains
relates to protecting YOUR SAFETY and PREVENTING PROBLEMS. The symbols
below are used to help you recognize this information.
DANGER: Indicates an imminently hazardous situation which, if not avoided, will
result in death or serious injury.
WARNING: Indicates a potentially hazardous situation which, if not avoided,
could result in death or serious injury.
CAUTION: Indicates a potentially haz ard ous situation which, if not avoided,
may result in minor or mod er ate injury.
NOTICE: Used without the safety alert symbol indicates potentially hazardous
situation which, if not avoided, may result in property damage.

3
Use of dust collection can reduce
dust-related hazards.
4) POWER TOOL USE AND CARE
a) Do not force the power tool. Use
the correct power tool for your
application. The correct power tool
will do the job better and safer at the
rate for which it was designed.
b) Do not use the power tool if the
switch does not turn it on and
off. Any power tool that cannot
be controlled with the switch is
dangerous and must be repaired.
c) Disconnect the plug from the
power source and/or the battery
pack from the power tool before
making any adjustments, changing
accessories, or storing power
tools. Such preventive safety
measures reduce the risk of starting
the power tool accidentally.
d) Store idle power tools out of
the reach of children and do not
allow persons unfamiliar with the
power tool or these instructions
to operate the power tool. Power
tools are dangerous in the hands of
untrained users.
e) Maintain power tools. Check for
misalignment or binding of moving
parts, breakage of parts and any
other condition that may affect the
power tool’s operation. If damaged,
have the power tool repaired before
use. Many accidents are caused by
poorly maintained power tools.
f) Keep cutting tools sharp and clean.
Properly maintained cutting tools with
sharp cutting edges are less likely to
bind and are easier to control.
g) Use the power tool, accessories
and tool bits, etc. in accordance
with these instructions, taking into
account the working conditions
and the work to be performed.
Use of the power tool for operations
different from those intended could
result in a hazardous situation.
5) SERVICE
a) Have your power tool serviced by
a qualified repair person using
only identical replacement parts.
This will ensure that the safety of the
power tool is maintained.
READ ALL INSTRUCTIONS
CHAINSAW SAFETY WARNINGS:
• Keep all parts of the body away from
the saw chain when the chainsaw
is operating. Before you start the
chainsaw, make sure the saw chain
is not contacting anything. A moment
of inattention while operating chainsaws
may cause entanglement of your clothing
or body with the saw chain.
• Always hold the chainsaw with your
right hand on the rear handle and
your left hand on the front handle.
Holding the chainsaw with a reversed
hand configuration increases the risk of
personal injury and should never be done.
• Hold the power tool by insulated
gripping surfaces only, because the
saw chain may contact hidden wiring
or its own cord. Saw chains contacting
a ″live″ wire may make exposed metal
parts of the power tool ″live″ and could
give the operator an electric shock.
• Wear safety glasses and hearing
protection. Further protective
equipment for head, hands, legs
and feet is recommended. Adequate
protective clothing will reduce personal
injury by flying debris or accidental
contact with the saw chain.
• Do not operate a chainsaw in a tree.
Operation of a chainsaw while up in a
tree may result in personal injury.
• Always keep proper footing and
operate the chainsaw only when
standing on fixed, secure and level
surface. Slippery or unstable surfaces
such as ladders may cause a loss of
balance or control of the chainsaw.
• When cutting a limb that is under
tension be alert for spring back. When
the tension in the wood fibres is released
the spring loaded limb may strike the
operator and/or throw the chainsaw out
of control.
•
Use extreme caution when cutting
brush and saplings. The slender material
may catch the saw chain and be whipped
toward you or pull you off balance.
• Carry the chainsaw by the front
handle with the chainsaw switched
off and away from your body. When
transporting or storing the chainsaw
always fit the scabbard. Proper
handling of the chainsaw will reduce the
likelihood of accidental contact with the
moving saw chain.
• Follow instructions for lubricating,
chain tensioning and changing
accessories. Improperly tensioned or
lubricated chain may either break or
increase the chance for kickback.
• Keep handles dry, clean, and free from
oil and grease. Greasy, oily handles are
slippery causing loss of control.
• Cut wood only. Do not use chainsaw
for purposes not intended. For
example: do not use chainsaw for
cutting plastic, masonry or non-wood
building materials. Use of the chainsaw
for operations different than intended
could result in a hazardous situation.
CAUSES AND OPERATOR
PREVENTION OF KICKBACK:
Kickback may occur when the nose or tip
of the guide bar touches an object, or when

the wood closes in and pinches the saw
chain in the cut.
Tip contact in some cases may cause a
sudden reverse reaction, kicking the guide
bar up and back towards the operator.
Pinching the saw chain along the top of the
guide bar may push the guide bar rapidly
back towards the operator.
Either of these reactions may cause you
to lose control of the saw which could
result in serious personal injury. Do not
rely exclusively upon the safety devices
built into your saw. As a chainsaw user,
you should take several steps to keep your
cutting jobs free from accident or injury.
Kickback is the result of tool misuse and/
or incorrect operating procedures or
conditions and can be avoided by taking
proper precautions as given below:
• Maintain a firm grip, with thumbs
and fingers encircling the chainsaw
handles, with both hands on the saw
and position your body and arm to
allow you to resist kickback forces.
Kickback forces can be controlled by the
operator, if proper precautions are taken.
Do not let go of the chainsaw.
• Do not overreach and do not cut
above shoulder height. This helps
prevent unintended tip contact and
enables better control of the chainsaw in
unexpected situations.
• Only use replacement bars and
chains specified by the manufacturer.
Incorrect replacement bars and chains
may cause chain breakage and/or
kickback.
• Follow the manufacturer’s sharpening
and maintenance instructions for the
saw chain. Decreasing the depth gauge
height can lead to increased kickback.
THE FOLLOWING PRECAUTIONS
SHOULD BE FOLLOWED TO MINIMIZE
KICKBACK:
(1.) Grip Saw Firmly. Hold the chainsaw
firmly with both hands when the motor is
running. Use a firm grip with thumbs and
fingers encircling the chainsaw handles.
Chainsaw will pull forward when cutting
on the bottom edge of the bar, and push
backward when cutting along the top edge
of the bar.
(2.) Do not over reach.
(3.) Keep proper footing and balance at all
times.
(4.) Don’t let the nose of the guide bar
contact a log, branch, ground or other
obstruction.
(5.) Don’t cut above shoulder height.
(6.) Use devices such as low kickback
chain and reduced kickback guide bars that
reduce the risks associated with kickback.
(7.) Only use replacement bars and chains
specified by the manufacturer or the
equivalent.
(8.) Never let the moving chain contact any
object at the tip of the guide bar.
(9.) Keep the working area free from
obstructions such as other trees, branches,
rocks, fences, stumps, etc. Eliminate or
avoid any obstruction that your saw chain
could hit while you are cutting through a
particular log or branch.
(10.) Keep your saw chain sharp and
properly tensioned. A loose or dull chain
can increase the chance of kickback.
Check tension at regular intervals with the
motor stopped and tool unpllugged, never
with the motor running.
(11.) Begin and continue cutting only with
the chain moving at full speed. If the chain
is moving at a slower speed, there is a
greater chance for kickback to occur.
(12.) Cut one log at a time.
(13.) Use extreme caution when re-entering
a previous cut. Engage ribbed bumpers into
wood and allow chain to reach full speed
before proceeding with cut.
(14.) Do not attempt plunge cuts or bore
cuts.
(15.) Watch for shifting logs or other forces
that could close a cut and pinch or fall into
chain.
KICKBACK SAFETY FEATURES
WARNING: The following features
are included on your saw to help reduce the
hazard of kickback; however such features
will not totally eliminate this dangerous
reaction. As a chainsaw user do not rely
only on safety devices. You must follow all
safety precautions, instructions, and
maintenance in this manual to help avoid
kickback and other forces which can result
in serious injury.
• Reduced-Kickback Guide Bar,
designed with a small radius tip which
reduces the size of the kickback danger
zone on bar tip. A reduced - kickback
guide bar is one which has been
demonstrated to significantly reduce the
number and seriousness of kickbacks
when tested in accordance with safety
requirements for electric chainsaws.
• Low-Kickback Chain, designed with a
contoured depth gauge and guard link
which deflect kickback force and allow
wood to gradually ride into the cutter. A
low-kickback chain is a chain which has
met kickback performance requirements
of ANSI B175.1-1991.
• Do not operate chainsaw while in a
tree, on a ladder, on a scaffold, or
from any unstable surface.
• Hold tool by insulated gripping
surfaces when performing an
operation where the cutting tool may
contact hidden wiring. Contact with a
“live” wire will make exposed metal parts
of the tool “live” and shock the operator.
4

5
• Do not attempt operations beyond
your capacity or experience. Read
thoroughly and understand completely all
instructions in this manual.
• Before you start chainsaw, make sure
saw chain is not contacting any object.
• Do not operate a chainsaw with one
hand! Serious injury to the operator,
helpers, or bystanders may result from
one handed operation. A chainsaw is
intended for two-handed use only.
• Keep the handles dry, clean, and free
of oil or grease.
• Do not allow dirt, debris, or sawdust
to build up on the motor or outside air
vents.
• Stop the chainsaw before setting it
down.
• Do not cut vines and/or small under
brush.
• Use extreme caution when cutting
small size brush and saplings because
slender material may catch the saw chain
and be whipped toward you or pull you
off balance.
WARNING: Some dust created by
power sanding, sawing, grinding, drilling,
and other construction activities contains
chemicals known to the State of California
to cause cancer, birth defects or other
reproductive harm. Some examples of these
chemicals are:
• lead from lead-based paints,
• crystalline silica from bricks and
cement and other masonry products,
and
• arsenic and chromium from
chemically-treated lumber.
Your risk from these exposures varies,
depending on how often you do this type
of work. To reduce your exposure to these
chemicals: work in a well ventilated area,
and work with approved safety equipment,
such as those dust masks that are specially
designed to filter out microscopic particles.
• Avoid prolonged contact with dust
from power sanding, sawing, grinding,
drilling, and other construction
activities. Wear protective clothing
and wash exposed areas with soap
and water. Allowing dust to get into
your mouth, eyes, or lay on the skin may
promote absorption of harmful chemicals.
WARNING: Use of this tool can
generate and/or disburse dust, which
may cause serious and permanent
respiratory or other injury. Always use
NIOSH/OSHA approved respiratory
protection appropriate for the dust
exposure. Direct particles away from face
and body.
An extension cord must have adequate
wire size (AWG or American Wire Gauge)
for safety. The smaller the gauge number
of the wire, the greater the capacity of the
cable, that is 16 gauge has more capacity
than 18 gauge. When using more than one
extension to make up the total length, be
sure each individual extension contains at
least the minimum wire size.
Recommended Minimum Wire Size for
Extension Cords
CHAINSAW NAMES AND TERMS
• Bucking - The process of cross cutting a
felled tree or log into lengths.
• Motor Brake - A device used to stop the
saw chain when the trigger is released.
• Chainsaw Powerhead - A chainsaw
without the saw chain and guide bar.
• Drive Sprocket or Sprocket - The
toothed part that drives the saw chain.
• Felling - The process of cutting down a
tree.
• Felling Back Cut - The final cut in a tree
felling operation made on the opposite
side of the tree from the notching cut.
•
Front Handle - The support handle located
at or toward the front of the chainsaw.
• Front Hand Guard - A structural barrier
between the front handle of a chainsaw
and the guide bar, typically located close
to the hand position on the front handle
and sometimes employed as an activating
lever for a chain brake.
• Guide Bar - A solid railed structure that
supports and guides the saw chain.
• Guide Bar Scabbard - Enclosure fitted
over guide bar to prevent tooth contact
when saw is not in use.
• Kickback - The backward or upward
motion, or both of the guide bar occurring
when the saw chain near the nose of the
top area of the guide bar contacts any
object such as a log or branch, or when
the wood closes in and pinches the saw
chain in the cut.
•
Kickback, Pinch - The rapid pushback of
the saw which can occur when the wood
closes in and pinches the moving saw chain
in the cut along the top of the guide bar.
• Kickback, Rotational - The rapid upward
and backward motion of the saw which
can occur when the moving saw chain
near the upper portion of the tip of the
guide bar contacts an object, such as a
log or branch.
• Limbing - Removing the branches from a
fallen tree
• Low-Kickback Chain - A chain that
complies with the kickback
performance requirements of ANSI
Minimum Gauge for Cord Sets
Volts Total Length of Cord in Feet
120V 0-25 26-50 51-100 101-150
240V 0-50 51-100 101-200 201-300
Ampere Rating
More Not more American Wire Gauge
Than Than
0 - 6 18 16 16 14
6 - 10 18 16 14 12
10 - 12 16 16 14 12
12 - 16 14 12 Not Recommended

6
B175.1-1991 (when tested on
a representative sample of chainsaws.)
• Normal Cutting Position - Those
positions assumed in
performing the bucking and felling cuts.
• Notching Undercut - A notch cut in a
tree that directs the tree’s fall.
• Rear Handle - The support handle
located at or toward the rear of the saw.
• Reduced Kickback Guide Bar - A guide
bar which has been demonstrated to
reduce kickback significantly.
• Replacement Saw Chain - A chain that
complies with kickback performance
requirements of ANSI B175.1-2000 when
tested with specific chainsaws. It may not
meet the ANSI performance
requirements when used with other saws.
• Saw Chain - A loop of chain having
cutting teeth, that cut the wood,and that is
driven by the motor and is supported by
the guide bar.
• Ribbed Bumper - The ribs used when
felling or bucking to pivot the saw and
maintain position while sawing.
• Switch - A device that when operated will
complete or interrupt an electrical power
circuit to the motor of the chainsaw.
• Switch Linkage - The mechanism that
transmits motion from a trigger to the
switch.
• Switch Lockout - A movable stop that
prevents the unintentional operation of
the switch until manually actuated.
INTENDED USE
Your BLACK+DECKER Chainsaw is ideal
for pruning applications and cutting small
logs up to 16 inches (406 mm) in diameter.
This tool is intended for consumer use only.
SAVE THESE INSTRUCTIONS
SYMBOLS
The label on your tool may include the
following symbols. The symbols and their
definitions are as follows:
V ................. volts
A ................. amperes
Hz ............... hertz
W ................ watts
min .............minutes
or AC .....alternating current
or DC ...direct current
n
o ...............no load speed
................Class I Construction
(grounded)
................earthing terminal
............... safety alert symbol
...............Class II Construction
(double insulated)
.../min or rpm...revolutions or
reciprocation per minute
m/s .............meters per second
in ................inches
mm .............millimeters
...............Read instruction manual
before use
................Use proper respiratory
protection
...............Use proper eye protection
................Use proper hearing
protection
PREPARING YOUR
CHAINSAW FOR USE
WARNING: Read and understand
all instructions. Failure to follow all
instructions listed below may result in
electric shock, fire and/or serious personal
injury.
1. Trigger switch
2. Lock-off button (not shown)
3. Front hand guard
4. Guide bar
5. Saw chain
6. Sprocket cover
7. Bar adjust locking knob
8. Chain tensioning wheel
9. Guide bar scabbard
10. Rear handle
11. Front handle
12. Power cord
13. Extention cord retainer
14. Oil cap
15. Oil level indicator
1
3
6
7
4
2
5
9
11
10
12
13
14
8
15
FUNCTIONAL DESCRIPTION

7
ASSEMBLY
INSTALLING THE GUIDE BAR
AND SAW CHAIN
CAUTION: Sharp chain. Always
wear protective gloves when handling
the chain. The chain is sharp and can cut
you when it is not running.
WARNING: Sharp moving chain. To
prevent accidental operation, ensure that
tool is unplugged before performing the
following operations. Failure to do this
could result in serious personal injury.
The saw chain (5) and guide bar (4) are
packed together in the carton. They need to
be attached to the body of the saw.
• Place the saw on a firm surface.
• Rotate the bar adjust locking knob (7)
counterclockwise as shown in figure A to
remove sprocket cover (6).
• Wearing protective gloves, grasp the saw
chain (5) and wrap it around the guide
bar (4), ensuring the teeth are facing the
correct direction (see figure G)
• Ensure the chain is properly set in the
slot around the entire guide bar.
• Place the saw chain around the sprocket
(16) while lining up the slot in the guide
bar with the bolt (17) in the base of the
tool and the chain tensioning pin (18) as
shown in figure B.
NOTE: You may need to adjust the position
of the chain tension pin (18) for it to properly
engage the slot in the guide bar by rotating
the chain tensioning wheel (8).
• Once in place, turn the chain tensioning
wheel (8) by hand to preliminarily tighten
the assembly and hold it in place.
• While holding the bar still, replace the
sprocket cover (6). Make sure the tab
(19) on the cover lines up with the slot
(20) in the main housing as shown in
figure C. Rotate the bar adjust locking
knob (7) clockwise until snug, then
loosen knob (7) one full turn, so the saw
chain can be properly tensioned.
• Follow instructions for “Adjusting Chain
Tension” in the next section.
ADJUSTING CHAIN TENSION
CAUTION: Sharp chain. Always
wear protective gloves when handling
the chain. The chain is sharp and can cut
you when it is not running.
WARNING: Sharp moving chain. To
prevent accidental operation, ensure that
the tool is unplugged before performing
the following operations. Failure to do
this could result in serious personal injury.
• With the saw on a firm surface, check the
saw chain (5) tension. The tension is correct
when the chain snaps back after being pulled
1/8 inch (3mm) away from the guide bar (4)
with light force from the middle finger and
thumb as shown in figure D.
•
To adjust saw chain tension, loosen bar
adjust locking knob (7), rotate the chain
tensioning wheel (8) towards the top of
the saw to increase tension as shown in
figure E. Tighten the bar adjust locking
knob until snug after making sure the saw
chain (5) is snug around the guide bar (4).
A
C
20
19
D
B
16 17
18
E

8
• There should be no “sag” between the guide
bar and the chain on the underside as shown
in figure F.
• Once chain tension is correct, tighten bar
adjust locking knob.
• Do not over-tension the chain as this will
lead to excessive wear and will reduce
the life of the bar and chain.
• When the chain is new, check the tension
frequently (after unplugging tool) during
the first 2 hours of use as a new chain
stretches slightly.
REPLACING THE SAW CHAIN
CAUTION: Sharp chain. Always
wear protective gloves when handling
the chain. The chain is sharp and can cut
you when it is not running.
WARNING: Sharp moving chain. To
prevent accidental operation, ensure that
the tool is unplugged before performing
the following operations. Failure to do
this could result in serious personal injury.
• Rotate the bar adjust locking knob (7)
counterclockwise to lessen chain tension.
• Remove sprocket cover (6) as described
in “Installing the Guide Bar and Saw
Chain” section.
• Lift the worn saw chain (5) out of the
groove in the guide bar (4).
• Place the new chain in the slot of the
guide bar, making sure the saw teeth are
facing the correct direction by matching
the arrow on the chain with the graphic on
the sprocket cover (6) shown in figure G.
• Follow previous instructions for Installing
the Guide Bar and Saw Chain and
adjusting chain tension.
AUTO OILING SYSTEM
This chainsaw is equipped with an auto
oiling system that keeps the saw chain and
guide bar constantly lubricated.
The oil level indicator (15) shows the
level of the oil in the chainsaw. If the oil
level is less than a quarter full, unplug the
chainsaw and refill with the proper oil.
NOTE: Use a high quality bar and chain
oil for proper chain and bar lubrication. As
a temporary substitute, a non-detergent
SAE30 weight motor oil can be used.The
use of a vegetable based bar and chain
oil is recommended when pruning trees.
Mineral oil is not recommended because
it may harm trees. Never use waste oil or
very thick oil. These may damage your
chainsaw.
FILLING THE OIL RESERVOIR
• Remove the oil cap (14) and fill the
reservoir with the recommended chain oil
until the oil level has reached the top of
the oil level indicator (15).
• Refit the oil cap.
• Periodically switch the chainsaw off and
check the oil level indicator to ensure the
bar and chain are being properly oiled.
ATTACHING EXTENSION CORD
An extension cord retainer (13) is built into
the switch handle. It prevents the extention
cord from coming unplugged.
• Double the extension cord and insert it
into the slot (21) in the end of the handle
area as shown in figure H. Hook the loop
formed by doubling the cord over the
cord retainer (13). Gently tug on the cord
to ensure that it is firmly retained in the
handle. Plug the receptacle end of the
extension cord into the power cord (12)
of the chainsaw.
TRANSPORTING SAW
• Always cover the guide bar (4) with the
scabbard (9) (figure I) when transporting
the saw.
I
H
21
13
2
G
F

9
OPERATING THE CHAINSAW
WARNING:
Read and understand
all instructions. Failure to follow all
instructions listed below may result in electric
shock, fire and/or serious personal injury.
• Guard Against Kickback which can
result in severe injury or death. See
Important Safety Instructions “Guard
Against Kickback”, to avoid the risk of
kickback.
• Do not overreach. Do not cut above
chest height. Make sure your footing
is firm. Keep feet apart. Divide your
weight evenly on both feet.
• Use a firm grip with your left hand on
the front handle (11) and your right
hand on the rear handle (10) so that
your body is to the left of the guide bar.
• Do not hold chainsaw by front hand
guard (3). Keep elbow of left arm locked
so that left arm is straight to withstand a
kickback.
WARNING: Never use a cross-
handed grip (left hand on the rear handle
and right hand on the front handle).
WARNING: Never allow any part of
your body to be in line with the guide bar
(4) when operating the chainsaw.
• Never operate while in a tree, in any
awkward position or on a ladder or
other unstable surface. You may lose
control of saw causing severe injury.
• Keep the chainsaw running at full
speed the entire time you are cutting.
• Allow the chain to cut for you. Exert
only light pressure. Do not put pressure
on chainsaw at end of cut.
ON / OFF
Always be sure of your footing and grip the
chainsaw firmly with both hands with the
thumb and fingers encircling both handles.
• To turn the tool ON, depress the lock off
button (2) and squeeze the trigger switch
(1) as shown in figure J. (Once the tool
is running you can release the lock off
button.)
• To turn the tool OFF, release the trigger
switch.
COMMON CUTTING TECHNIQUES
FELLING
Felling is the process of cutting down
a tree. Be sure battery is fully charged
before felling a tree so you can finish on a
single charge. Do not fell trees in high wind
conditions.
WARNING: Felling can result in
injury. It should only be performed by a
trained person.
• (Figure K) A retreat path should be
planned and cleared as necessary before
cuts are started. The retreat path should
extend back and diagonally to the rear of
the expected line of fall.
• Before felling is started, consider the
natural lean of the tree, the location of
larger branches and the wind direction to
judge which way the tree will fall. Have
wedges (wood, plastic or aluminum)
and a heavy mallet handy.
Remove dirt, stones, loose bark, nails,
staples, and wire from the tree where the
felling cuts are to be made.
• (Figure L) Notching Undercut - Make
the notch 1/3 of the diameter of the tree,
perpendicular to the direction of the fall.
Make the lower horizontal notching cut
first. This will help to avoid pinching of
either the saw chain or the guide bar
when the second notch is being made.
• (Figure L) Felling Back Cut - Make the
felling back cut at least
2 inches (51mm) higher than the
horizontal notching cut. Keep the felling
back cut parallel to the horizontal
notching cut. Make the felling back cut
so enough wood is left to act as a hinge.
The hinge wood keeps the tree from
twisting and falling in the wrong direction.
Do not cut through the hinge.
• (Figure L) As the felling cut gets close to
the hinge the tree should begin to fall. If
there is any chance that the tree may not
fall in the desired direction or it may rock
back and bind the saw chain, stop cutting
before the felling cut is complete and use
wedges to open the cut and drop the tree
along the desired line of fall. When the
tree begins to fall remove the chainsaw
from the cut, stop the motor, put the
J
2
DIRECTION
OF
FALL
RETREAT
45°
TREE
K

10
chainsaw down, then use the retreat
path planned. Be alert for overhead limbs
falling and watch your footing.
LIMBING
Limbing is removing the branches from
a fallen tree. When limbing, leave larger
lower limbs to support the log off the
ground. Remove the small limbs in one
cut. Branches under tension should be
cut from the bottom up to avoid binding
the chainsaw as shown in figure M. Trim
limbs from opposite side keeping tree stem
between you and saw. Never make cuts
with saw between your legs or straddle the
limb to be cut.
BUCKING
Bucking is cutting a felled tree or log into
lengths. How you should cut depends on
how the log is supported. Use a saw horse
(figure N) whenever possible.
• (Figure N) When using a saw horse
This is strongly recommended whenever
possible. Position the log in a stable
position. Always cut on the outside of the
saw horse arms.
Always start a cut with the chain running at
full speed.
• Place the bottom spike (22) of the
chainsaw behind the area of the initial cut
as shown in figure O.
• Turn the chainsaw on then rotate the
chain and bar down into the tree, using
the spike as a hinge.
• Once the chainsaw gets to a 45 degree
angle, level the chainsaw again and
repeat steps until you cut fully through.
• When the tree is supported along its
entire length, make a cut from the top
(overbuck), but avoid cutting the earth as
this will dull your saw chain quickly.
• (Figure P) When supported at one end
First, cut 1/3 the diameter from the
underside (underbuck). Then make the
finished cut by overbucking to meet the
first cut.
• (Figure Q) When supported at both ends
First, cut 1/3 down from the top
overbuck. Then make the finished cut by
underbucking the lower 2/3 to meet the
first cut.
• (Figure R) When on a slope
Always stand on the uphill side of the
log. When “cutting through”, to maintain
complete control release the cutting
pressure near the end of the cut without
relaxing your grip on the chainsaw
M
N
2 (5cm)
INCHES
DIRECTION
OF FALL
2 (5cm)
INCHES
HINGE
NOTCH
FELLING BACK
CUT
L
Q
2nd CUT UNDERBUCK
(2/3 DIAMETER)
TO MEET 1st CUT
(TO AVOID PINCHING)
1st CUT OVERBUCK
(1/3 DIAMETER)
TO AVOID SPLINTERING
1
1
2
2nd CUT OVERBUCK
(2/3DIAMETER) TO MEET 1st
CUT (TO AVOID PINCHING)
1st CUT UNDERBUCK
(1/3 DIAMETER)
AVOID SPLINTERING
P
O
22
CUT FROM TOP
(OVERBUCK)
AVOID CUTTING EARTH

11
handles. Don’t let the chain contact the
ground. After completing the cut, wait for
the saw chain to stop before you move
the chainsaw. Always stop the motor
before moving from cut to cut.
CARE AND MAINTENANCE
Use only mild soap and damp cloth to clean
the tool. Do not use solvents to clean the
plastic housing of the saw. Never let any
liquid get inside the tool; never immerse any
part of the tool into a liquid.
IMPORTANT: To assure product SAFETY
and RELIABILITY, repairs, maintenance
and adjustment should be performed by
authorized service centers or other qualified
service organizations, always using identical
replacement parts.
Regular maintenance ensures a long
effective life for your chainsaw. We
recommend you make the following checks
on a regular basis:
CHAIN AND BAR
After every few hours of use, remove the
guide bar and chain and
clean thoroughly.
SAW CHAIN SHARPENING
CAUTION: Sharp chain. Always
wear protective gloves when handling
the chain. The chain is sharp and can cut
you when it is not running.
WARNING: Sharp moving chain. To
prevent accidental operation, ensure that
the tool is unplugged before performing
the following operations. Failure to do
this could result in serious personal injury.
NOTE: The cutters will dull immediately if
they touch the earth or a nail while cutting.
To get the best possible performance
from your chainsaw it is important to
keep the teeth of the chain sharp. Follow
these helpful tips for proper saw chain
sharpening:
1. For best results use a 4.5mm file and
a file holder or filing guide to sharpen
your chain. This will ensure you
always get the correct sharpening
angles.
R
2. Place the file holder flat on the top
plate and depth gauge of the cutter.
3. (Figure S) Keep the correct top plate
(22) filing angle line of 30° on your
file guide parallel with your chain
(file at 60° from chain viewed from
above).
4. Sharpen cutters on one side of the
chain first. File from the inside of
each cutter to the outside. Then turn
your saw around and repeat the
processes (2,3,4) for cutters on the
other side of the chain.
NOTE: Use a flat file to file the tops of the
rakers (portion of chain link in front of the
cutter) so they are about .025 inch (.635
mm) below the tips of the cutters as shown
in Figure T.
5. (Figure U) Keep all cutter lengths
equal.
6. If damage is present on the chrome
surface of the top plates or side
plates, file back until such damage is
removed.
CAUTION: After filing, the cutter will
be sharp, use extra caution during this
process.
NOTE: Each time the chain is sharpened,
it loses some of the low kickback qualities
and extra caution should be used. It is
recommended that a chain be sharpened
no more than four times.
U
60°
S
22
T
.025 in.
.635mm

12
ACCESSORIES
WARNING: The use of accessories
not recommended in this manual may be
hazardous.
Accessories are available from your local
retailer or nearest BLACK+DECKER service
center.
• This chainsaw is compatible with the
BLACK+DECKER chain RC1600
• Replace bar with a corresponding 16-inch
Oregon low-kickback bar.
NOTE: Ensure the new bar is equipped with
a tool-free tension assembly (16).
SERVICE INFORMATION
All BLACK+DECKER Service Centers
are staffed with trained personnel to
provide customers with efficient and
reliable power tool service. Whether you
need technical advice, repair, or genuine
factory replacement parts, contact the
BLACK+DECKER location nearest you. To
find your local service location, call:
1-800-544-6986, or visit
www.blackanddecker.com
This Class B digital apparatus complies
with Canadian ICES-003.
This device complies with part 15 of the
FCC rules. Operation is subject to the
following two conditions: (1) This device
may not cause harmful interference, and
(2) this device must accept any interference
received, including interference that may
cause undesired operation.
NOTE: This equipment has been tested
and found to comply with the limits for
a Class B digital device, pursuant to
Part 15 of the FCC Rules. These limits
are designed to provide reasonable
protection against harmful interference in
a residential installation. This equipment
generates, uses and can radiate radio
frequency energy and, if not installed and
used in accordance with the instructions,
may cause harmful interference to radio
communications. However, there is no
guarantee that interference will not occur in
a particular installation.
If this equipment does cause harmful
interference to radio or television
reception, which can be determined by
turning the equipment off and on, the
user is encouraged to try to correct the
interference by one or more of the following
measures:
• Reorient or relocate the receiving
antenna.
• Increase the separation between the
equipment and receiver.
• Connect the equipment into an outlet on
a circuit different from that to which the
receiver is connected.
• Consult the dealer or an experienced
radio/TV technician for help.
Changes or modifications to this unit
not expressly approved by the party
responsible for compliance could void the
user’s authority to operate the equipment.
This Class B digital apparatus complies
with Canadian ICES-003.
TWO-YEAR LIMITED
WARRANTY
Black+Decker (U.S.) Inc. warranties this
product to be free from defects in material
or workmanship for a period of two (2)
years following the date of purchase,
provided that the product is used in a home
environment. This limited warranty does
not cover failures due to abuse, accidental
damage or when repairs have been
made or attempted by anyone other than
Black+Decker and its Authorized Service
Centers. A defective product meeting the
warranty conditions set forth herein will be
replaced or repaired at no charge in either
of two ways:
The first, which will result in exchanges
only, is to return the product to the retailer
from whom it was purchased (provided
that the store is a participating retailer).
Returns should be made within the time
period of the retailer’s policy for exchanges.
Proof of purchase may be required. Please
check with the retailer for its specific
return policy regarding time limits for
returns or exchanges. The second option
is to take or send the product (prepaid)
to a Black+Decker owned or authorized
Service Center for repair or replacement at
Black+Decker’s option. Proof of purchase
may be required. Black+Decker owned
and authorized service centers are listed
under “Tools–Electric” in the yellow pages
of the phone directory or online at www.
blackanddecker.com.
This warranty does not apply to
accessories. This warranty gives you
specific legal rights and you may have
other rights which vary from state to
state. Should you have any questions,
contact the manager of your nearest
Black+Decker Service Center. This product
is not intended for commercial use, and
accordingly, such commercial use of this
product will void this warranty. All other
guarentees, express or implied, are hereby
disclaimed.

13
TROUBLESHOOTING
Problem Possible Cause Possible Solution
• Chain saw will not start. • Cord not plugged in.
• Plug chain saw into a working outlet.
• Circuit fuse is blown. • Replace circuit fuse. (If the
product repeatedly causes the
circuit fuse to blow, discontinue use
immediately and have it serviced
at a BLACK+DECKER service center
or authorized servicer.)
• Circuit breaker is tripped.
• Reset circuit breaker. (If the product
repeatedly causes the circuit
breaker to trip, discontinue use
immediately and have it serviced
at a BLACK+DECKER service
center or authorized servicer.)
• Cord or switch is • Have cord or switch replaced at
damaged. BLACK+DECKER Service Center or
Authorized Servicer.
• Lock-off button not • Push lock off button and then
actuated. depress the trigger switch.
• Bar / chain overheated.
• Chain too tight. • Refer to “adjusting chain
tension” section.
• Lubrication needed.
• Refer to “filling the oil reservoir”
section.
• Chain is loose. • Chain tension set • Refer to “adjusting chain
incorrectly. tension” section.
• Poor cut quality. • Chain tension set • Refer to “adjusting chain
incorrectly. tension” section.
• Chain needs to be • Refer to “saw chain sharpening”
sharpened. section.
• Chain needs Note: Excessive tension leads to
replacement. excessive wear and reduction in
life of bar & chain. Ensure too is
always adequately filled with
proper oil.
Refer to “replacing the saw chain”
section.
• Unit runs but does • Chain installed • Refer to sections for installing
not cut. backwards. and removing chain.
For assistance with your product, visit our website www.blackanddecker.com for the location of
the service center nearest you or call the BLACK+DECKER help line at 1-800-544-6986.
Imported by
Black+Decker (U.S.) Inc.,
701 E. Joppa Rd.
Towson, MD 21286 U.S.A.
LATIN AMERICA: This warranty does not
apply to products sold in Latin America.
For products sold in Latin America, check
country specific warranty information
contained in the packaging, call the local
company or see the website for such
information.

14
MODE D’EMPLOI
SCIE À CHAÎNE
Merci d’avoir choisi BLACK+DECKER! Consulter le site Web
www.BlackandDecker.com/NewOwner pour enregistrer votre nouveau produit.
ÀLIRE AVANT DE RETOURNER CE PRODUIT POUR QUELQUE
RAISON QUE CE SOIT :
Si des questions ou des problèmes surgissent après l’achat d’un produit
BLACK+DECKER, consulter le site Web www.blackanddecker.com/instantanswers
pour obtenir des réponses instantanément 24 heures par jour. Si la réponse est
introuvable ou en l’absence d’accès à l’Internet, composer le 1 800 544-6986 de 8 h à
17 h HNE, du lundi au vendredi, pour parler avec un agent. Prière d’avoir le numéro de
catalogue sous la main lors de l’appel.
Pour l´achat d´un filtre de rechange composer le 1-888-678-7278
CONSERVER CE MODE D’EMPLOI POUR UN USAGE ULTÉRIEUR.
VOICI DES RENSEIGNEMENTS IMPORTANTS À CONNAÎTRE :
NE PAS EXERCER DE TENSION TROP FORTE SUR LA CHAÎNE. Se
reporter à la rubrique « RÉGLAGE DE LA TENSION DE LA CHAÎNE »
pour savoir comment tendre la chaîne correctement.
Retendre la chaîne fréquemment durant les deux premières heures
d’utilisation.
NUMERO DE CATALOGUE
CS1216
LIGNES DIRECTRICES EN MATIÈRE DE SÉCURITÉ - DÉFINITIONS
Il est important que vous lisiez et compreniez ce mode d’emploi. Les informations qu’il
contient concernent VOTRE SÉCURITÉ et visent à ÉVITER TOUT PROBLÈME. Les
symboles ci-dessous servent à vous aider à reconnaître cette information.
DANGER : Indique une situation dangereuse imminente qui, si elle n’est pas
évitée, causera la mort ou des graves blessures.
AVERTISSEMENT : Indique une situation potentiellement
dangereuse qui, si elle n’est pas évitée, pourrait causer la mort ou de graves blessures.
MISE EN GARDE : Indique une situation potentiellement dangereuse
qui, si elle n’est pas évitée, pourrait causer des blessures mineures ou modérées.
MISE EN GARDE : Utilisé sans le symbole d’alerte à la sécurité,
indique une situation potentiellement dangereuse qui, si elle n’est pas évitée, peut résulter
en des dommages à la propriété.

15
Avertissements de sécurité
généraux pour les outils
électriques
AVERTISSEMENT : Lire tous les
avertissements de sécurité et
toutes les directives. Le non-respect
des avertissements et des directives
pourrait se solder par un choc
électrique, un incendie et/ou une
blessure grave.
Conserver tous les
avertissements et toutes les
directives pour un usage
ultérieur.
Le terme «outil électrique» cité dans
les avertissements se rapporte à votre
outil électrique à alimentation sur
secteur (avec fil) ou par piles (sans fil).
1) Sécurité du lieu de travail
a) Tenir la zone de travail propre et
bien éclairée. Les endroits sombres
sont souvent des causes d’accidents.
b) Ne pas faire fonctionner d’outils
électriques dans un milieu
déflagrant, soit en présence de
liquides inflammables, de gaz ou
de poussière. Les outils électriques
produisent des étincelles qui peuvent
enflammer la poussière ou les vapeurs.
c) Éloigner les enfants et les curieux
au moment d’utiliser un outil
électrique. Une distraction pourrait
vous en faire perdre la maîtrise.
2) Sécurité en matière d’électricité
a) Les fiches des outils électriques
doivent correspondre à la prise. Ne
jamais modifier la fiche en aucune
façon. Ne jamais utiliser de fiche
d’adaptation avec un outil électrique mis
à la terre. Le risque de choc électrique
sera réduit par l’utilisation de fiches non
modifiées correspondant à la prise.
b) Éviter tout contact physique
avec des surfaces mises à la
terre comme des tuyaux, des
radiateurs, des cuisinières et des
réfrigérateurs. Le risque de choc
électrique est plus élevé si votre corps
est mis à la terre.
c) Ne pas exposer les outils
électriques à la pluie ou à d’autres
conditions où il pourrait être
mouillé. La pénétration de l’eau dans
un outil électrique augmente le risque
de choc électrique.
d) Ne pas utiliser abusivement le cordon
d’alimentation. Ne jamais utiliser
le cordon pour transporter, tirer ou
débrancher un outil électrique. Tenir
le cordon éloigné de la chaleur, de
l’huile, des bords tranchants ou
des pièces mobiles. Les cordons
endommagés ou emmêlés augmentent
les risques de choc électrique.
e) Pour l’utilisation d’un outil
électrique à l’extérieur, se servir
d’une rallonge convenant à une telle
utilisation. L’utilisation d’une rallonge
conçue pour l’extérieur réduit les
risques de choc électrique.
f) S’il est impossible d’éviter
l’utilisation d’un outil électrique
dans un endroit humide, brancher
l’outil dans une prise ou sur un
circuit d’alimentation dotés d’un
disjoncteur de fuite à la terre (GFCI).
L’utilisation de ce type de disjoncteur
réduit les risques de choc électrique.
3) Sécurité personnelle
a) Ê
tre vigilant, surveiller le travail
effectué et faire preuve de jugement
lorsqu’un outil électrique est utilisé.
Ne pas utiliser d’outil électrique en
cas de fatigue ou sous l’influence de
drogues, d’alcool ou de médicaments.
Un simple moment d’inattention en
utilisant un outil électrique peut entraîner
des blessures corporelles graves.
b) Utiliser des équipements de
protection individuelle. Toujours
porter une protection oculaire.
L’utilisation d’équipements de protection
comme un masque antipoussière, des
chaussures antidérapantes, un casque
de sécurité ou des protecteurs auditifs
lorsque la situation le requiert réduira les
risques de blessures corporelles.
c) Empêcher les démarrages
intempestifs. S’assurer que
l’interrupteur se trouve à la position
d’arrêt avant de relier l’outil à une
source d’alimentation et/ou d’insérer
un bloc-piles, de ramasser ou de
transporter l’outil. Transporter un
outil électrique alors que le doigt
repose sur l’interrupteur ou brancher
un outil électrique dont l’interrupteur
est à la position de marche risque de
provoquer un accident.
d) Retirer toute clé de réglage ou
clé standard avant de démarrer
l’outil. Une clé standard ou une clé
de réglage attachée à une partie
pivotante peut causer des blessures.
e) Ne pas trop tendre les bras.
Conserver son équilibre en tout
temps. Cela permet de mieux
maîtriser l’outil électrique dans les
situations imprévues.
f) S’habiller de manière appropriée.
Ne pas porter de vêtements amples
ni de bijoux. Garder les cheveux,
les vêtements et les gants à l’écart
des pièces mobiles. Les vêtements
amples, les bijoux ou les cheveux

16
longs risquent de rester coincés dans
les pièces mobiles.
g) Si des composants sont fournis
pour le raccordement de dispositifs
de dépoussiérage et de ramassage,
s’assurer que ceux-ci sont bien
raccordés et utilisés. L’utilisation
d’un dispositif de dépoussiérage peut
réduire les dangers
engendrés par les poussières.
4) Utilisation et entretien d’un outil
électrique
a) Ne pas forcer un outil électrique.
Utiliser l’outil électrique approprié
à l’application. L’outil électrique
approprié effectuera un meilleur travail,
de façon plus sûre et à la vitesse pour
laquelle il a été conçu.
b) Ne pas utiliser un outil électrique
dont l’interrupteur est défectueux.
Tout outil électrique dont l’interrupteur
est défectueux est dangereux et doit
être réparé.
c) Débrancher la fiche du secteur ou le
bloc-piles de l’outil électrique avant
de faire tout réglage ou changement
d’accessoire, ou avant de ranger
l’outil électrique. Ces mesures
préventives réduisent les risques de
démarrage accidentel de l’outil électrique.
d) Ranger les outils électriques
hors de la portée des enfants, et
ne permettre à aucune personne
n’étant pas familière avec un
outil électrique (ou son manuel
d’instruction) d’utiliser ce dernier.
Les outils électriques deviennent
dangereux entre les mains
d’utilisateurs inexpérimentés.
e) Entretenir les outils électriques.
Vérifier les pièces mobiles pour
s’assurer qu’elles sont bien
alignées et tournent librement,
qu’elles sont en bon état et ne
sont affectées par aucun trouble
susceptible de nuire au bon
fonctionnement de l’outil électrique.
En cas de dommage, faire réparer
l’outil électrique avant toute
nouvelle utilisation. Beaucoup
d’accidents sont causés par des outils
électriques mal entretenus.
f) S’assurer que les outils de coupe sont
aiguisés et propres. Les outils de coupe
bien entretenus et affûtés sont moins
susceptibles de se coincer et sont plus
faciles à contrôler.
g) Utiliser l’outil électrique, les
accessoires, les forets, etc.
conformément aux présentes
directives en tenant compte des
conditions de travail et du travail
à effectuer. L’utilisation d’un outil
électrique pour toute opération autre
que celle pour laquelle il a été conçu
est dangereuse.
5) Réparation
a) Faire réparer l’outil électrique
par un réparateur professionnel
en n’utilisant que des pièces de
rechange identiques. Cela permettra
de maintenir une utilisation sécuritaire
de l’outil électrique.
LIRE TOUTES CES DIRECTIVES.
CONSIGNES DE SÉCURITÉ ET
AVERTISSEMENTS POUR LES
SCIES Á CHAÍNE
• Éloigner toute partie du corps de
la chaîne de l’outil lorsque la scie
à chaîne est en marche. Avant de
démarrer la scie à chaîne, s’assurer
que la chaîne est dégagée, sans
aucun contact avec des objets. Un
moment d’inattention, durant l’utilisation
d’une scie à chaîne, peut résulter dans
l’enchevêtrement des vêtements ou d’une
partie du corps dans la chaîne.
• Toujours tenir la tronçonneuse avec
votre ISO sur la poignée arrière et la
main gauche sur la poignée avant. Tenir
la tronçonneuse avec une configuration
inversée main augmente le risque de
blessure et ne devrait jamais être fait.
• Tenir l’outil électrique par ses surfaces
de prise isolées seulement, car la
chaîne peut entrer en contact avec un
câblage caché ou le cordon de la scie.
Tout contact entre une chaîne de scie et
un fil « sous tension » risque de mettre
« sous tension » les pièces métalliques
exposées de l’outil et de donner un choc
électrique à l’opérateur.
• Porter des lunettes de sécurité et
une protection auditive. Le port
d’un équipement de protection
supplémentaire pour la tête, les
mains, les jambes et les pieds est
recommandé. Les vêtements de
protection appropriés réduisent les
blessures corporelles causées par les
débris projetés ou un contact accidentel
avec la chaîne de scie.
• Ne pas grimper dans un arbre pour
utiliser la scie à chaîne. L’utilisation d’une
scie à chaîne en hauteur dans un arbre peut
se solder par des blessures corporelles.
• Conserver toujours un pas sûr et
utiliser uniquement la scie à chaîne
debout sur une surface fixe, sécuritaire
et de niveau. Les surfaces glissantes ou
instables comme les échelles peuvent
entraîner une perte de l’équilibre ou du
contrôle de la scie à chaîne.
• Lors de la coupe d’une branche
maîtresse sous tension, prendre

17
garde au redressement de la branche.
Lorsque la tension contenue dans les
fibres de bois se relâche, la branche
maîtresse pendant la détente risque
de frapper l’utilisateur et/ou de lui faire
perdre le contrôle de la scie à chaîne.
• Être extrêmement prudent lors de la
coupe de broussailles ou de jeunes
arbres. Les branches élancées peuvent
se coincer dans la chaîne et être projetées
vers vous ou vous déséquilibrer.
• Transporter la scie à chaîne par la
poignée avant avec l’outil hors tension
et à l’écart du corps. Toujours mettre
la gaine du guide-chaîne avant de
transporter ou d’entreposer la scie à
chaîne. La manipulation adéquate de la
scie à chaîne réduit le risque de contact
accidentel avec la chaîne en mouvement.
• Suivre les consignes de graissage, de
tension de la chaîne et de changement
d’accessoires. Une chaîne mal tendue
ou graissée risque de se briser ou accroît
la probabilité d’un effet de rebond.
• Maintenir les poignées sèches,
propres et exemptes d’huile et de
graisse. Des poignées pleines de graisse
sont glissantes et peuvent vous faire
perdre le contrôle de votre outil.
• Ne couper que le bois. Ne pas utiliser
la scie à chaîne pour des applications
pour lesquelles l’outil n’est pas
conçu, comme la coupe des matières
plastiques, de la maçonnerie ou des
matériaux de constructions qui ne
sont pas en bois. L’utilisation de la scie
à chaîne pour toutes opérations autres
que celles pour lesquelles elle a été
conçue est dangereuse.
Causes de l’effet de rebond et
prévention par l’opérateur :
L’effet de rebond se produit lorsque
l’extrémité ou la partie supérieure du guide-
chaîne frappe un objet ou lorsque la chaîne
se coince dans une entaille.
Le contact de l’extrémité pourrait provoquer
une réaction inverse soudaine qui
projetterait le guide-chaîne vers le haut et
l’arrière en direction de l’opérateur.
Un coincement de la chaîne de la scie
sur le dessus du guide-chaîne pourrait
repousser rapidement le guide-chaîne vers
l’arrière en direction de l’opérateur.
L’un ou l’autre de ces mouvements
brusques pourrait vous faire perdre la
maîtrise de la scie et se solder par une
grave blessure corporelle. Il ne faut pas
se fier exclusivement aux dispositifs de
sécurité intégrés à votre scie. L’utilisateur
de scie à chaîne doit prendre plusieurs
mesures pour éviter tout accident ou toute
blessure lors des travaux de coupe.
Un effet de rebond est le résultat
d’une mauvaise utilisation de l’outil et/
ou de procédures ou conditions de
fonctionnement incorrectes. Il peut
être évité en prenant les précautions
nécessaires telles que décrites ci-dessous :
• Saisir fermement la scie à chaîne
des deux mains, avec les pouces et
les doigts autour des poignées, et
positionner le corps et les bras de
sorte à résister à la force de l’effet de
rebond. Il est possible de maîtriser
les forces de l’effet de rebond avec de
telles mesures de précaution. Ne pas
lâcher la scie à chaîne.
• Ne pas trop tendre les bras et ne
pas couper au-dessus du niveau des
épaules. Cela aide à éviter un contact
accidentel de l’extrémité et permet de
mieux maîtriser la scie à chaîne dans les
situations imprévues.
• Utiliser uniquement les guide-chaînes
et les chaînes de remplacement
spécifiés par le fabricant. Les guide-
chaînes et les chaînes de remplacement
inadéquats peuvent entraîner un bris de
la chaîne et/ou un effet de rebond.
• Suivre les directives du fabricant pour
l’affûtage et l’entretien de la chaîne
de scie. Le fait de baisser le guide de
profondeur peut accroître l’effet de rebond.
Suivre les précautions qui suivent pour
réduire l’effet de rebond notamment :
(1.) Saisir fermement la scie à chaîne. Tenir
fermement la scie à chaîne avec les deux
mains lorsque le moteur est en marche.
Utiliser une prise ferme avec les pouces et
les doigts et encercler les poignées de la
scie à chaîne. La scie à chaîne imprimera
un mouvement avant lors de la coupe avec
la partie inférieure du guide-chaîne et un
mouvement arrière lors de coupe avec la
partie supérieure du guide-chaîne.
(2.) Ne pas trop se pencher.
(3.) Conserver son équilibre en tout temps.
(4.) Ne pas laisser l’extrémité du guide-
chaîne frapper un billot, une branche, le sol
ou tout autre obstruction.
(5.) Ne pas couper au-dessus de la hauteur
des épaules.
(6.) Utiliser des dispositifs comme des chaînes
à faible effet de rebond et des guides-chaîne à
faible effet de rebond pour réduire les risques
associés à l’effet de rebond.
(7.) Utiliser uniquement des guides-chaîne
et des chaînes de rechange précisés par le
fabricant ou son équivalent.
(8.) Ne pas mettre en contact la chaîne et tout
objet se trouvant à l’extrémité du guide-chaîne.
(9.) Tenir la zone de travail dégagée et
exempte d’obstructions comme d’autres
arbres, branches, roches, clôtures,
souches, etc. Éliminer ou éviter toute
obstruction que la scie à chaîne pourrait

18
frapper lors d’une coupe d’un billot ou
d’une branche en particulier.
(10.) Maintenir la chaîne de la scie bien
affûtée et tendue correctement. Une chaîne
lâche ou émoussée peut augmenter le
risque d’effet de rebond. Vérifier la tension
à intervalles réguliers, avec le moteur hors
tension et sans le bloc-piles, jamais avec le
moteur en marche.
(11.) Commencer et poursuivre la coupe
uniquement lorsque la chaîne fonctionne
à plein régime. Si la chaîne tourne à un
régime plus lent, le risque d’un effet de
rebond est plus élevé.
(12.) Tronçonner un seul billot à la fois.
(13.) Faire très attention lorsque vous
recommencez à scier à partir d’une
entaille déjà entamée. Appuyer les butées
cannelées contre le tronc et laisser la
chaîne atteindre son plein régime avant de
poursuivre la coupe.
(14.) Ne pas essayer de coupes en
plongée ou le perçage de trous.
(15.) Prendre garde au déplacement des
billots ou à d’autres forces qui pourraient
faire refermer une entaille et pincer la
chaîne ou qui pourraient tomber sur celle-ci.
Directives de sécurité concernant l’effet
de rebond
AVERTISSEMENT : la scie à chaîne est
dotée des caractéristiques suivantes afin
d’aider à réduire les risques liés à l’effet de
rebond; toutefois, ces caractéristiques
n’élimineront pas totalement cette
dangereuse réaction. En tant qu’utilisateur
de scie à chaîne, ne pas se fier uniquement
aux dispositifs de sécurité. Vous devez
respecter toutes les précautions, directives
et consignes d’entretien et de sécurité
contenues dans ce manuel afin d’essayer
d’éviter l’effet de rebond et autres forces qui
pourraient entraîner de graves blessures.
• Frein de chaîne, conçu pour éteindre
immédiatement la scie à chaîne si le
rebond est trop grand.
• Guide-chaîne à faible effet de rebond,
conçu avec une extrémité de faible rayon
qui réduit la taille de la zone dangereuse
d’effet de rebond sur l’extrémité de la
barre. Un guide-chaîne à faible effet
de rebond est l’un des dispositifs qui
réduit de manière significative le nombre
et l’ampleur des effets de rebond
lors d’essais en conformité avec les
exigences de sécurité pour les scies à
chaîne électriques.
• Chaîne à effet de rebond réduit, conçue
avec un guide de profondeur profilé et un
lien de pare-main qui dévie la force de
l’effet de rebond et permet à la chaîne de
s’enfoncer progressivement dans le bois.
Une chaîne à faible effet de rebond est
une chaîne conforme aux exigences de
performance ANSI B175.1-1991.
• Ne pas utiliser la scie à chaîne lorsque
vous êtes dans un arbre, sur une
échelle ou un échafaudage ou sur
toute autre surface instable.
• Tenir l’outil par sa surface de prise
isolée dans une situation où l’outil de
coupe peut entrer en contact avec un
câblage dissimulé. Tout contact avec un
fil « sous tension » mettra « sous tension
» les pièces métalliques exposées de
l’outil et électrocutera l’opérateur.
• Ne pas effectuer d’opérations au-delà de
sa capacité ou de son expérience. Lire
attentivement et comprendre parfaitement
les directives de ce mode d’emploi.
• Avant de démarrer la scie à chaîne,
s’assurer que la chaîne est dégagée,
sans aucun contact avec des objets.
• Ne pas utiliser la scie à chaîne d’une
seule main! Une telle pratique risque
de blesser gravement l’opérateur,
les aides ou les curieux. Une scie à
chaîne est conçue uniquement pour une
utilisation à deux mains.
• Garder les poignées sèches, propres
et exemptes d’huile ou de graisse.
• Ne pas laisser la saleté, les débris ou
la sciure s’accumuler sur le moteur ou
les évents externes.
• Arrêter la scie à chaîne avant de la
déposer sur le sol.
• Ne pas couper de vignes, de petites
broussailles ou du sous-bois.
• Être extrêmement prudent lors de la
coupe de broussailles ou de jeunes
arbres, car les branches élancées
peuvent se coincer dans la chaîne et être
projetées vers vous ou vous déséquilibrer.
AVERTISSEMENT : certains outils
électriques, tels que les sableuses, les scies,
les meules, les perceuses ou certains autres
outils de construction, peuvent produire de
la poussière contenant des produits
chimiques reconnus par l’État de la
Californie comme étant susceptibles
d’entraîner le cancer, des malformations
congénitales ou pouvant être nocifs pour le
système reproductif. Parmi ces produits
chimiques, on retrouve :
• le plomb contenu dans les peintures à
base de plomb,
• la silice cristalline de la brique, du
ciment et d’autres
produits de maçonnerie, et
• l’arsenic et chrome provenant de bois
traité chimiquement
Les risques reliés à l’exposition à ces
poussières varient selon la fréquence à
laquelle l’utilisateur travaille avec ce type
de matériaux. Pour réduire l’exposition à
ces produits chimiques, travailler dans un
endroit bien ventilé et porter un équipement

19
de sécurité approuvé comme un masque
antipoussières conçu spécialement pour
filtrer les particules microscopiques.
• Éviter le contact prolongé avec les
poussières produites par les activités
de ponçage, sciage, meulage, perçage
et autres activités de construction.
Porter des vêtements de protection et
laver les parties du corps exposées
avec une solution d’eau et de savon.
Laisser la poussière pénétrer dans
la bouche et les yeux ou la laisser
reposer sur la peau, pourrait promouvoir
l’absorption de produits chimiques nocifs.
AVERTISSEMENT : Utilisation de cet
outil peut générer ou débourser de
poussière, ce qui peut causer des
blessures graves et permanentes
respiratoires ou autres. Toujours utiliser
une protection respiratoire approuvé par
NIOSH/OSHA approprié pour l’exposition à
la poussière. Particules directs loin du
visage et du corps.
TERMINOLOGIE ET
NOMENCLATURE RELATIVES Á
SCIES Á CHAÍNE
• Tronçonnage - le processus de coupe
transversale d’un arbre abattu ou d’un
billot en morceaux.
• Frein moteur - un dispositif utilisé pour
immobiliser la chaîne de la scie dès
que la détente est relâchée.
• Tête motorisée de la scie à chaîne -
une scie sans chaîne et guide-chaîne.
• Pignon d’entraînement ou pignon -
la pièce dentée qui entraîne la chaîne
de l’outil.
• Abattage - le processus de coupe d’un arbre.
• Trait d’abattage - la dernière entaille
pratiquée au côté opposé à l’entaille
d’abattage sur le tronc d’un arbre.
• Poignée avant - la poignée d’appui
logée à l’avant ou vers l’avant de la
scie à chaîne.
• Protège-main avant - une barrière
physique entre la poignée avant de
la scie à chaîne et le guide-chaîne
normalement positionné près de la
main sur la poignée avant et parfois
utilisé comme levier d’actionnement du
frein de chaîne.
• Guide-chaîne - une solide structure
sur rail qui supporte et guide la chaîne
de l’outil.
• Fourreau du guide-chaîne - boîtier
qui s’adapte sur le guide-chaîne pour
prévenir le contact des dents lorsque la
scie n’est pas en utilisation.
• Effet de rebond - le mouvement
vertical ou arrière, ou les deux
simultanément, du guide-chaîne, se
produit lorsque la chaîne près de
l’extrémité supérieure du guide-chaîne
frappe un objet tel un billot ou une
branche ou lorsque la chaîne est prise
dans une entaille du tronc.
• Effet de rebond par pincement - le
refoulement rapide de la scie peut
se produire lorsque l’entaille dans le
tronc se referme et pince la chaîne
en mouvement et la bloque près de
l’extrémité du guide-chaîne.
• Effet de rebond par rotation - le
mouvement vertical ou arrière rapide de
la scie peut se produire lorsque la chaîne
en mouvement près de l’extrémité
supérieure du guide-chaîne frappe un
objet tel un billot ou une branche.
• Ébranchage - la coupe des branches
d’un arbre abattu
• Chaîne à faible effet de rebond - une
chaîne conforme aux exigences de
performance de rebond de la norme
ANSI B175.1-1991 (lors d’essais sur un
échantillon représentatif de scies à chaîne).
• Position normale de coupe - ces
positions sont utilisées lors du
tronçonnage et des entailles d’abattage.
• Entaille d’abattage - une entaille dans
le tronc qui dirige la chute de l’arbre.
• Poignée arrière - la poignée d’appui
logée à l’arrière ou vers l’arrière de la scie.
• Guide-chaîne à faible effet de rebond
- un guide-chaîne qui réduit de façon
significative et prouvée l’effet de rebond.
• Chaîne de rechange - une chaîne
conforme aux exigences de
performance d’effet de rebond de la
norme ANSI B175.1-1991 lors d’essais
avec des modèles spécifiques de
scies à chaîne. Il est possible que
cette chaîne ne soit pas conforme aux
exigences de performance ANSI si
utilisée sur d’autres modèles d’outils.
• Chaîne pour scies à chaîne - une
chaîne dentée en boucle, qui coupe le
bois, et qui est entraînée par le moteur
et supportée par le guide-chaîne.
• Butée cannelée - le point d’appui utilisé
en cours d’abattage ou de tronçonnage
pour faire pivoter la scie et maintenir la
position lors de la coupe.
• Interrupteur - un dispositif qui, lorsque
actionné, complètera ou interrompra un circuit
électrique du moteur de la scie à chaîne.
• Bielle - un mécanisme qui transmet le
mouvement d’une détente à l’interrupteur.
• Verrou d’interrupteur - une butée
qui se déplace pour empêcher le
fonctionnement non intentionnel
de l’interrupteur à moins d’un
actionnement manuel.
UTILISATION PRÉVUE
La scie à chaîne sans fil BLACK+DECKER
est parfaite pour l’élagage et le tronçonnage
de petits billots jusqu’à 406 mm (16 po) de
diamètre. Cet outil se destine uniquement à
être utilisé par les consommateurs.

20
SYMBOLES
• L’étiquette apposée sur votre outil pourrait
comprendre les symboles suivants. Les symboles
et leurs définitions sont indiqués ci-après :
V ................. volts
A ................. ampères
Hz ............... hertz
W ................ watts
min ..............minutes
ou AC ....courant alternatif
ou DC ..courant continu
n
o ...............sous vide
................ Construction de classe I
................borne de mise à la minute
(mis à la terre)
PRÉPARATION POUR L’UTILISATION DE
LA SCIE À CHAÎNE
AVERTISSEMENT : Lire et assimiler toutes
les directives. Le non-respect des directives
indiquées ci-dessous peut entraîner des
risques de choc électrique, d’incendie ou de
blessures corporelles graves.
ASSEMBLAGE
INSTALLATION DU GUIDE-CHAÎNE ET
DE LA CHAÎNE
MISE EN GARDE :
Chaîne affûtée.
Toujours porter des gants protecteurs lors
de la manipulation de la chaîne. La chaîne
est tranchante et peut vous couper même
lorsqu’elle est au repos.
AVERTISSEMENT :
Chaîne affûtée en
mouvement. Pour prévenir tout
fonctionnement accidentel, s’assurer de
débrancher l’outil avant d’effectuer les
opérations suivantes. Le non-respect de
cette directive risque d’entraîner des
blessures corporelles graves.
La chaîne (5) et le guide-chaîne (4) sont
...............
Construction de classe II
.............. symbole d´avertissement
.../min ..........tours à la minute
m/s .............mètres par seconde
po ...............pouces
mm .............millimètres
.............. Lire le mode d’emploi avant
l’utilisation
............Utiliser une protection
respiratoire adéquate.
...........Utiliser une protection oculaire
adéquate.
............Utiliser une protection auditive
adéquate.
emballés ensemble dans la boîte. Ils
doivent être fixés au corps de la scie.
• Déposer la scie sur une surface ferme.
• Tourner le bouton de réglage du guide-
chaîne (7) dans le sens antihoraire comme
le montre la figure A pour enlever le
couvercle du pignon (6).
• Avec des gants de protection, saisir la
chaîne de scie (5) et l’enrouler autour du
guide-chaîne (4) en s’assurant que les
dents pointent dans la bonne direction
(voir la figure G).
• Vérifier que la chaîne est bien logée dans
la fente qui fait tout le tour du guide-
chaîne.
DESCRIPTION FONCTIONNELLE
1. Détente
2. Bouton de verrouillage (non illustré)
3. Protège-main avant
4. Guide-chaîne
5. Chaîne de scie
6. Couvercle du pignon
7. Bouton de réglage du guide-chaîne
8. Roue tendeuse de chaîne
9. Fourreau du guide-chaîne
10. Poignée arrière
11. Poignée avant
12. Cordon d’alimentation
13. Dispositif de retenue de rallonge
14. Bouchon du réservoir d’huile
15. Indicateur de niveau d’huile
A
1
3
6
7
4
2
5
9
11
10
12
13
14
8
15
La page est en cours de chargement...
La page est en cours de chargement...
La page est en cours de chargement...
La page est en cours de chargement...
La page est en cours de chargement...
La page est en cours de chargement...
La page est en cours de chargement...
La page est en cours de chargement...
La page est en cours de chargement...
La page est en cours de chargement...
La page est en cours de chargement...
La page est en cours de chargement...
La page est en cours de chargement...
La page est en cours de chargement...
La page est en cours de chargement...
La page est en cours de chargement...
La page est en cours de chargement...
La page est en cours de chargement...
La page est en cours de chargement...
La page est en cours de chargement...
La page est en cours de chargement...
La page est en cours de chargement...
La page est en cours de chargement...
La page est en cours de chargement...
-
 1
1
-
 2
2
-
 3
3
-
 4
4
-
 5
5
-
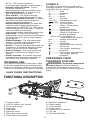 6
6
-
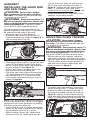 7
7
-
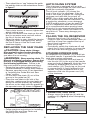 8
8
-
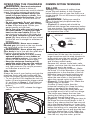 9
9
-
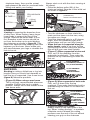 10
10
-
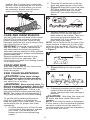 11
11
-
 12
12
-
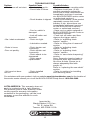 13
13
-
 14
14
-
 15
15
-
 16
16
-
 17
17
-
 18
18
-
 19
19
-
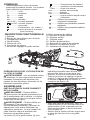 20
20
-
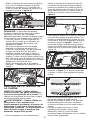 21
21
-
 22
22
-
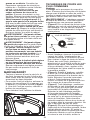 23
23
-
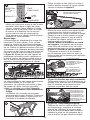 24
24
-
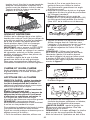 25
25
-
 26
26
-
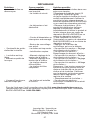 27
27
-
 28
28
-
 29
29
-
 30
30
-
 31
31
-
 32
32
-
 33
33
-
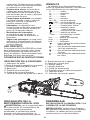 34
34
-
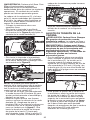 35
35
-
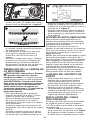 36
36
-
 37
37
-
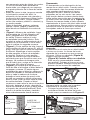 38
38
-
 39
39
-
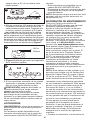 40
40
-
 41
41
-
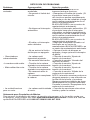 42
42
-
 43
43
-
 44
44


BLACK DECKER CS1216 Manuel utilisateur
- Catégorie
- Outils électroportatifs
- Taper
- Manuel utilisateur
dans d''autres langues
- English: BLACK DECKER CS1216 User manual
- español: BLACK DECKER CS1216 Manual de usuario
Documents connexes
Autres documents
-
DeWalt DCCS620 Manuel utilisateur
-
Ribimex RIBILAND PRTRE350 User And Maintenance Manual
-
STIHL MS 441 C Manuel utilisateur
-
Crafstman CMECS614 Le manuel du propriétaire
-
Crafstman CMECSP610 Le manuel du propriétaire
-
Black & Decker BCASCS61B Manuel utilisateur
-
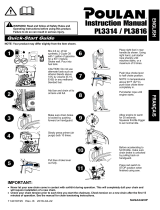 Poulan Pro PL3816 Le manuel du propriétaire
-
Black & Decker CCS818 Manuel utilisateur
-
-
Milwaukee 2727-20-49-16-2715-48-73-2010 Manuel utilisateur
