
Full - size Conversion Kit
Trousse de Conversion à un lit pleine grandeur
INSTRUCTIONS D'ASSEMBLAGE
Assembly Instruction
Made in China / Fabriqué en Chine
Important Information: / Information Importante :
Read all instructions BEFORE assembling crib / Lire attentivement toutes les instructions avant de procéder à l’assemblage du lit.
KEEP INSTRUCTIONS FOR FUTURE USE / CONSERVER LES INSTRUCTIONS POUR RÉFÉRENCE ULTÉRIEURE.
IMPORTED BY C&T International, Inc. / IMPORTE` PAR de C&T International, Inc.
CANADA ADDRESS:
105 Stonehurst Ct Northvale, NJ 07647 U.S.A.
3453, DU PRESIDENT KENNEDY LAC MEGANTIC, QUEBEC, CANADA G6B 2Y4
Tel, 201- 531-1919 Fax, 201- 531-1920
Website: www.sorellefurniture.com / Site Internet : www.sorellefurniture.com

Page 1
SORELLE
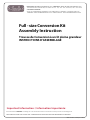
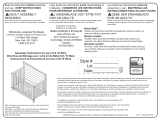
Adult Bed Assembly Parts / PIÈCES D’ASSEMBLAGE DU LIT D’ADULTE
(A) 228# Bed Rail (x2)
(A) Côté de lit #228 (x2)
(B) 228# Cross Slat (x4)
(B) Traverse #228 (x4)
(W) Additional Right Post
(W) Patte additionnelle droite
pour pied de lit (x1)
For Footboard (x1)
Headboard with Posts -
from Crib
Tête de lit avec pattes
provenant du lit de bébé Pied de lit avec patte gauche
provenant du lit de bébé
Footboard with Left Post -
from Crib
d. Screw x16
d. Vis à bois x16
PARTS: Hardware and
PIÈCES : Quincaillerie et outils
Tools
Phillips Screwdriver Not Supplied
Tournevis Phillips non fourni
Nuts x4
g. Écrou à manchon x4
g.
c. Flat Washer x 8
c. Rondelle x 8
M4 Hex Wrench
Clé Allen M4 incluse avec le lit
Included with Crib
f. M6 x 75mm Allen bolt x4
f. Boulon Allen M6 x 75mm x4
e. M6 x 17mm Allen bolt (x4)
e. Boulon Allen M6 x 17mm (x4)

Page 2
SORELLE
Adult Bed Assembly Steps / ÉTAPES D’ASSEMBLAGE DU LIT D’ADULTE
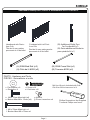
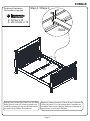
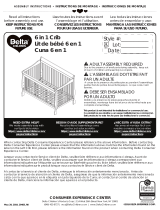
1
Unassemble your crib and get the components, Headboard
Démonter le lit de bébé et garder les composantes suivantes : Tête de lit avec la patte,
le pied de lit (C) et la patte avant gauche (D). Ensuite, suivre les étapes ici-bas.
with Post and Footboard (C) with
Left front post(D), then follow up below steps.
C
D
w
Step 1
Attach
additional right-front post(Part W) to the
Footboard using (3) Bolts (supplied with the crib).
DO NOT completely tighten the bolts at this time.
Attacher la patte additionnelle avant droite (Pièce W)
au pied de lit en utilisant 3 boulons (fournis avec le lit
de bébé).
NE PAS serrer les boulons complètement pour le
moment.
(HE) M6 x 50mm Allen bolt -
(HE) Boulon Allen M6 x 50mm
provenant du lit de bébé (x3)
from Crib (x 3)
HE
HE
HE

Page 3
SORELLE
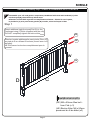
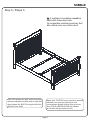
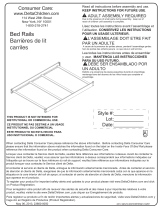
c
e
A
A
Attach each Bed Rail (Part A) to the
Footboard with Posts using (2) Bolts
(supplied with the crib) and (2) Flat
Washers (Part c).
DO NOT completely tighten the bolts at this
time.
Required Hardware
Quincaillerie requise
c. Flat Washer x 4
c. Rondelle x 4
M6 x 17mm Bolts x4
e. Boulons M6 x 17mm x 4
e.
Step / Étape 2
2
Les 2 côtés
Both Sides
Attacher chaque côté de lit (Pièce A) au pied de lit
avec les poteaux en utilisant (2) boulons (fournis
avec le lit de bébé) et 2 rondelles d’arrêt (Pièce c).
NE PAS SERRER complètement les boulons pour
le moment

Page 4
SORELLE
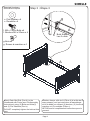
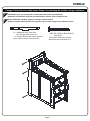
g
f
c
A
A
Attach Each Bed Rail (Part A) to the
Headboard with Posts (see Crib Assembly
Instructions) using (2) Bolts and Nuts(2)
and (2) Flat Washers (Part c).
DO NOT completely tighten the bolts at this
time.
.
M6 x 75mm
f. Boulons M6 x 20mm x 4
Bolts x4f.
Nuts x4
g. Écrous à manchon x 4
g.
c. Flat Washer x 4
c. Rondelle x 4
Required Hardware
Quincaillerie requise
Both Sides
Les 2 côtés
Step Étape 3 3
Attacher chaque côté de lit (Pièce A) à la tête de lit
avec poteaux (voir les instructions d’assemblage
du lit de bébé) en utilisant (2) boulons, (2) écrous à
manchon et (2) rondelles (Pièce c).
NE PAS serrer complètement les boulons pour le
moment.

Page 5
SORELLE
BX4
B
dd
Attach Each Cross Slat (Part B) to the Bed
Rails (Part A) with (2) Screw at each end,
install the screw into the pre-drilled hold in
the rails using Phillips Screwdriver.
d. Screw x16
d. Vis à bois x 16
Required Hardware
Quincaillerie requise Step / Étape 4 4
Attacher chaque traverse (Pièce B) aux côtés de lit
(Pièce A) avec (2) vis à chaque bout. Installer les
vis dans les trous pré-percés dans les côtés de lit
en utilisant un tournevis Phillips.

Page 6
SORELLE
After ALL screws are tight, ensure the bed
rails are adjusted correctly side to side and
then tighten ALL BOLTS using the M4 Hex
Wrench (from Crib).
Step / Étape 5 5
A mattress foundation must be
used with these bed rails.
Un ensemble matelas-sommier doit
être utilisé avec ces côtés de lit.
Après que TOUTES les vis sont bien serrées,
assurez-vous que les côtés de lit sont
correctement ajustés côte-à-côte et serrez
alors TOUS LES BOULONS en utilisant
la clé Allen M4 (provenant du lit).

Page 7
SORELLE
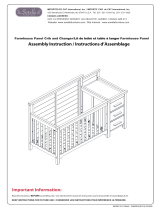
( V ) Additional Left - Rear Post
For Changer table alone (x1)
( V ) Patte additionnelle arrière gauche
pour table à langer seulement (x1) (HE) Boulon Allen M6 x 45mm
provenant du lit de bébé (x 3)
1
Unassemble your crib and get the components, then follow up below step.
Attach additional Left Rear Leg(V) to Changer Table as below.
2
(HE) M6 x 45mm Allen bolt (3)
from Crib
Changer Table Alone Assembly Steps / Étapes d’assemblage de la table à langer seulement
Démonter le lit de bébé et garder les composantes. Ensuite, suivre l’étape ici-bas.
Attacher la patte additionnelle arrière gauche (V) à la table à langer tel qu’illustré ici-bas.
-
 1
1
-
 2
2
-
 3
3
-
 4
4
-
 5
5
-
 6
6
-
 7
7
-
 8
8


Sorelle Sorelle 228 Assembly Instructions
- Taper
- Assembly Instructions
- Ce manuel convient également à
dans d''autres langues
- English: Sorelle Sorelle 228
Documents connexes


Autres documents
-
 Delta Children Crib N Changer Conversion Kit Assembly Instructions
-
 Delta Children Birkdale 4-in-1 Crib Assembly Instructions
-
 Delta Children Madisson Crib 'N' More Assembly Instructions
-
 Delta Children Duke 4-in-1 Convertible Baby Crib Assembly Instructions
-
 Delta Children Platform Bed Kit (500850) Assembly Instructions
-
 Delta Children Monterey Crib 'N' More Assembly Instructions
-
 Delta Children Canton Deluxe 6-in-1 Convertible Crib Assembly Instructions
-
 Delta Children Full Size Bed Rails (W0070) Assembly Instructions


