Powerfist 9081555 Le manuel du propriétaire
- Taper
- Le manuel du propriétaire

V1.0 9081555
Please read and understand all instructions before use. Retain this manual for
future reference.

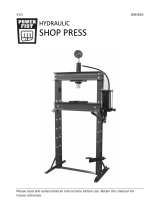
SPECIFICATIONS
Press Capacity 40,000 lb
Press Type Hydraulic
Ram Travel 6 in.
Working Range 4-1/8 to 38-9/16 in.
Bed Width 20-7/8 in.
Overall Height 68-1/2 in.
Material Steel Construction
INTRODUCTION
The workshop press is designed for light industrial use or for home use.
Perform straightening, stamping and bending with this powerful hydraulic
press. Features an H-frame design that makes it perfect for removing or
installing bearings, bushings, gears, ball joints, pulleys, universal joints and
more.
The press features a foot control and a sliding ram head.
SAFETY
WARNING! Read and understand all instructions before using this tool.
The operator must follow basic precautions to reduce the risk of
personal injury and/or damage to the equipment.
HAZARD DEFINITIONS
Please familiarize yourself with the hazard notices found in this manual. A
notice is an alert that there is a possibility of property damage, injury or death
if certain instructions are not followed.
DANGER! This notice indicates an immediate and specic hazard that will result
in severe personal injury or death if the proper precautions are not
taken.
WARNING! This notice indicates a specic hazard or unsafe practice that could
result in a serious injury if the proper precautions are not taken.
CAUTION! This notice indicates a potentially hazardous situation that may result
in minor or moderate injury if proper practices are not taken.
9081555 HYDRAULIC SHOP PRESS V1.0
www.princessauto.com / 1-800-665-8685 Page 2

NOTICE! This notice indicates that a specic hazard or unsafe practice will
result in equipment or property damage, but not personal injury.
WORK AREA
1. Operate in a safe work environment. Keep your work area clean, well-lit
and free of distractions. Place lights so you are not working in a shadow.
2. Keep anyone not wearing the appropriate safety equipment away from
the work area.
3. Store unused tools properly in a dry, safe and secure location to prevent
rust, damage or misuse.
PERSONAL SAFETY
WARNING! Wear personal protective equipment approved by the
Canadian Standards Association (CSA) or American National Standards
Institute (ANSI).
PERSONAL PROTECTIVE EQUIPMENT
1. Always wear impact safety goggles that provide front and side protection
for the eyes. Eye protection equipment should comply with CSA Z94.3-07
or ANSI Z87.1 standards based on the type of work performed.
2. Wear the appropriate type of full-face shield in addition to safety googles,
as the work can create chips, abrasive or particulate matter.
3. Wear steel toe footwear or steel toe caps to prevent a foot injury from
falling objects.
PERSONAL PRECAUTIONS
Control the tool, personal movement and the work environment to avoid
personal injury or damage to tool.
1. Do not operate any tool when tired or under the inuence of drugs,
alcohol or medications.
SPECIFIC SAFETY
WARNING! DO NOT let comfort or familiarity with product (gained from
repeated use) replace strict adherence to the tool safety rules. If you use
this tool unsafely or incorrectly, you can suer serious personal injury.
V1.0 HYDRAULIC SHOP PRESS 9081555
Page 3 www.princessauto.com / 1-800-665-8685

2. Use the correct tool for the job. This tool was designed for a specic
function. Do not modify or alter this tool or use it for an unintended
purpose.
3. The maximum load is 20 tons. Do not exceed this rated capacity. Never
apply excessive force to a workpiece and always use the pressure gauge
to accurately determine the applied load.
4. Inspect the press before each use. Do not use if any component is bent,
broken, cracked, leaking or showing other damage. Do not use the press
after a shock load until a qualied technician has examined the press.
5. Check to ensure that all bolts and nuts are tight.
6. Only use this shop press on a surface that is stable, level and not slippery.
The surface must be capable of sustaining the weight of the shop press
and the load.
7. Ensure that the workpiece is center-loaded and secure. An unbalanced
load may slip o the heel blocks or bed frame.
8. Keep hands and feet away from the bed frame area at all times.
9. Do not use the shop press to compress a spring or any other item that
could disengage and cause a potential hazard. Never stand directly in
front of a loaded press and never leave a loaded press unattended.
10. Do not allow an untrained person to operate the press.
11. Do not use brake uid or other improper uid in place of hydraulic oil.
Avoid mixing dierent types of oil when adding hydraulic oil. Only good
quality hydraulic jack oil can be used.
12. Do not expose the press to rain, snow or inclement weather.
13. Bolt the press to the oor if it is to be used on bulky or unstable items.
HYDRAULIC PRECAUTIONS
DANGER! Seek immediate medical attention if hydraulic uid under
pressure penetrates your skin. See Injection Injury precautions for
instructions before using a pressurized hydraulic system.
1. Do not touch or handle, hydraulic hoses or components while under
pressure. Hydraulic uid escaping under pressure has sucient force to
penetrate your clothing and skin. A pinpoint hole may inject hydraulic
9081555 HYDRAULIC SHOP PRESS V1.0
www.princessauto.com / 1-800-665-8685 Page 4

uid into your body. Seek immediate medical attention if this occurs (see
Injection Injury).
2. Never exceed the hydraulic system’s load capacity (see Specications).
3. Do not adjust the hydraulic system’s relief setting. The settings are preset
by the factory.
4. Hydraulic oil under pressure is hot and can cause a burn injury if touched,
sprayed or spilled. Allow the hydraulic system to cool before conducting
maintenance.
5. Hydraulic components require regular inspection. Release all pressure
from the system before you inspect it. Replace damaged hydraulic parts
with identical manufacturer's components.
6. Do not attempt makeshift repairs to a hydraulic system. Such repairs can
fail suddenly and create a hazardous condition.
7. A damaged or disconnected hydraulic hose under pressure may whip
around and inict personal injury or damage the work area. Secure the
hose to a xed or permanent structure with clamps or cable ties.
8. Hydraulic uid has a combustible ash point of 200°F (93°C). Do not
expose the uid to an ignition source.
9. Change your clothing immediately if sprayed with hydraulic uid. Store
clothing or rags contaminated with hydraulic uid in an approved metal
safety can with a spring-closing lid and venting designed to contain a re.
10. Only use hydraulic uid in the pump. Do not substitute or mix brake uid,
or any other uid, with the hydraulic uid. This can result in a pump
failure and injure the user or bystander.
INJECTION INJURY
DANGER! Seek immediate, professional medical treatment if uid
penetrates your skin. It may feel like a pricking or sting. Do not wait
for the appearance of symptoms. A toxic reaction can occur from the
exposure. Delay in treatment can lead to amputation or death.
Inform the medical sta that you have a uid penetration injury as soon as you
arrive at the medical facility. The severity of the symptoms will depend on the
type of uid injected. Bring the Safety Data Sheet for the uid with you to the
medical facility if possible.
V1.0 HYDRAULIC SHOP PRESS 9081555
Page 5 www.princessauto.com / 1-800-665-8685

INJECTION PRECAUTIONS
Fluid can penetrate the skin at 100 PSI pressure. Fluid escaping under pressure
from the tool has sucient force to penetrate your clothing and skin. Follow
the precautions below to avoid an injection injury.
1. Always check for leaks wearing a face shield, safety goggles, rubberized
gloves and protective clothes.
2. Release all pressure from the system before you inspect it.
3. Do not use your hands to detect a leak. Use a large piece of wood,
cardboard or paper and watch for discolouration.
4. Replace damaged parts with identical manufacturer's components to
ensure it is rated to handle the pressure.
UNPACKING
WARNING! Do not operate the tool if any part is missing. Replace
the missing part before operating. Failure to do so could result in a
malfunction and personal injury.
Remove the parts and accessories from the packaging and inspect for damage.
ASSEMBLY & INSTALLATION
Consult the parts list as necessary during assembly.
1. Lay the left post (#6) down on a at surface.
2. Position the lower crossbeam (#19) so the bolt holes align with the lower
bolt holes at the bottom of the left post. Insert a bolt (#13) through each
bolt hole from the inside. Do not secure yet.
3. Position one base (#15) over the protruding bolts. Secure each bolt with a
washer, lock washer and nut until hand-tight.
4. Secure a strut (#12) to each end of a base with an M10x30 bolt, M10
washer, M10 lock washer and M10 nut until hand-tight.
9081555 HYDRAULIC SHOP PRESS V1.0
www.princessauto.com / 1-800-665-8685 Page 6

5. Secure the free end of each strut to the second set of bolt holes from the
bottom with an M10x30 bolt, M10 washer, M10 lock washer and M10 nut.
6. Tighten all nuts in steps 3 to 5 with a wrench.
7. Repeat steps 1 to 5 with the right post. Do not connect the rear support
strut to the right post. This will be done later.
8. Slide the upper crossbeam (#1) onto the posts and align the bolt holes.
Insert M16x40 bolts from the outside through all eight bolt holes. Secure
each bolt with an M16 washer, M16 lock washer and M16 nut.
9. Raise the shop press frame upright.
10. Thread the pressure gauge (#38) into the pressure gauge connection nut
at the top of the ram.
11. Thread the upper round nut (#44) onto the ram until it reaches the
top threads.
12. Prepare four M8x20 bolts by sliding a washer onto each one. Set aside
within reach.
13. Position a movable plate (#45) inward over the cylinder base (#46) and
align the bolt holes. Insert a prepared screw through the sliding support
and into the cylinder base. Tighten to secure. Repeat with the other screw.
14. Position the cylinder base against the upper crossbeam's bottom and hook
the movable plate onto the crossbeam's lower ange.
15. Hold the cylinder base in position by hand or use clamps. Do not obstruct
the front where you will install the second movable plate.
16. Position the second movable plate inward over the crossbeam ange
and align the bolt holes with the cylinder base's bolt holes. Insert the
remaining prepared screws and tighten.
17. Adjust the movable plates. This is to avoid pressing at an angle, which can
damage a workpiece or allow it to pop out to one side.
a. Loosen all four screws and allowing the cylinder base to hang
naturally.
b. Check that the base is level from front-to-back and side-to-side by
holding a level against the base without applying pressure.
V1.0 HYDRAULIC SHOP PRESS 9081555
Page 7 www.princessauto.com / 1-800-665-8685

c. Raise the appropriate side of one or both movable plates to level the
base.
d. Tighten the screws to secure the base in this position.
18. Push the cylinder base back and forth along the crossbeam to conrm it
uses the full range. You may need to adjust the movable plates or smooth
out spots on the crossbeam ange if there are any obstructions.
19. Slide the ram through the opening in the cylinder base (#46) until the
upper round nut is sitting on top of it. Position the ram so the pressure
gauge is facing the front.
20. Thread the lower round nut (#39) onto the ram from beneath and tighten
to secure the ram to the cylinder base.
21. Center the ram assembly in relation to the frame. Tighten the nuts
securing the upper crossbeams to the posts with a wrench to hold the
ram in place during operation.
22. Push each bed frame pin (#10) through the matching set of holes on the
left and right side of the frame. The bed frame will rest on these, so
ensure they are level with each other. Secure the pins with the included
clips (#11).
23. Position the bed frame so the beams are outside of the leg assemblies.
Lower until the bed frame is resting on the pins.
24. Secure the pump (#35) with M10x15 bolts (#40) and washers (#16). The
bolts are inserted through the right post and into screw holes in the
pump’s mounting frame.
25. Connect the hydraulic hose (#36) tting to the connection nut on the
cylinder
26. Align the remaining support strut with the bolt hole in the right post.
Insert the M10x60 bolt (#20) through the inside of the right post and strut.
27. Insert the following onto the M10x60 bolt in this order: an M10 washer
(#16), M10 lock washer (#17), M10 nut (#18), long bushing (#41), foot pedal
bolt hole (not the slot), short bushing (#26), M10 washer (#16) and M10
lock nut (#24). Do not overtighten. The foot pedal must move freely.
9081555 HYDRAULIC SHOP PRESS V1.0
www.princessauto.com / 1-800-665-8685 Page 8

28. Insert the connector plate (#27) into the handle receiver bracket (#30).
Slide an M8x30 bolt (#50) through the bracket and connector plate. Secure
with an M8 washer (#51) and M8 lock nut (#32).
29. Insert the connector plate's (#27) other end between the foot pedal (#22)
struts. Insert an M10x30 bolt through the foot pedal's slots and the
connector plate. Secure with an M10 washer and an M10 lock nut. You
may need to adjust the foot pedal connection for the most ecient pedal
stroke.
30. Insert the handle (#43) into the handle socket when using it instead of the
foot pump.
31. Check all bolts and nuts and tighten if necessary.
OPERATIONS
BEFORE FIRST USE
Before the rst use, check for proper hydraulic oil level in the system. Then
thoroughly test the hydraulic ram for proper operation prior to its actual use.
1. Purge air from the hydraulic system. See Bleeding the Hydraulic System in
the Maintenance section.
2. Test the shop press without a workpiece to ensure all parts work
smoothly. Test again with a load. Gradually increase pressure and watch
that the workload does not shift and there is no distortion or deection
of the ram, leakage from the pump assembly or shifting of the frame.
A qualied technician should examine and repair any problems with the
pump itself.
OPERATING THE PRESS
IMPORTANT! Ensure that you read, understand and apply the safety
instructions and warnings before use.
1. Lift or lower the bed frame (#8) until it is in position. Insert a bed frame
pin (#10) into the left and right posts beneath the bed frame. Lower the
bed frame so it rests on the bed frame pins.
2. Move the sliding ram head over the area where the workpiece will require
work.
V1.0 HYDRAULIC SHOP PRESS 9081555
Page 9 www.princessauto.com / 1-800-665-8685

3. Place the heel blocks (#21) on the bed frame, then insert a workpiece on
the heel blocks.
• Tapping the elastic cylinder pins out on the heel block's corners can
help hold them in position during the task
4. Close the release valve on the pump by turning it clockwise.
5. Pump the handle (#43) or pedal (#22) until the ram nears the workpiece.
6. Align the workpiece and ram to ensure center-loading.
7. Pump the handle or pedal to apply load onto the workpiece.
• Pump slowly as the lower plate may shift upwards slightly until it
presses against the crossbeam.
8. Do not exceed the maximum piston stroke. If you see a red line on the
piston, retract the ram and adjust the bed to bring the workpiece closer to
the ram.
9. When the work is done, stop pumping the handle or pedal. Slowly
and carefully remove load from workpiece by turning the release valve
counterclockwise in small increments.
10. Once the ram has fully retracted, remove the workpiece from the bed
frame.
CARE & MAINTENANCE
1. Maintain the tool with care. A tool in good condition is ecient, easier to
control and will have fewer problems.
2. Keep the tool handles or gripping surfaces clean and dry.
3. Maintain the tool’s labels and name plates. These carry important
information. If unreadable or missing, contact Princess Auto Ltd. for
replacements.
WARNING! Only qualied service personnel should repair the tool. An
improperly repaired tool may present a hazard to the user and/or others.
HYDRAULIC RAM MAINTENANCE
Monthly maintenance is recommended for the hydraulic ram. Any restrictions
due to dirt, rust, etc. can cause the either slow movement or extremely rapid
9081555 HYDRAULIC SHOP PRESS V1.0
www.princessauto.com / 1-800-665-8685 Page 10

jerks, damaging the internal components. The following steps are designed to
keep the pump maintained and operational.
1. Lubricate the cylinder and the pumping mechanism with light oil.
2. Visually inspect for cracked welds, bent, loose, missing parts or hydraulic
oil leaks.
3. Inspect the hydraulic ram immediately if it was subjected to an abnormal
load or shock load.
4. Remove any hydraulic pump from service that is damaged, worn down or
operates abnormally, until repaired by an authorized service technician.
5. Check and maintain the ram oil level.
6. Always store the hydraulic ram in the fully retracted position. This will
help protect critical areas from corrosion.
7. Do not use brake or transmission uids or regular motor oil as they can
damage the seals. Always purchase and use products labeled Hydraulic
Oil.
REPLACE THE HYDRAULIC OIL
Replace the hydraulic oil annually.
The oil can be removed by using a uid extractor tool or detaching the
hydraulic pump from the press and manually emptying it.
FLUID EXTRACTOR TOOL
1. Retract the ram and remove the oil ller plug.
2. Follow the instructions for your uid extractor tool to remove the old
hydraulic oil.
3. Follow the instructions for Rell the Hydraulic Pump.
MANUAL OIL REPLACEMENT
1. Relieve pressure from the system by opening the release valve, then
loosening the oil ller plug.
2. Disconnect the the hydraulic line from the pump to the hydraulic ram.
3. Remove the pump from the press.
4. Remove the oil ll plug.
V1.0 HYDRAULIC SHOP PRESS 9081555
Page 11 www.princessauto.com / 1-800-665-8685

5. Lay the pump on its side and drain the oil into a suitable container.
Dispose of used hydraulic oil in accordance with local by-laws.
6. Stand the pump on its base and wipe o any excess oil.
7. Reinstall the hydraulic pump onto the press.
8. Follow the instructions for Rell the Hydraulic Pump.
REFILL THE HYDRAULIC PUMP
The pump may become less ecient when the hydraulic oil level is too low or
contaminated by metal particulate through normal wear-and-tear.
1. Retract the ram and remove the oil ller plug.
2. Check and maintain the ram oil level.
• Check the oil level with the oil dip stick. Use a long plastic cable tie
as a substitute if the unit does not have a dipstick.
3. Fill the cylinder with a high quality hydraulic jack oil, up to the oil plug
opening.
a. Place a funnel into the oil ll neck. The funnel opening should be
wide enough to prevent the oil from collecting in the funnel’s cone.
b. Pour oil into the funnel. Allow the oil to settle for one minute and
recheck the level. Repeat until the desired level is reached.
4. Follow the steps in Bleeding the Hydraulic System.
5. Insert the oil ller plug and hand tighten.
6. Wipe up any spilled oil. Dispose of oil soaked rags in a proper hazardous
waste container.
BLEEDING THE HYDRAULIC SYSTEM
Bleed excess air from the hydraulic system as follows:
1. Open the release valve by turning it counterclockwise.
2. Remove the oil ller screw and ll the pump with hydraulic uid.
3. Wait 5 minutes for trapped air to rise to the surface.
4. Check the oil ller hole and if necessary, top o with more hydraulic oil.
5. Restore the oil ller screw. Close the release valve by turning clockwise.
9081555 HYDRAULIC SHOP PRESS V1.0
www.princessauto.com / 1-800-665-8685 Page 12

6. Test the ram several times for proper operation before putting it into use.
Do not use the ram if it still does not appear to be working properly. Have
a qualied service technician service or repair the hydraulic system.
LUBRICATION
Inspect and lubricate the tool when required. Only use light oil to lubricate the
tool. Other lubricants may not be suitable and could damage the tool or cause a
malfunction during use.
Clean and lubricate all moving parts.
DISPOSAL
Recycle a tool damaged beyond repair at the appropriate facility.
Contact your local municipality for a list of disposal facilities or by-laws for
electronic devices, batteries, oil or other toxic liquids.
DO NOT pollute the environment by allowing uncontrolled discharge of
waste oil.
STORAGE
When not in use, store the press in a dry location with ram and piston fully
retracted.
TROUBLESHOOTING
Visit a Princess Auto Ltd. location for a solution if the tool does not function
properly or parts are missing. If unable to do so, have a qualied technician
service the tool.
V1.0 HYDRAULIC SHOP PRESS 9081555
Page 13 www.princessauto.com / 1-800-665-8685

Problem(s) Possible Cause(s) Suggested Solution(s)
No oil ow. 1. Cylinder doesn’t
move.
2. Air lock in the lines.
3. No pressure
reading on gauge.
1. Check oil level. Fill as required.
2. Loosen tting to bleed line.
3. Check pressure gauge. Replace if
defective.
a. Check control valve. Clean,
repair or replace as required.
b. Check cylinder seals. Oil
bypassing in cylinder. Replace
seals.
Oil on
Press.
1. Oil leaking from
cylinder.
2. Oil leaking from
loose tting or line.
1. Replace seals as required.
2. Tighten or add sealant as required.
a. Defective tting. Replace.
Cylinder
ram
doesn’t
move.
1. Hydraulic problems.
2. Press overloaded.
3. Ram jammed.
4. Ram binding.
5. Press eciency
drops.
1. Check hydraulic system. Check
workpiece.
2. Exceeded capacity of Press. Use a
larger press.
3. Check cylinder. Remove defective
part and repair.
4. Cylinder ram is bent. Replace ram
and seals. Use more care when
applying loads.
5. Purge air from hydraulic system
as described in Bleeding the
Hydraulic System.
9081555 HYDRAULIC SHOP PRESS V1.0
www.princessauto.com / 1-800-665-8685 Page 14

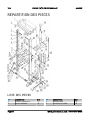
PARTS BREAKDOWN
PARTS LIST
DESCRIPTION QTY
1 Upper crossbeam 1
2 Bolt M16x40 8
DESCRIPTION QTY
3 Washer Ø16 8
4 Lock Washer Ø16 8
V1.0 HYDRAULIC SHOP PRESS 9081555
Page 15 www.princessauto.com / 1-800-665-8685

DESCRIPTION QTY
5 M16 Hex Nut 8
6 Post, left 1
7 Tube 4
8 Bed frame 2
9 Bolt M12 x 135 4
10 Bed frame pin 2
11 Clip 2
12 Support strut 4
13 Bolt M10x35 4
14 Bolt M10x30 7
15 Base 3
16 Washer Ø10 18
17 Lock Washer Ø10 12
18 M10 Nut 12
19 Lower Cross Beam 1
20 Bolt M10x60 1
21 Heel block 2
22 Foot pedal 1
23 M8 Nut 1
24 M10 Lock nut 2
25 Bolt M10x30 1
26 Short bushing 1
27 Connector plate 1
28 Eyelet bolt 1
DESCRIPTION QTY
29 Spring 1
30 Handle Receiver 1
31 Bolt M8x20 4
32 M8 Lock nut 1
33 Release Valve 1
34 Oil ller screw 1
35 Hydraulic Pump 1
36 Hose 1
37 Cylinder ram 1
38 Pressure gauge 1
39 Lower round nut 1
40 Bolt M10x15 4
41 Long bushing 1
42 Post, right 1
43 Handle 1
44 Upper round nut 1
45 Movable plate 2
46 Cylinder Base 1
47 Washer Ø12 4
48 Lock Washer Ø12 4
49 M12 Nut 4
50 Bolt M8x30 1
51 Washer Ø8 1
9081555 HYDRAULIC SHOP PRESS V1.0
www.princessauto.com / 1-800-665-8685 Page 16

V1,0 9081555
Vous devez lire et comprendre toutes les instructions avant d'utiliser l'appareil.
Conservez ce manuel afin de pouvoir le consulter plus tard.

SPÉCIFICATIONS
Capacité de presse 40 000 lb
Type de presse Hydraulique
Course du vérin 6 pouces
Plage de travail 4 1/8 à 38 9/16 po
Larg. de plate-forme 20 7/8 po
Hauteur hors tout 68 1/2 po
Matériau Construction en acier
INTRODUCTION
La presse d'atelier est conçue pour une utilisation industrielle peu intensive ou
pour l'utilisation à la maison. Eectuez des travaux de redressage, d’estampage
et de cintrage à l’aide de cette presse hydraulique puissante. Se caractérise par
une conception de cadre en H et ce qui la rend parfaite pour retirer ou installer
des roulements, des bagues, des engrenages, des joints à rotule, des poulies,
des joints universels et bien d’autres.
La presse comprend une commande au pied et une tête coulissante à vérin.
SÉCURITÉ
AVERTISSEMENT! Veuillez lire et comprendre toutes les instructions
avant d’utiliser cet outil. L’opérateur doit respecter les précautions
élémentaires pour réduire le risque de blessure corporelle ou de
dommage à l’équipement.
DÉFINITIONS DE DANGER
Veuillez vous familiariser avec les avis de danger qui sont présentés dans ce
manuel. Un avis est une alerte indiquant qu’il existe un risque de dommage
matériel, de blessure ou de mort si on ne respecte pas certaines instructions.
DANGER! Cet avis indique un risque immédiat et particulier qui
entraînera des blessures corporelles graves ou même la mort si
on omet de prendre les précautions nécessaires.
AVERTISSEMENT! Cet avis indique un risque particulier ou une pratique non
sécuritaire qui pourrait entraîner des blessures graves si on
omet de prendre les précautions nécessaires.
9081555 PRESSE D'ATELIER HYDRAULIQUE V1.0
www.princessauto.com / 1-800-665-8685 Page 2

ATTENTION! Cet avis indique une situation possiblement dangereuse qui
peut entraîner des blessures mineures ou modérées si on ne
procède pas de la façon recommandée.
AVIS! Cet avis indique un risque particulier ou une pratique
non sécuritaire qui entraînera des dommages au niveau de
l’équipement ou des biens, mais non des blessures corporelles.
AIRE DE TRAVAIL
1. Travaillez dans un environnement de travail sécuritaire. Gardez votre aire
de travail propre, bien éclairée et exempte de toute distraction. Placez les
lampes de façon à ne pas travailler dans l’ombre.
2. Assurez-vous que les personnes qui ne portent pas l’équipement de
sécurité approprié ne se trouvent pas à proximité de l’aire de travail.
3. Rangez les outils inutilisés correctement dans un lieu sécurisé et sec pour
empêcher la rouille, les dommages ou un mauvais usage.
SÉCURITÉ PERSONNELLE
AVERTISSEMENT! Portez de l’équipement de protection individuelle
homologué par l’Association canadienne de normalisation (CSA) ou
l’American National Standards Institute (ANSI).
ÉQUIPEMENT DE PROTECTION INDIVIDUELLE
1. Portez toujours des lunettes antiprojections qui orent une protection
frontale et latérale pour les yeux. L’équipement de protection des yeux
devrait être conforme à la norme CSA Z94.3-07 ou ANSI Z87.1 en fonction
du type de travail eectué.
2. Portez un écran facial panoramique de type approprié avec les lunettes
de sécurité puisque cette tâche peut créer des copeaux, des matières
abrasives ou des particules.
3. Portez des chaussures à embout d’acier ou à coquilles d’acier pour
prévenir les blessures aux pieds dues à la chute d’objets.
PRÉCAUTIONS PERSONNELLES
Gardez le contrôle de l’outil, de vos mouvements et de l’environnement de
travail pour éviter les blessures corporelles ou le bris de l’outil.
1. N’utilisez pas l’outil si vous êtes fatigué ou sous l’eet de drogues, d’alcool
ou de médicaments.
V1.0 PRESSE D'ATELIER HYDRAULIQUE 9081555
Page 3 www.princessauto.com / 1-800-665-8685

SÉCURITÉ SPÉCIFIQUE
AVERTISSEMENT! Peu importe votre aisance ou votre familiarité avec le
produit (à force de vous en servir), respectez TOUJOURS et strictement
les règles de sécurité. Si vous utilisez cet outil de façon dangereuse ou
incorrecte, vous pouvez subir des blessures corporelles graves.
2. Utilisez le bon outil pour la tâche à eectuer. Cet outil a été conçu pour
une utilisation spécique. Évitez de modier ou d’altérer cet outil ou de
l’utiliser à une n autre que celle pour laquelle il a été conçu.
3. La charge maximale est tonnes. N’exercez jamais de force excessive sur
une pièce à travailler. N’exercez jamais de force excessive sur une pièce à
travailler et utilisez toujours le manomètre pour déterminer avec précision
la charge exercée.
4. Vériez la presse avant chaque usage. N'utilisez pas la presse si un
composant est tordu, cassé, ssuré ou s'il présente une fuite ou toute
autre détérioration. N'utilisez pas la presse non plus après une charge
d'impact tant qu'elle n'a pas été examinée par un technicien qualié.
5. Vériez que tous les boulons et les écrous sont serrés.
6. Utilisez cette presse d’atelier seulement sur une surface qui est stable, de
niveau et non glissante. La surface doit pouvoir soutenir le poids d’une
presse d’atelier, ainsi que la charge.
7. Assurez-vous que la pièce à travailler soit montée au centre et sécurisée.
Une charge en déséquilibre peut glisser des cales de blocage ou du cadre
de plateforme de la presse.
8. Éloignez les mains et les pieds de la zone de la plateforme en tout temps.
9. N’utilisez pas la presse d’atelier pour comprimer un ressort ou tout autre
élément qui pourrait se dégager et causer un danger potentiel. Ne vous
mettez jamais directement devant une presse chargée et ne laissez jamais
sans surveillance une presse chargée.
10. Ne permettez pas aux personnes non formées d'utiliser la presse.
11. N’utilisez pas de liquide de frein ou tout autre uide inapproprié à
la place de l’huile hydraulique. Évitez de mélanger des types d’huile
diérents lorsque vous ajoutez de l’huile hydraulique. Seule l’huile de cric
hydraulique de bonne qualité doit être utilisée.
12. N’exposez pas la presse à la pluie, à la neige ou à toute autre intempérie.
9081555 PRESSE D'ATELIER HYDRAULIQUE V1.0
www.princessauto.com / 1-800-665-8685 Page 4
La page est en cours de chargement...
La page est en cours de chargement...
La page est en cours de chargement...
La page est en cours de chargement...
La page est en cours de chargement...
La page est en cours de chargement...
La page est en cours de chargement...
La page est en cours de chargement...
La page est en cours de chargement...
La page est en cours de chargement...
La page est en cours de chargement...
La page est en cours de chargement...
La page est en cours de chargement...
La page est en cours de chargement...
La page est en cours de chargement...
La page est en cours de chargement...
-
 1
1
-
 2
2
-
 3
3
-
 4
4
-
 5
5
-
 6
6
-
 7
7
-
 8
8
-
 9
9
-
 10
10
-
 11
11
-
 12
12
-
 13
13
-
 14
14
-
 15
15
-
 16
16
-
 17
17
-
 18
18
-
 19
19
-
 20
20
-
 21
21
-
 22
22
-
 23
23
-
 24
24
-
 25
25
-
 26
26
-
 27
27
-
 28
28
-
 29
29
-
 30
30
-
 31
31
-
 32
32
-
 33
33
-
 34
34
-
 35
35
-
 36
36


Powerfist 9081555 Le manuel du propriétaire
- Taper
- Le manuel du propriétaire
dans d''autres langues
- English: Powerfist 9081555 Owner's manual
Documents connexes
Autres documents
-
 Princess auto 9081563 Manuel utilisateur
-
PROPOINT 9081605 Le manuel du propriétaire
-
-
-
-
-
-
-
Extremis AMAi Manuel utilisateur
