GE HCM9DMWW Le manuel du propriétaire
- Catégorie
- Congélateurs
- Taper
- Le manuel du propriétaire

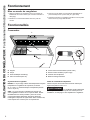
Write the model and serial
numbers here:
Model # _________________
Serial # _________________
You can find the rating label on
the right hand side of the freezer
above the machine compartment
cover.
OWNER’S MANUAL
AND INSTALLATION
INSTRUCTIONS
49-60798-2 04-18 GEA
Chest—Manual Defrost Model:
HCM9DMWW
ENGLISH/FRANÇAIS/
ESPAÑOL
SAFETY INFORMATION .........2
USING THE FREEZER
Operation .............................4
Features ..............................4
Defrosting Instructions .................6
CARE AND CLEANING ...........7
INSTALLATION ...................9
TROUBLESHOOTING TIPS ......10
Normal Operating Characteristics .......12
WARRANTY ......................15
CONSUMER SUPPORT ..........16
CHEST FREEZERS

2 49-60798-2
STATE OF CALIFORNIA PROPOSITION 65 WARNINGS:
WARNING
This product contains one or more chemicals known to the State of California to cause cancer
and birth defects or other reproductive harm.
CAUTION
To reduce the risk of injury when using your freezer, follow these basic safety precautions.
Ŷ 'RQRWFOHDQIUHH]HUZLWKZDUPZDWHUZKHQLWLV
cold. Components may break if exposed to sudden
temperature changes or impact, such as bumping or
dropping.
Ŷ .HHSILQJHUVRXWRIWKH³SLQFKSRLQW´DUHDV
clearances between the lid and cabinet are
necessarily small. Be careful closing lid when
children are in the area.
Ŷ 'RQRWWRXFKWKHFROGVXUIDFHVLQWKHIUHH]HU
compartment when hands are damp or wet, skin
may stick to these extremely cold surfaces.
Ŷ 'RQRWUHIUHH]HIUR]HQIRRGVZKLFKKDYHWKDZHG
completely.
READ AND SAVE THESE INSTRUCTIONS
WARNING
To reduce the risk of fire, explosion, electric shock, or injury when using your freezer, follow
these basic safety precautions:
Ŷ 7KLVIUHH]HUPXVWEHSURSHUO\LQVWDOOHGDQGORFDWHGLQ
accordance with the Installation Instructions before it
is used.
Ŷ 8QSOXJWKHIUHH]HUEHIRUHPDNLQJUHSDLUVRU
cleaning.
NOTE: Power to the freezer cannot be disconnected
by any setting on the control panel.
NOTE: Repairs must be performed by a qualified
Service Professional.
Ŷ 5HSODFHDOOSDUWVDQGSDQHOVEHIRUHRSHUDWLQJ
Ŷ 'RQRWVWRUHRUXVHJDVROLQHRURWKHUIODPPDEOH
vapors and liquids in the vicinity of this or any other
appliance.
Ŷ 'RQRWVWRUHH[SORVLYHVXEVWDQFHVVXFKDVDHURVRO
cans with a flammable propellant in this appliance.
Ŷ 'RQRWXVHDQH[WHQVLRQFRUG
Ŷ 7RSUHYHQWVXIIRFDWLRQDQGHQWUDSPHQWKD]DUGVWR
children, remove the lid from any freezer before
disposing of it or discontinuing its use.
Ŷ 7RDYRLGVHULRXVLQMXU\RUGHDWKFKLOGUHQVKRXOGQRW
stand on, or play in or with the appliance.
Ŷ &KLOGUHQDQGSHUVRQVZLWKUHGXFHGSK\VLFDOVHQVRU\
or mental capabilities or lack of experience and
knowledge can use this appliance only if they are
supervised or have been given instructions on safe
use and understand the hazards involved.
Ŷ 7KLVDSSOLDQFHLVLQWHQGHGWREHXVHGLQKRXVHKROG
and similar applications such as: staff kitchen areas
LQVKRSVRIILFHVDQGRWKHUZRUNLQJHQYLURQPHQWV
IDUPKRXVHVE\FOLHQWVLQKRWHOVPRWHOVEHG
EUHDNIDVWDQGRWKHUUHVLGHQWLDOHQYLURQPHQWV
catering and similar non-retail applications.
IMPORTANT SAFETY INFORMATION
READ ALL INSTRUCTIONS BEFORE USING THE APPLIANCE
SAFETY INFORMATION
WARNING
EXPLOSION HAZARD Flammable Refrigerant
This appliance contains isobutane refrigerant,
R600a, a natural gas with high environmental
compatibility. However, it is also combustible.
Adhere to the warnings below to reduce the risk of
injury or property damage.
1. When handling, installing and operating the
appliance, care should be taken to avoid damage to
the refrigerant tubing.
2. Service shall only be performed by authorized
VHUYLFHSHUVRQQHO8VHRQO\PDQXIDFWXUHUDXWKRUL]HG
service parts.
3. 'LVSRVHRIUHIULJHUDWRULQDFFRUGDQFHZLWK)HGHUDO
DQG/RFDO5HJXODWLRQV)ODPPDEOHUHIULJHUDQWDQG
insulation material used require special disposal
procedures. Contact your local authorities for the
environmentally safe disposal of your refrigerator.
4. .HHSYHQWLODWLRQRSHQLQJVLQWKHDSSOLDQFH
enclosures or in the built-in structure clear of
obstruction.
5. 'RQRWXVHPHFKDQLFDOGHYLFHVRURWKHUPHDQVWR
accelerate the defrosting process.
6. 'RQRWGDPDJHUHIULJHUDQWFLUFXLW
7. 'RQRWXVHHOHFWULFDODSSOLDQFHVLQVLGHWKHIRRG
storage compartment of the appliance.

49-60798-2 3
SAFETY INFORMATION
READ AND SAVE THESE INSTRUCTIONS
IMPORTANT SAFETY INFORMATION
READ ALL INSTRUCTIONS BEFORE USING THE APPLIANCE
INSTALLATION
WARNING
EXPLOSION HAZARD
.HHSIODPPDEOHPDWHULDOVDQGYDSRUVVXFKDVJDVROLQHDZD\IURPIUHH]HU)DLOXUHWRGRVRFDQUHVXOWLQILUH
explosion, or death.
WARNING
SUFFOCATION AND ENTRAPMENT HAZARD
)DLOXUHWRIROORZWKHVHGLVSRVDOLQVWUXFWLRQVFDQUHVXOWLQGHDWKRUVHULRXVLQMXU\
IMPORTANT: Child entrapment and suffocation are not
problems of the past. Junked or abandoned appliances
DUHVWLOOGDQJHURXVHYHQLIWKH\ZLOOVLWIRU³MXVWDIHZ
GD\V´,I\RXDUHJHWWLQJULGRI\RXUROGDSSOLDQFH
please follow the instructions below to help prevent
accidents.
Before You Throw Away Your Old Freezer:
Ŷ Take off the freezer lid.
Ŷ Leave the baskets in place so that children may not
easily climb inside.
PROPER DISPOSAL OF YOUR OLD APPLIANCE
Do not, under any circumstances, cut or remove the third (ground) prong from the power cord. For
personal safety, this appliance must be properly grounded.
The power cord of this appliance is equipped with a
3-prong (grounding) plug which mates with a standard
3-prong (grounding) wall outlet to minimize the
possibility of electric shock hazard from this appliance.
Have the wall outlet and circuit checked by a qualified
electrician to make sure the outlet is properly
grounded.
Where a standard 2-prong wall outlet is encountered, it
is your personal responsibility and obligation to have it
replaced with a properly grounded 3-prong wall outlet.
The freezer should always be plugged into its own
individual electrical outlet which has a voltage rating
that matches the rating plate.
A 115 Volt AC, 60 Hz, 15- or 20-amp fused, grounded
electrical supply is required. This provides the best
performance and also prevents overloading house
wiring circuits which could cause a fire hazard from
overheated wires.
Never unplug your freezer by pulling on the power
cord. Always grip plug firmly and pull straight out from
the outlet.
Immediately discontinue use of a damaged supply
cord. If the supply cord is damaged, it must be
replaced by a qualified service professional with an
authorized service part from the manufacturer.
When moving the freezer away from the wall, be
careful not to roll over or damage the power cord.
CONNECTING ELECTRICITY
WARNING
ELECTRICAL SHOCK HAZARD
Plug into a grounded 3-prong outlet.
'RQRWUHPRYHWKHJURXQGSURQJ
'RQRWXVHDQDGDSWHU
'RQRWXVHDQH[WHQVLRQFRUG
)DLOXUHWRIROORZWKHVHLQVWUXFWLRQVFDQUHVXOWLQGHDWKILUHRUHOHFWULFDOVKRFN
Refrigerant and Foam Disposal:
'LVSRVHRIUHIULJHUDWRULQDFFRUGDQFHZLWK)HGHUDODQG/RFDO5HJXODWLRQV)ODPPDEOHUHIULJHUDQWDQGLQVXODWLRQ
material used require special disposal procedures. Contact your local authorities for the environmentally safe
disposal of your refrigerator.

4 49-60798-2
Starting the Freezer
1. Clean the inside of the freezer with a mild solution of
baking soda and water (see Care and Cleaning).
2. Connect cord to power outlet.
3. Make sure the temperature control is set at 4
(recommended setting) between 1 (least cold) to 7
(coldest).
4. Allow freezer to operate for at least 6 to 8 hours
before placing food inside.
USING THE FREEZER: 2SHUDWLRQ)HDWXUHV
Operation
Features
Freezer Status Lights
RED: The red light will turn on automatically when the
WHPSHUDWXUHRIWKHIUHH]HULVWRRKLJKDERYH)&
,WZLOOJRRIIRQFHWKHWHPSHUDWXUHLVEHORZ)&
GREEN: The green light is the indicator light and assures
you that your freezer is running. If the indicator light is
not glowing, immediately check for power interruption,
unplugged power cord, open circuit breaker, blown fuse,
or burned out indicator light. If the light is burned out,
contact service for a replacement.
Temperature Control Dial
Turn using a coin in the slot to adjust the freezer
temperature between 1 and 7.
WARNING
)UHH]HUPXVWEHXQSOXJJHGWRDYRLG
electrical hazard from power source when installing,
cleaning or repairing the freezer
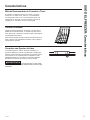
Controls
G
)
E
OFF
POWER-ON
HIGH
TEMPERATURE
4
13
7
5
2
6
A
B
C
'
H
A. Handle
B. Light
C. Removable Wire Basket (2)
D. Security Lock (with key)
E. Power Indicator (green light)
F. Alarm Indicator (red light)
G. Temperature Control
H.([WHULRU'UDLQ3OXJ

49-60798-2 5
USING THE FREEZER: )HDWXUHV
Features
Sliding Basket
Store small packages in the basket to avoid losing them
in the bottom of the freezer. The basket can be moved
from side to side or it can be removed when loading or
unloading the food below it.
To remove basket, lift it straight up and out. To replace
basket, lower basket back into place.
Key Eject Lock
The lock is spring loaded so the key cannot be left in the
lock. To lock or unlock, press the key in while turning.
If the key is lost, contact your dealer for a replacement
or go to GEApplianceParts.com. Always give the model
and serial number of the freezer when requesting a
replacement key.
WARNING
To prevent a child from being
entrapped, keep the key out of reach of children and
away from the freezer.
Recommended Grounding Method
A 115 Volt, 60 Hz, AC only, 15- or 20-amp fused,
grounded electrical supply is required. It is recommended
that a separate circuit serving only your freezer be
SURYLGHG8VHDQRXWOHWWKDWFDQQRWEHWXUQHGRIIE\D
VZLWFK'RQRWXVHDQH[WHQVLRQFRUG

6 49-60798-2
USING THE FREEZER: 'HIURVWLQJ,QVWUXFWLRQV
Defrosting Instructions
In most climates, defrosting will be necessary only about
twice a year.
To have your freezer operate most efficiently, do not
SHUPLWPRUHWKDQ´PPWKLFNQHVVRIIURVWRQ
average, to accumulate on the walls.
To remove frost, scrape with a plastic or wood spatula or
scraper.
Do not use an ice pick, metal, or sharp-edged
instrument as it may damage or scratch the freezer.
Do not use boiling water as it may damage the freezer.
Do not use any electrical device in defrosting your
freezer.
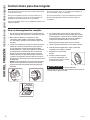
For Complete Defrosting
7XUQWKHWHPSHUDWXUHFRQWUROWRIDUOHIW2))VHWWLQJ
and unplug the freezer.
2. Remove all food and place it in corrugated boxes,
LQVXODWHGEDJVSLFQLFFRROHUVHWF8VHWRZHOVDQG
newspapers for insulation as needed.
3. Place a tray (not included) in front of the freezer,
beneath the exterior drain plug to collect the water.
Pull out the drain plug about 1" (2.5 cm) until the
drain hole on the plug shows completely. Turn the
drain plug clockwise until the arrow is pointed down.
8QVFUHZFRXQWHUFORFNZLVHWRUHPRYHWKHLQWHULRU
drain plug. This allows the water to flow out into the
tray.
NOTE: Water that has accumulated at the bottom of
the freezer during defrosting will drain into the tray.
Monitor the tray under the drain to avoid overflow.
4. With the lid open, you may choose to use pans of
KRWWDSZDWHUOHVVWKDQ)>&@WRVSHHG
GHIURVWLQJ'LUHFWLQJDLUIURPDQHOHFWULFIDQLQWR
WKHIUHH]HUZLOODOVRKHOS'RQRWSODFHIDQRUDQ\
electrical device in the freezer. Remove large pieces
before they melt.
5. Wipe water from walls with a towel or sponge.
6. After defrosting, clean the inside of the freezer (see
Care and Cleaning).
7. Replace the drain plugs.
8. Plug in the freezer. Return
the temperature control to its
previous position and return
food to the freezer.
WARNING
)UHH]HUPXVWEHXQSOXJJHGWRDYRLG
electrical hazard from power source when defrosting
unit.
Drain hole
Arrow
Interior
Drain plug

49-60798-2 7
CARE AND CLEANING
Care And Cleaning
Cleaning Your Freezer
ŶOutside. Protect the paint finish. The finish on the
outside of the freezer is a high quality, baked-on paint
finish. With proper care, it will stay new-looking and
rust-free for years. Apply a coat of appliance polish
wax when the freezer is new and then at least twice a
year. Appliance polish wax also works well to remove
tape residue from freezer surfaces.
Keep the finish clean. Wipe with a clean cloth
lightly dampened with appliance polish wax or mild
OLTXLGGLVKZDVKLQJGHWHUJHQW'U\DQGSROLVKZLWK
DFOHDQVRIWFORWK'RQRWZLSHWKHIUHH]HUZLWKD
VRLOHGGLVKZDVKLQJFORWKRUZHWWRZHO'RQRWXVH
scouring pads, powdered cleaners, bleach, or cleaners
containing bleach.
NOTICE: Care should be taken in moving the freezer
away from the wall. All types of floor coverings can be
damaged, particularly cushioned coverings and those
with embossed surfaces.
ŶInside. Clean the inside of your freezer at least once
a year. We recommend that the freezer be unplugged
before cleaning. If this is not practical, wring excess
moisture out of sponge or cloth when cleaning in the
vicinity of switches, lights or controls.
8VHZDUPZDWHUDQGEDNLQJVRGDVROXWLRQ±DERXWD
tablespoon of baking soda to a quart of water. Rinse
WKRURXJKO\ZLWKZDWHUDQGZLSHGU\'RQRWXVH
FOHDQLQJSRZGHUVRURWKHUDEUDVLYHFOHDQHUV'2127
wash removable parts in a dishwasher.
An open box of baking soda in the freezer will absorb
stale freezer odors. Change the box every three
months.
CAUTION
'DPSREMHFWVVWLFNWRFROGPHWDO
VXUIDFHV'2127WRXFKLQWHULRUPHWDOVXUIDFHVZLWK
wet or damp hands.
In Case of Extended Power Failure
Ŷ.HHSIUHH]HUOLGFORVHG<RXUIUHH]HUZLOONHHSIRRG
frozen for 24 hours provided warm air is not admitted.
Ŷ,IIUHH]HULVRXWRIRSHUDWLRQIRUKRXUVRUPRUHDGG
dry ice. Leave ice in large pieces. Add more ice as
required.
CAUTION
Handling of dry ice can cause
freezing of the hands—gloves or other protection is
recommended.
Ŷ,IGU\LFHLVQRWDYDLODEOHPRYHIRRGWRDIUR]HQIRRG
locker temporarily—until power is restored.
Preparing to Move
7XUQWKHWHPSHUDWXUHFRQWUROWR2))'LVFRQQHFWWKH
power cord plug from the wall outlet. Remove foods,
GHIURVWRQ0DQXDO'HIURVWPRGHOVDQGFOHDQWKH
freezer.
Secure all loose items such as baskets by taping them
securely in place to prevent damage.
Be sure freezer stays in upright position during actual
moving and during transportation. The freezer must be
secured during transportation to prevent movement.
Protect outside of freezer with blanket.

8 49-60798-2
CARE AND CLEANING
Care And Cleaning
Preparing for Vacation
To maintain freezer in operation during vacations,
EHVXUH\RXUKRXVHSRZHULVQRWWXUQHGRII)RUVXUH
protection of freezer contents, you may want to ask
a neighbor to check the power supply and freezer
operation every 24 hours.
)RUH[WHQGHGYDFDWLRQVRUDEVHQFHV\RXPD\SUHIHUWR
move your frozen foods to a storage locker temporarily.
If your freezer is to be left empty, disconnect power cord
plug from wall outlet. To prevent formation of odors,
place open box of baking soda in freezer and leave
freezer lid open.
Save Money and Energy
Ŷ7KHIUHH]HUVKRXOGEHORFDWHG
in the coolest area of the room,
away from heat-producing
appliances or heating ducts,
and out of direct sunlight.
Ŷ/HWKRWIRRGVFRROWRURRP
temperature before placing in the
freezer. Overloading the freezer forces the compressor
WRUXQORQJHU)RRGVWKDWIUHH]HWRRVORZO\PD\ORVH
quality or spoil.
Ŷ%HVXUHWRZUDSIRRGVSURSHUO\DQGZLSHFRQWDLQHUV
dry before placing them in the freezer. This cuts down
on frost buildup inside the freezer.
Ŷ)UHH]HUEDVNHWVVKRXOGQRWEHOLQHGZLWKDOXPLQXP
foil, wax paper or paper towels. Liners interfere with
cold air circulation, making the freezer less efficient.
Ŷ2UJDQL]HDQGODEHOIRRGWRUHGXFHOLGRSHQLQJVDQG
extended searches. Remove as many items as
needed at one time, and close the lid as soon as
possible.

49-60798-2
INSTALLATION
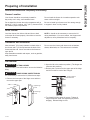
Preparing of Installation
Read these instructions completely and carefully.
Freezer Location
<RXUIUHH]HUVKRXOGEHFRQYHQLHQWO\ORFDWHGIRU
day-to-day use in a dry, well-ventilated room.
'RQRWLQVWDOOWKHIUHH]HUZKHUHWKHWHPSHUDWXUHZLOOJR
EHORZ)&RUDERYH)&EHFDXVHLWZLOO
not maintain proper temperatures.
'RQRWLQVWDOOWKHIUHH]HULQDORFDWLRQH[SRVHGWRUDLQ
water or direct sunlight.
Be sure to install your freezer on a floor strong enough
to support it when it is fully loaded.
Level Freezer
Level the freezer from side to side and front to back
VRWKDWWKHOLGZLOOVHDOSURSHUO\8VHVKLPVWROHYHOWKH
freezer if necessary.
NOTE: It should not be necessary to remove the lid
during installation. If, for some reason, the hinges need
adjustment, call a professional service company..
Clearances and Ventilation
$OORZDWOHDVW´PPFOHDUDQFHRQERWKVLGHVRI
WKHIUHH]HUDQG´PPEHWZHHQWKHEDFNRIWKH
freezer and the wall. Leave room above the freezer to
open the lid.
.HHSIODPPDEOHPDWHULDOVDQGYDSRUVVXFKDVJDVROLQH
away from freezer.
'RQRWFRYHUWKHIUHH]HUZLWKLWHPVVXFKDVEODQNHWV
sheets, tablecloths, etc. This reduces air circulation.
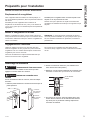
Lid Removal
CAUTION
LIFTING HAZARD
7KHOLGLVKHDY\8VHERWKKDQGVWRVHFXUHWKHOLGEHIRUH
lifting.
CAUTION
HINGE SPRING UNDER TENSION
If it is necessary to remove the lid, follow these steps:
1. Remove the lower part of the hinge cover and then
remove the upper part.
2. Open the lid to the maximum position. (The hinges are
loosest at this position.)
3. Remove the 4 screws from the upper part of the hinge
DQGOLG'RWKLVIRUHDFKRIWKHKLQJHV
4. To reinstall lid follow steps in reverse. Tighten all
hinge screws but avoid over-tightening to prevent
stripping. Reinstall hinge covers.
8SSHU+LQJH
Cover
Lower Hinge
Cover
Hinge Screws to
be Removed

10 49-60798-2
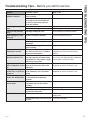
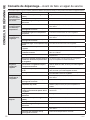
TROUBLESHOOTING TIPS
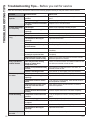
Troubleshooting Tips... Before you call for service
Save time and money! Review the charts on the following pages first and you may not need to call for service.
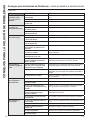
Problem Possible Causes What To Do
Freezer does not
operate
Temperature control set to OFF
position.
Turn the temperature control to a setting between 1
and 7.
Freezer is unplugged. Push the plug completely into the outlet.
The fuse is blown/circuit breaker
is tripped.
Replace fuse or reset the breaker.
Freezer starts/stops
too frequently
Lid left open. Check to see if package is holding lid open.
Too frequent or too long lid
openings.
Open the lid less often.
Temperature control set too cold. See About the operation of your freezer.
Freezer operates too
long
Lid left open. Check to see if package is holding lid open.
Too frequent or too long lid
openings.
Open the lid less often.
Temperature control set too cold. See About the operation of your freezer.
Inadequate air circulation space
around cabinet.
See Preparing to install the freezer.
Room or outside weather is hot. It’s normal for the freezer to work harder under these
conditions.
Freezer has been disconnected
recently for a period of time.
It takes 6-8 hours for the freezer to cool down
completely.
Large amounts of warm or hot
food have been stored recently.
Warm food will cause the freezer to run more until the
desired temperature is reached
Noisy operation or
cabinet vibrates
Floor may be weak, causing
freezer to vibrate when
compressor is on.
Check to make sure freezer is located on solid floor and
use shims, as needed, to level the unit.
Cabinet is not positioned solidly
on floor.
6HH3UHSDULQJWRLQVWDOOWKHIUHH]HU8VHVKLPVDV
needed, to level the unit.
Freezer is touching the wall. /HYHOIUHH]HURUPRYHVOLJKWO\6HH/HYHO)UHH]HUV
Freezer temperature
too warm
Lid left open. Check to see if package is holding lid open.
Too frequent or too long lid
openings.
Open the lid less often.
Temperature control is set too
warm.
Turn control to a colder setting. Allow several hours for
the temperature to stabilize.
Large amounts of water or hot
food may have been stored
recently.
Wait until the freezer has had a chance to reach its
selected temperature.
Freezer has been disconnected
recently.
)UHH]HUUHTXLUHVKRXUVWRFRROGRZQFRPSOHWHO\
Foods defrosting Temperature control set to OFF
position.
Turn the temperature control to a setting between 1
and 7.
Freezer is unplugged. Push the plug completely into the outlet.
The fuse is blown/circuit breaker
is tripped.
Replace fuse or reset the breaker.
Lid left open. Check to see if package is holding lid open.
Too frequent or too long lid
openings.
Open the lid less often.
Freezer temperature
too cold
Temperature control set too cold. See About the operation of your freezer.

49-60798-2 11
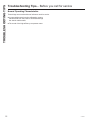
TROUBLESHOOTING TIPS
Troubleshooting Tips... Before you call for service
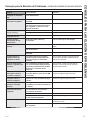
Problem Possible Causes What To Do
Moisture forms on
outside of cabinet
Not unusual during periods of
high humidity.
Wipe surface dry.
Lid may not be seating properly,
causing cold air from inside the
freezer to meet warm moist air
from the outside.
See Preparing to install the freezer.
Interior light does not
work
No power at outlet. Replace fuse or reset the breaker.
Freezer is unplugged. Push the plug completely into the outlet.
Lid won’t fully close by
itself
Package holding lid open. Move package to a different location.
Slow starting time after
being off
Built-in overload protection. This is normal after being off.
Excessive frost buildup Lid left open. Check to see if package is holding lid open.
Too frequent or too long lid
openings.
Open the lid less often.
Not unusual during periods of
high humidity.
Wipe surface dry.
Freezer external surface
temperature is warm
The external freezer walls can be
as much as 30°F (16.7° C) warmer
than room temperature.
This is normal while the compressor works
to transfer heat from inside the freezer
cabinet.
Louder sound levels
whenever freezer is on
Modern freezers have increased
storage capacity and more stable
temperatures. They require a high-
efficiency compressor.
This is normal. When the surrounding noise
level is low, you might hear the compressor
running while it cools the interior.
Higher sound levels
when compressor comes
on
Freezer operates at higher
pressures during the start of the
ON cycle.
This is normal. Sound will level off or
disappear as freezer continues to run.
Popping or cracking
sound when compressor
comes on
Metal parts undergo expansion
and contraction, as in hot water
pipes.
This is normal. Sound will level off or
disappear as freezer continues to run.
Bubbling or gurgling
sound, like boiling water
Refrigerant (used to cool freezer)
is circulating throughout the
system.
This is normal.
Moisture forms on inside
freezer walls
Weather is hot and humid, which
increases internal rate of frost
buildup.
This is normal.
Lid may not be seating properly. See Preparing to install the freezer.
Lid is kept open too long, or is
opened too frequently.
Open the lid less often.
Odors in freezer Interior needs to be cleaned. Clean interior with sponge, warm water and
baking soda.
Foods with strong odors are in the
freezer.
Cover the food tightly.

12 49-60798-2
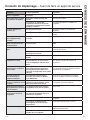
TROUBLESHOOTING TIPS
Troubleshooting Tips... Before you call for service
Normal Operating Characteristics
These things are normal and do not indicate a need for service.
Ŷ$ZDUPFDELQHWH[WHULRUDVWKHUHIULJHUDWLRQV\VWHP
transfers heat from the inside to the outside through
the exterior cabinet walls.
Ŷ7KHVRXQGRIWKHKLJKHIILFLHQF\FRPSUHVVRUPRWRU

49-60798-2 13
NOTES
Notes

14 49-60798-2
NOTES
Notes

49-60798-2 15
Ŷ Service trips to your home to teach you how to use
the product.
Ŷ Improper installation, delivery or maintenance.
Ŷ Failure of the product if it is abused, misused, or
used for other than the intended purpose or used
commercially.
Ŷ Loss of food due to spoilage.
Ŷ Damage caused after delivery.
Ŷ Replacement of house fuses or resetting of circuit
breakers.
Ŷ Damage to the product caused by accident, fire,
floods or acts of God.
Ŷ Incidental or consequential damage caused by
possible defects with this appliance.
Ŷ Product not accessible to provide required service.
Ŷ$VVRFLDWHGFRVWVZKHQ+RWSRLQW$SSOLDQFHVFKRRVHV
to issue the consumer a certificate as a form of
product replacement.
What Hotpoint Will Not Cover:
Staple your receipt here. Proof of the original purchase
date is needed to obtain service under the warranty.
Hotpoint.com
Hotpoint is backed by GE Appliances Service. $OOZDUUDQW\VHUYLFHLVSURYLGHGE\RXU)DFWRU\6HUYLFH&HQWHUVRUDQ
authorized Customer Care
®
WHFKQLFLDQ<RXFDQVFKHGXOHVHUYLFHRQOLQHDWHotpoint.com/service or call Hotpoint Service
at 800.GE.CARES (800.432.2737). Please have your model number available when calling.
In Canada, call 800.661.1616.
WARRANTY
Freezer Warranty
EXCLUSION OF IMPLIED WARRANTIES
<RXUVROHDQGH[FOXVLYHUHPHG\LVSURGXFWUHSDLUDVSURYLGHGLQWKLV/LPLWHG:DUUDQW\$Q\LPSOLHGZDUUDQWLHV
including the implied warranties of merchantability or fitness for a particular purpose, are limited to one year or
the shortest period allowed by law.
For US Customers: This warranty is extended to the original purchaser and any succeeding owner for products
SXUFKDVHGIRUKRPHXVHZLWKLQWKH86$,IWKHSURGXFWLVORFDWHGLQDQDUHDZKHUHVHUYLFHE\D+RWSRLQW$SSOLDQFHV
Authorized Servicer is not available, you may be responsible for a trip charge or you may be required to bring the product
to an Authorized Hotpoint Appliances Service location for service. In Alaska, the warranty excludes the cost of shipping or
service calls to your home.
Some states do not allow the exclusion or limitation of incidental or consequential damages. This warranty gives you
specific legal rights, and you may also have other rights which vary from state to state. To know what your legal rights
are, consult your local or state consumer affairs office or your state’s Attorney General.
Warrantor: GE Appliances, a Haier company
For Customers in Canada: This warranty is extended to the original purchaser and any succeeding owner for
products purchased in Canada for home use within Canada. In-home warrant service will be provided in areas where
it is available and deemed reasonable by Mabe to provide.
Warrantor Canada: MC Commercial, Inc., Burlington, Ontario, L7R 5B6
For the Period of: Hotpoint Appliances Will Replace
One Year
)URPWKHGDWHRIWKH
original purchase
)RUPRQWKVIURPWKHGDWHRIRULJLQDOUHWDLOSXUFKDVH+RWSRLQW$SSOLDQFHVZLOOFKRRVHDW
its discretion, to replace or service the defective unit. Should Hotpoint Appliances decide to
service the unit, Hotpoint Appliances will provide any part which fails due to a defect in materials
or workmanship free of charge, along with any labor and related service costs to replace the
GHIHFWLYHSDUW'XULQJWKLVSHULRGVKRXOG+RWSRLQW$SSOLDQFHVFKRRVHWRUHSODFHWKHXQLWLWPD\
do so by providing you with a certificate redeemable at a retailer for a replacement product.

16 49-60798-2
Consumer Support
CONSUMER SUPPORT
Hotpoint Appliances Website
Visit www.hotpoint.com for all of your product and support needs.
Register Your Appliance
Register your new appliance on-line at your convenience! Timely product registration will allow for enhanced
FRPPXQLFDWLRQDQGSURPSWVHUYLFHXQGHUWKHWHUPVRI\RXUZDUUDQW\VKRXOGWKHQHHGDULVH<RXPD\DOVRPDLOLQ
the pre-printed registration card included in the packing material.
,QWKH86Hotpoint.com/register
In Canada: Productsupport.mabe.ca/crm/Products/ProductRegistration.aspx
Schedule Service
Expert GE Appliances repair service is only one step away from your door. Get on-line and schedule your service
DW\RXUFRQYHQLHQFHDQ\GD\RIWKH\HDU,QWKH86Hotpoint.com/service or call 800.432.2737 during normal
business hours.
In Canada: call 888.880.3030
Extended Warranties
<RXPD\SXUFKDVHD+RWSRLQW$SSOLDQFHVH[WHQGHGZDUUDQW\RQOLQHDW Hotpoint.com/extended-warranty or call
800-626-2224.
In Canada: call 888.880.3030
Parts and Accessories
Individuals qualified to service their own appliances can have parts or accessories sent directly to their homes
9,6$0DVWHU&DUGDQG'LVFRYHUFDUGVDUHDFFHSWHG2UGHURQOLQHWRGD\KRXUVHYHU\GD\
,QWKH86GEApplianceparts.comRUE\SKRQHDWGXULQJQRUPDOEXVLQHVVKRXUV
Instructions contained in this manual cover procedures to be performed by any user. Other servicing
generally should be referred to qualified service personnel. Caution must be exercised, since improper
servicing may cause unsafe operation.
Customers in Canada should consult the yellow pages for the nearest MC Commercial service center, visit our
website at GEAppliances.ca/en/products/parts-filters-accessories or call 800.661.1616.
Contact Us
If you need to contact us for any reason, please visit Hotpoint.com/contact or call 800.626.2005.
<RXPD\DOVRZULWHWR
,QWKH86*HQHUDO0DQDJHU&XVWRPHU5HODWLRQV_*($SSOLDQFHV$SSOLDQFH3DUN_/RXLVYLOOH.<
GEAppliances.com/contact
,Q&DQDGD'LUHFWRU&RQVXPHU5HODWLRQV0DEH&DQDGD,QF_6XLWH)DFWRU\/DQH_0RQFWRQ1%(&0
GEAppliances.ca/en/contact-us

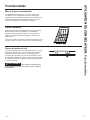
Inscrivez les numéros de modèle et
de série ici :
Numéro de modèle : ______
Numéro de série : _________
Vous trouverez l’étiquette
signalétique sur le côté droit
du congélateur au-dessus du
couvercle du compartiment
machine.
MANUEL
D’UTILISATION
ET D’INSTALLATION
Modèle horizontaux, à dégivrage
non automatique :
HCM9DMWW
FRANÇAIS
MESURES DE SÉCURITÉ .........2
UTILISATION DU CONGÉLATEUR
Fonctionnement .......................4
Fonctionnalités ........................4
Directives de dégivrage ................6
ENTRETIEN ET NETTOYAGE ....7
INSTALLATION ...................9
CONSEILS DE DÉPANNAGE ....10
Caractéristiques normales
de fonctionnement ....................12
GARANTIE ........................13
SOUTIEN
AU CONSOMMATEUR ...........14
CONGÉLATEURS
HORIZONTAUX
49-60798 -2 04-18 GEA

2 49-60798-2
AVERTISSEMENTS DE LA PROPOSITION 65 DE L’ÉTAT DE LA CALIFORNIE:
AVERTISSEMENT
Ce produit contient une ou plusieurs substances chimiques reconnues par l’État de Californie pour
causer le cancer et des anomalies congénitales ou d’autres problèmes liés à la reproduction.
ATTENTION
Pour réduire le risque de blessures lorsque vous utilisez votre congélateur, veuillez suivre les consignes de
sécurité suivantes :
Ŷ 1HQHWWR\H]SDVOHFRQJpODWHXUDYHFGHO¶HDXWLqGHTXDQG
celui-ci est froid. Les composants peuvent se casser
s’ils sont exposés à des changements soudains de
température ou si vous les cognez ou les faites tomber.
Ŷ eORLJQH]OHVGRLJWVGHVSDUWLHVGXFRQJpODWHXURO¶RQSHXW
facilement se pincer : les espaces entre le couvercle et
ODFXYHVRQWWRXMRXUVpWURLWV6R\H]SUXGHQWORUVTXHYRXV
fermez le couvercle en présence d’enfants.
Ŷ 1HWRXFKH]SDVOHVVXUIDFHVIURLGHVGXFRQJpODWHXU
lorsque vous avez les mains humides ou mouillées. La
peau risque d’adhérer à ces surfaces extrêmement froides.
Ŷ 1HUHFRQJHOH]SDVOHVDOLPHQWVVXUJHOpVTXLRQW
complètement dégelé.
LIRE ET CONSERVER CES INSTRUCTIONS
AVERTISSEMENT
Pour réduire le risque d’incendie, d’explosion, de choc électrique ou de blessures lorsque vous
utilisez votre congélateur, veuillez suivre ces consignes de sécurité :
Ŷ &HFRQJpODWHXUGRLWrWUHFRUUHFWHPHQWLQVWDOOp
conformément aux Consignes d’Installation avant toute
utilisation.
Ŷ 'pEUDQFKH]OHFRQJpODWHXUDYDQWG¶HIIHFWXHUXQH
UpSDUDWLRQGHUHPSODFHUXQHDPSRXOHRXGHOHQHWWR\HU
Remarque : L’alimentation du congélateur ne peut être
déconnectée par aucune des fonctions sur le panneau de
commande.
Remarque : Les réparations doivent être effectuées par
un professionnel qualifié.
Ŷ 5HPHWWH]WRXWHVOHVSLqFHVHWSDQQHDX[HQSODFHDYDQW
d’utiliser l’appareil.
Ŷ $EVWHQH]YRXVG¶HQWUHSRVHURXG¶XWLOLVHUGHO¶HVVHQFHRX
d’autres vapeurs et liquides inflammables aux alentours de
cet électroménager ou d’autres appareils.
Ŷ 1¶HQWUHSRVH]SDVGDQVFHWpOHFWURPpQDJHUGHV
substances explosives telles que des bombes aérosols qui
contiennent un gaz propulseur.
Ŷ 1¶XWLOLVH]SDVGHFRUGRQGHUDOORQJH
Ŷ 3RXUpYLWHUWRXWULVTXHGHVXIIRFDWLRQRXG¶HQIHUPHPHQW
retirez le couvercle d’un congélateur avant de le mettre au
rebut ou si vous arrêtez de l’utiliser.
Ŷ
$ILQGHSUpYHQLUOHVDFFLGHQWVJUDYHVRXODPRUWOHV
enfants ne doivent pas se tenir ni jouer dans ou sur
l’électroménager.
Ŷ /HVHQIDQWVHWOHVSHUVRQQHVGRQWOHVFDSDFLWpVVRQW
UpGXLWHVVXUOHSODQSK\VLTXHVHQVRULHORXPHQWDORXTXL
manquent d’expérience ou de connaissances, peuvent
utiliser cet électroménager seulement si elles sont
surveillées ou ont reçues des consignes de sécurité sur
VRQXVDJHHWOHVULVTXHV\VRQWDVVRFLpV
Ŷ &HWpOHFWURPpQDJHUHVWFRQoXSRXUXQHXWLOLVDWLRQ
domestique et applications similaires : salle du personnel
dans une usine, un bureau ou d’autres lieux de travail;
maison de ferme; clients dans un hôtel, un motel, un gîte
touristique et d’autres lieux résidentiels; approvisionnement
et applications similaires non reliées au commerce de
détail.
INSTRUCTIONS IMPORTANTES DE SÉCURITÉ
LIRE TOUTES LES INSTRUCTIONS AVANT D'UTILISER L'APPAREIL
INFORMATION DE SÉCURITÉ
RISQUE D’EXPLOSION Fluide frigorigène inflammable
Cet électroménager contient le réfrigérant isobutane,
R600a, un gaz naturel à compatibilité élevée avec
l’environnement. Il s’agit cependant d’un combustible.
Observez les consignes de sécurité ci-dessous afin
de réduire le risque de blessure ou de dommage à la
propriété.
1. Lors de la manipulation, de l’installation et de l’utilisation de
cet appareil, prenez soin de ne pas endommager les tubes
de circulation du fluide frigorigène.
2. L’entretien ou la réparation doivent être effectués par un
personnel de service autorisé. Utilisez seulement des
pièces de rechange autorisées par le fabricant.
3. Mettez le réfrigérateur au rebut conformément aux
réglementations fédérales et locales. Le fluide frigorigène
inflammable et le matériel isolant utilisés nécessitent des
procédures de mise au rebut spéciales. Communiquez
avec les autorités locales compétentes pour la mise
au rebut de votre réfrigérateur sans danger pour
l’environnement.
4. 1¶REVWUXH]SDVOHVpYHQWVGDQVO¶HQFHLQWHSUpYXHSRXU
l’appareil.
5.1¶XWLOLVH]SDVG¶DSSDUHLOVRXDXWUHVPR\HQVPpFDQLTXHV
pour accélérer le processus de dégivrage.
6. 1¶HQGRPPDJH]SDVOHFLUFXLWGXIOXLGHIULJRULJqQH
7. 1¶XWLOLVH]SDVG¶DSSDUHLOVpOHFWULTXHVGDQVOHFRPSDUWLPHQW
réfrigérateur de cet appareil.
AVERTISSEMENT

49-60798-2 3
INFORMATION DE SÉCURITÉ
LIRE ET CONSERVER CES INSTRUCTIONS
INSTRUCTIONS IMPORTANTES DE SÉCURITÉ
LIRE TOUTES LES INSTRUCTIONS AVANT D'UTILISER L'APPAREIL
INSTALLATION
AVERTISSEMENT
Risque d’explosion.
Conservez les matériaux et vapeurs inflammables tels que l’essence à l’écart de votre appareil. Une explosion, un incendie
voire la mort pourrait en résulter.
MISE AU REBUT APPROPRIÉE DE VOTRE ANCIEN CONGÉLATEUR
Ne coupez ni retirez en aucun cas la troisième broche (mise à la terre) de la fiche du cordon d’alimentation. Pour
votre sécurité, cet appareil doit être correctement mis à la terre.
Le cordon d’alimentation de cet appareil est muni d’une fiche
à 3 broches (mise à la terre) qui se branche dans une prise
murale ordinaire à 3 alvéoles (mise à la terre) pour réduire au
minimum les risques de chocs électriques.
Faites examiner la prise de courant et le circuit par un
électricien qualifié pour vous assurer que la prise est
correctement mise à la terre.
'DQVOHFDVG¶XQHSULVHELSKDVpHO¶LQVWDOODWHXUDOD
responsabilité et l’obligation de la remplacer par une prise
WULSKDVpHFRUUHFWHPHQWPLVHjODWHUUH1¶XWLOLVH]SDV
d’adaptateur.
Le congélateur doit toujours être branché dans sa propre
prise de courant, dont la tension nominale est identique à
celle indiquée sur la plaque signalétique.
8QHDOLPHQWDWLRQpOHFWULTXHjYROWV&$+]DYHF
XQIXVLEOHGHRXDPSqUHVHWXQHPLVHjODWHUUHHVW
nécessaire. Ceci permet d’obtenir un meilleur rendement et
évite de surcharger les circuits électriques du domicile qui
risque d’occasionner un incendie en surchauffant.
1HGpEUDQFKH]MDPDLVOHFRQJpODWHXUHQWLUDQWVXUOHFRUGRQ
d’alimentation. Saisissez fermement la fiche du cordon et
tirez droit pour la retirer de la prise.
Cessez immédiatement d’utiliser un cordon électrique
endommagé. Si le cordon électrique est endommagé,
son remplacement doit être effectué par un technicien en
UpSDUDWLRQTXDOLILpDXPR\HQG¶XQFRUGRQGHUHFKDQJH
autorisé par le fabricant.
Lorsque vous déplacez votre congélateur du mur, faites
attention de ne pas le faire rouler sur le cordon d’alimentation
afin de ne pas l’endommager.
BRANCHEMENTS ÉLECTRIQUES
AVERTISSEMENT
RISQUE DE CHOC ÉLECTRIQUE.
Branchez l’appareil dans une prise triple avec terre.
1HUHWLUH]SDVODEURFKHGHWHUUH
1¶XWLOLVH]SDVG¶DGDSWDWHXU
1¶XWLOLVH]SDVGHFRUGRQGHUDOORQJH
Le non-respect de ces instructions peut entraîner des risques d’incendies, des chocs électriques ou la mort.
AVERTISSEMENT
RISQUE DE SUFFOQUER OU D’Y ÊTRE EMPRISONNÉ
Le non-respect de ces instructions d'élimination peut entraîner la mort ou des blessures graves.
IMPORTANT: /HVHQIDQWVSULVDXSLqJHRXPRUWVG¶DVSK\[LH
sont toujours d’actualité. Les réfrigérateurs et congélateurs
abandonnés sont toujours aussi dangereux, même si on
n’attend que «quelques jours» pour s’en débarrasser. Si vous
ne gardez pas votre ancien réfrigérateur ou congélateur,
veuillez suivre les directives ci-dessous afin de prévenir les
accidents.
Avant de vous débarrasser de votre ancien réfrigérateur
ou congélateur :
Ŷ'pPRQWH]OHFRXYHUFOHGXFRQJpODWHXU
Ŷ/DLVVH]OHVFOD\HWWHVHQSODFHDILQG¶HPSrFKHUOHVHQIDQWV
de grimper à l’intérieur.
Mise au rebut des produits réfrigérants et en mousse
Mettez l’électroménager au rebut conformément à la réglementation fédérale et locale. Le fluide frigorigène inflammable et le
matériel isolant utilisés nécessitent des procédures de mise au rebut spéciales. Communiquez avec les autorités locales pour
connaître la façon de mettre votre électroménager au rebut qui soit respectueuse de l’environnement.

4 49-60798-2
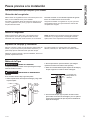
Mise en marche du congélateur
1HWWR\H]O¶LQWpULHXUGXFRQJpODWHXUDYHFXQHVROXWLRQGH
bicarbonate de soude et d’eau (voir la section Entretien et
QHWWR\DJH
2. Branchez le cordon d’alimentation dans une prise de
courant.
3. $VVXUH]YRXVGHUpJOHUODFRPPDQGHGHWHPSpUDWXUHj
(recommandé) entre 1 (moins froid) et 7 (plus froid).
4. Laissez fonctionner le congélateur pendant au moins quatre
KHXUHVDYDQWG¶\UDQJHUGHVDOLPHQWV
UTILISATION DU CONGÉLATEUR: Fonctionnement/Fonctionnalités
Fonctionnement
Fonctionnalités
Voyants d’état du congélateur
ROUGE :/HYR\DQWURXJHV¶DOOXPHDXWRPDWLTXHPHQWORUVTXHOD
température du congélateur est trop élevée, au-dessus
de -5 °C (23 °F)
. Il s’éteindra lorsque la température passera
sous -5 °C (23 °F).
VERT :/HYR\DQWYHUWHVWXQLQGLFDWHXUTXLV¶DVVXUHTXH
YRWUHFRQJpODWHXUIRQFWLRQQH6LFHYR\DQWHVWpWHLQWYpULILH]
immédiatement les causes possibles : panne de courant,
cordon d’alimentation débranché, disjoncteur déclenché,
IXVLEOHJULOOpRXDPSRXOHGHYR\DQWEUOpH'DQVFHGHUQLHUFDV
communiquez avec le service pour un remplacement.
Cadran de commande de température
Insérez une pièce de monnaie dans la fente du cadran pour
régler la température entre 1 et 7.
AVERTISSEMENT
Le congélateur doit être débranché
pour se prémunir contre le risque de choc électrique lors de
O¶LQVWDOODWLRQGXQHWWR\DJHRXGHODUpSDUDWLRQGXFRQJpODWHXU
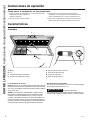
Commandes
G
F
E
OFF
POWER-ON
HIGH
TEMPERATURE
4
13
7
5
2
6
$
B
C
'
+
A. Poignée
B. Lampe
C. Panier métallique amovible (2)
D. Verrou de sécurité (avec clé)
E. Lémoin lumineux d’alimentation (lumière verte)
F. 7pPRLQOXPLQHX[G¶DODUPHYR\DQWURXJH
G. Contrôle de la température
H. Bonde de vidange extérieure
La page est en cours de chargement...
La page est en cours de chargement...
La page est en cours de chargement...
La page est en cours de chargement...
La page est en cours de chargement...
La page est en cours de chargement...
La page est en cours de chargement...
La page est en cours de chargement...
La page est en cours de chargement...
La page est en cours de chargement...
La page est en cours de chargement...
La page est en cours de chargement...
La page est en cours de chargement...
La page est en cours de chargement...
La page est en cours de chargement...
La page est en cours de chargement...
La page est en cours de chargement...
La page est en cours de chargement...
La page est en cours de chargement...
La page est en cours de chargement...
La page est en cours de chargement...
La page est en cours de chargement...
La page est en cours de chargement...
La page est en cours de chargement...
-
 1
1
-
 2
2
-
 3
3
-
 4
4
-
 5
5
-
 6
6
-
 7
7
-
 8
8
-
 9
9
-
 10
10
-
 11
11
-
 12
12
-
 13
13
-
 14
14
-
 15
15
-
 16
16
-
 17
17
-
 18
18
-
 19
19
-
 20
20
-
 21
21
-
 22
22
-
 23
23
-
 24
24
-
 25
25
-
 26
26
-
 27
27
-
 28
28
-
 29
29
-
 30
30
-
 31
31
-
 32
32
-
 33
33
-
 34
34
-
 35
35
-
 36
36
-
 37
37
-
 38
38
-
 39
39
-
 40
40
-
 41
41
-
 42
42
-
 43
43
-
 44
44


GE HCM9DMWW Le manuel du propriétaire
- Catégorie
- Congélateurs
- Taper
- Le manuel du propriétaire
dans d''autres langues
Documents connexes
-
Haier HCM7SMWW Le manuel du propriétaire
-
GE FCM16SLWW Le manuel du propriétaire
-
-
GE FCM11PHWW Le manuel du propriétaire
-
GE FCM22DLWW Le manuel du propriétaire
-
-
-
GE FCM22DLWW Manuel utilisateur
-
GE FCM22DLWW Le manuel du propriétaire
-