START OF THE PROGRAMME
Press the “Start/Pause”
pushbutton to
start the cycle ; the corresponding light will
come on green. It is normal for the pro-
gramme selector to remain stationary dur-
ing the cycle. The symbol for the current
cycle and the remaining time appear on the
display. If a delayed start has been selec-
ted, the countdown appears on the display.
The drain pump can operate for a short
time when the appliance fills water.
WARMING UP
During the cycle, the
symbol comes on
when the appliance is reaching the right
temperature.
INTERRUPTING A PROGRAMME
Adding washing
When the “Add washing” light
is on, you
can add washing by proceeding as follows.
Press the “Start/Pause”
pushbutton :
the corresponding light will flash green while
the appliance is paused. The lid can only be
opened around 2 minutes after the washing
machine has come to a stop. Press the
“Start/Pause”
pushbutton again to con-
tinue the programme.
Modifying the programme in progress
Before making any changes to the current
programme, you need to pause the wash-
ing machine by pressing the “Start/Pause”
pushbutton. If the modification is not
possible, “Err” flashes in the display and the
“Start/Pause”
pushbutton flashes red for
a few seconds. If you still decide to change
the programme, you must cancel the cur-
rent programme (see below).
Cancelling the programme
If you want to cancel the programme, turn
the programme selector to the “Stop” posi-
tion
.
END OF THE PROGRAMME
The washing machine stops automatically ;
the “Start/Pause”
button goes out and
flashes on the display. The lid can only
be opened around 2 minutes after the
washing machine has come to a stop. Turn
the programme selector to the “Stop”
position. Remove washing. Unplug and
close water inlet tap.
Stand by : once the programme has finish-
ed after a few minutes the energy saving
system will be enabled. The brightness of
the display is reduced. By pressing any but-
ton the appliance will come out of the ener-
gy saving status.
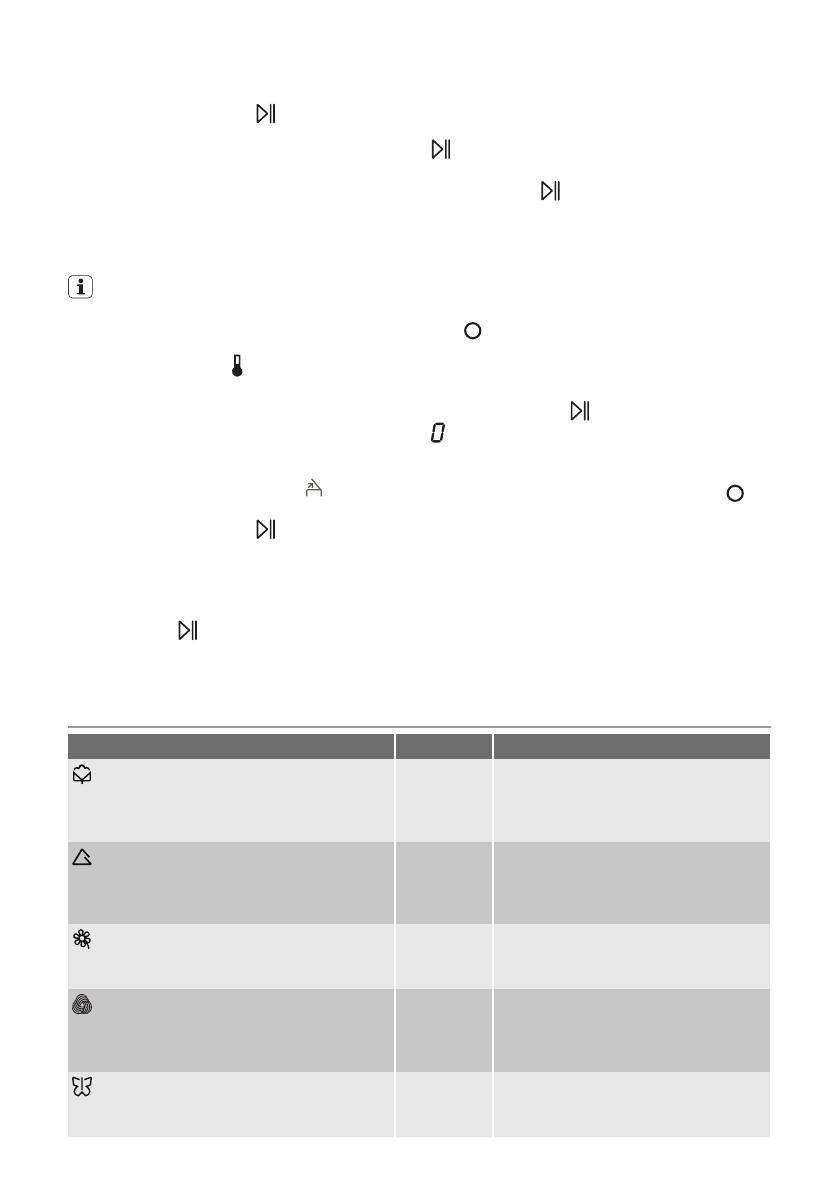
WASHING PROGRAMMES
Programme / Type of washing Load Available options
Cottons (cold - 90°) : White or colour,
e.g. normally soiled work clothes, bed linen,
table linen, body linen, towels.
Max. spin speed: 1000 rpm
5,5 kg Night cycle, Rinse hold, Prewash, Ex-
tra rinse, Delay start, Time manager
Synthetics (cold - 60°) : Synthetic fab-
rics, body linen, fab, coloured farics, non-iron
shirts, blouses.
Max. spin speed: 900 rpm
2,5 kg Night cycle, Rinse hold, Prewash, Ex-
tra rinse, Delay start, Time manager
Delicates (cold - 40°) : For all delicate
materials, for example curtains.
Max. spin speed: 700 rpm
2,5 kg Night cycle , Rinse hold, Prewash,
Extra rinse, Delay start, Time manager
Wool (cold - 40°) : Machine washable
wool carrying the labels “pure new wool, ma-
chine washable, does not shrink”.
Max. spin speed: 1000
1,0 kg Night cycle, Rinse hold, Delay start
Silk (cold - 30°) : Fabric machine wash-
able at 30°C.
Max. spin speed: 700 rpm
1,0 kg Night cycle, Rinse hold, Delay start
8 electrolux


