La page est en cours de chargement...

50
1.
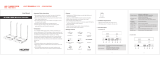
Connect the Button’s HDMI and USB jacks to the corresponding ports of a laptop.
2.
When the Button is successfully connected to the laptop, the LED indicator of the Button will
blink green.
3.
Make sure the Host is properly connected to a power source.
4.
Press
Start pairing
to pair the Host to the Button via the web management interface, you will
have two minutes to pair with the Button.
5.
Press the split screen key on the side of the Button for five seconds.The LED indicator of
the Button will blink blue for about 10 seconds.The pairing process is ongoing. A “Pairing in
progress” message will be shown on the screen.
HDMI
1.4
USB

51
6.
The LED indicator of the Button will turn static green when the Host and Button are successfully
paired.
•
Images are for reference only. Each product features a different serial number.
•
The maximum number of Buttons you can pair with one Host is 32.
7.
You may press
Stop pairing
anytime to stop the pairing process.

52
Monitor
Click
Monitor
to adjust
Monitor Output Setting.
Primary Screen output resolution, Secondary output resolution
configures the Host’s
output resolution for video broadcast by the Host.When
Primary Screen output resolution ,
Secondary output resolution
mode is set to
Auto
the Host will select the output resolution
based on the connected display’s native timing, or you can select an output resolution manually.
Primary Screen Scale, Secondary Screen Scale
allows users to adjust the borders of the
Host’s video output so that it properly fits the screen of the connected display.This setting is
mainly intended for users who connect the Host to a touchscreen display, so that the edges of the
video align to the edges of the display’s screen to ensure the accuracy of touch gestures.To adjust
the
Primary Screen Scale, Secondary Screen Scale
setting, click the
Adjustment
button,
then use the toggle buttons to scale the video to fit the screen.
Dual Screen Cast Setting
is a feature to define the output screen among 2 HDMI output
(HDMI 1 as Primary and HDMI 2 as Secondary). Default setting is
Duplicate
which means
Secondary screen has the same output screen of Primary Screen. In
Duplicate
mode, 4 users can
simultaneously project. In
Extend
mode, it can support up to 8 users in Primary and Secondary
screen.

53
Advance Setting
Click
Advance Setting
to adjust
4 + 4 Way Split
,
Login Code
,
Line Out
,
Security Key Active
,
BYOD Device
,
HDCP Auto
and
Network Standby
.
4 + 4 Way Split
enables or disables split screen presentations and has the same function as the
split screen button on a Button. See Split screen presentations on page 31 for more information
split screen presentations.

54
Login Code
allows you to set a login password for connections by mobile devices which will
appear on the guide screen.The default setting for this field is
Disable
which means that no login
password is needed for mobile devices to connect to the Host.To set a custom login password for
mobile devices, select
Custom
and then enter the password you want in the field to the right of
the
Login Code
field.To set an automatically generated login password select
Random
.
Line Out
is a port that allow user to connect to audio device through 3.5mm audio jack.When
Line Out is set to Enable, the HDMI 1 and HDMI 2 will not output the audio signal.When Line is
set to Disable, the audio will be output according to projected screen and active HDMI port.
Security Key Active
is a special feature design for meeting Host to allow or forbid BYOD device
to do their presentation.This feature is used for highly confidential needed meeting with BenQ
designated TX Button to prevent the wireless presentation being sniffed by malicious hackers.
When Security key Active is set to Active, the meeting host can press Mobile Projection Key at
the RX Host’ I/O Panel to allow all clients(include BYOD mobile devices) join into presentation
via InstaShare and wireless display protocols or only BenQ TX Buttons.The Mobile Projection Key
setting is also reflect to BYOD Device setting.When Security Key Active is set to Dormant, the
Mobile Projection Key is locked to switch from BYOD to TX Button only.

55
BYOD Device
is linked to
Mobile Projection
Key at RX Host's I/O Panel.When sets to
Allow
,
all the clients(include mobile) can do projection via InstaShare or other supported wireless display
protocols. When sets to
Disable
only TX Buttons are allowed to project their screens.
HDCP Auto
is a security setting that allows you configure whether or not HDCP digital copy
protection is automatically enabled for the content output by the Host.The default setting for this
field is
On
, which means that HDCP copy protection will be automatically enabled by Host for
content that features HDCP copy protection and disabled for content that does not feature HDCP
copy protection.To change the setting so that HDCP copy protection is always enabled by Host
select
Off
.
Network Standby
allows you to set the time of inactivity before the Host enters network
standby mode.

56
After you configure all the
Advance Setting
items, press
Apply
to proceed.
If you want to restart the Host, click
Restart
and the Host will restart.
If you want to place the Host in sleep mode, click
Sleep
.
To wake the Host from sleep mode, press the standby button on the top of the Host.

57
Scheduling
You can change the schedule by clicking
Scheduling
.You can set
System Time
and
Periodical Restart
.
You can select your
Time Zone
and the
NTP Server
from which the time is obtained.
You can check
Enable
to set
Periodical Restart
.You can also set restart time and day.
After you configure all the
Scheduling
settings, press
Apply
to proceed.

58
Tool
By clicking
Tool
, you can adjust
Password Setup
,
Firmware Upgrade
,
Configuration Management
,
Wi-Fi Traffic Test
, and
Log Setting
.
Password Setup
You can change
Password
by:
1.
Entering your old password.
2.
Entering your new password.
3.
Entering your new password again to confirm your new password.
4.
Pressing
Reset
to proceed.
1
2
3
4

59
Firmware Upgrade
The
Firmware Upgrade
sub-menu allows you to check for and execute firmware upgrades for
both the Host and Button.
•
Checking for Upgrades (for Host)
Before checking for a new firmware upgrade for your Host, ensure that the Host is connected via
the WAN port to a router with access to the Internet, then click the
New Firmware Check
button to check for a firmware upgrade.To have the Host periodically check for firmware upgrades
check the
Periodical Check
box.
Periodic checks for upgrades can only occur when the Host is connected via the WAN port to a router with access to
the Internet.
If a new firmware upgrade is available the new firmware version will be listed in the
New Firmware Version
field.

60
•
Upgrading the Host’s Firmware
After checking for and confirming the availability of a new firmware upgrade you will be able to
upgrade your Host’s Firmware.The product allows you to upgrade the Host’s firmware using either
an OTA (Over The Air) upgrade or a direct upgrade from an upgrade file located on your local
computer.
To perform an OTA upgrade of the Host’s firmware, click the
Firmware Upgrade
button in the
New Firmware Version
field.
To perform an OTA ensure that the Host is connected via the WAN port to a router with access to the Internet.
When performing any type of upgrade DO NOT do any of the following:
•
Power off or press the reset button on the Host or Button.
•
Close the browser window of the web management interface.
Failure to follow these warnings will result in firmware upgrade failure and subsequent product failure.
To perform a direct upgrade from an upgrade file located on your local computer follow the steps
below:
Before executing a direct firmware upgrade, please contact your BenQ regional office for access to the upgrade files.
1.
Click the
Select File
button in the
Firmware File
field.
2.
Navigate to and select the firmware upgrade file.

61
3.
Click the
Firmware Upgrade
button in the
Firmware File
field.
When performing any type of upgrade DO NOT do any of the following:
•
Power off or press the reset button on the Host or Button.
•
Close the browser window of the web management interface.
Failure to follow these warnings will result in firmware upgrade failure and subsequent product failure.
•
Upgrading the Button’s Firmware
You can upgrade the Button’s firmware using an upgrade file located on your local computer or
directly from your Host via the connection between the Button and Host.
To upgrade the Button’s firmware using an upgrade file located on your local computer follow the
steps below:
1.
Select
from a local file
in the
Firmware File
field and then click the
Select File
button.
2.
Navigate to and select the firmware upgrade file.

62
3.
Select the Button you want to upgrade and then click the
Firmware Upgrade
button in the
Upgrade selected InstaShow
X
button
field.
When performing any type of upgrade DO NOT do any of the following:
•
Power off or press the reset button on the Host or Button.
•
Close the browser window of the web management interface.
Failure to follow these warnings will result in firmware upgrade failure and subsequent product failure.
To upgrade the Button’s firmware directly from your Host follow the steps below:
1.
Select
from RX
in the
Firmware File
field.
2.
Select the Button you want to upgrade and then click the
Firmware Upgrade
button in the
Upgrade selected InstaShow
X
button
field.
When performing any type of upgrade DO NOT do any of the following:
•
Power off or press the reset button on the Host or Button.
•
Close the browser window of the web management interface.
Failure to follow these warnings will result in firmware upgrade failure and subsequent product failure.

63
Configuration Management
Configuration backup files feature the configuration settings for your Host except for the host
name, SSID and wireless password settings, and pairing status. In
Configuration Management
,
you can choose
Import Configuration File
,
Export Partial Configuration File
,
Export Complete Configuration File
, and
Factory Default
.
You can import configurations files by:
1.
Clicking
Import File
to choose the file to import.
2.
Navigating to and selecting the configuration file you want to import from your local computer.
You can export a partial configuration backup in the
Export Partial Configuration File
sub-
menu by:
1.
Clicking
Export
.
2.
Navigating to the folder you want to save the backup file to in your local computer and then
choosing
Save
.
3.
The following set values will not be exported:
a.
Information: Host Name
b.
Wireless Network
: SSID setting and password setting
c.
Pairing
:
Pairing Status

64
You can export a full configuration backup in the
Export Complete Configuration File
sub-
menu by:
1.
Clicking
Export
.
2.
Navigating to the folder you want to save the backup file to in your local computer and then
choosing
Save
.
The exported configuration file can only be imported by the same Host that exported the file. The configuration file
cannot be imported by any other Hosts.
You can have the Host restore to
Factory Default
by clicking
Return to Factory Default Setting
.
When the process is confirmed the Host will begin restoring to
Factory Default
and the LED
will quick flash red (flash red twice every second) then restart. After the Host restarts the entire
process is complete.
Wi-Fi Traffic Test
The
Wi-Fi Traffic Test
sub-menu allow you to test the speed of the connection between your
Host and the Button.

65
To test the speed of the connection follow the steps below:
1.
Select the channel you want to test the speed of in the
Option Channel
field.
2.
Click the
Settings
button to set the channel test.

66
3.
Click the
Test
button.The results of the test will be shown in the main window.

67
Log Setting
Logs are records of all system activity for your Host, which may be used by support technicians
to track errors or locate bugs. In the
Log Setting
menu, download the system log to your local
computer by clicking
Download To PC
, clear the system log by clicking
Clear Log
, and view the
system log in the
System Log View
window.
Legal Announcement
For information about disclaimer or privacy policy, press
Legal Announcement
to find out more.

68
Troubleshooting
Category Problem Cause Solution
Your screen
Your screen is
not appearing on
the display when
pressing the Button.
The system is locked.
Web Management
>
Advanced Setting
>
Screen Lock
>
Disable
The Button is
connecting to
another Host.
The Button should be paired
again with the Host.
Pressing time is not
enough.
Press the Present key until the
LED indicator turns from green
to blue.
The screen turns
blank or flickers
when the Host is
presenting.
Insufficient power
supply
Make sure the product’s
power is properly supplied or
connected.
The screen lags
seriously and the
audio breaks up
sometimes.
Insufficient power
supply for the Button.
An laptop with USB
2.0 port may be used
as the power supply
for the Button.
•
Make sure you use USB 3.0
as the power supply for the
Button.
•
If the USB 2.0 port is
the only option for the
power supply for the
Button, try to reduce the
power consumption of
the Button by changing
Picture Quality Mode
to
Low Power
in the web
management.
Wi-
Fi interference or
signal attenuation
•
Make sure the transmission
distance is within 15M and
with no obstacles.
•
Restart the Host in order to
rescan the Wi-Fi 5G channel.
•
Log in
Web Management
>
Wireless Network
>
Wi-Fi Radio Setup
>
toggle the
Rescan
button.

69
Category Problem Cause Solution
Your screen
The message,
"
NOHDMISIGNAL
",
from the Host
is shown on the
display when the
Button is presenting,
or your screen is
blank gray.
The HDMI
connection between
your laptop and the
Button is loose.
Reconnect the HDMI cable of
the Button.
Your laptop cannot
detect the second
monitor.
•
Reconnect the USB cable of
the Button.
•
Reboot your laptop.
Your screen is
shown, but your
audio is not playing
on the audio
system
of the meeting
room.
The audio signal on
your laptop is muted.
Right click on the speaker icon
and switch off the mute.
The audio output
of the laptop hasn’t
been set to the
second screen (BenQ
InstaShow™ X) from
the EDID of the
Button.
Change the default audio
output to the second screen
(BenQ InstaShow™ X) on the
laptop.
The Button
Your content is
removed from the
display and the LED
indicator of your
Button is blinking
red.
The wireless
connection is lost
between the Button
and Host.
1.
The Host will restore
the Wi-Fi connection
automatically.
2.
If this fails, the LED indicator
of your Button starts blinking
red.
3.
Unplug the Button from your
laptop and try again.
Wi-
Fi interference or
signal attenuation
Make sure the transmission
distance is within 15M and with
no obstacles.
The LED indicator
of the Button is
blinking red when
the power is on.
The Host has not
been turned on. Make sure the Host is turned
on.
The Host has not
paired with a Button.
The Host should pair with the
Button again.
Wi-
Fi interference or
signal attenuation
Make sure the transmission
distance is within 15M and with
no obstacles.
The LED indicator
of the Button is
always off.
There is no power
supply.
Check the USB port of your
laptop. If the port fails to
function, try other USB ports.
/