ROOMS TO GO 21012795 Assembly Instructions
- Taper
- Assembly Instructions

M S 1 1 6 5 1 1 3

2 |
Φ
3/16"

3 |

4 |
A x1
Top panel
Panel superior
Panneau supérieur
B x1
Bottom panel
Panel inferior
Panneau inférieur
C x1
Left vertical panel
Panel vertical izquierdo
Panneau vertical gauche
D x1
Right vertical panel
Panel vertical derecho
Panneau vertical droit
E x1
Left side panel
Panel lateral izuierdo
Panneau latéral gauche
F x1
Right side panel
Panel lateral derecho
Panneau latéral droit
G x1
Back panel
Panel posterior
Panneau arrière
H x2
Drawer front panel
Panel frontal del cajón.
Panneau avant du tiroir
I x2
Drawer left panel
Cajón Panel izquierdo.
Tiroir Panneau de gauche
J x2
Drawer right panel
Panel derecho del cajón
Panneau de droite du tiroir
K x2
Drawer back panel
Panel posterior del cajón
Panneau arrière du tiroir
L x2
Drawer bottom panel
Panel inferior del cajón
Panneau inférieur du tiroir

5 |
M x2
Shelf panel
Panel de estante
Panneau d’étagère
N x1
Left door panel
Panel de la puerta izquierda
Panneau de porte gauche
O x1
Right door panel
Panel de la puerta derecha
Panneau de porte de droite
P x2
Front leg
Pata delantera.
Jambe avant
Q x1
Left back leg
Pierna trasera izquierda
Jambe arrière gauche
R x1
Right back leg
Pierna trasera derecha
Jambe arrière droite
S x1
Middle support leg
Pata de soporte medio
Jambe de soutien du milieu

6 |
1 x16
Cam bolt
Perno de leva
Boulon à came
2 x16
Cam lock
Bloqueo de leva
Verrouillage de la came
3 x16
Wood dowel
Clavija de madera
Cheville en bois
∅
5/16”x1-1/4”L
4 x5
Bolt
Tornillo
Boulon
ø1/4”*1”L
5 x1
Allen wrench
Llave Allen
Clé Allen
ø1/4”
6 x20
Screw
Tornillo
Vis
ø1/8” *5/8” L
7 x2
Handle
Asa
Poignée
8 x4
Bolt
Tornillo
Boulon
Ø5/32” *3/4” L
9 x16
Screw
Tornillo
Vis
∅
8#x1-1/2” L
10 x4
Bracket
Paréntesis
Crochet
11 x4
Screw
Tornillo
Vis
Ø1/8”*5/8”L
12 x32
Cover
Cubrir
Couverture
13 x8
Shelf pin
Pasador de estante
Goupille d’étagère
14 x4
Hinge
Bisagra
Charnière
15 x24
Screw
Tornillo
Vis
ø1/8” *5/8” L
16 x4
Screw
Tornillo
Vis
ø1/8” *1-3/8” L
17 x4
Anchor
Ancla
Ancre
18 x2
Tie
Atar
Cravate

7 |
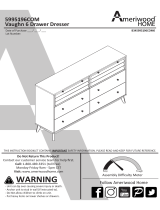
Step 1
: Attach cam bolt (1) to top panel (A).
Paso 1: Conecte el perno de leva (1) al panel superior (A).
Étape 1: Fixez le boulon à came (1) au panneau supérieur (A).
A
C
D
1
(×4)
2
(×4)
3
(×4)
12
(×4)
1
×
4
3
×
4
2
×
4
12
×
4
Step
2
: Attach left vertical panel (C), right vertical panel (D) using cam lock (2),
cover (12) and wood dowel (3).
Paso 2: Coloque el panel vertical izquierdo (C), el panel vertical derecho (D) usando
el bloqueo de leva (2), la cubierta (12) y la clavija de madera (3).
Étape 2: Fixez le panneau vertical gauche (C), le panneau vertical droit (D) à l’aide
du verrou à cames (2), du couvercle (12) et de la cheville en bois (3).
Step
1
: Attach cam bolt (1) to top panel (A).
Paso 1: Conecte el perno de leva (1) al panel superior (A).
Étape 1: Fixez le boulon à came (1) au panneau supérieur (A).

8 |
E
F
1
(×4)
2
(×4)
3
(×4)
12
(×4)
1
×
4
3
×
4
2
×
4
12×4
Step
3
: Attach cam bolt (1) to left side panel (E) and right-side panel(F).
Paso 3: Conecte el perno de leva (1) al panel lateral izquierdo (E) y al panel del lado
derecho (F).
Étape 3: Fixez le boulon à cames (1) au panneau latéral gauche (E) et au panneau
latéral droit (F).
Step
4
: Attach left side panel (E) and right-side panel (F) to top panel (A) using cam
lock (2), cover (12) and wood dowel (3).
Paso 4:
Conecte el panel lateral izquierdo (E) y el panel del lado derecho (F) al
panel superior (A) utilizando el bloqueo de leva (2), la cubierta (12) y la clavija de
madera (3).
Étape 4:
Fixez le panneau latéral gauche (E) et le panneau droit (F) au panneau
supérieur (A) à l’aide du verrou à cames (2), du couvercle (12) et de la cheville en
bois (3).

9 |
B
P
(×2)
Q
R
S
4
(×5)
5
4
×
5
5
Step
5
: Attach front leg (P), left back leg (Q), right back leg (R), middle support leg
(S) to bottom panel (B) using bolt (4), Allen wrench (5).
Paso 5:
Conecte la pata delantera (P), la pierna trasera izquierda (Q), la pata
trasera derecha (R), la pata de soporte medio (S) al panel inferior (B) usando el
perno (4), la llave Allen (5).
Étape 5:
Fixez la jambe avant (P), la jambe arrière gauche (Q), la jambe arrière
droite (R), la jambe de soutien du milieu (S) au panneau inférieur (B) à l’aide du
boulon (4), la clé Allen (5).

10 |
e E
1
(×8)
2
(×8)
3
(×8)
12
(×8)
1
×
8
2
×
8
12
×
8
3
×
8
Step
6
: Attach bolt (1) to bottom panel (B).
Paso 6:
Conecte el perno (1) al panel inferior (B).
Étape 6:
Attachez le boulon (1) au panneau inférieur (B).
Step
7
: Attach bottom panel (B) using cam lock (2), cover (12) and wood dowel (3).
Paso 7:
Conecte el panel inferior (B) con bloqueo de leva (2), cubierta (12) y clavija
de madera (3).
Étape 7:
Fixez le panneau inférieur (B) à l’aide du verrou à cames (2), du couvercle
(12) et de la cheville en bois (3).

11 |
G
6
(×20)
10
(×2)
11
(×4)
6
×
20
10
×
2
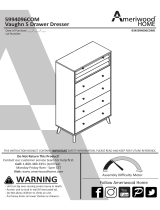
Step 8
: Attach back panel (G) using screw (6), bracket (10) and screw (11).
Paso 8: Conecte el panel posterior (G) con el tornillo (6), el soporte (10) y el
tornillo (11).
Étape 8: Fixez le panneau arrière (G) à l’aide de la vis (6), du support (10) et de la
vis (11).
11
×
4

12 |
12
×8
H
(×2)
I
(×2)
J
(×2)
L
(×2)
7
(×2)
8
(×4)
9
(×8)
12
(×8)
9
×
8
7
×
2
8
×
4
Step 9
: Attach handle (7) using bolt (8), Attach drawer side (J) / (I) to Drawer front
panel (H) Using screw (9), cover (12). Insert drawer bottom panel (L) into the
corresponding slots.
Paso 9:
Conecte el mango (7) usando el perno (8), conecte el lado del cajón (J) / (I) al
panel frontal del cajón (H) Usando el tornillo (9), la cubierta (12). Inserte el panel
inferior del cajón (L) en las ranuras correspondientes.
Étape 9:
Attachez la poignée (7) à l’aide d’un boulon (8), fixez le côté tiroir (J) / (I) au
panneau avant du tiroir (H) À l’aide de vis (9), couvercle (12). Insérez le panneau
inférieur du tiroir (L) dans les fentes correspondantes.
x 2
x 2
x 2 x 2

13 |
(×2)
12
×8
K
(×2)
9
(×8)
12
(×8)
M
(×2)
13
(×8)
13
×
8
9
×
8
Step
10
:
Attach drawer back panel (K) using screw (9), cover (12).
Paso 10:
Conecte el panel posterior del cajón (K) con el tornillo (9), la cubierta (12).
Étape 10:
Fixez le panneau arrière du tiroir (K) à l’aide de vis (9), couvercle (12).
Step
11
: Attach side adjustable shelf (M) using shelf pin (13).
Paso 11:
Coloque el estante ajustable lateral (M) usando el pasador del estante (13).
Étape 11:
Attachez une étagère réglable latérale (M) à l’aide d’une goupille d’étagère
(13).
x 2

14 |

15 |
(×2)
N
O
14
(×4)
15
(×8)
15
×
8
14
×
4
Step 13
: Attach soft close hinge (14) to door (N
&
O) using screw (15).
Paso 13:
Conecte la bisagra de cierre suave (14) a la puerta (N&O) con el tornillo
(15).
Étape 13:
Fixez la charnière de fermeture douce (14) à la porte (N &O) à l’aide de
vis (15).
Step
12
: Insert the assembled drawer into the slide slot.
Paso 12:
Inserte el cajón ensamblado en la ranura deslizante.
Étape 12:
Insérez le tiroir assemblé dans la fente de la glissière.

16 |
15
(×16)
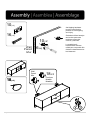
Step 14
: Attach door (N
&
O) to the body using screw (15).
Paso 14:
Conecte la puerta (N&O) al cuerpo con un tornillo (15).
Étape 14:
Fixez la porte (N&) au corps à l’aide d’une vis (15).
To achieve uniform clearance around the door, you may need to
adjust the door by tightening or loosening the two screws on the hinge
itself.
Para lograr un espacio uniforme alrededor de la puerta, es posible que
deba ajustar la puerta apretando o aflojando los dos tornillos de la
bisagra.
Pour obtenir un jeu uniforme autour de la porte, vous devrez peut-être
ajuster la porte en serrant ou en desserrant les deux vis de la
charnière.
15
×
16

17 |
17
(×4)
Φ3/16”
17
×
4
Wall
Pared
Mur
Wall
Pared
Mur

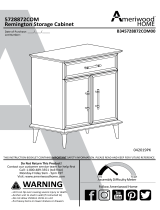
18 |
Anti-tipping hardware
must be used for this
product to avoid tipping
and injury.
Se deben utilizar herrajes
anti-vuelco para este
producto para evitar
vuelcos y lesiones.
Le matériel anti-
basculement doit être
utilisé pour ce produit afin
d'éviter le basculement et
les blessures.
10
(×2)
16
(×4)
18
(×2)
Furniture
Mueble
Muebles
Wall
Pared
Mur
18
(×2)
18
×
2
10
×
2
16
×
4
Wall
Pared
Mur

19 |
85 lbs<

20 |
Replacement Parts or Damages
You should examine your merchandise promptly upon receipt. For product concerns, please contact SEI Furniture
customer service at 800-633-5096 Mon-Fri 8:30 am - 5 pm CST. Please have your purchase information ready
when you call.
Requests for missing or damaged parts must be requested within one year of purchase. Damages or missing parts
reported outside of one year will not be honored. SEI Furniture is under no obligation to provide parts or
replacement merchandise. Replacement part requests will not be honored for fully assembled or modified items.
For merchandise purchased from an online retailer, please contact their customer service for parts or returns.
Merchandise purchased as “like new,” “open box,” or “as is,” or from private parties are exempt from replacement
parts.
One Year Limited Warranty
Product warranty applies to the original purchaser with items in original factory-sealed cartons. Proof of purchase
date, price, and seller must be shown to validate the warranty. This warranty covers defects in manufacturing. It
does not apply to any defects caused by negligence, misuse, accidental damage, or improper assembly. Glass and
mirrors are excluded from this warranty. Warranty does not extend to cosmetic damage, accidents, misuse, abuse,
or neglect. Liability for incidental or consequential damages is excluded to the maximum extent permitted by law.
After verification of claim, SEI Furniture will repair or replace any defective product or missing part. If the
defective item must be returned in whole or in part, we will send written authorization and a pre-addressed
shipping label for the return of any defective product or part.
No returns will be accepted without prior approval.
La page est en cours de chargement...
La page est en cours de chargement...
-
 1
1
-
 2
2
-
 3
3
-
 4
4
-
 5
5
-
 6
6
-
 7
7
-
 8
8
-
 9
9
-
 10
10
-
 11
11
-
 12
12
-
 13
13
-
 14
14
-
 15
15
-
 16
16
-
 17
17
-
 18
18
-
 19
19
-
 20
20
-
 21
21
-
 22
22


ROOMS TO GO 21012795 Assembly Instructions
- Taper
- Assembly Instructions
dans d''autres langues
- español: ROOMS TO GO 21012795
Documents connexes
-
ROOMS TO GO 20442036 Assembly Instructions
-
-
-
-
-
-
ROOMS TO GO 21012149 Manuel utilisateur
-
-
-
Autres documents
-
Ameriwood HD41111 Guide d'installation
-
 Dorel Home Vaughn 5555155COM Guide d'installation
-
-
 Dorel Home 7808886COM Assembly Manual
-
 Dorel Home HD48012 Guide d'installation
-
 Dorel Home 5728872COM Assembly Manual
-
-
Southern Enterprises DN1111930 Manuel utilisateur
-


