
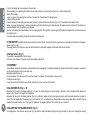
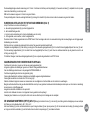
ISTRUZIONI D’USO
OPERATING ISTRUCTIONS
MODE D’EMPLOI
BEDIENUNGSANWEISUNG
INSTRUKCJA UŻYCIA
GEBRUIKSAANWIJZINGEN
NAVODILA ZA UPORABO
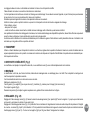
SCARIFICATORE
SCARIFIER
SCARIFICATEUR
VERTIKUTIERER
WERTYKULATOR
VERTICUTEERMACHINE SCARIFIER
BRANA


2
1
12
3
4
5
6
5
1
2
7
3
4
6
8
1
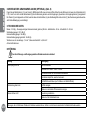
Costruttore
Manufacturer
Constructeur
Baurma
Producent
Fabrikant
Proizvajalec
2
Modello
Type
Modèle
Modell
Model
Model
Vrsta
3
Anno di costruzione
Year of construction
Année de construction
Baujahr
Rok produkcji
Bouwjaar
Leto izdelave
4
Numero di serie articolo – Progressivo
Serial number - Progressive
Numéro de série article - Progressif
Seriennummer Progressiv
Numer seryjny artykułu – Progresywny
Serienummer artikel - Volgnummer
Serijska številka – progresivno
5
Massa
Mass
Masse
Gewicht
Ciężar
Gewicht
Teža
6
Potenza in kW
Power in kW
Puissance en kW
Leistung in kW
Moc w kW
Vermogen in kW
Zmogljivost v kW
9

3
G
C
D
E
F
3-A
3-B
F
E
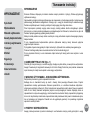
Regolazione altezza lame
Adjusting the blade height
Réglage de la hauteur des lames
Einstellung der messerhöhe
Regulacja wysokości noży
De hoogte van de messen afstellen
Nastavitev višine rezila

4
5
Innesto attrezzo
Cutter bar clutching
Embrayage barre
Mähbalkenantrieb
Sprzęgło
Werktuig aansluitpunt
Sklopka rezalne ročice
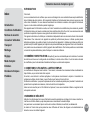
Lire le mode d’emploi avant l’usage.
Przed rozpoczęciem użytkowania maszyny należy przeczytać
instrukcję użytkowania i konserwacji.
Lees de handleiding door alvorens u de machine gebruikt.
Pred uporabo naprave preberite navodila za uporabo.
2
Pericolo lancio oggetti! Tenere le persone estranee fuori dalla
zona di pericolo!
Danger, hurling objects! Keep other people well away from the
danger area!
Danger : risque de projection d’objets! Eloigner toute personne
etrangère de la zone dengereuse!
Schleuder-Gefahr von Gegenständen! Unbefugte dürfen nicht in
den Gefahrenbereich gelangen!
Niebezpieczeństwo odrzutu przedmiotów! Osoby trzecie
powinny przebywać poza strefą zagrożenia!
Gevaar voor wegschietende voorwerpen! Houd onbevoegde
personen op een afstand van de gevaarlijke zone!
Nevarnost letečih predmetov. Med delovanjem naprave je
zadrževanje ljudi v neposredni bližini prepovedano.
3
Attenzione: pericolo ferimento arti. Parti rotanti.
Warning: risk of limb injury. Rotating parts.
1 2 4
3Attention ! Danger de blessures des membres. Parties
tournantes.
Achtung: Gliederverletzung Drehende Teile.
Uwaga: niebezpieczeństwo zranienia kończyn. Obracające się
części.
Let op: gevaar voor letsel aan lichaamsdelen. Draaiende
onderdelen. Warning: risk of limb injury. Rotating parts.
Pozor: Nevarnost poškodb okončin. Vrteči deli.
4
Rimuovere la spina dalla presa di corrente prima di effettuare
le riparazioni.
Remove the plug from the power socket before repairing the
machine.
Débrancher la che de la prise de courant avant d’effectuer
les réparations.
Vor der Ausführung von Reparaturen den Stecker aus der
Steckdose ziehen.
Przed przystąpieniem do wykonywania czynności naprawczych
należy wyjąć wtyczkę z gniazda prądu.
Verwijder de stekker uit het stopcontact alvorens u reparaties
verricht.
Pred popravilom naprave odstranite vtič iz vtičnice.
1
Leggere il libretto uso e manutenzione prima di usare
la macchina.
Lesen Sie die Gebrauchsanweisung vor der
Inbetriebnahme.
Read the instructions manual before operating on the
machine.

6
1
D
B
A
2
C
5
3
3
4
4
7
6
5
5
F
E
OPTIONAL
OPCJA
OPTIES
IZBIRNO
X
Y
X-Y=8÷11mm
2B
9
1
2A

ITALIANO
1
INTRODUZIONE
Gentile cliente la ringraziamo per la ducia accordata ai ns. prodotti e le auguriamo un piacevole utilizzo della
sua macchina.
Abbiamo creato queste istruzioni per l’uso allo scopo di assicurare, n dall’inizio, un funzionamento privo di
inconvenienti. Seguite attentamente questi consigli, avrete la soddisfazione di possedere per molto tempo una
macchina che funziona a dovere.
Le nostre macchine, prima di essere fabbricate in serie, vengono collaudate in maniera molto rigorosa e, durante
la fabbricazione vera e propria, sono sottoposte a severi controlli. Ciò costituisce, per noi e per voi, la migliore
garanzia che si tratta di un prodotto di riprovata qualità.
Questa macchina è stata sottoposta a rigorosi test neutrali, nel paese d’origine, e risponde alle norme di
sicurezza in vigore.
Per garantire questo, è necessario utilizzare esclusivamente ricambi originali.
L’utilizzatore perde ogni diritto di garanzia qualora vengono utilizzati ricambi non originali.
Con riserva di variazioni tecniche-costruttive.
Per informazioni e per ordinazioni di pezzi di ricambio si prega citare il numero di articolo e il numero di
produzione.
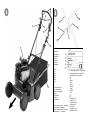
n DATI PER L’IDENTIFICAZIONE (Fig. 1)
L’etichetta (8) con i dati della macchina e il numero di matricola è sul anco sinistro dello scaricatore, di anco
al motore. Nota- Nelle eventuali richieste di Assistenza Tecnica o nelle ordinazioni delle Parti di Ricambio, citare
sempre il numero di matricola dello scaricatore interessato.
n CONDIZIONI DI UTILIZZAZIONE - LIMITI D’USO
Lo scaricatore si usa ad arieggiare il terreno. Sui tappeti erbosi ogni anno si creano muschio ed erbacce;
questo comporta un infeltrimento del terreno. Arieggiando si elimina la supercie infeltrita e il prato riprende a
respirare e ad assimilare le sostanze nutritive. Prima di arieggiare tagliare l’erba ad un’ altezza di circa 40 mm.
Utilizzare lo scaricatore solo con il prato asciutto/umido. Il periodo migliore per l’arieggiamento è durante tutta
la stagione di vegetazione, da ne aprile no a settembre. Arieggiare almeno una volta all’anno ed utilizzare un
buon fertilizzante subito dopo avere arieggiato.
Ogni utilizzo diverso da quello descritto è illegale; comporta, oltre al decadimento della garanzia, anche un
grave pericolo per l’operatore e per le persone esposte.
n NORME DI SICUREZZA
Attenzione: prima del montaggio e la messa in funzione della macchina, leggere attentamente il libretto
istruzione. Le persone che non conoscono le norme di utilizzazione non possono usare la macchina.
L’uso della macchine è vietato ai minori di 16 anni e alle persone che hanno assunto alcol, medicine o droghe.
Istruzioni originali
Indice
Introduzione
Condizioni di utilizzazione
Norme di sicurezza
Istruzioni d’ uso
Trasporto
Montaggio
Regolazione
Manutenzione
Dati tecnici
Guasti

ITALIANO
2
La macchina è stata progettata per essere utilizzata da un solo operatore. L’utilizzatore dell’apparecchio è responsabile di danni arrecati ad altre
persone ed alle loro proprietà; controllare che altre persone, soprattutto i bambini stiano lontani dalla zona di lavoro (almeno 10 metri).
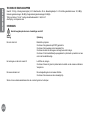
n DESCRIZIONE COMANDI (Fig. 1)
1) Leva acceleratore - 2) Leva innesto attrezzo - 3) Leva sollevamento attrezzo per trasferimento - 4) Pomolo regolazione profondità di lavoro - 5)
Motore - 6) Cesto raccogli erba (optional) - 7) Impugnature - 8) Etichetta CE - 9) Fermo di sicurezza.
n MISURE PREPARATORIE
Durante l’utilizzo dello scaricatore, portare sempre cufe per protezione acustica, scarpe e pantaloni lunghi. Non lavorare mai a piedi nudi oppure
con sandali aperti. Indossare occhiali protettivi quando si utilizza la macchina senza cesto raccoglierba.
Controllate sempre il terreno su cui viene impiegato lo scaricatore ed eliminare sassi, ramoscelli, li metallici, ossicini che potrebbero essere
proiettati dalle lame provocando inoltre danni alla macchina.
Prima di impiegare la macchina, controllate sempre l’accoppiamento di dadi, bulloni, viti e accertarsi che tutta l’unità di taglio non sia usurata o
danneggiata.
Sostituire i rebbi danneggiati od usurati per lotti compiuti, al ne di mantenere il bilanciamento.
ATTENZIONE! - La benzina è altamente inammabile!
- Conservate la benzina nel serbatoio previsto allo scopo.
- Rabboccate il serbatoio solo all’aperto e non fumate durante tale operazione; stare lontani da altre fonti di calore.
- Versate la benzina prima di avviare il motore; non aprite il tappo del serbatoio e non versate benzina quando il motore è in funzione oppure la
macchina è calda.
- Se la benzina è traboccata, non si deve cercare di avviare il motore. Togliere invece l’apparecchio dalla supercie sporca di benzina. Evitare
qualsiasi tentativo di accensione no a quando non si sono volatilizzati i vapori della benzina.
- Per motivi di sicurezza è necessario sostituire, in caso di guasti, il serbatoio della benzina e il tappo.
- Per l’operazione di rabbocco del serbatoio utilizzate un imbuto adeguato oppure un tubo di riempimento, in modo da evitare la fuoriuscita del
carburante su motore, carter o erba.
- Dopo aver eseguito il rifornimento, riposizionare in modo sicuro i tappi del serbatoio e dei contenitori del carburante.
Lo scarico e la zona di scarico del motore possono arrivare no ad una temperatura di 80° C.; alcuni punti della griglia di protezione possono superare
anche 110°C. ATTENZIONE: pericolo di ustioni. Sostituire i silenziatori di scarico danneggiati.
n Avvertenze sull’impiego
Il motore, a combustione interna, non deve funzionare in luoghi chiusi in cui possono concentrarsi gas combusti pericolosi - pericolo di
avvelenamento!
Usate la macchina solo alla luce del giorno o quando l’illuminazione è ottima. Osservate anche i tempi d’impiego locali/comunali consentiti.
Non usate lo scaricatore su pendii eccessivamente ripidi. Fate molta attenzione quando cambiate direzione di marcia sui pendii.
Disinnestare la rotazione delle lame quando spingete la macchina su superci non erbose - c’è pericolo che frammenti di pietra entrino nella
macchina o vengano proiettati.
Non utilizzate mai lo scaricatore con il carter danneggiato o dispositivi di protezione difettosi o mancanti (ad es. deettore di protezione, sportello
posteriore...).

ITALIANO
3
La regolazione base del motore è stata eseguita in fabbrica e quindi non deve essere modicata.
Avviare con cautela il motore secondo le istruzioni del costruttore.
Non ribaltare la macchina con motore avviato. Se occorre sollevare l’apparecchio, esso deve essere inclinato solo lo stretto necessario e non oltre 5
cm , e mai inclinarlo in modo da scoprire le lame verso l’operatore.
Non lasciate che nessuno avvicini mai mani o piedi alle lame in movimento.
Arrestare il motore:
- quando si abbandona o si trasporta I’apparecchio, nel tragitto tra l’area di lavoro ed il magazzino di stoccaggio.
- prima del rabbocco del serbatoio.
- prima di mettere o togliere il sacco raccogli erba (optional) rilasciare la leva innesto attrezzo (g. 1 part. 2) ed attendere l’arresto delle lame.
Le operazioni di manutenzione e pulizia sullo scaricatore, così pure lo smontaggio dei dispositivi di protezione, devono essere eseguite solo quando
il motore è spento, le lame ferme e il cappuccio candela è estratto.
Utilizzare la macchina solamente con i manici in posizione da lavoro.
Questo consente di mantenere una giusta distanza di sicurezza tra zona di comando e la zona operativa della macchina.
n TRASPORTO
Per la movimentazione è previsto l’uso di carrello elevatore. Le forche, allargate al massimo consentito, vanno inserite negli appositi spazi del pallet.
La massa della macchina è indicata nella etichetta della marcatura e riportata nei dati tecnici.
n DISPOSITIVO DI SICUREZZA (Fig. 1)
Lo scaricatore è dotato di dispositivo antinfortunistico: rilasciando la leva (2) si interrompe l’avanzamento della macchina.
n MONTAGGIO
Lo scaricatore viene consegnato a destinazione smontato e sistemato in un adeguato imballaggio. Per completare il montaggio della macchina
osservare la seguente procedura.
Si rammenta di serrare sempre adeguatamente viti e dadi.
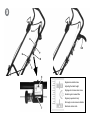
Montaggio del manubrio (Fig. 2)
Fissare il manubrio (1) al supporto (2) per mezzo delle viti (3), rondelle (4), pomoli di ssaggio (5) e dadi (6).
Ripiegatura manubrio (Fig. 4)
Allentare il pomolo (5) e ripiegare il manubrio superiore sul manubrio inferiore come indicato in gura.
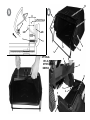
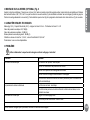
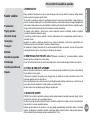
n REGISTRAZIONI (g. 3-5)
Registrazione del lo sollevamento lame (g. 3): Abbassare la leva di sollevamento lame (3) in posizione B. Agire sul registro C no quando le lame
si trovano ad un’altezza dal terreno di 5 mm circa.
Registrazione del lo innesto lame (g. 3 e 5) Attenzione:eseguire correttamente e periodicamente quanto di seguito indicato, per salvaguardare
l’integrità della cinghia. La molla (g. 5 part.1) si deve allungare di 8-11 mm durante il lavoro. Misurare la lunghezza della molla prima e dopo aver
azionato la leva innesto lame (g. 5 part. 2). Agire sul registro (g. 3 part. G) per ottenere l’allungamento sopra indicato.

ITALIANO
4
n REGOLAZIONE ALTEZZA LAME (Fig. 3)
Congurazione di lavoro: alzare la leva di sollevamento attrezzo (3) in posizione (A). Regolare l’altezza di lavoro delle lame girando il pomolo (D).
Ogni giro varia di 1.5 mm l’altezza di lavoro. In base alle indicazioni dell’etichetta (E), controllare lo spostamento dell’indice (F) per capire in che
direzione ruotare il pomolo.
NB: Fare penetrare le lame nel terreno circa 3-5 mm.
Congurazione di trasferimento: abbassare la leva di sollevamento attrezzo (3) in posizione B In questo modo le lame non entrano in contatto con il
terreno.
n MESSA IN MOTO E ARRESTO (Fig. 5)
Attenzione! Prima di ogni avviamento accertarsi che:
a - la leva innesto attrezzo (2) sia in posizione A
b - il serbatoio carburante sia rifornito
c - il livello dell’olio motore sia corretto (vedere l’allegato libretto del motore)
d – dove è previsto il sacco raccogli erba che sia correttamente agganciato
Avviamento del motore: Portare il comando acceleratore in posizione START. Procedere quindi all’accensione secondo quanto indicato dal libretto
istruzioni allegato al motore.
Dopo l’avviamento del motore spostare la leva acceleratore in modo da raggiungere il regime di giri del motore desiderato.
Spostare il fermo di sicurezza (9) nella direzione indicata dalla freccia, poi tirare la leva innesto attrezzo (2) in posizione B impugnando
contemporaneamente anche il manubrio (3).
Tirare la leva innesto attrezzo (2) in posizione B impugnando contemporaneamente anche il manubrio (3). Avanzare spingendo lo scaricatore sul
prato nella direzione indicata dalla freccia della g.1
Arresto : Rilasciare la leva innesto attrezzo (2) e portare il comando acceleratore in posizione STOP
n ISTRUZIONI DI MANUTENZIONE E RIMESSAGGIO
Controllate l’accoppiamento di dadi, bulloni e viti.
Fate attenzione durante le operazioni di regolazione : pericolo di lesioni! Portare i guanti di protezione.
Eseguire le registrazioni indicate nel paragrafo REGISTRAZIONI
Controllare regolarmente il perfetto stato del sacco raccogli erba (optional).
Per motivi di sicurezza, sostituire immediatamente le parti logorate o danneggiate.
Le lame devono essere sostituite quando la loro lunghezza è inferiore a 120 mm.
Utilizzare solo lame di ricambio e accessori originali per garantire la sicurezza e la funzionalità della macchina.
Non immagazzinare mai lo scaricatore con benzina nel serbatoio all’interno di un edicio in cui i vapori della benzina possono venire a contatto con
fuoco aperto o scintille : pericolo di esplosione!
Svuotare il serbatoio della benzina solo all’aperto.
Lasciare raffreddare il motore prima di riporre l’apparecchio in un luogo chiuso.
Per evitare pericoli d’incendio, togliere l’erba, le foglie e il grasso che fuoriesce (olio) dal motore e dallo scarico.

ITALIANO
5
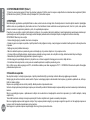
n MONTAGGIO DEL SACCO RACCOGLI ERBA (OPTIONAL) (Fig. 6) Inserire il telaio metallico (1) all’interno del sacco (2).
Con l’aiuto del manico di un comune cucchiaio, inserire il telaio all’interno dei bordi di aggancio A, B, C, D, E e F.
A questo punto sollevare il coperchio posteriore (3) dello scaricatore ed inserire gli agganci (4) nei perni (5). Completare il ssaggio abbassando il
coperchio (3) e facendo attenzione che le estremità (6) della maniglia cesto si inlino nei fori (7) del coperchio.
n CARATTERISTICHE TECNICHE
Massa : 33.5 Kg - Capienza sacco raccogli erba (optional) : 45 lt - Larghezza di lavoro : 42 cm - Profondità di lavoro : 0 ÷ 20 mm
Livello max di pressione acustica : 83,1 dB(A).
Livello di potenza sonora misurato : 94 dB(A).
Livello di potenza sonora garantito : 96 dB(A).
Vibrazioni al manubrio 7,4 m/s2, valore di incertezza nella misura K = ±0,45 m/s2.
Trasmissione : con cinghia trapezoidale
n GUASTI
Prima di effettuare qualsiasi operazione, staccare il cappuccio della candela !
Guasto Rimedio
Il motore non si avvia Carburante esaurito, fare rifornimento.
Controllare che l’acceleratore sia posizionato su START.
Controllare che il cappuccio candela sia ben inserito.
Controllare lo stato della candela ed eventualmente sostituire.
Controllare che il rubinetto del carburante sia aperto (solo per i modelli di motore
in cui è previsto il rubinetto).
La potenza del motore diminuisce Filtro aria sporco, pulirlo.
Controllare che sassi o residui di terra e vegetazione non frenino la rotazione
delle lame, nel caso rimuoverle.
Le lame non ruotano Registrare il lo innesto lame.
Controllare che le lame siano ssate all’albero.
Nel caso non si riesca a porre rimedio al guasto, rivolgersi ad un centro di assistenza autorizzato.

ENGLISH
6
List of contents
Introduction
Conditions of use
Safety norms
Instructions for operating
Transport
Assembly
Regulating
Maintenance
Technical Details
Fault
INTRODUCTION
Dear Customer:
Thank you for your condence in purchasing our products. We wish you to enjoy using our machines.
The following working instructions have been issued to ensure you a reliable running from the beginning. If you
carefully follow such information the machine will operate with complete satisfaction and have a long service life.
Our machines are tested under the most severe conditions before being put into production and are subjected
to strict continuous tests during manufacturing stages as well.
The present unit has been tested in the country of origin by independent testing authorities in accordance with
strict work norms and safety standards.
Only original spare parts must be used to maintain guaranteed functions and safety levels.
The user forfeits any claims which may arise, if the machine shows to be tted with components other than
original spare parts. Subject to changes in design and construction without notice.
For any questions or further information and spare part orders, please inform about the unit serial number printed
on the side of the machine.
n IDENTIFICATION DATA (Fig. 1)
The decal (8) showing the machine data and Serial N° is placed on the scarier left side next to the engine.
Note – Always state your unit serial number when you need Technical Service or Spare Parts.
n CONDITIONS OF USE AND LIMITATIONS OF USE
The scarier is used to scarify the ground. Each year and on lawns, moss and weeds take hold, which cause
the ground to become matted.
By scarifying, the hard surface is cut, allowing the grass to breathe and take up nutritional substances. Before
scarifying , mow the lawn to a height of about 40 mm.
Use the scarier when the lawn is dry /wet only . The best period for scarifying is during the growing season,
from the end of April to the end of September. Do this work at least once a year.
To get a nice green effect, we recommend using a fertiliser immediately after having used the scarier.
n SAFETY PRECAUTIONS
Attention: Before assembly and putting into operation, please carefully read the operating instructions . Persons
not familiar with such instructions should not use the machine.
Persons who are not familiar with the operating manual, as well as children, persons under the age of 16 and,
persons under the inuence of alcohol, drugs or medication must not operate the unit.
The unit was designed to be used by 1 operator only. The operator is responsible for any accidents involving
other persons or their property. When operating the machine, the user should ensure that no others, particularly
children, are standing in the area (10 mt.).
Translation of original user instructions

ENGLISH
7
n DESCRIPTION OF CONTROLS (g. 1)
1) Accelerator level 2) Fitting insertion level 3) Tool transfer raising lever) Handle for the job depth adjustment 5) Engine 6) Grass bag (optional)
7) Handles 8) CE Decal 9) Safety device.
n PREPARATION
During working wear ear protectors, sturdy footwear and long trousers should be worn . Do not work when barefoot or wearing open sandals.
Please wear protective goggles when using the machine without grass catcher.
Check the area on which the scarier is to be used carefully and remove any stones, sticks, wire, bones or other foreign objects which could be thrown
by the blades causing damages to the unit.
Before using the unit please always check the coupling of nuts, screws, bolts and check the cutting set not to be worn out or damaged.
Change the full set of the damaged or worn blades in order to keep the tool balancing.
WARNING !! The petrol/gasoline is highly inammable
- Store fuel only in containers intended for this purpose.
- Fill tank outdoors and do not smoke during this process; keep away from other heat sources.
- Put in the fuel before starting the engine.
- Never remove cap from fuel tank or add oil whilst the engine is running or the unit is hot.
- If fuel has overowed, do not attempt to start the engine. Move the scarier away from the area polluted with fuel. Do not attempt to start until the
fuel fumes have evaporated.
- For safety reasons, replace the fuel tank and tank cap if damaged.
- Use an appropriate funnel or ller tube when refuelling to prevent fuel from spilling on the engine, the housing or grass.
- For tank lling in operations use a proper funnel or lling tube in order to avoid the petrol/fuel coming out on the engine , casing or grass.
- after lling operations , safely re-position the tank caps and the fuel container ones.
The exhaust and area around it may heat up to 80° C; the temperature of some parts of the guard grids can exceed 110°C. WARNING: Risk of burning.
Replace any damaged exhaust pipes.
n Instructions for use
Never run the internal combustion engine in enclosed areas in which dangerous fumes may collect - danger of inhalation of poisonous fumes!
Use the unit only in daylight or with good lighting. While there are no regulations governing operating times, consideration should be shown to others
living nearby and to local rules, if any.
Do not use the scarier on very steep slopes. Be particularly careful when changing the direction of travel on slopes.
Disengage blade rotation when the machine is being pushed over non-grass surfaces. Danger of stones being sucked up by the machine or being
expelled.
Never operate the scarier with the damaged housing/casing or defective or missing protective devices (e. g. protection deector, back opening
etc.).
The engine adjustment has been correctly set at the factory and should not be altered. Carefully start the engine according to manufacturer’s
instructions.
Never tip the scarier whilst starting the engine. If the machine has to be lifted, it must be tilted only as strictly needed and max 5 cm. Do not bend

ENGLISH
8
it so that the blades risk to be exposed to the operator.
When switching on or operating the machine, do not allow nobody to put their hands or feet near or under rotating parts.
Switch off the engine:
- when you leave or transporting the machine on the way from the work area the storage place.
- before re-lling the tank;
- before equipping or taking the grass bag away (optional) , release the tool insertion lever (g. 1 part. 2) and wait for the blades to stop.
Before any mower maintenance or cleaning operation and before dismantling any safety devices, the engine must be switched off, the blade at a
complete standstill and the sparkplug cap removed.
Use the unit checking the guide handles to be on working position. Such position to keep a good safety distance between the unit driving area and
the operative area.
The safety distance provided by the guide handles must be observed.
n TRANSPORT A forklift truck should be used to move the machine. The forks should be opened as far as possible and inserted into the proper
spaces into the pallet.
The weight/mass of the machine is given on the Manufacturer’s data plate together with the other technical information.
n Safety feature (Fig. 1)
The scarier is equipped with a safety device.
If the lever (2) is released, the engine will be immediately switched off
n ASSEMBLY
The scarier is delivered to destination, disassembled in its own packaging. To complete the assembly please strictly follow the procedure ( we remind
you to correctly tighten all the screws and nuts) :
Handlebar assembly (Fig. 2)
Fix the handlebar (1) to the support (2) using the screws (3), washers (4), xing knobs (5) and nuts (6).
Folding the handle (g. 4)
Loosen the knob (5) and fold the upper handle onto the lower one, as shown in the picture.
n ADJUSTMENTS (Fig. 3 - 5)
Adjustment of the wire for the blades raising (g. 3) : lower the blade raising lever (3) on B position. Operate on the C adjuster until the blades are
shown to be at about 5 mm height from the ground.
Adjustment of the wire for the blades insertion (g. 3 e 5). Attention : please correctly and regularly perform what here below described in order to
protect the belt integrity/life. The spring ( g. 5 part 1) should 8-11 mm extend during the job. Measure the spring length before and after having
operated the blades insertion lever ( g. 5 part 2). Operate on the register (g.3 part. G) to obtain the a.m. extension.
n ADJUSTING THE BLADE HEIGHT (Fig. 3)
Job conguration : raise the tool raising lever (3) in (A) position. Adjust the blades job height turning the knob (D). Each turn changes the working

ENGLISH
9
height for 1,5 mm. Considering the indications shown on the label (E) please check the index shifting (F) to realize to which direction you have to
turn the knob.
NB: Make the blades to enter into the earth by about 3-5 mm
Transfer conguration : lower the tool raising lever (3) to position B. This way the blades are not touching the ground.
n STARTING AND STOPPING (Fig. 5)
Caution! Before operating the mower check:
a – the lever for the tool insertion (2) to be on A position.
b – the fuel tank to be full
c – the motor oil level to be correct. (please look at the engine instructions booklet).
d – in case you have the grass bag, please check it is correctly tightened.
Go on with the switching on according to what is described into the instructions booklet you can nd with the engine.
After the engine switching on, move the accelerator lever so that you can reach the RPM you need.
Move the safety device (9) towards the direction shown by the arrow, then pull the tool insertion lever (2) on B position grasping the handlebar (3) at
the same time.
Pull the tool insertion lever (2) on B position grasping the handlebar (3) at the same time. Go on pushing the scarier on the lawn following the direction
shown on the arrow g. n. 1.
Stop : release the tool insertion lever (2) and bring the accelerator control on STOP position.
n INSTRUCTIONS FOR MAINTENANCE AND STORAGE
Check the nuts, bolts and screws are tightened.
Be careful when making adjustments : danger of injury does exist. Do not clamp ngers between housing and blade. Wear protective gloves.
Please perform the adjustments as shown in paragraph : ADJUSTMENTS.
Check regularly to ensure that the grass box (optional) to be in satisfactory conditions
For safety reasons damaged and/or worn down parts should be immediately replaced.
The blades should be replaced when their length is less than 120mm.
Replacement blades and accessories should be original only to guarantee the safety and functionality of the unit.
Never store the scarier with fuel into the tank inside a building where fuel vapours may come into contact with open ame or sparks : danger of
explosion !
Empty the fuel tank outdoors only. Let engine cool down before storing it in an enclosed room.
To prevent danger of a re keep the engine and exhaust clear of grass leaves and leaking grease (oil).
n ASSEMBLY OF GRASS BOX (OPTIONAL) Fig. 6
Insert metal frame (1) into cloth-bag (2). Fix it inside clamping rims of cloth-bag by means of a simple rounded-off toll-a spoon handle, for A,B,C,D, E
and F. Now you have to lift the scarier rear cover (3) and insert the hooks (4) into the pins (5). Complete the tightening operations lowering the cover
(3) and making attention the bag handle ends (6) to enter the cover slots (7).

ENGLISH
10
n TECHNICAL DETAILS
Mass : 33,5 kg. - Volume of grass-box (optional) 45 lt. - Work width : 42 cm. - Work depth : 0 ÷ 20
Measured sound pressure level = 83,1 dB (A)
Measured sound power level : 94 dB (A)
Guaranteed sound power level: 96 dB (A)
Handlebar vibration : 7,4 m/s² , uncertainty value K = ±0,45 m/s2.
Transmission : through “V”- belt
n TROUBLESHOOTING
Before performing any maintenance and clearing work operation , please take the spark-plug cap off.!
FAULT FAULT CLEARANCE
The engine does not start Check the fuel level, if necessary refuel.
Check the throttle to be on START position.
Check the spark-plug connector to be properly attacched.
Check the spark-plug condition and if necessary replace it.
Check the fuel valve to be in the opened position( only for the models showing
such feature).
The engine power goes down The air lter is dirty – please clean it.
Check if any stone or soil/vegetation residue is stopping the blades, in case clean
them.
The blades are not rotating Adjust the blades wire insertion.
Check the blades to be fasten to the shaft.
In case you are not able to remedy the defect/damage according to a.m. table, please contact an authorized service center only .

FRANÇAIS
12
Index
Introduction
Conditions d’utilisation
Normes de sécurité
Conseils d’ utilisation
Transport
Montage
Réglage
Mode d’emploi
Entretien
Données techniques
Problème
INTRODUCTION
Cher client,
nous vous remercions de la conance que vous nous témoignez et vous souhaitons beaucoup de satisfaction
dans l’utilisation de votre machine . An de garantir d’emblée un fonctionnement sans accrocs nous avons créé
cette notice d’utilisation. Si vous observez exactement les indications suivantes votre appareil fonctionnera
toujours à votre entière satisfaction pendant longtemps.
Nos appareils avant la fabrication en série, sont mis à I’essai dans les conditions les plus sévères et, pendant
la fabrication même, sont soumis constamment à des contrôles très stricts. De ce fait, nous sommes sûrs de la
qualité de nos produits et pouvons vous garantir une machine à toute épreuve.
Cet appareil a été testé et contrôlé par un laboratoire indépendant selon des normes de travail et de sécurité
très sévères. Pour conserver à cet appareil les qualités et performances prévues, n’utilisez que des pièces
détachées originales. La qualité du travail et votre sécurité en dépendent. L’utilisateur perd tous ses droits à la
garantie lorsqu’il modie l’appareil par l’adjonction de pièces détachées pas originales. Dans le but d’améliorer
nos produits nous nous réservons le droit d’y apporter des modications. Pour toutes questions ou commandes
concernant les pièces détachées, prière d’indiquer le numéro de référence.
n DONNÉES D’IDENTIFICATION L’étiquette (8) avec les caractéristiques de la machine et le numéro
de matricule se trouve sur le coté gauche du scaricateur, à coté du moteur. Note - Fournir le numéro de série
du scaricateur pour toute demande d’assistance technique ou commande de pièces.
n CONDITIONS D’UTILISATION - LIMITES D’EMPLOI
Le scaricateur s’utilise pour aérer le terrain. Tous les ans, la mousse et les mauvaises herbes envahissent les
tapis d’herbe, ce qui rend le terrain très compact.
En aérant, vous éliminez la surface asphyxiée et votre pelouse recommence à respirer et à assimiler les
substances nutritives. Avant d’aérer, coupez l’herbe à une hauteur d’environ 40 mm.
N’utilisez le scaricateur que quand la pelouse est sèche. La meilleure période pour procéder à l’aèreation est
pendant toute la pèriode de croissance, c’est-à-dire de n avril à septembre.
Aérez au moins une fois par an. An d’obtenir un tapis vert, nous vous conseillons d’utiliser un engrais tout de
suite après avoir aéré.
n MESURES DE SÉCURITÉ
Attention: lire attentivement le manuel d’instructions avant de procéder au montage et à la mise en marche. La
machine ne doit être utilisée que par des personnes en connaissant le mode d’emploi.
Les personnes ne connaissant pas le contenu de la notice d’utilisation, les enfants, les adolescents
de moins de 16 ans ainsi que les personnes sous l’inuence de l’alcool, de drogues ou de médicaments ne
doivent en aucun cas utiliser l’appareil.
Traduction du mode d’emploi original

FRANÇAIS
13
La machine a été projetée pour etre utilisée par 1 seul opérateur. L’utilisateur de l’appareil répond
entièrement des dommages causés à des tiers ou à leurs biens. Veiller à ce qu’aucun enfant ne se trouve à proximité (10 mt.).
n Description des commandes (Fig. 1) 1) Levier d’accélérateur 2) Levier commande embrayage 3) Levier soulèvement outil pour
déplacement 4) Bouton de réglage de la profondeur de travail 5) Moteur 6) Sac-herbe (optional) 7) Poignées 8) Etiquette CE 9) Fermeture de sûreté.
n Mesures préparatoires
Pendant l’utilisation du scaricateur, portez toujours un serre-tête antibruit, des chaussures et des pantalons longs. Ne jamais tondre pieds nus ou
avec des sandales. Quand on utilise la machine sans bac pour l’herbe il faut mettre des lunettes de protection.
Inspecter méticuleusement la zone où l’on entend utiliser le scaricateur et la débarrasser de tout objet qui pourrait être projeté par la machine.
Avant de utiliser la machine, vérier toujours l’accouplement des écrous, des boulons et assurez vous que toutes les unités de coupes ne sont pas
usés ou endommagés.
Changer entièrement les lames endommagées ou usées an de maintenir l’ équilibrage de la machine.
ATTENTION - L’essence est hautement inammable!
- Conserver l’essence dans les récipients prévus à cet effet.
- Faire le plein à l’air libre et ne pas fumer en remplissant le réservoir; ne pas s’approcher des sources de chaleur.
- Faire le plein avant de mettre le moteur en marche. Ne pas ouvrir le bouchon du réservoir ou rajouter de l’essence pendant que le moteur tourne
ou qu’il est chaud.
- Si l’essence a débordé, ne pas essayer de mettre le moteur en marche. Eloigner le scaricateur de l’endroit où s’est répandue l’essence. Eviter
toute tentative d’allumage jusqu’à ce que les vapeurs d’essence se soient dissipées.
- Pour des raisons de sécurité, changer le réservoir d’essence et le bouchon du réservoir dès qu’ils sont endommagés.
- Utiliser un entonnoir ou un tuyau de remplissage pour faire le plein, de manière à ce que l’essence ne coule pas sur le moteur, le boîtier ou le
gazon.
- Après le ravitaillement en essence , respecter les mesures de sécurité en refermant soigneusement les bouchons du réservoir et des bidons de
carburant.
Le pot d’échappement et la partie située autour du pot peuvent atteindre des températures de 80°C.; certains points de protection peuvent dépasser
la température de 110°C. ATTENTION: risque de brûlure!
- Changer les pots d’échappement endommagés.
n Indications de manipulation
Ne pas laisser tourner le moteur thermique dans des locaux fermés: risque d’accumulation de gaz toxiques. Danger d’asphyxie !
Travailler seulement pendant le jour ou en présence d’une bonne illumination articielle. Tenir compte des horaires xés par les autorités locales ou
communales
N’utilisé pas le scaricateur sur des talus trop raide. ll faut faire particulièrement attention lorsque l’on change de direction sur les pentes et talus.
Arrêtez toujours la rotation de la lame quand le scaricateur doit rouler sur des surfaces où il n’y a pas d’herbe. Danger: des débris de pierre peuvent
pénétrer dans la machine ou être projetés.
Ne jamais utiliser le scaricateur dont le boîtier ou les dispositifs de protection sont endommagés ou n’existent pas (par exemple, chicane,
hayon,...).

FRANÇAIS
14
Le réglage de base du moteur a été réalisé correctement à l’usine et ne doit pas être modié.
Faites démarrer le moteur en suivant les instructions du constructeur
ll ne faut pas basculer la machine au moment de l’allumage ou du démarrage. Si vous devez soulever l’appareil, ne pas l’incliner plus que nécessaire
et pas plus de 5 cm, pour ne pas découvrir le lames vers l’opérateur.
Ne laissez personne approcher les mains et les pieds de la lame en mouvement.
Arrêter le moteur quand on quitte la machine ou quand on la transporte du terrain de travail au magasin de stockage.
Il faut arrêter le moteur:
- lorsque’on fait le plein;
- avant de mettre ou enlever le sac-herbe relâcher le levier embrayage outil et attendre que les lames s’arrêtent.
Les opérations d’entretien et de nettoyage de la tondeuse, tout comme le démontage des dispositifs de protection, doivent être effectués uniquement
quand le moteur est stoppe, la lame arrêtée et le capuchon de la bougie retiré.
La distance entre l’utilisateur et la machine est déterminée par l’inclinaison du guidon. Cette distance ne doit jamais être diminuée. L’utilisation n’est
autorisée que si le guidon est xé en position de travail.
n TRANSPORT
Utiliser un chariot élévateur pour transporter la machine. Les fourches, réglées dans la position d’écartement maximum, seront introduites dans les
espaces spécialment prévus de la palette. La masse de la machine est indiquée sur l’etiquette d’identication et reportée dans les caractéristiques
techniques de la machine.
n DISPOSITIF DE SÉCURITÉ ( Fig.1)
Le scaricateur est équipé d’un dispositif de sécurité, si vous relâché le levier (2) vous arrêté le déplacement de la machine.
n MONTAGE
Le scaricateur est livrée, sauf accord contraire, démontée et aménagée dans un emballage prévu à cet effet. Pour compléter le montage de la
machine respectez la procédure suivante.
Il est raccomandé de serrer les vis et les écrous avec les clés.
Montage du mancheron (Fig. 2)
Fixer le guidon (1) au support (2) au moyen des vis (3), rondelles (4) , pommes pour le xage (5) et les écrous (6).
Pour replier le guidon (g.4)
Desserrez le pomme (5) et repliez le guidon supérieur sur le guidon inférier comme illustré sur la gure.
n REGLAGES (Fig. 3-5)
Réglage du l de soulevage lames (g. 3): baisser le levier de soulevage lames (3) en position (B) Tourner le registre C. jusqu’au quand les lames
se trouvent à une hauteur du terrain d’a peu prés 5 mm.
Réglage du l d’embrayage des lames (g. 3 e 5) Attention: faire correctement et régulièrement comme de suite indiqué an de préserver l’intégrité
du courroie. Le ressort (g. 5 part.1) doit s’étendre 8-11 mm pendant le travail. Mesurer la longueur du ressort avant et après avoir démarré le levier
d’embrayage lames (g.5 part. 2). Tourner sur les registre (g.3 part. G) pour obtenir l’allongement sur indiqué..

FRANÇAIS
15
n RÉGLAGE DE LA HAUTEUR DES LAMES (g. 3)
Conguration de travail: Lever le levier soulevage outil (3) en position (A). Régler la hauteur de travail des lames en tournant la poignée (D). Chaque
tour change de 1.5 mm la hauteur de travail. Selon les indications de l’étiquette (E) , vérier le déplacement de l’indice (F) pour comprendre dans
quelle direction tourne la poignée.
NB: faites pénétrer les lames dans le terrain sur 3 mm de profondeur environ.
Comment deplacer l’unité: baisser le levier de soulevage de l’outil (3) en position B. De cette façon les lames ne sont pas en contact avec le
terrain.
n MISE IN MARCHE ET ARRET
Attention! avant chaque démarrage vérier que:
a – le levier embrayage outil (2) est dans la position A
b - le réservoir à combustible est ravitaillé.
c - le niveau d’huile du moteur est correct. (voir le manuel du moteur joint)
d – s’il y a le sac-herbe vérié qu’il soit bien xé.
Démarrage du moteur : mettre la manette de gaz sur la position START. Procéder avec l’allumage suivant les instructions dans le manuel joint au
moteur.
Apres le démarrage du moteur déplacer le levier accélérateur pour joindre le régime de tours de moteurs qu’il vous faut.
Déplacer la fermeture de sûreté (9) dans la direction indiqué par la èche, âpres tirer le levier embrayage outil (2) dans la position B et prendre en
même temps la poignée (3).
Tirer le levier embrayage outil (2) dans la position B et prendre en même temps la poignée (3). Avancer sur la pelouse poussant le scaricateur dans
la direction indiqué par la èche g. 1. Arrêt : Relâcher le levier embrayage outil (2) et amener le commande de l’accélérateur en position STOP.
n Consignes d’entretien et remisage
Veillez à ce que les écrous, les boulons et les vis soient bien serrés.
En cas de réglage, attention: risque de blessure, portez des gants de protection!.
Faire les enregistrements mentionnés au paragraphe REGLAGES
Vériez régulièrement que le sac- herbe (optionnel) est en bon état.
Pour des raisons de sécurité changer immédiatement les pièces usées ou endommagées.
Les lames doivent être remplacées quand la longueur devient moins de 120 mm
Lame de rechange et accessoires doivent correspondre aux prescriptions du fabricant. C’est une obligation pour préserver la sécurité et les
performances de la machine.
Ne jamais ranger le scaricateur dont le réservoir est plein dans un bâtiment où des vapeurs d’essence pourraient entrer en contact avec un feu nu
ou des étincelles : Risque d’explosion!
Vider le réservoir d’essence en plein air.
Laisser refroidir le moteur avant de ranger la machine dans des locaux fermés.
An d’éviter tout risque d’incendie, veillez à ce que le scaricateur ne présente aucun reste d’herbes de feuilles et de graisse (huile).
La page est en cours de chargement...
La page est en cours de chargement...
La page est en cours de chargement...
La page est en cours de chargement...
La page est en cours de chargement...
La page est en cours de chargement...
La page est en cours de chargement...
La page est en cours de chargement...
La page est en cours de chargement...
La page est en cours de chargement...
La page est en cours de chargement...
La page est en cours de chargement...
La page est en cours de chargement...
La page est en cours de chargement...
La page est en cours de chargement...
La page est en cours de chargement...
La page est en cours de chargement...
La page est en cours de chargement...
La page est en cours de chargement...
La page est en cours de chargement...
La page est en cours de chargement...
La page est en cours de chargement...
La page est en cours de chargement...
La page est en cours de chargement...
-
 1
1
-
 2
2
-
 3
3
-
 4
4
-
 5
5
-
 6
6
-
 7
7
-
 8
8
-
 9
9
-
 10
10
-
 11
11
-
 12
12
-
 13
13
-
 14
14
-
 15
15
-
 16
16
-
 17
17
-
 18
18
-
 19
19
-
 20
20
-
 21
21
-
 22
22
-
 23
23
-
 24
24
-
 25
25
-
 26
26
-
 27
27
-
 28
28
-
 29
29
-
 30
30
-
 31
31
-
 32
32
-
 33
33
-
 34
34
-
 35
35
-
 36
36
-
 37
37
-
 38
38
-
 39
39
-
 40
40
-
 41
41
-
 42
42
-
 43
43
-
 44
44


Stiga SC 42 B Le manuel du propriétaire
- Taper
- Le manuel du propriétaire
dans d''autres langues
- italiano: Stiga SC 42 B Manuale del proprietario
- English: Stiga SC 42 B Owner's manual
- Deutsch: Stiga SC 42 B Bedienungsanleitung
- Nederlands: Stiga SC 42 B de handleiding
- polski: Stiga SC 42 B Instrukcja obsługi
Autres documents
-
WOLF-Garten UV 38 BX Le manuel du propriétaire
-
Wolf Garten UV 32 B Manuel utilisateur
-
-
-
Toro Scarifier Manuel utilisateur
-
EINHELL Expert 34.200.30 Manuel utilisateur
-
Einhell Classic GC-SC 2240 P Manuel utilisateur
-
Husqvarna 1010000-01 Manuel utilisateur
-
Mountfield S 390 H Le manuel du propriétaire
-
EINHELL 34.200.19 Petrol Scarifier Manuel utilisateur