Fender Passport PD150 Plus Le manuel du propriétaire
- Catégorie
- Destinataire
- Taper
- Le manuel du propriétaire
Ce manuel convient également à


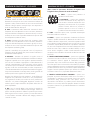
IMPORTANT SAFETY INSTRUCTIONS
This symbol warns the user of dangerous voltage levels localized within the
enclosure.
This symbol advises the user to read all accompanying literature for safe operation
of the unit.
∆ Read, retain, and follow all instructions. Heed all warnings.
∆ Only connect the power supply cord to an earth grounded AC receptacle in accordance with the
voltage and frequency ratings listed under INPUT POWER on the rear panel of this product.
∆ WARNING: To prevent damage, fire or shock hazard, do not expose this unit to rain or
moisture.
∆ Unplug the power supply cord before cleaning the unit exterior (use a damp cloth only). Wait
until the unit is completely dry before reconnecting it to power.
∆ Maintain at least 6 inches (15.25 cm) of unobstructed air space behind the unit to allow for
proper ventilation and cooling of the unit.
∆ This product should be located away from heat sources such as radiators, heat registers, or
other products that produce heat.
∆ This product may be equipped with a polarized plug (one blade wider than the other). This is
a safety feature. If you are unable to insert the plug into the outlet, contact an electrician to
replace your obsolete outlet. Do not defeat the safety purpose of this plug.
∆ Protect the power supply cord from being pinched or abraded.
∆ This product should only be used with a cart or stand that is recommended by the
manufacturer.
∆ The power supply cord of this product should be unplugged from the outlet when left unused
for a long period of time, or during electrical storms.
∆ This product should be serviced by qualified service personnel when: the power supply cord or
the plug has been damaged; or objects have fallen, or liquid has been spilled onto the product;
or the product has been exposed to rain; or the product does not appear to operate normally or
exhibits a marked change in performance; or the product has been dropped, or the enclosure
damaged.
∆ Do not drip nor splash liquids, nor place liquid filled containers on the unit.
∆ CAUTION: No user serviceable parts inside, refer servicing to qualified personnel only.
∆ Fender® amplifiers and loudspeaker systems are capable of producing very high sound
pressure levels which may cause temporary or permanent hearing damage. Use care when
setting and adjusting volume levels during use.
∆ Hazardous voltages may be present within the cabinet even when the power switch is off and
the power cord is connected. Therefore, disconnect the power cord from the rear panel power
inlet before servicing. The power inlet must remain readily operable.
FCC COMPLIANCE STATEMENT: This equipment has been tested and found to comply with the
limits of Part 15 of the FCC Rules. These limits are designed to provide reasonable protection against
harmful interference in a residential installation. This equipment generates, uses and can radiate
radio frequency energy and, if not installed and used in accordance with the instructions, may
cause harmful interference to radio communications. However, there is no guarantee that interfer-
ence will not occur in a particular installation. If this equipment does cause harmful interference
to radio or television reception, which can be determined by turning the equipment o and on,
the user is encouraged to try to correct the interference by one or more of the following measures:
•Reorient or relocate the receiving antenna. •Increase the separation between the equipment and
receiver. •Connect the equipment into an outlet on a circuit dierent from that to which the receiver
is connected. •Consult the dealer or an experienced radio/TV technician for help.
ENGLISH - PAGES . . . . . . . . . . . 6-15
ESPAÑOL - PAGINAS . . . . . . . 16-25
FRANÇAIS - PAGES . . . . . . . . . . 26-35
ITALIANO - PAGINE . . . . . . . . 36-45
DEUTSCH - SEITEN . . . . . . . . . . 46-55
PORTUGUÊS - PAGINA. . . . . . . 56-65
. . . . . . . . . . . . . 66-75

INSTRUCCIONES DE SEGURIDAD IMPORTANTES
Este símbolo advierte al usuario que en el interior de la carcasa hay niveles
peligrosos de voltaje.
Este símbolo advierte al usuario que lea toda la documentación adjunta para
utilizar la unidad con seguridad.
∆ Lea las atentamente instrucciones y sígalas al pie de la letra. Tenga en cuenta todas las
instrucciones.
∆ Conecte únicamente el cable de alimentación eléctrica a una toma de CA de acuerdo con las
especificaciones de voltaje y frecuencia que se indican en la potencia de entrada INPUT POWER
del panel posterior de este producto.
∆ ADVERTENCIA: Para evitar daños, incendios y descargas eléctricas, no exponga esta unidad
a la lluvia ni a la humedad.
∆ Antes de limpiar el exterior de la unidad, desconecte el cable de alimentación (utilícese
únicamente un paño húmedo). Deje que la unidad se seque completamente antes de volver a
conectarla a la corriente.
∆ Para una ventilación y refrigeración adecuadas, deje un espacio mínimo de 15.25 cm detrás de
la unidad.
∆ Este producto deberá estar situado lejos de fuentes de calor tales como radiadores, registros de
calefacción u otros productos que generen calor.
∆ Es posible que este producto esté equipado con un enchufe polarizado (un blade más ancho
que el otro). Esta es una función de seguridad. Si no puede introducir el enchufe dentro de la
toma de corriente, póngase en contacto con un electricista para que la cambie ya que podría
estar anticuada. No anule el propósito de seguridad de este enchufe.
∆ Tenga cuidado de que el cable de alimentación no se pinche ni se erosione.
∆ Este producto sólo se debe utilizar con el soporte recomendado por el fabricante.
∆ El cable de alimentación de este producto deberá estar desconectado de la toma de corriente
cuando no se vaya a utilizar durante un período de tiempo largo o en caso de tormenta
eléctrica.
∆ Este producto deberá ser reparado por personal cualificado si: el cable de alimentación o el
enchufe están dañados, ha caído algún objeto o se ha derramado líquido encima, el producto
ha estado expuesto a la lluvia, no funciona normalmente o muestra signos de cambio en el
rendimiento, ha sufrido algún golpe o la caja esta dañada.
∆ Evite que goteen o salpiquen líquidos y no coloque recipientes con líquidos sobre la unidad.
∆ PRECAUCIÓN: Contiene piezas cuyo mantenimiento no lo puede realizar el usuario, sino sólo
personal cualificado.
∆ Los amplificadores y altavoces Fender® pueden producir niveles de presión acústica muy
elevados, que pueden provocar daños temporales o permanenetes en el oído. Utilice la
precaución al ajustar el volumen nivela.
∆ Es posible que haya cargas eléctricas peligrosas dentro de la caja, aunque se haya apagado,
mientras esté conectado el cable de alimentación. Por tanto, se debe desconectar el cable de
alimentación del panel posterior antes de proceder a su reparación o mantenimiento. La toma
de corriente debe permanecer preparada para su funcionamiento.
CONSIGNES DE SÉCURITÉ IMPORTANTES
Ce symbole avertit l'utilisateur de la présence de niveaux de tension à risque dans
l'appareil.
Ce symbole conseille à l'utilisateur de lire toute la documentation jointe au produit
pour garantir une sécurité de fonctionnement.
∆ Veuillez lire attentivement toutes les instructions et vous y conformer. Respectez
scrupuleusement tous les avertissements.
∆ Connectez le câble d'alimentation électrique à une prise CA mise à la terre selon le voltage et
la fréquence indiqués sur le panneau arrière de l'amplificateur sous INPUT POWER.
∆ AVERTISSEMENT: Pour éviter l’endommagement de l’appareil, un départ d’incendie, ou un
choc électrique, ne l’exposez jamais a l’humidité ou à la pluie.
∆ Débranchez le câble d'alimentation avant de nettoyer le boîtier de l'appareil (utiliser un chiffon
légèrement humide). Attendez que l'appareil soit complètement sec avant de le rebrancher sur
le secteur.
∆ Conservez au moins 15.25 cm d'espace derrière l'appareil pour permettre une aération
appropriée de celui-ci.
∆ Il est conseillé d'entreposer cet appareil loin de toute source de chaleur, telle que des radiateurs,
des accumulateurs de chaleur ou autres unités produisant de la chaleur.
∆ Cet appareil peut être équipé d'une prise polarisée (une fiche plus large que l'autre). C'est une
garantie de sécurité. Si vous ne parvenez pas à insérer la prise dans la sortie, contactez un
électricien pour qu'il remplace la sortie. Ne modifiez rien qui puisse supprimer les garanties de
sécurité qu'offre cette prise.
∆ Veillez à ce que le câble d'alimentation ne soit pas coincé ou abrasé.
∆ Cet appareil doit uniquement être utilisé avec un support à roulettes ou un pied conseillé par
le fabricant.
∆ Le câble d'alimentation de cet appareil doit être débranché de la sortie lorsqu'il reste
longtemps sans être utilisé ou en cas d'orage électrique.
∆ Les réparations et la maintenance de cet appareil doivent être effectuées par un personnel
qualifié dans les cas suivants : le câble d'alimentation ou la prise sont endommagés ; des
objets sont tombés sur l'appareil, du liquide a été renversé dessus ou l'appareil a été exposé à
la pluie ; l'appareil ne semble pas fonctionner normalement ou vous notez des changements
notables dans la performance de l'amplificateur, ou encore le produit est tombé ou l'enceinte
est endommagée.
∆ Ne placez aucun récipient rempli de liquide sur le produit.
∆ ATTENTION: Aucune maintenance ne doit être effectuée pour les pièces situées dans
l’appareil. Les réparations et la maintenance doivent être exécutées uniquement par une
personne qualifiée.
∆ Les niveaux sonores élévés émis par les systèmes d'emplificateur et haut-parleurs Fender®
peuvent entraîner des lésions auditives durables. Faites attention lorsque vous réglez ou
ajustez le volume lors de l'utilisation des appareils.
∆ Voltage dangereux. Risque d'électrocution au niveau du coffret lorsque le câble d'alimentation
est branché même si l'appareil n'est pas sous tension. Débranchez le câble d'alimentation du
panneau arrière avant de travailler sur l'appareil. L'entrée électrique doit rester accessible.

Importanti Istruzioni per la Sicurezza
Questo simbolo indica che si avvisa l'utente della presenza di livelli di tensione
pericolosi all'interno della struttura.
Questo simbolo indica che si consiglia all'utente di leggere tutta la documentazione
allegata ai fini del funzionamento sicuro dell'unità.
∆ Leggere, conservare e seguire le istruzioni. Osservare le avvertenze.
∆ Collegare il cavo di alimentazione solo a una presa c.a. con messa a terra conforme ai requisiti
di tensione e frequenza indicati sull'etichetta INPUT POWER del pannello posteriore di questo
prodotto.
∆ AVVERTIMENTO: Per evitare danni, rischi di incendi o scosse elettriche, non esporre questa
unità alla pioggia o all'umidità.
∆ Scollegare il cavo di alimentazione prima di pulire l'esterno dell'unità (usare solo un
panno umido). Attendere che l'unità sia completamente asciutta prima di ricollegarla
all'alimentazione.
∆ Lasciare almeno 15.25 cm di spazio libero dietro all'unità per consentirne il corretto
raffreddamento tramite ventilazione.
∆ Questo prodotto va collocato lontano da fonti di calore come radiatori, unità di riscaldamento
o altri prodotti che producono calore.
∆ Questo prodotto può essere dotato di spina polarizzata (con poli grandi). Si tratta di una
misura di sicurezza. Se non si riesce a inserire la spina nella presa, far sostituire la presa
obsoleta ad un elettricista. Non eliminare la spina di sicurezza.
∆ Proteggere il cavo di alimentazione da danni e abrasioni.
∆ Questo prodotto deve essere usato solo con un carrello o con un supporto consigliato dal
produttore.
∆ Il cavo di alimentazione di questo prodotto deve essere scollegato dalla presa quando il
prodotto non viene usato per lunghi periodi o durante le tempeste elettromagnetiche.
∆ La manutenzione per il prodotto deve essere eseguita da personale di assistenza qualificato
nei casi seguenti: danno del cavo o della spina di alimentazione; caduta di oggetti o di liquido
sul prodotto; esposizione del prodotto alla pioggia; funzionamento anomalo del prodotto o
marcata variazione delle prestazioni del prodotto; caduta del prodotto; danno della struttura
del prodotto.
∆ Non disporre alcun contenitore riempito di liquido sul prodotto.
∆ ATTENZIONE: Non contiene parti riparabili dall'utente: fare eseguire la manutenzione
soltanto da personale qualificato.
∆ I sistemi di amplificazione e gli altiparlanti Fender® sono in grado di produrre livelli di
pressione acustica molto alti che possono provocare danni temporanei o permanenti all'udito.
Prestare attenzione all'impostazione e regolazione dei livelli di volume durante l'uso.
∆ All'interno dell'apparecchiatura possono essere presenti livelli di tensione pericolosi anche
quando l'interruttore dell'alimentazione è disinserito ma il cavo di alimentazione è collegato.
Si raccomanda, perciò, di staccare tale cavo dalla presa dell'alimentazione posta sul pannello
posteriore prima di eseguire qualsiasi intervento di manutenzione. La presa dell'alimentazione
deve, tuttavia, rimanere sgombra e pronta per l'uso in qualunque momento.
Wichtige Sicherheitshinweise
Dieses Symbol warnt den Benutzer vor gefährlichen Spannungen innerhalb des
Gehäuses.
Dieses Symbol bedeutet für den Benutzer, dass er für einen sicheren Betrieb des
Geräts die gesamte begleitende Dokumentation lesen muss.
∆ Befolgen Sie sämtliche Sicherheitshinweise und bewahren Sie sie auf. Beachten Sie alle
Warnungen.
∆ Das Netzkabel muss an eine geerdete Netzsteckdose angeschlossen werden, die die auf der
Rückseite des Verstärkers unter INPUT POWER angegebene Spannung und Frequenz liefert.
∆ WARNUNG: Setzen Sie dieses Gerät niemals Regen oder Feuchtigkeit aus, um Beschädigung,
Brandentwicklung und elektrische Schläge zu vermeiden.
∆ Ziehen Sie den Netzstecker, bevor Sie das Gehäuse des Geräts reinigen (verwenden Sie zum
Reinigen nur ein feuchtes Tuch). Stecken Sie den Netzstecker erst wieder ein, wenn das Gerät
vollständig getrocknet ist.
∆ Halten Sie hinter dem Gerät einen Freiraum von mindestens 15.25 cm ein, damit eine
ausreichende Belüftung gewährleistet ist.
∆ Der Verstärker darf nicht in der Nähe von Wärmequellen wie Heizkörpern oder anderen
wärmeerzeugenden Geräten aufgestellt werden.
∆ Dieses Produkt ist möglicherweise mit einem unvertauschbaren Stecker ausgestattet
(unterschiedlich breite Pole). Dabei handelt es sich um eine Sicherheitsvorrichtung. Wenn Sie
den Stecker nicht in die Steckdose stecken können, lassen Sie Ihre alte Steckdose von einem
Elektriker auswechseln. Zerstören Sie nicht die Sicherheitsfunktion des Steckers.
∆ Das Netzkabel darf nicht eingeklemmt oder abgescheuert werden.
∆ Das Produkt sollte nur mit vom Hersteller empfohlenen Karren oder Ständern verwendet
werden.
∆ Bei Gewitter oder wenn das Gerät längere Zeit nicht gebraucht wird, sollte der Netzstecker
gezogen werden.
∆ In folgenden Fällen sollte das Gerät repariert werden, und zwar ausschließlich von qualifizierten
Technikern: Schäden an Netzkabel oder -stecker; Beschädigung durch herabfallende
Gegenstände, ausgelaufene Flüssigkeit oder Regen; Funktionsstörungen oder deutlich
verändertes Betriebsverhalten; Beschädigung durch Herunterfallen; Schäden am Gehäuse.
∆ Setzen Sie das Gerät keiner tropfenden oder spritzenden Flüssigkeit aus; stellen Sie keine mit
Flüssigkeit gefüllten Behälter auf dem Gerät ab.
∆ VORSICHT: Im Gerät sind keine zu wartenden Teile. Reparaturarbeiten dürfen nur von
qualifizierten Technikern durchgeführt werden.
∆ Fender®-Verstärker und Lautsprecher können sehr hohe Lautstärkepegel erzeugen, die
vorübergehende oder dauerhafte Gehörschäden verursachen können. Gehen Sie beim
Einstellen bzw. Regulieren der Lautstärke vorsichtig vor.
∆ Im Gehäuse können auch im ausgeschalteten Zustand gefährliche Spannungen auftreten, wenn
das Netzkabel eingesteckt ist. Ziehen Sie daher das Netzkabel aus der Netzanschlussbuchse
auf der Rückseite des Geräts bevor Sie Wartungs- oder Reparaturarbeiten vornehmen. Die
Netzanschlussbuchse muss stets frei zugänglich bleiben.

Instruções Importantes de Segurança
Este símbolo adverte o usuário da presença de níveis perigosos de voltagem dentro
da caixa.
Este símbolo adverte o usuário de que toda literatura que vem acompanhada deste
aparelho deverá ser lida para um manuseio seguro do mesmo.
∆ Leia, conserve na memória e siga todas as instruções. Observe todas as advertências.
∆ Conecte o cabo de força somente à uma saída de corrente com terminal de terra e cujas
voltagem e freqüência correspondam ao indicado no INPUT POWER no painel traseiro deste
produto.
∆ ADVERTÊNCIA: Para evitar danos, incêndio ou choque elétrico, não permita que este aparelho
seja exposto à chuva ou umidade.
∆ Desconecte o cabo de energia antes de limpar a superfície exterior deste aparelho (use um pano
úmido somente). Espere até que esteja completamente seco para reconecta-lo.
∆ Durante a operação: Mantenha pelo menos 15.25cm de espaço livre por detrás desta unidade
para permitir uma correta ventilação e refrigeração da mesma.
∆ Este produto deve estar localizado longe de fontes de calor tais como radiadores, aquecedores
ou outros aparelhos que produzam calor.
∆ Este aparelho pode estar equipado com um plug polarizado (uma extremidade mais larga que
a outra). Esta é uma medida de segurança. Se você não conseguir inserir o plug na saída, entre
em contato com um eletricista para substituir sua saída ultrapassada. Não anule o propósito de
segurança deste plug.
∆ Evite que o cabo de alimentação fique retorcido ou esmagado.
∆ Este produto deve ser usado somente com um suporte ou carreta que tenham sido
recomendados pelo próprio fabricante.
∆ Desconecte o cabo de alimentação deste aparelho da saída quando este não for ser utilizado
durante um longo período de tempo ou durante tempestades elétricas.
∆ Este aparelho deve ser revisado por técnicos especializados quando: o cabo de alimentação ou
o plug forem danificados; objetos caírem sobre ele ou líquidos forem derramados no aparelho;
ou o produto tiver sido exposto à chuva; ou o produto não parecer operar corretamente ou se for
observada alguma alteração evidente em sua performance; ou se o aparelho for derrubado, ou
a caixa danificada.
∆ Não derrame ou espirre líquidos, nem coloque objetos que os contenham sobre este aparelho.
∆ AVISO: Manutenção e/ou reparo de quaisquer partes integrantes desde produto não devem ser
realizadas por usuários, encaminhe o serviço somente a técnicos especializados.
∆ Os sistemas de amplificadores e auto-falantes Fender® têm capacidade para produzir altíssimos
níveis de pressão de som os quais podem causar perda temporária ou permanente de audição.
Seja prudente ao definir e ajustar os níveis de volume durante a utilização.
∆ Es posible que haya cargas eléctricas peligrosas dentro de la caja, aunque se haya apagado,
mientras esté conectado el cable de alimentación. Por tanto, se debe desconectar el cable de
alimentación del panel posterior antes de proceder a su reparación o mantenimiento. La toma
de corriente debe permanecer preparada para su funcionamiento.

6
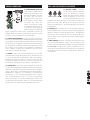
150 Watts of Clear Stereo Sound
Custom Designed Loudspeakers utilizing the latest in
High-Performance Speaker Technology
Built-in Professional, Digital Reverb
Two Mono Microphone / Line Inputs with XLR and 1/4”
balanced inputs connections
Stereo Input with 1/4” and RCA Connections
Stereo CD Channel
Switch Mode Power Supply
Everything You Need To Get Started:
– Passport Mixer Amplifier
– A Dynamic Microphone & Cable
– Speaker Cables
– IEC Power Cable
– Two, Full-Range Speaker Enclosures
– Full transportation enclosure
Congratulations on your purchase of a Fender Passport PD150
Plus high performance, self-contained portable audio system.
Your Passport includes everything you will need for great
sound… Anywhere.
Carry your Passport as you would a medium sized suit case.
Flip open the speaker latches, and you’ll discover two full-range
speaker cabinets, a powered mixer, one dynamic microphone,
plus all the cables you need to get started. Use your Passport
to amplify voices, musical instruments, computer sound cards,
CD’s, tape playback, studio monitors and more. Passport’s quick
and easy set-up, its ability to cover large audiences and simple
operation are the hallmarks of this innovative product line.
The Passport’s control panel features two mono mic/line inputs,
one stereo channel and one CD channel (four channels total).
The stereo input channel can be configured for mono or stereo
operation allowing superb flexibility in input use. Moreover, the
revolutionary speaker technology in each speaker enclosure
delivers remarkably clean, full range sound with exceptional
audience coverage. The self-powered mixer provides a total of
150 watts of high quality stereo sound.
Experiment with the tone controls, digital reverb and speaker
placement and discover the Passport’s incredible power and
versatility.
INtroductIoN
Fender Passport - PD150 PLUS
Deluxe Portable Sound System

7
Safety precautIoNS
The Fender Passport sound system is supplied
with a detachable power cable with an IEC female
connector and a male AC connector. Depending
on the territory in which the Passport system is
purchased, the power cable will be supplied with one of a
number of male AC connectors to accommodate the different
safety and code requirements of specific countries. All AC cables
supplied with Passport products are three pin grounded types.
Under no circumstances should the ground (earth) pin be
disconnected or removed.
Your Passport System features a Switch-Mode-Power-Supply
designed to operate on any AC voltage and line frequency
to convert AC power with maximum efficiency. When using
plug adapters or operating in a territory other than the
one in which the unit was purchased, take great care to
comply with local safety requirements and electrical codes
of practice.
If you are not sure of the local voltage, wiring codes
& colors, AC grounding, or correct procedures for
connection, consult a qualified technician.
Warning
Under no circumstances should the ground
pin on the Passport or on any of your electrical
equipment be lifted. It is possible that under certain
circumstances a combination of different types of
ungrounded equipment can create a life threatening shock
hazard. Microphones have metal cases and are connected
through the mic cable to the mixer’s chassis. Your Passport
mixer may be correctly grounded if the building’s wiring is to
code and the ground pin on the AC plug is properly connected.
However if for any reason external AC powered equipment
with ungrounded AC connections are used in conjunction
with the Passport system (e.g. an ungrounded music amplifier),
there may be a difference in potential to the microphone
case. With this combination a performer holding a (grounded)
microphone coming into contact with an ungrounded item of
powered equipment may be subject to dangerous electrical
shocks.
By following the correct procedures and safety precautions,
risks of severe shock hazard can be minimized. Always check
the AC connection and particularly the voltage between the
microphone and any other AC equipment. Avoid operating
the system in conjunction with ungrounded or improperly
grounded electrical equipment.
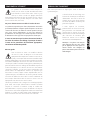
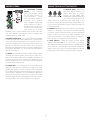
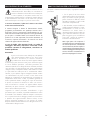
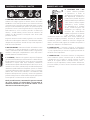
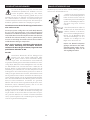
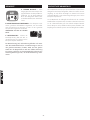
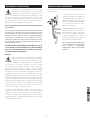
To open and close your Passport system, simply follow these
guidelines:
1. Place your finger tip under the
safety latch {A} and gently lift. When
the safety latch has disengaged, lift
both latches {A & B} clear on each
speaker before attempting to remove
the speaker.
2. To replace, position each speaker on
the tower foot and bring the speaker
in to close the engagement with the
tower and latches. Position the latch
hooks over the speaker notch and
close the latches. The 4 latches will
automatically engage.
Note: These parts are precision
engineered and no force is needed
to secure them. Careful alignment of
parts will ensure easy operation.
traNSportatIoN latcheS

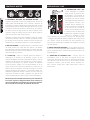
8
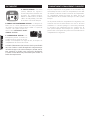
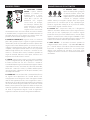
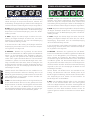
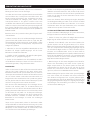
A. LEVEL Adjusts the volume level of the individual channel
with respect to the master volume level. Rotating the knob
clockwise increases the volume of the respective channel, while
rotating it counterclockwise decreases the volume. Adjust this
control after the Passport’s master volume level has been set.
B. LOW – Adjusts the relative level of the low frequency content.
Rotating the knob counterclockwise decreases the bass or low
frequency response. Likewise, rotating the knob clockwise
increases the bass or low frequency response.
C. HIGH – Adjusts the relative level of the high frequency
content. Rotating the knob counterclockwise decreases the
treble or high frequency response. Likewise, rotating the knob
clockwise increases the treble or high frequency response.
When the EQ controls are set at their 12 o'clock notched
position, the channel frequency response is “flat” with no
frequencies increased or decreased.
D. REV/AUX Adjusts the amount of signal sent to the Reverb
processor, and to the Rev/Aux send jack. Reverb can be used
to enhance the sound quality of any performance where
appropriate and desired. In the full left position there is no signal
sent to the reverb processor or Rev/Aux send jack. Care should
be taken to set the Master Reverb control to a middle position
or above, before adjusting levels from the individual channels.
When the Rev/Aux mix is set, overall levels of reverb can be
adjusted at the master control.
Keep in mind that while Reverb or effects can enhance a musical
performance or presentation, too much reverb can make the
same performance or presentation unintelligible, or “muffled”.
Keep your audience in mind when setting reverb levels.
E. PAN – Use the Pan control to adjust the amount of signal sent
to each speaker (left and right). Adjusting this control allows you
to adjust the position of the sound source within the horizontal
plane, left or right of center stage. Set to the center dot for equal
amounts to the left and right speakers.
A. LEVEL Adjusts the volume level of the individual channel
with respect to the master volume level. Rotating the knob
clockwise increases the volume of the respective channel, while
rotating it counterclockwise decreases the volume. Adjust this
control after the Passport’s master volume level has been set.
B. LOW – Adjusts the relative level of the low frequency content.
Rotating the knob counterclockwise decreases the bass or low
frequency response. Likewise, rotating the knob clockwise
increases the bass or low frequency response.
C. HIGH – Adjusts the relative level of the high frequency
content. Rotating the knob counterclockwise decreases the
treble or high frequency response. Likewise, rotating the knob
clockwise increases the treble or high frequency response.
When the EQ controls are set at their 12 o'clock notched
position, the channel frequency response is “flat” with no
frequencies increased or decreased.
D. REV/AUX Adjusts the amount of signal sent to the Reverb
processor, and to the Rev/Aux send jack. Reverb can be used
to enhance the sound quality of any performance where
appropriate and desired. In the full left position there is no signal
sent to the reverb processor or Rev/Aux send jack. Care should
be taken to set the Master Reverb control to a middle position
or above, before adjusting levels from the individual channels.
When the Rev/Aux mix is set, overall levels of reverb can be
adjusted at the master control.
Keep in mind that while Reverb or effects can enhance a musical
performance or presentation, too much reverb can make the
same performance or presentation unintelligible, or “muffled”.
Keep your audience in mind when setting reverb levels.
E. BAL – Use the Balance control to adjust the amount of signal
sent to each speaker (left and right). Adjusting this control
allows you to adjust the position of the sound source within the
horizontal plane, left or right of center stage. Set to the center
dot for equal amounts to the left and right speakers.
MoNo MIc / lINe coNtrol fuNctIoNS Stereo coNtrol fuNctIoNS

9
A. LEVEL Adjusts the volume level of the individual channel
with respect to the master volume level. Rotating the knob
clockwise increases the volume of the respective channel, while
rotating it counterclockwise decreases the volume. Adjust this
control after the Passport’s master volume level has been set.
B. LOW – Adjusts the relative level of the low frequency content.
Rotating the knob counterclockwise decreases the bass or low
frequency response. Likewise, rotating the knob clockwise
increases the bass or low frequency response.
C. HIGH – Adjusts the relative level of the high frequency
content. Rotating the knob counterclockwise decreases the
treble or high frequency response. Likewise, rotating the knob
clockwise increases the treble or high frequency response.
When the EQ controls are set at their 12 o'clock notched
position, the channel frequency response is “flat” with no
frequencies increased or decreased.
D. REV/AUX Adjusts the amount of signal sent to the Reverb
processor, and to the Rev/Aux send jack. Reverb can be used
to enhance the sound quality of any performance where
appropriate and desired. In the full left position there is no signal
sent to the reverb processor or Rev/Aux send jack. Care should
be taken to set the Master Reverb control to a middle position
or above, before adjusting levels from the individual channels.
When the Rev/Aux mix is set, overall levels of reverb can be
adjusted at the master control.
Keep in mind that while Reverb or effects can enhance a musical
performance or presentation, too much reverb can make the
same performance or presentation unintelligible, or “muffled”.
Keep your audience in mind when setting reverb levels.
E. BAL – Use the Balance control to adjust the amount of signal
sent to each speaker (left and right). Adjusting this control
allows you to adjust the position of the sound source within the
horizontal plane, left or right of center stage. Set to the center
dot for equal amounts to the left and right speakers.
(Note: All operations listed below occur only when a CD is
present within the player.)
A. EJECT – This button allows you to eject
your CD from the CD player.
B. PLAY/PAUSE – This button allows you to
begin play of a CD once it is inserted. Pushing
this button while a CD is being played allows
you to pause the track. Pushing this button
while a CD is paused allows you to resume
play.
C. STOP – Pushing this button while a CD is being played allows
you to stop the track.
D. MODE
– This button allows you to use the CD player's
"repeat" and "shuffle" commands. Pushing this button once
puts the CD player in "repeat track" mode, causing the player to
repeat the current track once it is through. Pushing the button
a second time begins the "repeat album" mode, causing the
entire CD to repeat once it is completed. Pushing the button
a third time begins the "shuffle" mode, causing a random play
order of tracks. Pushing the button a fourth time returns the CD
player to its normal operation.
E. PREVIOUS TRACK/REWIND
– This button allows you to
restart or rewind a track, or return to a previous track. Once
a track begins play, pushing the button once then quickly
releasing it will restart the track that is currently being played.
Pushing the button twice will return the CD player to the
previous track. Pressing and holding this button down during
normal play allows you to rewind the track that is currently
being played.
F. NEXT TRACK/FAST FORWARD – This button allows you to
skip or fast forward a track. Once a track begins play, pushing
this button then quickly releasing it causes the CD player to
jump to the next track. Pressing and holding this button down
during normal play allows you to fast forward the track that is
currently being played.
cd player coNtrol fuNctIoNS cd player ButtoN fuNctIoNS

10
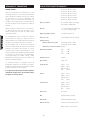
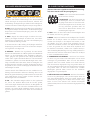
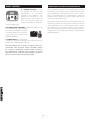
A. MASTER VOLUME LEVEL CONTROLS The Left and Right
Master Volume Controls adjust the output volume of the PD150
Plus. The Master controls feature notched position indicators.
For the majority of applications the Passport system has been
balanced to operate with these controls at their 12 o’clock
notched positions. In situations where more volume is required
the master controls can provide an additional 6 dB of gain
when turned to the right of the center position.
Set the system up in the normal manner and adjust levels as
necessary. Raise the master volume controls beyond their 12
o’clock notched positions only after increasing the individual
channel level controls.
B. MASTER REVERB – Adjusts the amount of reverb signal
sent to the output. Rotating the knob clockwise increases the
reverb signal sent to the main mix. When the knob is in its full
counterclockwise position, there is no reverb heard in the mix.
C. SYSTEM EQ – Adjusts the overall amount of frequency
increase or decrease on the Passport. Rotating the knob
counterclockwise increases the bass frequency response
while simultaneously decreasing the high frequency response.
Likewise, rotating the knob clockwise increases the high
frequency response while simultaneously decreasing the bass
frequency response. When the system EQ control is set at its 12
o'clock notched position, the channel response is “flat” with no
frequencies increased or decreased. To set the System EQ, start
with this control in the 12 o’clock notched position. Simply turn
the control until things sound good!
You will notice that the input jacks and channel controls
are color coded. This is done to easily identify which set of
controls is associated with which input connections.
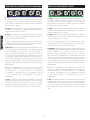
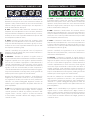
A. LINE / MIC SWITCH
– This
switch allows you to select gain
levels for either a microphone
or line level source. When the
switch is in the line position, the
input level is optimized for items
such as guitars, keyboards, drum
machines, outboard effects,
etc. When the switch is in the
mic position, the input level is
optimized for most commonly
used microphones. No harm will
come to the circuitry if the switch
is in the wrong position. However,
for optimum performance, be
sure to use the mic position when a microphone is plugged
into the respective channel and the line position when an item
using a line level signal is used.
B. MIC INPUT JACK – Plug your microphone in here. This three
pin XLR balanced female input connector is intended for input
signals from low impedance microphones.
C. LINE INPUT JACK Plug your instrument in here. This 1/4"
balanced input jack is suited for use with items having a line
level output such as high impedance microphones, keyboards,
drum machines, outboard effects, etc. It accepts both balanced
and unbalanced cables.
MaSter coNtrol fuNctIoNS MIc / lINe INputS

11
A. STEREO/ MONO SWITCH
– This switch allows you to
select between a stereo or
mono input from either the
RCA or 1/4” stereo input jacks.
This switch should be set to
the Mono position when a
source such as a guitar is input
to this channel, thus allowing
the mono source to be applied
to both outputs at the same
level. Failure to do this will
result in the input source only appearing at one of the outputs.
When the switch is in the stereo position, the full stereo field
is heard.
B. STEREO RCA INPUT – The Stereo phono (RCA) input
jacks are designed for use with a tape player, CD player, MP3
player, DAT player, or any other stereo source. Use these jacks
for connecting the output of a computer sound card or other
similar device to your Passport. Adapters that convert an 1/8”
male plug to RCA male phono plugs are readily available at
electronics stores. Note: These connectors are set at a constant
“line level”.
C. STEREO
– This stereo (1/4”) input jack is wired for Tip=Left,
Ring=Right and Sleeve=Ground, the standard format of
commercially available cables. The sensitivity of this input is
suited for playback devices such as CDs, Cassettes, DAT or Mini
Disc. Outputs from instruments such as keyboards can also be
used here (refer to item O).
D. STEREO OUT The Stereo Out RCA jacks provide an output
mix that is independent of the Master Level Controls. Connect
these to the inputs of a recording device, such as a cassette or
DAT recorder, to record your event. Changes made during the
performance, to the input level controls, channel EQ, and reverb
controls will be heard in the Stereo Out mix, while changes
made to the master level controls will not affect the level of the
recording. Adjust recording levels according to the instructions
on your recording device.
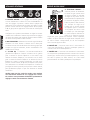
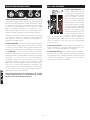
A. REV/AUX SEND
– Plug your
external effects signal processor
in here. Although the Passport is
already equipped with on-board
digital reverb, an external effects
signal processor can be incorporated
into the Passport’s signal flow. This 1/4" output jack is designed
to feed the Passport’s effects bus signal to an external signal
processing device, such as a digital delay or a chorus.
B. AUX/RET ST Plug the output of your external effects
signal processor in here. This 1/4" input stereo jack is designed
to accept signals from an external processing device, such as a
digital delay or a chorus unit. This input can also be used as a
stereo input with the volume controlled at the master volume
knobs.
C. FOOT SWITCH
The footswitch connector allows the
internal reverb return to be muted, or shut off, through the
use of a simple foot operated switch (Fender part number
099-4052-000). The footswitch should be wired to connect the
tip to the sleeve to turn the reverb off, and requires a standard
speaker or instrument cable.
aux aNd footSwItch jackS Stereo INputS

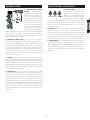
12
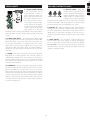
A. SPEAKER OUTPUTS – These
are speaker level (powered) output
jacks designed to feed each of your
Passport speaker enclosures. Use the
enclosed cables (or other speaker
cable) to connect the Passport’s
speakers to the power tower.
B. AC CONNECTOR/ LINE CORD – The Passport is equipped
with a grounding type IEC supply cord to reduce the possibility
of shock hazard. Be sure to connect it to a grounded AC
receptacle. DO NOT ALTER THE AC
PLUG.
C. POWER SWITCH –
Turns the AC
power ON and OFF. When the switch
is in the OFF position, your Passport is
completely shut down.
The power mains (AC) fuse and fuse holder are under the
IEC (power cord) socket. Replacement fuses must be of the
same rating (T3.15AL, 250V) and size as originally equipped.
To replace a blown fuse, remove the IEC power cord. Pull out
the fuse holder and find the spare fuse inside.
A small storage compartment can be found on the rear of the
Passport tower. To access this compartment, simply lift the
latch and pull open the storage door. This compartment is ideal
for storing cables, microphones or other items when you are
transporting your Passport.
On the back panel of the storage compartment you will see
a narrow metal strip with a screw on either end. This is the
protective cover for the wireless adapter terminal. Custom
wireless systems are available for your Passport. The receiver for
the wireless system installs in the storage compartment.
rear paNel rear Storage coMpartMeNt

13
Before turning on the Power, read and heed the safety warnings
on page 3.
It is wise to establish a routine for connecting and powering up
your sound system. Provided you have a properly grounded AC
outlet or outlet strip with sufficient power handling capacity,
plug all sound system equipment into the same outlet or
strip. This will enhance system safety and performance. Take
care that the AC circuit is capable of handling the peak power
demands of your system. Consult the product handbooks or a
qualified electrician if in doubt.
When setting up, be sure to follow these simple set-up
guidelines:
1. First, turn all channel Levels and Rev/Aux controls to their full
counterclockwise (OFF) positions. Next, place all Low, High, Pan,
Bal and Master controls at their 12 o’clock notched positions. Be
sure to set the appropriate input (mic/line switch position) for
the source you are setting up.
2. Next, connect each speaker cable to the appropriate Left &
Right Speaker outputs on the rear tower and on each speaker
front panel with the enclosed cables.
3. Connect all sources such as microphones, tape decks,
keyboards etc., into the appropriate inputs.
4. Plug the power cable into the IEC (power cord) socket on
the rear of the Passport Tower and connect the other end to a
properly grounded 3 wire AC power outlet.
POWERING UP
Turn the Power Switch to the ON position. The Power LED will
illuminate green and the system will turn on. If other powered
equipment is to be attached to the system, it is always advisable
to turn on your Passport last. In this way any transient spikes
and thumps caused by other equipment will not be amplified
and sent to your system speakers. For the same reasons it is
advisable to turn off your Passport system first before turning
off the attached equipment.
Should the Power LED not illuminate when the rear panel
power switch is operated, check your power connections and
retry. Should the Power LED still fail to illuminate after you have
confirmed the power connections, disconnect all cables and
check the Passport fuses. Be sure to replace any blown fuses
with fuses of the correct value. Reconnect the power and
speaker cables and turn the rear panel power switch on.
Re-set the system by turning on the power switch. If the Power
LED illuminates red, the system is indicating a thermal protect
mode or cooling problem. Be sure to check the air inlet filter at
the base of the unit by removing it and making sure it is clear
of debris.
Turn the power off and wait for a few minutes allowing heat to
dissipate and the Passport to reset itself. If after doing so the
Power LED continues to glow red this indicates a fault with your
system and you should consult an authorized Fender service
center.
If no audio is present in one of the speakers, check to see if your
control settings are correct. Next, unplug the cable from your
working speaker and reconnect it to the other speaker. If the
second speaker now works, this indicates that the first cable is
bad, and should be repaired or replaced.
SETUP SYSTEM VOLUME AND LEVELS
To set system volume and operating levels, be sure to follow
these simple set-up guidelines:
1. First, slowly raise the large Left and Right Master volume
controls to their 12 o’clock notched positions.
2. Use a microphone (or other source) in the same position as it
will be used on stage and in the manner in which it will be used
for the event. Slowly bring up the appropriate channel input
level control listening for the onset of feedback or howling
or until the required level is reached. Have a helper “walk” the
audience area to make sure coverage and levels are sufficient
for your needs. The system’s overall volume can be raised
simply by rotating the Left and Right Master volume controls
to the desired level.
3. Consider the application and needs of the event and set
the System EQ control as appropriate. This is best achieved
by playing recorded material of the same type as your show
program, or by having an assistant speak into the microphone
while you listen in the audience area.
For public address (spoken voice), it is advisable to rotate the
System EQ control clockwise to enhance the mid and high
frequencies, and limit the low frequency content. For large
outdoor spaces this will also give the maximum headroom
and output capability. Carefully consider the individual event’s
needs and set your control for the maximum effect.
Set-up aNd coNNectIoNS

14
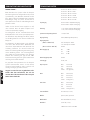
Part Number 069-3005-000 PD-150+ 120V US
069-3005-900 PD-150+ 120V DS
069-3005-930 PD-150+ 240V AUS
069-3005-940 PD-150+ 230V UK
069-3005-960 PD-150+ 230V EUR
069-3005-970 PD-150+ 100V JPN
Frequency Response 50 Hz to 20 kHz ± 1 dB (at speaker output)
30 Hz to 20 kHz ± 1 dB (at send output)
Distortion < 0.5%, 20 Hz to 20 kHz (at speaker output)
< 0.1%, 20 Hz to 20 kHz (at send output)
System Signal to Noise Ratio > 90 dB, “A” WTD
Power Output 150W (75W/ch @ 8ohms per channel)
Input Impedance
(Channels 1-2 XLR and 1/4”) “Mic” switch position: 2 k ohm
“Line” switch position: 66 k ohm
(Phono and Stereo Channel 1/4”) 78 k ohm
Max. Input Level Mic: -11 dBu
Line: 20 dBu
Stereo: 26 dBu
Return Input Impedance
47k ohm
Fuse type T3.15AL, 250V
Passport System Width: 610 mm (24 in.)
Height: 541 mm (18 in.)
Depth: 254 mm (10 in.)
Weight: 14.97 kgs (33 lbs)
Speakers Width: 245 mm (9.65 in.)
Height: 439 mm (17.5 in.)
Depth: 241 mm (9.5 in.)
Weight: 4.08 kgs (9.0 lbs)
Power Tower Width 245 mm (9.65 in.)
Height 451 mm (18 in.)
Depth 178 mm (7 in.)
Weight 6.80 kgs (15.00 lbs)
Tower Footprint
241 x 298 mm (9.5 x 11.75 in.)
Microphone Dynamic Cardioid, balanced
Microphone Cable XL -Male to XL-Female, 6 m (20 feet)
Speaker Cables 1/4 in. to 1/4 in., 9 m (27 feet)
0 dBu is referenced to 0.775 volts rms
POWER TOWER
™
In setting up the system, the Passport Mixing
console should ideally be placed where system
performance can be evaluated by the operator.
If no ongoing adjustments will be necessary, the
mixer may be placed conveniently and where the
cable lengths allow.
Take care to place the Power Tower where the
cables will not trip anyone. All cables should be
carefully secured.
The storage compartment in the rear of the
Tower can hold cables, microphones and other
system parts. To open simply slide the catch
upwards and pull open.
The mains (AC) fuse holder is under the IEC
(power cord) socket on the right rear of the
Tower. To change a fuse, remove the IEC plug
and, using an appropriate tool pull out the fuse
holder. Note there is a spare fuse in the fuse
holder; the Passport utilizes a T3.15AL, 250V fuse.
Only replace fuses with one of an identical value
and size.
The Passport System is weather resistant in
its packed transport mode. However, when
operating outdoors, take care to fully protect the
Power Tower in the event of exposure to rain.
Remember to allow free air flow through the
front air inlet located at the bottom of the
front panel on the Passport power tower.
SpecIfIcatIoNS
Set-up aNd coNNectIoNS

15
A PRODUCT OF:
FENDER MUSICAL INSTRUMENTS CORP.
CORONA, CA USA
Printed in China
P/N 668CGP002 REV A
VISIT US ON THE WEB For information on all of Fender’s
Passport and Fender Audio products, go to www.
fenderaudio.com.
PASSPORT ACCESSORIES
A complete line of accessories
are available for your Passport Sound System. Contact your
local dealer or visit our website for more information.
P51 MICROPHONE KIT Contains one dynamic cardioid
microphone, mic clip, mic cable and vinyl carry pouch.
Part Number 069-9000-000
PASSPORT P150 PROTECTIVE COVER
– Padded vinyl cover for
your Passport P150 and PD150 system.
Part Number - 069-9010-000
PASSPORT HAND HELD WIRELESS SYSTEM
Custom
designed wireless system for use with Passport sound
systems. Once installed, this system becomes a permanent
part of your sound system. Includes a hand held electret
condenser microphone and receiver module.
Part Number - 069-1201-00x (x indicates frequency-see
catalog for details)
PASSPORT EXECUTIVE WIRELESS SYSTEM
Custom
designed wireless system for use with Passport sound
systems. Once installed, this system becomes a permanent
part of your sound system. Includes a receiver module,
and a belt pack transmitter with interchangeable headset,
lavalier and instrument cable elements. Custom molded
carry case included.
Part Number - 069-1205-00x (x indicates frequency-see
catalog for details)
acceSSorIeS

16
150 watios de puro sonido stereo
Altavoces de diseño exclusivo en los que se ha usado la más
moderna tecnología en altavoces de alto rendimiento
Reverb digital interna con calidad profesional
Dos entradas mono de micro / línea con conexiones de
entrada balanceada XLR y de 6,3 mm
Entrada stereo con conexiones de 6,3 mm y RCA
Canal CD stereo
Fuente de alimentación conmutable
Todo lo necesario para ponerse en marcha:
– Amplificador-mezclador Passport
– Un micrófono dinámico + cable
– Cables de altavoz
– Cable de alimentación
– Dos recintos acústicos de rango completo
– Maleta de transporte
Felicidades y gracias por su compra de un sistema de sonido
portátil de alto rendimiento y "todo-en-uno" Fender Passport
PD150 Plus. Su nuevo Passport incluye todo lo necesario para
conseguir un buen sonido... en cualquier parte.
El transporte de su nuevo Passport es tan sencillo como
mover una maleta de tamaño medio. Abra los cierres laterales
y descubrirá dos recintos acústicos de rango completo, una
mesa de mezclas autoamplificada, un micrófono dinámico y
todos los cables necesarios para ponerse en marcha. Utilice su
Passport para amplificar voces, instrumentos musicales, tarjetas
de sonido de ordenador, la señal de reproducción de un CD,
pletina, monitores de estudio y para muchas otras aplicaciones.
Su montaje rápido y simple, su capacidad para cubrir grandes
superficies y su manejo simple son las características principales
de esta innovadora línea de productos de Passport.
El panel de control de este Passport le ofrece dos entradas mono
de micro/línea, un canal stereo y un canal CD (cuatro canales en
total). Puede configurar el canal stereo para funcionamiento en
mono o stereo, lo que le ofrece una impresionante flexibilidad
a la hora de usar distintas entradas. Además, la revolucionaria
tecnología de altavoces usada en cada uno de sus recintos
acústicos produce un sonido muy limpio y de rango completo
con una excepcional cobertura de público. La mesa de mezclas
autoamplificada interna le ofrece un total de 150 watios de
sonido stereo de alta calidad.
Experimente con los controles de tono, la reverb digital y
las distintas posibilidades de colocación de los altavoces y
descubra el increíble potencial y versatilidad de este Passport.
INtroduccIoN
Fender Passport - PD150 PLUS
Sistema de sonido portátil Deluxe

17
precaucIoNeS de SegurIdad
Este sistema de sonido Fender Passport viene con
un cable de alimentación extraíble con un conector
IEC hembra y un conector AC macho. Dependiendo
del país en el que haya comprado este sistema, el
cable de alimentación vendrá con uno de los posibles tipos
de conectores AC macho, que cumplirá todos los requisitos
eléctricos y de seguridad para dicho país. Todos los cables
de alimentación que se incluyen con los productos Passport
incluyen enchufes de tres puntas con toma de tierra.
Bajo ninguna circunstancia desconecte o elimine la punta
de tierra (masa) de este cable/enchufe.
Su sistema Passport dispone de una fuente de alimentación
conmutable que ha sido diseñada para funcionar con cualquier
voltaje y amperaje AC para su máxima eficiencia. Cuando esté
utilizando adaptadores de enchufe o use esta unidad en un país
distinto al que la adquirió, asegúrese de cumplir los requisitos
eléctricos y normas de seguridad locales.
Si no está seguro de cual es el voltaje, cableado o normas
de seguridad, aislamiento y cableado locales, póngase
en contacto con un técnico cualificado.
Peligro
Bajo ningún concepto anule la toma de tierra de este
aparato Passport ni de ningún otro dispositivo eléctrico.
Bajo determinadas circunstancias es posible que una
combinación de distintos tipos de dispositivos sin
conexión a tierra den lugar a riesgos eléctricos que puedan poner
en peligro su vida. Los micrófonos tienen carcasas metálicas y son
conectados a través de un cable de micro al chasis de la mesa
de mezclas. Su mesa de mezclas Passport estará correctamente
conectada a tierra si el cableado del edificio cumple las normas y
la toma de tierra del enchufe de alimentación está correctamente
conectada. No obstante, si utiliza por alguna razón unidades
exteriores con conexión eléctrica sin toma de tierra junto con
este sistema Passport (p.e. un amplificador sin conexión a tierra),
puede llegar a producirse una diferencia de potencial en la carcasa
del micrófono. En este caso si un músico que sujetase el micro
(conectado a tierra) entrase en contacto con un elemento con
conexión eléctrica sin toma de tierra, podría quedar sujeto a una
descarga eléctrica peligrosa.
Si usted sigue los procesos y precauciones de seguridad
correctas, podrá evitar cualquier riesgo de una descarga eléctrica
peligrosa. Compruebe siempre la conexión a la corriente de las
unidades y especialmente el voltaje entre el micrófono y el
resto de las unidades conectadas a la corriente. Evite utilizar este
aparato junto con dispositivos eléctricos sin conexión a tierra o
con conexiones inadecuadas.
Para abrir y cerrar su sistema Passport, simplemente siga estos
pasos:
1. Coloque la punta de su dedo debajo
del cierre de seguridad {A} y tire de
él suavemente hacia fuera. Cuando
dicho cierre quede desenganchado,
quite ambos cierres {A & B} de cada
altavoz antes de intentar separarlos.
2. Para volver a colocarlos en la
posición original, coloque cada
altavoz en la parte inferior de la torre
y empuje hacia dentro para cerrar
el bloque con la torre y los cierres.
Coloque los ganchos de los cierres
sobre la muesca del altavoz y cierre
estos enganches. Los cuatro cierres
quedarán automáticamente en la
posición correcta.
Nota: Estas piezas han sido diseñadas
con sumo cuidado, por lo que no es
necesario que aplique mucha fuerza
para cerrarlas. Un alineamiento
correcto de las piezas le asegurará un
manejo fácil.
cIerreS de traNSporte

18
A. LEVEL Ajusta el nivel de volumen de cada canal individual
con respecto al nivel master. Gire el mando hacia la derecha
para aumentar el volumen del canal respectivo, o a la izquierda
para disminuirlo. Ajuste este control después de haber ajustado
el nivel de volumen master del Passport.
B. LOW – Ajusta el nivel relativo del contenido de bajas
frecuencias. Gírelo a la derecha para aumentar la respuesta en
graves y a la izquierda para disminuirlo.
C. HIGH – Ajusta el nivel relativo del contenido en agudos.
Gire el mando a la derecha para aumentar la respuesta en altas
frecuencias o a la izquierda para disminuirlo.
Cuando estos controles EQ estén en su posición de muesca
central (posición de "las 12 en punto"), la respuesta de frecuencia
del canal será "plana" y por tanto ninguna de las frecuencias
estará realzada o cortada.
D. REV/AUX Ajusta la cantidad de señal enviada al procesador
de reverb y al conector de envío Rev/Aux. Puede usar la reverb
para mejorar la calidad sonora de cualquier interpretación
cuando quiera. En la posición de tope izquierdo, no será enviada
ninguna cantidad de señal al procesador de reverb o al conector
Rev/Aux. Ajuste siempre el control Master Reverb a su posición
central o por encima de ella, antes de ajustar los niveles de los
canales individuales. Una vez que haya ajustado la mezcla Rev/
Aux, podrá ajustar los niveles globales de reverb en el control
master.
Tenga en cuenta que si bien la reverb o unos efectos pueden
mejorar o intensificar una interpretación musical, una cantidad
excesiva de los efectos puede hacer que esa interpretación sea
ininteligible, o "difusa". Piense siempre en su público a la hora de
ajustar los niveles de reverb.
E. PAN – Use este control Pan para ajustar la cantidad de señal
enviada a cada uno de los altavoces (izquierda y derecha). El
ajuste de este control le permite fijar la posición de la fuente
sonora dentro del plano horizontal, a la izquierda o derecha del
punto central del escenario. Ajuste el mando a la posición del
punto central para conseguir cantidades de nivel iguales en el
altavoz izquierdo y derecho.
A. LEVEL Ajusta el nivel de volumen de cada canal individual
con respecto al nivel master. Gire el mando hacia la derecha
para aumentar el volumen del canal respectivo, o a la izquierda
para disminuirlo. Ajuste este control después de haber ajustado
el nivel de volumen master del Passport.
B. LOW – Ajusta el nivel relativo del contenido de bajas
frecuencias. Gírelo a la derecha para aumentar la respuesta en
graves y a la izquierda para disminuirlo.
C. HIGH – Ajusta el nivel relativo del contenido en agudos.
Gire el mando a la derecha para aumentar la respuesta en altas
frecuencias o a la izquierda para disminuirlo.
Cuando estos controles EQ estén en su posición de muesca
central (posición de "las 12 en punto"), la respuesta de frecuencia
del canal será "plana" y por tanto ninguna de las frecuencias
estará realzada o cortada.
D. REV/AUX Ajusta la cantidad de señal enviada al procesador
de reverb y al conector de envío Rev/Aux. Puede usar la reverb
para mejorar la calidad sonora de cualquier interpretación
cuando quiera. En la posición de tope izquierdo, no será enviada
ninguna cantidad de señal al procesador de reverb o al conector
Rev/Aux. Ajuste siempre el control Master Reverb a su posición
central o por encima de ella, antes de ajustar los niveles de los
canales individuales. Una vez que haya ajustado la mezcla Rev/
Aux, podrá ajustar los niveles globales de reverb en el control
master.
Tenga en cuenta que si bien la reverb o unos efectos pueden
mejorar o intensificar una interpretación musical, una cantidad
excesiva de los efectos puede hacer que esa interpretación sea
ininteligible, o "difusa". Piense siempre en su público a la hora de
ajustar los niveles de reverb.
E. BAL – Use este control Pan para ajustar la cantidad de señal
enviada a cada uno de los altavoces (izquierda y derecha). El
ajuste de este control le permite fijar la posición de la fuente
sonora dentro del plano horizontal, a la izquierda o derecha del
punto central del escenario. Ajuste el mando a la posición del
punto central para conseguir cantidades de nivel iguales en el
altavoz izquierdo y derecho.
coNtroleS de eNtrada MoNo MIc / lINe coNtroleS de eNtrada Stereo

19
A. LEVEL Ajusta el nivel de volumen de cada canal individual
con respecto al nivel master. Gire el mando hacia la derecha
para aumentar el volumen del canal respectivo, o a la izquierda
para disminuirlo. Ajuste este control después de haber ajustado
el nivel de volumen master del Passport.
B. LOW – Ajusta el nivel relativo del contenido de bajas
frecuencias. Gírelo a la derecha para aumentar la respuesta en
graves y a la izquierda para disminuirlo.
C. HIGH – Ajusta el nivel relativo del contenido en agudos.
Gire el mando a la derecha para aumentar la respuesta en altas
frecuencias o a la izquierda para disminuirlo.
Cuando estos controles EQ estén en su posición de muesca
central (posición de "las 12 en punto"), la respuesta de frecuencia
del canal será "plana" y por tanto ninguna de las frecuencias
estará realzada o cortada.
D. REV/AUX Ajusta la cantidad de señal enviada al procesador
de reverb y al conector de envío Rev/Aux. Puede usar la reverb
para mejorar la calidad sonora de cualquier interpretación
cuando quiera. En la posición de tope izquierdo, no será enviada
ninguna cantidad de señal al procesador de reverb o al conector
Rev/Aux. Ajuste siempre el control Master Reverb a su posición
central o por encima de ella, antes de ajustar los niveles de los
canales individuales. Una vez que haya ajustado la mezcla Rev/
Aux, podrá ajustar los niveles globales de reverb en el control
master.
Tenga en cuenta que si bien la reverb o unos efectos pueden
mejorar o intensificar una interpretación musical, una cantidad
excesiva de los efectos puede hacer que esa interpretación sea
ininteligible, o "difusa". Piense siempre en su público a la hora de
ajustar los niveles de reverb.
E. BAL – Use este control Pan para ajustar la cantidad de señal
enviada a cada uno de los altavoces (izquierda y derecha). El
ajuste de este control le permite fijar la posición de la fuente
sonora dentro del plano horizontal, a la izquierda o derecha del
punto central del escenario. Ajuste el mando a la posición del
punto central para conseguir cantidades de nivel iguales en el
altavoz izquierdo y derecho.
(Nota: Todas las operaciones siguientes se producen solo
cuando disponga de un reproductor de CD).
A. EJECT – Este botón le permite expulsar el
CD del reproductor.
B. PLAY/PAUSE – Este botón le permite
iniciar la reproducción de un CD una vez que
lo inserte en la unidad. El pulsar este botón
mientras el CD está siendo reproducido hace
que la unidad quede en pausa. Vuelva a
pulsarlo con la unidad en pausa para que la
reproducción continúe desde ese punto.
C. STOP – Pulse este botón durante la reproducción de un CD
para detener la reproducción de la pista.
D. MODE
– Este botón le permite usar las órdenes de "repetición"
y "aleatorio" de su reproductor de CD. Pulse una vez este botón
para que el reproductor quede en el modo de "repetición de
pista", haciendo que la unidad repita la pista activa una y otra
vez. Pulse este botón de nuevo para activar el modo "repetición
de álbum", que hará que todo el CD sea repetido una vez que
haya sido reproducido completamente. La tercera pulsación
sobre este botón activará el modo "shuffle" o aleatorio que dará
lugar a una reproducción de las pistas en un orden aleatorio.
Pulse el botón una cuarta vez para devolver el reproductor de
CD al modo operativo normal.
E. PREVIOUS TRACK/REWIND
– Este botón le permite reiniciar
o rebobinar la pista que esté siendo reproducida o pasar a
la pista anterior. Una vez que comience la reproducción de
una pista, el pulsar este botón una vez hará que se reinicie de
nuevo la reproducción de la pista; pulse el botón dos veces
para hacer que la unidad pase a la pista anterior. Mantenga
pulsado este botón durante la reproducción normal para
producir un rebobinado de los datos de la pista que esté siendo
reproducida.
F. NEXT TRACK/FAST FORWARD – Este botón le permite saltar
o avanzar rápidamente por una pista. Una vez que una pista
esté siendo reproducida, pulse este botón una vez para hacer
que la unidad salte directamente a la pista siguiente. Mantenga
pulsado este botón durante la reproducción normal de una
pista para producir un avance rápido de la misma.
coNtroleS eNtrada cd player BotoNeS cd player

20
A. CONTROLES DE NIVEL DE VOLUMEN MASTER Los
controles de volumen master Left y Right ajustan el nivel de
salida global del PD150 Plus. Estos controles disponen de
indicadores con muesca. Para la mayor parte de las aplicaciones
el sistema Passport ha sido balanceado para funcionar con estos
controles en su posición de muesca central de "las 12 en punto".
En situaciones en las que necesite un mayor volumen, estos
controles master le pueden ofrecer hasta 6 dB de ganancia
adicional cuando los gire al tope derecho.
Configure el sistema de la forma habitual y ajuste los niveles
de la forma adecuada. Suba los controles de volumen master
por encima de sus posiciones centrales solo una vez que haya
aumentado los controles de nivel de los canales individuales.
B. MASTER REVERB – Le permite ajustar la cantidad de señal
de reverb enviada a la salida. Gire este mando a la derecha
para aumentar la señal de reverb enviada a la mezcla principal.
Cuando este mando esté en su tope izquierdo, no se escuchará
señal de reverb en la mezcla.
C. SYSTEM EQ
– Ajusta la cantidad global de aumento o
disminución de frecuencias del Passport. El giro de este
mando a la izquierda aumenta la respuesta en graves y a la vez
disminuye la repuesta en altas frecuencias. De forma inversa,
el giro de este mando a la derecha aumenta la respuesta
en las frecuencias agudas a la vez que disminuye la de las
graves. Cuando este control esté ajustado en su posición de
muesca central, la respuesta del canal será "plana" y por tanto
ninguna frecuencia será realzada o cortada. Para ajustar esta
ecualización global del sistema, comience con este control en
su posición de muesca central y después vaya girando este
control suavemente hasta que consiga el sonido que quiera!
Observará que los conectores de entrada y los controles de
los canales siguen un código de colores. Esto se hace para
que pueda identificar fácilmente qué grupo de controles
está asociado con cada tipo de conector de entrada.
A. INTERRUPTOR LINE / MIC
– Este interruptor le permite
elegir el nivel de ganancia para
un micrófono o una fuente de
nivel de línea. Cuando esté en la
posición line, el nivel de entrada
estará optimizado para elementos
como guitarras, teclados, cajas
de ritmo, efectos exteriores, etc.
Cuando coloque este interruptor
en la posición mic, el nivel de
entrada estará optimizado para
los micros usados de forma más
habitual. No se producirá ningún
daño en la circuitería si coloca
este interruptor en la posición incorrecta. No obstante, para
conseguir el rendimiento óptimo, asegúrese de usar la posición
mic cuando conecte un micrófono al canal respectivo y la
posición line cuando utilice cualquier otro elemento con señal
de nivel de línea.
B. CONECTOR DE ENTRADA MIC – Conecte aquí su micrófono.
Esto es un conector de entrada hembra XLR balanceado de tres
puntas, diseñado para las señales de entrada de micrófonos de
baja impedancia.
C. CONECTOR DE ENTRADA LINE Conecte aquí sus
instrumentos. Esta es una toma de entrada de 6,3 mm
balanceada adecuada para su uso con elementos que tengan
una salida de nivel de línea como la de micrófonos de alta
impedancia, teclados, cajas de ritmo, efectos exteriores, etc.
Este conector acepta tanto cables balanceados como no
balanceados.
coNtroleS MaSter eNtradaS MIc / lINe
La page est en cours de chargement...
La page est en cours de chargement...
La page est en cours de chargement...
La page est en cours de chargement...
La page est en cours de chargement...
La page est en cours de chargement...
La page est en cours de chargement...
La page est en cours de chargement...
La page est en cours de chargement...
La page est en cours de chargement...
La page est en cours de chargement...
La page est en cours de chargement...
La page est en cours de chargement...
La page est en cours de chargement...
La page est en cours de chargement...
La page est en cours de chargement...
La page est en cours de chargement...
La page est en cours de chargement...
La page est en cours de chargement...
La page est en cours de chargement...
La page est en cours de chargement...
La page est en cours de chargement...
La page est en cours de chargement...
La page est en cours de chargement...
La page est en cours de chargement...
La page est en cours de chargement...
La page est en cours de chargement...
La page est en cours de chargement...
La page est en cours de chargement...
La page est en cours de chargement...
La page est en cours de chargement...
La page est en cours de chargement...
La page est en cours de chargement...
La page est en cours de chargement...
La page est en cours de chargement...
La page est en cours de chargement...
La page est en cours de chargement...
La page est en cours de chargement...
La page est en cours de chargement...
La page est en cours de chargement...
La page est en cours de chargement...
La page est en cours de chargement...
La page est en cours de chargement...
La page est en cours de chargement...
La page est en cours de chargement...
La page est en cours de chargement...
La page est en cours de chargement...
La page est en cours de chargement...
La page est en cours de chargement...
La page est en cours de chargement...
La page est en cours de chargement...
La page est en cours de chargement...
La page est en cours de chargement...
La page est en cours de chargement...
La page est en cours de chargement...
La page est en cours de chargement...
-
 1
1
-
 2
2
-
 3
3
-
 4
4
-
 5
5
-
 6
6
-
 7
7
-
 8
8
-
 9
9
-
 10
10
-
 11
11
-
 12
12
-
 13
13
-
 14
14
-
 15
15
-
 16
16
-
 17
17
-
 18
18
-
 19
19
-
 20
20
-
 21
21
-
 22
22
-
 23
23
-
 24
24
-
 25
25
-
 26
26
-
 27
27
-
 28
28
-
 29
29
-
 30
30
-
 31
31
-
 32
32
-
 33
33
-
 34
34
-
 35
35
-
 36
36
-
 37
37
-
 38
38
-
 39
39
-
 40
40
-
 41
41
-
 42
42
-
 43
43
-
 44
44
-
 45
45
-
 46
46
-
 47
47
-
 48
48
-
 49
49
-
 50
50
-
 51
51
-
 52
52
-
 53
53
-
 54
54
-
 55
55
-
 56
56
-
 57
57
-
 58
58
-
 59
59
-
 60
60
-
 61
61
-
 62
62
-
 63
63
-
 64
64
-
 65
65
-
 66
66
-
 67
67
-
 68
68
-
 69
69
-
 70
70
-
 71
71
-
 72
72
-
 73
73
-
 74
74
-
 75
75
-
 76
76


Fender Passport PD150 Plus Le manuel du propriétaire
- Catégorie
- Destinataire
- Taper
- Le manuel du propriétaire
- Ce manuel convient également à
dans d''autres langues
Documents connexes
-
Fender PD250 Plus Manuel utilisateur
-
-
-
-
-
-
Fender Passport Conference Series 2 Le manuel du propriétaire
-
-
-