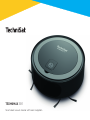
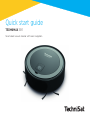
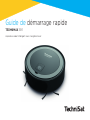
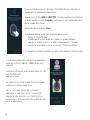
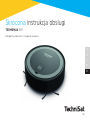
TechniSat TECHNIMAX SR1 Manuel utilisateur
- Taper
- Manuel utilisateur


2
CONTENTS
ENGLISH. .......................................................................................... 3-36
FRANÇAIS ......................................................................................37-70
ITALIANO ......................................................................................71-104
NEDERLANDS .......................................................................... 105-138
POLSKE ...................................................................................... 139-172


4
1 Contents
1 Contents .................................................................................................................................................................................. 4
2 Preface .....................................................................................................................................................................................5
2.1 Target group for this instruction manual ..............................................................................................................................................5
2.1.1 Intended use ......................................................................................................................................................................................................5
2.2 Scope of delivery ..............................................................................................................................................................................................6
2.3 Accessories ..........................................................................................................................................................................................................6
2.4 Information regarding this quick start guide ......................................................................................................................................6
3 Safety instructions ................................................................................................................................................................7
3.1 Regulations .......................................................................................................................................................................................................12
3.2 Service instructions ..................................................................................................................................................................................... 14
3.3 Disposal instructions ..................................................................................................................................................................................... 15
4 Device description ..............................................................................................................................................................17
4.1 Robot vacuum cleaner status indicator...............................................................................................................................................18
5 Operation .............................................................................................................................................................................. 19
5.1 Preparing for first-time use .......................................................................................................................................................................19
5.2 Operating the robot vacuum cleaner ..................................................................................................................................................22
5.3 Aer the cleaning process ........................................................................................................................................................................ 23
5.4 Thoroughly cleaning the robot vacuum cleaner ............................................................................................................................25
6 Control using the TECHNIMAX app ...............................................................................................................................29
6.1 Creating a TECHNIMAX user account ..................................................................................................................................................30
6.2 Registering the TECHNIMAX SR1 ............................................................................................................................................................31
7 Troubleshooting ................................................................................................................................................................. 33
7.1 Factory seings .............................................................................................................................................................................................. 34
8 Technical data ..................................................................................................................................................................... 34
9 Notes ......................................................................................................................................................................................36

5
EN
FR
IT
NL
PL
2 Preface
Dear Customer,
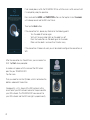
Congratulations on your decision to purchase the TECHNIMAX SR1 robot vacuum cleaner.
This quick start guide is designed to help you to familiarise yourself with the extensive functions of your new robot
vacuum cleaner and make best use of it.
Please read this quick start guide carefully before using the product for the first time and keep it for future reference.
An up-to-date version of the quick start guide can be found in the TECHNIMAX SR1 download area on the TechniSat
homepage at www.technisat.de.
We have kept the operating instructions as brief as possible and have used terminology that everybody can
understand.
The range of functions on your device can constantly be expanded by means of soware updates. This means that
additional operating steps may be added that are not covered in this quick start guide, or the operation of existing
functions may change. For this reason you should occasionally visit the TechniSat homepage, to download the latest
version of the quick start guide.
We hope you enjoy using your TechniSat TECHNIMAX SR1!
The
TechniSat Team
2.1 Target group for this instruction manual
The instruction manual is intended for anyone who is installing, operating, cleaning or disposing of the device.
2.1.1 Intended use
This device is intended for private use at home only and is not designed for commercial use. Use the device
exclusively for cleaning floor coverings (hard floors and low-pile carpets) in your home. The device is intended for
use in normal, dry ambient conditions of +10 to +40 degrees Celsius. Operation in damp rooms or outside the house
is expressly prohibited. Please use the device only as described in this quick start guide. No liability is assumed for
damage caused by improper use.

6
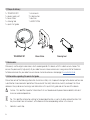
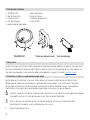
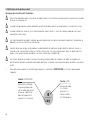
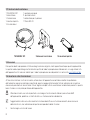
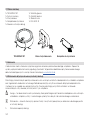
2.2 Scope of delivery
1 x TECHNIMAX SR1 1 x main brush
1 x power supply unit 2 x side brushes
1 x base station 1 x dust bin
1 x cleaning tool 1 x HEPA 13 filter
1 x quick start guide
TECHNIMAX SR1 Base station Cleaning tool
2.3 Accessories
Please only use the original accessories, which are designed for this device, with this robot vacuum cleaner. This
ensures the permanently high quality of your robot vacuum cleaner and ensures a long service life for the device.
Suitable accessories for your robot vacuum cleaner can be found on our homepage at www.technisat.de.
2.4 Information regarding this quick start guide
Please take note of the following information to minimise safety risks, to prevent damage to the device and to make
a contribution to environmental protection. Please read all the safety information carefully and keep it for future
reference. Always observe all warnings and information in this quick start guide and on the rear of the device.
Caution - This identifies important information that must be observed to prevent device defects, data loss/
misuse or undesired operation.
Tip - This identifies information relating to the described function, as well as to other related functions that
may have to be taken into account, with reference to the corresponding section in the manual.
> Indicates a work step.

7
EN
FR
IT
NL
PL
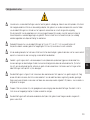
3 Safety instructions
Please fully charge the robot vacuum cleaner's baery before using it for the first time. Use only the supplied
base station and the supplied AC adapter for charging. Using other components to charge the robot vacuum
cleaner may damage the device and will void the warranty.
To maintain the capacity of the rechargeable baery for as long as possible, the device should only be stored
and operated at room temperature. At least once a year, the baery must be fully charged in order to avoid a
deep discharge.
The operating temperature of the robot vacuum cleaner is between 10°C and 40°C. Operation and storage
should never take place outside this temperature range, otherwise the service life can be reduced.
If the power adapter, power cord or base station is damaged, stop using these parts and contact your dealer
to replace the defective parts.
Before cleaning, the floor must be cleared of objects that the robot could suck in or damage. Cables may
be damaged by the rotating brush, and fine textiles may wrap around the rotating brush causing significant
damage. Before each use, please ensure that the robot vacuum cleaner can move around freely.
The robot vacuum cleaner has crash sensors that prevent the device from falling from a height. Please
make sure that these sensors, which are located at the boom of the robot, are cleaned at regular intervals.
Moreover, ensure that these crash sensors are in no way covered up. We recommend cleaning aer every use.
The robot vacuum cleaner cannot be used for cleaning stairs, tables and shelves. The robot is unable to drive
over and clean deep-pile carpets.
The robot vacuum cleaner has rotating parts which must never be touched during operation due to the risk of
injury!

8
Please never operate the robot vacuum cleaner close to the body as hair and clothing could be sucked in
causing injury!
The base station has a special paern that allows the robot to recognize it as such. Please make sure that the
base station can be seen in full by the robot vacuum cleaner. For optimal visibility of the base station by the
robot vacuum cleaner, no other objects may be present within a radius of one meter around the base station.
An internal safety mechanism protects the robot vacuum cleaner from overheating. Should the device or the
baery become too hot, the device switches o automatically. Please allow the device to cool for 30 minutes
before puing it back into operation.
Repairs to the robot vacuum cleaner or the base station may only be carried out by authorized specialists.
Use the device only with the intended, specially designed baeries. Using other baeries may result in injury
and fire.
When the baery is not in use, keep it away from other metal objects such as paper clips, coins, keys, nails,
screws, or other small metal objects that can create a connection between the baery contacts. A baery
contact short circuit can lead to burns or fires.
Never expose the baery or device to fire or high temperatures. Fire or temperatures over 130°C can cause an
explosion.
Follow all charging instructions and do not charge the baery or device outside the temperature range
specified in the instructions.
Incorrect charging or charging at temperatures outside the specified range may damage the baery and
increase the risk of fire.
Only have repairs carried out by qualified personnel using identical spare parts. This ensures that the safety of
the product is maintained.

9
EN
FR
IT
NL
PL
Do not aempt to modify or repair the device or the baery. The warranty is void in the event of unauthorized
intervention by third parties.
The power adapter and base station may only be used in dry, enclosed indoor areas.
The device must not be used as a toy. Not suitable for children under 12 years of age. When used near
children, close supervision is required. To prevent injury or damage, keep children away from the product and
make sure that children do not put fingers or other objects inside the openings of the device.
Use the device only as described in this quick start guide.
Do not use the power adapter if it has a damaged cable or plug. If the robot vacuum cleaner or power adapter
is not working properly, is dropped, damaged, le outdoors or dropped into water, it must be inspected and
repaired by a specialist before further use.
Do not pull or carry the power adapter by the cable, do not use the cable as a handle, do not trap the cable in
door frames, and do not pull the cable across sharp edges or around corners. Do not place the product on the
cable. Do not drive the device over the cable. Keep the cable away from hot surfaces.
Plug the power adapter into an easily accessible power outlet.
Never carry the power adapter by the cable or pull it out of the socket using the cable.
Ventilation ducts must not be covered.
Keep hair, loose clothing, fingers and all body parts away from openings and moving parts.
Do not place the robot on stairs or furniture, as this may result in injury or damage.
Never vacuum up flammable liquids such as gasoline or fine wood chips or use the device in areas where they
may be present -> there is a danger of explosion!

10
Do not vacuum up burning or smoking objects such as cigarees, matches or hot ashes.
Do not use the device without the dust bin and filter.
Turn o the main power switch before cleaning the brush roller.
Under extreme conditions, baery cell leaks can occur. If leaked liquid gets on the skin, wash the aected areas
quickly with soap and water. If leaked liquid gets into your eyes, do not rub the eyes. Rinse them immediately
with clean water. Seek assistance from a doctor immediately.
Only use the supplied base station and power adapter for charging.
Move cables from other devices outside the area to be cleaned.
Do not use the robot vacuum cleaner in a room where an infant or child is sleeping.
Do not use the robot vacuum cleaner in an area where burning candles or fragile objects are on the floor to be
cleaned.
Do not use the robot vacuum cleaner in a room where burning candles are placed on furniture that the robot
vacuum cleaner might accidentally bump into.
Do not use the robot vacuum cleaner in rooms or buildings with motion detectors or alarm monitoring.
Do not allow children or animals to sit on the robot vacuum cleaner.
Do not use the robot to transport objects.
WARNING!
The power adapter is designed for operation at 230 V / 50 Hz AC voltage. Only plug the power adapter into
an undamaged and easily accessible socket.
Do not vacuum up hard, sharp objects with this product, as they may cause damage.

11
EN
FR
IT
NL
PL
Make sure that there are no children or pets in the room or that they do not have access to the room that is
being cleaned to avoid the risk of injury.
To avoid injury and / or damage to the device, do not vacuum up hot, poisonous or sharp objects or liquids.
CAUTION
To avoid damage, remove fragile objects, loose cables, and small objects that could fall over.
Laser and laser classification
The robot vacuum cleaner is equipped with a laser-controlled navigation unit. The iR laser is classified as a Laser Class
1 product according to DIN EN 60825-1: 2015-07:
The following safety instructions must be observed with regard to the laser beam:
Do not aim the laser beam at people or animals.
Do not look at the direct or reflected laser beam.
Any form of manipulation of the laser unit is strictly prohibited.
The camera on the laser unit is used exclusively for the evaluation of the reflected laser signals for map
generation and does not detect any images in the conventional sense.

12
3.1 Regulations
WEEE Directive
Directive 2012/19/EU on Waste Electrical and Electronic Equipment RoHS.
Directive 2011/65 / EU of the European Parliament and of the Council of 8 June 2011 on the restriction of the use of
certain hazardous substances in electrical and electronic equipment (OJ L 174, 1 July, 2011).
ErP Directive on ecodesign for energy-related products:
The Ecodesign Directive 2009/125/EC is a European Directive which sets out the requirements for the environmentally
sound design of "energy-related products" (ErP) in the common internal market of the European Union. When it came
into force, it replaced Directive 2005/32/EC of 6 July 2005, also known as the Energy Using Products (EuP) Directive.
For the TECHNIMAX SR1: ENER 7 Chargers and Power Supplies Regulation (EC) 278/2009.
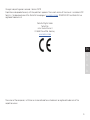
Declaration of Conformity
TechniSat hereby declares that the TECHNIMAX SR1 radio equipment type complies with Directive 2014/53/EU. The
complete text of the EU Declaration of Conformity is available at the following web address:
hp://konf.tsat.de/?ID=22233
TechniSat accepts no liability for product damage as a result of external influences, wear or improper handling,
unauthorised repairs, modifications or accidents.

13
EN
FR
IT
NL
PL
Changes and printingerrors reserved. Version 09/19.
Duplication and reproduction only with the publisher's approval. The current version of the manual is available in PDF
format in the download area of the TechniSat homepage at www.technisat.de. TECHNIMAX SR1 and TechniSat are
registered trademarks of
TechniSat Digital GmbH
TechniPark
Julius-Saxler-Strasse 3
D-54550 Daun/Eifel, Germany
www.technisat.de
The names of the companies, institutions or makes referred to are trademarks or registered trademarks of the
respective owners.

14
3.2 Service instructions
This product is quality-tested and provided with the legal warranty period of 24 months as from the date of
purchase. Natural wear, i.e. any impairment of the robot vacuum cleaner due to wear, which is not caused
by defects in the materials, is excluded from the warranty. The warranty is only valid if the product is used as
intended. Please keep your receipt as proof of purchase. In the event of warranty claims please contact the
product dealer.
Should you experience a problem with this device, or for queries and information, our Technical Hotline is
available:
Mon. - Fri. 8:00 am - 6:00 pm on:
+49 (0) 3925 9220 1800.
Repairs can also be ordered directly online at www.technisat.de/reparatur.
If the device needs to be returned, please only use the following address:
TechniSat Digital GmbH
Service Center
Nordstr. 4a
39418 Stassfurt, Germany

15
EN
FR
IT
NL
PL
3.3 Disposal instructions
The device packaging consists exclusively of recyclable materials. Please sort the components appropriately, and
dispose of them in line with your local waste disposal regulations. At the end of its service life, this device must not
be disposed of with your regular household waste. It must be taken to a recycling collection point for electrical and
electronic equipment.
This is indicated by the symbol on the product, the instruction manual or the packaging.
The materials are recyclable according to their labelling.
An important contribution is made to our environment by recycling, recovery of materials or other kinds of recycling
for old devices.
Please ask local authorities for the location of the relevant disposal point. Please ensure that electronic waste is not
disposed of in your regular household refuse, but is correctly disposed of either in special bins for problem waste, or
at collection points in the retail trade.
Baeries/rechargeable baeries may contain poisonous substances which cause harm to health and the environment.
Baeries/rechargeable baeries are subject to European Directive 2006/66/EC. They must not be disposed of with
normal household waste.
Disposal of packaging:
Your new device was protected by packaging on its way to you. All materials used are environmentally friendly
and recyclable. Please collaborate and dispose of the packaging in an environmentally-friendly way. Ask for
information from your dealer regarding current disposal means or your local disposal facility.

16
Risk of suocation! Keep packaging and parts thereof away from children. Risk of suocation by films and
other packaging materials.
Device disposal:
Old devices constitute valuable waste. Valuable raw materials can be recovered through environmentally-friendly
disposal. Consult your town or local authority as to the possibilities for environmentally-friendly and proper disposal of
the device. Prior to disposal of the device, remove the baeries/rechargeable baeries contained therein.
This device is identified in accordance with the Waste Electrical and Electronic Equipment (WEEE)
Directive2012/19/EU.
At the end of its service life, this device must not be disposed of with your regular household waste. It must
be taken to a recycling collection point for electrical and electronic equipment. The symbol on the product,
the operating manual or the packaging indicates this. The materials are recyclable according to their labelling.
An important contribution is made to our environment by recycling, recovery of materials or other kinds of
recycling for old devices.
Important information for the disposal of baeries/rechargeable baeries: baeries/rechargeable baeries may
contain poisonous substances that harm the environment. Therefore you must always comply with applicable
statutory provisions when you dispose of baeries/rechargeable baeries. Never dispose of baeries in normal
household waste. Used baeries/rechargeable baeries can be disposed of at your specialist retailer or at
special disposal sites free of charge.

17
EN
FR
IT
NL
PL
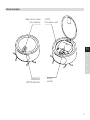
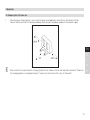
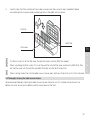
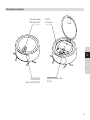
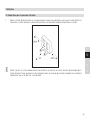
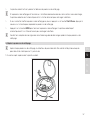
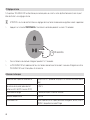
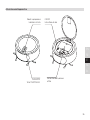
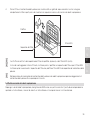
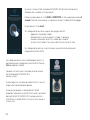
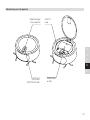
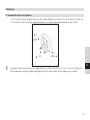
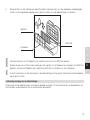
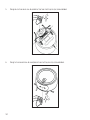
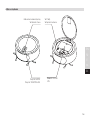
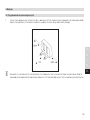
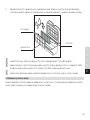
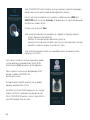
4 Device description
Dust bin
and filter
ON/OFF
Mains power switch
HOME buon
START/PAUSE buon
Robot vacuum cleaner
Status indicators

18
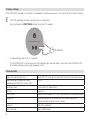
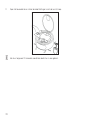
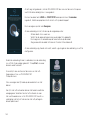
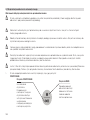
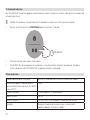
4.1 Robot vacuum cleaner status indicator
Baery
The baery icon informs you of the baery status. If it lights up, it means that the baery level is sucient.
When it starts to flash, the robot vacuum cleaner needs to be charged via the base station. When the baery
runs low during cleaning, the robot vacuum cleaner automatically moves to the base station and continues
cleaning once the baery is fully charged.
WiFi connection
The blue WiFi symbol lights up when the robot vacuum cleaner has connected to the WiFi via the TECHNIMAX
app and the robot vacuum cleaner can be found on the WiFi network. If the symbol is not lit, the robot
vacuum cleaner is not connected to the WiFi.
Dust bin full
The dust bin icon lights up permanently when the dust bin needs to be emptied. The robot vacuum cleaner
will continue cleaning even when the dust bin is full.
Error
If this symbol flashes, there is a problem and the robot vacuum cleaner cannot start cleaning. Possible reasons
are a missing dust bin, or a brush geing stuck. Please refer to the information in Section 7 “Troubleshooting“,
on page 33.

19
EN
FR
IT
NL
PL
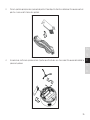
5 Operation
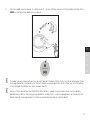
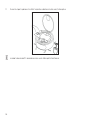
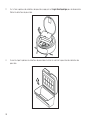
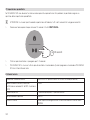
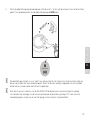
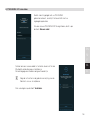
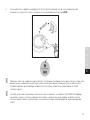
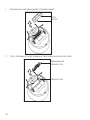
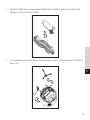
5.1 Preparing for first-time use
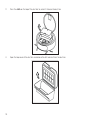
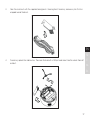
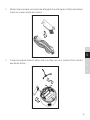
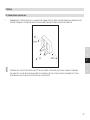
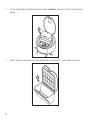
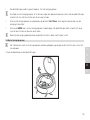
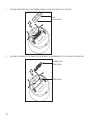
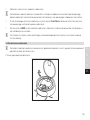
1. Place the base station against a wall such that there are no obstacles within 50 cm of the base station.
Connect the base station to the power adapter, then connect the power adapter to the power supply.
Make sure that the metal contacts (charging contacts) on the base station are free of dirt and dust. Otherwise,
the charging process can end prematurely. If necessary, clean them with a dry, lint-free cloth.

20
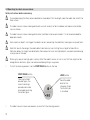
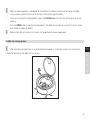
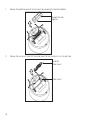
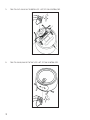
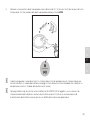
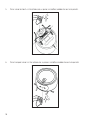
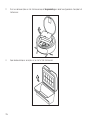
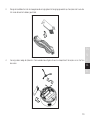
2. Open the top cover and switch on the robot vacuum cleaner using the power switch.
The robot takes about 20 seconds to be ready for use.
La page est en cours de chargement...
La page est en cours de chargement...
La page est en cours de chargement...
La page est en cours de chargement...
La page est en cours de chargement...
La page est en cours de chargement...
La page est en cours de chargement...
La page est en cours de chargement...
La page est en cours de chargement...
La page est en cours de chargement...
La page est en cours de chargement...
La page est en cours de chargement...
La page est en cours de chargement...
La page est en cours de chargement...
La page est en cours de chargement...
La page est en cours de chargement...
La page est en cours de chargement...
La page est en cours de chargement...
La page est en cours de chargement...
La page est en cours de chargement...
La page est en cours de chargement...
La page est en cours de chargement...
La page est en cours de chargement...
La page est en cours de chargement...
La page est en cours de chargement...
La page est en cours de chargement...
La page est en cours de chargement...
La page est en cours de chargement...
La page est en cours de chargement...
La page est en cours de chargement...
La page est en cours de chargement...
La page est en cours de chargement...
La page est en cours de chargement...
La page est en cours de chargement...
La page est en cours de chargement...
La page est en cours de chargement...
La page est en cours de chargement...
La page est en cours de chargement...
La page est en cours de chargement...
La page est en cours de chargement...
La page est en cours de chargement...
La page est en cours de chargement...
La page est en cours de chargement...
La page est en cours de chargement...
La page est en cours de chargement...
La page est en cours de chargement...
La page est en cours de chargement...
La page est en cours de chargement...
La page est en cours de chargement...
La page est en cours de chargement...
La page est en cours de chargement...
La page est en cours de chargement...
La page est en cours de chargement...
La page est en cours de chargement...
La page est en cours de chargement...
La page est en cours de chargement...
La page est en cours de chargement...
La page est en cours de chargement...
La page est en cours de chargement...
La page est en cours de chargement...
La page est en cours de chargement...
La page est en cours de chargement...
La page est en cours de chargement...
La page est en cours de chargement...
La page est en cours de chargement...
La page est en cours de chargement...
La page est en cours de chargement...
La page est en cours de chargement...
La page est en cours de chargement...
La page est en cours de chargement...
La page est en cours de chargement...
La page est en cours de chargement...
La page est en cours de chargement...
La page est en cours de chargement...
La page est en cours de chargement...
La page est en cours de chargement...
La page est en cours de chargement...
La page est en cours de chargement...
La page est en cours de chargement...
La page est en cours de chargement...
La page est en cours de chargement...
La page est en cours de chargement...
La page est en cours de chargement...
La page est en cours de chargement...
La page est en cours de chargement...
La page est en cours de chargement...
La page est en cours de chargement...
La page est en cours de chargement...
La page est en cours de chargement...
La page est en cours de chargement...
La page est en cours de chargement...
La page est en cours de chargement...
La page est en cours de chargement...
La page est en cours de chargement...
La page est en cours de chargement...
La page est en cours de chargement...
La page est en cours de chargement...
La page est en cours de chargement...
La page est en cours de chargement...
La page est en cours de chargement...
La page est en cours de chargement...
La page est en cours de chargement...
La page est en cours de chargement...
La page est en cours de chargement...
La page est en cours de chargement...
La page est en cours de chargement...
La page est en cours de chargement...
La page est en cours de chargement...
La page est en cours de chargement...
La page est en cours de chargement...
La page est en cours de chargement...
La page est en cours de chargement...
La page est en cours de chargement...
La page est en cours de chargement...
La page est en cours de chargement...
La page est en cours de chargement...
La page est en cours de chargement...
La page est en cours de chargement...
La page est en cours de chargement...
La page est en cours de chargement...
La page est en cours de chargement...
La page est en cours de chargement...
La page est en cours de chargement...
La page est en cours de chargement...
La page est en cours de chargement...
La page est en cours de chargement...
La page est en cours de chargement...
La page est en cours de chargement...
La page est en cours de chargement...
La page est en cours de chargement...
La page est en cours de chargement...
La page est en cours de chargement...
La page est en cours de chargement...
La page est en cours de chargement...
La page est en cours de chargement...
La page est en cours de chargement...
La page est en cours de chargement...
La page est en cours de chargement...
La page est en cours de chargement...
La page est en cours de chargement...
La page est en cours de chargement...
La page est en cours de chargement...
La page est en cours de chargement...
La page est en cours de chargement...
La page est en cours de chargement...
La page est en cours de chargement...
La page est en cours de chargement...
La page est en cours de chargement...
La page est en cours de chargement...
La page est en cours de chargement...
La page est en cours de chargement...
La page est en cours de chargement...
La page est en cours de chargement...
La page est en cours de chargement...
La page est en cours de chargement...
La page est en cours de chargement...
-
 1
1
-
 2
2
-
 3
3
-
 4
4
-
 5
5
-
 6
6
-
 7
7
-
 8
8
-
 9
9
-
 10
10
-
 11
11
-
 12
12
-
 13
13
-
 14
14
-
 15
15
-
 16
16
-
 17
17
-
 18
18
-
 19
19
-
 20
20
-
 21
21
-
 22
22
-
 23
23
-
 24
24
-
 25
25
-
 26
26
-
 27
27
-
 28
28
-
 29
29
-
 30
30
-
 31
31
-
 32
32
-
 33
33
-
 34
34
-
 35
35
-
 36
36
-
 37
37
-
 38
38
-
 39
39
-
 40
40
-
 41
41
-
 42
42
-
 43
43
-
 44
44
-
 45
45
-
 46
46
-
 47
47
-
 48
48
-
 49
49
-
 50
50
-
 51
51
-
 52
52
-
 53
53
-
 54
54
-
 55
55
-
 56
56
-
 57
57
-
 58
58
-
 59
59
-
 60
60
-
 61
61
-
 62
62
-
 63
63
-
 64
64
-
 65
65
-
 66
66
-
 67
67
-
 68
68
-
 69
69
-
 70
70
-
 71
71
-
 72
72
-
 73
73
-
 74
74
-
 75
75
-
 76
76
-
 77
77
-
 78
78
-
 79
79
-
 80
80
-
 81
81
-
 82
82
-
 83
83
-
 84
84
-
 85
85
-
 86
86
-
 87
87
-
 88
88
-
 89
89
-
 90
90
-
 91
91
-
 92
92
-
 93
93
-
 94
94
-
 95
95
-
 96
96
-
 97
97
-
 98
98
-
 99
99
-
 100
100
-
 101
101
-
 102
102
-
 103
103
-
 104
104
-
 105
105
-
 106
106
-
 107
107
-
 108
108
-
 109
109
-
 110
110
-
 111
111
-
 112
112
-
 113
113
-
 114
114
-
 115
115
-
 116
116
-
 117
117
-
 118
118
-
 119
119
-
 120
120
-
 121
121
-
 122
122
-
 123
123
-
 124
124
-
 125
125
-
 126
126
-
 127
127
-
 128
128
-
 129
129
-
 130
130
-
 131
131
-
 132
132
-
 133
133
-
 134
134
-
 135
135
-
 136
136
-
 137
137
-
 138
138
-
 139
139
-
 140
140
-
 141
141
-
 142
142
-
 143
143
-
 144
144
-
 145
145
-
 146
146
-
 147
147
-
 148
148
-
 149
149
-
 150
150
-
 151
151
-
 152
152
-
 153
153
-
 154
154
-
 155
155
-
 156
156
-
 157
157
-
 158
158
-
 159
159
-
 160
160
-
 161
161
-
 162
162
-
 163
163
-
 164
164
-
 165
165
-
 166
166
-
 167
167
-
 168
168
-
 169
169
-
 170
170
-
 171
171
-
 172
172
-
 173
173
-
 174
174
-
 175
175
-
 176
176


TechniSat TECHNIMAX SR1 Manuel utilisateur
- Taper
- Manuel utilisateur
dans d''autres langues
- italiano: TechniSat TECHNIMAX SR1 Manuale utente
- English: TechniSat TECHNIMAX SR1 User manual
- Nederlands: TechniSat TECHNIMAX SR1 Handleiding
- polski: TechniSat TECHNIMAX SR1 Instrukcja obsługi
Documents connexes
Autres documents
-
Electrolux PI91-5SGM Manuel utilisateur
-
Amica VM 9002 Joran PET Manuel utilisateur
-
Miele ScoutRX2 Le manuel du propriétaire
-
 Eziclean Aqua connect X850 Manuel utilisateur
-
Samsung SR10M703WWW Manuel utilisateur
-
-
Electrolux PI81-4SWN Manuel utilisateur
-
Black & Decker HRV425BL Manuel utilisateur
-
-
Hoover HGO330HC 011 Manuel utilisateur
