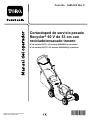
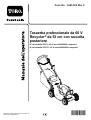
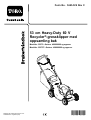
Toro 53cm Heavy-Duty 60V Recycler/Rear Bagger Lawn Mower Manuel utilisateur
- Catégorie
- Tondeuses à gazon
- Taper
- Manuel utilisateur
Ce manuel convient également à

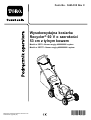
FormNo.3443-337RevC
53cmHeavy-Duty60VRecycler®/RearBaggerLawn
Mower
22275/T
Professioneller60VRasenmähermitRecycler®bzw.
Heckfänger(53cm)
22275/T
CortacéspeddeserviciopesadoRecycler®60Vde53
cmconreciclado/ensacadotrasero
22275/T
TondeusegrandrendementRecycler®60Vde53
cm/bacarrière
22275/T
Tosaerbaprofessionaleda60VRecycler®da53cm
conraccoltaposteriore
22275/T
Zwaaruitgevoerde60Vgazonmaaiervan53cmmet
Recycler®/grasvanger
22275/T
53cmHeavy-Duty60VRecycler®-gressklippermed
oppsamlingbak
22275/T
WysokowydajnakosiarkaRecycler®60Voszerokości
53cmztylnymkoszem
22275/T
Recycler®-gräsklippareförtungdriftmedbakre
uppsamlare,53cm,60V
22275/T
www.T oro.com.
*3443-337*


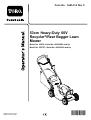
FormNo.3443-314RevC
53cmHeavy-Duty60V
Recycler
®
/RearBaggerLawn
Mower
ModelNo.22275—SerialNo.400000000andUp
ModelNo.22275T—SerialNo.400000000andUp
Registeratwww.T oro.com.
OriginalInstructions(EN)
*3443-314*

ThisproductcomplieswithallrelevantEuropean
directives;fordetails,pleaseseetheseparateproduct
specicDeclarationofConformity(DOC)sheet.
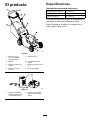
Introduction
Thisrotary-blade,walk-behindlawnmoweris
intendedtobeusedbyresidentialhomeowners
orprofessional,hiredoperators.Itisdesigned
primarilyforcuttinggrassonwell-maintainedlawnson
residentialorcommercialproperties.Itisdesignedto
uselithium-ionbatterypackModels81875(provided
withModel22275),81825,81850,or81860.These
batterypacksaredesignedtobechargedonlyby
batterychargerModels81805(providedwithModel
22275)or81802.Usingtheseproductsforpurposes
otherthantheirintendedusecouldprovedangerous
toyouandbystanders.
Model22275Tdoesnotincludeabatteryora
charger.
Visitwww.Toro.comformoreinformation,including
safetytips,trainingmaterials,accessoryinformation,
helpndingadealer,ortoregisteryourproduct.
Wheneveryouneedservice,genuinethe
manufacturerparts,oradditionalinformation,contact
anAuthorizedServiceDealerorthemanufacturer
CustomerServiceandhavethemodelandserial
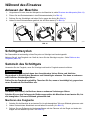
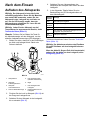
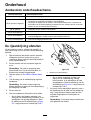
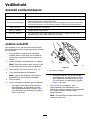
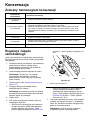
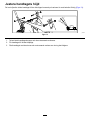
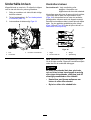
numbersofyourproductready.Figure1identies
thelocationofthemodelandserialnumbersonthe
product.Writethenumbersinthespaceprovided.
Important:Withyourmobiledevice,youcan
scantheQRcodeontheserialnumberdecal(if
equipped)toaccesswarranty,parts,andother
productinformation
g226623
Figure1
1.Modelandserialnumberlocation
ModelNo.
SerialNo.
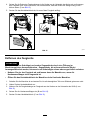
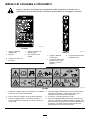
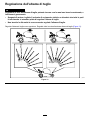
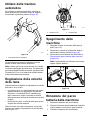
Thismanualidentiespotentialhazardsandhas
safetymessagesidentiedbythesafety-alertsymbol
(Figure2),whichsignalsahazardthatmaycause
seriousinjuryordeathifyoudonotfollowthe
recommendedprecautions.
g000502
Figure2
Safety-alertsymbol
Thismanualuses2wordstohighlightinformation.
Importantcallsattentiontospecialmechanical
informationandNoteemphasizesgeneralinformation
worthyofspecialattention.
©2021—TheToro®Company
8111LyndaleAvenueSouth
Bloomington,MN55420
2
Contactusatwww.Toro.com.
PrintedintheUSA
AllRightsReserved

Contents
Safety.......................................................................3
SafetyandInstructionalDecals..........................6
Setup........................................................................8
1MountingtheBatteryCharger
(Optional)........................................................8
2RemovingtheCableGuard..............................9
3AssemblingtheLowerHandle........................10
4InstallingtheHandle.......................................11
5InstallingtheCableGuard...............................11
6AssemblingtheGrassBag.............................12
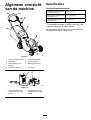
ProductOverview...................................................13
Specications..................................................13
BeforeOperation.................................................14
InstallingtheBatteryPack................................14
AdjustingtheCuttingHeight.............................15
AdjustingtheHandleHeight.............................16
DuringOperation.................................................17
StartingtheMachine.........................................17
RecyclingtheClippings....................................17
BaggingtheClippings.......................................17
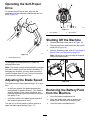
OperatingtheSelf-PropelDrive........................19
AdjustingtheBladeSpeed................................19
ShuttingOfftheMachine..................................19
RemovingtheBatteryPackfromthe
Machine........................................................19
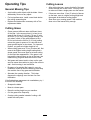
OperatingTips.................................................20
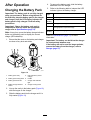
AfterOperation....................................................21
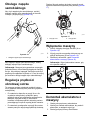
ChargingtheBatteryPack................................21
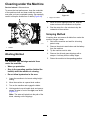
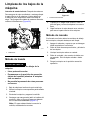
CleaningundertheMachine.............................22
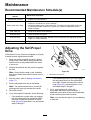
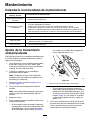
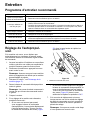
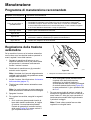
Maintenance...........................................................23
RecommendedMaintenanceSchedule(s)...........23
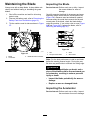
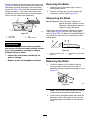
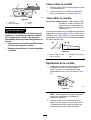
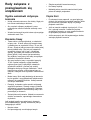
AdjustingtheSelf-PropelDrive.........................23
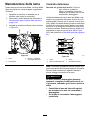
MaintainingtheBlade.......................................24
CleaningtheWheels.........................................26
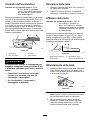
PreparingtheBatteryPackfor
Recycling......................................................26
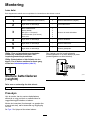
Storage...................................................................27
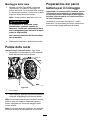
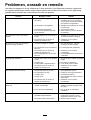
Troubleshooting......................................................28
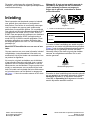
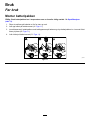
Safety
IMPORTANTSAFETY
INSTRUCTIONS
WARNING—Whenusinganelectricmachine,always
readandfollowbasicsafetywarningsandinstructions
toreducetheriskofre,electricshock,orinjury,
includingthefollowing:
I.Training
1.Theoperatorofthemachineisresponsiblefor
anyaccidentsorhazardsoccurringtoothersor
theirproperty.
2.Donotallowchildrentouseorplaywiththe
machine,batterypack,orthebatterycharger;
localregulationsmayrestricttheageofthe
operator.
3.Donotallowchildrenoruntrainedpeopleto
operateorservicethisdevice.Allowonlypeople
whoareresponsible,trained,familiarwiththe
instructions,andphysicallycapabletooperate
orservicethedevice.
4.Beforeusingthemachine,batterypack,and
batterycharger,readalltheinstructionsand
cautionarymarkingsontheseproducts.
5.Becomefamiliarwiththecontrolsandproper
useofthemachine,batterypack,andbattery
charger.
II.Preparation
1.Keepbystanders,especiallychildrenandpets,
outoftheoperatingarea.
2.Donotoperatethemachinewithoutallguards
andsafetydevices,suchasdeectorsandgrass
catchers,inplaceandfunctioningproperlyon
themachine.
3.Inspecttheareawhereyouwillusethemachine
andremoveallobjectsthatcouldinterferewith
theoperationofthemachineorthatthemachine
couldthrow.
4.Beforeusingthemachine,ensurethattheblade,
bladebolt,andbladeassemblyarenotwornor
damaged.Replaceanydamagedorunreadable
labels.
5.UseonlythebatterypackspeciedbyToro.
Usingotheraccessoriesandattachmentsmay
increasetheriskofinjuryandre.
6.Pluggingthebatterychargerintoanoutletthat
isnot100to240Vcancauseareorelectric
shock.Donotplugthebatterychargerintoan
outletotherthan100to240V.Foradifferent
styleofconnection,useanattachmentplug
3

adapterofthepropercongurationforthepower
outletifneeded.
7.Donotuseadamagedormodiedbattery
packorbatterycharger,whichmayexhibit
unpredictablebehaviorthatresultsinre,
explosion,orriskofinjury.
8.Ifthesupplycordtothebatterychargeris
damaged,contactanAuthorizedServiceDealer
toreplaceit.
9.Donotusenon-rechargeablebatteries.
10.Chargethebatterypackwithonlythebattery
chargerspeciedbyT oro.Achargersuitablefor
1typeofbatterypackmaycreateariskofre
whenusedwithanotherbatterypack.
11.Chargethebatterypackinawell-ventilatedarea
only.
12.Donotexposeabatterypackorbatterycharger
toreortotemperatureshigherthan68°C
(154°F).
13.Followallcharginginstructionsanddo
notchargethebatterypackoutsideofthe
temperaturerangespeciedintheinstructions.
Otherwise,youmaydamagethebatterypack
andincreasetheriskofre.
14.Dressproperly—Wearappropriateclothing,
includingeyeprotection;longpants;substantial,
slip-resistantfootwear(notbarefootorwearing
sandals);andhearingprotection.Tiebacklong
hairanddonotwearlooseclothingorloose
jewelrythatcangetcaughtinmovingparts.
Wearadustmaskindustyoperatingconditions.
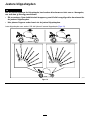
III.Operation
1.Contactwiththemovingbladewillcauseserious
injury.Keepyourhandsandfeetawayfromthe
cuttingareaandallmovingpartsofthemachine.
Keepclearofanydischargeopening.
2.Usingthismachineforpurposesotherthanits
intendedusecouldprovedangeroustoyouand
bystanders.
3.Disengagetheself-propeldrive(ifequipped)
beforestartingthemachine.
4.Donottiltthemachinewhenstartingthemotor.
5.Preventunintentionalstarting—Ensurethatthe
electric-startbuttonisremovedfromtheignition
beforeconnectingthebatterypackandhandling
themachine.
6.Useyourfullattentionwhileoperatingthe
machine.Donotengageinanyactivitythat
causesdistractions;otherwise,injuryorproperty
damagemayoccur.
7.Whenyoureleasetheblade-controlbar,the
motorshouldshutoffandthebladeshould
stopwithin3seconds.Ifnot,stopusingyour
machineimmediatelyandcontactanAuthorized
ServiceDealer.
8.Stopthemachine,removetheelectric-start
button,removethebatterypackfromthe
machine,andwaitforallmovementtostop
beforeadjusting,servicing,cleaning,orstoring
themachine.
9.Removethebatterypackandelectric-start
buttonfromthemachinewheneveryouleaveit
unattendedorbeforechangingaccessories.
10.Donotforcethemachine—Allowthemachineto
dothejobbetterandsaferattherateforwhichit
wasdesigned.
11.Stayalert—Watchwhatyouaredoinganduse
commonsensewhenoperatingthemachine.
Donotusethemachinewhileill,tired,orunder
theinuenceofalcoholordrugs.
12.Operatethemachineonlyingoodvisibilityand
appropriateweatherconditions.Donotoperate
themachinewhenthereistheriskoflightning.
13.Useextremecautionwhenreversingorpulling
themachinetowardyou.
14.Keepproperfootingandbalanceatalltimes,
especiallyonslopes.Mowacrosstheface
ofslopes,neverupanddown.Useextreme
cautionwhenchangingdirectionsonslopes.Do
notmowexceedinglysteepslopes.Walk,never
runwiththemachine.
15.Donotdirectthedischargematerialtoward
anyone.Avoiddischargingmaterialagainsta
wallorobstruction;materialmayricochettoward
you.Stoptheblade(s)whencrossinggravel
surfaces.
16.Watchforholes,ruts,bumps,rocks,orother
hiddenobjects.Uneventerraincouldcauseyou
toloseyourbalanceorfooting.
17.Wetgrassorleavescancauseseriousinjuryif
youslipandcontacttheblade.Avoidmowingin
wetconditionsorwhenitisraining.
18.Ifthemachinestrikesanobjectorstartsto
vibrate,immediatelyshutoffthemachine,
removetheelectric-startbutton,removethe
batterypack,andwaitforallmovementtostop
beforeexaminingthemachinefordamage.
Makeallnecessaryrepairsbeforeresuming
operation.
19.Stopthemachineandremovetheelectric-start
buttonbeforeloadingthemachineforhauling.
20.Underabusiveconditions,thebatterypackmay
ejectliquid;avoidcontact.Ifyouaccidently
comeintocontactwiththeliquid,ushwith
water.Iftheliquidcontactsyoureyes,seek
medicalhelp.Liquidejectedfromthebattery
packmaycauseirritationorburns.
4

IV.MaintenanceandStorage
1.Stopthemachine,removetheelectric-start
button,removethebatterypackfromthe
machine,andwaitforallmovementtostop
beforeadjusting,servicing,cleaning,orstoring
themachine.
2.Donotattempttorepairthemachineexceptas
indicatedintheinstructions.HaveanAuthorized
ServiceDealerperformserviceonthemachine
usingidenticalreplacementparts.
3.Wearglovesandeyeprotectionwhenservicing
themachine.
4.Sharpenadullbladeonbothendstomaintain
balance.Cleanthebladeandensurethatitis
balanced.
5.Replacethebladeifitisbent,worn,orcracked.
Anunbalancedbladecausesvibration,which
coulddamagethemotororcausepersonal
injury.
6.Whenservicingtheblade,beawarethatthe
bladecanstillmoveeventhoughthepower
sourceisoff.
7.Checkthegrasscollectionbagfrequentlyfor
deteriorationorwear,andreplaceawornbag
withaT oro[replacement]bag.
8.Forbestperformance,useonlygenuineToro
replacementpartsandaccessories.Other
replacementpartsandaccessoriescouldbe
dangerous,andsuchusecouldvoidtheproduct
warranty.
9.Maintainthemachine—Keepcuttingedges
sharpandcleanforthebestandsafest
performance.Keephandlesdry,clean,andfree
fromoilandgrease.Keepguardsinplaceandin
workingorder.Keepbladessharp.Useidentical
replacementbladesonly.
10.Checkthemachinefordamagedparts—Ifthere
aredamagedguardsorotherparts,determine
whetherthemachinewilloperateproperly.
Checkformisalignedandbindingmovingparts,
brokenparts,mounting,andanyothercondition
thatmayaffectitsoperation.Unlessindicated
intheinstructions,haveanAuthorizedService
Dealerrepairorreplaceadamagedguardor
part.
11.Whenthebatterypackisnotinuse,keepit
awayfrommetalobjectssuchaspaperclips,
coins,keys,nails,andscrewsthatcanmakea
connectionfrom1terminaltoanother.Shorting
thebatteryterminalsmaycauseburnsorare.
12.Checkthebladeandmotormountingbolts
frequentlyfortightness.
13.Whenyouarenotusingthemachine,storeit
indoorsinadry,secureplaceoutofthereach
ofchildren.
14.CAUTION—Amistreatedbatterypackmay
presentariskofreorchemicalburn.Donot
disassemblethebatterypack.Donotheatthe
batterypackabove68°C(154°F)orincinerate
it.ReplacethebatterypackwithagenuineT oro
batterypackonly;usinganothertypeofbattery
packmaycauseareorexplosion.Keep
batterypacksoutofthereachofchildrenand
intheoriginalpackaginguntilyouarereadyto
usethem.
15.Donotdisposeofthebatteryinare.The
cellmayexplode.Checkwithlocalcodesfor
possiblespecialdisposalinstructions.
SAVETHESE
INSTRUCTIONS
5

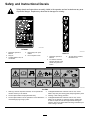
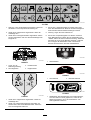
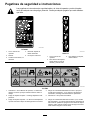
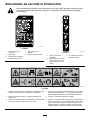
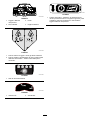
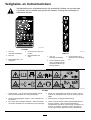
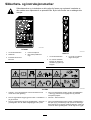
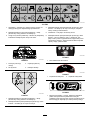
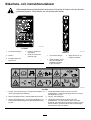
SafetyandInstructionalDecals
Safetydecalsandinstructionsareeasilyvisibletotheoperatorandarelocatednearanyarea
ofpotentialdanger.Replaceanydecalthatisdamagedormissing.
decal137-9490
137-9490
1.ReadtheOperator’s
Manual.
4.Keepawayfromopen
ames.
2.Recycle5.Donotexposetorain.
3.Containslithiumions;do
notdiscard.
decal144-3175
144-3175
1.ReadtheOperator’s
Manual.
3.Toshutoffthemachine,
releasethebar.
2.Tostartthemachine,
squeezethebartothe
handleandpressthe
button.
decal116-7583
116-7583
1.Warning—readtheOperator’sManual;donotoperatethis
machineunlessyouaretrained.
4.Cutting/dismembermenthazardofhandorfoot,mower
blade—stayawayfrommovingparts;keepallguardsinplace.
2.Thrownobjecthazard—keepbystandersaway.5.Warning—wearhearingprotection.
3.Thrownobjecthazard—donotoperatethemowerwithoutthe
reardischargeplugorbaginplace.
6.Cutting/dismembermenthazardofhandorfoot,mower
blade—donotoperateupanddownslopes;operateside
tosideonslopes;shutofftheenginebeforeleavingthe
machine;pickupanydebrisbeforemowing;lookbehindyou
whenmovinginreverse.
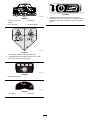
6

decal140-8472
140-8472
1.ReadtheOperator’s
Manual.
3.Residential
2.Donotdiscard.4.Doubleinsulated
decal112-8760
112-8760
1.Thrownobjecthazard—keepbystandersaway.
2.Cutting/dismembermenthazardofhandorfoot,mower
blade—stayawayfrommovingparts.
decal137-9461
137-9461
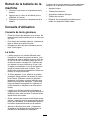
1.Batterychargestatus
decal134-4691
134-4691
1.Autospeed2.Maxspeed
decal131-0822
131-0822
1.Self-propeldrive—Attention;prematurewearofthe
transmissionmayoccurifthebeltisover-tightened;before
servicingorperformingmaintenance,readtheOperator's
Manual.
7

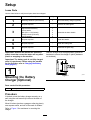
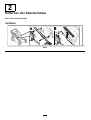
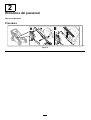
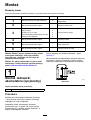
Setup
LooseParts
Usethechartbelowtoverifythatallpartshavebeenshipped.
ProcedureDescription
Qty.
Use
1
Mountinghardware(notincluded)
2
Mountthebatterycharger(optional).
2
Nopartsrequired
–
Removethecableguard.
Upperhandleassembly1
Lowerhandle2
Bolt(5/16x1-3/4inches)
4
Flangelocknut(5/16inch)
4
3
Curvedwasher
8
Assemblethelowerhandle.
4
Nopartsrequired
–
Installthehandle.
5
Nopartsrequired
–
Installthecableguard.
6
Nopartsrequired
–
Assemblethegrassbag.
Important:Removeanddiscardtheprotective
plasticsheetthatcoversthemotorandanyother
plasticorwrappingonthemachine.
Important:Thebatterypackisnotfullycharged
whenitispurchased.Beforeusingthemachine
forthersttime,refertoChargingtheBattery
Pack(page21).
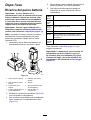
1
MountingtheBattery
Charger(Optional)
Partsneededforthisprocedure:
2
Mountinghardware(notincluded)
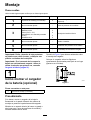
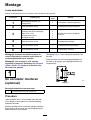
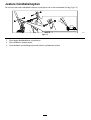
Procedure
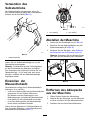
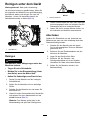
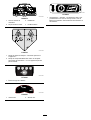
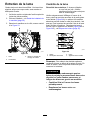
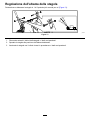
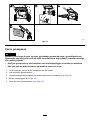
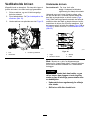
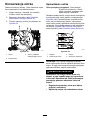
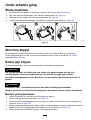
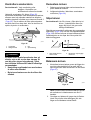
Ifdesired,mountthebatterychargersecurelyona
wallusingthewall-mountkeyholesonthebackof
thecharger.
Mountitindoors(suchasagarageorotherdryplace),
nearapoweroutlet,andoutofthereachofchildren.
RefertoFigure3forassistanceinmountingthe
charger.
Slidethechargerovertheappropriatelypositioned
hardwaretosecurethechargerinplace(hardware
notincluded).
g290534
Figure3
8

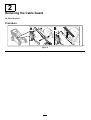
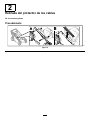
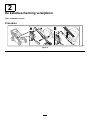
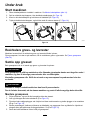
2
RemovingtheCableGuard
NoPartsRequired
Procedure
g328502
Figure4
9

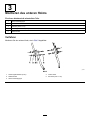
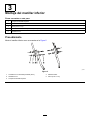
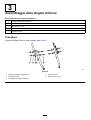
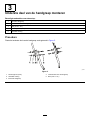
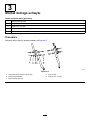
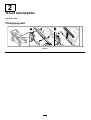
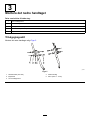
3
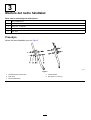
AssemblingtheLowerHandle
Partsneededforthisprocedure:
1Upperhandleassembly
2Lowerhandle
4
Bolt(5/16x1-3/4inches)
4
Flangelocknut(5/16inch)
8
Curvedwasher
Procedure
AssemblethelowerhandleasshowninFigure5.
g340673
Figure5
1.Flangelocknut(5/16inch)
4.Lowerhandle
2.Curvedwasher5.Bolt(5/16x1-3/4inches)
3.Upperhandleassembly
10

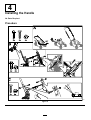
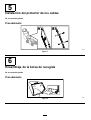
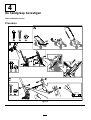
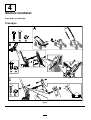
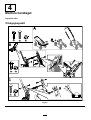
4
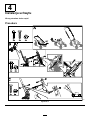
InstallingtheHandle
NoPartsRequired
Procedure
g351011
Figure6
11

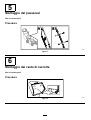
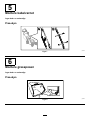
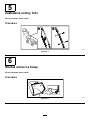
5
InstallingtheCableGuard
NoPartsRequired
Procedure
g350108
Figure7
6
AssemblingtheGrassBag
NoPartsRequired
Procedure
g238450
Figure8
12

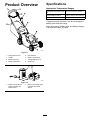
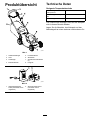
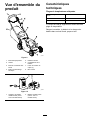
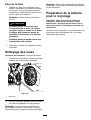
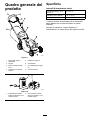
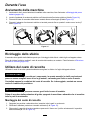
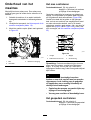
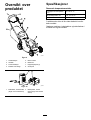
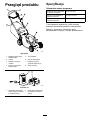
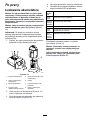
ProductOverview
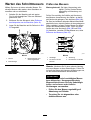
g346507
Figure9
1.Self-propeldrivebar5.Reardeector
2.Handle6.Batterycompartment
3.Blade-controlbar
7.Cutting-heightlever(4)
4.Electric-startbutton
8.Grassbag
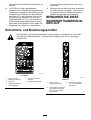
g292995
Figure10
1.BatterychargerModel
81805(includedwith
Model22275)
2.BatterypackModel81875
(includedwithModel
22275)
Specications
AppropriateTemperatureRanges
Charge/storethebatterypack
at
5°C(41°F)to40°C(104°F)*
Usethebatterypackat
-30°C(-22°F)to49°C(120°F)*
Usethemachineat
0°C(32°F)to49°C(120°F)*
*Chargingtimewillincreaseifyoudonotchargethe
batterypackwithinthisrange.
Storethemachine,batterypack,andbatterycharger
inanenclosedclean,dryarea.
13

Operation
BeforeOperation
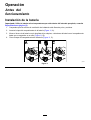
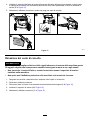
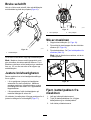
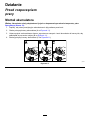
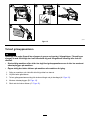
InstallingtheBatteryPack
Important:Usethebatterypackonlyintemperaturesthatarewithintheappropriaterange;refer
toSpecications(page13).
1.Makesurethattheventsonthebatteryareclearofanydustanddebris.
2.Liftupthebattery-compartmentlid(AofFigure11).
3.Lineupthecavityinthebatterypackwiththetongueonthemachineandslidethebatterypackintothe
compartmentuntilitlocksintoplace(BofFigure11).
4.Closethebattery-compartmentlid(CofFigure11).
g303151
Figure11
14

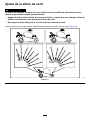
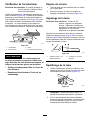
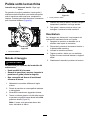
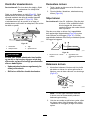
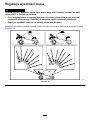
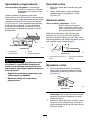
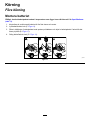
AdjustingtheCuttingHeight
WARNING
Adjustingthecutting-heightleverscouldbringyourhandsintocontactwithamovingblade
andresultinseriousinjury.
•Shutoffthemotor,removetheelectric-startbutton,andwaitforallmovingpartstostop
beforeadjustingthecuttingheight.
•Donotputyourngersunderthehousingwhenadjustingthecuttingheight.
Adjustthecuttingheightasdesired.Setallwheelstothesamecuttingheight(Figure12).
g303150
Figure12
15

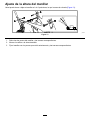
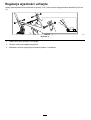
AdjustingtheHandleHeight
Youcanraiseorlowerthehandlein1of3positionsthatismorecomfortableforyou(Figure13).
g331956
Figure13
1.Removebothhandleboltsandcorrespondingnuts.
2.Movethehandletothedesiredheightposition.
3.Securethehandlewiththepreviouslyremovedboltsandcorrespondingnuts.
16

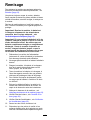
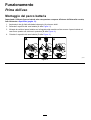
DuringOperation
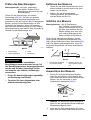
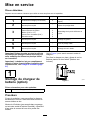
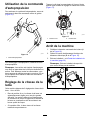
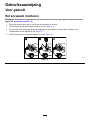
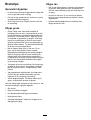
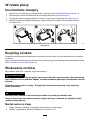
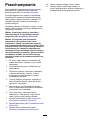
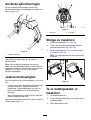
StartingtheMachine
1.Ensurethatthebatterypackisinstalledinthemachine;refertoInstallingtheBatteryPack(page14).
2.Inserttheelectric-startbuttonintotheelectricstarterswitch(AofFigure14).
3.Squeezetheblade-controlbarandholdittothehandle(BofFigure14).
4.Presstheelectric-startbuttonandkeepitpresseduntilthemotorstarts(CofFigure14).
g331970
Figure14
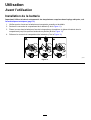
RecyclingtheClippings
Yourmachinecomesfromthefactoryreadytorecyclethegrassandleafclippingsbackintothelawn.
Ifthegrassbagisonthemachine,removeitbeforerecyclingtheclippings.RefertoRemovingtheGrassBag
(page18).
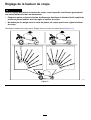
BaggingtheClippings
Usethegrassbagwhenyouwanttocollectgrassandleafclippingsfromthelawn.
WARNING
Aworngrassbagcouldallowsmallstonesandothersimilardebristobethrowntowardyou
orbystanders,resultinginseriouspersonalinjuryordeath.
Checkthegrassbagfrequently.Ifitisdamaged,installanewthemanufacturerreplacement
bag.
WARNING
Thebladesaresharp;contactingthebladescanresultinseriouspersonalinjury.
Shutoffthemachineandwaitforallmovingpartstostopbeforeleavingtheoperatingposition.
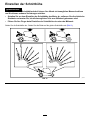
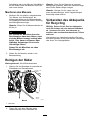
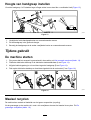
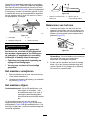
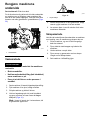
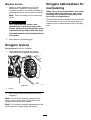
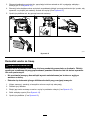
InstallingtheGrassBag
1.Shutoffthemachineandwaitforallmovingpartstostop.
2.Raiseandholdupthereardeector(AofFigure15).
3.Removetherear-dischargeplugbypushinginthelatchwithyourthumbandpullingtheplugoutfrom
themachine(BandCofFigure15).
4.Installthebag-rodendsintothenotchesatthebaseofthehandle,androckthebagbackandforthto
ensurethatthebag-rodendsareseatedatthebottomofbothnotches(DofFigure15).
5.Lowerthereardeectoruntilitrestsonthegrassbag.
17

g303153
Figure15
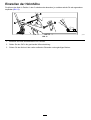
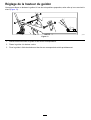
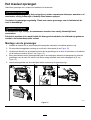
RemovingtheGrassBag
DANGER
Themachinecanthrowgrassclippingsandotherobjectsthroughanopeninginthemachine
housing.Objectsthrownwithenoughforcecouldcauseseriouspersonalinjuryordeathto
youortobystanders.
•Neverremovethegrassbagandthenstartthemachinewithoutthedischargepluginstalled
onthemachine.
•Neveropenthereardeectoronthemachinewhenthemachineisrunning.
1.Shutoffthemachineandwaitforallmovingpartstostop.
2.Raisethereardeector.
3.Removethebagrodonthegrassbagfromthenotchesatthebaseofthehandle(AofFigure15).
4.Installthedischargeplug(BofFigure15).
5.Lowerthereardeector(CofFigure15).
18
La page est en cours de chargement...
La page est en cours de chargement...
La page est en cours de chargement...
La page est en cours de chargement...
La page est en cours de chargement...
La page est en cours de chargement...
La page est en cours de chargement...
La page est en cours de chargement...
La page est en cours de chargement...
La page est en cours de chargement...
La page est en cours de chargement...
La page est en cours de chargement...
La page est en cours de chargement...
La page est en cours de chargement...
La page est en cours de chargement...
La page est en cours de chargement...
La page est en cours de chargement...
La page est en cours de chargement...
La page est en cours de chargement...
La page est en cours de chargement...
La page est en cours de chargement...
La page est en cours de chargement...
La page est en cours de chargement...
La page est en cours de chargement...
La page est en cours de chargement...
La page est en cours de chargement...
La page est en cours de chargement...
La page est en cours de chargement...
La page est en cours de chargement...
La page est en cours de chargement...
La page est en cours de chargement...
La page est en cours de chargement...
La page est en cours de chargement...
La page est en cours de chargement...
La page est en cours de chargement...
La page est en cours de chargement...
La page est en cours de chargement...
La page est en cours de chargement...
La page est en cours de chargement...
La page est en cours de chargement...
La page est en cours de chargement...
La page est en cours de chargement...
La page est en cours de chargement...
La page est en cours de chargement...
La page est en cours de chargement...
La page est en cours de chargement...
La page est en cours de chargement...
La page est en cours de chargement...
La page est en cours de chargement...
La page est en cours de chargement...
La page est en cours de chargement...
La page est en cours de chargement...
La page est en cours de chargement...
La page est en cours de chargement...
La page est en cours de chargement...
La page est en cours de chargement...
La page est en cours de chargement...
La page est en cours de chargement...
La page est en cours de chargement...
La page est en cours de chargement...
La page est en cours de chargement...
La page est en cours de chargement...
La page est en cours de chargement...
La page est en cours de chargement...
La page est en cours de chargement...
La page est en cours de chargement...
La page est en cours de chargement...
La page est en cours de chargement...
La page est en cours de chargement...
La page est en cours de chargement...
La page est en cours de chargement...
La page est en cours de chargement...
La page est en cours de chargement...
La page est en cours de chargement...
La page est en cours de chargement...
La page est en cours de chargement...
La page est en cours de chargement...
La page est en cours de chargement...
La page est en cours de chargement...
La page est en cours de chargement...
La page est en cours de chargement...
La page est en cours de chargement...
La page est en cours de chargement...
La page est en cours de chargement...
La page est en cours de chargement...
La page est en cours de chargement...
La page est en cours de chargement...
La page est en cours de chargement...
La page est en cours de chargement...
La page est en cours de chargement...
La page est en cours de chargement...
La page est en cours de chargement...
La page est en cours de chargement...
La page est en cours de chargement...
La page est en cours de chargement...
La page est en cours de chargement...
La page est en cours de chargement...
La page est en cours de chargement...
La page est en cours de chargement...
La page est en cours de chargement...
La page est en cours de chargement...
La page est en cours de chargement...
La page est en cours de chargement...
La page est en cours de chargement...
La page est en cours de chargement...
La page est en cours de chargement...
La page est en cours de chargement...
La page est en cours de chargement...
La page est en cours de chargement...
La page est en cours de chargement...
La page est en cours de chargement...
La page est en cours de chargement...
La page est en cours de chargement...
La page est en cours de chargement...
La page est en cours de chargement...
La page est en cours de chargement...
La page est en cours de chargement...
La page est en cours de chargement...
La page est en cours de chargement...
La page est en cours de chargement...
La page est en cours de chargement...
La page est en cours de chargement...
La page est en cours de chargement...
La page est en cours de chargement...
La page est en cours de chargement...
La page est en cours de chargement...
La page est en cours de chargement...
La page est en cours de chargement...
La page est en cours de chargement...
La page est en cours de chargement...
La page est en cours de chargement...
La page est en cours de chargement...
La page est en cours de chargement...
La page est en cours de chargement...
La page est en cours de chargement...
La page est en cours de chargement...
La page est en cours de chargement...
La page est en cours de chargement...
La page est en cours de chargement...
La page est en cours de chargement...
La page est en cours de chargement...
La page est en cours de chargement...
La page est en cours de chargement...
La page est en cours de chargement...
La page est en cours de chargement...
La page est en cours de chargement...
La page est en cours de chargement...
La page est en cours de chargement...
La page est en cours de chargement...
La page est en cours de chargement...
La page est en cours de chargement...
La page est en cours de chargement...
La page est en cours de chargement...
La page est en cours de chargement...
La page est en cours de chargement...
La page est en cours de chargement...
La page est en cours de chargement...
La page est en cours de chargement...
La page est en cours de chargement...
La page est en cours de chargement...
La page est en cours de chargement...
La page est en cours de chargement...
La page est en cours de chargement...
La page est en cours de chargement...
La page est en cours de chargement...
La page est en cours de chargement...
La page est en cours de chargement...
La page est en cours de chargement...
La page est en cours de chargement...
La page est en cours de chargement...
La page est en cours de chargement...
La page est en cours de chargement...
La page est en cours de chargement...
La page est en cours de chargement...
La page est en cours de chargement...
La page est en cours de chargement...
La page est en cours de chargement...
La page est en cours de chargement...
La page est en cours de chargement...
La page est en cours de chargement...
La page est en cours de chargement...
La page est en cours de chargement...
La page est en cours de chargement...
La page est en cours de chargement...
La page est en cours de chargement...
La page est en cours de chargement...
La page est en cours de chargement...
La page est en cours de chargement...
La page est en cours de chargement...
La page est en cours de chargement...
La page est en cours de chargement...
La page est en cours de chargement...
La page est en cours de chargement...
La page est en cours de chargement...
La page est en cours de chargement...
La page est en cours de chargement...
La page est en cours de chargement...
La page est en cours de chargement...
La page est en cours de chargement...
La page est en cours de chargement...
La page est en cours de chargement...
La page est en cours de chargement...
La page est en cours de chargement...
La page est en cours de chargement...
La page est en cours de chargement...
La page est en cours de chargement...
La page est en cours de chargement...
La page est en cours de chargement...
La page est en cours de chargement...
La page est en cours de chargement...
La page est en cours de chargement...
La page est en cours de chargement...
La page est en cours de chargement...
La page est en cours de chargement...
La page est en cours de chargement...
La page est en cours de chargement...
La page est en cours de chargement...
La page est en cours de chargement...
La page est en cours de chargement...
La page est en cours de chargement...
La page est en cours de chargement...
La page est en cours de chargement...
La page est en cours de chargement...
La page est en cours de chargement...
La page est en cours de chargement...
La page est en cours de chargement...
La page est en cours de chargement...
La page est en cours de chargement...
La page est en cours de chargement...
La page est en cours de chargement...
La page est en cours de chargement...
La page est en cours de chargement...
La page est en cours de chargement...
La page est en cours de chargement...
La page est en cours de chargement...
La page est en cours de chargement...
La page est en cours de chargement...
La page est en cours de chargement...
La page est en cours de chargement...
La page est en cours de chargement...
La page est en cours de chargement...
La page est en cours de chargement...
La page est en cours de chargement...
La page est en cours de chargement...
La page est en cours de chargement...
La page est en cours de chargement...
La page est en cours de chargement...
La page est en cours de chargement...
La page est en cours de chargement...
La page est en cours de chargement...
La page est en cours de chargement...
La page est en cours de chargement...
-
 1
1
-
 2
2
-
 3
3
-
 4
4
-
 5
5
-
 6
6
-
 7
7
-
 8
8
-
 9
9
-
 10
10
-
 11
11
-
 12
12
-
 13
13
-
 14
14
-
 15
15
-
 16
16
-
 17
17
-
 18
18
-
 19
19
-
 20
20
-
 21
21
-
 22
22
-
 23
23
-
 24
24
-
 25
25
-
 26
26
-
 27
27
-
 28
28
-
 29
29
-
 30
30
-
 31
31
-
 32
32
-
 33
33
-
 34
34
-
 35
35
-
 36
36
-
 37
37
-
 38
38
-
 39
39
-
 40
40
-
 41
41
-
 42
42
-
 43
43
-
 44
44
-
 45
45
-
 46
46
-
 47
47
-
 48
48
-
 49
49
-
 50
50
-
 51
51
-
 52
52
-
 53
53
-
 54
54
-
 55
55
-
 56
56
-
 57
57
-
 58
58
-
 59
59
-
 60
60
-
 61
61
-
 62
62
-
 63
63
-
 64
64
-
 65
65
-
 66
66
-
 67
67
-
 68
68
-
 69
69
-
 70
70
-
 71
71
-
 72
72
-
 73
73
-
 74
74
-
 75
75
-
 76
76
-
 77
77
-
 78
78
-
 79
79
-
 80
80
-
 81
81
-
 82
82
-
 83
83
-
 84
84
-
 85
85
-
 86
86
-
 87
87
-
 88
88
-
 89
89
-
 90
90
-
 91
91
-
 92
92
-
 93
93
-
 94
94
-
 95
95
-
 96
96
-
 97
97
-
 98
98
-
 99
99
-
 100
100
-
 101
101
-
 102
102
-
 103
103
-
 104
104
-
 105
105
-
 106
106
-
 107
107
-
 108
108
-
 109
109
-
 110
110
-
 111
111
-
 112
112
-
 113
113
-
 114
114
-
 115
115
-
 116
116
-
 117
117
-
 118
118
-
 119
119
-
 120
120
-
 121
121
-
 122
122
-
 123
123
-
 124
124
-
 125
125
-
 126
126
-
 127
127
-
 128
128
-
 129
129
-
 130
130
-
 131
131
-
 132
132
-
 133
133
-
 134
134
-
 135
135
-
 136
136
-
 137
137
-
 138
138
-
 139
139
-
 140
140
-
 141
141
-
 142
142
-
 143
143
-
 144
144
-
 145
145
-
 146
146
-
 147
147
-
 148
148
-
 149
149
-
 150
150
-
 151
151
-
 152
152
-
 153
153
-
 154
154
-
 155
155
-
 156
156
-
 157
157
-
 158
158
-
 159
159
-
 160
160
-
 161
161
-
 162
162
-
 163
163
-
 164
164
-
 165
165
-
 166
166
-
 167
167
-
 168
168
-
 169
169
-
 170
170
-
 171
171
-
 172
172
-
 173
173
-
 174
174
-
 175
175
-
 176
176
-
 177
177
-
 178
178
-
 179
179
-
 180
180
-
 181
181
-
 182
182
-
 183
183
-
 184
184
-
 185
185
-
 186
186
-
 187
187
-
 188
188
-
 189
189
-
 190
190
-
 191
191
-
 192
192
-
 193
193
-
 194
194
-
 195
195
-
 196
196
-
 197
197
-
 198
198
-
 199
199
-
 200
200
-
 201
201
-
 202
202
-
 203
203
-
 204
204
-
 205
205
-
 206
206
-
 207
207
-
 208
208
-
 209
209
-
 210
210
-
 211
211
-
 212
212
-
 213
213
-
 214
214
-
 215
215
-
 216
216
-
 217
217
-
 218
218
-
 219
219
-
 220
220
-
 221
221
-
 222
222
-
 223
223
-
 224
224
-
 225
225
-
 226
226
-
 227
227
-
 228
228
-
 229
229
-
 230
230
-
 231
231
-
 232
232
-
 233
233
-
 234
234
-
 235
235
-
 236
236
-
 237
237
-
 238
238
-
 239
239
-
 240
240
-
 241
241
-
 242
242
-
 243
243
-
 244
244
-
 245
245
-
 246
246
-
 247
247
-
 248
248
-
 249
249
-
 250
250
-
 251
251
-
 252
252
-
 253
253
-
 254
254
-
 255
255
-
 256
256
-
 257
257
-
 258
258
-
 259
259
-
 260
260
-
 261
261
-
 262
262
-
 263
263
-
 264
264
-
 265
265
-
 266
266
-
 267
267
-
 268
268
-
 269
269
-
 270
270
-
 271
271
-
 272
272


Toro 53cm Heavy-Duty 60V Recycler/Rear Bagger Lawn Mower Manuel utilisateur
- Catégorie
- Tondeuses à gazon
- Taper
- Manuel utilisateur
- Ce manuel convient également à
dans d''autres langues
- italiano: Toro 53cm Heavy-Duty 60V Recycler/Rear Bagger Lawn Mower Manuale utente
- English: Toro 53cm Heavy-Duty 60V Recycler/Rear Bagger Lawn Mower User manual
- español: Toro 53cm Heavy-Duty 60V Recycler/Rear Bagger Lawn Mower Manual de usuario
- Deutsch: Toro 53cm Heavy-Duty 60V Recycler/Rear Bagger Lawn Mower Benutzerhandbuch
- Nederlands: Toro 53cm Heavy-Duty 60V Recycler/Rear Bagger Lawn Mower Handleiding
- polski: Toro 53cm Heavy-Duty 60V Recycler/Rear Bagger Lawn Mower Instrukcja obsługi
- svenska: Toro 53cm Heavy-Duty 60V Recycler/Rear Bagger Lawn Mower Användarmanual
Documents connexes
-
Toro 53cm Heavy-Duty 60V Recycler/Rear Bagger Lawn Mower Manuel utilisateur
-
Toro Heavy-Duty Proline 53cm Professional Cordless Mower Manuel utilisateur
-
Toro Heavy-Duty 60V 21in Recycler/Rear Bagger Lawn Mower Manuel utilisateur
-
-
-
-
-
-
Toro Flex-Force Power System 60V MAX 22in Recycler Lawn Mower Manuel utilisateur
-