Aeg-Electrolux FM600KM-B Manuel utilisateur
- Taper
- Manuel utilisateur

1
OPERATION MANUAL
Ceramic Cooktop
CCA60S
COD. 208219 - REV 1 - 16.01.2007

2
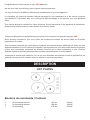
DESCRIPTION
HOT PLATES
Boutons de commande / Controls
3. Hi-lite heating element 145 mm 1200 W
4. Hi-lite heating element 180 mm 1800 W
7 Hi-lite heating 210 mm 2200 W
Congratulations on the purchase of your AEG appliance.
We are sure it will provide many years of great cooking experience.
You may find that it has different features and characteristics to your last appliance.
It is essential you read this operation manual thoroughly to fully understand all of the various functions
and operations. Experiment with your cooking and take advantage of the features your new appliance
offers.
This manual should be retained for future reference. Should ownership of the appliance be transferred,
please ensure that the manual is also passed onto the new owner.
Toutes nos félicitations et remerciements pour avoir choisi d’acquérir un appareil ménager AEG.
Nous sommes convaincus qu’il vous offrira de nombreuses années de service fiable et de belles
expériences de cuisine.
Vous trouverez sûrement que votre appareil comporte des caractéristiques différentes de celles de votre
appareil précédent et c’est la raison pour laquelle il est important que vous lisiez votre manuel d’utilisation
et que vous compreniez clairement les diverses fonctions qui s’offrent maintenant à vous. Essayez
diverses recettes et profitez pleinement des nouvelles caractéristiques de votre appareil.
Conservez ce manuel pour référence. Au cas où vous décideriez de transférer le titre de propriété de cet
appareil, assurez-vous de remettre aussi ce manuel au nouveau propriétaire.

3
INSTRUCTION FOR THE USER
All installation and electrical connections should be carried out by qualified personnel in
conformity with the regulations in force.
The specific instruction are described in the booklet section intended for the installer.
Toutes les opérations relatives à l’installation et aux connexions électriques doivent être
effectuées par du personnel diplômé et certifié, conformément aux règlements et lois de la
province ou du pays.
Les instructions spécifiques sont décrites dans la section réservée à l’installateur.
OPERATIONS
To switch the appliance on, simply turn the corresponding knob to the element intended for use. The knob
is separated into increments of 1 – 9 (1 being the lowest heat and 9 being the highest).
To switch the appliance off, turn the knob back to the OFF position. The heat indicator light will stay illumi-
nated until the surface has returned to a safe temperature to touch.
To select each element area, refer to the image located next to each knob indicating which element the
individual knob corresponds with.

4
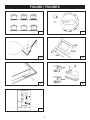
FIGURE / FIGURES
1 2
3 4
5 6
560
50
50
490
* Scraper not supplied
H05RR-F 3X2.5 mm
2
220/240 V2~
5
7

5
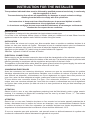
INSTRUCTION FOR THE INSTALLER
The operations indicated below must be followed by qualified personnel exclusively, in conformity
with the regulations in force.
The manufacturing firm refuses all responsibility for damages to people, animals or things,
resulting from the failure to comply with such provisions.
Les instructions ci-dessous doivent être effectuées par du personnel diplômé et certifié,
conformément aux lois et règlements en vigueur.
Le fournisseur se dégage de toute responsabilité relativement aux dommages ou blessures
résultant du non-respect de ces conditions.
INSTALLATION
The appliance is designed to be embedded into heat-resistant counter tops.
Cut a hole in the countertop 490mm (deep) x 560mm (wide) at a distance of at least 50mm from the
appliance border to the adjacent walls. Adhere insulation along the border.
INSTALLATION
Cette surface de cuisson est conçue pour être encastrée dans un meuble en matériau résistant à la
chaleur ou dans une armoire de cuisine. Découpez le haut du meuble/comptoir selon les dimensions
indiquées une distance d’au moins 50 mm entre le rebord de l’appareil et les murs adjacents.
Appliquez un joint adhésif (“S”) placé le long du rebord inférieur de l’appareil.
Stabilisez l’appareil à l’aide de crochets de fixation.
ELECTRICAL CONNECTIONS
Before carrying out the electrical connection be sure that the characteristics of the electrical system meet
the specifications. These are located at the bottom of the work-top. The electrical system is provided with
effective grounding in compliance with the regulations and provision of the law in force.
The appliance is provided with a cable. Attach the green (ground) wire to the ground supply, the red to red
and black to black at the junction box. The white wire must not be used.
CONNEXIONS ÉLECTRIQUES
Avant de commencer les connexions électriques, assurez-vous que les caractéristiques du système
électrique répondent bien aux spécifications indiquées sous la surface de cuisson et qu’une mise à la
terre efficace est disponible, conformément aux lois et règlements en vigueur dans votre province ou
pays. Une mise à la terre adéquate est exigée, quelles que soient les circonstances.
Si vous désirez une connexion directe à la ligne, il est nécessaire d’utiliser un interrupteur à pôle
unique, avec une ouverture minimale de 3 mm entre les contacts, conformément aux lois et règlements
en vigueur dans votre province (le câble de mise à la terre jaune/vert ne doit pas être interrompu par
l’interrupteur).
ATTENTION
Should a built-in oven or any other appliance producing heat be fitted directly under a glass ceramic
cooktop, it is necessary to isolate the countertop from the oven by at least 25 mm / 1”. The bottom
temperature must be below 60°C.
ATTENTION
Dans le cas ou vous avez l’intention de placer un four encastré ou tout autre appareil produisant de la
chaleur, directement sous la surface de cuisson en céramique, nous recommandons fortement d’isoler
la surface de cuisson à l’aide d’un séparateur (en matériau résistant aux hautes températures). La
température de fonctionnement de la surface de cuisson doit être inférieure à 60°C.
Si vous ne respectez pas cette précaution, cela pourrait causer un disfonctionnement du système des
touches de commande et affecter directement la garantie de ce produit.

66

77
WARRANTY
AEG products are designed and built to the highest standards.
We expect your appliances to provide many years of trouble free enjoyment.
In the event of an appliance requiring attention, each appliance is covered by a 2 year warranty from the
date of purchase.
Refer to warranty policy for complete terms and conditions.
Coverage is for costs of parts and labor for appliances in capital cities & metropolitan areas. We reserve
the right to charge directly for handling expenses outside the metropolitan region.
AEG products are supported by a national service support system.
Call our customer service department for attention.
Please retain your invoice to quote should you require service assistance. This will identify your
product for our priority service back-up. Please attach your invoice to this manual for easy future
reference.
Euro-Line Appliances Inc.
2278 Speers Road
Oakville, Ontario,
Canada L6L2X8
Tel 905-829.3980
Fax 905-829.3985
email: [email protected]
For Service & Spares:
EURO-PARTS
1-800.678-8352
Important: Please record details of your purchase below and mail or fax to Euroline Appliances Inc.
-------------------------------------------------------------- cut along line ---------------------------------------------------------
Name:____________________________ Tel n° ______________________________________
Address: ____________________________________________________________________________
City: __________________________ Province:_______________ Postal Code: __________________
Where purchased: ______________________________________ Purchase date : ________________
Items purchased: _____________________________________________________________________
Serial N° (s): ________________________________________________________________________

Euroline Appliances Inc.
2278 Speers Road
Oakville, Ontario,
Canada L6L2X8
Tel 905-829.3980
Fax 905-829.3985
email: [email protected]
For Service & Spares:
EURO-PARTS
1-800.678-8352
-
 1
1
-
 2
2
-
 3
3
-
 4
4
-
 5
5
-
 6
6
-
 7
7
-
 8
8


Aeg-Electrolux FM600KM-B Manuel utilisateur
- Taper
- Manuel utilisateur
dans d''autres langues
- English: Aeg-Electrolux FM600KM-B User manual