

M_Genius_GB_2.pmd
21.03.2005, 11:53
10

TABLE OF CONTENTS
WHAT DOES MR HANDSFREE GENIUS INCLUDE?..........2
INSTALLATION.........................................................................2
OPERATION OF MR HANDSFREE GENIUS............................6
TROUBLE-SHOOTING ............................................................7
MAINTENANCE........................................................................9
M_Genius_GB_2.pmd 21.03.2005, 11:531

2English
3
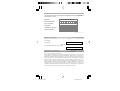
Dear mr Handsfree Genius owner,
Congratulations on your purchase of one of the most sophisticated and
easy to use car kits! This model provides you with the highest quality full-
duplex voice communication. Now you can enjoy the safest telephone
conversations in your car without any inconveniences.
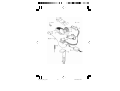
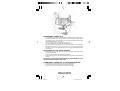
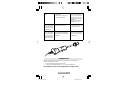
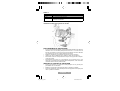
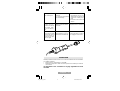
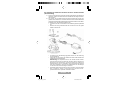
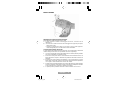
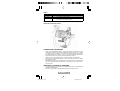
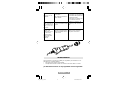
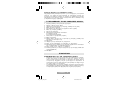
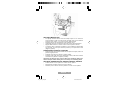
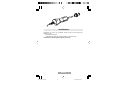
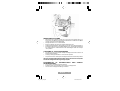
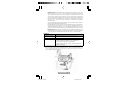
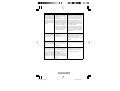
WHAT DOES MR HANDSFREE GENIUS INCLUDE?
1. Main Unit with built-in speaker.
2. TALK mode LED indicators.
3. Buttons for releasing the Main Unit from the Main unit holder.
4. Holder for Mobile phone.
5. Button to release the cramps of the Holder.
6. Main unit holder.
7. Microphone jack.
8. Power adapter for cigarette plug:
8.1. Curled cord.
8.2. Removable fuse.
9. LED indicator of Power Adapter.
10. Mounting bracket.
11. Long screws (15mm) for fastening the Mounting Unit to the dashboard of
your car.
12. Microphone.
13. Button for microphone sensitivity.
14. Clips for guiding the microphone cord.
15. Adapter for connection to car power supply and Mute cord of Car Radio (CRM).
16. Contact clips for connecting the cords.
17. Connector for connecting Mobile Phone to the Main Unit (not included).
18. Screw driver.
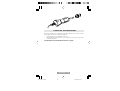
INSTALLATION
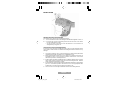
MOUNTING MR HANDSFREE GENIUS
• Select the place where you want to install the Genius main unit. The place
for the main unit has to be easily accessible for your hands, clearly visible
for the phone’s display and safe enough in case of accidents and for the
operation of Airbags. Under no circumstances should the appliance prevent
the driver from controlling or operating the car in any way.
• The mounting for the Genius main unit (this is also the phone holder) has to
be done by using a mounting bracket. The Genius main unit has to be
removed from the main unit holder. This holder is already screwed to the
universal mounting bracket.
2
M_Genius_GB_2.pmd 21.03.2005, 11:532

3
English
INSTALLATION
Mounting the Genius main unit holder
The Genius main unit can be mounted in two ways:
A. You can mount the universal mounting bracket with the supplied screw
s, or:
B. • Remove the universal mounting bracket from the main unit holder
by unscrewing the 6 screws.
• Screw the main unit holder to the dashboard or a bracket that is
designed for your type of car.
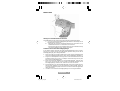
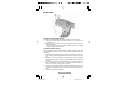
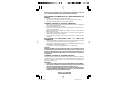
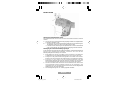
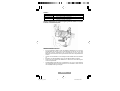
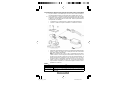
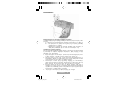
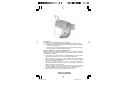
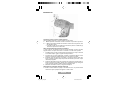
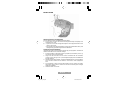
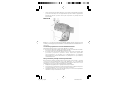
How to fix the universal mounting bracket?
In most cars, the universal mounting bracket is placed on the right side of the
gear-control console. Make sure that the mounting bracket does not block any
airbags!
1. Check for a location in your car (close to the gear-control console) where the
mounting bracket fits and where it is comfortable for use.
2. Make sure that the location in your car where you want to install your mr
Handsfree Genius is free from dust and dirt. Remove the cover of the
adhesive tape on the mounting bracket.
3. Put the upper part of the mounting bracket , with the adhesive tape, over the
edge of the console. Put the lower part of the mounting bracket , with the
angle, under the edge of the console.
4. Press both parts of the mounting bracket together until the face of the upper
part is in a horizontal position. Insert the screw in the appropriate hole.
Tighten the screw. Place the enclosed cap over the nut.
5. You have now successfully installed the universal mounting bracket.
3
2
M_Genius_GB_2.pmd
21.03.2005, 11:53
3

4
English
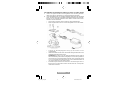
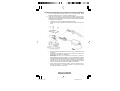
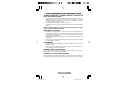
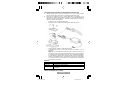
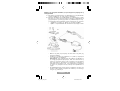
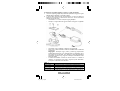
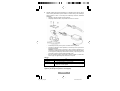
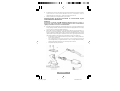
Connecting the electrical wires for power and mute function
A. When you want to use the cigarette plug with the curled cord, you
have to insert this plug in the cigarette lighter of your car
.
B. You can also change the curled cord of the cigarette plug into the
straight
cord. This way you can hide the cables easily and use the mut
e functions for
your car radio. This mute function
has to comply with the standard.
• Unscrew the 4 screws on the main unit holder
.
• Unplug the curled cord and plug the straight cord in the socket.
• Screw the cover plate back on the main unit holder
.
• Connect the wires of the cord with the radio by using the supplied
cable connectors.
Remark:
We recommend to connect the + wire to the continuous
power supply. This makes it able to use the car kit also when your
engine is turned off. To prevent your car’s battery from getting low
, we
recommend taking your phone out of the car kit when you leave the car
.
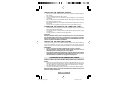
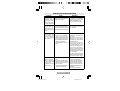
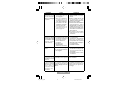
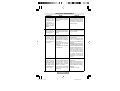
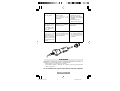
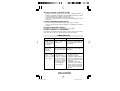
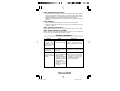
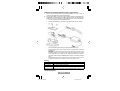
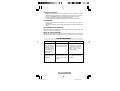
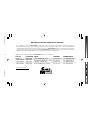
• The wires are color coded. They are
listed in Table 1 and each
wire should be connected to the corresponding item listed in the column B.
Table 1.
A
B
Red wire The + voltage of the car’s power supply
Black wire The negative GND connection
Brown wire Used for Car Radio muting (CRM)
and is
connected to Car Radio.
Warning: Connect only to a negative ground electrical system and
a +12
Volts power system.
M_Genius_GB_2.pmd
21.03.2005, 11:53
4

5
English
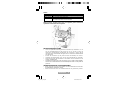
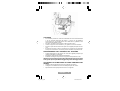
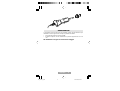
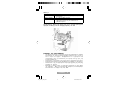
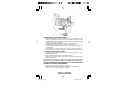
MICROPHONE CONNECTION
• For optimum performance, the microphone should be located at least 75
cm from the Genius main unit and 40-50 cm from the driver’s mouth. Make
sure that the holes of the microphone are directed towards the driver and
not towards the Genius main unit.
• Place the microphone on its location using V
elcro.
• Use the supplied clips to guide the microphone cord.
• Insert the microphone plug into the socket of the Genius main unit holder
.
• By default, the button on the microphone is in OUT
-position (unpressed
position). Only for some telephones it is necessary to put the button in the
ON-position.
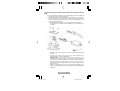
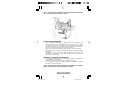
ADJUSTMENT OF THE PHONE HOLDER
• Turn the big screw in the centre of the main unit holder to the left to make
movements possible.
• Put the main unit holder in the preferred position.
• Fasten the big screw to the right to fix the main unit holder in the preferred
position.
Warning: Do not move the main unit holder without unfastening the big screw.
This will damage the fixation rubber inside!
CONNECTING A CONNECTOR TO THE GENIUS MAIN UNIT
• Take the Genius main unit of the Genius main unit holder
.
• Connect the Genius connector to the Genius main unit.
• Place the Genius main unit back on the main unit holder
.
M_Genius_GB_2.pmd
21.03.2005, 11:53
5

6English
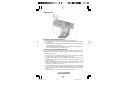
HOW TO USE THE UNIVERSAL HOLDER?
• Release the cramps of the Genius main unit by pushing the button between
the cramps.
• Put your telephone between the cramps.
• Close the cramps in a way that they hold the telephone and it therefore
cannot fall.
• Take the telephone out of the holder without releasing the cramps by sliding
the telephone to the top side.
• To insert the telephone, you slide it from the top side between the cramps of
the Genius.
• You only have to adjust the cramps to the size of your telephone once.
CONNECTING THE PHONE TO THE CONNECTOR CABLE
• Activate the power supply to the Genius by starting the engine and connecting
the cigarette plug (if applicable).
• Connect the Genius connector to the mobile phone after the power supply
is activated.
• Charging function is activated now (if applicable).
Important:
During installation always make sure that the power cord is inserted into
the cigarette lighter and power provided before connecting your mobile
phone. The connection of your mobile phone should ALWAYS be the LAST
step of complete mr Handsfree installation.
HOW TO USE THE ANTI-THEFT SYSTEM
The Genius main unit can be released from the holder. When the two buttons
are pressed together, the main unit can be taken of the Genius main unit
holder. This way you can remove all important electronics and avoid being robbed.
IMPORTANT!
• Always read the ‘TROUBLE-SHOOTING’ chapter carefully.
• The mr Handsfree ‘Special Brand’ mobile phone connector can be
obtained by mail or directly from your local supplier.
• Due to the ‘Special Brand’ mobile phone connector which can be ordered
separately for each mobile phone model (Nokia, Ericsson etc.), your mr
Handsfree Genius is suitable for any type of mobile phone.
OPERATION OF MR HANDSFREE GENIUS
HOW TO SWITCH ON YOUR GENIUS WHILE USING THE CIGARETTE
PLUG?
• Insert your mr Handsfree power cord into the cigarette lighter of your car to
switch mr Handsfree in ON-position. Please note that for several brands of
cars the engine has to be turned on before the cigarette plug is activated.
• LED indicator lights on the cigarette plug.
• To switch off, you simply plug out your power cord from the cigarette lighter.
When the Built-in cable is used, and connected to the continuous power, the
Genius is always switched on.
6
M_Genius_GB_2.pmd 21.03.2005, 11:536

7
English
HOW TO ANSWER A CALL?
• Answer incoming calls as normal on your mobile phone. For most phones
it is possible to enable the ‘auto answer’ function. In this case the phone will
answer the call automatically.
• You can start the conversation immediately by speaking into the microphone.
• Adapt to the appropriate speaker-volume by using your mobile phone control
panel.
HOW TO PLACE A CALL?
• Dial the telephone number on your mobile phone as normal.
• You can start the conversation immediately after being connected by speaking
into the microphone.
HOW TO END A CALL?
At the end of your conversation hang up your mobile phone as normal.
HOW TO USE VOICE DIALING?
If your telephone supports the voice dialing function, you can pronounce the
name of the person you want to call after activating the voice dialing function.
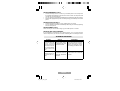
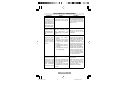
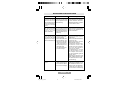
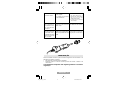
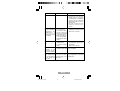
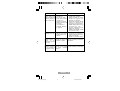
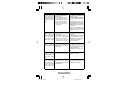
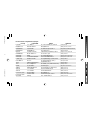
TROUBLE-SHOOTING
The device does not
charge, you don’t
hear the caller, the
caller does not hear
you, and the MUTE
function does not
work.
Sometimes a high-
frequency noise can
be heard in the car
radio.
There is a bad connec-
tion between the main
unit and the holder.
It is possible that your
car radio does not have
enough RF distortions
protection.
You should remove main unit
from the holder and connect it
again. If you made the connec-
tion correctly, you will hear a click.
Please place the mr Handsfree
Genius at least 20 cm from the
car radio.
Problem Reason Elimination
6
M_Genius_GB_2.pmd 21.03.2005, 11:537

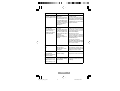
8English
A caller does not hear
you.
Your Mobile phone is
connected to Mr
Handsfree Genius but
it does not work.
Mr Handsfree Genius
is connected to Car
Radio but does not
mute it during a call.
• The microphone is
disconnected.
• Microphone’s cord is
damaged.
Telephone or connector
contacts are dirty.
Car Radio Mute function
needs additional settings
to be activated.
Problem Reason Elimination
• Check the connection of the
microphone and the micro-
phone jack of the Mounting unit.
• Apply to a service center.
Clean the contacts of the
telephone and connector.
Check your Car Radio User’s
Guide and make necessary
settings.
Mr Handsfree does
not work. Green LED
of Cigar Adapter is off.
Mr Handsfree Genius
does not work.
It is connected to Car
Radio through
Additional Adapter.
Car Radio works.
• Cigarette lighter jack is
damaged.
• No contact between
Power Adapter and
Cigarette lighter jack.
• 1.5A fuse in the Power
Adapter is burned.
• Power Adapter is
damaged.
• No contact between
the wires.
• Car Radio wires have
smaller diameter than
necessary (with cross
section area less than
0.75mm
2
).
• 1.5A fuse in the
Additional Adapter is
burned.
• Check the contact in the con-
nection points.
• Use for connection contact
clips which correspond to the
standard of your car or another
suitable type of connection.
• Replace the fuse.
• Check if the Cigarette
lighter functions normally.
• Clean the contact of the
Cigarette lighter jack and
the Power Adapter.
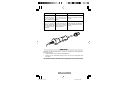
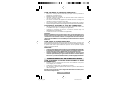
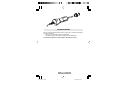
• Remove the Fuse.
Unscrew the nut from the
Power Adapter, open the
housing and take out the Fuse
(Illustration p.9.)
Insert new 1.5A fuse.
Assemble the Power Adapter.
• If items 1-3 did not help apply
to a service center.
M_Genius_GB_2.pmd 21.03.2005, 11:538

9
English
MAINTENANCE
Please check following mr Handsfree maintenance TIPS to keep your kit in top
condition:
• Do not expose the appliance to moisture.
• Always unplug the power cable when not in use.
mr Handsfree wishes you a nice and safe journey!
M_Genius_GB_2.pmd 21.03.2005, 11:539

INHOUDSTAFEL
WAT OMVAT MR HANDSFREE GENIUS?..............................2
INSTALLATIE............................................................................2
WERKING VAN MR HANDSFREE GENIUS..............................7
VERHELPEN VAN PROBLEMEN .............................................8
ONDERHOUD..........................................................................9
M_Genius_NL.pmd 18.03.2005, 12:021

2
Nederlands
Beste eigenaar van de mr Handsfree Genius,
Gefeliciteerd met de aankoop van één van de meest gesofisticeerde en
gemakkelijk te hanteren car kits! Dit model biedt u de hoogste kwaliteit
op het gebied van full-duplex voice communication. Nu kan u in alle
veiligheid en zonder ongemakken vanuit uw wagen telefoneren.
WAT OMVAT MR HANDSFREE GENIUS?
1. Hoofdeenheid met ingebouwde luidspreker.
2. LED voor de weergave van de TALK-mode.
3. Toetsen om de hoofdeenheid los te maken van de houder.
4. Houder voor de mobiele telefoon.
5. Toets om de armen van de houder los te maken.
6. Houder van de hoofdeenheid.
7. Microfoonaansluiting.
8. Stroomadapter voor sigarenaansteker:
8.1. Krulsnoer.
8.2. Verwijderbare zekering.
9. LED indicator van de stroomadapter.
10. Bevestigingsbeugel.
11. Lange schroeven (15 mm) om de houder van de hoofdeenheid aan het
dashboard van uw wagen te bevestigen.
12. Microfoon.
13. Toets voor de microfoongevoeligheid.
14. Clips voor de geleiding van de microfoonkabel.
15. Adapter voor verbinding met de stroomvoorziening van de wagen en de
“Mute”- draad van de autoradio.
16. Contact clips voor het verbinden van de draden.
17. Connector om de mobiele telefoon met de hoofdeenheid te verbinden (niet
inbegrepen).
18. Schroevendraaier.
INSTALLATIE
HET MONTEREN VAN MR HANDSFREE GENIUS
• Kies de plaats waar u de hoofdeenheid van de Genius wilt aanbren-
gen. Deze plaats moet binnen handbereik zijn, duidelijk zichtbaar
voor het display van de telefoon en veilig genoeg bij een ongeval en
voor de werking van airbags. Het toestel mag in geen geval de be-
stuurder verhinderen de wagen te beheersen of te bedienen.
• Het monteren van de hoofdeenheid van de Genius (dit is ook de telefoon-
houder) gebeurt het best door gebruik te maken van een bevestigingsbeugel.
De hoofdeenheid van de Genius dient verwijderd te worden van de houder.
Deze houder is al vastgeschroefd aan de universele bevestigingsbeugel.
M_Genius_NL.pmd 18.03.2005, 12:022

3
Nederlands
INSTALLATIE
Montage van de hoofdeenheid van de Genius
De hoofdeenheid van de Genius kan op twee manieren gemonteerd worden:
A. U kan de universele bevestigingsbeugel monteren met behulp van de
bijgeleverde schroeven, of:
B. • Verwijder de universele bevestigingsbeugel van de houder van de
hoofdeenheid door de 6 schroeven los te schroeven.
• Schroef de houder van de hoofdeenheid vast op het dashboard of op
een beugel ontworpen voor uw type van wagen.
Installeren van de universele bevestigingsbeugel
In de meeste wagens wordt de universele bevestigingsbeugel aan de rechter-
kant van de console met de versnellingspook geplaatst. Zorg ervoor dat de
bevestigingsbeugel geen airbags blokkeert!
1. Zoek een locatie in uw wagen (dicht bij de console met
de versnellings
pook)
waar de bevestigingsbeugel past en waar deze gemakkelijk te gebruiken is.
2. Zorg ervoor dat de plaats in uw wagen waar u de mr Handsfree Genius wilt
installeren stofvrij en schoon is. Verwijder de bescherming van het plak-
band op de bevestigingsbeugel.
3. Plaats het bovenste gedeelte van de bevestigingsbeugel, met het plak-
band, over de rand van de console. Plaats het onderste gedeelte van de
bevestigingsbeugel, met de hoek, onder de rand van de console.
4. Duw beide delen van de bevestigingsbeugel samen tot het oppervlak van
het bovenste gedeelte zich in een horizontale positie bevindt. Plaats de
schroef in het geschikte gaatje. Draai de schroef vast. Plaats het bijgesloten
dopje op de moer.
5. U hebt nu uw universele bevestigingsbeugel succesvol geïnstalleerd.
M_Genius_NL.pmd
18.03.2005, 12:02
3

4
Nederlands
Het verbinden van de elektrische draden voor stroom- en “Mute”-functie
A . Indien u de sigarenaansteker met het gekrulde snoer wenst te
gebruiken,
dient u deze plug in de stekker van de sigarenaanste
ker te steken.
B. U kan het gekrulde snoer van de sigarenaansteker verwisselen
met het gladde
snoer. Op deze manier kan u de kabels gemakkelijk verbergenen de “Mute”-
functies van uw autoradio gebruiken. Deze “Mute”- functie moet overeen-
stemmen met de standaard:
• Schroef de 4 schroeven op de houder van de hoofdeenheid los.
• Maak het gekrulde snoer los en steek het gladde snoer in de stekker
.
• Schroef de bevestigingsplaat terug op de houder van de
hoofdeenheid.
• Verbind de kabels van het snoer met de radio door gebruik te maken
van
de bijgeleverde kabelconnectoren.
Opmerking:
We raden u aan de +kabel te verbinden met de continue
stroomvoorziening. Dit maakt het mogelijk uw car kit ook te gebruiken
als de motor van uw voertuig uitgeschakeld is.Om te voorkomen dat de
accu van uw wagen leeg raakt, raden we u aan uw mobiele telefoon uit
uw car kit te halen als u uw wagen verlaat.
• De draden zijn elk voorzien van een kleur. U vindt ze terug in
T
abel 1.
Elke draad zou verbonden moeten worden met het
corresponde-
rende item in kolom B.
M_Genius_NL.pmd
18.03.2005, 12:02
4

5
Nederlands
Tabel 1.
AB
Rode draad Het + voltage van de stroomvoorziening van de wagen.
Zwarte draad De negatieve GND-verbinding.
Bruine draad Wordt gebruikt voor de “Mute”- functie van uw autoradio
en wordt verbonden met de autoradio.
Waarschuwing: Verbind enkel met een negatief geaard elektrisch
systeem en een +12 Volt stroomsysteem.
MICROFOONAANSLUITING
• Voor een optimale werking moet de microfoon op minstens 75 cm
van de hoofdeenheid van de Genius en op ca. 40-50 cm van de
mond van de bestuurder aangebracht zijn. V
ergewis u ervan dat de
microfoon naar de bestuurder toe gericht is en niet naar de hoofdeenheid
van de Genius.
• Plaats de microfoon op de juiste locatie met behulp van V
elcro.
• Gebruik de bijgevoegde clips om de microfoonkabel te geleiden.
• Steek de plug van de microfoon in de stekker van de houder van de
Genius hoofdeenheid.
• Standaard staat de toets op de microfoon in ‘OUT’-positie (niet
ingedrukt).
Slechts voor enkele telefoons is het noodzakelijk
deze toets in ‘ON’-positie te
plaatsen.
AANPASSEN VAN DE TELEFOONHOUDER
• Draai de grote schroef in het midden van de hoofdeenheid naar
links
om bewegingen mogelijk te maken.
• Plaats de houder van de hoofdeenheid in de gewenste positie.
M_Genius_NL.pmd
18.03.2005, 12:02
5

6
Nederlands
• Draai de grote schroef naar rechts om de houder van de hoofdeenheid
vast te maken in de gewenste positie.
Waarschuwing: Verplaats de hoofdeenheid niet zonder de grote schroef los te
draaien. Dit zal de fixatierubber aan de binnenkant beschadigen.
EEN CONNECTOR VERBINDEN AAN DE HOOFDEENHEID VAN
DE GENIUS
• Verwijder de hoofdeenheid van de Genius uit de houder.
• Verbind de connector van de Genius met de hoofdeenheid van de Genius.
• Plaats de hoofdeenheid van de Genius terug op de houder.
HOE DE UNIVERSELE HOUDER GEBRUIKEN?
• Maak de armen van de houder van de hoofdeenheid van de Genius
los door op de toets tussen de armen te drukken.
• Plaats uw telefoon tussen de armen.
• Sluit de armen zodat ze uw telefoon vastklemmen en deze dus niet
kan vallen.
• Neem de telefoon uit de houder zonder de armen los te maken door de
telefoon naar de bovenzijde te schuiven.
• Om de telefoon terug tussen de armen van de Genius te bevestigen,
schuift u deze er terug tussen vanaf de bovenzijde.
• U dient de armen slechts 1 maal aan de grootte van uw telefoon aan te passen.
DE TELEFOON VERBINDEN MET DE CONNECTORKABEL
• Activeer de stroomvoorziening naar de Genius door de motor te starten
en de sigarenplug te verbinden (indien van toepassing).
• Verbind de connector van de Genius met uw mobiele telefoon nadat de
stroomvoorziening geactiveerd werd.
• De laadfunctie is nu actief (indien van toepassing).
Belangrijk:
Tijdens de installatie dient u er steeds voor te zorgen dat de stroom-
kabel in de stekker van de sigarenaansteker steekt en dat de stroom
aanstaat alvorens uw mobiele telefoon aan te sluiten. De aansluiting
van uw mobiele telefoon moet ALTIJD de LAATSTE stap zijn van de
volledige mr Handsfree installatie.
HOE HET ANTI-DIEFSTAL SYSTEEM GEBRUIKEN?
De hoofdeenheid van de Genius kan losgemaakt worden van de houder.
Wanneer u de twee toetsen tegelijkertijd indrukt, kan de hoofdeenheid
van de Genius uit de houder genomen worden. Op deze manier kunt u
alle belangrijke elektronica verwijderen en diefstal vermijden.
BELANGRIJK!
• Lees altijd zorgvuldig het hoofdstuk ‘VERHELPEN VAN PROBLEMEN’.
• U kunt de speciale connector voor uw mr Handsfree per post of
rechtstreeks bij uw plaatselijke leverancier bestellen.
M_Genius_NL.pmd 18.03.2005, 12:026

7
Nederlands
• Dankzij de speciale connector, die afzonderlijk besteld kan worden voor
elk type mobiele telefoon (Nokia, Ericsson etc.), is uw mr Handsfree
Genius voor elk type van mobiele telefoon geschikt.
WERKING VAN MR HANDSFREE GENIUS
HOE DE GENIUS AANSCHAKELEN BIJ HET GEBRUIK VAN DE
SIGARENPLUG?
• Steek de stroomkabel van uw mr Handsfree in de stekker van de
sigarenaansteker van uw auto om uw mr Handsfree aan te zetten.
Bij verschillende merken van auto’s moet de motor van de wagen
gestart worden voor de sigarenaansteker geactiveerd wordt.
• De LED indicator van de sigarenaansteker licht op.
• Om uit te zetten dient u enkel de stroomkabel uit de sigarenaansteker te
verwijderen.
Wanneer de ingebouwde kabel gebruikt wordt, en aangesloten is op de con-
tinue stroom, staat de Genius altijd aan.
HET BEANTWOORDEN VAN EEN OPROEP
• Beantwoord inkomende oproepen zoals u dat normaal met uw
mobiele telefoon doet. Voor de meeste telefoons is het mogelijk de
‘auto answer’ functie aan te schakelen. In dit geval beantwoordt uw
telefoon de oproep automatisch.
• U kunt het gesprek nu starten door in de microfoon te spreken.
• Pas het geluidsniveau aan door middel van het controlepaneel op
uw mobiele telefoon.
HET TELEFONEREN
• Vorm een telefoonnummer zoals u dat met uw mobiele telefoon gewend bent.
• Als u verbinding krijgt, kunt u het gesprek beginnen door in de richting van de
microfoon te praten.
HET BEËINDIGEN VAN EEN GESPREK
Aan het einde van een gesprek verbreekt u de verbinding zoals u dat
normaal doet met uw mobiele telefoon.
HOE ‘VOICE DIALING’ GEBRUIKEN?
Als uw telefoon de ‘Voice Dialing’ functie ondersteunt, kan u na het activeren van
deze functie, de naam van de persoon die u wilt bellen, uitspreken.
M_Genius_NL.pmd 18.03.2005, 12:027

8
Nederlands
VERHELPEN VAN PROBLEMEN
Het toestel laadt
niet op, u hoort uw
oproeper niet, uw
oproeper hoort u
niet en de “Mute”-
functie werkt niet.
Er is soms een
geluid met hoge
frequentie hoor-
baar op uw auto-
radio.
Mr Handsfree Ge-
nius werkt niet.
Groene LED van
de sigarenplug
brandt niet.
Mr Handsfree Ge-
nius werkt niet.
Het is verbonden
met de autoradio
via de extra
adapter. De auto-
radio werkt.
Er is een slechte verbin-
ding tussen de hoofdeen-
heid en de houder.
Het is mogelijk dat uw au-
toradio niet voldoende be-
scherming heeft tegen
radiofrequentie vervorming.
• Stekker voor sigarenaan-
steker is beschadigd.
• Geen contact tussen
stroomadapter en de stek-
ker voor sigarenaansteker.
• 1,5A zekering in de stroom-
adapter is verbrand.
• Stroomadapter is bescha-
digd.
• Geen contact tussen de dra-
den.
• De draden van de autora-
dio zijn smaller dan nodig
(met kruissectie kleiner
dan 0,75mm
2
).
• 1,5 A zekering in de stroom-
adapter is verbrand.
U dient de hoofdeenheid van
de houder te verwijderen
en deze terug aan te sluiten.
Als de verbinding goed
gebeurt, hoort u een “klik”.
Plaats de mr Handsfree Ge-
nius op minstens 20 cm van
de autoradio.
• Controleer of de sigaren-
aansteker normaal func-
tioneert.
• Maak het contact van de
stekker voor de sigaren-
aansteker en van de stroom-
adapter schoon.
• Vervang de zekering.
U dient eerst de dop van
de zekeringhouder naar
beneden te duwen voor-
dat u draait. De afbeel-
ding (p. 9) toont de richting
waarin de dop van de hou-
der gedraaid moet worden
bij installatie.
• Als deze oplossingen niet
helpen, neemt u best contact
op met een service center.
• Controleer de contacten
van de verbindingen.
• Gebruik voor de verbinding
contact clips die overeen-
komen met de standaard
van uw voertuig of een
ander gebruikt type van ver-
binding.
• Vervang de zekering.
Probleem Reden Oplossing
M_Genius_NL.pmd 18.03.2005, 12:028

9
Nederlands
ONDERHOUD
Gelieve de volgende TIPS ter harte te nemen om uw mr Handsfree in
optimale toestand te houden:
• Stel de apparatuur niet bloot aan vocht.
• Trek de stroomkabel altijd uit als u uw car kit niet gebruikt.
mr Handsfree wenst u een aangename en veilige rit toe!
Uw oproeper hoort
u niet.
Uw mobiele tele-
foon is verbonden
met de mr Hands-
free Genius, maar
het werkt niet.
Mr Handsfree Ge-
nius is verbonden
met de autoradio,
maar de “Mute”-
functie werkt niet
tijdens de oproep.
• De microfoon is niet meer
verbonden.
• Het snoer van de micro-
foon is beschadigd.
De contactjes van de telefoon
of de connector zijn vuil.
Bijkomende instellingen die-
nen geactiveerd te worden
voor de “Mute”- functie van de
autoradio.
• Controleer de verbin-
ding van de microfoon
en de microfoon-
aansluiting van de
houder van de hoofd-
eenheid.
• Neem contact op met
uw service center.
Maak de contactjes
van de telefoon en de
connector schoon.
Controleer de handlei-
ding van uw autoradio
en activeer de nodige
instellingen.
M_Genius_NL.pmd 18.03.2005, 12:029
La page est en cours de chargement...
La page est en cours de chargement...
La page est en cours de chargement...
La page est en cours de chargement...
La page est en cours de chargement...
La page est en cours de chargement...
La page est en cours de chargement...
La page est en cours de chargement...
La page est en cours de chargement...
La page est en cours de chargement...
La page est en cours de chargement...
La page est en cours de chargement...
La page est en cours de chargement...
La page est en cours de chargement...
La page est en cours de chargement...
La page est en cours de chargement...
La page est en cours de chargement...
La page est en cours de chargement...
La page est en cours de chargement...
La page est en cours de chargement...
La page est en cours de chargement...
La page est en cours de chargement...
La page est en cours de chargement...
La page est en cours de chargement...
La page est en cours de chargement...
La page est en cours de chargement...
La page est en cours de chargement...
La page est en cours de chargement...
La page est en cours de chargement...
La page est en cours de chargement...
La page est en cours de chargement...
La page est en cours de chargement...
La page est en cours de chargement...
La page est en cours de chargement...
La page est en cours de chargement...
La page est en cours de chargement...
La page est en cours de chargement...
La page est en cours de chargement...
La page est en cours de chargement...
La page est en cours de chargement...
La page est en cours de chargement...
La page est en cours de chargement...
La page est en cours de chargement...
La page est en cours de chargement...
La page est en cours de chargement...
La page est en cours de chargement...
La page est en cours de chargement...
La page est en cours de chargement...
La page est en cours de chargement...
La page est en cours de chargement...
La page est en cours de chargement...
La page est en cours de chargement...
La page est en cours de chargement...
La page est en cours de chargement...
La page est en cours de chargement...
La page est en cours de chargement...
La page est en cours de chargement...
La page est en cours de chargement...
La page est en cours de chargement...
La page est en cours de chargement...
La page est en cours de chargement...
La page est en cours de chargement...
La page est en cours de chargement...
La page est en cours de chargement...
La page est en cours de chargement...
La page est en cours de chargement...
La page est en cours de chargement...
La page est en cours de chargement...
La page est en cours de chargement...
La page est en cours de chargement...
La page est en cours de chargement...
La page est en cours de chargement...
La page est en cours de chargement...
La page est en cours de chargement...
La page est en cours de chargement...
La page est en cours de chargement...
La page est en cours de chargement...
La page est en cours de chargement...
La page est en cours de chargement...
La page est en cours de chargement...
La page est en cours de chargement...
La page est en cours de chargement...
La page est en cours de chargement...
La page est en cours de chargement...
La page est en cours de chargement...
La page est en cours de chargement...
La page est en cours de chargement...
La page est en cours de chargement...
La page est en cours de chargement...
La page est en cours de chargement...
La page est en cours de chargement...
La page est en cours de chargement...
La page est en cours de chargement...
La page est en cours de chargement...
La page est en cours de chargement...
La page est en cours de chargement...
La page est en cours de chargement...
La page est en cours de chargement...
La page est en cours de chargement...
-
 1
1
-
 2
2
-
 3
3
-
 4
4
-
 5
5
-
 6
6
-
 7
7
-
 8
8
-
 9
9
-
 10
10
-
 11
11
-
 12
12
-
 13
13
-
 14
14
-
 15
15
-
 16
16
-
 17
17
-
 18
18
-
 19
19
-
 20
20
-
 21
21
-
 22
22
-
 23
23
-
 24
24
-
 25
25
-
 26
26
-
 27
27
-
 28
28
-
 29
29
-
 30
30
-
 31
31
-
 32
32
-
 33
33
-
 34
34
-
 35
35
-
 36
36
-
 37
37
-
 38
38
-
 39
39
-
 40
40
-
 41
41
-
 42
42
-
 43
43
-
 44
44
-
 45
45
-
 46
46
-
 47
47
-
 48
48
-
 49
49
-
 50
50
-
 51
51
-
 52
52
-
 53
53
-
 54
54
-
 55
55
-
 56
56
-
 57
57
-
 58
58
-
 59
59
-
 60
60
-
 61
61
-
 62
62
-
 63
63
-
 64
64
-
 65
65
-
 66
66
-
 67
67
-
 68
68
-
 69
69
-
 70
70
-
 71
71
-
 72
72
-
 73
73
-
 74
74
-
 75
75
-
 76
76
-
 77
77
-
 78
78
-
 79
79
-
 80
80
-
 81
81
-
 82
82
-
 83
83
-
 84
84
-
 85
85
-
 86
86
-
 87
87
-
 88
88
-
 89
89
-
 90
90
-
 91
91
-
 92
92
-
 93
93
-
 94
94
-
 95
95
-
 96
96
-
 97
97
-
 98
98
-
 99
99
-
 100
100
-
 101
101
-
 102
102
-
 103
103
-
 104
104
-
 105
105
-
 106
106
-
 107
107
-
 108
108
-
 109
109
-
 110
110
-
 111
111
-
 112
112
-
 113
113
-
 114
114
-
 115
115
-
 116
116
-
 117
117
-
 118
118
-
 119
119


Mr Handsfree Telephone Handsfree Kit Manuel utilisateur
- Taper
- Manuel utilisateur
- Ce manuel convient également à
dans d''autres langues
- italiano: Mr Handsfree Telephone Handsfree Kit Manuale utente
- español: Mr Handsfree Telephone Handsfree Kit Manual de usuario
- Nederlands: Mr Handsfree Telephone Handsfree Kit Handleiding
- português: Mr Handsfree Telephone Handsfree Kit Manual do usuário
- dansk: Mr Handsfree Telephone Handsfree Kit Brugermanual
Documents connexes


Autres documents
-
Alpine CDE-178BT Le manuel du propriétaire
-
Alpine CDE-173BT Le manuel du propriétaire
-
Alpine CDE-185BT Le manuel du propriétaire
-
Alpine CDE-183BT Le manuel du propriétaire
-
Alpine CDE-W296BT Le manuel du propriétaire
-
Audi 4G0051435C Guide de démarrage rapide
-
Seca mVSA 535 Manuel utilisateur
-
Edision 216301 COMPRESSION TOOL Manuel utilisateur