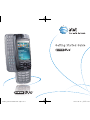
Pantech Pantech Laser Getting Started Manual
- Catégorie
- Les smartphones
- Taper
- Getting Started Manual
Ce manuel convient également à

070816_PantechGSGFinal 수정.indd 1 2007-08-16 ¿ÀÈÄ 1:50:17

2
Table of Contents
Set up Your Pantech Duo 4
What’s in the Box? 4
Insert Battery 5
Insert microSD™ Card 5
Charge Battery
5
Get to Know Your Pantech Duo
6
Get to Know Your Pantech Duo 6
Check Your AT&T Wireless Network Connection 7
Learn to Navigate & Type
8
Use the Phone 10
Make a Phone Call 10
Set Up Voicemail 11
Check Voicemail
11
Use Text/Multimedia Messaging & IM 12
Send a Text/Multimedia Message 12
Instant Messaging
12
Browse the Web & Shop Online 15
Go to Web Pages 15
Use MEdia Net
16
AT&T Mall
17
Set up Your Email 18
Personal Email Setup With Xpress Mail 20
Send and Receive Personal Email 22
Corporate Email Setup With Xpress Mail
22
070816_PantechGSGFinal 수정.indd 2 2007-08-16 ¿ÀÈÄ 1:50:21

Send and Receive Corporate Email 25
Connect to Other Devices 26
Sync Your Device to Your PC 26
Set up Bluetooth®
27
Listen to Music & Watch TV & Video 28
AT&T Music 28
Transfer Music & Video to Your Device
29
Play Music 30
Stream Music (XM Radio®)
30
Watch Cellular Video 31
Watch MobiTV®
31
Use the Camera 32
Take & Send a Picture 32
Take & Send a Video
33
Office Mobile 34
Office Mobile 34
View Your Documents
34
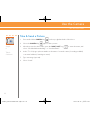
Manage Contacts and appointments 35
Add a Contact 35
Schedule an Appointment
35
Troubleshooting 36
Tips & Tricks 40
3
070816_PantechGSGFinal 수정.indd 3 2007-08-16 ¿ÀÈÄ 1:50:21

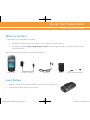
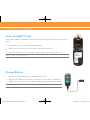
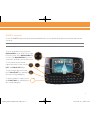
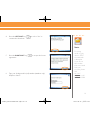
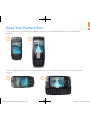
BatteryAC Travel ChargerPantech Duo USB Cable 3.5mm Headset Adapter
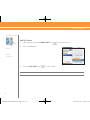
What’s in the Box? Insert Battery
4
What’s in the Box?
To get started, we recommend the following:
Carefully follow the step-by-step instructions in this guide to set up your device.
Review the User Manual (by clicking the proper link) on the Getting Started CD to learn about the full power
of the Pantech Duo.
Take note of the following components included in the box:
Insert Battery
1. Align the contacts on the battery with the contacts in the back of the device.
2. Push the battery down until it locks into place.
•
•
Set up Your Pantech Duo
070816_PantechGSGFinal 수정.indd 4 2007-08-16 ¿ÀÈÄ 1:51:14

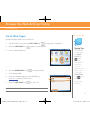
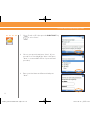
Insert microSD™ Card
A microSD™ Card is a removable memory card that may increase data storage capacity of the
device.
1. Slide open your device to reveal the Number Pad.
2. Remove the cover on the top of the device, that reads “microSD™”.
3. Insert the narrow end of the microSD™ Card into the slot, then replace the cover.
Note: microSD™ Card sold separately
Charge Battery
1. Plug the AC Travel Charger into a standard AC wall outlet.
2. Plug the travel charger into the jack on the bottom of the phone. The indicator
light at the top of the device is red while charging, and green when fully charged.
Note: When charging is complete, unplug the charger from the power outlet.
5
Insert microSD™ Card, Charge Battery
070816_PantechGSGFinal 수정.indd 5 2007-08-16 ¿ÀÈÄ 1:51:38

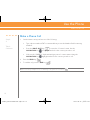
Get to Know Your Pantech Duo
6
Get to Know Your Pantech Duo
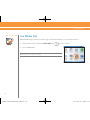
Turn On/Off Your Device
Press and hold the END key.
Answer a Phone Call
Press and hold the SEND key.
Lock/Unlock Your Device Keypad
To Lock the device, press and hold the LOCK key. To unlock the device, press the LEFT
SOFT
key , followed by the * key.
Backlight
After 10 seconds your screen will dim to save battery power. To turn your screen on, press any
key, or open one of the keypads.
Change Backlight Settings
Press the LEFT SOFT key to enter the “Start” menu. Select “Settings”, then Click
“Power Management”. Scoll down to “Display time out”, or “Backlight time out on battery”,
Press the LEFT or RIGHT side of the NAVIGATION key to change the Display Time Out
settings.
Get to Know Your Pantech Duo
070816_PantechGSGFinal 수정.indd 6 2007-08-16 ¿ÀÈÄ 1:51:42

Check Your AT&T Wireless Network Connection
7
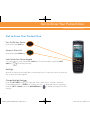
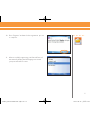
Check Your Wireless AT&T Connection
On the top right corner of the home screen, you will find the network coverage indicator.
Full wireless 3G data coverage
Full wireless coverage (no data coverage)
No wireless coverage
Wireless is turned off
x
G
3
070816_PantechGSGFinal 수정.indd 7 2007-08-16 ¿ÀÈÄ 1:51:45

8
Learn to Navigate & Type
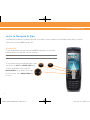
Your Pantech Duo has two separate keyboards. If you want to insert a number, use the Number Pad, and if you want to
enter letters, use the QWERTY Keyboard.
Number Pad
To use the Number Pad, ensure that the QWERTY Keyboard is closed, then
hold the phone vertically and slide the screen up.
Note: The QWERTY Keyboard must be closed before sliding open the Number Pad.
To select the bottom left and right items on the
screen, use the LEFT and RIGHT SOFT keys.
To move around the screen, press the
NAVIGATION
key up, down, left or right.
Press the center of the NAVIGATION key
to select.
Learn to Navigate & Type
070816_PantechGSGFinal 수정.indd 8 2007-08-16 ¿ÀÈÄ 1:51:47

9
QWERTY Keyboard
To use the QWERTY Keyboard, ensure that the Number Pad is closed, then hold the phone horizontally and slide the
screen up.
Note: The Number Pad must be closed before sliding open the QWERTY Keyboard.
To move around the screen, press the
NAVIGATION
key up, down, left or right.
Press the center of the NAVIGATION key
to select. The NAVIGATION key is now
oriented to landscape just like the screen.
To select the bottom left and
right items on the screen, use the
LEFT
and RIGHT SOFT keys.
To type a single uppercase letter,
press CAPS/SHIFT key, and then
press the corresponding key.
To enter a number or symbol, press
the FUNCTION key, and then press
the corresponding key.
070816_PantechGSGFinal 수정.indd 9 2007-08-16 ¿ÀÈÄ 1:52:45

10
Make a Phone Call
1. On the Home screen, perform one of the following:
Type a phone number. AT&T recommends that you use the Number Pad for entering
numbers.
Press the RIGHT SOFT key to enter the “Contacts” menu. Use the
NAVIGATION
key to highlight and select the contact you wish to call.
Slide out the “QWERTY” keyboard and type part of a contact name. Using the
NAVIGATION
key ,highlight and select the contact you wish to call.
2. Press the SEND
key .
3. To end the call, press the END
key .
Note: to turn the speakerphone on or off during a call, press the “Send” key .
•
•
•
Use the Phone
Steps?
3
Takes?
2 minutes
Make a Phone Call
070816_PantechGSGFinal 수정.indd 10 2007-08-16 ¿ÀÈÄ 1:52:46

11
Set Up Voicemail
1. Press and hold the 1 key on your Pantech Duo to connect to the AT&T voicemail system.
2. Create your password.
3. Record your name.
4. Record a greeting.
Check Voicemail
1. Press and hold the 1 key.
2. Follow the voice prompts.
Check Voicemail Messages From Other Devices
1. Dial your 10-digit wireless number.
2. Press the
* key when you hear your personal greeting. (Press the # key in Puerto Rico)
3. Enter your personal password that you created while setting up your voicemail.
Set Up Voicemail, Check Voicemail
Steps?
4
Takes?
4 minutes
070816_PantechGSGFinal 수정.indd 11 2007-08-16 ¿ÀÈÄ 1:52:46

12
Send a Text/Multimedia Message
1. On the Home screen, press the LEFT SOFT key to enter the “Start” menu.
2. Select “Messaging”.
3. Select “Messages”.
4. Press the RIGHT SOFT
key to enter the menu.
5. Select “New”.
6. Choose “Multimedia Message” or “Text Message”.
7. In the “To” field, type a phone number, or press the
center of the to NAVIGATION key select a contact.
8. Type a message.
To add or attach an item to the message, press the RIGHT SOFT key
to enter the menu. Select “Add Item” and select the type of
item to attach. Choose the desired item from the list.
9. Press the LEFT SOFT key to select “Send”.
Note: Additional charges may apply.
Steps?
9
Takes?
2 minutes
Use Text/Multimedia Messaging & IM
Send a Text/Multimedia Message
070816_PantechGSGFinal 수정.indd 12 2007-08-16 ¿ÀÈÄ 1:52:51

13
Instant Messaging
If you subscribe to an instant messaging (IM) service such as Yahoo!®, AOL®, or Windows Live™,
you can have the convenience and fun of IM on your Pantech Duo.
Set Up
1. On the Home screen, press the LEFT SOFT key to select “Start”.
2. Select “IM & Email”.
3. Select “IM”.
4. Highlight your desired IM service and press the center of
the NAVIGATION key .
5. Enter your user name and password and press the LEFT SOFT
key to select “Sign
In”.
Instant Messaging
Steps?
5
Takes?
1 minute
070816_PantechGSGFinal 수정.indd 13 2007-08-16 ¿ÀÈÄ 1:52:52

14
Add A Contact
1. While signed in, press the RIGHT SOFT key to enter the menu.
2. Select “Add Buddy”.
3. Press the LEFT SOFT
key to select “Add”.
Note: Additional charges may apply.
Instant Messaging
Steps?
3
Takes?
1 minute
070816_PantechGSGFinal 수정.indd 14 2007-08-16 ¿ÀÈÄ 1:52:53

Typing Tips:
To Capitalize
a letter, press
the CAPS/
SHIFT
key
, then
press the
appropriate
letter key.
To insert
symbols such
as @, _ and
/, press the
FUNCTION
key , then
press the
appropriate
letter key.
15
Go to Web Pages
Use Internet Explorer® to access web sites.
1. On the Home screen, press the LEFT SOFT key to enter the “Start Menu”.
2. Press the LEFT SOFT
key again for more options.
3. Select “Internet Explorer”.
4. Press the RIGHT SOFT
key to enter the menu.
5. Click “Address Bar”.
6. In the text field that appears, type the URL (e.g.
www.att.com) that you wish to go to.
7. Press the LEFT SOFT
key to click “Go”.
Note: Additional charges may apply.
Go to Web Pages
Browse the Web & Shop Online
070816_PantechGSGFinal 수정.indd 15 2007-08-16 ¿ÀÈÄ 1:52:54

16
Use MEdia Net
MEdia Net® brings your favorite web pages, downloads and more to your wireless device.
1. On the Home Screen, press the LEFT SOFT key to select “Start”.
2. Select “MEdia Net”.
Note: Additional charges may apply.
Use MEdia Net
070816_PantechGSGFinal 수정.indd 16 2007-08-16 ¿ÀÈÄ 1:52:55

Note:
For web
browsing,
AT&T
recommends
a data plan.
If you do
not have a
data plan
associated
with your
account,
please visit
att.com/
wireless or call
1-800-331-0500
17
AT&T Mall
Personalize your device with downloadable games, graphics and ring tones.
Browse thousands of ring tones in “Shop Tones”.
Select “Shop Games” to find games that turn your down-time into fun time.
Personalize your phone with unique art at “Shop Graphics”.
Go to “Shop Multimedia” to find an MMS greeting card that’s perfect for the occasion.
Subscribe to useful applications and cool tools discovered at “Shop Applications”.
1. On the Home screen, press the LEFT SOFT
key to enter the “Start” menu.
2. Select “AT&T Mall”.
3. Select the “Mall” you wish to enter.
Note: Additional charges may apply.
•
•
•
•
•
AT&T Mall
070816_PantechGSGFinal 수정.indd 17 2007-08-16 ¿ÀÈÄ 1:52:56

18
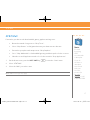
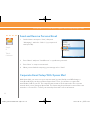
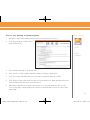
Personal Email Setup With Xpress Mail
Xpress Mail automates the setup process, and will work with the majority of email services such as
Yahoo!® or AOL®.
1. Highlight “Get Xpress Mail” on the Home Screen and press
the center of the NAVIGATION key .
2. Highlight “Install Now”and press the center of the
NAVIGATION
key .
3. Highlight “Download Now” and press the center of the NAVIGATION key . (Download
time will vary depending on your service area).
Steps?
7
Takes?
8 minutes
Set up Your Email
Personal Email Setup With Xpress Mail
070816_PantechGSGFinal 수정.indd 18 2007-08-16 ¿ÀÈÄ 1:52:56

Note:
For using
email on your
device, AT&T
recommends
a data plan.
If you do not
have a data
plan associated
with your
account, please
visit
att.com/
wireless or call
1-800-331-0500
19
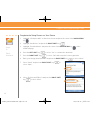
4. Press the LEFT SOFT key to select “Yes” to
continue the download.
5 Press the RIGHT SOFT
key to accept the license
agreement.
6. Type your 10-digit mobile (cell) number (numbers only)
and press “Next”.
070816_PantechGSGFinal 수정.indd 19 2007-08-16 ¿ÀÈÄ 1:52:57

20
7. Select “Portal or ISP” then press the RIGHT SOFT key
to select “Next”.
8. Choose your provider and press “Next”. (If your
provider is not listed highlight “More” then press
“Next” to view an additional list of personal email
providers.)
9. Enter your User Name and Password and press
“Next”.
Personal Email Setup With Xpress Mail
070816_PantechGSGFinal 수정.indd 20 2007-08-16 ¿ÀÈÄ 1:52:57
La page charge ...
La page charge ...
La page charge ...
La page charge ...
La page charge ...
La page charge ...
La page charge ...
La page charge ...
La page charge ...
La page charge ...
La page charge ...
La page charge ...
La page charge ...
La page charge ...
La page charge ...
La page charge ...
La page charge ...
La page charge ...
La page charge ...
La page charge ...
La page charge ...
La page charge ...
La page charge ...
La page charge ...
La page charge ...
La page charge ...
La page charge ...
La page charge ...
La page charge ...
La page charge ...
La page charge ...
La page charge ...
-
 1
1
-
 2
2
-
 3
3
-
 4
4
-
 5
5
-
 6
6
-
 7
7
-
 8
8
-
 9
9
-
 10
10
-
 11
11
-
 12
12
-
 13
13
-
 14
14
-
 15
15
-
 16
16
-
 17
17
-
 18
18
-
 19
19
-
 20
20
-
 21
21
-
 22
22
-
 23
23
-
 24
24
-
 25
25
-
 26
26
-
 27
27
-
 28
28
-
 29
29
-
 30
30
-
 31
31
-
 32
32
-
 33
33
-
 34
34
-
 35
35
-
 36
36
-
 37
37
-
 38
38
-
 39
39
-
 40
40
-
 41
41
-
 42
42
-
 43
43
-
 44
44
-
 45
45
-
 46
46
-
 47
47
-
 48
48
-
 49
49
-
 50
50
-
 51
51
-
 52
52


Pantech Pantech Laser Getting Started Manual
- Catégorie
- Les smartphones
- Taper
- Getting Started Manual
- Ce manuel convient également à
dans d''autres langues
- English: Pantech Pantech Laser
Autres documents
-
ZTE C-E520 Manuel utilisateur
-
Juniper FIELD PC Manuel utilisateur
-
LG GW825.ATLSTN Manuel utilisateur
-
Trust Xpress Wireless Keyboard Manuel utilisateur
-
 LG IQ iQ Mode d'emploi
-
LG HB455M Le manuel du propriétaire
-
Palm Centro (Bell) Quick Start
-
Samsung HP-T5044 Manuel utilisateur
-
-
