1
Operating Instructions | Instructions d‘utilisation
Instrucciones de uso
Tab-Ex® 03 D2
class I,II DIV 2
Class III

2
English Page 3
Français Page 26
Español Página 51

3
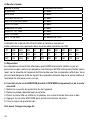
Content
1. Application ....................................................................................................................4
2. Safety precautions .......................................................................................................4
3. Radiation Exposure Statement ..................................................................................... 4
4. Band and mode ............................................................................................................ 5
5. Repair ........................................................................................................................... 5
6. Inserting the SIM/USIM card (LTE/WWAN model only) and microSD card ................ 5
7. Charging the tablet computer ........................................................................................6
8. Safety precautions for the battery ................................................................................6
9. Cleaning, maintenance and storage ............................................................................. 7
10. Disposal ......................................................................................................................7
11. Warranty and liability ................................................................................................... 8
12. Device layout and functions ........................................................................................ 8
13. Battery ....................................................................................................................... 14
14. Memory card (microSD card)....................................................................................20
15. Operation ..................................................................................................................25
Note:
The current Operating Instructions, Ex-Safety Manual, and the Certicate of Conformity
can be downloaded from the relevant product page at www.ecom-ex.com, or alternatively
they can be requested directly from the manufacturer.

4
1. Application
The Tab-Ex
®
03 D2 is a nonincentive water-, dust- and impact resistant tablet for indus-
trial application in hazardous areas with gaseous or dust atmospheres according to the
bi-national standard UL121201/CSA C22.2 No 213.
2. Safety precautions
These safety instructions contain information and safety regulations which are to be
observed. Non-observance of this information and these instructions can have serious
consequences and may violate regulations. Please read these Ex-Safety manual MAS-
0177 carefully before starting to use the device. In the event of conicting information
the details specied in the safety instructions shall apply. In case of any doubt (in the
form of translation or printing errors) the English version shall apply.
3. Radiation Exposure Statement
l Warning: This equipment complies with International Commission on Non-Ionizing
Radiation Protection (ICNIRP), IEEE C95.1, Federal Communications Commission
Ofce of Engineering and Technology (OET) Bulletin 65 and European Committee
for Electrotechnical Standardization (CENELEC) EN62311 limits for exposure to radio
frequency (RF) radiation.
The FCC ID and CE marking are printed on the device label.
The battery pack has to be removed to nd the info.
3.1 SAR values for European countries:
The SAR values below are only for devices developed for use in European countries.
The SAR limit is 2.0 W/kg.
Maximum SAR for this model and conditions under which it was recorded:
Body-worn SAR: 1.390 W/kg
Head SAR: 1.091 W/kg
3.2 SAR values for USA:
The SAR values below are only for devices developed for use in USA.
The SAR limit is 1.6 W/kg.
Maximum SAR for this model and conditions under which it was recorded:
Body-worn SAR: 1.390 W/kg
Simultaneous Transmission: 1.58 W/kg

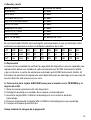
5
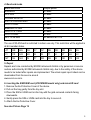
4. Band and mode
Band and mode Output power
EGSM900 33 dBm
DCS1800 30 dBm
WCDMA 900/2100 24 dBm
LTE 1/3/7/8/20/28/38/40 23 dBm
Wi-Fi 2.4 GHz 20 dBm
Bluetooth 2.4 GHz 20 dBm
Wi-Fi 5.1-5.7 GHz 23 dBm
Wi-Fi 5.8 GHz 25 mW
NFC 13.56 MHz 42 dBuA/m at 10 m
The use of WLAN band is restricted to indoor use only. This restriction will be applied in
all EU member states.
AT BE BG CH CY CZ DE DK EE ES EL
FI FR HR HU IE IS IT LI LT LU LV
MT NL NO PL PT RO SE SI SK TR UK
5. Repair
Repairs are to be conducted by ECOM Instruments GmbH or by personnel or service
centers authorized by ECOM Instruments GmbH only, due to the safety of the device
needs to be tested after repairs are implemented. The actual repair report sheet can be
downloaded from the service area at
www.ecom-ex.com.
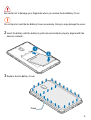
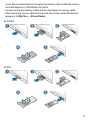
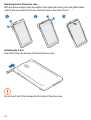
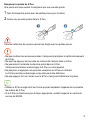
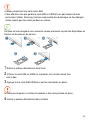
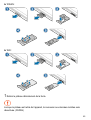
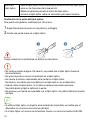
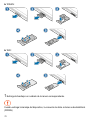
6. Inserting the SIM/USIM card (LTE/WWAN model only) and microSD card
1. Remove the Ex-Protective Cover of the device.
2. Pull out the tray gently from the tray slot.
3. Place the SIM or USIM card on the tray with the gold-coloured contacts facing
downwards.
4. Gently press the SIM or USIM card into the tray to secure it.
5. Attach the Ex-Protective Cover.
See also Picture Page 19

6
7. Charging the tablet computer
Charging the tablet computer is allowed only outside hazardous areas!
The battery of the tablet computer is delivered not fully charged. It is recommended to
charge the tablet computer’s battery for ve hours before using it for the rst time. The
full capacity of the battery is reached after 3 - 4 complete charge / discharge cycles.
Note:
•
There is a risk of explosion if the device is exposed to a ame.
•
Only use ECOM-approved chargers.
At the end of its lifetime, the supplied lithium-ion battery must be recycled or disposed
of separately from household waste. Don’t incinerate the battery.
8. Safety precautions for the battery
Damaged batteries and chargers should be removed from use and sent to ECOM
Instruments GmbH for inspection.
Note:
•
Extreme temperatures can have an adverse effect on charging the battery.
•
Do not dispose of the device in a re.
•
Dispose of the device in accordance with local regulations and not with normal house-
hold waste.
A high quality lithium-ion battery is used in your Tab-Ex® 03. These batteries have
numerous advantages in everyday use, such as a low weight and high capacity in a
nevertheless compact construction. In addition these batteries also exhibit practically
no memory effect. However, these batteries are susceptible to a natural aging process
which impairs their functionality.
Modern batteries today have a lifespan of around 500 charge cycles, which, when used
daily, corresponds to a service life of approximately two years. The ageing process in-
creases rapidly after this period, which means that the batteries are deemed technically
defective after 500 charge cycles. Moreover, the battery cells could expand and cause
irreparable damage to your device in a worst case scenario. For this reason recharge-
able batteries with lithium cells should be replaced after two years at the latest or after
reaching a battery capacity that is 50% of its initial value.

7
Note:
The battery used in this unit poses a re hazard and can cause chemical injuries if it is
used improperly. Neither the battery nor the battery cells should be opened or disas-
sembled and they should not be burned or exposed to temperatures exceeding 60 °C.
9. Cleaning, maintenance and storage
•
Only use a suitable cloth or sponge to clean the tablet computer.
•
Do not use any solvents or abrasive cleaning agents when cleaning.
•
It is recommended that you have the functionality and accuracy of the tablet
inspected by the manufacturer every two years.
•
Do not exceed the permissible storage temperature range of -20 °C to +60 °C
10. Disposal
Old electrical devices by ECOM Instruments GmbH will be directed to disposal at
our expense and disposed of free of charge in accordance with European Directive
2002/96/EC. Please follow local regulations for the disposal of electronic products.
The costs associated with returning devices to ECOM Instruments GmbH are to be
borne by the sender.
In accordance with Article 1, Section 18 and Article 2 of the Act revising the law of
Waste-Related Product Responsibility for Batteries and Accumulators (Gesetz zur Neu-
regelung der abfallrechtlichen Produktverantwortung für Batterien und Akkumulatoren)
dated 25 June 2009, we are obligated to provide the following information.
Your device contains a rechargeable lithium battery.
Depleted batteries or rechargeable batteries that can no longer be recharged should
never be disposed of along with normal or household waste. Old batteries can contain
harmful substances that are hazardous to health and damaging to the environment.
Please return the batteries/rechargeable batteries. Return is free of charge and requi-
red by law. Please only dispose of discharged batteries in the designated containers
and tape the terminals of lithium batteries.
Note:
The battery used in this unit poses a re hazard and can cause chemical injuries if it is
used improperly. Neither the battery nor the battery cells should be opened or disas-
sembled and they should not be burned or exposed to temperatures exceeding 60 °C.
If the battery needs to be disposed of, it can be removed as described under point (12).
The disposal regulations specied above are also applicable for old devices.

8
All batteries and rechargeable batteries can be recycled. Precious raw materials such
as iron, zinc and nickel can therefore be reused.
The symbol has the following meaning: Old electrical devices should not be dispo-
sed of along with normal or household waste.
This symbol on the battery, manual or packaging indicates that the batteries in this
product should not be disposed of with other household waste at the end of their wor-
king life. Where marked, the chemical symbols Hg, Cd or Pb indicate that the battery
contains mercury, cadmium or lead above the reference levels in EC Directive 2006/66.
11. Warranty and liability
The warranty of this product follows the General Conditions of Delivery and Payment of
ECOM Instruments GmbH, which are available at www.ecom-ex.com, or alternatively
they can be requested directly from the manufacturer.
This warranty can be extended by the optional Service Level Agreement.
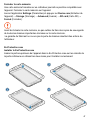
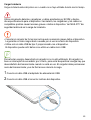
12. Device layout and functions
Package contents
Refer to the quick start guide for package contents.
• The items supplied with the device and any available accessories may vary
depending on the region or service provider.
• The supplied items are designed only for this device and may not be compatible
with other devices.
• Appearances and specications are subject to change without prior notice.
• A case is supplied to protect your device. If you want to remove the case attached
to the device, it is recommended to detach it from the top corners.

9
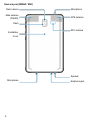
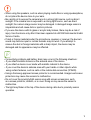
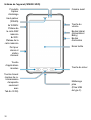
Device layout (WWAN / WiFi)
Proximity
Light sensor
Speaker
(WWAN)
► WWAN:
SIM card /
Memory
card tray
► WiFi:
Memory
card tray
Keyboard
dock port
Recents key
Home key
(Fingerprint
recognition
sensor
only with
Tab-Ex 03 D2)
Front camera
Volume key
Side key
(Power/Bixby)
Active key
Touchscreen
Back key
Multipurpose
jack
(USB Type- C)

10
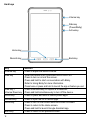
Device layout (WWAN / WiFi)
Rear camera
Main antenna
(WWAN)
Flash
Ex-Battery
Cover
Microphone
Microphone
GPS antenna
NFC antenna
Speaker
Earphone jack

11
• When using the speakers, such as when playing media les or using speakerphone,
do not place the device close to your ears.
• Be careful not to expose the camera lens to a strong light source, such as direct
sunlight. If the camera lens is exposed to a strong light source, such as direct
sunlight, the camera image sensor may be damaged. A damaged image sensor is
irreparable and will cause dots or spots in pictures.
• If you use the device with its glass or acrylic body broken, there may be a risk of
injury. Use the device only after it has been repaired at a ECOM Instruments GmbH
Service Centre.
• If dust or foreign materials enter the microphone, speaker, or receiver, the device’s
sound may become quiet or certain features may not work. If you attempt to
remove the dust or foreign materials with a sharp object, the device may be
damaged and its appearance may be affected.
• Connectivity problems and battery drain may occur in the following situations:
– If you attach metallic stickers on the antenna area of the device
– If you attach a device cover made with metallic material to the device
– If you cover the device’s antenna area with your hands or other objects while
using certain features, such as calls or the mobile data connection (WWAN)
• Using a Samsung-approved screen protector is recommended. Unapproved screen
protectors may cause the sensors to malfunction.
• Do not cover the proximity/light sensor area with screen accessories, such
as a screen protector, stickers, or a cover. Doing so may cause the sensor to
malfunction.
• The light may icker at the top of the device during calls due to proximity sensor
operation.

12
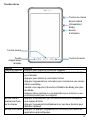
Hard keys
Volume key
Side key
(Power/Bixby)
Active key
Back key
Home key
Recents key
Key Function
Volume key • Press to adjust the device volume.
Side key • When the device is off, press and hold to turn it on.
• Press to turn on or lock the screen.
• Press and hold to start a conversation with Bixby.
Refer to Using Bixby for more information.
•
Press twice or press and hold to launch the app or feature you set.
Side key +
Volume Down key
• Press simultaneously to capture a screenshot.
• Press and hold simultaneously to turn off the device.
Active key • Press or press and hold to launch preset apps.
Recents key • Press to open the list of recent apps.
Home key • Press to turn on the screen while the screen is locked.
• Press to return to the Home screen.
• Press and hold to launch Google Assistant app.
Back key • Press to return to the previous screen.

13
Setting the Side key
Select an app or feature to launch by pressing the Side key twice or pressing and
holding the Side key.
Launch the Settings app, tap Advanced features → Side key, and then select an option
you want.
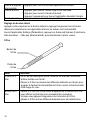
S Pen
S Pen button
S Pen nib
Name Functions
S Pen nib • Use the S Pen to write, draw, or perform touch actions on the
screen.
• Hover the S Pen over items on the screen to access additional
S Pen features, such as the Air view feature.
S Pen button • Hover the S Pen over the screen and press the S Pen button to
display the Air command features.
• While pressing and holding the S Pen button, drag the S Pen over
items to select them.
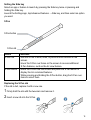
Replacing the S Pen nib
If the nib is dull, replace it with a new one.
1 Firmly hold the nib with the tweezers and remove it.
2 Insert a new nib into the S Pen.

14
Be careful not to pinch your ngers with the tweezers.
• Do not reuse old nibs. Doing so may cause the S Pen to malfunction.
• Do not press the nib excessively when inserting the nib into the S Pen.
• Do not insert the round end of the nib into the S Pen.
Doing so may cause damage to the S Pen or your device.
• Do not bend or apply excessive pressure with the S Pen while using it.
The S Pen may be damaged or the nib may be deformed.
• Do not hard press on the screen with the S Pen. The pen nib may be deformed.
• If you use the S Pen at sharp angles on the screen, the device may not recognise
the S Pen actions.
• If the S Pen is not working properly, take it to a ECOM Service Centre.
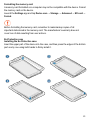
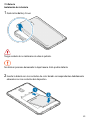
13. Battery
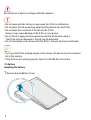
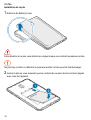
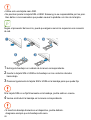
Installing the battery
1 Remove the Ex-Battery Cover.

15
Be careful not to damage your ngernails when you remove the Ex-Battery Cover.
Do not bend or twist the Ex-Battery Cover excessively. Doing so may damage the cover.
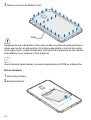
2 Insert the battery with the battery’s gold-coloured contacts properly aligned with the
device’s contacts.
3 Replace the Ex-Battery Cover.
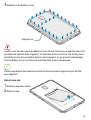
Press

16
Ensure that the Ex-Battery Cover is closed tightly to prevent water and dust from enter-
ing the device. Open or loose Ex-Battery Cover may allow water and dust to enter the
device and cause damage. A loose cover is not permitted in the hazardous area.
Use only ECOM-approved Ex-Battery Covers and accessories with the device.
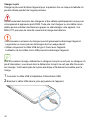
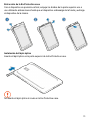
Removing the battery
1 Remove the Ex-Battery Cover.
2 Pull out the battery.
Charging the battery
Charge the battery before using it for the rst time or when it has been unused for
extended periods.
Use only ECOM-approved battery, charger, and cable specically designed for your
device. Incompatible battery, charger, and cable can cause serious injuries or damage
to your device. See MAS-0177 for additional battery charging safety.

17
• Connecting the charger improperly may cause serious damage to the device.
Any damage caused by misuse is not covered by the warranty.
• Use only USB Type-C cable supplied with the device.
The device may be damaged if you use Micro USB cable.
To save energy, unplug the charger when not in use. The charger does not have a
power switch, so you must unplug the charger from the electric socket when not in
use to avoid wasting power. The charger should remain close to the electric socket
and easily accessible while charging.
1 Connect the USB cable to the USB power adaptor.
2 Plug the USB cable into the device’s multipurpose jack.
3 Plug the USB power adaptor into an electric socket.
4 After fully charging, disconnect the charger from the device.
Then, unplug the charger from the electric socket.
Do not remove the battery before removing the charger.
This may damage the device.

18
Reducing the battery consumption
Your device provides various options that help you conserve battery power.
• Optimise the device using the device care feature.
• When you are not using the device, turn off the screen by pressing the Side key.
• Activate power saving mode.
• Close unnecessary apps.
• Deactivate the Bluetooth feature when not in use.
• Deactivate auto-syncing of apps that need to be synced.
• Decrease the backlight time.
• Decrease the screen brightness.
Battery charging tips and precautions
• When the battery power is low, the battery icon appears empty.
• If the battery is completely discharged, the device cannot be turned on immediately
when the charger is connected. Allow a depleted battery to charge for a few minutes
before turning on the device.
• If you use multiple apps at once, network apps, or apps that need a connection to
another device, the battery will drain quickly. To avoid losing power during a data
transfer, always use these apps after fully charging the battery.
• Using a power source other than the charger, such as a computer, may result in a
slower charging speed due to a lower electric current.
• The device can be used while it is charging, but it may take longer to fully charge the
battery.
• If the device receives an unstable power supply while charging, the touchscreen may
not function. If this happens, unplug the charger from the device.
• While charging, the device and the charger may heat up. This is normal and should not
affect the device’s lifespan or performance. If the battery gets hotter than usual, the
charger may stop charging. If this occurs during wireless charging, disconnect the
device from the charger to let it cool down, then charge the device again later.
•
If you charge the device while the multipurpose jack is wet, the device may be damaged.
Thoroughly dry the multipurpose jack before charging the device.
• If the device is not charging properly, take the device and the charger to a ECOM
Service Centre.
Fast charging
The device has a built-in fast charging feature. You can charge the battery more quickly
while the device or its screen is turned off.

19
Increasing the charging speed
To increase the charging speed, turn the device or its screen off when you charge the
battery. If the fast charging feature is not activated, launch the Settings app, tap Device
care → Battery → Charging, and then tap the Fast charging switch to activate it.
• While charging, you cannot activate or deactivate this feature.
• You cannot use the built-in fast charging feature when you charge the battery
using a standard battery charger.
• If the device heats up or the ambient air temperature rises, the charging speed may
decrease automatically. This is a normal operating condition to prevent damage to
the device.
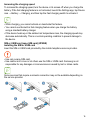
SIM or USIM card (nano-SIM card) (WWAN)
Installing the SIM or USIM card
Insert the SIM or USIM card provided by the mobile telephone service provider.
• Use only a nano-SIM card.
• Use caution not to lose or let others use the SIM or USIM card. Samsung is not
responsible for any damages or inconveniences caused by lost or stolen cards.
Some services that require a network connection may not be available depending on
the service provider.

20
1 Pull out the tray gently from the tray slot.
2 Place the SIM or USIM card on the tray with the gold-coloured contacts facing
downwards.
3 Gently press the SIM or USIM card into the tray to secure it.
If the card is not xed rmly into the tray, the SIM card may leave or fall out of the tray.
4 Insert the tray back into the tray slot.
• If you insert the tray into your device while the tray is wet, your device may be
damaged. Always make sure the tray is dry.
• Fully insert the tray into the tray slot to prevent liquid from entering your device.
14. Memory card (microSD card)
Installing a memory card
Your device’s memory card capacity may vary from other models and some memory
cards may not be compatible with your device depending on the memory card manu-
facturer and type. To view your device’s maximum memory card capacity, refer to the
Samsung website.
• Some memory cards may not be fully compatible with the device.
Using an incompatible card may damage the device or the memory card, or corrupt
the data stored in it.
• Use caution to insert the memory card right-side up.
• The device supports the FAT and the exFAT le systems for memory cards.
When inserting a card formatted in a different le system, the device will ask to
reformat the card or will not recognise the card. To use the memory card, you must
format it.
La page est en cours de chargement...
La page est en cours de chargement...
La page est en cours de chargement...
La page est en cours de chargement...
La page est en cours de chargement...
La page est en cours de chargement...
La page est en cours de chargement...
La page est en cours de chargement...
La page est en cours de chargement...
La page est en cours de chargement...
La page est en cours de chargement...
La page est en cours de chargement...
La page est en cours de chargement...
La page est en cours de chargement...
La page est en cours de chargement...
La page est en cours de chargement...
La page est en cours de chargement...
La page est en cours de chargement...
La page est en cours de chargement...
La page est en cours de chargement...
La page est en cours de chargement...
La page est en cours de chargement...
La page est en cours de chargement...
La page est en cours de chargement...
La page est en cours de chargement...
La page est en cours de chargement...
La page est en cours de chargement...
La page est en cours de chargement...
La page est en cours de chargement...
La page est en cours de chargement...
La page est en cours de chargement...
La page est en cours de chargement...
La page est en cours de chargement...
La page est en cours de chargement...
La page est en cours de chargement...
La page est en cours de chargement...
La page est en cours de chargement...
La page est en cours de chargement...
La page est en cours de chargement...
La page est en cours de chargement...
La page est en cours de chargement...
La page est en cours de chargement...
La page est en cours de chargement...
La page est en cours de chargement...
La page est en cours de chargement...
La page est en cours de chargement...
La page est en cours de chargement...
La page est en cours de chargement...
La page est en cours de chargement...
La page est en cours de chargement...
La page est en cours de chargement...
La page est en cours de chargement...
La page est en cours de chargement...
La page est en cours de chargement...
La page est en cours de chargement...
La page est en cours de chargement...
-
 1
1
-
 2
2
-
 3
3
-
 4
4
-
 5
5
-
 6
6
-
 7
7
-
 8
8
-
 9
9
-
 10
10
-
 11
11
-
 12
12
-
 13
13
-
 14
14
-
 15
15
-
 16
16
-
 17
17
-
 18
18
-
 19
19
-
 20
20
-
 21
21
-
 22
22
-
 23
23
-
 24
24
-
 25
25
-
 26
26
-
 27
27
-
 28
28
-
 29
29
-
 30
30
-
 31
31
-
 32
32
-
 33
33
-
 34
34
-
 35
35
-
 36
36
-
 37
37
-
 38
38
-
 39
39
-
 40
40
-
 41
41
-
 42
42
-
 43
43
-
 44
44
-
 45
45
-
 46
46
-
 47
47
-
 48
48
-
 49
49
-
 50
50
-
 51
51
-
 52
52
-
 53
53
-
 54
54
-
 55
55
-
 56
56
-
 57
57
-
 58
58
-
 59
59
-
 60
60
-
 61
61
-
 62
62
-
 63
63
-
 64
64
-
 65
65
-
 66
66
-
 67
67
-
 68
68
-
 69
69
-
 70
70
-
 71
71
-
 72
72
-
 73
73
-
 74
74
-
 75
75
-
 76
76