Nicols GP 200 R1 IP Z Manuel utilisateur
- Catégorie
- Stroboscopes
- Taper
- Manuel utilisateur

GP 200 Z IP
Manuel d’utilisation
1

2
Manuel d’utilisation
1. AVANT DE COMMENCER
1.1 Que contient l’emballage
1 –Un GP 200 R1 IP Z
2 – Un manuel d’utilisation
1.2 Consignes de déballage
Immédiatement après réception d'un appareil, déballez soigneusement le carton, vérifiez le contenu
pour vous assurer que toutes les pièces sont présentes et qu'elles ont été reçues en bon état. En cas de
manquement ou de bien vous semblant endommagées, avisez immédiatement l'expéditeur et conservez
le matériel d'emballage à des fins de vérification. Faites de même si l’emballage vous semble
endommagé ou n’avoir pas été manipulé convenablement.
Conservez le carton et tous les matériaux d'emballage. Dans le cas où un appareil doit être retourné sous
garantie, il est important qu’il soit retourné dans la boîte d'origine et l'emballage d'origine.
1.3 Consignes de sécurité (lisez attentivement ce manuel d’utilisation)
* S'il vous plaît garder ce manuel d’utilisation pour une future consultation. Si vous vendez l'appareil à un
autre utilisateur, assurez-vous de lui transmettre.
* Assurez-vous toujours que vous vous connectez à la tension appropriée et que la tension de ligne à
laquelle vous vous connectez n'est pas plus élevée que celle indiquée sur l'autocollant ou le panneau
arrière de l'appareil.
* Ce produit est destiné à une utilisation en intérieur et extérieur
•Pour éviter tout risque d'incendie ou de choc, n'exposez pas le contrôleur à la pluie ou à l'humidité.
Assurez-vous qu'il n'y a pas de matériaux inflammables à proximité de l'appareil pendant le
fonctionnement.
•Ne pas utiliser l’appareil sans lampe ou si le boitier est endommagé
•Il est impératif de ne jamais regarder directement la source lumineuse sous risque de graves séquelles
oculaires. ATTENTION aux émissions des Leds qui pourraient blesser ou irriter l’œil.
•Ne pas utiliser en présence de personnes souffrant d’épilepsie
* L'unité doit être installée dans un endroit avec une ventilation adéquate, à au moins 50 cm des
surfaces adjacentes. Assurez-vous que les fentes d'aération ne sont pas obstruées.
* Débranchez toujours la source d'alimentation avant de procéder à l'entretien ou au remplacement du
fusible et veillez à remplacer le même.
* En cas de problème de fonctionnement sérieux, arrêtez immédiatement d'utiliser l'appareil. N'essayez
jamais de réparer l'unité par vous-même. Les réparations effectuées par des personnes non qualifiées
peuvent entraîner des dommages ou des dysfonctionnements. Veuillez contacter le centre d'assistance
technique agréé le plus proche. Utilisez toujours les mêmes pièces de rechange.
* Assurez-vous que le cordon d'alimentation n'est jamais endommagé.
* Ne débranchez jamais le cordon d'alimentation en tirant sur le cordon.
•Ne pas utiliser cet appareil dans des conditions de température ambiante supérieur à 45°C ou 113 °F.
•Toute modification/adaptation/tentative de réparation et autres ajustements de votre appareil en
dehors de notre service technique, annulera sa garantie.
•La modification des câbles fournis avec ce produit peut ralentir une intervention technique. Nous vous
invitons à ne JAMAIS les couper.
GP 200 Z IP

3
Manuel d’utilisation
1.4 Consignes d’installation
* Ce produit peut être monté en suspension grâce à la lyre de fixation. Cette lyre peut être fixée sur une
structure ou un pont de manière sécurisée, une élingue supplémentaire reste obligatoire.
* Le produit doit être correctement fixé afin d’éviter toute vibration ou glissement lorsque celui-ci est en
marche. Assurez-vous que la structure puisse supporter 10 fois le poids de l’appareil. Utilisez des
élingues de sécurité pouvant supporter 12 fois le poids de l’appareil. Le produit doit être fixé par du
personnel qualifié.
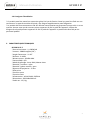
2. CARACTERISTIQUES TECHNIQUES
GP 200 R1 IP Z
* Source lumineuse : 1 x 200W led
* Lumens : 38600Lux@1m (26°)
* Angle d’ouverture : 11-26°
* Dimmer : 0-100%
* Niveau sonore : 28 dBA MAX
* Canaux DMX : 8/9
* Mode de pilotage : Auto, DMX, Master-slave
* Roue de 7 couleurs + open
* Roue de 7 gobos rotatifs + open
* Distance de projection : 5-25m
* Effet prism
* Fonction zoom
* Fonction focus
* Alimentation : AC110-240V, 50/60Hz
* Dimensions : 560x318x200 mm
* Poids net : 12,5 Kg
GP 200 Z IP

4
Manuel d’utilisation
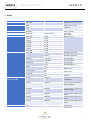
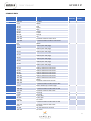
3. MENU
GP 200 Z IP
Menu 1
Menu 2
Menu 2
Functions
1)DMX Address
001
–512
DMX Address code setting
2)Channel Mode
1:8Ch
DMX Channel mode
selection
2:9Ch
3)Auto Mode
Auto Run
Auto run mode
Scene Edit
Scene1
-Scene7
Scene Edit
4) Slave Mode
Slave mode
5)Manual Control
1
: Dimmer
0
-255
Manual mode
2
: Color
0
-255
3
: Gobo
0
-255
4
: GoboR
0
-255
5
: Focus
0
-255
6
: Zoom
0
-255
7
: Prism
0
-255
8
: PrismR
0
-255
6)Settings
1
:No DMX
1
:Off
No DMX, signal clear
2
:Hold
No DMX, signal keep
2
:Display
1
:Normal
Normal display
2
:Inverted
Inverted display
3
:Back Light
1
:On
Always bright
2
:Off
30S back
-light off
4
:Reset
No
Yes
Motor reset
5
:Factory Sets
No
Yes
Factory Sets
6
:Cal Clear
No
Yes
Cal Clear
7)Calibrations
Password
(088)
1
: Color
000
-255
Initial position calibration of
color wheel
2
: Gobo
000
-255
Initial position calibration of
gobo revolution
3
: GoboR
000
-255
Initial position calibration of
goboR rotation
4
: Focus
000
-255
Initial position calibration of
focus
5
: Zoom
000
-255
Initial position calibration of
zoom
6
: Prism
000
-255
Initial position calibration of
prism
8)Version
Vx.xx
CPU version
9
)Screensaver
Lock
screen

5
Manuel d’utilisation
4.CANAUX DMX
GP 200 Z IP
Function
DMX Value
Setting
8
Channels
9
Channels
Dimmer
000
-255
0~100%
1
1
Color
0~15
OPEN
2
2
16~31
Red
32~47
Green
48~63
Blue
64~79
Yellow
80~95
Purple
96~111
Orange
112~127
UV
128~191
Clockwise rotation: fast to slow
192~255
Counterclockwise rotation: slow to fast
Gobo
0
~7
OPEN
3
3
8
~15
Gobo 1 (See next page)
16
~23
Gobo 2 (See next page)
24
~31
Gobo 3 (See next page)
32
~39
Gobo 4 (See next page)
40
~47
Gobo 5 (See next page)
48
~55
Gobo 6 (See next page)
56
~63
Gobo 7 (See next page)
64
~71
Gobo 7
shake from slow to fast
72
~79
Gobo 6 shake from slow to fast
80
~87
Gobo 5 shake from slow to fast
88
~95
Gobo 4 shake from slow to fast
96
~103
Gobo 3 shake from slow to fast
104
~111
Gobo 2 shake from slow to fast
112
~119
Gobo 1 shake from slow to fast
120
~127
OPEN
128
~191
Clockwise rotation fast to slow
192
~255
Counterclockwise rotation slow to fast
GoboR
0~127
Static rotation by a certain angle
4
4
128~191
Counterclockwise rotation fast to slow
192~255
Clockwise rotation slow to fast
Focus
0~255
Focusing
5
5
Zoom
0~255
Zooming
6
6
Prism
0~31
Prism close
7
7
32~255
Prism open
PrismR
0
~127
No rotate
8
8
128
~191
Counterclockwise rotation fast to slow
192
~255
Clockwise rotation slow to fast
Function
0~31
No action
9
32~191
All reset
after three seconds
192~255
No action

6
Manuel d’utilisation GP 200 Z IP
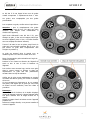
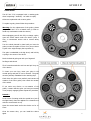
ROUE des GOBOS
Le GP 200 Z IP est équipé d'une roue de gobos
rotatifs comprenant 7 emplacements dont 1 vide.
Les gobos sont remplaçables par des gobos
personnalisés.
Pour remplacer un gobo, veuillez suivre la procédure:
Attention : pour le remplacement des gobos
veuillez mettre votre GP 200 Z IP dans une pièce
chauffée (afin d'éviter toute condensation à
l'intérieur de l'appareil)
Après avoir débranché votre GP 200 Z IP, pour
changer un gobo , il faut ouvrir la trappe d’accès qui
est sous l’appareil (10cm x 5cm, 4 vis têtes fraisées
avec une soupape de sécurité centrale)
Tourner à la main la roue en photo jusqu’à avoir le
gobo que vous souhaité remplacer face à nous. (ne
pas insérer un gobo dans l’emplacement vide
d’origine en position 0)
Le gobo est encastré dans la grande roue, et
maintenu grâce à un ressort au centre de la roue.
Pincer l’engrenage du gobo souhaité avec l’ongle de
l’index et le pouce.
Penchez le vers l'avant en direction de l’objectif de
sortie et tirer le vers le haut à l’extérieur de
l’appareil.
Pour insérer votre nouveau logo, insérer votre gobo
dans le ressort central et pousser le dans son
emplacement. Le gobo doit être parfaitement
encastré dans les clips de maintien.
Vérifier que le gobo tourne parfaitement et entraine
la rotation des autres gobos, puis vérifier la rotation
de la roue.
Si vous constatez un frottement ou la non rotation
des gobos, cela signifie que le gobo que vous venez
de mettre est mal enclenché, merci de refaire la
procédure.
Remarque :
En cas de buée à l'intérieur de la lentille d'optique
(sortie du faisceau lumineux). Mettez l'appareil dans
une pièce chauffée avec la trappe d'accès sur le
dessus.
Ouvrez la trappe d'accès et laissez tourner l'appareil
pendant 10h.
Refermez la trappe d'accès, vous pouvez installer de
nouveau l'appareil.

7
Manuel d’utilisation
5. FONCTIONS PRINCIPALES
5.1 Mode DMX
Appuyez sur le bouton SETUP pour entrer dans ce menu et sélectionnez votre choix à l’aide des
boutons UP et DOWN –Appuyez à nouveau sur SETUP pour sauvegarder et revenir au menu principal –Si
vous n’avez rien sélectionné au bout de 30s, vous reviendrez automatiquement au menu principal.
5.2 Mode canaux
Appuyez sur le bouton SETUP pour entrer dans ce menu et sélectionnez votre choix à l’aide des
boutons UP et DOWN - Appuyez à nouveau sur SETUP pour sauvegarder et revenir au menu principal –Si
vous n’avez rien sélectionné au bout de 30s, vous reviendrez automatiquement au menu principal.
5.3 Mode Auto
Dans « Auto Mode » se trouvent 2 menus optionnels : Mode Auto et Scene edit. Editez et
sauvegardez vos scènes manuellement, jusqu’à 7 modes auto configurables avec les mêmes paramètres
utilisateurs qu’en DMX.
5.4 Slave mode
Appuyez sur SETUP pour sélectionner le mode esclave – L’appareil recevra alors un signal et
fonctionnera comme le projecteur Maître connecté par le cable DMX qui lui tourne en mode Auto ou Manual
5.5 Contrôle Manuel
Dans le menu « Manual control » vous pouvez régler tous les paramètres pour une configuration fixe.
Une fois que c’est fait, appuyez sur le bouton pour sauvegarder et retournez au menu principale
Si vous n’avez rien sélectionné l’afficheur revient au menu principal après 30 secondes.
5.6 Réglages
- Echec DMX : Appuyez sur le bouton SETUP. Ensuite utilisez les touches UP/DOWN pour sélectionner
votre choix « OFF »(pas de DMX, appareil éteint) ou « HOLD » (pas de DMX mais l’appareil reste allumé) –
Appuyez à nouveau sur SETUP pour sauvegarder et retourner au menu principal. Si vous n’avez rien
sélectionné au bout de 30s, vous reviendrez automatiquement au menu principal.
- Affichage : Sélectionnez le menu Display et appuyez sur SETUP. Ensuite utilisez les touches
UP/DOWN pour sélectionner votre choix « normal » ou « Inverted ». Appuyez à nouveau sur SETUP pour
sauvegarder et retourner au menu principal. Si vous n’avez rien sélectionné au bout de 30s, vous reviendrez
automatiquement au menu principal.
- Back light : Sélectionnez le menu Back Light et appuyez sur SETUP. Ensuite utilisez les touches
UP/DOWN pour sélectionner votre choix «YES» ou «NO». Appuyez à nouveau sur SETUP pour sauvegarder et
retourner au menu principal. Si vous n’avez rien sélectionné au bout de 30s, vous reviendrez
automatiquement au menu principal.
- Reset : Sélectionnez le menu Reset et appuyez sur SETUP. Ensuite utilisez les touches UP/DOWN
pour sélectionner votre choix «ON» ou «OFF». Appuyez à nouveau sur SETUP pour sauvegarder et retourner
au menu principal. Si vous n’avez rien sélectionné au bout de 30s, vous reviendrez automatiquement au
menu principal.
GP 200 Z IP

8
Manuel d’utilisation
- Réglage usine : Sélectionnez le menu Factory set et appuyez sur SETUP. Ensuite utilisez les touches
UP/DOWN pour sélectionner votre choix «YES» (pour restaurer les paramètres usine) ou «NO». Appuyez à
nouveau sur SETUP pour sauvegarder et retourner au menu principal. Si vous n’avez rien sélectionné au bout
de 30s, vous reviendrez automatiquement au menu principal.
- Cal clear : Sélectionnez le menu Auto test et appuyez sur SETUP. Ensuite utilisez les touches
UP/DOWN pour sélectionner votre choix «YES» ou «NO». Appuyez à nouveau sur SETUP pour sauvegarder et
retourner au menu principal. Si vous n’avez rien sélectionné au bout de 30s, vous reviendrez
automatiquement au menu principal.
- Calibrations : Sélectionnez le menu Calibrations - Entrez 088 pour rentrer dans le menu Calibrations.
Si erreur retournez au menu Calibrations, si correct appuyez sur le bouton UP/DOWN pour sélectionner votre
choix : Color (position initiale de la roue couleur), Gobo (position initiale de la rotation du gobo), GoboR
(position initiale de la rotation du goboR), Focus (position initialedu focus), Zoom (position initiale du zoom)
- Version : Sélectionnez le menu Version et appuyez sur SETUP. La led vous indiquera la version du
produit. Cette fois appuyez sur SETUP pour sauvegarder et retourner au menu principal. Si vous n’avez rien
sélectionné au bout de 30s, vous reviendrez automatiquement au menu principal.
-Economiseur d’écran : Sélectionnez le menu Screensaver et appuyez sur SETUP pour entrer dans la
page Screensaver. Si vous n’avez rien sélectionné au bout de 30s, vous reviendrez automatiquement au
menu principal.
GP 200 Z IP

9
Manuel d’utilisation
6. DEPANNAGE
Vous trouverez ci-dessous une liste de problèmes qui pourraient survenir lors de l’utilisation
de votre appareil. Nous vous apportons quelques suggestions pour remédier facilement à la
situation.
1. L’appareil de fonctionne pas, il n’y a pas de lumière :
A. Vérifier les branchements de l’alimentation et du fusible
B. Vérifier la tension du secteur
2. L’appareil ne répond pas au contrôleur DMX :
A. La LED DMX dot être allumée. Si ce n’est pas le cas, vérifiez les connecteurs et les
câbles pour voir si le raccordement est correct.
B. Si la LED DMX est allumée et que le canal ne répond pas, vérifiez les réglages de
l’adresse et la polarité du signal DMX
C. Si vous rencontrez des problèmes avec le signal DMX mais de façon intermittente,
vérifier les connecteurs ou la carte électronique de l’appareil défaillant ainsi que de
l’appareil précédent.
D. Essayer d’utiliser un autre contrôleur DMX
E. Vérifiez l’absence d’interférence entre les câbles électriques
POUR TOUT PROBLEME DE PANNE, VEUILLEZ CONTACTER VOTRE REVENDEUR
7. ENTRETIEN DE L’APPAREIL
Le nettoyage du système d’optique externe de l’appareil doit être fait régulièrement;
1. Nettoyez l’appareil avec un chiffon doux et utilisez un liquide de nettoyage pour vitres
2. Il est toujours recommandé d’essuyer correctement toutes les pièces de l’appareil
www.expelec.fr [email protected]
167 rue des peupliers 74330
Epagny - France
33 (0)4.50.60.80.20
est une marque déposée de la Société Expelec SA
GP 200 Z IP

GP 200 Z IP
User manuel
10

11
User manual
1.Before you begin
1.1 What are included
1) 1 x GP 200 R1 Z IP
2) Manual
1.2 Unpacking Instructions
Immediately upon receiving a fixture, carefully unpack the carton, check the
contents to ensure that all parts are present, and have been received in good
condition. Notify the shipper immediately and retain packing material for inspection if any parts
appear damaged from shipping or the carton itself shows signs
of mishandling. Save the carton and all packing materials. In the event that a
fixture must be returned to the factory, it is important that the fixture be returned
in the original factory box and packing.
1.3 Safety Instructions
Please read these instructions carefully, which includes important
information about the installation, usage and maintenance .
* Please keep this User Guide for future consultation. If you sell the unit to another user,
be sure that they also receive this instruction booklet.
*Always make sure that you are connecting to the proper voltage and that the line
voltage you are connecting to is not higher than that stated on decal or rear panel of
the fixture.
* This product is intended for indoor and outdoor use
* To prevent risk of fire or shock, do not expose fixture to rain or moisture. Make sure
there are no flammable materials close to the unit while operating.
* DO NO look directly at the light while the fixture is on
* The unit must be installed in a location with adequate ventilation, at least 50cm
from adjacent surfaces. Be sure that no ventilation slots are blocked.
*Always disconnect from power source before servicing or replacing lamp or fuse
and be sure to replace with same lamp source.
* In the event of serious operating problem, stop using the unit immediately. Never try to
repair the unit by yourself. Repairs carried out by unskilled people can lead to damage or
malfunction. Please contact the nearest authorized technical assistance center.
Always use the same type spare parts.
* Don’t connect the device to a dimmer pack.
* Make sure power cord is never crimped or damaged.
* Never disconnect power cord by pulling or tugging on the cord.
•Don’t operate this device under 113°F ambient temperature conditions.
•Any modification, adjustment, attempt of repair or any other settings made outside our
technical department will void your warranty. Moreover, NEVER CUT any supplied cable
because it may delay the time of repair by our service and increase the cost.
GP 200 Z IP

12
User manual
1.4 INSTALLATION
The unit should be mounted by its screws holes on the bracket. Always ensure that th eunit is frimly fixed
to avoid vibration and slipping while operating. The strcture to which you are attaching the unit should
be able to support 10 times the weight of the unit. Also always use a safety cable than can hold 12 times
the weight of the unti when installing the fixture. The quipment must be fixed by professionals.
2. TECHNICAL SPECIFICATIONS
200W LED gobo projector IP with zoom
* Light source : 1x 200W LED
* Lumens : 38600Lux@1m (26°)
* Beam angle : 11-26°
* Dimmer : 0-100%
* Sound level : 28 dBA MAX
* DMX Channels : 8/9
*Operation Mode : Auto, DMX, Master/Slave
* 7 colors wheel + open
* 7 rotative gobos wheel + open
* Projection distance : 5-25 m
*Prism effect
* Zoom function
* Focus function
* Voltage : AC110-240V, 50/60 Hz
* Dimensions : 560*318*200mm
* Net weight : 12,5 Kg
GP 200 Z IP

13
3. MENU
GP 200 Z IP
Menu 1
Menu 2
Menu 2
Functions
1)DMX Address
001
–512
DMX Address code setting
2)Channel Mode
1:8Ch
DMX Channel mode
selection
2:9Ch
3)Auto Mode
Auto Run
Auto run mode
Scene Edit
Scene1
-Scene7
Scene Edit
4) Slave Mode
Slave mode
5)Manual Control
1
: Dimmer
0
-255
Manual mode
2
: Color
0
-255
3
: Gobo
0
-255
4
: GoboR
0
-255
5
: Focus
0
-255
6
: Zoom
0
-255
7
: Prism
0
-255
8
: PrismR
0
-255
6)Settings
1
:No DMX
1
:Off
No DMX, signal clear
2
:Hold
No DMX, signal keep
2
:Display
1
:Normal
Normal display
2
:Inverted
Inverted display
3
:Back Light
1
:On
Always bright
2
:Off
30S back
-light off
4
:Reset
No
Yes
Motor reset
5
:Factory Sets
No
Yes
Factory Sets
6
:Cal Clear
No
Yes
Cal Clear
7)Calibrations
Password
(088)
1
: Color
000
-255
Initial position calibration of
color wheel
2
: Gobo
000
-255
Initial position calibration of
gobo revolution
3
: GoboR
000
-255
Initial position calibration of
goboR rotation
4
: Focus
000
-255
Initial position calibration of
focus
5
: Zoom
000
-255
Initial position calibration of
zoom
6
: Prism
000
-255
Initial position calibration of
prism
8)Version
Vx.xx
CPU version
9
)Screensaver
Lock
screen
User manual

14
4.CANAUX DMX
GP 200 Z IP
Function
DMX Value
Setting
8
Channels
9
Channels
Dimmer
000
-255
0~100%
1
1
Color
0~15
OPEN
2
2
16~31
Red
32~47
Green
48~63
Blue
64~79
Yellow
80~95
Purple
96~111
Orange
112~127
UV
128~191
Clockwise rotation: fast to slow
192~255
Counterclockwise rotation: slow to fast
Gobo
0
~7
OPEN
3
3
8
~15
Gobo 1 (See next page)
16
~23
Gobo 2 (See next page)
24
~31
Gobo 3 (See next page)
32
~39
Gobo 4 (See next page)
40
~47
Gobo 5 (See next page)
48
~55
Gobo 6 (See next page)
56
~63
Gobo 7 (See next page)
64
~71
Gobo 7
shake from slow to fast
72
~79
Gobo 6 shake from slow to fast
80
~87
Gobo 5 shake from slow to fast
88
~95
Gobo 4 shake from slow to fast
96
~103
Gobo 3 shake from slow to fast
104
~111
Gobo 2 shake from slow to fast
112
~119
Gobo 1 shake from slow to fast
120
~127
OPEN
128
~191
Clockwise rotation fast to slow
192
~255
Counterclockwise rotation slow to fast
GoboR
0~127
Static rotation by a certain angle
4
4
128~191
Counterclockwise rotation fast to slow
192~255
Clockwise rotation slow to fast
Focus
0~255
Focusing
5
5
Zoom
0~255
Zooming
6
6
Prism
0~31
Prism close
7
7
32~255
Prism open
PrismR
0
~127
No rotate
8
8
128
~191
Counterclockwise rotation fast to slow
192
~255
Clockwise rotation slow to fast
Function
0~31
No action
9
32~191
All reset
after three seconds
192~255
No action
User manual

15
GP 200 Z IP
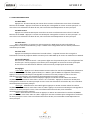
GOBOS WHEEL
The GP 200 Z IP is equipped with a rotating gobo
wheel comprising 7 locations, 1 of which is empty.
Gobos are replaceable with custom gobos.
To replace a gobo, please follow the procedure:
Warning: for the replacement of the gobos, please
put your GP 200 Z IP in a heated room (in order to
avoid any condensation inside the device)
After unplugging your GP 200 Z IP, to change a gobo,
open the access hatch under the device (10cm x
5cm, 4 countersunk screws with a central safety
valve)
Turn the wheel pictured by hand until you have the
gobo you want to replace in front of us. (do not insert
a gobo in the original empty slot in position 0)
The gobo is embedded in the big wheel, and held by
a spring in the center of the wheel.
Pinch the desired gobo gear with your fingernail
forefinger and thumb.
Tilt it forward towards the exit lens and pull it up out
of the device.
To insert your new logo, insert your gobo in the
central spring and push it into its location. The gobo
must be perfectly embedded in the retaining clips.
Check that the gobo turns perfectly and causes the
rotation of the other gobos, then check the rotation
of the wheel.
If you notice any friction or non-rotation of the
gobos, it means that the gobo you have just inserted
is not properly engaged, please repeat the procedure.
Remark :
In the event of misting inside the optical lens (exit of
the light beam). Place the appliance in a heated room
with the access hatch on top.
Open the access hatch and let the device run for 10
hours.
Close the access door, you can install the device
again.
User manual

16
5. Menu descriptions
1) DMX Address
Select the DMX Address menu, press the SETUP button. And then press the UP/DOWN button to set
initial address code (001 ~ 512).
Once you have set initial address code, please press the SETUP button to save and go back to main
menu.
If you have not done anything for 30s, it will go back to main menu automatically.
2) Channel Mode
Select the Channel Mode menu, press the SETUP button. And then press the UP/DOWN button to
select channel mode.
Once you have set it well, please press the SETUP button to save and go back to the main menu.
If you have not done anything for 30s, it will go back to main menu automatically.
3) Auto Mode
Select the Auto Mode menu, there are two menus for option, one is Auto Mode, another is Scene
Edit with 7 scenes for editing. Each scene can be edited independently, and also includes all the
DMX channels function and time-keeping function, but no Reset function. If need less than 7 scenes,
then set the scene time-keeping to “0”. The editing process is the same as Manual Control, exit to
save.
If you have not done anything for 30s, it will go back to main menu automatically.
4) Slave Mode
Select the Slave Mode menu, press the SETUP button to enter Slave Mode, then it will receive the
signal from the master and keep the same state as the master. The fixture in Auto Mode or Manual
mode is the master.
In the screensaver, it will switch to DMX mode in response to the channel sent from the console
whenever the master or slave receives the DMX512 signal.
5) Manual Control
Select the Manual Control menu, press the SETUP button to enter static color manual control mode.
And then press the UP/DOWN button to set relevant parameters.
Once you have set it well, please press the button to save and go back to the main menu.
If you have not done anything for 30s, it will go back to main menu automatically.
6) Settings
1: DMX Fail
Select DMX Fail menu, press the SETUP button. And then press the UP/DOWN button to
select settings: “OFF” (No DMX, lighting is off.), “HOLD” (No DMX, lighting keeps the original state).
Once you have set it well, please press the SETUP button to save and go back to the main menu.
If you have not done anything for 30s, it will go back to main menu automatically.
2: Display
Select Display menu, press the SETUP button. And then press the UP/DOWN button to select
settings: “Normal” or “Inverted”.
Once you have set it well, please press the SETUP button to save and go back to the main menu.
If you have not done anything for 30s, it will go back to main menu automatically.
If you have not done anything for 30s, it will go back to main menu automatically.
GP 200 Z IPUser manual

17
3: Back Light
Select Back Light menu, press the SETUP button. And then press the UP/DOWN button to select
settings: “On”(It is bright for a long time.),“Off”(No operation in 15s)
Once you have set it well, please press the SETUP button to save and go back to the main menu.
If you have not done anything for 30s, it will go back to main menu automatically.
4: Reset
Select Reset menu, press the SETUP button. And then press the UP/DOWN button to select settings:
“Yes”(Motor reset.),“No”(Exiting).
Once you have set it well, please press the SETUP button to save and go back to the main menu.
If you have not done anything for 30s, it will go back to main menu automatically.
5: Factory Sets
Select Factory Sets menu, press the SETUP button. And then press the UP/DOWN button to select
settings: “Yes”(Restore factory setting),“No”(Exiting).
Once you have set it well, please press the SETUP button to save and go back to the main menu.
If you have not done anything for 30s, it will go back to main menu automatically.
6: Cal Clear
Select Auto Test menu, press the SETUP button. And then press the UP/DOWN button to select
settings: “Yes”(Cal Clear),“No”( Exiting).
Once you have set it well, please press the SETUP button to save and go back to the main menu.
If you have not done anything for 30s, it will go back to main menu automatically.
7: Calibrations
Select Calibrations menu, input 088 to enter Calibrations menu, if error then back to Calibrations
menu, if correct then press the UP/DOWN button to select setting: Color(Initial position calibration of color
wheel), Gobo(Initial position calibration of gobo revolution), GoboR(Initial position calibration of
goboR rotation), Focus(Initial position calibration of focus), Zoom(Initial position calibration of zoom).
This time, please press the SETUP button to save and go back to the main menu.
If you have not done anything for 30s, it will go back to main menu automatically.
8:Version
Select Version menu, press the SETUP button. The led will show the version of the lighting.
This time, please press the SETUP button to save and go back to the main menu.
If you have not done anything for 30s, it will go back to main menu automatically.
9:Screensaver
Select Screensaver menu, press the SETUP button to enter Screensaver page.
If you have not done anything for 30s, it will go back to main menu automatically.
GP 200 Z IPUser manual

18
User manual
6. TROUBLESHOOTING
Following are a few common problems that may occur during operation. Here are some suggestions
for easy troubleshooting:
1. The fixture doesn’t not work, no light :
1. Check the connection of power and main fuse
2. Measure the main voltage on the main connector
2. The fixture does not respond to DMX controller :
1. DMX LED should be on. If not, check DMX connectors, cables to see if link prperly
2. If the DMX LED is on and no response to the channel, check the address settings and DMX
polarity
3. If you have intermittent DMX signal problems, check the pins on connectors or on PCB of
the fixture or the previous one
4. Try to use another DMX controler
5. Check if the DMX cables run near or run alongside to high voltage cables that may cause
damage or interference to DMX interface circuit
FOR ANY PROBLEM OR MALFUNCTION, PLEASE CONTACT YOUR RESELLER
7. MAINTENANCE AND CLEANING
Clean with soft cloth
Always dry to parts carefully
www.expelec.fr
33(0)4.50.60.80.20
167 rue des peupliers 74330
Epagny - France
est une marque déposée de la société Expelec SA
GP 200 Z IP
-
 1
1
-
 2
2
-
 3
3
-
 4
4
-
 5
5
-
 6
6
-
 7
7
-
 8
8
-
 9
9
-
 10
10
-
 11
11
-
 12
12
-
 13
13
-
 14
14
-
 15
15
-
 16
16
-
 17
17
-
 18
18


Nicols GP 200 R1 IP Z Manuel utilisateur
- Catégorie
- Stroboscopes
- Taper
- Manuel utilisateur
dans d''autres langues
- English: Nicols GP 200 R1 IP Z User manual
Documents connexes
Autres documents
-
Chauvet MAVERICK Guide de référence
-
-
-
-
-
-
-
-