Polar CM359 Le manuel du propriétaire
- Catégorie
- Boissons glacées
- Taper
- Le manuel du propriétaire

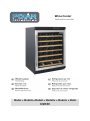
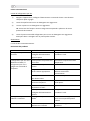
Model ●Modèle ●Modell ● Modello ● Modelo ● Malli:
CM359
Wine Cooler
Instruction manual

Safety Tips
Posion on a sle surface
A service agen/qualid echnician should carry ou inon and any repairs if required.
Do no remove and compon or service panels on his produ
Consul Local and Naonal dards o comply he following:
oHnd safey work legion
oBS EN Codes of pracce
oFire Precauons
oIEE wiring regulaons
oBuilding reguons
DO NOT use je/pressure washers o cle appliance
DO NOT use he appliance ou
DO NOT use he appliance o sore medical supplies
DO NOT use eleppliances inside pliance (e.g. heaerce-cream makers ec)
DO NOT allow oil or fa o come ino cona h plasc compons or door seal.
Clean immediely if cona occurs
DO NOT sore producs on op of he appliance
Boles a conn a high percene of alcohol mus e sealed and placed verlly in he
refrigeraor
Always carry sore and handle appliance in a ver posion and move y holding
ase of he appliance
Always swich o and disconnec he power supply o nfore cleaning
Keep all packaging away from children. Dispose of packaging in accordance
reguons of local auori
If power cord is damag mu e replaced y a POLAR ag or a recommended
qualid echnician in order o avoid a hazard
This appliance is no inended for use y persons (including children) reduced physical
sensory or menl capaili or lack of experience or knowledg unless ey have een
given supervision or inuon concerning e use of e appliance y a person responsile
for heir safe
Children should supervised o ensure ha hey do no play wh he appliance
This appliance is inended o used exclusively for he sorage of wine
Warning: Risk of Fire / flammable materials
Do no sore explosive sus such as aerosol cans wh a ammale propellan in his
appliance
Warning: Keep clear of oson all venlaon openingpliance enclosure or in
scfouilding-in
Warning : Do no use mechanical devices or or means o accelerae e defro
process o n hose recommended y he manu
Warning: Do no damage he refrigeran circu
Warning: Do no use elecrical appliances inside he food sorage comparm of he
applian unless y are he ype recommended y he manufac
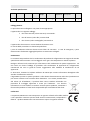
The refrigerant gas contained in this
appliance is isobutene (R600a), which is
low-polluting but flammable

Instruction Manual
Product Description
CM359 Polar Wine Chiller – 54 Bottle Capacity
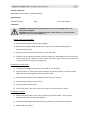
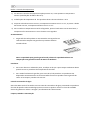
Pack Contents
Polar Wine Chiller Keys
Installation
1) Remove all the exterior and interior packaging
2) Before connecting the chiller to the power supply, let the chiller stand upright for
approximately 12 hours
3) Clean the interior with lukewarm water, using a soft cloth
4) The door can be opened from either the left or right side. When delivered, the door can be
opened from the left. Should you want to open it from the right, follow the instructions for
“reversing the door swing of your appliance”
Installing your wine chiller
1) The product is designed to be built-in, recessed, or free standing
2) Place the chiller on a floor that is able to support it once fully loaded. To level the chiller,
adjust the front levelling leg at the bottom of the chiller
3) Don’t place the chiller in direct sunlight or near other heat sources.
4) Avoid placing the chiller in damp areas
5) Plug the chiller into the socket.
6) Ensure that the air vent at the front of the chiller is never blocked or covered
Installing the handle
1) Remove the door gasket on the side you want to install the handle – there are two
designated holes for the handle installation
2) Install the handle tightly with two screws, lock washers and flat washers provided
3) Replace the door gasket
Before using your wine chiller
WARNING: When positioning the appliance, ensure the supply cord is not
trapped or damaged.
WARNING: Do not locate multiple portable socket-outlets or portable power
supplies at the rear of the appliance.

Operating you wine chiller
NB: the chiller should be placed in an area where the ambient temperature is between 16-35°C
When using the chiller for the first time, or re-starting it after a long period of time, there
may be a few degrees variance between the selected temperature and what is shown on the
LED readout. Once the chiller has been switched on for a few hours, this should rectify itself
If the unit is unplugged, has lost power or been turned off, wait 3 to 5 minutes before
restarting the chiller.
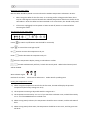
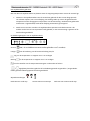
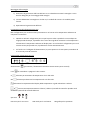
The controls of your wine chiller
Power (to switch on/off button must be held for 5 seconds)
Light To control the inner light on/off
Up Used to increase the temperatures by 1°C
Down Used to decrease the temperature by 1°C
Select the temperature display setting in Fahrenheit or Celsius
& pressed simultaneously will lock / unlock the control panel. When locked control panel
will be disabled.
Wine Indicator Lights
Red LED for red wine Green LED for white wine Amber LED for sparkling wine
Setting the temperature control
1) When using the temperature controls for the first time, the LED will display the previous
temperature (the factory settings are 12°C)
2) The temperature setting is adjustable with the range 5-22°C .
3) The temperature increases by 1°C or 1°F if you touch the UP button once, and will decrease by
1°C or 1°F if the DOWN button is touched once
4) When storing mainly red wine, the temperature should be set at 15-18°C, and the red LED will
be lit
5) When storing mainly white wine, the temperature should be set at 9-14°C, and the green LED
will be lit

6) When storing mainly sparkling wine, the temperature should be set at 5-8°C, and the amber
LED will be lit
7) To view the current temperature of the chiller, press either the UP or DOWN button and the
temperature will flash on the display for five seconds
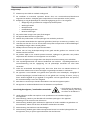
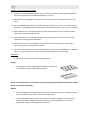
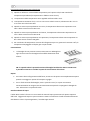
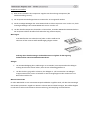
Storage
54 wine bottles can be stored with 8 bottles on each full size and 6
bottles on the bottom half size shelf
NB: Bottle capacities are approximate maximums when storing traditional Bordeaux
750ml bottles and include bulk storage.
Shelves
To prevent damage to the door gasket, ensure the door is fully open when pulling shelves
out of the rail compartment.
For easy access to the bottles, pull the shelf out by about 1/3. The shelf will stop
automatically if they are being taken out too far when housing wine bottles. Only pull out 1
shelf at a time.
Water Reservoir Box
Your Polar Wine Cooler is supplied with a water reservoir box, positioned on the top shelf of the
unit. Adding water to this box will help maintain the humidity levels within the cabinet and reduce
the drying out / shrinkage of natural corks.
Cleaning, Care & Maintenance
Cleaning your wine chiller
1) Turn off the power, unplug the appliance and take out all items including shelves and racks
2) Wash the inside surfaces with a mild detergent
3) Wash the shelves with a mild detergent
NB: ensure that excess water is wrung out when cleaning any area of the controls
4) Wash the outside of the cooler with a mild detergent. Rinse well and wipe dry with a soft,
clean cloth

Defrosting
1) The unit defrosts automatically
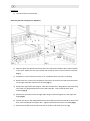
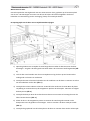
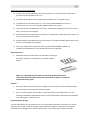
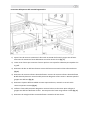
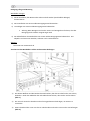
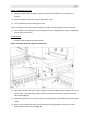
Reversing the door swing of your appliance
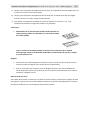
1) Open the glass door 4 and remove the two lock screws 2 that hold the door shaft assembly
to the door. Make sure that you hold the door firmly once the screws have been removed
(Fig. 1)
2) Pull down to remove the door and lay it on a padded surface to prevent scratching
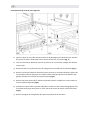
3) Remove the two screws from the bottom of the door on the left hand side and install them
on the right hand side of bottom of the door (Fig 3.)
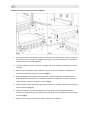
4) Remove the right lower door hinge 1. Take the left lower door hinge 6 from the plastic bag
and install it in designated position on the left hand side. Then install the door shaft
assembly (Fig 2)
5) Remove the door axle 5 from the right upper hinge, install and tighten it in the upper left
hinge (Fig 4.)
6) Position the door in the designated position and install the two lock screws 2 to connect the
door shaft assembly 3 to the glass door. Tighten them before the door is levelled (Fig 5).
7) Remove the handle from the left hand side of the door and install it on the right

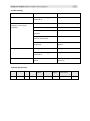
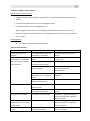
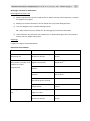
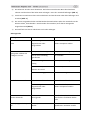
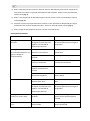
Trouble Shooting
Fault
Probable Cause
Action
The wine chiller does not work
Unit may not be plugged in or
switched on
Plug in and switch on chiller.
The wine chiller is not cold
enough or turns on/off
frequently
Temperature incorrectly set
Check the temperature setting
The door is not completely shut
Shut door
The door gasket is not sealing
properly
Check door seal fitted correctly
The room temperature is
warmer than normal
Reduce room temperature
The door is opened too
frequently
Reduce number of times door is
opened
The light does not work
The light switch is set to “OFF”
Set light switch to “ON”
Unit may not be plugged in or
switched on
Plug in and switch on chiller.
The display shows “EL” or “EH”
The air temperature sensor has
failed
Contact Polar agent or qualified
technician
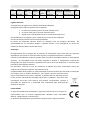
Technical Specifications
Model
Voltage
Power
Current
Bottle
Capacity
Refrigerant
Temp
Range ⁰C
Dimensions
h x w x d mm
Weight
CM359
230v50Hz
100w
1.2A
54
R600a 30g
5-22
865 x 595 x 570
47kg

Electrical Wiring
This appliance is supplied with a 3 pin, moulded, BS1363 plug and lead, with a 13 amp fuse as
standard
The plug is to be connected to a suitable mains socket
The appliance is wired as follows:
Live wire (coloured brown) to terminal marked L
Neutral wire (coloured blue) to terminal marked N
Earth wire (coloured green/yellow) to terminal marked E
This appliance must be earthed, using a dedicated earthing circuit
If in doubt, consult a qualified electrician
Electrical isolation points must be kept clear of any obstructions. In the event of any emergency
disconnection being required they must be readily accessible
Disposal
EU regulations require refrigeration product to be disposed of by specialist companies who remove
or recycle all gasses, metal and plastic components
Consult your local waste collection authority regarding disposal of your appliance. Local authorities
are not obliged to dispose of commercial refrigeration equipment but may be able to offer advice
on how to dispose of the equipment locally
Alternatively, call the POLAR helpline for details of national disposal companies within the EU
The WEEE logo on this product or its documentation indicates that the product
must not be disposed of as household waste. The help prevent possible harm to
human health and/or the environment, the product must be disposed of in an
approved and environmentally safe recycling process. For further information on
how to dispose of this product correctly, contact the product supplier, or the local
authority responsible for waste disposal in your area
Compliance
POLAR parts have undergone strict product testing in order to comply with
regulatory standards and specifications set by international, independent and
federal authorities
POLAR products have been approved to carry the following symbol:

Veiligheids�ps
Plaatsen op een vlakke en stabiele ondergrond
De installae en eventuele repars dienen door een servicetechnicus/vaktechnicus
uitgevoerd te worden. Verwijder geen componenten of servicepanelen van dit product
Raadpleeg en volg de plaatselijke en naonale regelgeving op m.b.t. het volgende:
oWetgeving voor gezondheid en veiligheid op de werkplaats
oWerkregels BS EN
oBrandprevene
oIEE bekabelingsnormen
oBouwverordeningen
Dit product NIET reinigen met spuit-/drukreinigers
Dit apparaat NIET buitenshuis gebruiken
Gebruik het product NIET voor het opbergen van medische producten
In dit product GEEN elektrische apparaten gebruiken (zoals bijv. verwarmers, ijsmakers, etc.)
Laat NIET toe dat olie of vet in contact komt met pla componenten of deurafdichngen.
Onmiddellijk reinigen indien dit wel gebeurt
GÉÉN producten bovenop het apparaat neerzeen
Flessen met en hoog alcoholpercentage moet goed worden gesloten en vel in de
koelkast worden bewaard
Dit product d in een v po vervoeren, opbergen en gebruiken. Het product
verplaatsen door de basis van het apparaat vast te houden
Alvorens dit apparaat te reinigen dient mend de stroomvoorziening uit te schakelen
Laat verpakkingsmateriaal niet binnen handbereik van kinderen. Verpakkingsmateriaal in
overeenstemming met de regelgeving van de plaatselijke overheden als afval laten
verwerken
Indien de stroomkabel beschadigd raakt, dient men deze door een POLAR technicus of
aanbevolen vaktechnicus te laten vervangen om gevaarlijke situa te voorkomen
Dit apparaat is niet bedoeld voor gebruik door personen met lichamelijke, zintuiglijke of
mentale beperkingen (inclusief kinderen) of met gebrek aan ervaring of kennis, tenzij zij
hierin worden begeleid of zijn opgeleid in het gebruik van het apparaat door een persoon,
die verantwoordelijk is voor hun veiligheid
Men dient er toezicht op te houden dat kinderen niet met het apparaat spelen
Dit apparaat is uitsluitend bedoeld voor het bewaren van wijnessen
Hee explosieve stoen niet opslaan: zoals spuitbussen met brandbaar drijfgas in
esta apparaat
Waarschuwing: Houd vrij van obstakels alle vae-openingen in het apparaat
behuizing of in de structuur voor de bouw-in
Waarschuwing: Gebruik geen mechanische apparaten of andere middelen te gebruiken om
het ontdooien, andere dan de door de fabrikant aanbevolen versnellen
Waarschuwing: het koelcircuit niet beschadigen
Waarschuwing: Gebruik geen elektrische apparaten binnen het voedsel opbergvakken van
het apparaat, tenzij ze zijn het type aanbevolen door de fabricant
Voorzich�g brandgevaar / ontvlambare materialen
•Het koelgas in dit apparaat is
isobuteen (R600a), dat weinig
vervuilend en brandbaar is.

Productbeschrijving
CM359 Polar Wijnklimaatkast – Capaciteit voor 54 flessen
Verpakkingsinhoud
POLAR Wijnklimaatkast Sleutels Handleiding
Voordat u uw wijnklimaatkast gaat gebruiken
1) Verwijder al het intern en extern verpakkingsmateriaal
2) Voordat u de wijnklimaatkast op de stroomvoorziening aansluit, dient u de kast gedurende
ongeveer 12 uur rechtop te laten staan.
3) Reinig de binnenkant van de wijnklimaatkast met lauw water en een zachte doek
4) De deur kan zowel voor rechts of links openen worden aangepast. Bij levering kan men de
deur links openen. Wanneer u wilt dat de deur van rechts te openen is, volgt u de
aanwijzingen "deuropening van uw apparaat wijzigen"
Uw wijnklimaatkast installeren
1) Het product is ontworpen voor inbouw-, verzonken of voor vrijstaande montage
2) Plaats de wijnklimaatkast op een ondergrond die de kast volledig gevuld kan dragen. Om de
wijnklimaatkast waterpas te zetten, verstelt u de voorste nivelleerpoot aan de onderkant
van de kast
3) Plaats de wijnklimaatkast niet in direct zonlicht of vlakbij een andere warmtebron.
4) Plaats de wijnklimaatkast niet in vochtige plaatsen
5) Steek de stekker van de wijnklimaatkast in het stopcontact.
6) Zorg dat de luchtventilator aan de voorzijde van de wijnklimaatkast nooit wordt geblokkeerd
of bedekt
De griphendel installeren
1) Verwijder de deurpakking van de zijde waar u de griphendel wilt installeren - er zijn twee
voorbestemde gaten voor de installatie van de hendel.
2) Monteer de hendel met de meegeleverde twee schroeven, borgplaatjes en platte
ringplaatjes
3) Plaats de deurpakking opnieuw
Waarschuwing: Let er bij het plaatsen van het apparaat op dat het netsnoer niet
bekneld of beschadigd is.
Waarschuwing: Plaats niet meerdere draagbare stopcontacten of bruikbare
benodigdheden.
Installatie

Uw wijnklimaatkast gebruiken
NB: men dient de wijnklimaatkast te plaatsen waar de omgevingstemperatuur tussen de 16-35°C ligt
Wanneer u de wijnklimaatkast voor de eerste keer gebruikt of deze na een lange periode
van stilstaan opstart, kan er een afwijking van enkele graden zijn tussen de geselecteerde
temperatuur en de weergegeven temperatuur van de LED-meting. Nadat de kast gedurende
enkele uren is ingeschakeld, wordt deze afwijking automatisch gecorrigeerd
Wacht 3 tot 5 minuten voordat u de wijnklimaatkast opnieuw inschakelt wanneer u de
stekker van de kast uit het stopcontact heeft gehaald, er een stroomstoring is geweest of de
kast heeft uitgeschakeld.
De bedieningsknoppen van uw wijnklimaatkast
Stroom (aan / uit te schakelen toets moet worden gehouden voor 5 seconden)
Lampje voor de bediening van de binnenverlichting aan/uit
Omhoog om de temperatuur in stappen van 1°C te verhogen
Omlaag om de temperatuur in stappen van 1°C te verlagen
Voor het instellen van de temperatuurweergave in Fahrenheit of Celsius
& tegelijkertijd worden ingedrukt zal het bedieningspaneel vergrendelen / ontgrendelen.
Indien gesloten bedieningspaneel wordt uitgeschakeld.
Wijnindicatorlampjes
Rode LED voor rode wijn Groene LED voor witte wijn Gele LED voor mousserende wijn

Instellen van de temperatuurregeling
1) Wanneer u de temperatuurknoppen voor de eerste keer gebruikt, zal de LED de voorgaande
temperatuur weergeven (de fabrieksinstellingen zijn 12°C)
2) De temperatuurinstellingen van elk deel is aan te passen binnen een bereik van 5-18°C (40-
65°F).
3) Als u de OMHOOG-knop één keer indrukt wordt de temperatuur met 1°C of 1°F verhoogd en
wanneer u de OMLAAG-knop één keer indrukt wordt de temperatuur met 1°C of 1°F verlaagd
4) Bij het bewaren van voornamelijk rode wijn moet de temperatuur tussen 15-18°C worden
ingesteld en zal de rode LED branden
5) Bij het bewaren van voornamelijk witte wijn moet de temperatuur tussen 9-14°C worden
ingesteld en zal de groene LED branden
6) Bij het bewaren van voornamelijk mousserende wijn moet de temperatuur tussen 5-8°C
worden ingesteld en zal de gele LED branden
7) Om de actuele temperatuur van de wijnklimaatkast te zien, drukt u de OMHOOG- of OMLAAG-
knop in en zal de temperatuur op het display knipperen gedurende vijf seconden
Ontdooien
1) De unit heeft een automatische ontdooiingsfunctie
Opslag
54 wijnflessen worden opgeslagen met 8 flessen op elke full
size en 6 flessen op de onderste halve grootte
NB: de flessencapaciteiten zijn benaderde maxima bij de opslag van traditionele Bordeaux 750ml
flessen en omvatten bulkopslag.
Rekken
Om beschadiging van de deurpakking te voorkomen, dient men de deur volledig te openen
bij het uittrekken van de rekken uit het railcompartiment.
Voor gemakkelijke toegang tot de flessen dient u de rekken ongeveer 1/3 uit de kast te
trekken. De rekken stoppen automatisch wanneer zij met wijnflessen te ver worden
uitgetrokken. Alleen trek een plateau op een tijd.

Waterreservoir Doos
Uw Polar wijnkoeler wordt geleverd met een waterreservoir doos, geplaatst op de bovenste plank
van de unit. Het toevoegen van water aan de box zal helpen de luchtvochtigheid in de kast te
behouden en vermindering van de verdroging / krimp van natuurlijke kurken.
De openingszijde van de deur van uw wijnklimaatkast wijzigen
1) Open de glasdeur 4 en verwijder de twee borgschroeven 2 die de deurasunit aan de deur
bevestigen. Zorg dat u de deur goed vast heeft nadat u de schroeven heeft losgemaakt (afb.
1)
2) Trek de deur naar beneden om deze te verwijderen en leg de deur op een kussenzachte
ondergrond om krassen te voorkomen
3) Verwijder de twee schroeven linksonder aan de onderkant van de deur en monteer ze rechts
aan de onderkant van de deur (afb. 3.)
4) Verwijder de rechter onderste scharnier 1. Haal de linker onderste scharnier 6 uit de plastic
verpakking en monteer deze op de aangewezen plek aan de linkerzijde. Monteer vervolgens
de deurpinunit (afb. 2)
5) Verwijder de deurpin 5 van de rechter bovenscharnier en monteer en bevestig deze aan de
linker bovenscharnier (afb. 4.)
6) Plaats de deur in de aangewezen positie en monteer de twee borgschroeven 2 om de
deurpinunit 3 aan de glasdeur te bevestigen. Draai ze voordat u de deur waterpas maakt
(afb. 5).
7) Verwijder de griphendel van de linkerzijde van de deur en monteer deze aan de rechterzijde

Reiniging, zorg & onderhoud
Uw wijnklimaatkast reinigen
1) Zet de stroom uit, haal de stekker uit het stopcontact en verwijder alle items, inclusief
roosters en rekken
2) Was de binnenoppervlakken met een zacht reinigingsmiddel
3) Was de rekken met een zacht reinigingsmiddel
NB: zorg dat er geen overmatig water in het gebied van de bedieningsknoppen komt
4) Was de buitenkant van de wijnklimaatkast met een zacht reinigingsmiddel. Goed naspoelen
en droogmaken met een zachte, schone doek
Problemen oplossen
Probleem
Mogelijke oorzaak
Handeling
De wijnklimaatkast werkt
niet
Het kan zijn dat de stekker van
het apparaat niet is
aangesloten of dat het
apparaat niet is ingeschakeld.
Steek de stekker in het stopcontact
en zet de kast aan.
De wijnklimaatkast wordt
niet koud genoeg / De
wijnklimaatkast gaat vaak
aan en uit
Temperatuur verkeerd
afgesteld
Controleer de temperatuurinstelling
De deur is niet volledig dicht
Sluit de deur
De deurpakking zorgt niet
voor een goede afdichting
Controleer of de deurpakking juist is
geplaatst
De kamertemperatuur is
hoger dan normaal.
Verlaag de kamertemperatuur
De deur wordt te vaak
geopend
Beperk het aantal keren dat u de
deur opent
De lamp werkt niet
De lichtschakelaar staat op
“OFF” (uit)
Zet de lichtschakelaar op “ON”
(aan)
Het kan zijn dat de stekker van
het apparaat niet is
aangesloten of dat het
apparaat niet is ingeschakeld.
Steek de stekker in het stopcontact
en zet de wijnklimaatkast aan.
De wijnklimaatkast trilt /
maakt teveel geluid
De kast staat niet waterpas
Zorg dat de wijnklimaatkast op een
vlakke en even ondergrond staat
De display geeft aan “EL” of
“EH”
De luchttemperatuursensor is
defect
Neem contact op met een Polar-
vertegenwoordiging of een erkende
technicus

Technische specificaties
Model
Voltage
Verm
ogen
Stroom
Flessenca
paciteit
Koelmiddel
Temperatuur
bereik ⁰C
Afmetingen
h x b x d mm
Gewicht
CM359
230v50Hz
100w
1.2A
54
R600a 30g
5-22
865 x 595 x 570
47kg
Elektrische bedrading
Men dient de stekker op een geschikt stopcontact aan te sluiten
De bedrading van dit apparaat is als volgt:
Stroomkabel (bruin) naar de aansluitklem gemarkeerd met L
Neutraalkabel (blauw) naar de aansluitklem gemarkeerd met N
Aardekabel (groen/geel) naar de aansluitklem gemarkeerd met E
Dit apparaat moet worden geaard met behulp van een adequaat aardingscircuit
Bij twijfel raadpleeg een vakkundige elektricien
De elektrische isolatiepunten mogen niet worden geblokkeerd. In geval van een nooduitschakeling
moeten de isolatiepunten direct toegankelijk zijn
Afvalverwerking
De EU-richtlijnen vereisen dat koelproducten door gespecialiseerde bedrijven als afval worden
verwerkt die gassen, metalen en plastic componenten verwijderen of recyclen.
Raadpleeg uw plaatselijke afvalverwerkingsbedrijf voor informatie over de afvalverwerking van uw
apparaat. De plaatselijke overheden zijn niet verplicht om koelingsproducten van bedrijven als afval
te verwerken maar kunnen u informeren waar u het apparaat kunt afgeven
U kunt ook de POLAR helplijn bellen voor informatie over landelijke
afvalverwerkingsbedrijven in de EU
Het WEEE-logo op dit product of op de bijbehorende documentatie geeft aan dat het product niet
onder huisvuil valt en als zodanig ook niet mag worden verwerkt. Ter preventie
van mogelijke gevaren voor de gezondheid van personen en/of voor het milieu,
dient men dit product als afval te verwerken in overeenstemming met het
voorgeschreven en milieuveilige recyclingproces. Raadpleeg uw
productleverancier of uw plaatselijk afvalverwerkingsbedrijf voor meer informatie
over de juiste afvalverwerking van dit product.
Productconformiteit
De onderdelen van POLAR producten hebben strenge producttesten
ondergaan om te voldoen aan wettelijke regels en specificaties die door
internationale, onafhankelijke en landelijke overheden worden voorgeschreven
POLAR producten zijn goedgekeurd en voorzien van het volgende symbool:

Consejos de seguridad
Colóquela sobre una superficie plana y estable.
La instalación y cualquier reparación que pueda ser necesaria debe ser realizada por un
agente de servicio/técnico cualificado. No re˜re ningún componente ni paneles de servicio
del producto.
Consulte la normativa nacional o local correspondiente a los siguientes aspectos:
oLegislación en materia de salud y seguridad laboral
oCódigos de prácticas BS EN
oPrecauciones contra incendios
oNormativas de cableado de la IEE
oNormas de construcción
NO utilice limpiadores a chorro/presión para limpiar el aparato.
NO utilice el aparato en exteriores.
NO utilice el aparato para guardar material médico.
NO introduzca dispositivos eléctricos dentro del aparato (por ejemplo, calentadores,
máquinas para hacer helados, etc.).
NO permita que el aceite o la grasa entren en contacto con los componentes de plástico o
con el cierre de la puerta. En caso de contacto, límpielos inmediatamente.
NO ponga ningún producto sobre el aparato.
Las botellas que contengan un alto porcentaje de alcohol deben estar bien cerradas y
colocarse en posición vertical en la unidad refrigerada.
Mueva, guarde y maneje siempre el aparato en posición vertical y agarrándolo por la base.
Apague y desenchufe siempre el aparato antes de limpiarlo.
Mantenga todo el embalaje fuera del alcance de los niños. Elimine el embalaje de acuerdo
con las normativas de las autoridades locales.
Si el cable de alimentación estuviera dañado, un agente de POLAR o un técnico cualificado
recomendado debe cambiarlo para evitar riesgos.
Este aparato no debe ser utilizado por personas (niños incluidos) que tengan limitadas sus
capacidades físicas, sensoriales o mentales o que no tengan experiencia y conocimientos, a
menos que estén bajo supervisión o hayan recibido instrucciones relativas al uso del
aparato a cargo de una persona responsable de su seguridad.
Los niños deben estar bajo supervisión para evitar que no jueguen con el aparato.
Este aparato está diseñado para ser u˜lizado exclusivamente para almacenar vinos
Advertencia: Riesgo de incendio / materiales
inflamables
No guarde sustancias explosivas, tales como latas de aerosol con un propelente
inflamable en este aparato
Advertencia: Mantenga libres de obstrucción todas las aberturas de ventilación de la
carcasa del aparato o en la estructura de edificio en
Advertencia: No u˜lice disposi˜vos mecánicos u otros medios para acelerar el proceso de
descongelación, que no sean los recomendados por el fabricante
Advertencia: No dañe el circuito refrigerante
• El Gas Refrigerante contenido
en este aparato es Isobuteno
(R600a), el cual es poco
contaminante pero inflamable.

Advertencia: No utilice aparatos eléctricos dentro de los compartimentos de
almacenamiento de alimentos del aparato, a menos que sean del tipo recomendado por el
fabricante
Descripción del producto
CM359 Refrigerador para Vinos Polar – Capacidad para 54 botellas
Contenido del paquete
Manual de instrucciones Refrigerador para vinos Polar Llaves
Instalación
1) Elimine todos los embalajes exteriores e interiores
2) Antes de conectar la nevera a la corriente, déjela reposar en posición vertical durante
aproximadamente 12 horas
3) Limpie el interior con agua tibia utilizando un paño suave
4) La puerta puede ser abierta tanto desde la derecha como desde la izquierda. Cuando se
suministra la nevera, la puerta se abre desde la izquierda. Si quiere abrirla desde la derecha,
siga las instrucciones para “el cambio de la apertura de la puerta de su aparato”
Instalación de su nevera de vinos
1) El producto está diseñado para ser integrado, empotrado o en posición vertical
2) Coloque la nevera sobre un suelo que pueda soportarla una vez esté totalmente cargada.
Para nivelar la nevera, ajuste la nivelación de la pata delantera situada en la parte baja de la
nevera
3) No coloque la nevera donde esté expuesta directamente a la luz solar o cerca de otras
fuentes de calor
4) Evite colocar la nevera en zonas húmedas
5) Enchufe la nevera a la toma de corriente
6) Asegúrese de que salida de aire de la parte delantera de la nevera no esté nunca cubierta o
bloqueada
Instalación del asa
1) Retire la junta de la puerta en el lado en que desea instalar el asa – hay dos agujeros
previstos para la instalación del asa
2) Instale el asa apretando bien los dos tornillos (se suministran las arandelas de bloqueo y las
arandelas planas)
3) Sustituya la junta de la puerta
Antes de usar su nevera de vinos
ADVERTENCIA: Cuando coloque el aparato, asegúrese de que el cable de
alimentación no esté atrapado o dañado.
ADVERTENCIA: No coloque enchufes portátiles o fuentes de alimentación
portátiles en la parte posterior del aparato.

Utilización de la nevera de vinos
NOTA: la nevera deber ser ubicada en una zona donde la temperatura ambiente esté entre los 16 y
los 35°C
Cuando utilice la nevera por primera vez, o la reinicie tras un largo periodo de tiempo, puede
haber una variación de unos pocos grados entre la temperatura seleccionada y la que se
muestra en la lectura del LED. Una vez la nevera haya sido encendida durante algunas horas,
esto se rectificará por sí solo
Si la unidad está desenchufada, ha perdido potencia o ha sido apagada, espere de 3 a 5
minutos antes de reiniciarla
Los controles de su nevera de vinos
Encendido (para cambiar de encendido / apagado debe ser mantenida durante 5 segundos)
Luz Para controlar la luz interior encendida/apagada
Arriba Se utiliza para incrementar la temperatura en 1°C
Abajo Se utiliza para disminuir la temperatura en 1°C
Selecciona el visualizador de la temperatura en Fahrenheit o Celsius
& pulsadas simultáneamente se bloquear / desbloquear el panel de control. Cuando se
desactivará el panel de control de bloqueo.
Luces indicadoras del vino
LED rojo para vino tinto LED verde para vino blanco LED ámbar para el vino espumoso

Ajustar el control de la temperatura
1) Al utilizar los controles de temperatura por primera vez, el LED mostrará la temperatura
previa (los ajustes de fábrica son 12°C)
2) Los ajustes de temperatura de pueden ajustarse dentro de un rango de 5-22°C
3) La temperatura se incrementa en 1°C o 1°F si toca el botón ARRIBA una sola vez, y
disminuirá en 1°C o 1°F si toca el botón ABAJO también una sola vez
4) Cuando almacene principalmente vinos tintos, la temperatura debe fijarse entre los 15 y los
18°C, y el LED rojo se encenderá
5) Cuando almacene principalmente vinos blancos, la temperatura debe fijarse entre los 9 y los
14°C, y el LED verde se encenderá
6) Cuando almacene principalmente vinos espumosos, la temperatura debe fijarse entre los 5 y
los 8°C, y el LED ámbar se encenderá
7) Para ver la temperatura actual de la nevera, pulse el botón ARRIBA o ABAJO y la
temperatura parpadeará en el visualizador durante cinco segundos
Almacenamiento
54 botellas de vino se almacenan con 8 botellas en cada una
de tamaño completo y 6 botellas en la mitad de tamaño
inferior
NOTA: las capacidades de las botellas son máximos aproximados para el
almacenamiento de botellas tradicionales de Burdeos de 750ml, e incluyen el
almacenamiento a granel
Estantes
Para evitar dañar la junta de la puerta, asegúrese de que la puerta está totalmente abierta
cuando tire de los estantes hacia afuera de la guía
Para un acceso más fácil a las botellas, tire de los estantes hacia afuera aprox. 1/3. Los
estantes se detendrán automáticamente si se sacan demasiado al almacenar las botellas de
vino. Sólo saque 1 anaquel a la vez
Caja de depósito de agua
Su Polar enfriador de vino se suministra con una caja de depósito de agua, colocado en el estante
superior de la unidad. La adición de agua a este cuadro de le ayudará a mantener los niveles de
humedad dentro del gabinete y reducir la desecación / contracción de los corchos naturales.

Cambio de la apertura de la puerta de su aparato
1. Abra la puerta de cristal 4 y quite los dos tornillos de la cerradura 2 que sujetan el conjunto
del eje de la puerta a la puerta. Asegúrese de sujetar la puerta firmemente una vez que los
tornillos hayan sido quitados (Fig. 1)
2. Tire hacia abajo para quitar la puerta y póngala sobre una superficie acolchada para evitar
arañazos
3. Quite los dos tornillos de la parte baja de la puerta en el lado izquierdo e instálelos en la
parte derecha de la parte baja de la puerta (Fig 3.)
4. Retire la bisagra inferior derecha de la puerta 1. Tome la bisagra inferior izquierda de la
puerta 6 de la bolsa de plástico e instálela en la posición designada en la parte izquierda.
Luego instale el conjunto del eje de la puerta (Fig 2)
5. Quite el eje de la puerta 5 de la bisagra superior derecha, instálelo y apriételo en la bisagra
superior izquierda (Fig 4.)
6. Ponga la puerta en la posición designada e instale los dos tornillos de bloqueo 2 para
conectar el conjunto del eje de la puerta 3 a la puerta de cristal. Apriételos antes de nivelar
la puerta (Fig 5).
7. Quite el asa de la parte izquierda de puerta e instálela a la derecha
La page charge ...
La page charge ...
La page charge ...
La page charge ...
La page charge ...
La page charge ...
La page charge ...
La page charge ...
La page charge ...
La page charge ...
La page charge ...
La page charge ...
La page charge ...
La page charge ...
La page charge ...
La page charge ...
La page charge ...
La page charge ...
La page charge ...
La page charge ...
La page charge ...
La page charge ...
La page charge ...
La page charge ...
La page charge ...
La page charge ...
La page charge ...
La page charge ...
La page charge ...
La page charge ...
La page charge ...
La page charge ...
La page charge ...
La page charge ...
La page charge ...
La page charge ...
-
 1
1
-
 2
2
-
 3
3
-
 4
4
-
 5
5
-
 6
6
-
 7
7
-
 8
8
-
 9
9
-
 10
10
-
 11
11
-
 12
12
-
 13
13
-
 14
14
-
 15
15
-
 16
16
-
 17
17
-
 18
18
-
 19
19
-
 20
20
-
 21
21
-
 22
22
-
 23
23
-
 24
24
-
 25
25
-
 26
26
-
 27
27
-
 28
28
-
 29
29
-
 30
30
-
 31
31
-
 32
32
-
 33
33
-
 34
34
-
 35
35
-
 36
36
-
 37
37
-
 38
38
-
 39
39
-
 40
40
-
 41
41
-
 42
42
-
 43
43
-
 44
44
-
 45
45
-
 46
46
-
 47
47
-
 48
48
-
 49
49
-
 50
50
-
 51
51
-
 52
52
-
 53
53
-
 54
54
-
 55
55
-
 56
56


Polar CM359 Le manuel du propriétaire
- Catégorie
- Boissons glacées
- Taper
- Le manuel du propriétaire
dans d''autres langues
- italiano: Polar CM359 Manuale del proprietario
- español: Polar CM359 El manual del propietario
- Deutsch: Polar CM359 Bedienungsanleitung
- Nederlands: Polar CM359 de handleiding
- português: Polar CM359 Manual do proprietário
Documents connexes
Autres documents
-
Fagor VT-12 BIZONE Le manuel du propriétaire
-
Bifinett KH 1220 Le manuel du propriétaire
-
 LE CHAI PRO46E Manuel utilisateur
-
Samsung RW13EBBB Manuel utilisateur
-
Dometic Macave S16FG, S40FGD, S117FG Mode d'emploi
-
Aeg-Electrolux SW98820-4R Manuel utilisateur
-
AEG SWS98820L0 Manuel utilisateur
-
 Thermo Fisher Scientific Merlin M75 Recirculating Chiller Quick Start

