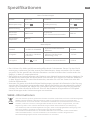
DREAME H12 Manuel utilisateur
- Catégorie
- Aspirateurs
- Taper
- Manuel utilisateur

注:此页面非印刷内容
2022/05/09
说明书
04170500000970
A01:20220509 删除深度自清洁
单色印刷
A01
W2213
封面 :157G 哑粉纸过油, 内页 :68G 哑粉
张紫安
140mm*210mm

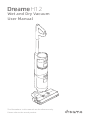
The illustrations in this manual are for reference only.
Please refer to the actual product.
Wet and Dry Vacuum
User Manual
H12

THANK YOU
FOR PURCHASING THIS DREAME
WET AND DRY VACUUM.
Registration Quick Start
Welcome to register a Dreame account by
scaning the QR code. You are available
for the User Manual and Special Oers.
With it you are obtaining a high quality product that is
engineered for optimal performance.
If you have any questions on the product,
please contact us: [email protected].

Contents
EN User Manual 001
DE Benutzerhandbuch 021
FR Manuel d'utilisation 042
IT Manuale utente 062
ES Manual de usuario 082
RU Руководство пользователя 102
PL Instrukcja obsługi 122
SA ﻡﺍﺪﺨﺘﺳﻻﺍ ﻞﻴﻟﺩ 162
HE 142
שמתשמל ךירדמ

1
EN
• Please read this manual carefully before use and retain it for future reference.
• When using an electrical appliance, basic precautions should always be followed,
including the following:
• READ ALL INSTRUCTIONS BEFORE USING (THIS APPLIANCE). Failure to follow the
warnings and instructions may result in electric shock, re and/or serious injury.
Safety Information
To reduce the risk of re, electric shock, or injury:
WARNING-
Important Safety Instructions
For Household Use Only
• Use only as described in this user guide. Use only manufacturer's recommended
attachments.
• Use indoors only, on non-carpeted oor surfaces such as vinyl, tile, sealed wood, etc.
Be careful not to run over loose objects or the edges of area rugs. Stalling the brush
may result in premature belt failure.
• This product should not be used by children younger than 8 years old nor persons
with physical, sensory, intellectual deciencies, or limited experience or knowledge
without the supervision of a parent or guardian to ensure safe operation and to avoid
any risks. Cleaning and maintenance shall not be performed by children without
supervision.
• This appliance is not intended for use by persons (including children) with reduced
physical, sensory or mental capabilities, or lack of experience and knowledge, unless
they have been given supervision or instruction concerning use of the appliance by a
person responsible for their safety.
• Do not use a ammable or combustible liquid to clean oors.
• Do not use to pick up ammable or combustible liquids, such as gasoline. Do not use
in areas where ammable or combustible liquids may be present.
• For the purposes of recharging the battery, only use the detachable adapter provided
with this appliance. Use only with <YLS0251B-E260090> adapter.
• An adapter that is suitable for one type of battery pack may create a risk of re when
used with another battery pack.
• Do not immerse the appliance in liquid.
• Plastic lm can be dangerous. To avoid the danger of suocation, keep it away from
children.
• Keep hair, loose clothing, ngers, and all parts of the body away from openings and
moving parts of the appliance and its accessories.
• Only use the type and amount of liquids specied under the operations section of
this guide.Liquid must not be directed towards equipment containing electrical
components.

2
EN
Safety Information
• Do not put any object into openings. Do not use the appliance when any opening is
blocked; keep free of dust, lint, hair, and anything that may inhibit air ow.
• Do not use it without lters in place.
• Do not use the appliance with a damaged adapter. If the adapter is damaged, it must
be replaced by the manufacturer, its service agent or similarity qualied persons in
order to avoid hazards.
• Do not pick up toxic material (chlorine bleach, ammonia, drain cleaner, etc.). Do not
pick up hard or sharp objects such as glass, nails, screws, coins, etc.
• Do not use the appliance in an enclosed space lled with vapour given o by oil-
based paint, paint thinner, some moth-proong substances, ammable dust, or other
explosive or toxic vapour.Do not pick up anything that is burning or smoking, such as
cigarettes, matches or hot ashes.
• Follow all charging instructions and do not charge the appliance outside of the
temperature range specied in the battery as doing so increases the risk of re.
• Charger base output terminals should not be short-circuited. Do not use it with
damaged charger base. If the appliance has been dropped, damaged, left outdoors,
dropped into water, or is not working as it should, return it to a service center.
• Keep the adapter cable away from heated surfaces. Do not handle the adapter plug or
appliance with wet hands. To unplug, grasp the adapter plug, rather than the cable.
• Do not pull or carry adapter by cable, use cable as a handle, close door on cable, or
pull cable around sharp edges or corners.
• Switch o when not in use, before cleaning, maintainingor servicing the appliance,
and before connecting or disconnecting the tool with a moving brush.
• Do not use an appliance that is damaged or modied. Damaged or modied
appliance may exhibit unpredictable behavior resulting in re, explosion, or risk of
injury.
• Do not expose the appliance to re or excessive temperature. Exposure to re or
excessive temperature may cause an explosion.
• Ensure that the appliance is placed on a horizontal surface. Do not use the appliance
at the same position if the appliance is equipped with a brush roller and the handle is
not completely upright. Do not store the appliance in a place where it may freeze.
• Use extra care when cleaning on stairs.
• Prevent unintentional starting. Ensure the switch is in the OFF-position before picking
up or carrying the appliance. Carrying the appliance with your nger on the switch or
energizing appliance that have the switch on invites accidents.
• This product contains batteries that can only be replaced by qualied technicians or
after-sales service.

3
EN Safety Information
SAVE THESE INSTRUCTIONS
IMPORTANT SAFEGUARDS
• Have servicing performed by a qualied repair person using only identical
replacement parts. This will ensure that the safety of the product is maintained.
• Do not modify or attempt to repair the appliance excepts as indicated in the
instructions for use and care.
• Do not use in extremely hot or cold environments (below 0℃ /32° F or above
40° C/104° F). Please charge the appliance in temperature above 0℃ /32° F and
below 40℃ /104° F).
• If appliance has been dropped, damaged, left outdoors, dropped into water, or is
not working as it should, never attempt to operate it. Please have it repaired at an
authorized service center.
We, Dreame Trading (Tianjin) Co., Ltd., hereby, declares that this equipment is in
compliance with the applicable Directives and European Norms, and amendments.
The full text of the EU declaration of conformity is available at the following internet
address: https://global.dreametech.com
For detailed e-manual, please go to
https://global.dreametech.com/pages/user-manuals-and-faqs
detachable supply unit
read operator's manual

4
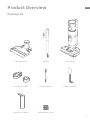
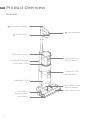
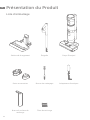
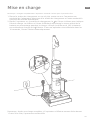
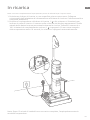
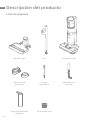
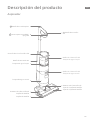
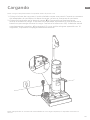
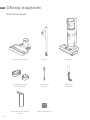
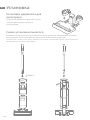
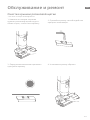
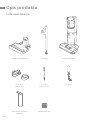
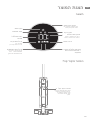
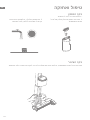
EN
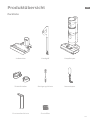
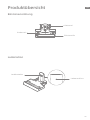
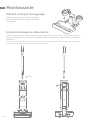
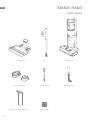
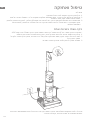
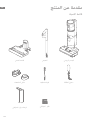
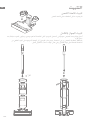
Handle Main BodyCharging Base
Spare Brush Roller Replacement Filter
Product Overview
Packing List
Power Adapter
Accessory Holder Cleaning Brush

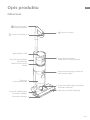
5
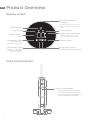
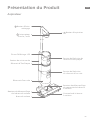
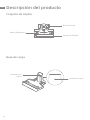
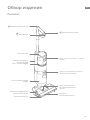
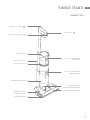
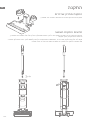
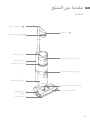
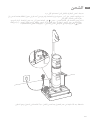
EN
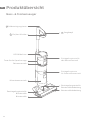
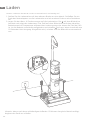
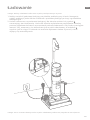
Voice Prompt Button
Clean Water Tank
Used Water Tank
Brush Roller Cover
Release Buttons
Brush Roller
Release Button
Brush Roller
Self-Cleaning Button
On/O Switch
LED Display Screen
Brush Roller Cover
Clean Water Tank
Release Button
Used Water Tank
Release Button
Suction Button
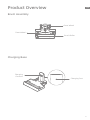
Product Overview
Vacuum

6
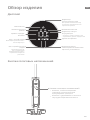
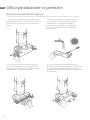
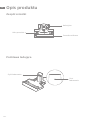
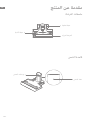
EN
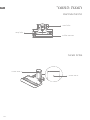
Charging Port
Charging
Contacts
Charging Base
Front Wheel
Rear Wheel
Brush Roller
Product Overview
Brush Assembly

7
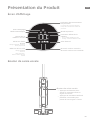
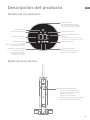
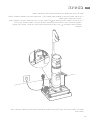
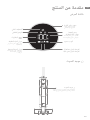
EN Product Overview
Display Screen
Suction Mode
Blocked Tube
Brush Roller Stuck /
Brush Roller Not Installed
Used Water Tank
Battery Status Indicator
Self-Cleaning
Auto Mode
Battery Level /
Error
Clean Water Tank
Blinking orange:
clean water tank empty
Blinking red: used water
tank full / used water
tank not installed
• Green: battery level > 20%
• Orange: battery level ≤ 20%
Dust Concentration
Indicator
The color of the curve changes
with the amount of dust in real
time.
Voice Prompt Button
Voice Prompt Button
• Press briey to activate voice
prompt or adjust the volume
• Press and hold for 3 seconds to
switch between languages

8
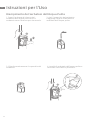
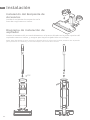
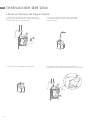
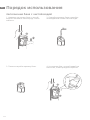
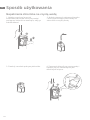
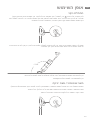
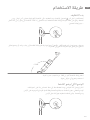
EN
2
咔哒
1
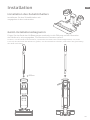
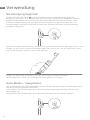
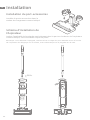
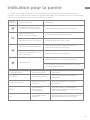
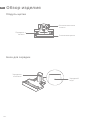
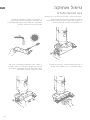
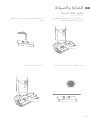
Installation
Accessory Holder Installation
Install the accessory holder into the
charging base as indicated.
Vacuum Installation
Insert the end of the handle vertically into the port on the top of the vacuum as
indicated until you hear a click.
Note: To disassemble, extend a hard object into the hole on the back of the vacuum to press
contacts, and pull the handle upwards at the same time.
Click

9
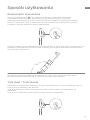
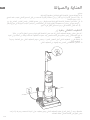
EN
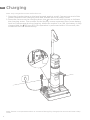
Note: If there is no operation within 15 minutes of being fully charged, the vacuum will enter sleep
mode.
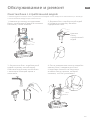
Charging
Note: Fully charge the vacuum before rst use.
1. Place the charging base on the level ground against a wall. Connect one end of the
power adapter to the charging base and another end to a power outlet.
2. Place the vacuum on the charging base, the on the screen will light up to indicate
the charging status. The number on the display screen represents the current battery
level as a percentage during charging. When the number is at 100, the battery is fully
charged and the will turn o. If no operation is performed within 10 seconds, the
screen will turn o automatically.

10
EN
咔哒
1
1
2
2
1
2
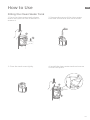
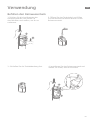
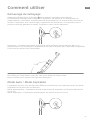
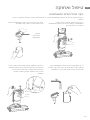
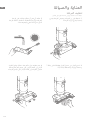
How to Use
Filling the Clean Water Tank
1. Press the clean water tank release
button and pull the tank outwards to
remove it.
2. Remove the cover of the clean water
tank and ll the tank with clean water.
3. Close the tank cover tightly. 4. Install the clean water tank and ensure
it clicks into place.
Click

11
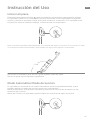
EN
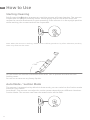
Note: When the vacuum is working, neither move it o the ground nor lay it at. Otherwise, the dirty
water may ow into the motor.
Do not recline the vacuum backwards more than 140° to prevent the vacuum from
leaking water.
Do not use to vacuum any foamy liquids.
<140°
Auto Mode / Suction Mode
The vacuum is powered on by default in Auto mode, you can switch to the Suction mode
based on your needs.
Auto Mode: The vacuum can adjust its suction power depending on dierent situations.
Suction Mode: The vacuum can clean the water stains on the oor.
How to Use
Starting Cleaning
Briey press the button to power on, and the vacuum will start cleaning. The vacuum
comes with an upright/reclining switch. Please gently step on the brush cover and
recline the vacuum backwards to start operating. If the vacuum is in the upright position
while working, the current task will be suspended.

12
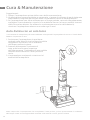
EN
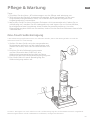
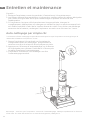
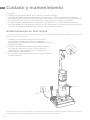
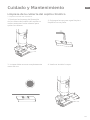
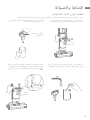
Care & Maintenance
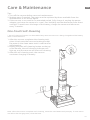
One-Touch Self-Cleaning
1. After the vacuum completes the cleaning task,
place it back onto the base and make sure that
the water in the clean water tank is sucient for
self-cleaning.
2. Briey press the self-cleaning button on the top
of the handle, the self-cleaning indicator will
light up, and the vacuum will start self-cleaning.
3. After the self-cleaning ends, the vacuum
continues charging its battery.
* The self-cleaning function can be enabled only when the vacuum is being charged and the battery
level is more than 15%.
Tips:
1. Turn o the vacuum before care and maintenance.
2. Replace parts if needed. The parts must be replaced by those available from the
manufacturer or its service agent.
3. If the vacuum is not used for an extended period, fully charge it, unplug the power
adapter, and store the vacuum in a cool, low-humidity environment away from direct
sunlight. To avoid over-discharge of the battery, charge the vacuum at least once
every 3 months.
Note: After the vacuum completes self-cleaning, clean theusedwater tankpromptly. If some stains
are left on the charging base, clean the base.

13
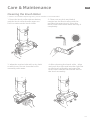
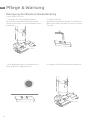
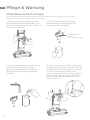
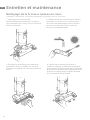
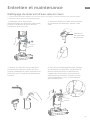
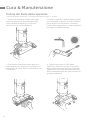
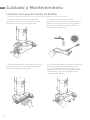
EN Care & Maintenance
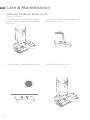
Cleaning the Brush Roller Cover
1. Press the brush roller cover release
buttons at both ends inward to remove
the cover
2. Rinse the cover with clean water or
wipe it with a cloth.
* Clean it as needed.
3. Dry the cover completely before use. 4. Re-install the cover back.

14
EN
1
2
1
2
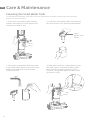
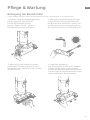
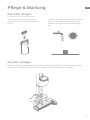
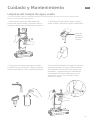
Care & Maintenance
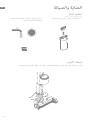
Cleaning the Brush Roller
1. Press the brush roller release button,
and the brush roller handle pops out.
Pull it to take out the brush roller.
2. Clean outanyhair and debris
tangled on the brushrollerwith the
provided cleaning brush. Rinse the
brushrollerwith clean water and dry it
completely.
3. Wipe the suction inlet with a dry cloth
or wet tissue. Do not rinse the brush
assembly with water.
4. After cleaning the brush roller , align
and pushtheright end into the right slot
on the brush assembly and press the
brush roller handle into the left slot on
the brush assembly.
* Clean it as needed. Replacing every 3 to 6 months is recommended.

15
EN
1
2
咔哒
1
2
1. Press the used water tank release
button, and pull the used water tank
outwards to take it out.
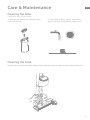
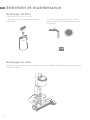
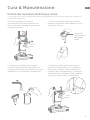
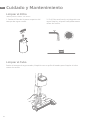
Care & Maintenance
Cleaning the Used Water Tank
*Cleaningthe used water tank after each use and before and after enabling the self-cleaning
functionis recommended.
2. Hold the used water tank and remove
the tank cover. Pour out the wastewater.
Used
Water Tank
Cover
3. Rinse the used water tank and tank
cover with clean water. Clean the inner
wall of the tank with the provided
cleaning brush.
4. After the cleaning is completed, close
the tank cover, snap the bottom of the
tank into the support position of the
vacuum, and gently push the tank until
you hear a click.
Click

16
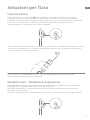
EN
Remove the used water tank, wipe it with a damp cloth to clean out the tube before use.
Cleaning the Tube
Care & Maintenance
Cleaning the Filter
1. Remove the lter from the top of the
used water tank.
2. If the lter is dirty, rinse it with clean
water and dry it completely before use.
* Replace it every 3 to 6 months.
La page est en cours de chargement...
La page est en cours de chargement...
La page est en cours de chargement...
La page est en cours de chargement...
La page est en cours de chargement...
La page est en cours de chargement...
La page est en cours de chargement...
La page est en cours de chargement...
La page est en cours de chargement...
La page est en cours de chargement...
La page est en cours de chargement...
La page est en cours de chargement...
La page est en cours de chargement...
La page est en cours de chargement...
La page est en cours de chargement...
La page est en cours de chargement...
La page est en cours de chargement...
La page est en cours de chargement...
La page est en cours de chargement...
La page est en cours de chargement...
La page est en cours de chargement...
La page est en cours de chargement...
La page est en cours de chargement...
La page est en cours de chargement...
La page est en cours de chargement...
La page est en cours de chargement...
La page est en cours de chargement...
La page est en cours de chargement...
La page est en cours de chargement...
La page est en cours de chargement...
La page est en cours de chargement...
La page est en cours de chargement...
La page est en cours de chargement...
La page est en cours de chargement...
La page est en cours de chargement...
La page est en cours de chargement...
La page est en cours de chargement...
La page est en cours de chargement...
La page est en cours de chargement...
La page est en cours de chargement...
La page est en cours de chargement...
La page est en cours de chargement...
La page est en cours de chargement...
La page est en cours de chargement...
La page est en cours de chargement...
La page est en cours de chargement...
La page est en cours de chargement...
La page est en cours de chargement...
La page est en cours de chargement...
La page est en cours de chargement...
La page est en cours de chargement...
La page est en cours de chargement...
La page est en cours de chargement...
La page est en cours de chargement...
La page est en cours de chargement...
La page est en cours de chargement...
La page est en cours de chargement...
La page est en cours de chargement...
La page est en cours de chargement...
La page est en cours de chargement...
La page est en cours de chargement...
La page est en cours de chargement...
La page est en cours de chargement...
La page est en cours de chargement...
La page est en cours de chargement...
La page est en cours de chargement...
La page est en cours de chargement...
La page est en cours de chargement...
La page est en cours de chargement...
La page est en cours de chargement...
La page est en cours de chargement...
La page est en cours de chargement...
La page est en cours de chargement...
La page est en cours de chargement...
La page est en cours de chargement...
La page est en cours de chargement...
La page est en cours de chargement...
La page est en cours de chargement...
La page est en cours de chargement...
La page est en cours de chargement...
La page est en cours de chargement...
La page est en cours de chargement...
La page est en cours de chargement...
La page est en cours de chargement...
La page est en cours de chargement...
La page est en cours de chargement...
La page est en cours de chargement...
La page est en cours de chargement...
La page est en cours de chargement...
La page est en cours de chargement...
La page est en cours de chargement...
La page est en cours de chargement...
La page est en cours de chargement...
La page est en cours de chargement...
La page est en cours de chargement...
La page est en cours de chargement...
La page est en cours de chargement...
La page est en cours de chargement...
La page est en cours de chargement...
La page est en cours de chargement...
La page est en cours de chargement...
La page est en cours de chargement...
La page est en cours de chargement...
La page est en cours de chargement...
La page est en cours de chargement...
La page est en cours de chargement...
La page est en cours de chargement...
La page est en cours de chargement...
La page est en cours de chargement...
La page est en cours de chargement...
La page est en cours de chargement...
La page est en cours de chargement...
La page est en cours de chargement...
La page est en cours de chargement...
La page est en cours de chargement...
La page est en cours de chargement...
La page est en cours de chargement...
La page est en cours de chargement...
La page est en cours de chargement...
La page est en cours de chargement...
La page est en cours de chargement...
La page est en cours de chargement...
La page est en cours de chargement...
La page est en cours de chargement...
La page est en cours de chargement...
La page est en cours de chargement...
La page est en cours de chargement...
La page est en cours de chargement...
La page est en cours de chargement...
La page est en cours de chargement...
La page est en cours de chargement...
La page est en cours de chargement...
La page est en cours de chargement...
La page est en cours de chargement...
La page est en cours de chargement...
La page est en cours de chargement...
La page est en cours de chargement...
La page est en cours de chargement...
La page est en cours de chargement...
La page est en cours de chargement...
La page est en cours de chargement...
La page est en cours de chargement...
La page est en cours de chargement...
La page est en cours de chargement...
La page est en cours de chargement...
La page est en cours de chargement...
La page est en cours de chargement...
La page est en cours de chargement...
La page est en cours de chargement...
La page est en cours de chargement...
La page est en cours de chargement...
La page est en cours de chargement...
La page est en cours de chargement...
La page est en cours de chargement...
La page est en cours de chargement...
La page est en cours de chargement...
La page est en cours de chargement...
La page est en cours de chargement...
La page est en cours de chargement...
La page est en cours de chargement...
La page est en cours de chargement...
La page est en cours de chargement...
La page est en cours de chargement...
La page est en cours de chargement...
La page est en cours de chargement...
La page est en cours de chargement...
La page est en cours de chargement...
-
 1
1
-
 2
2
-
 3
3
-
 4
4
-
 5
5
-
 6
6
-
 7
7
-
 8
8
-
 9
9
-
 10
10
-
 11
11
-
 12
12
-
 13
13
-
 14
14
-
 15
15
-
 16
16
-
 17
17
-
 18
18
-
 19
19
-
 20
20
-
 21
21
-
 22
22
-
 23
23
-
 24
24
-
 25
25
-
 26
26
-
 27
27
-
 28
28
-
 29
29
-
 30
30
-
 31
31
-
 32
32
-
 33
33
-
 34
34
-
 35
35
-
 36
36
-
 37
37
-
 38
38
-
 39
39
-
 40
40
-
 41
41
-
 42
42
-
 43
43
-
 44
44
-
 45
45
-
 46
46
-
 47
47
-
 48
48
-
 49
49
-
 50
50
-
 51
51
-
 52
52
-
 53
53
-
 54
54
-
 55
55
-
 56
56
-
 57
57
-
 58
58
-
 59
59
-
 60
60
-
 61
61
-
 62
62
-
 63
63
-
 64
64
-
 65
65
-
 66
66
-
 67
67
-
 68
68
-
 69
69
-
 70
70
-
 71
71
-
 72
72
-
 73
73
-
 74
74
-
 75
75
-
 76
76
-
 77
77
-
 78
78
-
 79
79
-
 80
80
-
 81
81
-
 82
82
-
 83
83
-
 84
84
-
 85
85
-
 86
86
-
 87
87
-
 88
88
-
 89
89
-
 90
90
-
 91
91
-
 92
92
-
 93
93
-
 94
94
-
 95
95
-
 96
96
-
 97
97
-
 98
98
-
 99
99
-
 100
100
-
 101
101
-
 102
102
-
 103
103
-
 104
104
-
 105
105
-
 106
106
-
 107
107
-
 108
108
-
 109
109
-
 110
110
-
 111
111
-
 112
112
-
 113
113
-
 114
114
-
 115
115
-
 116
116
-
 117
117
-
 118
118
-
 119
119
-
 120
120
-
 121
121
-
 122
122
-
 123
123
-
 124
124
-
 125
125
-
 126
126
-
 127
127
-
 128
128
-
 129
129
-
 130
130
-
 131
131
-
 132
132
-
 133
133
-
 134
134
-
 135
135
-
 136
136
-
 137
137
-
 138
138
-
 139
139
-
 140
140
-
 141
141
-
 142
142
-
 143
143
-
 144
144
-
 145
145
-
 146
146
-
 147
147
-
 148
148
-
 149
149
-
 150
150
-
 151
151
-
 152
152
-
 153
153
-
 154
154
-
 155
155
-
 156
156
-
 157
157
-
 158
158
-
 159
159
-
 160
160
-
 161
161
-
 162
162
-
 163
163
-
 164
164
-
 165
165
-
 166
166
-
 167
167
-
 168
168
-
 169
169
-
 170
170
-
 171
171
-
 172
172
-
 173
173
-
 174
174
-
 175
175
-
 176
176
-
 177
177
-
 178
178
-
 179
179
-
 180
180
-
 181
181
-
 182
182
-
 183
183
-
 184
184
-
 185
185
-
 186
186
-
 187
187


DREAME H12 Manuel utilisateur
- Catégorie
- Aspirateurs
- Taper
- Manuel utilisateur
dans d''autres langues
- italiano: DREAME H12 Manuale utente
- español: DREAME H12 Manual de usuario
- Deutsch: DREAME H12 Benutzerhandbuch
- polski: DREAME H12 Instrukcja obsługi