
GEAppliances.com
0
0_
0_
0_
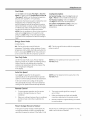
Safety Instructions ............ 2,3
Operating Instructions ......... 4,s
Care and Cleaning
Air Filter ............................. 6
Outdoor Coils ........................ 6
Installation Instructions ..... 7-1o
Troubleshooting Tips........... 11
Normol Operoting Sounds ........... 11
Consumer Support
Consumer Support .......... Bock Cover
Ownership Registrotion for
Customers in Conodo only ........ 13, 14
Worronty for Customers
in Conodo .......................... 16
Worronty for Customers
in the U.S.A........................ 15
*ENERGY STAR ® labeled product
STAR
As an ENERGYSTAR®partner, GE has
determined that this product meets
the ENERGYSTAR®guidelines for
energy efficiency.
Write the model and serial numbers here:
Model #
Serial #
Find these numbers on a label on the side of
the air conditioner.
In Canada, contact us at:
www.GEAppliances.ca
AEWIO*
AEZIO*
AEWI2*
AEZI2*
Climatiseur
Lo section fronqoise commence _ Io poge 17
Acondicionador
deaire
Lo secci6n en espohol empiezo en Io pdgino 55
49-7657 12-10 GE

IMPORTANT SAFETY INFORMATION.
READ ALL INSTRUCTIONS BEFORE USING.
WARNING!
Foryour safety, the information in this manual must be followed to minimize the risk of fire, electric shock
or personal injury.
SAFETYPRECAUTIONS
Use this appliance only for its intended
purpose as described in this Owner's
Manual.
This air conditioner must be properly
installed in accordance with the Installation
Instructions before it is used.
Never unplug your air conditioner by pulling
on the power cord. Always grip plug firmly
and pull straight out from the receptacle.
Replace immediately all electric service
cords that have become frayed or otherwise
damaged. A damaged power supply cord
must be replaced with a new power supply
cord obtained from the manufacturer and
not repaired. Do not use u cord that shows
cracks or abrasion damage along its length
or at either the plug or connector end.
Turn the unit OFFand unplug your air
conditioner before cleaning.
GEdoes not support any servicing of the
air conditioner. We strongly recommend
that you do not attempt to service the air
conditioner yourself.
For your safety...do not store or use
combustible materials, gasoline or other
flammable vapors or liquids in the vicinity
of this or any other appliance.
Allair conditioners contain refrigerants,
which under federal law must be removed
prior to product disposal. If you are getting
rid of an old product with refrigerants, check
with the company handling disposal about
what to do.
If the receptacle does not match the plug,
the receptacle must be changed out by a
qualified electrician.
These R410A air conditioning systems
require contractors and technicians to
use tools, equipment and safety standards
approved for use with this refrigerant.
DO NOT use equipment certified for
R22 refrigerant only.
2
HOW TO CONNECT ELECTRICITY
Do not, under any circumstances, cut or remove
the third (ground) prong from the power cord.
For personal safety, this appliance must be
properly grounded.
DO NOT use an adapter plug with this
appliance.
The power cord of this appliance is equipped
with a 3-prong (grounding) plug which mates
with a standard 3-prong (grounding) wall outlet
to minimize the possibility of electric shock
hazard from this appliance.
Power cord includes a current interrupter device.
A test and reset button is provided on the plug
case. The device should be tested on a periodic
basis by first pressing the TESTbutton and
then the RESETbutton while plugged into the
outlet. If the TESTbutton does not trip or if the
RESETbutton will not stay engaged, discontinue
use of the air conditioner and contact a qualified
service technician.
Have the wall outlet and circuit checked by
a qualified electrician to make sure the outlet
is properly grounded.
Where a 2-prong wall outlet is encountered,
it isyour personal responsibility and obligation to
have it replaced with a properly grounded
3-prong wall outlet.
The air conditioner should always be plugged
into its own individual electrical outlet which has
a voltage rating that matches the rating plate.
This provides the best performance and also
prevents overloading house wiring circuits which
could cause a fire hazard from overheated wires.
See the Installation Instructions, Electrical
Requirements section for specific electrical
connection requirements.

WARNING!
USEOFEXTENSION CORDS
RISK OF FIRE. Could couse serious injury or
death.
• DO NOT use an extension cord with this
Window Air Conditioner.
• DO NOT use surge protectors or multi-outlet
adaptors with this Window Air Conditioner.
GEAppliances.com
READANDFOLLOWTHISSAFETYINFORMATIONCAREFULLY.
SAVETHESEINSTRUCTIONS

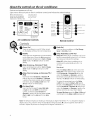
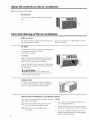
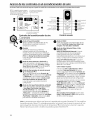
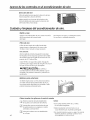
About the controlson the air conditioner.
Features and appearance will vary.
Lights next to the touch pads on the air conditioner control panel indicate the selected settings.
NOTE:Thedisplayalways Lightindicates the unit
showstheroomtemperature is in the temperatureor
except when setting theSet delaytimeSetmode.
temperatureortheDelaytimer.
0 -Auto
u, High uCool
Med I Energg Saver
LOW _ Fan Ontg
a--@e9G?e3 r-r oa
Lightindicates the
delaytimerisset.
Air Conditioner Controls
Delay1-24hr
Delaytimer @Decrease
Modeselect 0
Fanspeed 0Decrease
Temperature 0
set Increase
andDecrease
Remote Control
Controls
O ower Pad 0
Turnsair conditioner on and off.When turned
on,the display will show the room temperature.
O Display
Showsthe room temperature or time remaining
onthe Delaytimer. Shows the Settemperature
while setting the temperature inCool or Energy
Saver modes.TheSetlight will turn onwhile
setting.
O emp Increase •/Decrease • Pads
Useto set temperature when in Coolor Energy
Saver mode.TheSet light will turn onwhile
setting.
O elay Timer Increase • (+)/Decrease • (-)
Pads
Eachtouch of the Increase • / Decrease •
pads on the unit or the Increase + / Decrease
- padson the remote control will setthe delay
time when usingthe Delay 1-24hr timer. The
Setlight will turn on while setting.
O an Speed Pads
Useto set the fan speed to Low, Mad,High
or Auto on the unit. NOTE:Onthe remote
control, usethe fan speedIncrease + /
Decrease - pads to set the fan speeds to Low,
Mad or High. Usethe Auto pad to turn Auto
fan on.
0
Mode Pad
Useto set the air conditioner to Coo/,Energy
Saver or Fan Onlymode.
Delay Pads/Delay 1-24hr Pad
Delay ON--When the air conditioner isoff,itcan
be set to automatically come on in 1to 24 hours
at its previous mode and fan settings.
Delay OFF--Whenthe air conditioner ison,
it can be set to automatically turn offin 1to
24 hours.
How to set:
Pressthe Delay 1-24hr pad on the unit or the
Delay pad on the remote control. Eachtouch
of the Increase • / Decrease• pads onthe
unit or the Increase + / Decrease - pads on
the remote control will setthe timer in 1-hour
intervals.TheSet lightwill turn on while setting.
Toreview the remaining time on the Delay
1-24hr timer, pressthe Delay 1-24hr padon
the unit or the Delay pad on the remote control.
Usethe Increase • / Decrease • padson the
unit or the Increase+ / Decrease - pads on the
remote control to set a new time if desired.
Tocancel the timer, pressthe Delay 1-24hr pad
until the light on the Delay 1-24hr pad goes off.
Note: The default temperature reading on the display is degree Fahrenheit (°F). Tochange the display to
degree Celcius (°C),press the Temp Increase • and Temp Decrease • buttons together and hold for 3
seconds. Repeat the process to change back to degree Fahrenheit (°F)
4

GEAppliances.com
Cool Mode
Usethe Cool mode at Low, Meal,High or Auto Fen
Speedfor cooling. Usethe Temperature Increase •
/ Decrease • padsto set the desired temperature
between 64°Fand 86°Fin l°F increments.
An electronicthermostat isusedto maintain the room
temperature. Thecompressorwill cycleon
and off to keepthe room atthe setlevelof comfort.
Setthe thermostat at a lower number and the indoor
air will become cooler.Setthe thermostat at a higher
number and the indoor air will become warmer.
NOTE:If the air conditioner isoff and isthen turned on
while set to a Coolsetting or ifturned from a fan
setting to a Coolsetting, it may take approximately
3 minutes forthe compressor to start and cooling to
begin.
Cooling Descriptions
For Normal Cooling-Select the Cool mode and
High or Medfan with a middle set temperature.
For Maximum Cooling-Select the Cool mode
and High fan with a lower settemperature.
For Quieter and Nighttime Cooling-Select the
Cool mode and Low fan with a middle set
temperature.
Energy Saver Mode
Controls the fan.
ON--The fan will cycle on and off with the
compressor.Thisresults in wider variations of room
temperature and humidity. Normally usedwhen the
room isunoccupied.NOTE:Thefan may continueto
run for a short time after the compressor cyclesoff.
OFF--Thefun runs oil the time, while the compressor
cycleson and off.
Fan Only Mode
Usethe FanOnly Mode at Low, Medor Highfan
speed to provide air circulation and filtering without
cooling. Sincefan-only settings do not provide
cooling, a Settemperature cannot be entered.The
room temperature will appear
in the display.
NOTE:Auto Fan Speed cannot be used when in the
Fan Only Mode.
Auto Fan Speed
Setto Auto fun speedfor the fun speed to
automatically set to the speed neededto provide
optimum comfort settings with the set temperature.
Ifthe room needsmore cooling,the fun speed
will automatically increase.If the room needs less
cooling, the fun speedwill automatically decrease.
NOTE:Auto Fan Speed cannot be used when in the
Fan Only Mode.
Remote Control
Toensure proper operation, aim the remote
control at the signal receiver on the air
conditioner.
Hoke sure nothing isbetween the air conditioner
and the remote control that could block the
signal.
Theremote control signal has o range of
up to 20 feet.
Make sure batteries ore fresh and installed
correctly as indicated on the remote control.
Remotecontains o magnet allowing it to attach
to metal surfaces.
Power Outage Recovery Feature
Inthe case of o power outage or interruption, the
unit will automatically re-start in the settings lost
used offer the power isrestored. Ifthe Delay1-24hr
feature was set,it will resume countdown. You may
need to set o new time if desired.

About the controlsonthe air conditioner
Additional important information.
Air Direction
Usethe leverto adjust the air direction left and right
only.
Careand cleaningof the air conditioner.
Grille and Case
Turn the air conditioner off and remove the plug from Toclean, usewater and a mild detergent. Do not use
the wall outlet before cleaning, bleachor abrasives.
Air Filter
Theair filter behind the front grille should be checked
and cleaned at least every 30 daysor
more often if necessary.
Toremove:
Open the inlet grille by pulling downward on the tabs
at the top upper corners ofthe inlet grille until the
grille is in a 850position. Removethe filter.
Cleanthe filter with warm, soapy water. Rinseand let
the filter dry before replacing it. Donot cleanthe filter
in a dishwasher.
CAUTION:_oNoro_erotetheair
conditioner without o filter becausedirt and lint will
clog itand reduceperformance.
Tab Tab
Outdoor Coils
Thecoils on the outdoor sideof the air conditioner
should be checked regularly. Ifthey are clogged with
dirt or soot,they may be professionallycleaned.
6
How to Insert the Batteries in the Remote Control
[_ emove the battery cover by sliding it according
to the arrow direction.
[-2-J Insertnew batteries, making sure that the (+)
and (-) of battery are installed correctly.
[-_ Reattachthe cover by slidingit back
into position.
NOTES:
Use2"AAA"(1.5volt) alkaline batteries.Do not
use rechargeable batteries.
Removethe batteriesfrom the remote control if
the system isnot going to be usedfor a long time.
Donot mix old and new batteries. Donot mix
alkaline,standard (carbon-zinc)or rechargeable
(ni-cad,ni-mh, etc) batteries.

I
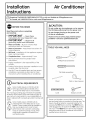
Installation
Instructions
Air Conditioner
I-_ Questions? Call 800.GE.CARES (800.432.2737) or visit our Website at: GEAppliances.com
In Canada, call 1.800.561.3344 or visit www.GEAppliances.ca I
BEFORE YOU BEGIN
Read these instructions completely
and carefully.
• IMPORTANT - Savethese
instructions for local inspector's use.
• IMPORTANT - Observe all
governing codes and ordinances.
• Note to Installer- Be sure to leave these
instructions with the Consumer.
• Note to Consumer - Keep these instructions for
future reference.
• Skill level - Installation of this appliance requires
basic mechanical skills.
• Completion time - Approximately 1 hour
• We recommend that two people install
this product.
• Proper installation is the responsibility of the
installer.
• Product failure due to improper installation is not
covered under the Warranty.
• You MUST use all supplied parts and use proper
installation procedures us described in these
instructions when installing this air conditioner.
(_ ELECTRICAL REQUIREMENTS
Some models require a llS/120-volt AC,
60-Hz grounded outlet protected with a
15-amp time-delay fuse or circuit breaker.
The 3-prong grounding plug minimizes the possibility
of electric shock hazard. If the wall outlet you plan to
use is only a 2-prong outlet, it isyour responsibility to
have it replaced with a properly grounded 3-prong wall
outlet.
©
@
Some models require 230/208-volt AC,
protected with a time-delay fuse or circuit
breaker. These models should be installed on
their own single branch circuit for best
performance and to prevent overloading
house or apartment wiring circuits, which
could cause a possible fire hazard from
overheating wires.
ACAUTION:
Do not, under any circumstances, cut or remove
the third (ground) prong from the power cord.
Do not change the plug on the power cord
of this air conditioner.
Aluminum house wiring may present special
problems--consult a qualified electrician.
TOOLS YOU WILL NEED
Phillips-head screwdriver
Flat-blade screwdriver
Pencil Ruler or tape measure
Level Scissors or knife
Power cord includes a current interrupter device. A
test and reset button is provided on the plug case. The
device should be tested on a periodic basis by first
pressing the TESTbutton and then the RESETbutton
while plugged into the outlet. If the TESTbutton does
not trip or if the RESETbutton will not stay engaged,
discontinue use of the air conditioner and contact a
qualified service technician.

Installation Instructions
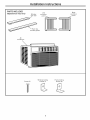
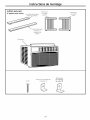
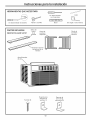
PARTS INCLUDED
(Appearance may vary) Window
sash seal
Left
accordion
panel
Right
accordion
)anel
Air
conditioner
Screw (6)
Window locking
bracket (1)
Frame locking
bracket (2)
8

Installation Instructions
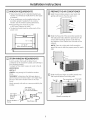
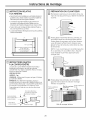
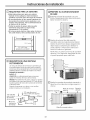
D WINDOW REQUIREMENTS
•Theseinstructions are for a standard double-hung
window. Youwill need to modify them for other types
of windows.
• The air conditioner can be installed without the
accordion panels if needed to fit in a narrow
window. Seethe window opening dimensions.
• All supporting parts must be secured
to firm wood, masonry or metal.
• The electrical outlet must be within reach of the
power cord.
m
t"
1 //J
B===8
15 1/2"min.
22" to 36"
(With accordion panels)
I
I
STORM WINDOW REQUIREMENTS
A storm window frame will not allow the air
conditioner to tilt toward the outside, and will keep it
from draining properly.
To adjust for this, attach a piece of wood to the sill.
WOOD PIECES
WIDTH: 2"
LENGTH:Long enough to fit inside the window
frame.
THICKNESS: To determine the thickness, place a
piece of wood on the sill to make it 1/2" higher than
the top of the storm window frame or the vinyl
frame.
Attach securely with nails or screws provided by the
installer.
1/2" higher
than vinyl frame
1/2,,higher _ ; (°n s°me wind°ws)
./,-Wood
-rr; !)) j_ j)/I
than storm _-- n$l: IJ,,=Y(_I
window
frame _ Sill r_
Storm window
frame - r_ Vinyl frame I I
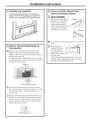
D PREPARE THE AIR CONDITIONER
r_ Hold the accordion panel in one hand and
gently pull back to free the open end.
Slide the free end of the accordion panel into
the side panel rails. Slide the panel down. Be
sure to leave enough space to slip the top
and bottom of the frame into the rails on the
cabinet.
NOTE: There is a right and a left accordion
panel. Be sure to use the proper panel for each
side.
FC] Slide the left and right accordion panels into
the top and bottom mounting roils.
Top mounting rail Top right
Top,_t _/ i_
Bottom mounting rail
9

Installation Instructions
@
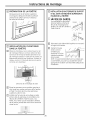
PREPARE THE WINDOW
Cut the window sash seal to the proper
length. Peel off the backing and attach the
seal to the underside of the window sash.
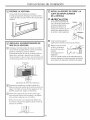
[] INSTALL THE AIR CONDITIONER IN
THE WINDOW
r_ Place the air conditioner on the sill with the
bottom mounting rail against its back edge.
Center it and close the window securely behind
the top mounting rail.
It should be level or slightly tilted to the outside.
Use a level; about a 1/3 bubble will be the correct
case slant to the outside.
3 Screws
2 Frame locking brackets
r_ Extend the left and right accordion panels to
the vertical window sashes and attach 3 screws
through the holes in the upper panels, as
appropriate.
rCl Install the frame locking brackets between the
bottom of the accordion panel and the window
sill. Attach with 2 screws. NOTE: To prevent the
window sill from splitting, drive the pilot holes
before driving the screws.
[_] INSTALL SUPPORT BRACKET AND
FOAM TOP WINDOW GASKET
@
%
©
-ACAUTION:
To prevent broken glass or
damage to windows, on
vinyl or other similarly
constructed windows,
attach the window locking
bracket to the window
side jamb with one screw.
Cut the foam top window gasket to the window
width.
Stuff the foam
between the glass
and the window
to prevent air and
insects from getting
into the room.
NOTE: If the gasket supplied does not fit your
window, obtain appropriate material locally to
provide a proper installation seal.
- 10

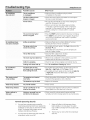
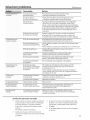
Troubleshooting Tips. GEAppliances.com
Possible Causes What To Do
Aircbnditioner Theair conditioner • Make surethe air conditioner plug ispushed
doesnot start Jsunplugged, completely into the outlet.
Thefuse is blown/circuit • Checkthe house fuse/circuit breaker box and replace
breaker istripped, the fuse or reset the breaker.
Power failure. •The unit will automatically re-start in the settings last
used after the power isrestored.
•There is a protective time delay (approximately
3 minutes) to prevent tripping of the compressor
overload. For this reason, the unit may not start
normal cooling for 3 minutes after it is turned
back on.
The current interrupter • Pressthe RESETbutton located on the power cord plug.
device is tripped. • If the RESETbutton will not stay engaged, discontinue
use of the air conditioner and contact a qualified
service technician.
Air conditioner does Airflow is restricted. • Make surethere are nocurtains, blindsor furniture
not cool asitshould blocking the front of the air conditioner.
Thetamp control may • On modelswith touch pads: Inthe Cool mode, pressthe
not be set correctly. Decrease • pad.
• On modelswith control knobs,turn the temperature
knob to a higher number.
The air filter isdirty. • Cleanthe filter at leastevery 30 days.
Seethe Careand Cleaningsection.
The room may have been hot. • When the air conditioner isfirst turned on,you need
to allow time for the room to cool down.
Cold air isescaping. • Checkfor open furnace registersand cold air returns.
Cooling coils have iced up. • See "Air conditioner freezing up" below.
Air conditioner
freezing up
Ice blocks the air flow
and stopsthe air conditioner
from cooling the room.
• On modelswith control knobs,set the mode control at
High Fan or High Coolwith the Tamp at 1 or 2.
• On modelswith touch pads, set the controls at High Fan
or High Cool and set the thermostat to a higher
temperature.
Theremote control The batteries are inserted • Checkthe position of the batteries. They should be
is not working incorrectly, inserted inthe opposite (+)and (-)direction.
The batteries may be dead. • Replacethe batteries.
Water drips outside Hot, humid weather. • Thisisnormal.
Water drips indoors The air conditioner is not • Forproper water disposal,make sure the air conditioner
tilted to the outside, slants slightlyfrom the case front to the rear.
Water collects in Moisture removed from air
base pan and drains into base pan.
• Thisisnormal for a short period in areaswith little
humidity; normal for a longer period in very humid areas.
Normal Operating Sounds
Youmay hear a pinging noisecaused by
water being picked up and thrown against the
condenser on rainy days or when the humidity
is high.This designfeature helpsremove
moisture and improve efficiency.
Youmay hear the thermostat clickwhen the
compressor cycles on and off.
Water will collect in the basepan during
high humidity or on rainy days.Thewater
may overflow and drip from the outdoor side
of the unit.
Thefan may run even when the compressor
does not.

Notes.
12

Notes.
13

Notes.
14

GEAir Conditioner--One Year Limited Warranty. rForcustomers in theU.S.A.)
Staple your receipt here.
Proof of the original purchase date is needed
to make a warranty claim.
From the date of the
original purchase ......
We Will Replace:
Replacementunitfor any product which fails dueto a defect in materials or workmanship.
The replacement unit iswarranted for the remainder ofyour product's original one-year
warranty period.The replacement unit may either be a new unit or a refurbished unit.
Properly pack your unit. We recommend using
the original carton and packing materials.
Return the product to the retail location where
it was purchased.
Include in the package a copyof the sales receipt or
other evidence of date of original purchase. Also print
your name and address and adescription of the defect.
Locate your original sales receipt and make a note
of your model and serial number.
Call GEat 1.866.907.1655to initiate the product
replacement process.
You will be asked to provide your name, address,
date of purchase, model and serial number.
GEwill arrange for a carton to be sent to your home
to recover the product.
You must return the product (postage pre-paid by GE)
to GE'srecovery center before a replacement unit will be
provided. Pleaseinclude a description of the defect.
You should receive your replacement product within
7to 10 business days after your unit is received.
If you experience any problems or delays after initiating
the replacement process, please call 1.256.796.6610for
assistance.
ii iii
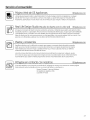
Customer instruction. This owner's manual provides
information regarding operating instructions and
user controls.
Improper installation. If you have an installation problem,
or if the air conditioner isof improper cooling capacity
for the intended use, contact your dealer or installer.
You are responsible for providing adequate electrical
connecting facilities.
Failure of the product resulting from modifications to
the product or due to unreasonable use including failure
to provide reasonable and necessary maintenance.
Replacement of house fuses or resetting of circuit
breakers.
Failure due to corrosion on models not corrosion-
protected.
Damage to the product caused by improper power
supply voltage, accident, fire, floods or acts of God.
Incidental or consequential damage caused by possible
defects with this air conditioner.
Damage caused after delivery.
EXCLUSION OF IMPLIED WARRANTIES--Your sole and exclusive remedy is product replacement
as provided in this Limited Warranty. Any implied warranties, including the implied warranties of
merchantability or fitness for a particular purpose, are limited to one year or the shortest period
allowed by law.
This warranty is extended to the original purchaser and any succeeding owner for products purchased for
home use within the USA.
Some states do not allow the exclusion or limitation of incidental or consequential damages. This warranty
gives you specific legal rights, and you may also have other rights which vary from state to state. To know
what your legal rights are, consult your local or state consumer affairs office or your state's Attorney General
Exclusion of implied warranties: Except where prohibited or restricted by law, there are no warranties,
whether express, oral or statutory which extend beyond the description on the face hereof, including
specifically the implied warranties of merchantability or fitness for a particular purpose.
Warrantor: General Electric Company. Louisville, KY 40225

GE Air Conditioner--One-Vear Limited Warranty. (Forcustomers in Canada)
Staple your receipt here.
Proof of the original purchase date is
needed to make a warranty claim.
wowi,,
OneVear I Replacement unit for any product which fails due to a defect in materials or workmanship.
From the date of the I Thereplacement unit iswarranted for the remainder of your product's original one-year
original purchase i warranty period.
Properly pack your unit. We recommend using the
original carton and packing materials.
Return the product to the retail location where it
was purchased.
Include in the package a copy of the sales receipt or
other evidence of date of original purchase. Also print
your name and address and a description of the defect.
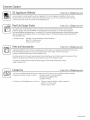
Customer instruction. This owner's manual provides
information regarding operating instructions and
user controls.
Improper installation, delivery or maintenance. If you
have an installation problem, or if the air conditioner is
of improper cooling capacity, contact your dealer or
installer. You are responsible for providing adequate
electrical, plumbing and other connecting facilities.
Failure of the product resulting from modifications to
the product or due to unreasonable use, including failure
to provide reasonable and necessary maintenance.
Replacement of house fuses or resetting of circuit
breakers.
Failure due to corrosion on models not corrosion-
protected.
Damage to the product caused by improper power
supply voltage, accident, fire, floods or acts of God.
Incidental or consequential damage caused by possible
defects with this air conditioner.
Damage caused after delivery.
EXCLUSION OF IMPLIED WARRANTIES--Your sole and exclusive remedy is product replacement
as provided in this Limited Warranty. Any implied warranties, including the implied warranties of
merchantability or fitness for a particular purpose, are limited to one year or the shortest period
allowed by law.
This warranty is extended to the original purchaser and any succeeding owner for products purchased in Canada
for home use within Canada.
Some provinces do not allow the exclusion or limitation of incidental or consequential damages, so the above
exclusion may not apply toyou. This warranty gives you specific legal rights, and you may also have other rights
which vary from province to province. To know what your legal rights are in your province, consult your local or
provincial consumer affairs o_ce.
Exclusion of implied warranties: Except where prohibited or restricted by law, there are no warranties,
whether express, oral or statutory which extend beyond the description on the face hereof, including
specifically the implied warranties of merchantability or fitness for a particular purpose.
16
Warrantor: Mabe Canada Inc.,
Burlington, Ontario

Consignes de s_curit_ ........... 18,19
Consignesd'utilisation ............ 20,21
Entretien et nettoyage
Filtre 6 air ................................ 22
Serpentins ext6rieurs ..................... 22
Instructions de montage ......... 23-26
Conseils de d_pannage ............. 2z
Bruits normaux de fonctionnement ........ 27
Assistance _ la clientele
Assistance 6 la clientele ................... 34
Garantie .................................. ZZ
Enregistrement du titre
de propri6t6 ............................ Z1, Z2
AEWIO*
AEZIO*
AEW12*
AEZ12*
* Produits homologu6s ENERGYSTAR®
ENERGYSTAR
Entant que partenaire d'ENERGYSTAR®,GEa
d6termin6 que ce produit 6tait conforme aux
exigences d'efficacit6 6nerg6tique d'ENERGY
STAR®.
Inscrivez ici les num_ros de module et de s_rie :
Num_ro de module :
Num_ro de S_rie :
Vous trouverez ces num6ros sur 1'6tiquette
appos6e sur le c6t6 du climatiseur.
Au Canada, visitez-nous au
www.electromenagersge.ca
17

IMPORTANTES CONSIGNES DE S 'CURIT '.
VEUILLEZ LIRE TOUTES LES CONSIGNES AVANT UTILISATION.
AVERTISSEMENT!
Pour votre s6curit6, les informations contenues dans ce manuel doivent 6tre suivies afin de minimiser
les risques d'incendie, de chocs 61ectriques ou de blessures corporelles.
18
CONSIGNESDESL-CURITL-
N'utilisez cet appareil qu'aux fins pr6vues
d6crites dans le manuel d'utilisation.
Ce climatiseur dolt @trecorrectement
install6 conform6ment aux Instructions
d'lnstallation avant toute utilisation.
Ne d6branchezjamais votre climatiseur en
tirant sur le cordon d'alimentation. Prenez
toujours fermement la fiche en main et tirez
pour la sortir de la prise.
Remplacez imm6diatement tout cordon
61ectrique us6 ou endommag& Un
cordon d'alimentation endommag6 dolt
6tre remplac6 par un nouveau cordon
d'alimentation obtenu du fabricant. Ne
r6parez pas le cordon endommag& N'utilisez
pas un cordon fissur6 ou pr6sentant des
dommages dus aux frottements salt sur
sa Iongueur ou aux extr6mit6s du c6t6
de la fiche ou du raccord.
Eteignez votre climatiseur et d6branchez-le
avant de le nettoyer.
GE n'offre pas de service d'entretien pour les
climatiseurs. Nous vous recommandons de
ne pas essayer d'effectuer I'entretien
de votre climatiseur vous-m6me.
Pour votre s6curit6, ne stockez pas et
n'utilisez pas de mat6riaux combustibles,
d'essence ou d'autres vapeurs et liquides
inflammables dans les parages de cet
appareil ou de tout autre appareil.
Tousles climatiseurs contiennent des
fluides frigorig_nes qui, conform6ment, 6 la
16gislation f6d6rale doivent 6tre retir6s avant
la mise au rebut de I'appareil. Si vous mettez
au rebus un ancien appareil contenant des
fluides frigorig6nes, v6rifiez la proc6dure 6
suivre aupr6s de la compagnie responsable
de 1'61imination.
Si la prise de courant est d'un format
diff6rent de la fiche, cette prise dolt @tre
chang6e par un 61ectricien qualifi&
Ces syst@mes de climatisation R410A
n6cessitent que les entrepreneurs et
techniciens adoptent des outils, du mat6riel
et des normes de s6curit6 approuv6s pour
utilisation avec ce r6frig6rant. N'utilisez pas
de mat6riel certifi6 pour le r6frig6rant R22
uniquement.
BRANCHEMENTS L-LECTRIOUES
Ne coupez pas ou n'enlevez pas, sous aucun
pr6texte, la troisi6me broche de mise 6 la terre
du cordon d'alimentation. Pour des raisons
de s6curit6, cet appareil dolt 6tre correctement
mis 6 la terre.
N'utilisez PASd'adaptateur avec cet appareil.
Le cordon d'alimentation de cet appareil
est 6quip6 d'une fiche 6 trois broches (pour une
mise 6 la terre) qui s'adapte 6 la prise
de courant standard 6 3 broches (pour une mise
6 la terre) pour minimiser les risques
de chocs 61ectriques par cet appareil.
Le cordon d'alimentation est 6quip6 d'un
dispositif d'interruption du courant. Un bouton
d'essai et de r6enclenchement est fourni
sur le battier de la prise. Vous devez tester le
m6canisme r6guli_rement en appuyant d'abord
sur le bouton TEST(essa# puis sur le bouton
RESET(r#enclenchemeng Iorsque I'appareil est
branch& Si le bouton TEST(essa# ne bascule
pas ou si le bouton RESET(r_,enclenchemeng
ne reste pas enclench& cessez d'utiliser votre
climatiseur et appelez un technicien de service
qualifi&
Faites v6rifier la prise murale et le circuit
61ectrique par un 61ectricien qualifi6 pour
s'assurer que le syst_me est correctement
mis 6 la terre.
Dans le cas d'une prise biphas6e,
I'installateur a la responsabilit6 et I'obligation
de la remplacer par une prise triphas6e
correctement mise 6 la terre.
Le climatiseur dolt toujours 6tre branch6
6 sa propre prise 61ectrique d'une tension
nominale correspondant 6 celle indiqu6e
sur sa plaque signal6tique.
Ceci permet d'obtenir un meilleur rendement
du climatiseur et 6vite de surcharger les circuits
61ectriques du domicile qui risque d'occasionner
un incendie en surchauffant.
Consultez les Consignes d'lnstallations, dans
la section Exigences Electriques pour les
exigences de branchements 61ectriques
particuliers.

www.electr0menagersge.ca
VERTISSEMENT !
UTILISATION DE RALLONGE5
RISQUED'INCENDIE. Peut occasionner des
blessures graves ou la mort.
• NE PASutiliser de rallonge avec ce climatiseur.
• NE PASutiliser de parasurtenseur ou
d'adaptateur (_prises multiples avec ce
climatiseur.
s s
LISEZETSUIVEZSOIGNEUSEMENTCESCONSIGNESDESECURITE.
CONSERVEZCESINSTRUCTIONS
19

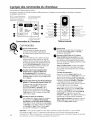
A propos des commandes du climatiseur.
Les fonctions et I'ospect peuvent vorier.
Les t_moins lumineux _ c6t_ des touches _ eff7eurement sur le tableau de commondes du climotiseur indiquent
les r_gloges s_lectionn_s.
NOTE: L'@ranaffichetoujours
la temp@aturede la piecesauf
Iorsquevousprogrammezla
temp@atureou la minuterie.
Let6moin indiquequaI'appareil
esten modeProgrammationde la
temp6ratureou dud61ai.
_ Auto T_m_) e_
Med _,, Energy Saver
Low m Fan Only
_ _'-Fan-'_ _o "_-_a_
_,Speed__ dO i__24h-r_
O
ke t6moin lumineux indique que
la mJnuterieest programm6e.
Commandes du Climatiseur
D6lai 1-24hr
R6ductiondu d6lai
S61ectiondu mode_i
Augmentationet
R6ductiondela
temp@atureprogramm@
Augmentationdud6laJ
• i A Marcheautomatique
_ i'---i------_ du ventJlateur
_ _ I A Augmentationde la vitesse
_._-_j/_ _-""j""""_ du ventJlateur
_f___::::-_ I _ Mise en marchede I'appareil
/ _1 ON/OFF(marche/arr@t)
J
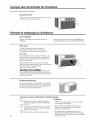
T616commande
20
Commondes
!1
0
Touche d'alimentation
IVletleclimatiseuren positionde marche
ou d'arrCt.L'_cranaffichela temp@ature
de la pieceIorsqueI'appareilestmis en marche.
Affichage
Affichela temp@aturede lapieceou letemps
restantavant la miseen marche ou I'arrCtde
I'appareil.Affichela temp@atureder_glageIors
de la programmationde la temp@aturepour les
modesCool(refroidissement}ou EnergySaver
(economied'energie).Let_moin lumineuxSet
(programme)s'allumeIorsdu r_glage.
@
O
0
Touches Tamp Increase (Augmentation
temperature} • /Decrease (R_duction
de la temp@rature)T Sontutilis_espour
programmerlatemp@aturedonslesmodesCool
ou EnergySaver.Let_moinlumineuxSets'allume
Iorsdu r_glage.
TouchesDelay TimerIncrease(Augmentation du
d_laiJ• (+J/Decrease(Diminution du d#lai)T N
Chaquefoisquavous effleurezlestouches
Increase • / DecreaseT surI'appareilou
lestouchesIncrease+ / Decrease- de la
t61ecommande,vousprogrammezladur6e
du d_laiIorsde I'utilisationde la minuterieDelay
1-24hr(d_laide 1-24h).Let_moin lumineuxSet
s'allumeIorsdu glage.
Touches de vitesse du ventilateur
Sontutilis_espour r_glerlavitessedu ventilateur
de I'appareilsurLow(foible),Mad(moyenne),
High(elev6e)ouAuto (automatiqueLREMARQUE:
Surlat616commande,utilisezlestouchesIncrease
+/Decrease - pour r6glerlavitessedu ventilateur
surLow,Mad,ou High.Utilisezla toucheAuto
pour allumerleventilateuren modeAuto.
0
0
Touche Mode
Estutilis_epour programmer leclimatiseursur
lesmodesCool, EnergySaverou FanOnly
(ventilateuruniquement).
Touches de D_lai/ D_laide I _ 24heures
Delay ON(d6laide miseen marche)-Lorsque
leclimatiseurest @eint,il peutCtreprogramm_
pour d_marrerautomatiquementdonsun d_lai
de 1 6 2/4heures6 sesr_glagesprecedents(mode,
vitessedu ventilateur).
Delay OFF(d6laid'arr_t)-Lorsque leclimatiseur
est enfonctionnement,il peut_treprogramm_
pour s'arr_terautomatiquementdansund_laide
16 2/4heures.
Comment leprogrammer:
AppuyezsurlatoucheDelay1-24hr(D6laide1
6 24heures)de I'appareilou Delaypad (Touchesde
D61ai)delat_l_commande.Chaquefoisquevous
effleurezlestouchesIncrease• / Decrease• sur
I'appareilou lestouchesIncrease+/Decrease
- de lat_l_commande,vousprogrammezla
dur@du d6lai par intervallede i heure.Let6moin
lumineuxSets'allumeIorsdu r6glage.
Pourconna_treletempsrestantsurla minuterie
Delay1-24hr,appuyezsurlatoucheDelay1-24hr
deI'appareilouDelaypad (Touchesde D61ai)de
lat_l_commande.UtilisezlestouchesIncrease•
/Decrease• sur I'appareiloulestouches
Increase+/Decrease - de lat_l_commande pour
programmer un nouveaud_lai sin_cessaire.
Pourannular la minuterie, appuyezsurlatouche
Delay1-24hrjusqu'6ceque levoyant lumineux
surla toucheDelay _-24hr s'_teigne.
Remarque : La lecture de temp6rature par d6faut s'affiche en degr6 Fahrenheit (°F).Pour modifier
I'affichage en degr6 Celcius (°C),appuyez simultan6ment sur les boutons d'augmentation aou
d'abaissement Vde la temp6rature et maintenez-les enfonc6s pendant 3 secondes. R6p6tez la m6thode
pour effectuer un retour @I'affichage des degr6s Fahrenheit (°F).
La page est en cours de chargement...
La page est en cours de chargement...
La page est en cours de chargement...
La page est en cours de chargement...
La page est en cours de chargement...
La page est en cours de chargement...
La page est en cours de chargement...
La page est en cours de chargement...
La page est en cours de chargement...
La page est en cours de chargement...
La page est en cours de chargement...
La page est en cours de chargement...
La page est en cours de chargement...
La page est en cours de chargement...
La page est en cours de chargement...
La page est en cours de chargement...
La page est en cours de chargement...
La page est en cours de chargement...
La page est en cours de chargement...
La page est en cours de chargement...
La page est en cours de chargement...
La page est en cours de chargement...
La page est en cours de chargement...
La page est en cours de chargement...
La page est en cours de chargement...
La page est en cours de chargement...
La page est en cours de chargement...
La page est en cours de chargement...
-
 1
1
-
 2
2
-
 3
3
-
 4
4
-
 5
5
-
 6
6
-
 7
7
-
 8
8
-
 9
9
-
 10
10
-
 11
11
-
 12
12
-
 13
13
-
 14
14
-
 15
15
-
 16
16
-
 17
17
-
 18
18
-
 19
19
-
 20
20
-
 21
21
-
 22
22
-
 23
23
-
 24
24
-
 25
25
-
 26
26
-
 27
27
-
 28
28
-
 29
29
-
 30
30
-
 31
31
-
 32
32
-
 33
33
-
 34
34
-
 35
35
-
 36
36
-
 37
37
-
 38
38
-
 39
39
-
 40
40
-
 41
41
-
 42
42
-
 43
43
-
 44
44
-
 45
45
-
 46
46
-
 47
47
-
 48
48


dans d''autres langues
- English: GE AEW12APL1 Owner's manual
- español: GE AEW12APL1 El manual del propietario
Documents connexes
-
GE AEH12AQ Le manuel du propriétaire
-
-
-
GE AEL05LXW1 Le manuel du propriétaire
-
-
GE AEE08ATL2 Le manuel du propriétaire
-
GE AEM06LPL1 Le manuel du propriétaire
-
-
-