Panasonic EY7840 Manuel utilisateur
- Catégorie
- Perceuses mixtes sans fil
- Taper
- Manuel utilisateur
Ce manuel convient également à

Cordless Rotary Hammer Drill & Driver
Perceuse/Visseuse rotative à percussion sans fi l
Destornillador y martillo de taladro rotatorio sin cables
Operating Instructions
Instructions d'utilisation
Manual de instrucciones
Model No: EY7840
IMPORTANT
This manual contains safety information. Read manual completely before first using this product and save this
manual for future use.
IMPORTANT
Ce mode d’emploi contient des informations sur la sécurité. Lisez-le en entier avant d’utiliser le produit et
conservez-le pour référence.
IMPORTANTE
Este manual contiene información de seguridad. Lea completamente este manual antes de utilizar por primera
vez este producto, y guárdelo para poder consultarlo en el futuro.

-
2
-
Index/Index/Indice
English: Page 4
Français: Page 17
Español: Página 32
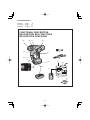
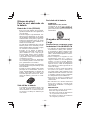
FUNCTIONAL DESCRIPTION
DESCRIPTION DES FONCTIONS
DESCRIPCIÓN FUNCIONAL
(A) (C) (D)
(E)
(F)
(M)
(N)
(L)
(R)
(
Q
)
(
S
)
(
T
)
Ni-MH
Ni-Cd
(
G
)
(
G
)
(
H
)
(
I
)
(
K
)
(
J
)
(O)
(P)
(B)

-
3
-
(A)
Chuck Mandrin Portabroca
(B)
Clutch handle Poignée de l’embrayage Mango de embrague
(C)
Hammering/drilling switching
lever
Commutateur martelage/
perforation
Palanca de conmutación de
martillo/taladro
(D)
Forward/Reverse lever
Levier d’inversion marche
avant-marche arrière
Palanca de avance/inversión
(E)
Variable speed control trigger
Gâchette de commande de
vitesse
Disparador del control de
velocided variable
(F)
Battery pack (EY9L40) Batterie autonome (EY9L40) Batería (EY9L40)
(G)
Alignment marks Marques d’alignement Marcas de alineación
(H)
Control panel
Panneau de commande Panel de controle
(I)
Overheat warning lamp
(battery)
Témoin d’avertissement de
surchauffe (batterie)
Luz de advertencia de sobreca-
lentamiento (batería)
(J)
LED light ON/OFF button
Bouton Marche/Arrêt de la
lumière DEL
Botón ON/OFF de luz LED
(K)
Battery low warning lamp
Témoin d’avertissement de
batterie basse
Luz de aviso de baja carga de
batería
(L)
Battery pack release button
Bouton de libération de batte-
rie autonome
Botón de liberación de batería
(M)
Bit adapter holder Porte-adaptateur de mèche Soporte de adaptador de broca
(N)
LED light Lumière DEL Luz indicadora
(O)
Bit adapter (EY9HX403E)
Adaptateur de mèche (EY9HX403E)
Adaptador de broca (EY9HX403E)
(P)
Shoulder strap
Dragonne Correa al hombro
(Q)
Battery charger (EY0L80)
Chargeur de batterie (EY0L80) Cargador de batería (EY0L80)
(R)
Pack cover
Couvercle de la batterie
autonome
Cubierta de batería
(S)
Ni-MH/Ni-Cd battery pack
dock
Poste d’accueil de la batterie
autonome Ni-MH/Ni-Cd
Enchufe de carga de batería
Ni-MH/Ni-Cd
(T)
Li-ion battery pack dock
Poste d’accueil de la batterie
autonome Li-ion
Enchufe de carga de batería
Li-ión

-
4
-
. INTRODUCTION
This tool is a Rotary Hammer for drill-
ing in concrete. In addition, the tool
has a “rotation only mode” without
hammering. The mode is suitable for
drilling and screw-fastening.
.
GENERAL SAFE-
TY RULES
WARNING! Read all instructions
Failure to follow all instructions listed below
may result in electric shock, fire and/or
serious injury. The term “power tool” in all
of the warnings listed below refers to your
main operated (corded) power tool and
battery operated (cordless) power tool.
SAVE THESE INSTRUCTIONS
Work Area Safety
1) Keep work area clean and well lit.
Cluttered or dark areas invite acci-
dents.
2) Do not operate power tools in ex-
plosive atmospheres, such as in
the presence of flammable liq-
uids, gases or dust.
Power tools create sparks which
may ignite the dust or fumes.
3)
Keep children and bystanders
away while operating a power tool.
Distractions can cause you to lose
control.
Electrical Safety
1)
Power tool plugs must match the
outlet. Never modify the plug in any
way. Do not use any adapter plugs
with earthed (grounded) power tools.
Unmodified plugs and matching out-
lets will reduce risk of electric shock.
2)
Avoid body contact with earthed or
grounded surfaces such as pipes,
radiators, ranges and refrigerators.
There is an increased risk of elec-
tric shock if your body is earthed or
grounded.
3) Do not expose power tools to
rain or wet conditions.
Water entering a power tool will in-
crease the risk of electric shock.
4) Do not abuse the cord. Never use
the cord for carrying, pulling or
unplugging the power tool. Keep
cord away from heat, oil, sharp
edges or moving parts.
Damaged or entangled cords in-
crease the risk of electric shock.
5)
When operating a power tool out-
doors, use an extension cord suit-
able for outdoor use.
Use of a cord suitable for outdoor use
reduces the risk of electric shock.
Personal Safety
1) Stay alert, watch what you are
doing and use common sense
when operating a power tool. Do
not use a power tool while you
are tired or under the influence of
drugs, alcohol or medication.
A moment of inattention while oper-
ating power tools may result in per-
sonal injury.
2) Use safety equipment. Always
wear eye protection.
Safety equipment such as dust
mask, non-skid safety shoes, hard
hat, or hearing protection used for
appropriate conditions will reduce
personal injuries.
3) Avoid accidental starting. Ensure
the switch is in the off position
before plugging in.
Carrying power tools with your fin-
ger on the switch or plugging in the
power tools that have the switch on
invites accidents.
4)
Remove any adjusting key or wrench
before turning the power tool on.
A wrench or a key left attached to a
rotating part of the power tool may
result in personal injury.
5) Do not overreach. Keep proper
footing and balance at all times.
This enables better control of the
power tool in unexpected situations.
6) Dress properly. Do not wear
loose clothing or jewelry. Keep
your hair, clothing and gloves
away from moving parts.
Loose clothes, jewelry or long hair
can be caught in moving parts.
7)
If devices are provided for the
connection of dust extraction and
collection facilities, ensure these

-
5
-
are connected and properly used.
Use of these devices can reduce
dust related hazards.
Power Tool Use and Care
1)
Do not force the power tool. Use
the correct power tool for your
application.
The correct power tool will do the
job better and safer at the rate for
which it was designed.
2)
Do not use the power tool if the
switch does not turn it on and off.
Any power tool that cannot be con-
trolled with the switch is dangerous
and must be repaired.
3)
Disconnect the plug from the pow-
er source and/or the battery pack
from the power tool before making
any adjustments, changing acces-
sories, or storing power tools.
Such preventive safety measures
reduce the risk of starting the pow-
er tool accidentally.
4)
Store idle power tools out of the
reach of children and do not al-
low persons unfamiliar with the
power tool or these instructions
to operate the power tool.
Power tools are dangerous in the
hands of untrained users.
5) Maintain power tools. Check for
misalignment or binding of mov-
ing parts, breakage of parts and
any other condition that may af-
fect the power tools operation. If
damaged, have the power tool re-
paired before use.
Many accidents are caused by
poorly maintained power tools.
6)
Keep cutting tools sharp and clean.
Properly maintained cutting tools with
sharp cutting edges are less likely to
bind and are easier to control.
7) Use the power tool, accessories
and tool bits etc. in accordance
with these instructions and in the
manner intended for the particu-
lar type of power tool, taking into
account the working conditions
and the work to be performed.
Use of the power tool for operations
different from those intended could
result in a hazardous situation.
Battery Tool Use and Care
1)
Ensure the switch is in the off posi-
tion before inserting battery pack.
Inserting battery pack into pow-
er tools that have the switch on in-
vites accidents.
2) Recharge only with the charger
specified by the manufacturer.
A charger that is suitable for one type
of battery pack may create a risk of fire
when used with another battery pack.
3) Use power tools only with specif-
ically designated battery packs.
Use of any other battery packs may
create a risk of injury and fire.
4)
When battery pack is not in use,
keep it away from other metal ob-
jects like paper clips, coins, keys,
nails, screws, or other small metal
objects that can make a connection
from one terminal to another.
Shorting the battery terminals to-
gether may cause burns, or a fire.
5) Under abusive conditions, liq-
uid may be ejected from battery;
avoid contact. If contact acciden-
tally occurs, flush with water. If
liquid contacts eyes, additionally
seek medical help.
Liquid ejected from the battery may
cause irritation or burns.
Service
1) Have your power tool serviced by
a qualified repair person using
only identical replacement parts.
This will ensure that the safety of
power tool is maintained.
. SPECIFIC SAFE-
TY RULES
1) Wear ear protectors. Exposure to
noise can cause hearing loss.
2)
Use auxiliary handles supplied
with the tool. Loss of control can
cause personal injury.
3)
Hold power tools by insulated grip-
ping sur faces when performing an
operation where the cutting tool
may contact hid den wiring.
Contact with a “live” wire will make
ex posed metal parts of the tool
“live” and shock the operator.

-
6
-
4)
Be aware that this tool is always in
an operating condition, since it does
not have to be plugged into an elec-
trical outlet.
5) If the bit becomes jammed, imme-
diately turn the trigger switch off
to prevent an overload which can
damage the battery pack or mo-
tor. Use reverse motion to loosen
jammed bits.
6)
Do not operate the Forward/Reverse
lever when the trigger switch is on.
The battery will discharge rapidly
and damage to the unit may occur.
7) When storing or carrying the tool,
set the Forward/Reverse lever to
the center position (switch lock).
8) Do not strain the tool by holding
the speed control trigger halfway
(speed control mode) so that the
motor stops. The protection cir-
cuit will activate and may prevent
speed control operation. If this hap-
pens, release the speed control
trigger and squeeze again for nor-
mal operation.
9) Be careful not to get dust inside the
chuck.
10) Do not touch the rotating parts to
avoid injury.
11)
Do not use the tool continuously for a
long period of time. Stop using the tool
from time to time to avoid temperature
rise and heat overload of the motor.
12) Do not drop the tool.
13)
Do not put the tool on the place where
the chuck is depressed. The bit may
come off from the chuck and fall down
when the chuck is depressed. It may
cause injuries.
Symbol meaning
V Volts
Direct current
n
0
No load speed
… min
-1
Revolutions or
reciprocation per minutes
Rotation with hammering
Rotation only
WARNING:
Some dust created by power sand-
ing, sawing, grinding, drilling, and
other construction activities contains
chemicals known to the State of Cal-
ifornia to cause cancer, birth defects
or other reproductive harm. Some
examples of these chemicals are:
* Lead from lead-based paints
* Crystalline silica from bricks and
cement and other masonry prod-
ucts
* Arsenic and chromium from chem-
ically-treated lumber.
To reduce your exposure to these
chemicals: work in a well ventilated
area, and work with approved safety
equipment, such as dust masks that
are specially designed to filter the
microscopic particles.
. FOR BATTERY
CHARGER & BAT-
TERY PACK
Important Safety Instructions
1)
SAVE THESE IN STRUCTIONS -This
manual contains important safety
and operating instructions for bat-
tery charger EY0L80.
2) Before using battery charger, read
all instructions and cautionary mark-
ings on (1) battery charger, (2) bat-
tery pack.
3) CAUTION
- - To reduce the risk of in-
jury, charge only Panasonic Battery
Pack as shown in last page.
Other types of batteries may burst
causing personal injury and dam-
age.
4) Do not expose charger to rain or
snow.
5) To reduce the risk of damaging the
electric plug and cord, pull by plug
rather than cord when disconnect-
ing charger.
6) Make sure cord is located so that it
will not be stepped on, tripped over,
or otherwise subjected to damage
or stress.

-
7
-
7) An extension cord should not be
used unless absolutely necessary.
Use of improper extension cord
could result in a risk of fire and
electric shock. If extension cord
must be used, make sure:
a. that pins on plug of extension
cord are the same number, size
and shape as those of plug on
charger.
b. that extension cord is proper-
ly wired and in good electrical
condition.
c. that wire size is large enough
for ampere rating of charger as
specified below.
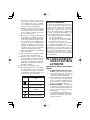
RECOMMENDED MINIMUM AWG SIZE OF
EXTENSION CORDS FOR
BATTERY CHARGERS
AC Input Rating.
Amperes
AWG Size of Cord
Equal to or
greater than
But less
than
Length of Cord, Feet
25 50 100 150
0 2 18 18 18 16
8) Do not operate charger with dam-
aged cord or plug
replace them
immediately.
9) Do not operate charger if it has re-
ceived a sharp blow, been dropped,
or otherwise damaged in any way;
take it to a qualified serviceman.
10) Do not disassemble charger; take
it to a qualified serviceman when
service or repair is required. Incor-
rect reassembly may result in a risk
of electric shock or fire.
11) To reduce the risk of electric shock,
unplug charger from outlet before
attempting any maintenance or
cleaning.
12) The charger and battery pack are
specifically designed to work togeth-
er. Do not attempt to charge any
other cordless tool or battery pack
with this charger.
13) Do not attempt to charge the battery
pack with any other charger.
14) Do not attempt to disassemble the
battery pack housing.
15) Do not store the tool and battery
pack in locations where the tempera-
ture may reach or exceed 50°C (122°F)
(such a metal tool shed, or a car in
the summer), which can lead to de-
terioration of the storage battery.
16) Do not charge battery pack when the
temperature is BELOW 0°C (32°F)
or ABOVE 40°C (104°F). This is very
important.
17) Do not incinerate the battery pack.
It can explode in a fire.
18) Avoid dangerous environment. Do not
use charger in damp or wet locations.
19) The charger is designed to operate
on standard household electrical
power only. Do not attempt to use it
on any other voltage!
20) Do not abuse cord. Never car-
ry charger by cord or yank it to dis-
connect from outlet. Keep cord away
from heat, oil and sharp edges.
21) Charge the battery pack in a well
ventilated place, do not cover the
charger and battery pack with a
cloth, etc., while charging.
22) Use of an attachment not recom-
mended may result in a risk of fire,
electric shock, or injury to persons.
23) Do not short the battery pack. A bat-
tery short can cause a large current
flow, over heating and burns.
24) NOTE: If the supply cord of this appli-
ance is damaged, it must only be re-
placed by a repair shop appointed by
the manufacturer, because special
purpose tools are required.
25) TO REDUCE THE RISK OF ELEC-
TRIC SHOCK, THIS APPLIANCE
HAS A POLARIZED PLUG (ONE
BLADE IS WIDER THAN THE
OTHER).
This plug will fit in a polarized outlet
only one way. If the plug does not fit
fully in the outlet, reverse the plug. If
it still does not fit, contact a qualified
electrician to install the proper outlet.
Do not change the plug in any way.

-
8
-
WARNING:
• Do not use other than the Panasonic
battery packs that are designed for
use with this rechargeable tool.
• Do not dispose of the battery pack in
a fire, or expose it to excessive heat.
• Do not drive the likes of nails into the
battery pack, subject it to shocks,
dismantle it, or attempt to modify it.
• Do not allow metal objects to touch
the battery pack terminals.
• Do not carry or store the battery
pack in the same container as nails
or similar metal objects.
• Do not charge the battery pack in a
high-temperature location, such as
next to a fire or in direct sunlight.
Otherwise, the battery may over-
heat, catch fire, or explode.
• Never use other than the dedicated
charger to charge the battery pack.
Otherwise, the battery may leak,
overheat, or explode.
• After removing the battery pack from
the drill or the charger, always reat-
tach the back cover. Otherwise, the
battery contacts could be shorted,
leading to a risk of fire.
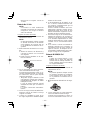
. ASSEMBLY
CAUTION:
Use of a concrete drill bit larger than
the recommended size may cause
damage to the tool.
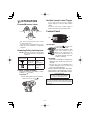
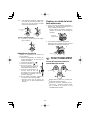
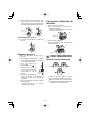
1. To insert the bit
1-1. Insert a bit into the mounting hole, and
turn it slightly to locate an engaged
position.
1-2. At the engaged position, push the bit
as far as it goes. Make sure that the
bit is fixed by pulling it.
2. To remove the bit
2-1.
Depress the chuck and pull the bit.
Bit adapter
Use a bit adapter (O) and bit.
1. Remove the bit adapter from
the bit adapter holder on the
main unit.
2. Pull the bit holder. (
)
3. Insert the bit. (
)
Bit
holder
4. Make sure the bit is inserted
firmly by pulling it lightly.
5. Insert the bit adapter into the
mounting hole and turn to
locate an engaged position.
6. At the engaged position,
push in as far as it goes.
• Make sure it does not move by
pulling it lightly.
Attaching or Removing Bat-
tery Pack
1.
To connect the battery pack:
Line up the alignment marks and attach
the battery pack.
Slide the battery pack until it locks into
position.
Alignment marks
2.
To remove the battery pack:
Push on the button from the front to re-
lease the battery pack.
Button
SDS PLUS type
shank

-
9
-
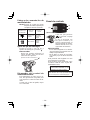
. OPERATION
Forward/Reverse Lever
ReverseForward
Lock
Be sure to set the lever in the center
to lock it after use.
Operate the Forward/Reverse lever
after the motor rotation is completely
stopped.
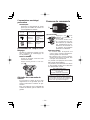
Hammering/Drilling Switching Lever
NOTE: Operate the mode change after
the motor rotation is completely
stopped.
Position of
switching lever
Action mode Operation
Rotation with
hammering
Concrete
Drilling,
Block Drilling
Rotation only
Screw
Fastening,
Drilling
Clutch Torque Setting
Adjust the torque to one of the 5 clutch
set tings or “
” position.
CAUTION:
Test the setting before actual operation.
Set the scale at this mark ( ).
Variable Speed Control Trigger
To set the center of a hole, pull the
trigger slightly to start the drill rotation
slowly.
The more the speed control trigger is
pulled, the higher the speed becomes.
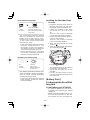
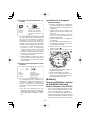
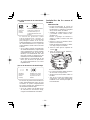
Control Panel
(1)
(2)
(3)
(1) LED light
Pressing toggles the
LED light on and off.
The light illuminates with
very low current, and it
does not adversely af-
fect the performance of
the driver during use or its
battery capacity.
CAUTION:
• The built-in LED light is designed to
illuminate the small work area tem-
porarily.
•
Do not use it as a substitute for a
regular
flashlight, since it does not
have enough brightness
.
This product has the built-in LED light.
This product is classified into “Class 1
LED Product” to IEC (EN) 60825-1:2001.
LED RADIATION
DO NOT STARE INTO BEAM
CLASS 1 LED PRODUCT
Use of controls or adjustments or perform-
ance of procedures other than those speci-
fi ed herein may result in hazardous radiation
exposure.

-
10
-
(2) Overheat warning lamp
Off
(normal
operation)
Flashing: Overheat
Indicates operation has
been halted due to battery
overheating.
The overheating protection feature
halts tool operation to protect the
battery pack in the event of over-
heating. The overheat warning lamp
on the control panel flashes when
this feature is active.
• If the overheating protection feature
activates, allow the tool to cool
thoroughly (at least 30 minutes).
The driver is ready for use when the
overheat warning lamp goes out.
• Avoid using the tool in a way that
causes the overheating protection
feature to activate repeatedly.
(3) Battery low warning lamp
Off
(normal
operation)
Flashing
(No charge)
Battery protection
feature active
The battery protection feature acti-
vates immediately before the battery
loses its charge, causing the battery
low warning lamp to flash.
• If you notice the battery low warning
lamp flashing, charge the battery
pack immediately.
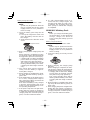
Installing the Shoulder Strap
CAUTION:
• Install the shoulder strap firmly to
the main unit of the tool and check
the length of the strap before use.
• Check the condition of the strap
and do not use if it is cut or torn
etc.
There is a risk of injury or damage
if used while improperly installed.
• Please wear the shoulder strap se-
curely on the shoulder.
There is a risk of injury or damage
if it is accidentally dropped.
1. Pass the strap through the strap
holders. (
)
2. Pass the strap through the buckles
and adjust the length. ( )
Shoulder pad
• The shoulder strap can be adjusted
according to the individual.
• Adjust the shoulder pad to the
shoulder.
• Pull the shoulder strap to make
sure it is firmly attached to the main
unit of the tool.
[Battery Pack]
For Appropriate Use of Bat-
tery pack
Li-ion Battery pack (EY9L40)
• For optimum battery life, store the Li-
ion battery pack following use without
charging it.
• When charging the battery pack, con-
firm that the terminals on the bat-
tery charger are free of foreign sub-

-
11
-
stances such as dust and water etc.
Clean the terminals before charging
the battery pack if any foreign sub-
stances are found on the terminals.
The life of the battery pack terminals
may be affected by foreign substances
such as dust and water etc. during
operation.
• When battery pack is not in use,
keep it away from other metal objects
like: paper clips, coins, keys, nails,
screws, or other small metal objects
that can make a connection from one
terminal to another.
Shorting the battery terminals togeth-
er may cause sparks, burns or a fire.
• When operating the battery pack,
make sure the work place is well ven-
tilated.
• When the battery pack is removed
from the main body of the tool, replace
the battery pack cover immediately in
order to prevent dust or dirt from con-
taminating the battery terminals and
causing a short circuit.
Battery Pack Life
The rechargeable batteries have a
limited life. If the operation time be-
comes extremely short after recharg-
ing, replace the battery pack with a
new one.
Battery Recycling
ATTENTION:
FOR Li-ion Battery Pack, EY9L40
A Li-ion battery that is recyclable powers
the product you have purchased. Please
call 1-800-8-BATTERY for information on
how to recycle this battery.
[Battery Charger]
Charging
Common Cautions for the Li-
ion/Ni-MH/Ni-Cd Battery Pack
• The ambient temperature range is be-
tween 0°C (32°F) and 40°C (104°F).
If the battery pack is used when the
battery temperature is below 0°C
(32°F), the tool may fail to function
properly.
• Use the charger at temperatures be-
tween 0°C and 40°C, and charge the
battery at a temperature similar to that
of the battery itself. (There should be
no more than a 15°C difference be-
tween the temperatures of the battery
and the charging location.)
• When charging a cool battery pack
(below 0°C (32°F)) in a warm place,
leave the battery pack at the place
and wait for more than one hour to
warm up the battery to the level of
the ambient temperature.
•
Cool down the charger when charging
more than two battery packs consecu-
tively.
• Do not insert your fingers into contact
hole, when holding charger or any
other occasions.
CAUTION:
To prevent the risk of fire or damage
to the battery charger.
• Do not use power source from an
engine generator.
• Do not cover vent holes on the
charger and the battery pack.
• Unplug the charger when not in
use.
Li-ion Battery Pack
NOTE:
Your battery pack is not fully charg-
ed at the time of purchase. Be sure
to charge the battery before use.

-
12
-
Battery charger (EY0L80)
1. Plug the charger into the AC outlet.
NOTE:
Sparks may be produced when the
plug is inserted into the AC power
supply, but this is not a problem in
terms of safety.
2.
Insert the battery pack firmly into the
charger.
1 Line up the alignment marks and
place the battery onto the dock on
the charger.
2 Slide forward in the direction of the
arrow.
Alignment marks
3.
During charging, the charging lamp will
be lit.
When charging is completed, an inter-
nal electronic switch will automatically
be triggered to prevent overcharging.
• Charging will not start if the battery
pack is warm (for example, immedi-
ately after heavy-duty operation).
The orange standby lamp will be
flashing until the battery cools down.
Charging will then begin automati-
cally.
4. The charge lamp (green) will flash
slowly once the battery is approxi-
mately 80% charged.
5.
When charging is completed, the charg-
ing lamp will start flashing quickly in
green color.
6. If the temperature of the batter pack is
0°C or less, charging takes longer to
fully charge the battery pack than the
standard charging time.
Even when the battery is fully charged,
it will have approximately 50% of the
power of a fully charged battery at nor-
mal operating temperature.
7.
If the power lamp does not light imme-
diately after the charger is plugged in,
or if after the standard charging time the
charging lamp does not flash quickly in
green, consult an authorized dealer.
8. If a fully charged battery pack is in-
serted into the charger again, the
charging lamp lights up. After sever-
al minutes, the charging lamp may
flash quickly to indicate the charging
is completed.
Ni-MH/Ni-Cd Battery Pack
NOTE:
When you charge the battery pack
for the first time, or after prolonged
storage, charge it for about 24
hours to bring the battery up to full
capacity.
Battery charger (EY0L80)
1. Plug the charger into the AC outlet.
NOTE:
Sparks may be produced when the
plug is inserted into the AC power
supply, but this is not a problem in
terms of safety.
2.
Insert the battery pack firmly into the
charger.
3. During charging, the charging lamp
will be lit.
When charging is completed, an inter-
nal electronic switch will automatically
be triggered to prevent overcharging.
• Charging will not start if the battery
pack is warm (for example, immedi-
ately after heavy-duty operation).
The orange standby lamp will be
flashing until the battery cools down.
Charging will then begin automati-
cally.
4.
When charging is completed, the charg-
ing lamp will start flashing quickly in
green color.
5.
If the charging lamp does not light imme-
diately after the charger is plugged in,
or if after the standard charging time the
charging lamp does not flash quickly in
green, consult an authorized dealer.

-
13
-
LAMP INDICATIONS
Green Lit
Charger is plugged into the AC outlet.
Ready to charge.
Green Flashing Quickly
Charging is completed. (Full charge.)
Green Flashing
Battery is approximately 80% charg ed. (Usable charge. Li-
ion only)
Green Lit
Now charging.
Orange Lit
Battery pack is cool.
The battery pack is being charged slowly to reduce the load
on the battery. (Li-ion only)
Orange Flashing
Battery pack is warm. Charging will begin when temperature
of battery pack drops.
If the temperature of the battery pack is –10°C or less, the
charging status lamp (orange) will also start fl ashing. Charging
will begin when the temperature of the battery pack goes up (Li-
ion only)
Charging Status Lamp
Left: green Right: orange will be displayed.
Both Orange and Green Flashing Quickly
Charging is not possible. Clogged with dust or malfunction of
the battery pack.
6. If a fully charged battery pack is in-
serted into the charger again, the
charging lamp lights up. After sever-
al minutes, the charging lamp may
flash quickly to indicate the charging
is completed.

-
14
-
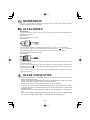
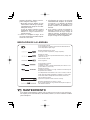
. MAINTENANCE
Use only a dry, soft cloth for wiping the unit. Do not use a damp cloth, thinner, benzine,
or other volatile solvents for cleaning.
. ACCESSORIES
CAUTION:
To prevent the risk of injury, only use accessory or attachment for its stated purpose.
Bit adapter (included)
•EY9HX403E
Drill chuck (Optional accessory)
•EY9HX400E
Use with wood drill bit or metal drill bit with shank of 1.5 mm to 13 mm diameter.
Do not use the drill chuck in “Rotation with hammering mode” ( ). Use in "Rotation
with hammering mode" may cause break of chuck or bit and result in injury.
Hammer chuck (Optional accessory)
•EY9HX401E
Use with concrete drill bit, wood drill bit or metal drill bit with straight shank of 2.5 mm
to 13 mm diameter.
Do not use the hammer chuck with wood drill bit or metal drill bit in “Rotation with
hammering mode” (
). Use in “Rotation with hammering mode” may cause break of
bit and result in injury.
If you need any assistance for more details regarding these accessories, ask your
local service center.
. USAGE SUGGESTION
1. If there isn’t enough force pushing down on the bit, the tool may not be able to
blow in hammering mode.
This is to prevent the hammering mode from operating with no load. Press down
harder on the bit to engage the tool and cause it to blow.
Always be sure to press down with enough force when working.
2. In winter or in other situations where the temperature of the unit is low (5°C (41°F)
or below), the blow of the hammering mode may be weaker than normal at the
beginning stage.
This is because the grease becomes stiffer in low temperatures, increasing fric-
tion.
If this should happen, operating hammering mode with no load for approximately
30 seconds and repeat this 3 times. This will restore its blowing power.

-
15
-
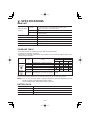
. SPECIFICATIONS
MAIN UNIT
Maximum drilling
diameter
Concrete
16.5 mm (21/32")*
*For work that can be completed with one battery pack.
( 12.5 mm (15/32") - 16.5 mm (21/32"))
Steel
13 mm (33/64")
Wood
18 mm (23/32")
Motor voltage 14.4 V DC
Speed at no load (RPM) 0
-
1000 min
-1
(rpm)
Blows rate per minute (BPM) 0
-
3800 min
-1
(bpm)
Weight (with battery pack) 2.3 kg
(5.1 lbs)
Overall length 249 mm (9
-5
1/64")
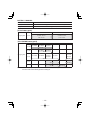
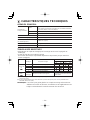
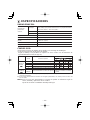
GUIDELINE TABLE
• Select the torque for fastening screws with the clutch handle.
• Guide for the selection of torque
Depending on the job, adjustments are possible in five levels by approximately 1 N•m
(10 kgf-cm) increments.
Setting Torque
Guide Depending on Material
Concrete Block
(A) (B) (A) (B)
Fastening
Screws
1 Approximately 1.5 N•m (15 kgf-cm)
2 Approximately 2.5 N•m (25 kgf-cm)
3 Approximately 3.4 N•m (35 kgf-cm)
4 Approximately 4.4 N•m (45 kgf-cm)
5 Approximately 5.4 N•m (55 kgf-cm)
Drilling
Holes
(Drill Mark) Approximately 10.5 N•m (107 kgf-cm)
Drilling holes in wood and
metal
(A) For fastening screws into plastic anchor which requires dia. 6.0 mm (1/4") prehole in the concrete.
(B) For directly fastening screws into concrete (like topcon) with dia. 3.5 mm (1/8") prehole.
NOTE: This is only a rough guide. Required torque is different depending on the
shape, material, and application of the screws.
Set according to the work environment of the site.
BATTERY PACK
Model EY9L40
Storage battery Li-ion Battery
Battery voltage 14.4 V DC (3.6 V x 4 cells)
Capacity 3 Ah

-
16
-
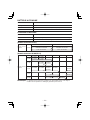
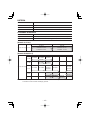
BATTERY CHARGER
Model EY0L80
Rating See the rating plate on the bottom of the charger.
Weight 0.95 kg
(2.1 lbs)
[Li-ion battery pack]
Charging time 3 Ah
14.4 V 28.8 V
EY9L40
Usable: 35 min.
Full: 50 min.
EY9L80
Usable: 55 min.
Full: 70 min.
[Ni-Cd/Ni-MH battery pack]
Charging time
7.2 V 9.6 V 12 V 15.6 V 18 V 24 V
1.2 Ah
EY9065
EY9066
EY9080
EY9086
EY9001
20 min.
1.7 Ah
EY9180
EY9182
EY9101
EY9103
25 min.
2 Ah
EY9168 EY9188
EY9106
EY9107
EY9108
EY9136
EY9116
EY9117
30 min.
60 min.
3 Ah
EY9200 EY9230 EY9210
45 min. 90 min.
3.5 Ah
EY9201 EY9231 EY9251
55 min. 65 min.
NOTE: This chart may include models that are not available in your area.
Please refer to the latest general catalogue.

-
17
-
.
INTRODUCTION
Cet outil est un marteau rotatif pour
perçage du béton. De plus, l’outil est
équipé d’un “mode rotation seulement”
sans percussion. Ce mode est adapté
au perçage et au serrage de vis.
.
CONSIGNES DE
SECU RITE GENE-
RALES
AVERTISSEMENT! Veuillez lire
toutes les instructions.
Si les instructions détaillées ci-dessous ne
sont pas observées, cela peut entraîner
une électrocution, un incendie et/ou des
blessures graves. Le terme “outil mécani-
que” utilisé dans tous les avertissements
ci-dessous se réfère aux outils mécaniques
opérés par cordons d'alimentation et par
batterie (sans fi l).
CONSERVEZ CES INSTRUCTIONS
Sécurité de la zone de travail
1) Gardez la zone de travail propre
et bien aérée.
Les endroits encombrés et som-
bres invitent les accidents.
2) Ne faites pas fonctionner les
outils mécaniques dans des at-
mosphères explosives, comme
en présence de liquides infl am-
mables, de gaz ou de poussière.
Les outils mécaniques génèrent
des étincelles qui peuvent enflam-
mer la poussière ou les vapeurs.
3) Gardez les enfants et les specta-
teurs éloignés lors du fonction-
nement d’un outil mécanique.
Les distractions peuvent en faire
perdre le contrôle.
Sécurité électrique
1) La fiche des outils mécani-
ques doit correspondre aux pri-
ses secteur. Ne modifiez la fiche
sous aucun prétexte. N’utilisez
pas de fiche adaptatrice avec les
outils mécaniques mis à la terre.
Des fiches non modifiées et des
prises secteur correspondant ré-
duisent les risques d’électrocution.
2) Evitez tout contact physique
avec les surfaces mises à la ter-
re telles que tuyaux, radiateurs,
micro-ondes et réfrigérateurs.
Il y a un risque d’électrocution sup-
plémentaire si votre corps est mis à
la terre.
3) N’exposez pas les outils méca-
niques à la pluie ou à des condi-
tions humides.
De l’eau pénétrant dans un outil
mécani que augmente le risque
d’électrocution.
4) Ne malmenez pas le cordon.
N’utilisez jamais le cordon pour
transporter, pour tirer ou pour
débrancher l’outil mécanique.
Gardez le cordon éloigné de la
chaleur, de l’huile, d’objets aux
bords coupants ou de pièces en
mouvement.
Les cordons endommagés on em-
mêlés augmentent le risque d'élec-
trocution.
5) Lors du fonctionnement des
outils méca niques à l’extérieur,
utilisez une rallonge adaptée à
l’utilisation à l’extérieur.
L’utilisation d’un cordon adapté à
l’utilisa tion à l’extérieur réduit les
risques d’élec trocution.
Sécurité personnelle
1)
Restez alerte, regardez ce que
vous faites et faites preuve de bon
sens lorsque vous utilisez un outil
méca nique. N’utilisez pas un outil
méca nique alors que vous êtes
fatigué ou sous les effets de dro-
gue, d’alcool ou de médicaments.
Un moment d’inattention pendant
que vous faites fonctionner l’outil
mécanique peut entraîner des bles-
sures graves.
2) Utilisez des équipements de sé-
curité. Portez toujours des pro-
tection pour vos yeux.
Des équipements de sécurité com-
me masque antipoussière, chaus-
sures de sécurité non glissantes,
casque de protection ou protec-

-
18
-
tions d’oreilles, utilisés dans des
conditions appropriées réduisent
les blessures corporelles.
3) Evitez tout démarrage acciden-
tel. Assurez-vous que l’interrup-
teur est en position d'arrêt avant
de brancher l’outil.
Le transport d’outils mécaniques
avec le doigt sur l’interrupteur ou le
branchement d’outils mécaniques
dont l’interrupteur est sur la posi-
tion de marche invite les accidents.
4) Retirez toute clé d’ajustement
ou clé de serrage avant de met-
tre l’outil mécanique en marche.
Une clé de serrage ou une clé
d’ajuste ment laissée attachée à
une pièce tournante de l’outil mé-
canique peut entraîner des blessu-
res corporelles.
5) Ne vous mettez pas en déséqui-
libre. Gardez une bonne prise au
sol et votre équilibre à tout mo-
ment.
Ceci permet un meilleur contrôle
de l’outil mécanique dans des si-
tuations inatten dues.
6) Habillez-vous correctement. Ne
portez pas de vêtements lâches
ou de bijoux. Gardez vos che-
veux, vêtements et gants éloi-
gnés des pièces en mouve ment.
Des vêtements lâches, des bijoux
ou des cheveux longs peuvent se
faire prendre dans les pièces en
mouvement.
7) Si des dispositifs pour la
connexion d’ap pareils d’extrac-
tion et de ramas sage de la pous-
sière sont fournis, assurez-vous
qu’ils sont connectés et correc-
tement utilisés.
L’utilisation de ces dispositifs peut
réduire les risques concernés.
Utilisation et soins de
l’outil méca nique
1) Ne forcez pas l’outil mécanique.
Utilisez l’outil mécanique correct
pour votre application.
L’outil mécanique correct exécute
mieux le travail dans de meilleurs
conditions de sécurité s’il est uti-
lisé à l’allure pour laquelle il a été
conçu.
2) N’utilisez pas l’outil mécanique
si l’inter rupteur ne le met pas en
marche ou ne l’arrête pas.
Tout outil mécanique qui ne peut
pas être contrôlé par son interrup-
teur est dangereux et doit être ré-
paré.
3)
Débranchez la fiche de la sour-
ce d’ali mentation et/ou du bloc
de batterie avant d’effectuer tout
ajustement, de changer d’acces-
soire ou de ranger l’outil mécani-
que.
De telles mesures de sécurité pré-
ventives réduisent les risques de
faire démarrer l’outil mécanique ac-
cidentellement.
4)
Rangez les outils mécaniques
inuti lisés hors de la portée des
enfants et ne laissez personne qui
n’est pas familiarisé avec l’outil
mécanique ou ses instructions
faire fonctionner l’outil mécani-
que.
Les outils mécaniques sont dan-
gereux dans les mains des utilisa-
teurs manquant d’entraînement.
5) Entretenez bien les outils mécani-
ques. Vérifiez l’alignement ou
l’emboîtage des pièces en mou-
vement, l’intégrité des pièces
et toute autre condition pou-
vant affecter le fonctionnement
de l’outil mécanique. S’il est en-
dommagé, faites réparer l’outil
mécanique avant de l’utiliser.
De nombreux accidents sont pro-
voqués par des outils mécaniques
mal entre tenus.
6) Maintenez les outils de coupe af-
fûtés et propres.
Les outils de coupe bien entrete-

-
19
-
nus avec des lames bien affûtées
ont moins de chances de gripper et
sont plus faciles à contrôler.
7) Utilisez l’outil mécanique, les
acces soires, les mèches, etc.,
conformé ment à ces instruc-
tions et de la façon pour laquelle
l’outil particulier a été conçu en
tenant compte des con ditions de
travail et de la tâche à exé cuter.
L’utilisation de l’outil mécanique à
des fins autres que celles pour les-
quelles il a été conçu peut présen-
ter une situa tion à risque.
Utilisation et soins de la
batterie de l’outil
1) Assurez-vous que l’interrupteur
est dans la position d’arrêt avant
d’insérer le bloc de batterie.
L’insertion du bloc de batterie dans
un outil mécanique dont l’interrup-
teur est sur la position de marche
peut provoquer des accidents.
2) N’effectuez la recharge qu’avec
le chargeur spécifié par le fabri-
cant.
Un chargeur convenant à un bloc
de bat terie peut entraîner un risque
d’incendie lorsqu’un autre bloc de
batterie est utilisé.
3) N’utilisez les outils mécaniques
qu’avec les bloc de batterie spé-
cialement conçus pour eux.
L’utilisation de tout autre bloc de
bat terie peut entraîner un risque de
bles sure et d’incendie.
4) Lorsqu’un bloc de batterie
n’est pas utilisé, gardez-le éloi-
gné d’objets métal liques com-
me agrafes, pièces de mon naie,
clés, clous, vis ou tout autre pe-
tit objet métallique pouvant éta-
blir une connexion entre les
deux bornes.
Si les bornes de la batterie sont
mises en court-circuit, cela peut
entraîner des brûlures ou un incen-
die.
5) Si elle est malmenée, du liqui-
de peut s’échapper de la bat-
terie. Evitez tout contact. Si un
contact accidentel se produit,
rincez à l’eau. Si du liquide en-
tre en contact avec les yeux, con-
sultez un médecin.
Le liquide éjecté de la batterie peut
entraîner des irritations ou des brû-
lures.
Réparation
1) Faites réparer votre outil méca-
nique par du personnel de répa-
ration quali fié en n’utilisant que
des pièces de rechange identi-
ques.
Ceci assure le maintien de la sécu-
rité de l’outil mécanique.
. REGLES DE
SECURITE PAR-
TICULIERES
1) Portez des lunettes lorsque vous
utilisez l’outil pendant de lon-
gues périodes.
L’exposition prolon-
gée à du bruit de haute densité peut
entraîner la perte de l’ouïe.
2) Utilisez la manche auxiliaire
fournie avec l'outil. Si vous per-
dez le contrôle de l'outil, vous ris-
quez de vous blesser.
3) Tenez l’outil par les surfaces de
prise isolées lorsque vous ef-
fectuez une opération lors de
laquelle l’outil de coupe risque
d’entrer en contact avec des câ-
blages cachés.
Le contact avec un fil sous tension
fera passer le courant dans les piè-
ces métalliques exposées et élec-
trocutera l’opérateur.
4) N’oubliez pas que cet appareil est
toujours prêt à fonctionner, parce
qu’il ne doit pas être branché dans
une prise électrique.
5) Si la mèche est coincée, mettez
immé diate ment le commutateur de
la gâchette hors tension afin de
prévenir une sur charge pouvant
endommager la batterie autonome
ou le moteur. Dégagez la mèche
en inversant le sens de rotation.
6)
Ne manœuvrez pas le levier d’inver-

-
20
-
sion marche avant - marche arrière
lorsque le commutateur principal est
sur la position de marche. La batte-
rie se déchargerait rapidement et la
perceuse serait endommagée.
7) Lorsque vous rangez ou transpor-
tez l’outil, mettez le levier d’inver-
sion marche avant - marche arrière
sur la position centrale (verrouilla-
ge du commutateur).
8)
Ne forcez pas l’outil en main tenant
la gâchette de contrôle de vitesse
enfon cée à moitié (mode de contrô-
le de la vitesse) de sorte que le mo-
teur s’arrête. Le circuit de protection
s’activera et pourra empêcher le
contrôle de la vitesse. Dans ce cas,
relâchez la gâchette de contrôle de
la vitesse, puis serrez-la à nouveau
pour le fonc tionnement normal.
9) Evitez la pénétration de poussière
dans le mandrin.
10) Ne touchez pas les pièces rotati-
ves pour éviter toute blessure.
11) N’utilisez pas l’outil continuelle-
ment pen dant une longue période.
Arrêtez d’utiliser l’outil de temps
en temps pour éviter une augmen-
tation de la température et de sur-
chauffer le moteur.
12) Ne laissez pas tomber l’outil.
13)
Ne déposez pas l’outil si le mandrin
est déverrouillé. Le foret pourrait
s'échapper du mandrin et tomber
si le mandrin est déverrouillé. Cela
peut provoquer des blessures.
Symbole Signifi cation
V Volts
Courant continu
n
0
Vitesse sans charge
… min
-1
Rotations ou retour par
minute
Rotation avec martelage
Rotation seulement
AVERTISSEMENT!
La poussière résultant de ponçage,
sciage, meulage, perçage à haute
pression et de toute autre activité de
construction, contient des produits
chimiques réputés être cause de
cancer, de malformations congénitales
ou autres problèmes reproductifs. Ces
produits chimiques sont, par exemple :
* Le plomb contenu dans les peintu-
res à base de plomb
* La silice cristalline, contenue dans
les briques, le ciment et autres
produits de maçonnerie; et
* L’arsenic et le chrome provenant
du bois traité chimiquement.
Pour réduire l’exposition à ces produits
chimiques, il faut travailler dans un
lieu bien aéré et porter un équipement
de sécurité approprié tel que certains
masques anti-poussière conçus
spécialement pour filtrer les particules
microscopiques.
.
CHARGEUR DE BAT-
TERIE ET BATTERIE
AUTO NOME
Instructions de sécurité impor-
tantes
1) CONSERVEZ CES INSTRUC-
TIONS La présente notice contient
des instructions de sécurité et
d’utilisation importantes pour le
chargeur de batterie EY0L80.
2) Avant d’utiliser le chargeur de bat-
terie, lisez toutes les instructions
et les marques d’avertissement fi-
gurant sur (1) le chargeur de bat-
terie, (2) la batterie autonome.
3) MISE EN GARDE – Pour réduire
le risque de blessures, chargez la
batterie autonome Panasonic seu-
lement comme indiqué à la der-
nière page.
Les autres types de batteries ris-
quent d’exploser et de causer des
blessures corporelles et des dom-
mages matériels.
La page charge ...
La page charge ...
La page charge ...
La page charge ...
La page charge ...
La page charge ...
La page charge ...
La page charge ...
La page charge ...
La page charge ...
La page charge ...
La page charge ...
La page charge ...
La page charge ...
La page charge ...
La page charge ...
La page charge ...
La page charge ...
La page charge ...
La page charge ...
La page charge ...
La page charge ...
La page charge ...
La page charge ...
La page charge ...
La page charge ...
La page charge ...
La page charge ...
-
 1
1
-
 2
2
-
 3
3
-
 4
4
-
 5
5
-
 6
6
-
 7
7
-
 8
8
-
 9
9
-
 10
10
-
 11
11
-
 12
12
-
 13
13
-
 14
14
-
 15
15
-
 16
16
-
 17
17
-
 18
18
-
 19
19
-
 20
20
-
 21
21
-
 22
22
-
 23
23
-
 24
24
-
 25
25
-
 26
26
-
 27
27
-
 28
28
-
 29
29
-
 30
30
-
 31
31
-
 32
32
-
 33
33
-
 34
34
-
 35
35
-
 36
36
-
 37
37
-
 38
38
-
 39
39
-
 40
40
-
 41
41
-
 42
42
-
 43
43
-
 44
44
-
 45
45
-
 46
46
-
 47
47
-
 48
48


Panasonic EY7840 Manuel utilisateur
- Catégorie
- Perceuses mixtes sans fil
- Taper
- Manuel utilisateur
- Ce manuel convient également à
dans d''autres langues
- English: Panasonic EY7840 User manual
- español: Panasonic EY7840 Manual de usuario
Documents connexes
-
Panasonic EY7552X Manuel utilisateur
-
-
Panasonic EY7960 Manuel utilisateur
-
-
-
Panasonic EY7880 Manuel utilisateur
-
-
-
-