Merlin POLARIS 400CP Manuel utilisateur
- Catégorie
- Jouets télécommandés
- Taper
- Manuel utilisateur

INSTRUCTION MANUAL
ML44048

We know you will have great fun with your model, but to get the best from your purchase please read
this information BEFORE you operate the model
Table of contents
Page
Warranty
………………………………………………………..….. 1
90 Day Component Warranty………………………………… 1
Not covered by warranty………………………………………. 1
How to claim against your warranty………………………….. 1
Introduction………………………………………………………… 2
Specifications…………………………………………………… 2
Items required for operation…………………………………… 2
Glossary…………………………………………………………. 2
Safety precautions…………………………….………………. 3
Recommended tools…………………………………………… 3
Charging the battery pack…………………………………….. 3
Transmitter………………………………………………………… 4
Preparing the transmitter……….……………………………… 4
Transmitter Controls…………..……………………………….. 4
Controlling your Helicopter...………………………………… 5
Trimming Adjustments and Control Test……...……. 6
Installing the battery……………………………………………. 6
Trimming check.………………………………………………… 6
Switching off…………………………………………………….. 6
Checklist…………………………………………………………. 7
Control test………………………………………………………. 7
How to Fly……………………………………………………………. 8
Experience……………………………………………………….. 8
Site and conditions………………………………………………. 8
Learning to hover.………………………………………………. 8
Learning to turn...………………………………………………... 8
Learning forward and backwards flight………………………. 9
Learning sideways flight……………………………………….. 9
Combining controls……………………………………………… 9
Tips for success…………………………………………………. 9
Use of the Idle Up Switch……………………………………….. 9
Using Your Flying Simulator Freeware…………………… 10
Downloading……………………………………………………… 10
Setting your transmitter…………………………………………. 10
Training…………………………………………………………… 10
Helpful Information..………….…………………………………. 11
Trouble shooting……………...…………………………………. 11
Exploded diagram……………………………………………….. 11
Parts listing….………………………………………………… … 12
Replacing the blades...……………………………………….. 13
Fine tuning of Yaw control….………..…………………………. 13
HAVE FUN! But please read this first !!

1
Warranty
90 Day Component Warranty
We want you to enjoy your purchase, but please read this first!
This product is covered by a 90 day component warranty from date of purchase. If any part of the product fails as a
result of faulty manufacture during this period then we will repair or replace that part at our discretion.
We do not operate a new for old warranty once the product has been used.
Please note this product is not a toy and it is recommended that children 14 and under are supervised by an adult. It
is the responsibility of the parent or guardian to ensure minors are given appropriate guidance and supervision.
If you suspect there is a problem with the product, for whatever reason, it is the user’s responsibility to investigate
and take steps to rectify the problem before further damage occurs.
Not Covered By Warranty
This is a sophisticated, high performance model and should be treated with care and respect. Every effort has been
made to make this product as strong and durable as possible, however due to the nature of this product, it is still
possible to break or damage parts through crashing or extreme use. Components damaged as a result of crash
damage, improper use, lack of maintenance or abuse are not covered by the warranty.
How to Claim Against your Warranty
For warranty claims please first contact your supplying retailer. Do not return the product to your distributor with-
out their prior approval. You may not need to return the product in full, only the damaged component along with a
copy of your purchase receipt. In many cases it is faster and more cost effective for the user to fit the replacement
part(s) to the product & therefore we reserve the right to supply parts only in these instances.
Any returned component that is inspected by your distributor and found to have an invalid warranty claim may be
subject to an inspection and handling fee before it can be returned. Any repairs required as a result of neglect or mis-
use will be charged before any work is carried out on the product. If you decide not to have any work carried out the
distributor reserves the right to charge a handling and a shipping fee. The level of these fees are at the discretion of
the distributor.
Please attach your proof of purchase in the manual as you may need it again in the future.

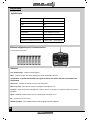
8 * AA Batteries for the Transmitter
2
Introduction
Specifications
Items Required for Operation
Glossary
Landing gear - legs on the underside of helicopter.
Rotor - High speed rotating blades used to lift the helicopter into the air.
Throttle - A control function to adjust the speed of the rotating blades & height of the helicopter.
Rudder - A control function to turn the helicopter.
Cyclic Controls - Control functions to move the helicopter in flight.
Fuselage - Main body of the helicopter containing motor, receiver, speed control, servos and battery
Gyro - An electronic stabiliser built into the helicopter to assist flight.
LED - A coloured indicator light.
Swash Plate - Rotating plate below the rotor that adjusts the blade angles.
Main Rotor Diameter 550mm
Fuselage Length 580mm
Flying Weight 438g
Motor 380 Size Brushed
Battery 11.4V 950 mAh Li-Po Battery
Transmitter MTX-44 35 MHz FM 4 Channel
Receiver MRX-44 35 MHz FM 6 Channel
Servos 3 x 9g Micro Servos
Charger Mains 240V / 12.6V 500mAh

Safety Precautions
• Read and follow this manual completely, observing all instructions and safety directions. Otherwise, serious
injury and damage can occur. Think about your safety, and the safety of others, first.
• Hold the product securely when the flight battery is plugged in, keep the rotor away from body parts and
clothing, even it isn’t spinning, as it could be turned on by accident. Beware of hair becoming en-tangled in
the rotor.
• Do not fly when it’s too windy or you may lose control and crash, causing injury or damage. Never fly near
people, vehicles, train tracks, buildings, power lines, water, hard surfaces or trees. Never allow anyone to
attempt to catch the model while it’s in flight or serious injury may result.
• Adult supervision for flying and battery charging is recommended for pilots age 14 and younger.
• Only use a battery charger that is compatible with the flight battery. Never leave the charger unattended while
charging. This will help prevent overcharging and make sure damage does not occur to the battery, charger or
any other property. While charging, place the battery on a heat-resistant surface. Do not lay it on carpet or up-
holstery while charging.
• Never cut into the battery, charger, or aeroplane wires or serious injury may occur. Causing the battery to
“short out” (crossing negative and positive bare wires) can cause fire, serious injury and damage.
• When you finish flying your product, always unplug the battery before you turn off the transmitter.
• Never use the product on the same frequency as another RC model in your area. The frequency of the model
is shown on the frequency crystals.
Recommended Tools
These tools are not included with the product but are recommended for use whilst working with this product
Mini flat head Screwdriver Mini Philips Screwdriver
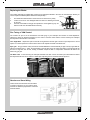
Charging the battery pack
Use the supplied charger to charge the supplied battery. Other products are available and if used, you must follow
the products instructions to avoid damage.
The charge time for the battery is 120 minutes.
1. Plug the battery charger into an AC outlet. The LED on the charger should glow green.
2. Plug the battery into the charger. The LED on the charger will turn red indicating charging is in progress.
3. Charging is complete when the LED indicator glows green. As charging nears completion the battery will get
warm.
4. Unplug the battery from the charger when finished.
Cautions
• Use the charger with adult supervision. Do not use the charger near water or when wet.
• Do not use the charger if the wire is frayed or worn. If the wire is frayed or worn a short circuit can cause a fire
or burns.
• If your battery gets hot and exceeds 50 degrees C during charge it may be faulty and you should contact your
retailer
• If the battery pack bulges or expands during charge or use it is faulty and you should contact your retailer.
• Never leave your battery pack on charge unattended.
3

4
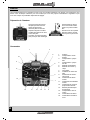
Transmitter
Your Merlin Transmitter is an advanced controller designed for the beginner to be easy to use and tune. You will
need to follow the steps below to ensure you prepare the controller correctly for use and understand the adjustment
possibilities available.
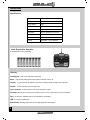
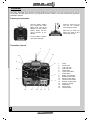
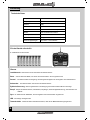
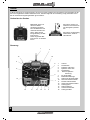
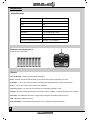
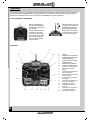
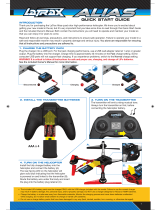
Transmitter Controls
Preparing the transmitter
Insert the aerial into the
hole and turn clockwise
until it is tightly secured.
Make sure you never over
extend the aerial as this
will cause it to break.
Open the battery holding
tray to expose the empty
battery slots. Insert 8 AA
batteries into the marked
spaces. Please note the
correct direction of the
batteries
Incorrect battery insertion
could lead to damage
1. Aerial
2. Throttle Trim
3. Cyclic L/R Trim
4. Cyclic F/B Trim
5. Throttle Stick
6. Cyclic Control Stick
7. Power Switch
8. Battery level indicator
9. Rudder reverse switch
10. Aileron reverse switch
11. Throttle reverse switch
12. Elevator reverse switch
13. Frequency Crystal
14. Rudder Trim
15. Idle up switch
16. Training switch
1
4
7
2
3
5
6
108 12 11 9 13
14
15
16

5
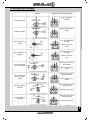
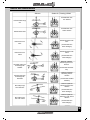
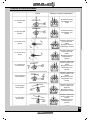
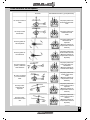
Main body lifts up
Main body lowers
The nose will turn to
the left
The nose will turn to
the right
The nose will dive
and move forwards
The nose will raise
and move back-
wards
The body will pitch
to the left
The body will pitch
to the right
Push throttle stick
forwards
Pull throttle stick back-
wards
Push the rudder stick
to the left
(Move trim lever to
right)
Push the rudder stick
to the right
(Move trim lever to
left)
Push the cyclic control
stick forwards
(Move trim lever back-
wards)
Pull the cyclic control
stick backwards
(Move trim lever for-
wards)
Push the cyclic control
stick to the left
(Move trim lever right)
Push the cyclic control
stick to the right
(Move trim lever left)
Actions Transmitter & (Trimming ) Input
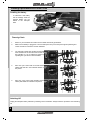
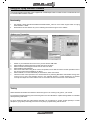
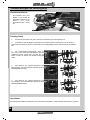
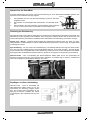
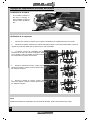
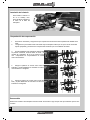
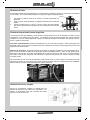
Controlling your Helicopter

3. The helicopter swash plate should be horizontal
when viewed from the front and from the side of
the helicopter. If it is not, adjust it’s position by
operating the cyclic trims on the transmitter.
4. Move the cyclic control stick to the left and the
swash plate will tilt in the indicated direction in
the picture.
5. Move the cyclic control stick forwards and the
swash plate will tilt as indicated in the picture.
6
Trimming Adjustments and Control Tests
1. Switch on your transmitter and make sure the throttle stick is fully pulled back.
2. Make sure the battery is plugged in. Leave the helicopter until you see the power light stop flashing and
remain constant to confirm the unit has calibrated.
Trimming Check
Switching Off
Unplug the helicopter battery followed by switching off the transmitter. Always follow this procedure when switching
off.
Installing the battery
To install the Li-PO battery
into the fuselage insert the
charged battery into the
bottom of the helicopter
base.

7
Control Test
• Be certain that the throttle stick is in the “off” position.
• Switch on the transmitter, fully extend the aerial and check to make sure the green LED is lit indicating the
transmitter has power. If the red LED is lit then transmitter batteries are low on power and must be replaced
before flying.
• Plug in the helicopter battery and wait 5 seconds for the receiver power light to stop flashing to confirm the
unit has calibrated.
• Place your model on the ground and walk away whilst operating the swash plate controls.
• Check that the servos operate without interference up to a distance of 30 metres.
• Gently move the throttle stick forwards to check the main blades rotate.
Checklist
Each time before you start flying your Merlin Flight Product, please carry out the following checks and tests.
• Make sure the Swash plate has free movement
• All screws, bolts, etc. are tight
• Radio equipment is securely fastened inside fuselage
• Batteries are fully charged.
• No wires interfere with servo motors
• Antenna is properly strung
• Blades are securely fastened

8
How to Fly
Learning to Hover
1. Place your helicopter in a an open space facing away from yourself about 5 metres in distance.
2. Push the throttle stick gently forwards increasing the blade speed until it becomes light just lifting from the
ground.
3. Gently decrease the power to land smoothly.
4. If your helicopter moves away from the centre of your training area place it back in the middle.
5. Repeat this exercise increasing the flying height of 1 metre can be achieved whilst remaining in control.
All helicopters experience some instability immediately on lifting from the ground. If this does not stabilise as height
is gained and your helicopter drifts or turns repeatedly in one direction you will need to adjust the transmitter trim
levers. To do this refer to Controlling Your Helicopter and move the transmitter trim lever one or two clicks in the
opposite direction to the travel until a steady hover is achieved.
Experience
Your Pulsar helicopter makes an ideal introduction to flying RC Helicopters and by following the following basic
instructions inexperienced pilots should soon master basic flying skills. If you have a computer with internet access
then download & follow the FMS simulator training section before flying your model. This will help new pilots become
familiar with the controls.
Learning to Turn
1. Hover your helicopter 1 metre in the air.
2. Move the rudder stick a small amount in one direction and release it. The tail of your helicopter will swing
around and stop in the new position.
3. Repeat applications of rudder so you can turn and hover facing in any chosen direction.
Site & Conditions
• Fly your helicopter indoors in a large room, hall or office. Only fly outdoors in perfectly calm conditions with no
wind unless you are an experienced pilot.
• Make sure there are no obstacles that will get in your way when flying, such as furniture, trees or buildings.
• Make sure you do not fly where there are people or animals who could be hurt by the helicopter.
• If flying outdoors position yourself so that you keep the sun at your back and out of your eyes. Wear
sunglasses on bright days.
• Keep your helicopter in front of you so you don’t have to turn in circles as you fly. Try to avoid flying directly
overhead.
Learning Forward and Backwards Flight
1. Hover your helicopter 1 metre in the air.
2. Move the cyclic control stick forwards gently and release it, your helicopter will move forwards then hover
stationary.
3. Reduce the throttle stick and land your helicopter returning it to its starting position.
4. Repeat this exercise but prior to landing move the cyclic stick back to return the helicopter to its starting
position whilst in flight.

9
Tips for Success
• Only operate the throttle stick gently with small inputs, the most common form of damage is due to reducing
the throttle by large amounts causing sudden reductions in height and crashing.
• When your helicopter begins to climb slowly or is unable to climb on full throttle then the battery is beginning
to run low, for safety land your model as soon as possible and re-charge.
• Damage or bends to the blades or fuselage can greatly affect flight control. Replace damaged parts
immediately.
• Don’t attempt to fly or do manoeuvres beyond your flying abilities.
Learning Sideways Flight
1. Hover your helicopter 1 metre in the air.
2. Move the cyclic control stick sideways gently and release it, your helicopter will move sideways then hover
stationary.
3. Reduce the throttle stick and land your helicopter returning it to its starting position.
4. Repeat this exercise but prior to landing move the cyclic stick back to return the helicopter to its starting
position whilst in flight.
Combining Controls
1. Hover your helicopter 1 metre in the air.
2. Move the cyclic stick forwards and hold its position to achieve a slow forward flight.
3. Move the rudder stick left or right and your helicopter will begin to fly in a circular motion.
4. Practice turning left and right circles of small and large diameters.
By combining control inputs you will be able to control your helicopter position accurately and fly in more advanced
patterns such as figure of eight or carry out simple aerobatic manoeuvres.
Once confidence and control has been gained experiment by increasing the hovering height to 2 to 3 metres and
combining forwards, backwards, sideways and turn controls.
Use of the Idle Up Switch
The idle up switch is used for aerobatic manoeuvres. Its function by pushing the switch forwards in flight is to main-
tain the rotor turning at a high pre-set speed so the angle of the rotor blades react to your throttle input. In this mode
throttle stick movements about the centre point will change the blade angles up or down enabling the helicopter to fly
inverted and other complex aerobatics.
Once you have mastered flight combining control functions then whilst hovering push the idle up switch back and
practice basic manoeuvres as learnt previously remembering controls will react more quickly. Should you wish to
attempt a basic loop then with Idle up on carry out the following control steps.
1. With plenty of height gain fast forward flight by applying forward cyclic
2. Pull quickly back to give rear cyclic and hold on, the nose of the helicopter will climb.
3. At the point of the helicopter becoming inverted pull back on the throttle stick and hold to maintain height.
4. As the helicopter continues through the loop becoming vertical push the throttle stick forwards.
5. As the helicopter becomes horizontal decrease the rear cyclic and return to a hover.
If you wish to advance further to experienced pilot level then we suggest ask at your retailer about joining local
model flight clubs or search the internet for terms such as “learning to fly a model helicopter + 3D”.

10
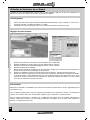
Using your Flying Simulator Freeware
Your Merlin helicopter transmitter comes supplied with a USB adaptor cable to enable it to link to a Windows PC and
run freeware FMS simulation software.
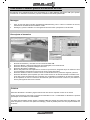
Setting your Transmitter
1. Switch on your transmitter and connect it to your PC with the USB cable.
2. Select Model and load Hughes from the pull down menu as above.
3. Select Controls and Analogue Controls from the menu as above.
4. Select Mapping and Calibration
5. Move each control stick noting which channel is operated, ensure that the channel number operated is set to
the correct control function (Mapping) as above.
6. Select Calibrate, move the controls fully in all directions, select next & finish.
7. Check that each control operates in the desired direction by selecting Simulation and Initialise moving each
control in turn to see if the helicopter moves in the expected direction. If control surfaces do not operate
correctly then adjust the control numbers & Inv to reverse the function to achieve the correct directions.
Training
Select Simulation & Initialise then follow the instructions given in the Learning to Fly part of your manual.
For inexperienced pilots selecting View and ticking Auto zoom and Simulation / Options ticking Model Un crashable
will help learning basic skills.
For more advanced pilots the FMS software simulator can be adjusted to change models (Model) to include
aeroplanes, flying sites (Landscape) and screen view (View) by experimenting with the menus.
Downloading
1. Visit website http://n-old.ethz.ch/student/mmoeller/fms/index_e.html or use a search engine search for “flying
model simulator + FMS”
2. Download and run the software for your PC following the instructions given on the website.

11
Problem Cause Solution
Unit does not operate Transmitter “AA” batteries are depleted or
installed incorrectly, indicated by a dim or
unlit LED on transmitter or the low battery
alarm.
Check polarity installation or replace with
fresh “AA” batteries.
No electrical connection. Push connectors together until they “click.”
Main motor does not turn 4-in-1 unit not operating correctly Consult your retailer
Helicopter spins uncontrollably Gyro gain is incorrectly setup Adjust Gyro gain to 90%
Helicopter will not hover still when sticks are
neutral
Trimming incorrect or swash plate is not level Adjust trim levers or adjust Swash plate
Vibration Bent main shaft Replace main shaft
Blades are broken Replace blades
Troubleshooting
Helpful Information
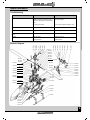
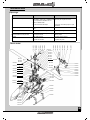
ML44020
ML44002
ML44004
ML44011
ML44004
ML44004
ML44008
ML44020
ML44020
ML44036
ML44035
ML44038
ML44034
ML44027
ML44050
ML44031
ML44031
ML44030
ML44017
ML44033
ML44033
ML44033
ML44033
ML44003
ML44020
ML44007
ML44001
ML44024
ML44023
ML44005
ML44037
ML44029
ML44020
ML44023
ML44037
ML44020
ML44012
ML44006
ML44009
ML44009
ML44010
ML44030
ML44015
ML44016
ML44044
ML44042
ML44043
ML44021
ML44020
ML44049
ML44020
ML44041
ML44020
ML44013
ML44025
ML44014
ML44009
ML44018
ML44039
ML44026
ML44009
ML44010
ML44009
ML44026
ML44026
ML44020
ML44028
ML44028
ML44013
ML44019
ML44022
ML44019
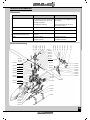
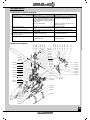
Exploded Diagram

12
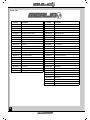
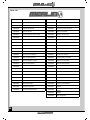
Parts List
Part No Description
ML44023 Washer Set
ML44024 O-Ring Set
ML44025 Main Rotor Gear
ML44026 Main Shaft Collar And Bushing
ML44027 Tail Motor Mount
ML44028 Main Motor 380
ML44029 Main Rotor Blades
ML44030 Motor Heatsink
ML44031 Tail Motor
ML44032 Training Gear
ML44033 Tail Vertical Fin
ML44034 Tail Shaft
ML44035 Tail Rotor Gear
ML44036 Tail Rotor Blade
ML44037 Feathering Bearings
ML44038 Tail Rotor Bearing
ML44039 Main Frame Bearing
ML44040 Tail Motor Wire
ML44041 Servo
ML44042 Lipo Battery
ML44043 E-Board
ML44044 Receiver
ML44045 Charger (UK 3 Pin)
ML44046 Charger (EU 2-Pin)
ML44047 Transmitter
ML44048 Polaris 400CP Instruction & Parts manual
ML44049 Aerial Tube
ML44050 Silcon Tube
Part No Description
ML44001 Center Hub
ML44002 Head Button
ML44003 Slide Block And Seesaw
ML44004 Flybar Carrier
ML44005 Main Rotor Blade Grips
ML44006 Flybar Link
ML44007 Main Rotor Link
ML44008 Flybar Paddles
ML44009 Swashplate Assembly
ML44010 Pushrod
ML44011 Flybar
ML44012 Feathering Spindle
ML44013 Upper Main Frame
ML44014 Swashplate Stay
ML44015 Lower Main Frame
ML44016 Support Strut
ML44017 Tail Boom
ML44018 Main Shaft
ML44019 Canopy
ML44020 Screw Set
ML44021 Skid Support
ML44022 Landing Skids

13
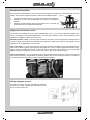
Fine Tuning of YAW Control
The controls are pre set in the manufacture and test flying of your helicopter and should not need adjustment.
However for tuning by experienced pilots or in the event of a serious crash and the need to re-build your helicopter
their adjustment and function is as follows :-
Left / Right Bias - adjusts the speed of the tail turning between left and right to achieve equal response to control
inputs. To increase speed of movement to the left turn the adjuster clockwise a small amount.
Gyro gain - the gyro detects rotary movement and will stabilise the tail automatically in flight. The Gyro gain dial ad-
justs the sensitivity from 0 - 100%, the best setting is around 90% as pre-set. When the setting is too high the tail will
be seen to wag from side to side, making it unstable. Adjust the dial to compensate. Clockwise will reduce the
amount of gyro gain.
Tail Rotor Trim - if when hovering the helicopter tail drifts more than can be corrected by the transmitter trim levers
then adjust the tail rotor trim to achieve a stable flight. Adjusting the trim clockwise will add right turn.
Replacing the Blades
Your Polaris helicopter is supplied with a spare set of replacement blades in the event of crash damage. Should you
need to replace the blades please follow these simple steps :-
1. The blades are fastened with a screw and can be removed very easily
2. Loosen the screw on the damaged blade and remove it allowing the blade
to come off
3. Insert the new blade into the gap and replace the screw tightening only suf-
ficient to make sure the blade still moves freely.
Receiver and Servo Wiring
Under normal circumstances there should be
no need to unplug any of your receiver wiring,
however for reference purposes the receiver is
wired as follows.

14
Inhaltsverzeichnis
Seite
Garantie………………………………………………………...…….. 15
90-Tage-Garantie auf Komponenten..…………………….... 15
Von der Garantie nicht gedeckt..…………………………….. 15
Garantieansprüche geltend machen.……………………….. 15
Einführung……………..…………………………………….………. 16
Technische Daten……………………….……………………… 16
Für den Betrieb erforderlich………………………………….. 16
Glossar…………………………………………………………. 16
Allgemeine Sicherheitsmaßnahmen…………………….….. 17
Empfohlenes Werkzeug……………………………………… 17
Batteriepack aufladen……..………………………………….. 17
Transmitter………………………………………...…………………. 18
Vorbereiten des Senders………………………………….…. 18
Steuerung des Senders.……………………………………... 18
Steuern des Hubschraubers…….………………….……………… 19
Trimmeinstellungen und Steuerungstests…………….....……. 20
Einsetzen der Batterie…………………………………………. 20
Trimming-Check………………………………………………… 20
Ausschalten……………………………………………….…….. 20
Checkliste………………………………………………………. 21
Steuerungstest…………………………………………………. 21
Fliegen...…………………………………………………………….…. 22
Erfahrung…………………………………………………….….. 22
Ort und Bedingungen……………………………………………. 22
Lernen zu Schweben.……………………………………………. 22
Lernen zu Drehen...……………………………………………... 22
Lernen, vorwärts und rückwärts zu fliegen……………………. 22
Lernen, seitwärts zu fliegen…………………………………….. 22
Steuerelemente kombinieren…………………………………… 23
Tips für den Erfolg….……………………………………………. 23
Verwendung des Leerlauf-Auf-Schalters……………………… 23
Flugsimulator-Freeware………………...…………………….…… 24
Downloaden……………………………………………………… 24
Einstellen des Senders…………………………………………. 24
Fliegen…………………………………………………………… 24
.Nützliche Informationen.………….…………………………..…… 25
Fehlersuche……………...……………………………………… 25
Explosionszeichnung………………………………………….. 25
Teileliste….……………………………………………………. 26
Austauschen der Rotorblätter...……………….…………….. 27
Feintuning der Giersteuerung….………..……………………. 27
Empfänger- und Servo-Verdrahtung………………………….. 27
VIEL SPASS! Aber lesen Sie bitte erst diese Anleitung !!
Wir wissen, dass Sie mit Ihrem Modell viel Spaß haben weden, aber BEVOR Sie das Modell in Betrieb nehmen, le-
sen Sie bitte erst diese Informationen, damit Sie das Beste aus Ihrem Kauf machen können

15
Garantie
90-Tage-Garantie auf Komponenten
Für dieses Produkt gilt eine 90-Tage-Garantie auf Komponenten ab dem Kaufdatum. Wenn während dieser Zeit ein
Teil des Produkts infolge Fabrikationsmängeln ausfallen sollte, liegt es in unsrem Ermessen, ob wir das Teil repari-
eren oder austauschen.
Wenn das Produkt einmal benutzt wurde, bieten wir keine Neu-für-Alt-Garantie.
Beachten Sie bitte, dass dieses Produkt kein Spielzeug ist und dass Kinder unter 14 Jahren von einem Erwachse-
nen beaufsichtigt werden sollten. Es liegt in der Verantwortung der Eltern oder Aufsichtspersonen, sicherzustellen,
dass Minderjährige entsprechende Anleitung und Aufsicht erhalten.
Bei der Vermutung eines Problems mit dem Produkt, aus welchem Grunde auch immer, ist der Benutzer dafür
verantwortlich, das Problem zu untersuchen und für Abhilfe zu sorgen, bevor weitere Schäden entstehen.
Von der Garantie nicht gedeckt
Dies ist ein technisch ausgereiftes Hochleistungs-Modell, das mit Sorgfalt und Respekt behandelt werden sollte. Wir
haben zwar alles getan, um dieses Produkt so stabil und haltbar wie nur möglich zu machen, trotzdem können auf
Grund der Natur dieses Produkts Teile bei Zusammenstößen oder extremem Einsatz beschädigt werden oder bre-
chen. Komponenten, die durch einen Unfall, falsche Verwendung, mangelnde Wartung und Pflege oder Mißbrauch
beschädigt wurden, fallen nicht unter die Garantie.
Garantieansprüche geltend machen
Mit Garantieansprüchen wenden Sie sich bitte zuerst an Ihren Händler. Ohne vorherige Genehmigung das Produkt
nicht an den Distributor einschicken. Sie brauchen das Produkt nicht als Ganzes einschicken, nur die beschädigte
Komponente zusammen mit einer Kopie des Kaufbelegs. In vielen Fällen ist es für Sie schneller und kostengünsti-
ger, Ersatzteile in das Produkt einzubauen; daher behalten wir uns das Recht vor, nur in solchen Fällen die Ersatz-
teile zu liefern.
Für jede eingeschickte Komponente, bei deren Überprüfung Ihr Distributor einen ungültigen Garantieanspruch fest-
gestellt hat, werden Ihnen vor der Rücksendung möglicherweise Prüfungs- und Bearbeitungskosten in Rechnung
gestellt. Reparaturen, die als Folge von Nachlässigkeit oder Mißbrauch erforderlich sind, werden in Rechnung
gestellt, bevor Arbeiten am Produkt durchgeführt werden. Wenn Sie sich entscheiden, dass keine Arbeiten ausge-
führt werden sollen, hat der Distributor das Recht, Bearbeitungs- und Versandkosten in Rechnung zu stellen.
Sie sollten Ihren Kaufbeleg an dieses Handbuch anheften, für den Fall, dass Sie ihn später noch einmal benötigen.

Für den Betrieb erforderlich
8 * AA Batterien für den Sender
16
Technische Daten
Hauptrotordurchmesser 550mm
Rumpflänge 580mm
Gewicht 438g
Motor 380 Size Brushed
Batteries 11.4V 950 mAh Li-Po Battery
Sender MTX-43 35 MHz FM 4 Kanal
Empfänger MRX-43 35 MHz FM 6 Kanal
Servo 3 x 9g Mikroservos
Geschwindigkeitsregler Netz 240V / 12.6V 500mAh
Einführung
Glossar
Landefahrwerk - Beine/Kufen auf der Unterseite des Hubschraubers.
Rotor - schnell rotierende Blätter, mit denen der Hubschrauber in die Luft gehoben wird.
Drossel - eine Steuerfunktion zur Regelung der Rotorgeschwindigkeit und der Flughöhe des Hubschraubers.
Seitenruder - eine Steuerfunktion zum Drehen des Hubschraubers.
Zyklische Steuerung - Steuerungsfunktionen zur Bewegung des Hubschraubers während des Flugs.
Rumpf - Körper des Hubschraubers, enthält Motor, Empfänger, Geschwindigkeitssteuerung, Servoantriebe und
Batterie
Gyro - ein elektronischer Stabilisator, der als Flughilfe in den Hubschrauber eingebaut ist.
LED - eine farbige Anzeigeleuchte.
Taumelscheibe - rotierende Platte unterhalb des Rotors, über die der Blattanstellwinkel geregelt wird.

17
Sicherheitsmaßnahmen
• Dieses Handbuch vollständig durchlesen und alle Anweisungen und Sicherheitshinweise befolgen. Sonst kann
es zu schweren Unfällen und Sachschäden kommen. Denken Sie zuallererst an Ihre Sicherheit und die Si-
cherheit anderer.
• Halten Sie beim Anschließen der Flugbatterie das Modell sicher fest, den Rotor von Körperteilen und Kleidung
fernhalten.
• Nicht fliegen, wenn es zu windig ist - Sie können leicht die Kontrolle verlieren und bei einer Bruchlandung sind
Verletzungen oder Sachschäden möglich. Nicht in der Nähe von Personen, Fahrzeugen, Eisenbahnschienen,
Gebäuden, Stromleitungen, Wasser, harten Flächen oder Bäumen fliegen. Nie zulassen, dass jemand das
Modell im Flug zu fangen versucht - schwere Verletzungen können die Folge sein.
• Bei Fliegen und Aufladen der Batterie wird für Piloten unter 14 Jahren Aufsicht durch einen Erwachsenen
empfohlen.
• Nur ein mit der Flugbatterie kompatibles Ladegerät verwenden. Beim Aufladen das Ladegerät nie un-
beaufsichtigt lassen. Damit wird Überladen der Batterie verhindert und sichergestellt, dass Batterie, Ladegerät
oder andere Gegenstände nicht zu Schaden kommen. Während des Aufladens die Batterie auf einer hitze-
beständigen Unterlage ablegen, nicht auf Teppichen oder Polstern.
• Nie in Batterie, Ladegerät oder Kabel schneiden - ernsthafte Verletzungen können die Folge sein. Kurzsch-
ließen der Batterie (blanker Draht zwischen Plus- und Minuspol) kann Brand, ernsthafte Verletzungen und
Sachschäden verursachen.
• Nach dem Fliegen des Modells immer erst die Batterie abklemmen, und dann erst den Sender ausschalten.
• Nie das Produkt mit der gleichen Fernsteuerfrequenz verwenden wie ein anderes funkgesteuertes Modell in
der Nähe. Die Frequenz des Modells ist auf den Schwingquartzen angegeben.
Empfohlenes Werkzeug
Diese Werkzeuge werden mit dem Produkt mitgeliefert, sind aber für Arbeiten an diesem Produkt empfohlen.
Miniatur-Schraubendreher
Batteriepack aufladen
Zum Aufladen der mitgelieferten Batterie das mitgelieferte Ladegerät verwenden. Wenn andere handelsübliche Pro-
dukte verwendet werden, zur Vermeidung von Schäden die zugehörigen Anweisungen befolgen.
Die Ladedauer für die Batterie beträgt 90 Minuten.
1. Das Batterie-Ladegerät in eine Wandsteckdose einstecken. Die LED auf Ladegerät sollte grün leuchten.
2. Die Batterie in das Ladegerät einstecken. Die LED am Ladegerät leuchtet rot und zeigt so an, dass die Bat-
terie geladen wird.
3. Das Aufladen ist beendet, wenn die LED-Anzeige grün leuchtet. Gegen Ende des Aufladevorgangs wird die
Batterie warm.
4. Die aufgeladene Batterie vom Ladegerät trennen
Vorsichtshinweise
• Das Ladegerät nur unter Aufsicht eines Erwachsenen verwenden. Das Ladegerät nicht nass oder in der Nähe
von Wasser verwenden.
• Das Ladegerät nicht verwenden, wenn das Kabel ausgefranst oder abgescheuert ist. Bei einem ausgefransten
oder abgescheuerten Kabel kann leicht ein Kurzschluß auftreten und Feuer oder Verbrennungen verursachen.
• Wenn Ihre Batterie heiß wird und während des Aufladens 50°C überschreitet, könnte sie defekt sei - wenden
Sie sich in diesem Fall bitte an Ihren Händler.
• Wenn während des Aufladens und beim Betrieb das Batteriepack anschwillt oder expandiert, ist es defekt -
wenden Sie sich in diesem Fall bitte an Ihren Händler.
• Die Batterie am Ladegerät nie unbeaufsichtigt lassen.

18
Ihr Merlin Sender ist ein moderner Regler, der auch von einem Anfänger leicht zu bedienen und einzustellen ist. Mit
den unten aufgeführten Schritten stellen Sie sicher, dass der Regler für die Verwendung richtig vorbereitet ist und
Sie die vorhandenen Regelmöglichkeiten ganz verstehen.
Steuerung
Die Antenne in das Loch
einsetzen und rechtsherum
(im Uhrzeigersinn) festdre-
hen.
Die Antenne nie übermäßig
herausziehen, damit sie
nicht abbricht.
Batteriefach öffnen, um
die leeren Batteri-
eschächte freizulegen.
Die 8 AA Batterien in die
markierten Schächte ein-
setzen. Dabei auf die
richtige Richtung der Bat-
terien achten.
Falsch eingesetzte Bat-
terien können zu Schäden
führen.
1. Antenne
2. Drosseltrimm
3. Zyklischer L/R-Trimm
4. Zyklischer V/R-Trimm
5. Drosselhebel
6. Hebel für Zyklische
Steuerung
7. Ein-/Ausschalter
8. Batteriestandsanzeige
9. Seitenruder-Umkehrschalter
10. Querruder-Umkehrschalter
11. Drossel-Umkehrschalter
12. Höhenruder-Umkehrschalter
13. Schwingquartz
14. Seitenrudertrimm
15. Leerlauf-Auf-Schalter
16. Trainingsschalter
1
4
7
2
3
5
6
108 12 11 9 13
14
Sender
Vorbereiten des Senders
15
16
La page est en cours de chargement...
La page est en cours de chargement...
La page est en cours de chargement...
La page est en cours de chargement...
La page est en cours de chargement...
La page est en cours de chargement...
La page est en cours de chargement...
La page est en cours de chargement...
La page est en cours de chargement...
La page est en cours de chargement...
La page est en cours de chargement...
La page est en cours de chargement...
La page est en cours de chargement...
La page est en cours de chargement...
La page est en cours de chargement...
La page est en cours de chargement...
La page est en cours de chargement...
La page est en cours de chargement...
La page est en cours de chargement...
La page est en cours de chargement...
La page est en cours de chargement...
La page est en cours de chargement...
La page est en cours de chargement...
La page est en cours de chargement...
La page est en cours de chargement...
La page est en cours de chargement...
La page est en cours de chargement...
La page est en cours de chargement...
La page est en cours de chargement...
La page est en cours de chargement...
La page est en cours de chargement...
La page est en cours de chargement...
La page est en cours de chargement...
La page est en cours de chargement...
La page est en cours de chargement...
La page est en cours de chargement...
La page est en cours de chargement...
La page est en cours de chargement...
La page est en cours de chargement...
La page est en cours de chargement...
-
 1
1
-
 2
2
-
 3
3
-
 4
4
-
 5
5
-
 6
6
-
 7
7
-
 8
8
-
 9
9
-
 10
10
-
 11
11
-
 12
12
-
 13
13
-
 14
14
-
 15
15
-
 16
16
-
 17
17
-
 18
18
-
 19
19
-
 20
20
-
 21
21
-
 22
22
-
 23
23
-
 24
24
-
 25
25
-
 26
26
-
 27
27
-
 28
28
-
 29
29
-
 30
30
-
 31
31
-
 32
32
-
 33
33
-
 34
34
-
 35
35
-
 36
36
-
 37
37
-
 38
38
-
 39
39
-
 40
40
-
 41
41
-
 42
42
-
 43
43
-
 44
44
-
 45
45
-
 46
46
-
 47
47
-
 48
48
-
 49
49
-
 50
50
-
 51
51
-
 52
52
-
 53
53
-
 54
54
-
 55
55
-
 56
56
-
 57
57
-
 58
58
-
 59
59
-
 60
60


Merlin POLARIS 400CP Manuel utilisateur
- Catégorie
- Jouets télécommandés
- Taper
- Manuel utilisateur
dans d''autres langues
- English: Merlin POLARIS 400CP User manual
- español: Merlin POLARIS 400CP Manual de usuario
- Deutsch: Merlin POLARIS 400CP Benutzerhandbuch
Documents connexes
Autres documents
-
Align RH70E06XT Le manuel du propriétaire
-
Align RH70E12XT Le manuel du propriétaire
-
-
-
-
-
SKY ROVER US858922 Knightforce 2.4GHz Radio Control Helicopter Manuel utilisateur
-
Alpha 858931 Red Sky Rover Knight Force Manuel utilisateur
-
Swann Air Duel Operating Instructions Manual
-
 LaTrax Alias Start Manual
