
06
10
30
www.krups.com

06
10
30
l
k
j
a
e
f
g
c
d
i
b
c (therm)
prog
1-3
h/min
AM
PM
h
prog
1-3
h/min
AM
PM
o
p
p
m
n
12
10
8
6
4
2

3
Instrucciones de uso
Garantía
Garantía de rendimiento
English 4
Français 15
Español 26
Instructions for Use
Warranty
Guarantee of Performance
Mode d’emploi
Garantie
Garantie de rendement
Art. FME1/FME2/FME4/FMF3/FMF4/FMF5
Sommaire.PM6.5 copie 4/12/06, 10:283

4
IMPORTANT SAFEGUARDS
When using electrical appliances, basic safety precautions should
always be followed to reduce the risk of fire, electric shock, and/or
injury to persons including the following :
1. Read all instructions.
2. Do not touch hot surfaces. Use handles or knobs.
3. To protect against fire, electric shock and injury to persons, do
not place cord, plugs or appliance in water or other liquid.
4. Close supervision is necessary when any appliance is used near
children. Keep appliance out of reach of children.
5. This appliance is not intended for use by persons (including
children) with reduced physical, sensory or mental capacities, or
lack of experience and knowledge, unless they have been given
supervision or instruction concerning use of the appliance by a
person responsible for their safety.Children should be
supervised to ensure that they do not play with the appliance.
6. Burns can occur from touching hot plate, hot metal parts, hot
water or steam. Exercise caution.
7. Unplug from outlet when not in use and before cleaning. Allow
to cool before putting on or taking off parts, before cleaning
the appliance, and before storing.
8. Do not operate any appliance with a damaged cord or plug or
after the appliance malfunctions, or has been damaged in any
manner. Return appliance to the nearest KRUPS Service Center
for examination, repair or adjustment.
9. The use of accessory attachments not recommended by KRUPS
may result in fire, electric shock or injury to persons.
10. Do not use outdoors.
11. Do not let cord hang over edge of table or counter, or touch hot
surfaces.
12. Do not place on or near a hot gas or electric burner, or in a
heated oven.
13. To disconnect, turn the control to «off» then remove plug from
wall outlet. Do not yank cord, instead grasp plug and pull to
disconnect.
English
NPA USA. PM6.5 copie 4/12/06, 10:264

5
14. Do not use the appliance for other than intended use.
15. Scalding may occur if the lid is removed during the brewing
cycles.
16. Do not pour liquids other than water and descaling solutions
specified in this manual into the water tank.
17. Do not pour cold water into the water reservoir immediately
after brewing. Allow the unit to cool down before refilling the
reservoir.
18. This appliance is intended for household use only.
To reduce the risk of injury, do not drape cord over the counter top
or table top where it can be pulled on by children or tripped over
unintentionally.
SAVE THESE INSTRUCTIONS
SHORT CORD INSTRUCTIONS
A. We do not recommend using an extension cord with this
device.
B. If an extension cord is absolutely necessary,
1) the marked electrical rating of the extension cord should be
at least as great as the electrical rating of the appliance,
2) the longer cord should be arranged so that it will not drape
over the counter top or table top where it can be pulled on by
children or tripped over.
C. This appliance has a polarized plug (one blade is wider than
other). To reduce risks of electric shock, this plug is intended to
fit into a polarized outlet only one way. If the plug does not fit
fully into the outlet, reverse the plug. If it still does not fit,
contact a qualified electrician. Do not attempt to modify the
plug in any way.
NPA USA. PM6.5 copie 4/12/06, 10:265

6
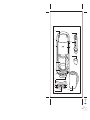
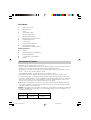
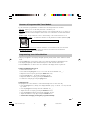
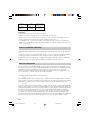
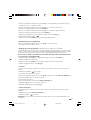
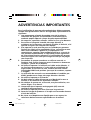
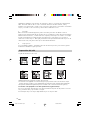
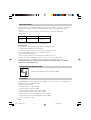
Description
a Water Reservoir Lid
b Water Reservoir
c Carafe
d Heating Plate / Base
e Water Level Indicator
f Swing Out Filter Basket
g Filter Basket Soft Release Button
h Programmable Clock
i Cord Storage
j Duo Filter Water Filtration
k Water Filtration Holder
l Water Filtration Change Indicator
Models with Timer
m On/Off
n Hours and Minutes Setting Button
o Programming Button
p 1-3 Cup Flavor Setting Button
q Display
Description of Features
• Water Reservoir : Lid flips back for easy access.
• Carafe : Both thermal and glass carafes are designed with drip free pour spout and ergonomic
handle for easy pouring. Thermal carafe has a heat resistant plastic base.
• Heating Plate : On glass models with timer the heating plate can be programmed to stay on
from 1 - 5 hours. The default setting is 2 hours.
• Swing Out Filter Basket : Use #4 paper filters or a permanent filter.
• Filter Basket Soft Release Button : Opens the filter holder to insert filter and add coffee.
•1-3 Cup Flavor Setting : For brewing smaller quantities while fully extracting the coffee flavor.
• “Duo Filter“ Water Filtration : Active vegtable based double acting anti-chlorine and anti-scale
filter. The anti-chlorine action of the filter brings out the most delicate flavors of the coffee.
The anti-scale action allows for longer periods between descaling.
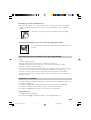
Note: There is a rotary indicator on the top of the water filter holder. This indicates when the
“Duo Filter” should be changed. Place the index mark next to the month the filter should be
changed, referring to the chart below.
Example: If you replace the “Duo Filter” in January (1) you should set the indicator to March (3)
or May (5), depending on the hardness of your local water supply: position the number 3 or 5
opposite the index mark.
Water type Uses Replace Duo filter every:
Soft water about 120 4 months
Hard water about 80 2 months
NPA USA. PM6.5 copie 4/12/06, 10:266

7
• Please note that the glass and the carafes are not interchangeable. Glass cannot be used with
thermal carafes...
Important:
• The “Duo Filter“must only be used with water.
• The coffee machine still functions if the water filter is not in place.
• If the coffee machine has not been used for more than one month, rinse the “Duo filter“
under running water.
• It is recommended not to leave the “Duo Filter“ in place for more than 5 months.
• Your appliance is designed for use with the carafe type (glass or thermal) it was purchased
with. Do not use thermal carafes on coffeemakers purchased with a glass carafe and vice versa.
Before First Use
• Run the coffee machine through one cycle with water only. Do not run with coffee or the
“Duo Filter”(j).
• Remove the“Duo Filter” from its plastic covering. Rinse it under tap water for 1 minute.
• Lift the water reservoir lid (a) and remove the water filtration holder (k).
• Unhinge the lower part of the holder and insert the “Duo Filter” into its housing.
• Replace the water filtration holder. The coffee machine is ready to use.
• The water filter holder and cartridge are located inside the water reservoir. Please
remove before filling water tank.
Making the Perfect Cup of Coffee
Making the perfect cup of coffee is something different for everyone. It is an art and a science,
that is not only effected by the coffee that is used, but also the equipment. The water, the
water temperature, the time the water is in contact with the coffee, the grind, the type of filter,
all play an important role in determining the flavor. Fine tuning these aspects is the art of
making the ultimate cup of coffee.
The four main principles :
1. The Water
It is important to use fresh water that you like. Since coffee is 98% water the taste of the water
will come through in the coffee. The Duo Filter system removes chlorine taste, but the better the
water you start with the better the flavor of the coffee.
2. The Coffee
Chose premium fresh whole beans suited to your taste. There are two principale species of
coffee: Arabica and Robusta. Arabica beans are the choice beans with more flavor and less
caffeine. Robusta beans have more caffeine and are more « robust » and are usually used in
blends. The origin of the beans and the roast will determine the flavor. Roasts vary from light to
very dark. Light roasts have a smooth, delicate aromatic taste, medium to medium dark roasts
NPA USA. PM6.5 copie 4/12/06, 10:267

8
are slightly stronger, with a full-bodied balanced taste, and dark roasts are bold with smoky
undertones.
3. The Grind
Use the proper grind finesse and grind just prior to brewing. The variation in the grind depends
on the type of filter you use. We prefer paper filters because they allow you to use a finer grind,
thus allowing a full extraction and more contact time with the water. Permanent filters require a
slightly coarser grind therefore the extraction rate is reduced. A general rule of thumb for
grinding is the longer the brew process the coarser the grind.
4. The Proportion
We recommend that you use 1 rounded Tbsp. of ground coffee per cup and modify the quantity
to suit your taste.
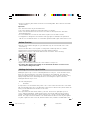
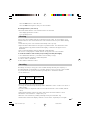
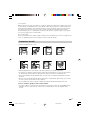
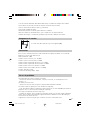
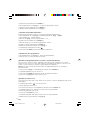
Making Coffee
• Follow the illustrations from 1 to 8.
• Use only cold water and a #4 filter paper or a permanent filter.
• The coffee maker is fitted with a drip-stop device, allowing you to serve coffee before the
water has finished running through. Replace the carafe quickly to avoid overflow.
• Do not exceed the maximum capacity of the water reservoir as shown by the water level
indicator (e).
• Place the ground coffee into the paper filter or directly into a permanent filter. After use,
discard the grounds, and rinse the filter basket under running water.
• It is normal for a small amount of steam to escape during the brewing cycle.
For models with thermal carafe:
• To ensure maximum heat retention, rinse the thermal carafe with HOT water before use, and
close the lid by turning clockwise.
To serve coffee depress the trigger (9).
1
3
1 x 4
5
6
7
1
2
4
1
0
8
6
4
2
9
7
5
3
2
10
prog
1-3
h/min
AM
PM
8
9
10
8
8
8
9
NPA USA. PM6.5 copie 4/12/06, 10:268

9
Features of Programmable Timer Models
If your model has a programmable clock/timer the following features are included:
. Auto On - Allows you to set the daily start time of the brew cycle.
.
Auto Off - Allows you to set the length of time the coffee machine will stay on. It can be set
from 1 to 5 hours for units with glass carafes and is set to 20 minutes for units with thermal
carafes.
.
Audible Signal - Beeps when the coffee is done brewing. This can be turned off or on.
. 1 - 3 Cup Flavor Setting : To extract the full flavor or the grinds from smaller quantities. (10)
Exercise caution with hot water and steam.
.
Electronic Limescale Detection - Indicates when the coffee machine needs to be descaled.
.
Empty Water Reservoir - Indicates when the water reservoir has not been filled and
automatically shuts off the coffee machine.
Programming Your Coffee Machine
• Plug in your appliance: the display will light up briefly in blue, blink “8888“ and then remain
fixed.
• Press the O/I button if you wish to make coffee without using the programmable mode.
• The display will light up in blue and alternately show “ON“ and the current time.
• Press the O/I button to shut off the coffee machine. The display will no longer be lit.
Setting and Adjusting the Clock
• The machine must be “off“.
• Press and hold the prog button (o) for 3 seconds: the hours will blink “88 _ _“.
• Adjust the hours in steps by pressing the h/min button (n).
• Press the prog button : the minutes will blink“ XX 88“.
• Adjust the minutes in steps by pressing the h/min button.
• Confirm the setting by pressing the prog button.
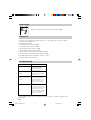
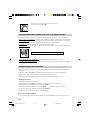
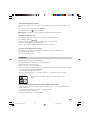
Setting Auto On
This programs the coffee machine to start automatically at the set time each day.
• Press the prog button (o) briefly : the display will blink “prog“ for about 1 second, followed
by “8888“.
• Press the prog button briefly: the hours will blink “88 _ _“.
• Adjust the hours in steps by pressing the h/min button (n).
• Press the prog button briefly: the minutes will blink “XX 88“.
• Adjust the minutes in steps by pressing the h/min button .
• Confirm the setting by pressing the prog button briefly:
prog
1-3
h/min
AM
PM
10
NPA USA. PM6.5 copie 4/12/06, 10:269

10
• The display (q) will show the time and a
“ “.
• Press the h/min button to cancel the programming. This will shut off the Auto On.
Changing the Programming
• Press the prog button (o) briefly : the current clock setting will blink.
• Now proceed as above.
Setting Auto Off (units with timer only)
On models with a glass carafe, the auto off can be set to shut the coffee machine off from 1 - 5
hours after the brew cycle is complete. The factory setting is 2 hours. On models with a thermal
carafe, the coffee machine shuts off after 20 minutes.
Note : On models without a timer the coffee machine must be turned off manually. It
will not automatically shut off.
• Press the prog button (o), immediately followed by the h/min button (n).
• The display will show the time setting.
• Press the h/min button in steps to set the auto off time.
• Press the prog button to confirm the setting.
Setting Audible signal
This function gives an audible signal when the coffee is ready. The factory setting is “On“.
• The display (q) will show
“
“
with the current time.
• To turn off the audible signal :
• Press prog button then the 1 - 3 cup button (p).
• The display will show “YES“: indicating the audible signal is on.
• To turn the audible signal off:
• Press the 1-3 cup button again.
• The display will show “NO“: the audible signal is off.
• Press prog button to confirm.
1 - 3 Cup Flavor Setting
This setting extracts the full flavor of the coffee when making small quantities.
• Press the 1-3 cup button (p).
• The display will show
“
“
with the current time.
Note: this function cannot be changed once the brew cycle has started.
Empty Water Reservoir
This feature automatically shuts off the coffee machine when the water reservoir has not been
filled.
• The display will show: “
“.
• Wait for the coffee maker to cool down (about 10 minutes) before filling the reservoir (a)
with water.
NPA USA. PM6.5 copie 4/12/06, 10:2610

11
• Press the O/I button to cancel the icon.
• Press the O/I button again to start your coffee machine.
Descaling Indicator (calc sensor)
This feature warns that the coffee machine needs to be descaled.
• The display (q) will show “CALC“.
• See descaling section.
Cleaning
Turn off the coffee machine and remove the plug from the outlet. Do not clean the coffee
machine when it is hot. Never immerse the coffee machine in water or put it under running
water.
• Clean the body of the coffee machine with a damp cloth or sponge.
• Open the filter holder and remove the paper or permanent filter. The filter holder can be
washed in warm soapy water and rinsed thoroughly, or cleaned in the upper rack of a
dishwasher.
• We recommend washing carafes by hand with a mild detergent.
• Do not use scouring agents or harsh cleansers on any part of the coffee machine.
To clean the stainless steel vacuum pot (according to model) thoroughly
1. Put a dishwasher tablet into your stainless steel vacuum pot (only).
2. Completely fill the vacuum pot with boiling water.
3. Leave to work for 10 minutes.
4. Rinse with hot water three times.
Descaling
Descaling is necessary to keep your coffee machine running efficiently. The frequency of
descaling depends on the hardness of your water and how often you use the coffee machine.
If you notice the brew cycle has slowed it is generally time to descale the machine.
See the chart below:
Type of Water Without Duo Filter With Duo Filter
Water Filtration Water filtration
Hard 40 uses 80 uses
Soft 80 uses 160 uses
• Before descaling, remove the filter holder (k).
• You may use either the Krups descaling solution diluted in 8 ounces of water or 8 ounces of
white vinegar.
• Pour the solution or vinegar into water reservoir (b) and start the coffee machine (without
coffee).
• Allow half the liquid to run into the carafe, then switch off and let stand for 1 hour.
• Restart the coffee machine to complete the cycle.
• Rinse the coffee machine by running it through 2 full cylces with water only.
• On the timer models if the display continues to read “CALC“ repeat the process again.
NPA USA. PM6.5 copie 4/12/06, 10:2611

12
Cord storage
Unused cord can be stored under the coffee maker. (12)
Accessories
Accessories can be purchased at many retail stores, or by calling your respective countries
consumer service department.
• Permanent filter: F049
• 12-cup glass carafe, black: F15B0G
• 12-cup glass carafe, white: F15B0H
• 10-cup thermal carafe , black: F15B0J
• 10-cup thermal carafe , white: F15B0K
• 10-cup stainless steel thermal carafe, black: F15B0P
• 10-cup stainless steel thermal carafe, white: F15B0Q
• Duo Filter water filtration cartridges - pack of 2 : F472
• Krups descaling solution : F054
Troubleshooting
PROBLEM SOLUTION
Coffee machine does not turn Check to ensure the appliance
on. is plugged into a working
outlet, and the appliance is
in the «ON» position.
Appliance appears to be Make sure that the water tank
leaking. has not been filled beyond the
max. fill level.
The thermal carafe does not For best results we recommend
keep the coffee hot long that you pre-heat your therm
enough. with HOT water just prior to
brewing. This will ensure the
hottest coffee for the longest
time.
Takes a long time to brew. It may be time to descale your
coffee maker. On timer models
you should see the words «CALC»
in the display. On non-timer
models you should descale every
40 to 80 uses depending on the
hardness of your water.
If your appliance still does not work, please call your respective countries consumer service
department.
12
NPA USA. PM6.5 copie 4/12/06, 10:2612

13
LIMITED WARRANTY
This Krups product is warranted for 1 year from the date of
purchase against defects in material and workmanship. During this
period, the Krups product that, upon inspection by Krups, is proved
defective, will be repaired or replaced, at Krups’ option, without
charge to the customer. If a replacement product is sent, it will
carry the remaining warranty of the original product. This warranty
does not apply to any defect arising from a buyer’s or user’s misuse
of the product, negligence, failure to follow Krups’ instructions, use
on current or voltage other than that stamped on the product,
wear and tear, alteration or repair not authorized by Krups, or use
for commercial purposes.
THE WARRANTIES SET FORTH HEREIN ARE EXCLUSIVE AND NO
OTHER WARRANTIES, EXPRESS OR IMPLIED, INCLUDING BUT NOT
LIMITED TO ANY WARRANTY OF MERCHANTABILITY OR FITNESS
FOR A PARTICULAR PURPOSE OR USE, ARE MADE BY KRUPS OR ARE
AUTHORIZED TO BE MADE WITH RESPECT TO THE PRODUCT.
Some states do not allow limitation on how long an implied
warranty lasts or do not allow the exclusion of incidental or
consequential damages, so the above limitations may not apply to
you. This warranty gives you specific legal rights, and you may
also have other rights, which vary from state to state.
If you believe your product is defective, bring the product (or send
it, postage prepaid) along with proof of purchase to the nearest
authorized Krups Service Center. (Please contact your respective
countries customer service department, indicated below, for the
address of the nearest authorized Krups Service Center.)
If you send the product, please include a letter explaining the
nature of the claimed defect.
NPA USA. PM6.5 copie 4/12/06, 10:2613

14
If you have additional questions, please call our Consumer Service
Department:
USA: 1-800-526-5377;
Mon – Fri 8:30 a.m. – 7:00 p.m. (EST).
www.KrupsUSA.com
Canada: 1-800-418-3325;
Mon – Fri 8:30 a.m. – 4:30 p.m. (EST)
www.Krups.ca
Please note hours are subject to change.
Before calling the Consumer Service Department, please have the type
number of your Krups appliance available. This will assist in answer your
questions. The type number is generally found on the bottom of the
machine. It would be helpful if you had the appliance available at the
time of your call.
General correspondence can be addressed to:
USA:
Krups
196 Boston Avenue
Medford, MA 02155
Only letters can be accepted at this address. Shipments and packa-
ges that do not have a return authorization number will be
refused.
Canada:
Groupe SEB Canada Inc.
455 Finchdene Square
Scarborough, Ontario M1X 1B7
NPA USA. PM6.5 copie 4/12/06, 10:2614

15
IMPORTANTES MISES EN
GARDE
Lors de l’utilisation d’appareils électroménagers il est essentiel de
respecter certaines précautions de base afin de réduire les risques
d’incendie, de choc électrique ou de blessures, notamment les
règles suivantes :
1. Lire attentivement le mode d’emploi avant la première
utilisation.
2. Ne pas toucher aux surfaces chaudes. Utiliser les poignées et
boutons.
3. Pour éviter les risques de feu, les chocs électriques ou les
blessures, n’immerger ni le cordon, ni la fiche, ni l’appareil dans
de l’eau ou un autre liquide.
4. Une étroite surveillance s’impose quand l’appareil est utilisé par
ou à proximité d’enfants. Garder l’appareil hors de leur portée.
5. Cet appareil n’est pas prévu pour être utilisé par des personnes
(y compris les enfants) dont les capacités physiques, sensoriel-
les ou mentales sont réduites ou des personnes dénuées d’ex-
périence ou de connaissance, sauf si elles ont pu bénéficier, par
l’intermédiaire d’une personne responsable de leur sécurité,
d’une surveillance ou d’instructions préalables concernant
l’utilisation de l’appareil. Il convient de surveiller les enfants
pour s’assurer qu’ils ne jouent pas avec l’appareil.
6. Ne pas toucher à la plaque chaude, aux pièces de métal chau-
des, à l’eau chaude ou à la vapeur; cela pourrait occasionner
des brûlures. Faire preuve de prudence.
7. Débrancher l’appareil quand il ne sert pas et avant de le net-
toyer. Le laisser refroidir avant d’y installer ou d’y enlever des
pièces, avant de le nettoyer et avant de le ranger.
8. Ne pas utiliser l’appareil si la fiche ou le cordon sont endomma-
gés, s’il ne fonctionne pas correctement, s’il est tombé ou a été
endommagé de quelque façon que se soit. Dans ce cas, le
retourner au centre de service autorisé KRUPS le plus proche
pour le faire examiner, réparer ou régler.
9. L’utilisation d’accessoires non recommandés par KRUPS peut
entraîner un feu, un choc électrique ou une blessure.
10. Ne pas utiliser l’appareil à l’extérieur.
11. Ne pas laisser le cordon pendre du bord de la table ou du
comptoir, ni toucher à des surfaces chaudes.
12. Ne pas placer l’appareil sur ou à proximité d’une plaque
électrique ou d’une cuisinière à gaz, ni dans un four chaud.
Français
NPA USA. PM6.5 copie 4/12/06, 10:2615

16
13. Veiller à ce que l’appareil soit hors circuit (off) avant de le dé-
brancher ou de le brancher. Ne pas tirer sur le cordon; saisir
plutôt la fiche et tirer doucement pour débrancher.
14. N’utiliser l’appareil qu’aux fins prévues.
15. Il y a risque de brûlures si le couvercle est enlevé pendant le
cycle d’infusion.
16. Ne verser dans le réservoir que de l’eau et les solutions de
détartrage spécifiées dans le manuel.
17. Ne jamais verser d’eau froide dans le réservoir immédiatement
après le cycle d’infusion. Laisser refroidir l’appareil avant de
remplir à nouveau le réservoir.
18. Cet appareil est réservé à un usage domestique.
Pour réduire les risques de blessures, ne jamais laisser pendre le
cordon le long du comptoir ou de la table, où il pourrait être
tiré par un enfant ou faire trébucher quelqu’un.
CONSERVER CES
INSTRUCTIONS
INSTRUCTIONS POUR LE
CORDON D’ALIMENTATION
A. Nous déconseillons l’utilisation d’une rallonge avec cet appareil.
B. Si une rallonge s’avère néanmoins nécessaire.
1) Sa capacité électrique doit être égale ou supérieure à celle de
l’appareil.
2) La rallonge devra être placée de façon à ne pas pendre le long
du comptoir ou de la table, où elle pourrait être tirée par un
enfant ou faire trébucher quelqu’un.
D. L’appareil est doté d’une fiche polarisée (une lame est plus large
que l’autre). Pour réduire les risques de choc électrique, cette
fiche ne s’enfonce dans une prise polarisée que d’une seule
façon. Si la fiche n’entre pas bien dans la prise, la retourner. Si
elle n’y entre toujours pas, contacter un électricien. Ne tenter en
aucun cas de modifier la prise.
NPA USA. PM6.5 copie 4/12/06, 10:2616

17
Description
a Couvercle du réservoir
b Réservoir à eau
c Carafe
d Plaque chauffante
e Indicateur du niveau d’eau
f Porte filtre pivotant
g Commande d’ouverture du porte filtre pivotant
h Horloge programmable
i Logement du cordon
j Système de filtration de l’eau Duo Filter
K Support pour filtre à eau Duo Filter
l Témoin de changement du filtre Duo Ffilter
Modèle avec minuteur
m Marche/arrêt
n Touche de réglage des heures et minutes
o Touche de programmation
p Touche de sélection d’arômes
q Afficheur
Description des caractéristiques
• Réservoir à eau : le couvercle s’ouvre vers l’arrière pour un accès facile.
• Carafe : les carafes en verre ou isolante sont dotées d’un mécanisme anti-gouttes et d’une
poignée ergonomique, pour faciliter le service.
• Plaque chauffante : sur les modèles avec minuteur et carafe en verre, il est possible de
programmer la plaque pour garder le café au chaud de 1 à 5 heures. La programmation par
défaut est de 2 heures.
• Porte filtre pivotant : utiliser des filtres papier n° 4 ou un filtre permanent.
• Commande d’ouverture du porte filtre pivotant : pour ouvrir le porte filtre pour y placer le filtre
et le café.
• Touche de sélection d’arômes : pour préparer de plus petites quantités, tout en profitant de la
pleine saveur du café.
• Système de filtration de l’eau Duo Filter : filtre végétal double action anti-chlore et anti-tartre.
L’action anti-chlore du filtre révèle les arômes les plus délicats du café. L’action anti-tartre
permet d’espacer les opérations de détartrage.
Remarque : Un indicateur rotatif est situé sur la partie supérieure du support pour filtre. Il
rappelle quand changer le Duo Filter : placer le chiffre indiquant le mois du prochain change-
ment du Duo Filter en face de l’indicateur, en se référant au tableau ci-dessous.
Exemple : Si le Duo Filter a été remplacé en janvier (1), il devrait être à nouveau changé en mars
(3) ou en mai (5), dépendant de la teneur en calcaire de l’eau : placer le chiffre 3 ou 5 en face de
l’indicateur.
NPA USA. PM6.5 copie 4/12/06, 10:2617

18
Type d’eau Cycles Remplacer le Duo
filter à tous les
Eau douce environ 120 4 mois
Eau dure environ 80 2 mois
Important :
• Le Duo Filter ne doit être utilisé qu’avec de l’eau.
• L’absence de filtre n’empêche pas le fonctionnement de la cafetière.
• Rincer à l’eau courante le Duo Filter si la cafetière n’a pas été utilisée depuis plus d’un mois.
• Il est conseillé de ne pas laisser le Duo Filter en place plus de 5 mois.
• Cet appareil a été conçu pour fonctionner avec le type de carafe (en verre ou isolante) avec
lequel il a été vendu. Ne pas utiliser la carafe isolante avec la cafetière munie d’une carafe en
verre, et vice-versa.
Avant la première utilisation
• Faire fonctionner une première fois la cafetière avec 1l d’eau, sans mouture et sans Duo Filter
(j).
• Sortir le Duo Filter de son sachet plastique. Le rincer sous l’eau du robinet pendant 1 minute.
• Soulever le couvercle (a) du réservoir de la cafetière et retirer le support pour filtre (k).
• Faire pivoter la partie inférieure de ce support et introduire le Duo Filter dans son logement.
• Replacer le support pour filtre dans la cafetière : la cafetière est prête à l’emploi.
Pour un café parfait
Ce qui constitue un café parfait change d’une personne à l’autre. Faire un café parfait est à la
fois un art et une science, dont les résultats dépendent non seulement du café utilisé mais aussi
du matériel. L’eau, la température de l’eau, la durée de contact entre l’eau et le café, la
mouture et le filtre jouent tous un rôle important au niveau de la saveur. Le réglage précis de
tous ces éléments… voilà sur quoi repose l’art du café parfait.
Les quatre grandes règles de base sont les suivantes :
1. L’eau
Il est important d’utiliser une eau douce dont on apprécie le goût. Puisque le café est constitué
à 98 % d’eau, le goût de l’eau influencera le goût du café. Le système de filtration de l’eau Duo
Filter élimine le goût de chlore, mais plus l’eau est de bonne qualité, meilleur sera le café.
2. Le café
Choisir des grains frais de première qualité, selon les goûts de chacun. Il existe deux principaux
types de café : l’arabica et le robusta. Les grains arabica sont des grains de première qualité, qui
contiennent davantage de saveur et moins de caféine. Les cafés robusta contiennent davantage
de caféine et offrent un goût plus âcre, et sont en règle générale utilisés dans les mélanges.
L’origine et la torréfaction du café en détermineront la saveur. La torréfaction varie de claire à
très foncée. La torréfaction claire produit un café doux, au goût délicatement aromatisé. La
torréfaction moyenne offre un goût légèrement plus fort et corsé, bien équilibré. La torréfaction
foncée procure un café au goût beaucoup plus prononcé avec des arrière-goûts de fumée.
8
9
NPA USA. PM6.5 copie 4/12/06, 10:2618

19
3. La mouture
Utiliser la bonne grosseur de mouture et moudre les grains juste avant de les utiliser. La grosseur
de la mouture sera déterminée par le type de filtre utilisé. Nous préférons les filtres papier, parce
qu’ils permettent d’utiliser une mouture plus fine, pour une meilleure extraction de la saveur et
un contact prolongé entre l’eau et le café. Les filtres permanents nécessitent une mouture
légèrement plus grosse, ce qui diminue l’extraction des arômes. En général, plus le cycle d’infu-
sion est long, plus grosse sera la mouture.
4. Les proportions
Nous recommandons une cuillère à table comble de café moulu par tasse (soit 6 à 7 grammes de
café); ces quantités pourront être modifiées selon les goûts de chacun.
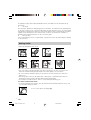
Préparation du café
• Suivre les illustrations de 1 à 8.
• Utiliser uniquement de l’eau froide et un filtre papier n°4 ou un filtre permanent.
• La cafetière est équipée d’un mécanisme anti-gouttes permettant de se servir un café avant la
fin du passage de l’eau. Replacer rapidement la carafe pour éviter tout débordement.
• Respecter la quantité d’eau maximale dans le réservoir en se référant à l’indicateur de niveau
d’eau (e).
• Placer le café moulu directement dans le filtre papier ou permanent. Après usage, jeter le marc
de café et rincer le porte filtre à l’eau courante.
• Il est normal qu’un peu de vapeur s’échappe de l’appareil durant la préparation du café.
Pour les cafetières équipées d’une carafe isolante :
• Pour une meilleure conservation de la chaleur, rincer la carafe isolante à l’eau CHAUDE avant
utilisation et visser fermement le couvercle en le tournant dans le sens des aiguilles d’une
montre.
1
3
1 x 4
5
6
7
1
2
4
10
8
6
4
2
9
7
5
3
2
prog
1-3
h/min
AM
PM
8
NPA USA. PM6.5 copie 4/12/06, 10:2619

20
•Pour servir le café, appuyer sur le bouton placé
au-dessus de la poignée (9).
Caractéristiques des modèles avec minuteur programmable
Les modèles équipés d’une horloge/minuteur programmable offrent les fonctions suivantes :
. Mise en marche automatique - Permet de programmer à l’avance le début du cycle d’infusion.
.
Arrêt automatique - Pour que la cafetière s’arrête automatiquement au bout de 1 à 5 heures
(modèle avec carafe en verre) ou 20 minutes (modèle avec carafe isolante).
.
Signal sonore - Indique quand le café est prêt. Peut être inactivé.
. Sélecteur d’arômes - Pour extraire toute la saveur du café, même avec de petites quantités de
mouture (10).
Faire preuve de prudence; eau très chaude et vapeur.
.
Détection électronique d’entartrage - Indique quand un détartrage est nécessaire.
. Détection de réservoir d’eau vide - Indique que le réservoir d’eau n’a pas été rempli et arrête
automatiquement la cafetière.
Programmation de la cafetière
• Brancher l’appareil : l’afficheur s’éclaire briévement en bleu, affiche en clignotant 8888, puis
reste fixe.
• Appuyer sur la touche O/I pour préparer du café sans utiliser le mode programmable.
• L’afficheur s’éclaire en bleu et affiche en alternance ON et l’heure.
• Appuyer sur la touche 0/I pour arrêter la cafetière. L’afficheur n’est plus éclairé.
• Réglage de l’heure
• L’appareil doit être en mode «arrêt».
• Appuyer sur la touche prog (o) pendant 3 secondes : les heures clignotent 88 _ _.
• Régler les heures par impulsions sur la touche h/min(n).
• Donner une impulsion rapide sur la touche prog (o) : les minutes clignotent XX 88.
• Régler les minutes par impulsions sur la touche h/min (n).
• Valider par une impulsion rapide sur la touche prog (o).
Mise en marche automatique
Cette fonction permet à la cafetière de démarrer automatiquement à heure fixe tous les jours.
10
prog
1-3
h/min
AM
PM
9 ,
10
NPA USA. PM6.5 copie 4/12/06, 10:2620
La page est en cours de chargement...
La page est en cours de chargement...
La page est en cours de chargement...
La page est en cours de chargement...
La page est en cours de chargement...
La page est en cours de chargement...
La page est en cours de chargement...
La page est en cours de chargement...
La page est en cours de chargement...
La page est en cours de chargement...
La page est en cours de chargement...
La page est en cours de chargement...
La page est en cours de chargement...
La page est en cours de chargement...
La page est en cours de chargement...
La page est en cours de chargement...
La page est en cours de chargement...
La page est en cours de chargement...
-
 1
1
-
 2
2
-
 3
3
-
 4
4
-
 5
5
-
 6
6
-
 7
7
-
 8
8
-
 9
9
-
 10
10
-
 11
11
-
 12
12
-
 13
13
-
 14
14
-
 15
15
-
 16
16
-
 17
17
-
 18
18
-
 19
19
-
 20
20
-
 21
21
-
 22
22
-
 23
23
-
 24
24
-
 25
25
-
 26
26
-
 27
27
-
 28
28
-
 29
29
-
 30
30
-
 31
31
-
 32
32
-
 33
33
-
 34
34
-
 35
35
-
 36
36
-
 37
37
-
 38
38


Krups FME214 Manuel utilisateur
- Catégorie
- Cafetières
- Taper
- Manuel utilisateur
dans d''autres langues
- English: Krups FME214 User manual
- español: Krups FME214 Manual de usuario
Documents connexes
-
Krups FMF7 Le manuel du propriétaire
-
-
Krups FME2 Le manuel du propriétaire
-
-
-
-
-
-
