
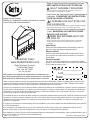
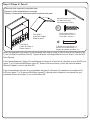
JUNE 7, 2016, 26783 , R0 ©2016 DELTA ENTERPRISE CORP.
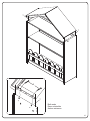
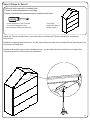
Happy Home Storage
Meuble de rangement amusant en forme de maison
Casa Feliz para almacenamiento
Consumer Care:
www.DeltaChildren.com
Delta Children’s Products
114 West 26th Street
New York, NY 10001
Tele.212-645-9033
Need Help?
Please visit www.DeltaChildren.com/assembly-videos to
watch our easy and effective assembly videos
Besoin d’aide?
Veuillez visiter www.DeltaChildren.com/assembly-videos
pour regarder nos vidéos faciles et efficaces concernant
l’assemblage
Necesita ayuda?
Por favor, visite www.DeltaChildren.com/assembly-videos
para que vea nuestros videos que muestran como ensamblar
de una manera efectiva y fácil.
Style #:
Lot:
Date:
___________
___________
___________
A
REV
Read all instructions before assembly and use.
KEEP INSTRUCTIONS FOR FUTURE USE.
ADULT ASSEMBLY REQUIRED
Due to the presence of small parts during assembly, keep out of
reach of children until assembly is complete.
Lisez toutes les instructions avant l’assemblage et
l’utilisation. CONSERVEZ LES INSTRUCTIONS
POUR UN USAGE ULTERIEUR.
L’ASSEMBLAGE DOIT ETRE FAIT
PAR UN ADULTE
A cause de la presence de petites pieces, pendant l’assemblage gardez
hors de portee des enfants jusqu'a ce que celui-ci soit termine.
Lea todas las instrucciones antes de ensamblar
y usar. MANTENGA LAS INSTRUCCIONES
PARA SU USO FUTURO.
DEBE SER ENSAMBLADO POR
UN ADULTO
Debido a la presencia de piezas pequeñas durante el ensamblaje,
mantenga fuera del alcance de los niños hasta que complete el
ensamblaje.
When contacting Delta Consumer Care please reference the above information. Before contacting Delta Consumer Care
please ensure that the information above matches the information found on the label on the Back Triangle Panel, please
reference the information found on the product when contacting Delta Consumer Care.
Lorsque vous contactez le Service client de Delta, veuillez faire référence aux informations ci-dessus. Avant de contacter le
Service client de Delta, veuillez vous assurer que les informations ci-dessus correspondent aux informations indiquées sur
l’étiquette qui se trouve sur panneau triangulaire arrière; veuillez faire référence aux informations indiquées sur le produit
lorsque vous contactez le Service client de Delta.
Al contactar al servicio al cliente de Delta, entregue la información anteriormente mencionada. Antes de contactar al servicio
de atención al cliente de Delta, asegúrese de que la información anteriormente mencionada calza con la que aparece en la
etiqueta en panel triangular trasero; al contactar al centro de atención al cliente de Delta, mencione la información que
aparece en el producto.
To register your product for important safety alerts and updates to your product please visit www.DeltaChildren.com and click
on Product Registration.
Pour enregistrer votre produit afin de recevoir des alertes de sécurité et des mises à jour importantes relatives à votre
produit, veuillez visiter le site www.DeltaChildren.com, puis cliquer sur Enregistrement de produits.
Para registrar su producto a fin de recibir importantes alertas y actualizaciones de seguridad, visite www.DeltaChildren.com y
haga clic en Registro de Productos (Product Registration).
This product is not intended for institutional or commercial use.
Ce produit ne pas destine a un usage institutionnel ou commercial.
Este producto no esta hecho para uso institucional o comercial.

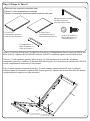
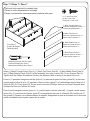
NOTES ON ASSEMBLY:
-During the assembly process whenever using screws or bolts, check each by placing the screw/bolt
on the diagram of the item which is drawn actual size and design. Be sure to use the proper size and
shape specified in the instructions.
-To assemble this unit you may be required to place the unit on it’s side and face. It is strongly
recommended that assembly is done on a soft, non-abrasive surface (such as the foam packing wrap)
to avoid damaging the finish.
NOTES ON CARE AND MAINTENANCE:
- Do not scratch or chip the finish.
- Inspect the product periodically, contact Delta Children's Products for replacement parts or questions.
- Do not store the product or any parts in extreme temperatures and conditions such as a hot attic or a
damp, cold basement. These extremes can cause a loss of structural integrity.
-To preserve the luster of the high quality finish on your product, it is recommended to place a doily or
felt pad under any items you place on the finish.
-Clean with a damp cloth, then a dry cloth to preserve the original luster and beauty of this fine finish.
-Do not use abrasive chemicals.
-Do not spray cleaners directly onto furniture.
-Lift slightly when moving on carpeting to prevent leg breakage.
-Use of a vaporizer near furniture will cause wood to swell and finish to peel.
2
REMARQUES SUR L’ASSEMBLAGE :
-Lors de l’assemblage, quand vous utilisez vis ou boulons, verifiez chaque piece en placant le vis/boulon
sur le diagramme de la piece concernee qui est dessine en taille et forme reelle. Assurez vous d’utiliser
la taille et la forme exacte comme il est specifie dans les instructions.
-Pour assembler cet element vous pourriez avoir besoin de le placer sur le cote lateral et sur le cote
frontal. Il est fortement recommandé de faire l’assemblage sur une surface lisse, non abrasive (comme
le film mousse de l'emballage)pour eviter d’endommager les finitions.
REMARQUES SUR LE SOIN ET L’ENTRETIEN :
-Ne pas rayer ou ebrecher la finition.
-Examinez de pres le produit regulierement, contactez Delta Children’s Products pour les pieces de
rechange ou pour poser des questions.
-Ne pas ranger le produit ou des pieces a des temperatures extremes ou dans des conditions comme
un grenier chaud ou une cave froide et humide. Ces extremes peuvent causer une perte de l’integrite de
la structure du produit
-Pour préserver le lustre original et la beauté de ce fini raffiné nettoyer avec un chiffon humide, puis un
chiffon sec.
-Ne pas utiliser des produits chimiques abrasifs
-Ne pas pulveriser un nettoyant directement sur le meuble, pulveriser sur le torchon et puis appliquer
sur le meuble. Testez le produit nettoyant sur un endroit discret avant de l’utiliser sur la totalite du
meuble
-Lors d’un deplacement sur une moquette ou tapis, soulevez legerement le meuble pour eviter de
casser les pieds.
-L’utilisation d’un vaporisateur pres du meuble causera le gonflement du bois et l’ecaillage de la finition.
La page est en cours de chargement...

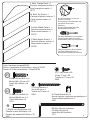
C. Left Side x 1
Côté gauche x 1
Lado izquierdo x 1
26770
4
E. Top Shelf x 2
Tablette supérieur x 2
Estante superior x 2
26772
F. Bottom Shelf x 1
Tablette inférieur x 1
Estante inferior x 1
26773
D. Right Side x 1
Côté droit x 1
Lado derecho x 1
26771
A. Left Top x 1
Côté supérieur gauche x 1
Parte superior izquierda x 1
26768
B. Right Top x 1
Côté supérieur droit x 1
Parta superior derecho x 1
26769
G. Back Shelf Rail x 2
Barre arrière de tablette x 2
Barra trasera del estante x 2
26774
H. Middle Rail x 1
Barre centrale x 1
Barra central x 1
26775
J. Front Rail x 1
Barrière frontale x 1
Barra Frontal x 1
26776
K. Wedge Block x 1
Barre triangulaire x 1
Cuña de bloqueo x 1
26781
PARTS: MAKE SURE THAT ALL PRE-ASSEMBLED PARTS ARE TIGHT
PIÈCES : VÉRIFIEZ QUE TOUTES LES PIÈCES PRÉ-MONTÉES SONT BIEN SERRÉES.
PIEZAS: ASEGÚRESE DE QUE TODAS LAS PIEZAS PRE-ENSAMBLADAS ESTÁN BIEN APRETADAS.

5
Parts: Hardware kits part#26782
Pièces: L'ensemble de quincaillerie - pièce n°26782
Piezas: El kit de herramientas - Pieza #26782
R. M6 x 30 mm Bolt x 19
Boulon M6 x 30 mm x 19
Perno M6 x 30mm x 19
5463
M4 Allen Wrench (included)
Clé Allen M4 (inclus)
Llave Allen M4 (incluido)
1177
Flat Head Screwdriver (not supplied)
Tournevis à tête plate (non fourni)
Destornillador plano (no suministrado)
Phillips Screwdriver (Not Provided)
Tournevis’Phillips’(Non Prévu)
Destornillardor’Phillips’(No incluido)
No drills necessary. Do not use
power screwdriver.
Aucun forage n’est nécessaire. Ne
pas utiliser de tournevis
électrique.
No hace falta taladrar No utilice
destornilladores eléctricos
L. Back Triangle Panel x 1
Panneau triangulaire arrière x 1
Panel triangular trasero x 1
26777
M. Back Top Panel x 1
Panneau supérieur arrière x 1
Panel superior trasero x 1
26778
N. Back Middle Panel x 1
Panneau central arrière x 1
Panel central trasero x 1
26779
P. Back Bottom Panel x 1
Panneau inférieur arrière x 1
Panel inferior trasero x 1
26780
S. M6 x 18 mm Bolt x 4
Boulon M6x18 mm x 4
Perno M6x18mm x 4
5763
T. Φ6x30 mm Wood Dowel x 32
Cheville en bois Φ6x30mm x 32
Pasador de madera Φ6x30mm x 32
4491
U. 17 mm Screw x 28
Vis de 17 mm x 28
Tornillo de 17 mm x 28
5955
V. 50 mm Screw x 4
Vis de 50 mm x 4
Tornillo de 50 mm x 4
5954
W. Plastic Barrel Nut x 4
écrous à portée cylindrique en plastique x 4
Tuerca cilíndrica plástica x 4
5497

M4 Allen Wrench (included)
Clé Allen M4 (inclus)
Llave Allen M4 (incluido)
Parts and tools required to complete step
Pièces et outils nécessaires au montage
Piezas y herramientas necesarias para completar este paso
6
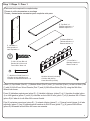
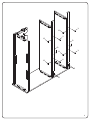
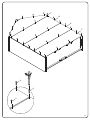
Step 1 / Étape 1 / Paso 1
C. Left Side x 1
Côté gauche x 1
Lado izquierdo x 1
Attach (2) Top Shelfs (Part E), (1) Bottom Shelf (Part F) and (1) Front Rail (Part J) to the Left Side (Part
C) with (8) Φ6x30 mm Wood Dowels (Part T) and (8) M6x30mm Bolts (Part R) using the M4 Allen
Wrench as shown.
Fixez (2) tablettes supérieures (pièce E), (1) tablette inférieure (pièce F) et (1) barrière frontale (pièce
J) au côté gauche (pièce C) avec (8) chevilles en bois Φ6x30 mm (pièce T) et (8) boulons M6 x 30mm
(pièce R) à l’aide de la clé Allen M4 comme illustré.
Fijar (2) estantes superiores (pieza E), (1) estante inferior (pieza F) y (1) barra frontal (pieza J) al lado
izquierdo (pieza C) con (8) pasadores de madera de Φ6x30 mm (pieza T) y (8) pernos M6x30mm
(pieza R) utilizando la llave Allen M4 como se muestra.
E. Top Shelf x 2
Tablette supérieur x 2
Estante superior x 2
F. Bottom Shelf x 1
Tablette inférieur x 1
Estante inferior x 1
R. M6 x 30 mm Bolt x 8
Boulon M6 x 30 mm x 8
Perno M6 x 30mm x 8
T. Φ6x30 mm Wood Dowel x 8
Cheville en bois Φ6x30mm x 8
Pasador de madera Φ6x30mm x 8
J. Front Rail x 1
Barrière frontale x 1
Barra Frontal x 1
La page est en cours de chargement...

G. Back Shelf Rail x 2
Barre arrière de tablette x 2
Barra trasera del estante x 2
From Step 1
À partir de l’étape 1
Desde el paso 1
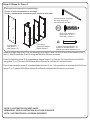
Parts and tools required to complete step
Pièces et outils nécessaires au montage
Piezas y herramientas necesarias para completar este paso
8
Step 2
Étape 2
Paso 2
Lay the Left Side on the floor. Attach (2) Back Shelf Rails (Part G) to the assembly from step 1 using (4)
Φ6x30 mm Wood Dowels (Part T), (4) 50 mm Screws (Part V) and (4) Plastic Barrel Nuts (Part W). Use
the Flat Head Screwdriver to hold the Plastic Barrel Nut in the proper alignment. Tighten with the Phillips
Screwdriver.
Posez le côté gauche sur le sol. Fixez (2) barres arrière de tablette (pièce G) à l’assemblage depuis
l’étape 1 à l’aide de (4) chevilles en bois Φ6x30 mm (pièce T), (4) vis 50mm (pièce V) et (4) écrous à
portée cylindrique (pièce W). Utilisez le tournevis à tête plate pour tenir l’écrou à portée cylindrique en
plastique dans le bon alignement. Serrez avec un tournevis Phillips.
Colocar el lado izquierdo en el piso. Fijar (2) barras traseras del estante (pieza G) al ensamblado del
paso 1 utilizando (4) pasadores de madera de Φ6x30 mm (pieza T), (4) tornillos de 50 mm (pieza V) y
(4) tuercas cilíndricas plásticas (pieza W). Utilizar el destornillador de cabeza plana para mantener la
tuerca cilíndrica plástica debidamente alineada. Apretar con el destornillador de estrella.
Phillips Screwdriver (Not Provided)
Tournevis’Phillips’(Non Prévu)
Destornillardor’Phillips’(No siempre)
V. 50 mm Screw x 4
Vis de 50 mm x 4
Tornillo de 50 mm x 4
W. Plastic Barrel Nut x 4
écrous à portée cylindrique en plastique x 4
Tuerca cilíndrica plástica x 4
T. Φ6x30 mm Wood Dowel x 4
Cheville en bois Φ6x30mm x 4
Pasador de madera Φ6x30mm x 4
La page est en cours de chargement...

H
T
T
Parts and tools required to complete step
Pièces et outils nécessaires au montage
Piezas y herramientas necesarias para completar este paso
10
Step 3
Étape 3
Paso 3
From Step 2
À partir de l’étape 2
Desde el paso 2
Attach the Middle Rail (Part H) to the Left Side (Part C) using (2) Φ6x30 mm Wood Dowels (Part T).
Fixez la barre centrale (pièce H) au côté gauche (pièce C) à l’aide de (2) chevilles en bois Φ6x30 mm
(pièce T)
Fijar la barra central (pieza H) al lado izquierdo (pieza C) utilizando (2) pasadores de madera de Φ6x30
mm (pieza T).
T. Φ6x30 mm Wood Dowel x 2
Cheville en bois Φ6x30mm x 2
Pasador de madera Φ6x30mm x 2
H. Middle Rail x 1
Barre centrale x 1
Barra central x 1

From Step 3
À partir de l’étape 3
Desde el paso 3
M4 Allen Wrench (included)
Clé Allen M4 (inclus)
Llave Allen M4 (incluido)
Parts and tools required to complete step
Pièces et outils nécessaires au montage
Piezas y herramientas necesarias para completar este paso
11
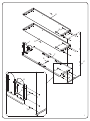
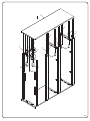
Step 4 / Étape 4 / Paso 4
Attach the Right Side (Part D) to the assembly from step 3 with (14) Φ6x30 mm Wood Dowels (Part T)
and (7) M6x30 mm Bolts (Part R) using the M4 Allen Wrench as shown.
Fixez le côté droit (pièce D) à l’assemblage depuis l’étape 3 à l’aide de (14) chevilles en bois Φ6x30
mm (pièce T) et (7) boulons M6X30mm (pièce R) avec la clé Allen M4 comme illustré.
Fijar el lado derecho (pieza D) al ensamblado del paso 3 con (14) pasadores de madera de Φ6x30 mm
(pieza T) y (7) pernos M6x30mm (pieza R) utilizando la llave Allen M4 como se muestra.
R. M6 x 30 mm Bolt x 7
Boulon M6 x 30 mm x 7
Perno M6 x 30mm x 7
T. Φ6x30 mm Wood Dowel x 14
Cheville en bois Φ6x30mm x 14
Pasador de madera Φ6x30mm x 14
D. Right Side x 1
Côté droit x 1
Lado derecho x 1
NOTE: ILLUSTRATION ON NEXT PAGE.
REMARQUE: VOIR ILLUSTRATION À LA PAGE SUIVANTE.
NOTA: ILUSTRACIÓN EN LA PÁGINA SIGUIENTE.
La page est en cours de chargement...

M4 Allen Wrench (included)
Clé Allen M4 (inclus)
Llave Allen M4 (incluido)
Parts and tools required to complete step
Pièces et outils nécessaires au montage
Piezas y herramientas necesarias para completar este paso
13
Step 5 / Étape 5 / Paso 5
Attach (1) Left Top (Part A) and (1) Right Top (Part B) to (1) Wedge Block (Part K) using (4) M6x18 mm
Bolts (Part S), Tighten with the M4 Allen Wrench. DO NOT completely tighten the bolts at this time.
Fixez le (1) côté supérieur gauche (pièce A) et le (1) côté supérieur droit (pièce B) à la barre
triangulaire (pièce K) à l’aide de (4) boulons M6X18mm (pièce S). Serrez avec la clé Allen M4. NE PAS
serrer complètement les boulons à cette étape.
Fijar (1) parte superior izquierda (pieza A) y (1) parte superior derecha (pieza B) con (1) cuña de
bloqueo (pieza K) utilizando (4) pernos M6x18 mm (pieza S). Apretar con la llave Allen M4. NO apriete
completamente los pernos en este momento.
S. M6 x 18 mm Bolt x 4
Boulon M6x18 mm x 4
Perno M6x18mm x 4
S
B
S
S
S
K
A
A. Left Top x 1
Côté supérieur gauche x 1
Parte superior izquierda x 1
B. Right Top x 1
Côté supérieur droit x 1
Parta superior derecho x 1
K. Wedge Block x 1
Barre triangulaire x 1
Cuña de bloqueo x 1

From Step 4
À partir de l’étape 4
Desde el paso 4
From Step 5
À partir de l’étape 5
Desde el paso 5
M4 Allen Wrench (included)
Clé Allen M4 (inclus)
Llave Allen M4 (incluido)
Parts and tools required to complete step
Pièces et outils nécessaires au montage
Piezas y herramientas necesarias para completar este paso
14
Step 6 / Étape 6 / Paso 6
Attach the assembly from step 5 to the assembly from step 4 using (4) Φ6x30 mm Wood Dowels (Part
T) and (4) M6x30 mm Bolts (Part R). Tighten all bolts, including those left loose in Step 5, with the M4
Allen Wrench.
Fixez l’assemblage de l’étape 5 à l’assemblage de l’étape 4 à l’aide de (4) chevilles en bois Φ6x30 mm
(pièce T) et (4) boulons M6x30mm (pièce R). Serrez tous les boulons y inclus les boulons laissés
lâches à l’étape 5, avec la clé Allen M4
Fijar el ensamblado del paso 5 al ensamblado del paso 4 utilizando (4) pasadores de madera de Φ
6x30 mm (pieza T) y (4) pernos M6x30mm (pieza R). Apretar odos los pernos, incluyendo los que
quedaron sueltos en el paso 5, con la llave Allen M4.
R. M6 x 30 mm Bolt x 4
Boulon M6 x 30 mm x 4
Perno M6 x 30mm x 4
T. Φ6x30 mm Wood Dowel x 4
Cheville en bois Φ6x30mm x 4
Pasador de madera Φ6x30mm x 4

T
T
T
T
T
15
Both ends
Deux extrémités
Ambos extremos
R

From Step 6
À partir de l’étape 6
Desde el paso 6
Parts and tools required to complete step
Pièces et outils nécessaires au montage
Piezas y herramientas necesarias para completar este paso
16
Step 7 / Étape 7 / Paso 7
Attach (1) Back Triangle Panel (Part L), (1) Back Top Panel (Part M), (1) Back Middle Panel (Part N)
and (1) Back Bottom Panel (Part P) to the assembly from step 6 using (28) 17 mm Screws (Part U).
Tighten with the Phillips Screwdriver. Ensure the Address Label is facing to the back of the unit.
Fixez le (1) panneau triangulaire arrière (pièce L), la panneau supérieur arrière (pièce M), le panneau
central arrière (pièce N) et le (1) panneau inférieur arrière (pièce P) à l’assemblage depuis l’étape 6 à
l’aide de (28) vis 17mm (pièce U). Serrez avec le tournevis Phillips. Assurez vous que l’étiquette avec
l’adresse fait face sur l’arrière de l’unité.
Fijar el panel triangular trasero (pieza L), (1) panel superior trasero (pieza M), (1) panel central trasero
(pieza N) y (1) panel inferior trasero (pieza P) al ensamblado del paso 6 utilizando (28) tornillos de 17
mm (pieza U). Apretar con el destornillador de estrella. Asegurarse de que la etiquetas con la dirección
estén orientadas hacia la parte trasera de la unidad.
Phillips Screwdriver (Not Provided)
Tournevis’Phillips’(Non Prévu)
Destornillardor’Phillips’(No siempre)
U. 17 mm Screw x 28
Vis de 17 mm x 28
Tornillo de 17 mm x 28
L. Back Triangle Panel x 1
Panneau triangulaire arrière x 1
Panel triangular trasero x 1
M. Back Top Panel x 1
Panneau supérieur arrière x 1
Panel superior trasero x 1
N. Back Middle Panel x 1
Panneau central arrière x 1
Panel central trasero x 1
P. Back Bottom Panel x 1
Panneau inférieur arrière x 1
Panel inferior trasero x 1
La page est en cours de chargement...

From Step 7
À partir de l’étape 7
Desde el paso 7
Parts and tools required to complete step
Pièces et outils nécessaires au montage
Piezas y herramientas necesarias para completar este paso
18
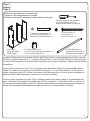
Step 8 / Étape 8 / Paso 8
Install the Tipover restraint here, see instructions included with Tipover restraint for installation
instructions.
Installez le dispositif anti bascule ici, lire les instructions incluses avec le dispositif anti bascule pour les
instructions d’installation.
Instalar el dispositivo para evitar volcaduras aquí, ver las instrucciones incluidas con el dispositivo
antivuelco para las instrucciones de instalación.
Phillips Screwdriver (Not Provided)
Tournevis’Phillips’(Non Prévu)
Destornillardor’Phillips’(No siempre)

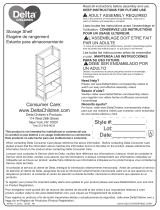
Consumer Care:
www.DeltaChildren.com
Delta Children’s Products
114 West 26th Street
New York, NY 10001
Tele.212-645-9033
To register your product for important safety alerts and updates to
your product please visit www.deltachildren.com
Pour enregistrer votre produit pour avoir les alertes de sécurité et les
mises a jour de votre produit veuillez visiter
www.DeltaChildren.com
Para registrar su producto para alertas importantes de seguridad y
estar al tanto sobre novedades de su producto por favor visite
www.DeltaChildren.com y seleccione Product Registration.
Warranty:
This Delta product is warranted to be free from defects for a period of 90
days from the date of purchase under normal use. This warranty extends only to the
original retail purchaser and is valid only when supplied with proof of purchase, or if
received as a gift, when the registration is on file with Delta.
Garantie: Ce produit Delta est garanti sans défauts pour une période de 90 jours a
partir de la date d’achat et sous condition d’une utilisation normale. Cette garantie
concerne seulement l’acheteur d’origine et est valide uniquement sur présentation de la
preuve d’achat, ou si reçu en cadeau, lorsque l’enregistrement en a été fait chez Delta.
Garantía: Esta producto Delta tienen una garantía por defectos de 90 dias desde la
fecha de su compra bajo uso normal. Esta garantía se ofrece solamente al
compradororiginal y es vålida solo si provee la prueba de su compra, o si fue recibido
como regalo cuando elregistro se encuentra en el archivo de Delta.
Date of Purchase: _____________ (you should also keep your receipt)
Date d’Achat: _____________ (vous devriez aussi garder votre facture d’achat)
Fecha de Compra: _____________ (debe además mantener su recibo)
To report a problem, please log on to www.deltachildren.com and
click the Consumer Care Tab, or contact us by phone at
(212) 645-9033.
Pour signaler un problème, veuillez vous connecter a
www.DeltaChildren.com et cliquez sur la touche Consumer Care,
ou contactez nous par téléphone au (212) 645-9033
Para reportarcualquier problema, por favor entre a
www.DeltaChildren.com y de clicen Servicio al cliente o
contáctenos por telefono al (212) 645-9033.
La page est en cours de chargement...
-
 1
1
-
 2
2
-
 3
3
-
 4
4
-
 5
5
-
 6
6
-
 7
7
-
 8
8
-
 9
9
-
 10
10
-
 11
11
-
 12
12
-
 13
13
-
 14
14
-
 15
15
-
 16
16
-
 17
17
-
 18
18
-
 19
19
-
 20
20


Serta Serta Happy Home Storage Instructions Manual
- Taper
- Instructions Manual
- Ce manuel convient également à
dans d''autres langues
- English: Serta Serta Happy Home Storage
- español: Serta Serta Happy Home Storage
Autres documents
-
 Delta Children Essex Changing Table/Bookcase Assembly Instructions
-
 Delta Children Gateway Ladder Shelf Assembly Instructions
-
 Prime-Line L 5763 Mode d'emploi
-
 Delta Children Delta Arch Trundle Assembly Instructions
-
 Delta Children Delta Arch Trundle Assembly Instructions
-
 Delta Children Under Crib Roll-Out Storage Assembly Instructions
-
 Delta Children Gateway 2-in-1 Changing Table & Storage Unit Mode d'emploi
-
 Delta Children Emerson 4-in-1 Crib Assembly Instructions
-
 Delta Children Delta Nighstand Assembly Instructions
-
 Delta Children Convertible Changing Unit Assembly Instructions


