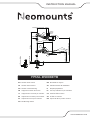
Neomounts FPMA-D500KEYB Manuel utilisateur
- Catégorie
- Supports de bureau à panneau plat
- Taper
- Manuel utilisateur

FPMA-D500KEYB
WWW.NEOMOUNTS.COM
INSTRUCTION MANUAL
IT
EN
NL
DE
FR
ES
PT
DK
Monitor desk mount
Monitor bureausteun
Monitor Tischhalterung
Support moniteur de bureau
Supporto da scrivania per monitor
Soporte de escritorio para monitor
Suporte de mesa para monitor
Bordbeslag skærm
NO
SE
FI
PL
CS
SK
RO
Bordstativ til skjerm
Skrivbordsfäste för bildskärm
Näytön pöytäteline
Uchwyt nabiurkowy do monitora
Stolní držák monitoru
Držiak na monitor
Suport de birou pentru monitor
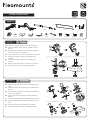
100mm
min0mm-max92mm
min400mm-max977mm
min0mm-max780mm
810mm
min10mm-max85mm
min260mm-max312mm 65mm
100mm
115mm
75mm
215mm
min295mm-max347mm
211mm
650mm
115mm
100mm
75mm
+90°
-90°
180°
180°
180°
Ø35mm

FPMA-D500KEYB
Tool
PARTS
Mount the clamp to the rod and install to the desk
Monteer de klem aan de stang en installeer aan het
bureau
Befestigen Sie die Klemme an der Stange und instal-
lieren Sie sie auf dem Schreibtisch
Montez la pince sur la barre et installez-la sur le bureau
Montare il morsetto sulla barra e installarlo sulla
scrivania
Monte la abrazadera en la barra e instálela en el
escritorio
Montar a braçadeira na barra e instalar na secretária
Zamontuj zacisk na pręcie i zainstaluj na biurku
EN
NL
DE
FR
IT
ES
PT
PL
Mount the grommet to the rod and install through the
desk
Monteer de doorvoer aan de stang en installeer in het
bureau
Befestigen Sie die Tülle an der Stange und installieren
Sie sie im Schreibtisch
Montez le passe-fil sur la tige et installez-le dans le
bureau
Montare il gommino sull'asta e installarlo nella scrivania
Monte el pasacables en la varilla e instálelo en el escri-
torio
Montar a argola na vara e instalar na secretária
Zamontuj przelotkę na pręcie i zainstaluj w biurku
EN
NL
DE
FR
IT
ES
PT
PL
A. (x1) B. (x1) C. (x1) D. (x1) E. (x1)
F. (x1) G. (x5) H. (x1) K. (x4) L. (x1) M. (x1)I. 3mm
(x1)
J. 6mm
(x1)
M-A. M4x14
(x4)
M-B. M5x14
(x4)
M-C. D5
(x4)
0-9 kg75x75 -
100x100 mm
E
G
C
I
E
F
H
C
I
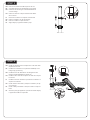
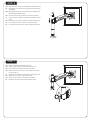
Clamp
STEP 1A
Grommet
STEP 1B

Remove the collar and cable clip from the rod
Verwijder de kraag en de kabelclip van de stang
Entfernen Sie den Kragen und die Kabelklemme
von der Stange
Retirez le collier et le clip de maintien des câbles
de la colonne
Rimuovere il colletto e la clip del cavo dall'asta
Retire la arandela y el clip del vástago
Remova a anilha e o clipe da haste
Zdjąć obejmę i organizator kabla z pręta
EN
NL
DE
FR
IT
ES
PT
PL
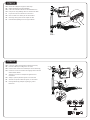
Install the articulated arm and place the collar and cable
clip back on the rod
Installeer de scharnierarm en plaats de kabelclip en de
kraag terug op de stang
Installieren Sie den Gelenkarm und bringen Sie den
Kragen und die Kabelklemme wieder an
Installez le bras articulé et replacez le collier et le clip sur
la colonne
Installare il braccio articolato e posizionare il colletto e la
clip del cavo sull'asta
Instale el brazo articulado y coloque la arandela y el clip
en el vástago
Instale o braço articulado e coloque a anilha e o clipe na
haste
Zamontuj ramię przegubowe i ponownie umieść obejmę
i organizartor kabla na wsporniku
EN
NL
DE
FR
IT
ES
PT
PL
STEP 2
STEP 3
B
I
I

Install the keyboard holder to the bracket
Installeer de toetsenbordhouder aan de beugel
Installieren Sie den Tastaturhalter an die Halterung
Installez le support de clavier sur le support
Installare il supporto per tastiera sulla staffa
Instale el soporte del teclado en el soporte
Instale o suporte do teclado no suporte
Zainstaluj uchwyt klawiatury na wsporniku
EN
NL
DE
FR
IT
ES
PT
PL
Install the monitor
Installeer de monitor
Installation des Monitors
Vissez le moniteur sur la plaque VESA
Installazione del Monitor
Instalar el monitor
Instalar o monitor
Zainstaluj monitor
EN
NL
DE
FR
IT
ES
PT
PL
* Not Included
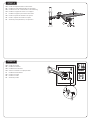
STEP 4
STEP 5
M-C
K
L
D
M-A
M-B

Adjust the height and tighten the screw
Stel de juiste hoogte in en draai de schroef vast
Höhe einstellen und fixieren mit der Schraube
Réglez la hauteur des 2 bras sur la colonne et les fixer
en serrant les vis
Regolazione dell'altezza e stringere nuovamente la vite
Ajuste Altura y vuelva a apretar el tornillo
Ajuste Altura e aperte novamente os parafuso
Regulacja wysokości i ponownie dokręcić śrubę
EN
NL
DE
FR
IT
ES
PT
PL
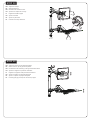
Attach the arm to the rod and place the decorative cover
Bevestig de arm aan de stang en plaats het decoratieve
afdekkapje
Befestigen Sie den Arm an der Stange und bringen Sie
die dekorative Abdeckung an
Fixez le bras à la tige et placez le couvercle décoratif
Fissare il braccio all'asta e posizionare la copertura deco-
rativa
Fije el brazo a la varilla y coloque la cubierta decorativa
Fixar o braço à haste e colocar a tampa decorativa
Przymocuj ramię do pręta i umieść osłonę dekoracyjną
EN
NL
DE
FR
IT
ES
PT
PL
STEP 6
STEP 7
M
I

Loosen or tighten the adjustment knob if necessary
Draai de stelknop zo nodig losser of vaster
Fixieren oder Lockern des Drehknopfs wenn notwendig
Desserrez ou serrez le bouton de réglage selon la dureté
d'articulation désirée
Allentare o serrare la manopola di regolazione se
necessario
Afloje o ajuste la perilla de ajuste si es necesario
Afrouxe ou aperte o botão de ajuste, se necessário
Poluzuj lub dokręć pokrętło regulacyjne, jeśli to
konieczne
EN
NL
DE
FR
IT
ES
PT
PL
Route the cable(s) through the cable clips
Geleid de kabel(s) door de kabelclips
Führen Sie das/die Kabel durch die Kabelklemmen
Faire passer le(s) câble(s) dans les attaches de câble
Far passare il/i cavo/i attraverso i fermacavi
Pase el cable o los cables por las abrazaderas
Guiar o(s) cabo(s) através dos clipes do cabo
Przełóż kabel (kable) przez uchwyty kablowe
EN
NL
DE
FR
IT
ES
PT
PL
STEP 9
STEP 8
J
FOLD 3
DUST CA
T
CHER
1
2

Adjust the mount to the desired position
Stel de steun in op de gewenste positie
Positionieren die Halterung in die gewünschte Position
Ajustez le support à la position souhaitée
Regolare il supporto nella posizione desiderata
Ajuste el soporte a la posición deseada
Ajuste o suporte na posição desejada
Dostosuj pozycję uchwytu do twoich wymagań
EN
NL
DE
FR
IT
ES
PT
PL
Adjust the torque
Stel het koppel in
Einstellen des Drehmoments
Ajustez les couples de serrage
Regolazione della coppia
Ajuste el tornillo
Ajuste os parafusos
Ustawić momenty obrotowe
EN
NL
DE
FR
IT
ES
PT
PL
STEP 11
STEP 10
J
+90°
-90°
360°
180°

-
 1
1
-
 2
2
-
 3
3
-
 4
4
-
 5
5
-
 6
6
-
 7
7
-
 8
8


Neomounts FPMA-D500KEYB Manuel utilisateur
- Catégorie
- Supports de bureau à panneau plat
- Taper
- Manuel utilisateur
dans d''autres langues
- español: Neomounts FPMA-D500KEYB Manual de usuario
- português: Neomounts FPMA-D500KEYB Manual do usuário
Documents connexes
-
Neomounts FPMA-D550DBLACK Manuel utilisateur
-
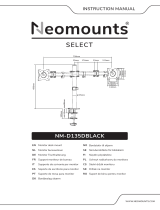 Neomounts NM-D135DBLACK Manuel utilisateur
-
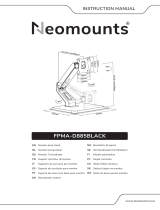 Neomounts FPMA-D885BLACK Manuel utilisateur
-
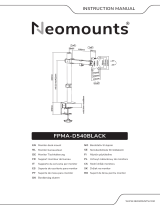 Neomounts FPMA-D540BLACK Manuel utilisateur
-
 Neomounts FPMA-D510BLACK Manuel utilisateur
-
Neomounts FPMA-D850BLACK Manuel utilisateur
-
-
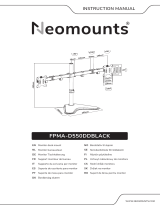 Neomounts FPMA-D550DDBLACK Manuel utilisateur
-
Neomounts FPMA-D550DDVBLACK Manuel utilisateur
-
 Neomounts FPMA-D550DDVBLACK Monitor Desk Stand Manuel utilisateur


