West Bend 87966 Manuel utilisateur
- Catégorie
- Mijoteuses
- Taper
- Manuel utilisateur

2018 West Bend
®
www.westbend.com
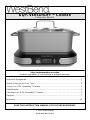
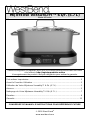
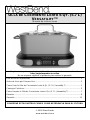
6 QT. VERSATILITY™ COOKER
Instruction Manual
Register this and other West Bend products through our website:
http://registerproducts.online
Product registration is not required to activate warranty.
Important Safeguards ............................................................................................... 2
Before Using for the First Time ................................................................................ 3
Using Your 6 Qt. Versatility™ Cooker ...................................................................... 3
Helpful Hints ............................................................................................................. 5
Cleaning Your 6 Qt. Versatility™ Cooker ................................................................. 7
Recipes .................................................................................................................... 7
Warranty ................................................................................................................. 12
SAVE THIS INSTRUCTION MANUAL FOR FUTURE REFERENCE

English - 2
IMPORTANT SAFEGUARDS
To prevent personal injury or property damage, read and follow all instructions
and warnings.
When using electrical appliances, basic safety precautions should always be
followed including:
• Read all instructions.
• Do not touch hot surfaces. Use handles or knobs and hot pads or oven mitts.
• Intended for countertop use only.
• For countertop use only.
• Always unplug from outlet when not in use and before cleaning. Allow to cool
before putting on or taking off parts and before cleaning.
• Close supervision is necessary when this appliance is used by or near children.
• Do not operate any appliance with a damaged cord or plug, after the appliance
malfunctions, or has been damaged in any manner. For service information see
warranty page.
• The use of accessory attachments not recommended by West Bend may cause
fire, electric shock, or injury.
• Do not use this appliance outdoors.
• Do not let cord hang over the edge of the table or counter, or touch hot surfaces.
• Do not place on or near a hot gas or electric burner, or in a heated oven.
• Extreme caution must be used when moving an appliance containing hot oil or
other hot liquids.
• Always attach plug to appliance first, then plug cord into the wall outlet. To
disconnect, turn any control to “OFF,” then remove plug from wall outlet.
• Do not use appliance for other than intended use.
• To protect against electric shock, do not immerse cord, plugs, or other electric
parts in water or other liquids.
• Do not attempt to repair this appliance yourself.
• A short power-supply cord is provided to reduce risks resulting from becoming
entangled in or tripping over a longer cord.
• WARNING: Spilled food can cause serious burns. Keep appliance and cord away
from children. Never drape cord over the edge of the counter, never use an outlet
below counter, and never use with an extension cord.
• Longer extension cords are available, but care must be exercised in their use.
While use of an extension cord is not recommended, if you must use one, ensure
that the marked electrical rating of the extension cord is equal to or greater than
that of the appliance. If the plug is of the grounded type, the extension cord must
be a grounding-type 3-wire cord. To avoid pulling, tripping or entanglement,
position the extension cord so that it does not hang over the edge of the counter,
table or other area where it can be pulled on by children or tripped over.
• Do not use an outlet or extension cord if the plug fits loosely or if the outlet or
extension cord feels hot.
• For household use only.
SAVE THESE INSTRUCTIONS

English - 3
BEFORE USING FOR THE FIRST TIME
Please check all packaging material carefully before discarding. Accessory
parts may be contained within the packaging material.
Before using, wash the cooking vessel, cover, and roasting rack as directed in the
“Cleaning your 6 Qt. Versatility™ Cooker” section of this manual. Wipe the non-stick
finish of the slow cooker heating base with a damp cloth and dry.
USING YOUR 6 QT. VERSATILITY™ COOKER
To Use as a Slow Cooker:
1. Place heating base on dry, level, heat-resistant surface away from any edge.
2. Place foods into cooking vessel, cover and place cooking vessel onto heating base.
If browning or pre-cooking is required, you can use the cooking vessel directly on
range top over medium heat. NOTE: Use only plastic, rubber, wooden, or non-
metal cooking tools in the cooking vessel. Use of metal cooking tools will scratch
the non-stick surface. Do not strike utensils against vessel or cover rim.
3. Plug cord into a 120 volt, AC electric outlet only. The display will read “18:88”.
4. Set the heat setting to “LOW,” “MEDIUM,” “HIGH,” or “GRIDDLE” with the dial as
recommended in the recipe. “WARM” should only be used to keep cooked foods
warm for serving. “LOW”, “MEDIUM” and “HIGH” are used for slow cooking foods.
NOTE: DO NOT USE A HEAT SETTING BELOW “LOW” FOR ACTUAL COOKING
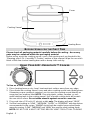
Cover
Cooking Vessel
Heating Base

English - 4
OF RAW FOODS, AS THE SLOW COOKER WILL NOT GET HOT ENOUGH TO
COOK FOODS. DO NOT USE THE GRIDDLE SETTING FOR SLOW COOKING -
OVERCOOKING WILL OCCUR.
The temperature can be adjusted during the cook cycle. As a general guideline,
most meat and vegetable combinations need 7 to 10 hours of cooking at “LOW”,
4 to 6 hours of cooking at “MEDIUM” or 2 to 3 hours of cooking at “HIGH”. Meats
become most tender when cooked for longer times at lower heat settings. Avoid
removing the cover when slow cooking, as cooking time will be increased by the
loss of heat. Remove cover only when stirring is needed or when adding
ingredients.
5. Press the “TIME” down arrow button. The minutes will flash. Press the up arrow
button to set the desired cooking time minutes. Minutes increase in 5-minute
increments. Press the down arrow button again to select hours. Press the up
arrow button to set desired hours. The base will not heat if the timer is not set.
You cannot program the Versatility™ Slow Cooker to cook for longer than 19
hours, 55 minutes.
• The timer, once set, will count down in minutes. Pressing the “TIME” buttons
after the cycle has begun will not change set time. To reset cook time, the base
must be unplugged from the outlet.
6. When desired time is displayed, do not press any additional buttons. The time will
flash 3 times, the heating base will begin to heat, and the “ : ” between numbers
and the on light will flash.
7. When cook time has elapsed, the slow cooker will stop heating and turn off.
Unplug from the outlet. If additional cook time is needed, repeat steps 3-6 to set
temperature and time desired for cooking.
To Use as a Griddle:
The heating base can be used as a light duty griddle.
1. Turn the temperature dial to “GRIDDLE.” Press “TIME” down arrow button. The
minutes will flash. Press the up arrow button to set desired cooking time minutes.
Minutes increase in 5-minute increments. For best results, preheat base for about
8 - 10 minutes before cooking. Please refer to the “Temperature Guide” below.
The heating base will perform only as a light duty griddle. “GRIDDLE” setting
should NEVER be used as a slow cooker setting.
2. When cook time has elapsed, the slow cooker will stop heating and turn off.
Unplug from the outlet, and allow to cool completely. Follow cleaning instructions
in the “Cleaning Your 6 Qt. Versatility™ Cooker” section of this manual.
• A small amount of smoke and/or odor may occur upon heating due to the
release of manufacturing oils – this is normal.
• Some minor expansion/contraction sounds may occur during heating and
cooling – this is normal.

English - 5
TEMPERATURE GUIDE
Be sure to cook foods to recommended food-safe temperatures. Always check with a
meat thermometer to ensure that the center is cooked completely.
MEAT
INTERNAL TEMPERATURES
Beef
Rare
140°F/60°C
Medium
160°F/71°C
Well
170°F/76°C
Pork
Fresh
170°F/76°C
Smoked
160°F/71°C
Canned
140°F/60°C
Lamb
170°F to 180°F/76°C to 82°C
Veal
170°F/76°C
Poultry
180°F/82°C
HELPFUL HINTS
• Adapting Recipes to Slow Cooking: Many of your favorite oven and range top
recipes can be adapted to slow cooking with a few minor changes. Here are some
important points to remember:
Amount of Liquid: Because little moisture evaporates during slow cooking,
reduce amount of liquid in your recipe by one-half (1 cup of liquid is enough for
most recipes). For soup recipes, add all ingredients except water or broth to
vessel; add only enough liquid to cover ingredients.
Amount of Seasoning: Reduce amount of seasoning in proportion to reduced
amount of liquid. Use whole or leaf herbs and spices rather than crushed or ground.
Slow Cooking Meat: Less tender, less expensive cuts of meat are better suited
to slow cooking than expensive cuts of meat. Remove excess fat before slow
cooking if desired. Meat can be browned in the cooking vessel on top of the
range before slow cooking.
Slow Cooking Vegetables: Add partially frozen vegetables, Chinese vegetables
and fresh mushrooms during the last hour of cooking. Strong-flavored vegetables
such as spinach, eggplant, okra and collard greens should be precooked before
adding to cooker. The amount of onion normally used in your recipe should be
reduced because its flavor gets stronger during cooking. In most cases, fresh
vegetables take longer to cook than meats because liquid simmers rather than boils.
Slow Cooking Raw Meats and Vegetables: Most raw meat and vegetable
combinations need at least 4 to 6 hours of cooking at “HI” or 7 to 10 hours at “LO.”
Slow Cooking Fish and Seafood: Fresh or thawed seafood and fish fall apart
during long hours of cooking. Add these ingredients an hour before serving and
cook at “HI.”
Slow Cooking Milk, Sweet or Sour Cream and Cheese: Because milk, sour or
sweet cream and cheese break down during long hours of cooking, add these
ingredients just before serving or substitute undiluted condensed canned soups or
evaporated milk. Processed cheese tends to give better results than aged cheese.`
Rice and Pasta: Rice and pasta may either be cooked separately, or added
uncooked during last hour of cooking time. If added uncooked, make sure there is
at least 1 to 1½ cups of liquid in vessel and heat is set at “LO” or higher.
Dumplings: Dumplings may be cooked in broth or gravy at “HI.” Drop by
spoonfuls on simmering broth or gravy. Cook covered for 30 minutes.

English - 6
Thickening Juices for Gravies and Sauces: To thicken juices for gravies and
sauces, add 2 to 3 tablespoons of quick cooking tapioca at start, or thicken after
cooking by adding a smooth paste made of 2 to 4 tablespoons cornstarch or flour
and ¼ cup cold water. Bring to a boil at “HI.” Solid foods may be removed first.
• Don’t Remove Cover During Cooking: To retain heat, moisture and food flavor, don’t
remove cover during cooking unless necessary for adding additional ingredients.
• Using Cooking Tools on Non-Stick Finish: The following types of cooking tools
may be used on the non-stick finish: plastic, rubber or wooden. Do not use sharp
edged metal cooking tools (forks, knives, mashers) as these could scratch the
non-stick finish.
• Using Cooking vessel on Top of Range: The cooking vessel (without heating
base) can be used for range top cooking. Place vessel on large range unit. Use
medium to low heat. The use of low to medium heat will prevent foods from
overcooking, reduce spattering and help retain natural juices. Do not use high heat
except for bringing liquids to a boil. If cooking on a gas range, do not let flame
extend up side of cooking vessel. ALWAYS USE OVEN MITTS WHEN USING
COOKING VESSEL AND COVER ON RANGE UNIT.
• Cooking Meats: When cooking meats, preheat empty cooking vessel over
medium to medium-low heat for 2 to 3 minutes or until a drop of water sizzles in
cooking vessel. To prevent sticking of lean meats, you may wish to add a small
amount of cooking oil. Add meat and brown as desired. Cover cooking vessel and
reduce heat to low for cooking on range top OR transfer cooking vessel to heating
base and cook at desired setting. The shortest cooking time will be at “HI.”
• Using Cooking vessel in Oven: The cooking vessel (without heating base) can
be used in a conventional or convection oven up to preheated temperatures of
350°F/177°C. Cooking vessel may be covered with aluminum foil for oven use.
ALWAYS USE OVEN MITTS WHEN USING COOKING VESSEL IN OVEN.
• DO NOT USE THE COOKING VESSEL IN A MICROWAVE OVEN, OVER A
CAMPFIRE OR UNDER AN OVEN BROILER UNIT TO PREVENT DAMAGE TO
THE COOKING VESSEL OR OVEN.
• Using a Roasting Rack: Your slow cooker includes a small wire rack for roasting
meats and poultry. To use the rack, simply place into bottom of cooking pot and
place roast, chicken, or ham onto rack. Add a small amount of liquid to cooking pot
before cooking. If you wish, the meat can be browned in cooking pot on top of
range before roasting. The rack can also be used for steaming fresh vegetables
such as broccoli and corn-on-the-cob. Add 1 cup of water to cooking pot to steam
vegetables. Cook on top of range over medium to medium-low heat or on heating
base at “HI” to desired doneness.
• Bread, Cakes & Desserts: Use an 8 x 4-inch or a 9 x 5-inch loaf pan. Place the
roasting rack in the pan before placing the loaf pan. Check to ensure that your
pan fits completely into the cooking pot before mixing any ingredients. To
prevent condensation from dripping onto food while baking, place double layer of
paper toweling and single layer of aluminum foil across top of cooking pot. Cover
and bake according to recipe.

English - 7
CLEANING YOUR 6 QT. VERSATILITY™ COOKER
1. Unplug the cord from the outlet and allow the entire appliance (base, cooking
vessel, rack, cover)) to cool completely before cleaning. Set the cooking vessel
and cover on a dry, heat-protective surface for gradual cooling. NOTE: Do not
run cold water over hot glass cover as it may crack or shatter if cooled
suddenly.
2. Wipe heating base and cord with a damp cloth. Do not immerse the heating base
in water or any other liquid.
3. The cooking vessel, rack, and glass cover cover may be washed using warm,
soapy water by hand or cleaned in the dishwasher. If dishwasher cleaning, avoid
contact between pieces to prevent damage. Do not use metal scouring pads or
cleansers as damage can occur. Wipe with distilled vinegar to remove water
spots or mineral deposits. Rewash with warm, soapy water, rinse and dry.
Cleaning Heating Base After Griddle Use: Always unplug cord from electrical
outlet and allow base to cool completely before cleaning. With a spoon or baster,
remove any fat or grease that has collected on the griddle surface. Wipe oil residue
from base with paper towel. Wipe non-stick finish with a damp, soapy dishcloth or
nylon-scouring pad recommended for non-stick finishes. Clean finish thoroughly,
wiping base several times with a clean, damp cloth to remove soap residue.
If a tacky oil film forms on the non-stick finish of base, wipe with a dry cloth to
remove. If this residue is not removed, it will adhere to the finish when reheated and
become impossible to remove.
This appliance has no user serviceable parts.
RECIPES
Beef Vegetable Soup - 5 Qt.
1½ lbs. Beef soup bones or 1 lb. beef
short ribs
1½ qt. Water
1 tsp. Salt
¼ tsp. Pepper
2 Carrots, chopped
2 Ribs celery, chopped
2 Potatoes, peeled and chopped
1 Small onion, chopped
1 Bay leaf
1 16 oz. Can whole tomatoes,
undrained
1. Place soup bone, water, salt, pepper, carrots, celery, potatoes, onion and
bay leaf into cooking vessel. Cover and slow cook at “LOW” for 6 to 7
hours.
2. Remove soup bone and cool slightly. Remove meat from bones and return
to soup with tomatoes. Cover and slow cook an additional hour. Noodles or
barley may be added, if desired.
Herb Pork Roast - 5 Qt.
1 tsp. Salt
1 tsp. Thyme
½ tsp. Sage
½ tsp. Ground cloves
1 tsp. Grated lemon peel
4-5 lbs. Pork roast, boneless or bone-in
4 Large cloves garlic, quartered
2 tbsp. Water, optional
2 tbsp. Cornstarch, optional
1. In small bowl combine salt, thyme, sage, cloves and lemon peel. Rub into
pork roast. Cut 16 small pockets into roast and insert garlic pieces.
2. Place roast in cooking vessel. Cover and cook at “LOW” for 7 to 9 hours
or “HIGH” for 4 to 5 hours. Insert meat thermometer into roast to ensure
internal temperature is 170°F/77°C or higher before serving. Allow roast to
stand 10-15 minutes before carving. Remove garlic pieces. Juices may be
thickened for gravy, if desired. Dissolve 2 tablespoons cornstarch in 2
tablespoons water. Stir slowly into juices until thickened at “HIGH”.

English - 8
Pepper Steak - 5 Qt.
1½ lbs Round steak, cut into thin strips
1 Clove garlic, minced
1 cup Chopped onion
½ tsp. Salt
¼ tsp. Pepper
¼ tsp. Ginger
1 tsp. Sugar
½ cup Soy sauce
1 Large green pepper, cut into thin
strips
4 Tomatoes, cut into eighths, or 1 1-
pound can whole tomatoes, undrained
1 lb. Can bean sprouts, drained
1 tbsp. Cornstarch
½ cup Cold water
1. Brown steak in cooking vessel on range unit over medium heat. Transfer
cooking vessel to heating base using hot pads.
2. In a small bowl, combine garlic, onion, salt, pepper, ginger, sugar and soy
sauce. Pour over steak. Cover and slow cook at “LOW” for 6 to 8 hours or
“HIGH” for 4 to 5 hours.
3. Add green peppers, tomatoes, and bean sprouts, stir to blend. Slow cook
an additional hour. Just before serving, increase heat to “HIGH”. Combine
cornstarch and water. Gradually add to pepper steak, stirring until
thickened. Reduce to “WARM” for serving.
Corned Beef and Cabbage - 5 Qt.
3 - 4 lb. Corned beef brisket
1 Medium onion, sliced
½ tsp. Celery seed
½ tsp. Mustard seed
1 Clove garlic, minced
1 Bay leaf
Water
1 Small head cabbage, cut into wedges
1. Place brisket with liquid and spices from package in cooking vessel. Add onion,
celery seed, mustard seed, garlic and bay leaf. Add just enough water to cover
brisket (about 4 cups). Cover and cook at “LOW” for 7 to 9 hours or until brisket is
fork tender.
2. During last hour of cooking, add cabbage wedges and continue cooking at
“LOW”. Discard cooking liquid and spices.
Hearty Chicken Noodle Soup - 5 Qt.
2 lbs. Chicken parts, skinned if desired
5 cups Water
1 Medium onion, chopped
4 Carrots, cut into ½-inch pieces
4 Ribs celery, cut into ½-inch pieces
1 16 oz. Can whole tomatoes, cut up
1 tbsp. Instant chicken bouillon
1 tbsp. Minced parsley
1 tsp. Salt
½ tsp. Dried rosemary
¼ tsp. Pepper
1 cup Uncooked fine egg noodles
1. Combine all ingredients, except egg noodles, in cooking vessel. Cover and
cook at “LOW” for 6 to 8 hours or at “HIGH” for 3 to 4 hours or until chicken and
vegetables are tender.
2. Remove chicken pieces from cooking vessel and set aside to cool slightly.
Increase heat to “HIGH” and add noodles, stirring to blend. Cover and continue
to cook for 30 minutes.
3. Meanwhile, remove chicken from bones and cut into bite-size pieces. Return
meat to cooking vessel to heat as noodles finish cooking. Reduce heat to
“WARM” for serving.

English - 9
Chili - 5 Qt.
1½ lbs. Ground beef
1 cup Onion, chopped
1 cup Green pepper, chopped
1 Clove garlic, minced
1 28 oz. Can whole tomatoes,
undrained
1 16 oz Can kidney beans, undrained
1½ tbsp. Chili powder
1 tsp. Salt
1 tsp. Ground cumin
½ tsp. Pepper
1. Brown ground beef with onion and green pepper in cooking vessel over
medium heat of range unit. Remove excess grease.
2. Transfer cooking vessel to heating base using hot pads. Add remaining
ingredients, stir to blend. Cover and slow cook at “LOW” for 7 to 8 hours.
Reduce heat to “WARM” for serving.
Slow Cooker Roast - 5 Qt.
1 - 3lb Boneless beef chuck roast
1 cup Water
1 (.7 oz.) packet Italian-style dressing mix
1 (.75 oz.) packet Dry brown gray mix
1 (1 oz.) packet Ranch dressing mix
1. Place the beef roast into the cooking vessel.
2. Whisk the water, ranch dressing mix, gravy mix, and Italian dressing mix
together until smooth. Pour over beef roast.
3. Cover and slow cook at “LOW” for 6 to 8 hours or “HIGH” for 4 to 5 hours.
Fish Chowder - 5 Qt.
2 lbs. Fresh or frozen fish fillets
(haddock, perch, cod, flounder)
2 tbsp. Lemon juice
4 Slices bacon
1 cup Chopped onion
¼ cup Diced celery
4 Medium potatoes, cut into cubes
4 cups Hot water
1 16 oz Can stewed tomatoes
1 cup Diced carrots
2 tsp. Salt
¼ tsp. Pepper
1 tbsp. Worcestershire sauce
2 tbsp. Dry sherry, optional
1. Cut fish into chunks and remove bones. Sprinkle with lemon juice. Cover
and refrigerate.
2. Fry bacon in cooking vessel on range top over medium heat until crispy. Drain
on paper towel, crumble and set aside.
3. Sauté onion and celery in bacon drippings until brown. Transfer cooking vessel
to heating base using hot pads. Add potatoes, water, tomatoes, carrots, salt
and pepper to cooking vessel. Stir to combine. Cover and cook at “LOW” for 4
to 5 hours or at “HIGH” for 2 to 3 hours.
4. Drain lemon juice from fish. Add fish, Worcestershire sauce and sherry to
cooking vessel. Simmer for 1 hour or until fish flakes easily with fork. Reduce
heat to “WARM” for serving. Garnish with crumbled bacon.

English - 10
Beef Stew - 5 Qt.
1½ lbs. Beef Stew Meat, cubed
1 med. Onion, Chopped
4 med. Carrots, Sliced ½”
2 Ribs Celery, Sliced ½”
4 med. Potatoes, Sliced ½”
1 - 28oz. can Diced Tomatoes
1 - 10.5 oz. Beef Broth
1 tbsp. Worcestershire Sauce
2 tbsp. Dried Parsley Flakes
1 Bay Leaf
1 tsp. Salt
¼ tsp. Pepper
2 tbsp. Quick Cooking Tapioca
1. Brown stew meat in cooking vessel on range unit over medium heat. Transfer
cooking vessel to heating base using hot pads.
2. Add remaining ingredients to cooking vessel. Stir to combine.
3. Cover and cook at “LOW” for 8 hours or “HIGH” for 5 hours. Reduce heat to
“WARM” for serving.
Country Ribs with Apples ‘N Kraut - 6 Qt.
3 lbs. Lean country-style pork ribs,
trimmed of any excess fat
Salt and pepper
1 16 oz Can sauerkraut, undrained
1 Medium onion, thinly sliced and
separated into rings
1 8 oz Can mushrooms stems and
pieces, drained
1 Large or 2 small apples, cored and
cut into wedges
¼ cup Brown sugar
½ tsp. Celery seed
1. Preheat cooking vessel on electric or gas range top heating unit over medium
heat. Add ribs in batches to brown. Season with salt and pepper.
2. Return all ribs to cooking vessel. Layer sauerkraut, onion, mushrooms, apple
wedges and brown sugar over ribs. Sprinkle with celery seed.
3. Place cooking vessel on base, cover and cook at “LOW” for 7 to 9 hours or at
“HIGH” for 3 to 4 hours until meat is tender. Reduce heat to “WARM” for
serving.
Carrot Cake - 6 Qt.
2 cups Flour
2 cups Sugar
1 tsp. Baking soda
1 tsp. Salt
1 cup Vegetable oil
4 Eggs
3 cups Grated carrots
1 tsp. Cinnamon
1. Grease bottom only of a 9 x 5-inch or 8 x 4-inch loaf pan with solid
hydrogenated shortening. Dust with flour and shake out excess. Set covered
cooking vessel on base and preheat at “HIGH” while mixing ingredients.
2. In mixing bowl, sift flour, sugar, baking soda and salt. Add vegetable oil and stir
until ingredients are moistened. Add eggs one at a time, beating well after each
egg is added. Stir in grated carrots and cinnamon until evenly mixed. Pour
batter into pan. Place pan in cooking vessel.
3. Cover and bake at “HIGH” for 2 hours. Do not remove cover during this time.
To test for doneness at end of recommended baking time, insert a metal cake
tester in several places including center of cake. If cake tester comes out
clean, cake is done. If batter clings to cake tester, continue baking in 15-minute
intervals. Remove cake from pan and cool on rack. Frost with softened cream
cheese, if desired. Makes a 1½-pound cake.

English - 11
Cranberry Nut Bread - 6 Qt.
2 cups (8oz) fresh or frozen cranberries
½ cup Walnuts
2 cups Flour
1 cup Sugar
1½ tsp. Baking powder
½ tsp. Baking soda
½ tsp. Salt
6 tbsp. Butter or margarine
1 Egg
1 tbsp. Grated orange peel
½ cup Orange juice
1. Grease 9 x 5-inch or 8 x 4-inch loaf pan with solid hydrogenated shortening.
Dust with flour and shake out excess. Set covered cooking vessel on base and
preheat at “HIGH” while mixing ingredients.
2. Grind cranberries and walnuts with coarse blade of food chopper. In a large
mixing bowl, combine flour, sugar, baking powder, baking soda and salt. Cut in
butter or margarine to form a coarse mixture. Make an indentation in mixture
and add egg, orange peel and orange juice. Beat only until lumps disappear.
Add chopped cranberries and walnuts. Stir until evenly mixed. Pour batter into
pan. Place pan in cooking vessel.
3. Cover and bake at “HIGH” for 3 hours. Do not remove cover during this time.
To test for doneness at end of recommended baking time, insert a metal cake
tester in several places including center of bread. If cake tester comes out clean,
bread is done. If batter clings to cake tester, continue baking for 15-minute
intervals. Remove bread from pan and cool on rack. Makes a 1½-pound loaf.
Western Omelet Casserole
1 bag (32 oz.) Frozen shredded hash
brown potatoes
1 lb. Bacon sliced, cooked, and drained
1 med. Sweet onion, diced
1 Green bell pepper, diced
1 dozen Eggs
1 ½ cup Shredded cheddar or Jack
cheese
1 cup Milk
1 tsp. Salt
Pepper (to taste)
1. Place a layer of frozen potatoes on the bottom of the slow cooker, followed by a
layer of bacon then onions, green pepper and cheese. Add another 2 to 3
layers, ending with a layer of cheese. Note: precooked sausage or cubed ham
may be used in place of bacon.
2. Beat the eggs, milk and salt & pepper together. Pour over the layers in the slow
cooker and cover. Cook for 10-12 hours on “LOW” or 3-5 hours on “HIGH”.
Suggested Alternate Ingredients: Mushrooms, green onions, cubed ham, precooked
sausage, tomatoes. The sky’s the limit!

English - 12
L5956A 03/18 West Bend
®
Printed in China
PRODUCT WARRANTY
Appliance 1 Year Limited Warranty
West Bend
®
(“the Company”) warrants this appliance from failures in the material and
workmanship for one (1) year from the date of original purchase with proof of purchase,
provided that the appliance is operated and maintained in conformity with the Instruction
Manual. Any failed part of the appliance will be repaired or replaced without charge at the
Company’s discretion. This warranty applies to indoor household use only.
This warranty does not cover any damage, including discoloration, to any non-stick surface of
the appliance. This warranty is null and void, as determined solely by the Company, if the
appliance is damaged through accident, misuse, abuse, negligence, scratching, or if the
appliance is altered in any way.
THIS WARRANTY IS IN LIEU OF ALL IMPLIED WARRANTIES, INCLUDING WARRANTIES
OF MERCHANTABILITY, FITNESS FOR A PARTICULAR PURPOSE, PERFORMANCE, OR
OTHERWISE, WHICH ARE HEREBY EXCLUDED. IN NO EVENT SHALL THE COMPANY
BE LIABLE FOR ANY DAMAGES, WHETHER DIRECT, INDIRECT, INCIDENTAL,
FORSEEABLE, CONSEQUENTIAL, OR SPECIAL ARISING OUT OF OR IN CONNECTION
WITH THIS APPLIANCE.
If you think the appliance has failed or requires service within its warranty period, please
contact the Customer Care Department at (866) 290-1851, or e-mail us at
customercare@westbend.com. A receipt proving the original purchase date will be required for
all warranty claims, hand written receipts are not accepted. You may also be required to
return the appliance for inspection and evaluation. Return shipping costs are not refundable.
The Company is not responsible for returns lost in transit.
Valid only in USA and Canada
REPLACEMENT PARTS
Replacement parts, if available, may be ordered directly from the Company several ways.
Order online at www.westbend.com, e-mail customercare@westbend.com, over the phone by
calling (866) 290-1851, or by writing to:
West Bend
Attn: Customer Care Dept.
P. O. Box 53
West Bend, WI 53095
To order with a check or money order, please first contact Customer Care for an order total.
Mail your payment along with a letter stating the model or catalog number of your appliance,
which can be found on the bottom or back of the appliance, a description of the part or parts
you are ordering, and the quantity you would like.
Your state/province’s sales tax and a shipping fee will be added to your total charge. Please
allow two weeks for processing and delivery.
This manual contains important and helpful information regarding the safe use and care of your
product. For future reference, attach dated sales receipt for warranty proof of purchase and
record the following information:
Date purchased or received as gift: _______________________________________________
Where purchased and price, if known: _____________________________________________
Item number and Date Code (shown bottom/back of product):___________________________

NOTES

2018 West Bend
®
www.westbend.com
MIJOTEUSE VERSATILITY™ 6 QT. (5.7 L)
Mode d’Emploi
Veuillez enregistrer cet appareil ainsi que vos autres produits West Bend sur notre
site Internet: http://registerproducts.online
L’enregistrement du produit n’est pas obligatoire pour activer la garantie.
Précautions Importantes .......................................................................................... 2
Avant la Première Utilisation .................................................................................... 3
Utilisation de Votre Mijoteuse Versatility™ 6 Qt. (5.7 L) ........................................... 3
Astuces .................................................................................................................... 5
Nettoyage de Votre Mijoteuse Versatility™ 6 Qt. (5.7 L) .......................................... 7
Recettes ................................................................................................................... 8
Garantie ................................................................................................................. 13
CONSERVEZ CE MANUEL D’INSTRUCTIONS POUR RÉFÉRENCE FUTURE

Française - 2
PRECAUTIONS IMPORTANTES
Pour empêcher toute blessure physique ou tout dommage matériel, lisez et suivez toutes
les consignes et mises en garde.
Lorsque vous utilisez des appareils électriques, les précautions de sécurité élémentaires
devraient toujours être respectées, notamment:
• Lisez toutes les instructions
• Ne touchez pas les surfaces à haute température. Utilisez les poignées carrées ou rondes et
des maniques ou des gants de cuisine.
• Conçu pour être utilisé sur un comptoir uniquement.
• Débranchez toujours l’appareil du secteur lorsque vous ne l’utilisez pas et avant de le
nettoyer. Laissez refroidir avant de mettre en place ou de retirer des pièces ainsi qu’avant de
procéder au nettoyage.
• Une surveillance rapprochée est nécessaire en cas d’utilisation d’un appareil par des enfants
ou en présence d’enfants.
• N’utilisez aucun appareil dont le cordon ou la fiche sont endommagés, si l’appareil a
dysfonctionné ou s’il a été détérioré de quelque manière que ce soit. Pour des
renseignements sur les réparations, voir la page de garantie.
• L'utilisation des accessoires non recommandés par West Bend risque de provoquer le feu, la
décharge électrique ou la blessure.
• N’utilisez pas cet appareil à l’extérieur.
• Ne laissez pas le cordon pendre depuis l’extrémité de la table ou du plan de travail, ou ne le
laissez pas entrer en contact avec une surface à haute température.
• Ne placez pas l’appareil sur ou à proximité d’une gazinière chaude ou d’un brûleur électrique,
ou dans un four chaud.
• Vous devez faire preuve d’une extrême prudence lorsque vous déplacez un appareil
contenant de l’huile ou d’autres liquides à haute température.
• Fixez toujours la fiche à l’appareil en premier, avant de brancher la fiche dans la prise
secteur. Pour débrancher l’appareil, tournez toute commande sur « OFF » (arrêt) puis retirez
la fiche de la prise murale.
• N’utilisez pas l’appareil pour un usage autre que celui pour lequel il a été conçu.
• Pour vous protéger contre tout choc électrique, n’immergez pas le cordon, les fiches ni
aucune autre pièce électrique dans l’eau ni dans tout autre liquide.
• Ne tentez pas de réparer cet appareil vous-même.
• Le cordon d’alimentation fourni est court pour réduire les risques qu’une personne se prenne
les pieds ou trébuche sur un cordon plus long.
• AVERTISSEMENT: Des éclaboussure d'aliment peuvent causer des brûlures graves. Garder
l'appareil et le cordon d'alimentation à l'écart des enfants. Ne jamais placer le cordon
d'alimentation sur le bord du comptoir, ne jamais utiliser une prise placée sous le comptoir, et
ne jamais utiliser avec une rallonge.
• Des cordons de rallonge plus longs sont disponibles, mais vous devez faire preuve de prudence
lors de leur utilisation. Bien que l’utilisation d’un cordon de rallonge ne soit pas recommandée, si
vous devez en utiliser un, assurez-vous que la puissance nominale indiquée pour le cordon de
rallonge est égale ou supérieure à celle de l’appareil. Si la fiche est raccordée à la terre, le
cordon de rallonge doit lui aussi proposer un raccordement à la terre. Pour éviter de tirer sur le
cordon, de trébucher ou de s’emmêler dedans, positionnez le cordon de rallonge de sorte qu’il
ne pende pas depuis l’extrémité du plan de travail, de la table ou de toute zone où des enfants
pourraient tirer dessus ou trébucher.
• N’utilisez pas une prise secteur ou un cordon de rallonge si la fiche s’adapte avec un jeu ou si
la prise secteur ou le cordon de rallonge vous semblent chauds.
• Pour une utilisation domestique uniquement.

Française - 3
CONSERVEZ CES CONSIGNES
AVANT LA PREMIÈRE UTILISATION
Veuillez vérifier la totalité de l’emballage attentivement avant de le jeter. Il est
possible que l’emballage contienne des accessoires.
Avant la première utilisation, lavez la marmite, le couvercle et la grille à rôtir en
suivant les instructions de la section « Nettoyage de Votre Mijoter Versatility™ 6 Qt.
(5.7 L) » de ce manuel. Essuyez la finition antiadhésive du socle chauffant de la
cocotte mijoteuse avant un chiffon humide puis séchez.
UTILISATION DE VOTRE MIJOTEUSE VERSATILITY™ 6 QT. (5.7 L)
À Utiliser en Mijoteuse:
1. Placez la base chauffante sur une surface plane et sèche, résistante à la chaleur,
à l’écart de tout bord.
2. Placez les aliments dans le récipient de cuisson, couvrez et placez le récipient de
cuisson sur le socle chauffant. Si vous devez faire brunir ou précuire, vous pouvez
directement mettre le récipient de cuisson sur la cuisinière, à feu moyen.
REMARQUE: Ne mettez que des ustensiles de cuisine en plastique, en
caoutchouc, en bois mais pas métalliques, dans le récipient de cuisson. L’utilisation
d’outils de cuisine en métal peut rayer la surface antiadhésive. Ne cogner aucun
ustensile de cuisine contre le récipient ou contre les bords du couvercle.
3. Branchez le cordon d’alimentation sur une prise secteur de 120 volts CA,
uniquement. L’écran indiquera "18:88".
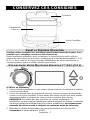
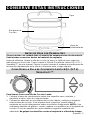
Couvercle
Récipient de
Cuisson
Socle Chauffant

Française - 4
4. Réglez la chaleur sur « LOW » (faible), « MEDIUM » (moyenne), « HIGH » (élevé)
ou « GRIDDLE » (plaque), le cadran tel que conseillé sur la recette. « WARM »
(chaud) ne devrait être utilisé que pour conserver les aliments cuits au chaud,
avant de les servir. « LOW » (faible), « MEDIUM » (moyenne) et « HIGH » (élevé)
sont utilisés pour les aliments à cuisson lente. REMARQUE: NE RÉGLEZ PAS EN
DESSOUS DE « LOW » (faible) POUR FAIRE CUIRE DES ALIMENTS CRUS,
CAR MIJOTER NE SERA PAS SUFFISANT POUR FAIRE CUIRE CES
ALIMENTS. NE RÉGLEZ PAS SUR « GRIDDLE POUR FAIRE MIJOTER - IL Y
AURA UNE « SURCHAUFFE ».
La température peut être ajustée pendant la cuisson. En règle générale, la
plupart des combinaisons de viande et de légumes doivent être cuites pendant 7
à 10 heures sur « LOW » (faible), entre 4 et 6 heures sur "MEDIUM » (moyenne)
ou entre 2 à 3 heures sur « HIGH » (élevé). Les viandes deviennent plus tendres
lorsqu’elles sont cuites plus longtemps à des températures plus basses. Évitez
de retirer le couvercle lorsque vous faites cuire lentement, car le temps de
cuisson sera augmenté en raison de la perte de chaleur. N’enlevez le couvercle
que lorsqu’il faut remuer ou ajouter des ingrédients.
5. Appuyez sur le bouton fléché « TIME » (temps). Les minutes clignoteront. Appuyez
sur la flèche allant vers le haut pour régler les minutes de cuisson désirées. Les
minutes augmentent par incréments de 5 minutes. Appuyez à nouveau sur le
bouton fléché allant vers le bas pour sélectionner les heures. Appuyez sur la flèche
allant vers le haut pour régler les heures de cuisson désirées. Le socle ne
chauffera pas si la minuterie n’est pas réglée. Vous ne pouvez pas programmer la
mijoteuse Versatility™ pour cuisiner pendant plus de 19 heures et 55 minutes.
• La minuterie, une fois réglée, comptera à rebours en quelques minutes. Une
pression sur les boutons « TIME » (temps) une fos le cycle commencé, ne
changera pas l’heure réglée. Pour remettre à zéro le temps de cuisson, le
socle doit être débranché de la prise.
6. Lorsque l’heure souhaitée est affichée, n’appuyez sur aucune autre touche. L’heure
clignotera 3 fois, le socle chauffant commencera à chauffer, et les « : » entre les
chiffres et la lumière ON clignoteront.
7. Lorsque le temps de cuisson est écoulé, la mijoteuse s’arrête de chauffer et
s’éteint. Débranchez sa prise. Si vous devez faire cuire un peu plus longtemps,
reprenez les étapes de 3 à 6 pour régler la température et l’heure souhaitées de
la cuisson.
À Utiliser Comme Plaque de Cuisson:
Le socle chauffant peut être utilisé comme une plaque de cuisson légère.
1. Mettez le cadran de température sur « GRIDDLE » (plaque). Appuyez sur le
bouton fléché vers le bas, « TIME » (temps) (temps). Les minutes clignoteront.
Appuyez sur la flèche allant vers le haut pour régler les minutes de cuisson
désirées. Les minutes augmentent par incréments de 5 minutes. Pour que la
cuisson soit parfaite, préchauffez le socle pendant environ 8 à 10 minutes avant
la cuisson. Veuillez vous référer au « Guide de Températures » ci-dessous. Le
socle chauffant ne peut être utilisé que comme une plaque de cuisson légère. «
GRIDDLE » (plaque) ne doit JAMAIS être utilisé pour régler la mijoteuse.
2. Lorsque le temps de cuisson est écoulé, la mijoteuse s’arrête de chauffer et
s’éteint. Débranchez la mijoteuse de la prise et laissez-la refroidir complètement.
Suivez les instructions de la section « Nettoyage de votre mijoteuse 6 Qt.
Versatility™ » de ce manuel.
• Il est possible qu’un peu de fumée et une légère odeur se dégagent pendant le
chauffage en raison de la diffusion des huiles de fabrication: c’est tout à fait normal.

Française - 5
• De petits bruits d’expansion/contraction peuvent être produits pendant le
chauffage et le refroidissement: c’est out à fait normal.
GUIDE DE TEMPERATURE
Assurez-vous de cuire les aliments aux températures recommandées pour une
cuisson sans danger. Vérifiez toujours à l’aide d’un thermomètre à viande pour vous
assurer que le centre est complètement cuit.
VIANDE
TEMPÉRATURES INTERNES
Bœuf
Saignant
140°F/60°C
A Point
160°F/71°C
Bien Cuit
170°F/76°C
Porc
Frais
170°F/76°C
Fumé
160°F/71°C
En Conserve
140°F/60°C
Agneau
170°F à 180°F/76°C à 82°C
Veau
170°F/76°C
Volaille
180°F/82°C
ASTUCES
• Adapter des Recettes pour la Cuisson au Faitout: Un grand nombre de vos
recettes préférées au four et à la gazinière peuvent être adaptées à la cuisson au
faitout avec quelques modifications mineures. Voici quelques points importants à
ne pas oublier:
Quantité de Liquide: Très peu de liquide s’évaporant pendant une cuisson au
faitout, réduisez la quantité de liquide de votre recette de moitié (1 tasse de
liquide est suffisante pour la plupart des recettes). Pour les recettes de soupes,
ajoutez tous les ingrédients sauf l’eau ou le bouillon dans le récipient; ajoutez
seulement suffisamment de liquide pour recouvrir les ingrédients.
Quantité d’Assaisonnement: Réduisez la quantité d’assaisonnement
proportionnellement par rapport à la quantité de liquide. Utilisez des épices ou
des feuilles entières plutôt que des formes écrasées ou moulues.
Cuisson Lente de la Viande: Les morceaux de viande moins chers et moins onéreux
sont mieux adaptés à la cuisson mijotée que les pièces de viande onéreuses. Retirez
l’excès de graisse avant la cuisson lente si vous le souhaitez. La viande peut être dorée
dans le récipient de cuisson sur la gazinière avant la cuisson au faitout.
Cuisson Lente des Légumes: Ajoutez les légumes partiellement surgelés, les
légumes chinois et les champignons frais pendant les dernières heures de cuisson.
Les légumes à saveur forte comme les épinards, les aubergines, le gombo et les
choux verts devraient être précuits avant d’être ajoutés dans le faitout. La quantité
d’oignons normalement utilisée dans votre recette devrait être réduite parce que leur
saveur se renforce pendant la cuisson. Dans la plupart des cas, les légumes frais
sont plus longs à cuire que les viandes parce que le liquide mijote et ne bout pas.
Cuisson Lente de Viandes et de Légumes Crus: La plupart des combinaisons
de viande crue et de légumes a besoin d’au moins 4 à 6 heures de cuisson sur
« HIGH » (élevé) ou 7 à 10 heures sur « LOW » (faible).
Cuisson Lente de Poissons et de Fruits de Mer: Les fruits de mer et les
poissons frais se décomposent pendant les longues heures que dure la cuisson.
Ajoutez ces ingrédients une heure avant de servir t cuisez sur « HIGH » (élevé).

Française - 6
Cuisson Lente de Lait, de Crème Sucrée ou Salée et de Fromage: Parce que
le lait, la crème sucrée ou salée et le fromage se décomposent pendant les
longues heures que dure la cuisson, ajoutez ces ingrédients juste avant le
service ou substituez du lait condensé non dilué en boîte ou du lait évaporé. Le
fromage fondu a tendance à donner de meillleurs résultats que le fromage vieilli.
Le Riz et les Pâtes: Le riz et les pâtes peuvent être cuits séparément, ou ajoutés
non cuits pendant la dernière heure de cuisson. Si ces ingrédients sont ajoutés
non cuits, assurez-vous qu’il y a au moins 1 à 1½ tasses de liquide dans le
récipient et que la température est réglée sur « LOW » (faible) ou plus.
Les Quenelles: Les quenelles peuvent être servies dans un bouillon ou dans
une gravy sur « HIGH » (élevé). Posez les quenelles à la cuiller dans le bouillon
ou la gravy qui mijote. Laissez cuire à couvert pendant 30 minutes.
Faire Épaissir les Jus de Viandes pour la Gravy et pour les Sauces: Pour
épaissir les jus de viandes pour les gravies et les sauces, ajoutez 2 à 3 c. à
soupe de tapioca à cuisson rapide au départ, ou épaississez après la cuisson en
ajoutant une pâte onctueuse obtenue à partir de 2 à 4 c. à soupe d’amidon de
maïs ou de farine et ¼ tasse d’eau froide. Portez à ébullition sur « HIGH »
(élevé). Les aliments solides peuvent être retirés en premier.
• Ne Retirez pas le Couvercle Pendant la Cuisson: Afin de conserver la chaleur,
l’humidité et la saveur des aliments, ne retirez pas le couvercle pendant la cuisson
sauf si cela est nécessaire pour ajouter des ingrédients supplémentaires.
• Utilisation des Ustensiles de Cuisine sur la Finition Antiadhésive: Les types
d’ustensiles de cuisine suivants peuvent être utilisés sur la finition antiadhésive:
en plastique, en caoutchouc ou en bois. N’utilisez pas d’ustensiles de cuisine
métalliques aux extrémités affutées (fourchettes, couteaux, écraseurs) car ceux-ci
risqueraient de rayer la finition antiadhésive.
• Utilisation du Récipient de Cuisson sur la Gazinière: Le récipient de cuisson (sans
la base chauffante) puis être utilisé pour la cuisson sur votre gazinière. Placez le
récipient sur le grand feu et utilisez une puissance moyenne à faible. L’utilisation d’une
chaleur faible à moyenne va empêcher de trop cuire les aliments, cela réduira les
tâches et contribuera à conserver les jus de viandes naturels. N’utilisez pas de
température élevée sauf pour porter des liquides à ébullition. Si vous cuisinez sur une
cuisinière à gaz, ne laissez pas la flamme monter le long du récipient de cuisson.
UTILISEZ TOUJOURS DES GANTS DE CUISINE LORSQUE VOUS UTILISEZ LE
RÉCIPIENT DE CUISSON ET LE COUVERCLE SUR VOTRE GAZINIÈRE.
• Cuisson des Viandes: Lorsque vous cuisez des viandes, préchauffez le récipient
de cuisson vide à chaleur moyenne à faible pendant 2 à 3 minutes ou jusqu’à ce
qu’une goutte d’eau grésille au fond du récipient de cuisson. Pour empêcher les
viandes maigres de coller, vous pouvez souhaiter ajouter une petite quantité
d’huile de cuisine. Ajoutez la viande et laissez dorer selon votre souhait. Couvrez
le récipient de cuisson et réduisez la température sur une température faible pour
la cuisson sur la gazinière OU transférez le récipient de cuisson vers la base
chauffante et faites cuire au réglage souhaité. La durée de cuisson la plus courte
sera obtenue avec le réglage « HIGH » (élevé).
• Utilisation du Récipient de Cuisson au Four: Le récipient de cuisson (sans la
base chauffante) peut être utilisé dans un four traditionnel ou un four à convection
jusqu’à une température de préchauffage de 350°F/177°C. Si le récipient de cuisson
doit être couvert, utilisez uniquement le couvercle de verre dans le four. Le récipient
de cuisson peut être recouvert de papier aluminium pour une utilisation au four.
UTILISEZ TOUJOURS DES GANTS DE CUISINE LORSQUE VOUS UTILISEZ LE
RÉCIPIENT DE CUISSON DANS LE FOUR.

Française - 7
N’UTILISEZ PAS LE RÉCIPIENT DE CUISSON DANS UN FOUR A MICRO-ONDES,
SUR UN FEU DE CAMP OU SOUS UN APPAREIL DE CUISSON AU FOUR AFIN
D’ÉVITER DE DÉTÉRIORER LE RÉCIPIENT DE CUISSON OU LE FOUR.
• Utilisation d’une Grille à Rôtir: Votre cocotte à mijoter inclut une petite grille
métallique pour rôtir des viandes et de la volaille. Pour utiliser la grille, placez-la
simplement au fond de la marmite, puis placez le rôti, le poulet ou le jambon sur la
grille. Ajoutez une petite quantité de liquide à la marmite avant la cuisson. Si vous
le souhaitez, vous pouvez dorer la viande dans la marmite sur une gazinière avant
de la rôtir. La grille peut également être utilisée pour cuire à la vapeur des
légumes frais comme des brocolis et du maïs entier. Ajoutez une tasse d’eau à la
marmite pour cuire à la vapeur les légumes. Cuisez sur la gazinière sur feu moyen
à moyen-faible ou sur le socle chauffant sur « HIGH » (élevé) jusqu’au niveau de
cuisson souhaité.
• Pain, Gâteaux & Desserts: Utilisez un moule à pain de 8 x 4 pouces ou un moule à
pain de 9 x 5 pouces. Placez la grille à rôtir dans le moule avant de placer le moule
à pain. Vérifiez pour vous assurer que votre moule entre complètement dans la
marmite avant de mélanger les ingrédients. Pour empêcher la condensation de
s’écouler sur les aliments pendant la cuisson, placez une double couche de
serviettes en papier et une seule couche de papier aluminium à travers le haut de la
marmite. Couvrez et cuisez, en suivant la recette.
NETTOYAGE DE VOTRE MIJOTEUSE VERSATILITY™ 6 QT. (5.7 L)
1. Débranchez le fil de la prise et laissez tout l’appareil (socle, récipient de cuisson,
panier, couvercle) refroidir complètement avant de le nettoyer. Posez le récipient
de cuisson et le couvercle sur une surface sèche et résistante à la chaleur, afin
de les laisser refroidir progressivement. REMARQUE: Ne faites pas couler
d’eau froide sur un couvercle en verre encore chaud, car il pourrait se fêler
s’il est refroidi trop rapidement.
2. Essuyez le socle chauffant et le fil d’alimentation à l’aide d’un torchon humide.
n’immergez PAS le socle chauffant dans l’eau ni dans aucun autre liquide.
3. Le récipient de cuisson, panier, et le couvercle en verre peuvent être lavés à la
main avec de l’eau savonneuse chaude, ou mis au lave-vaisselle. Si vous utilisez
un lave-vaisselle, évitez que les ustensiles ne soient en contact les uns avec les
autres afin qu’ils ne se brisent pas. N’utilisez pas de tampons à récurer ni de
nettoyants, car ils pourraient endommager ce matériel. Essuyez avec du vinaigre
distillé pour éliminer les taches d’eau ou les dépôts minéraux. Lavez une fois de
plus à l’eau chaude savonneuse, rincez et faites sécher.
Nettoyage du Socle Chauffant Après Utilisation de la Plaque Chauffante:
Débranchez toujours la prise de la prise secteur et laissez refroidir complètement
avant de procéder au nettoyage. À l’aide d’une cuillère ou d’une poire, enlevez toute
la graisse accumulée sur la surface de la plaque chauffante. Essuyez les résidus
d’huile se trouvant sur le socle à l’aide d’une serviette en papier. Essuyez la surface
antiadhésive avec un torchon humide et savonneux, ou un tampon à récurer en
nylon recommandé pour les surfaces antiadhésives. Nettoyez soigneusement la
surface, en essuyant le socle plusieurs fois à l’aide d’un chiffon propre et humide,
pour enlever les résidus de savon.
Si un film d’huile collant se forme sur la surface antiadhésive du socle, essuyez à
l’aide d’un chiffon sec pour l’enlever. Si ce résidu n’est pas éliminé, il adhérera à la
surface lorsqu’il sera réchauffé, et sera ensuite impossible à enlever.
Cet appareil ne contient aucune pièce réparable par l’utilisateur.
La page charge ...
La page charge ...
La page charge ...
La page charge ...
La page charge ...
La page charge ...
La page charge ...
La page charge ...
La page charge ...
La page charge ...
La page charge ...
La page charge ...
La page charge ...
La page charge ...
La page charge ...
La page charge ...
La page charge ...
La page charge ...
La page charge ...
La page charge ...
-
 1
1
-
 2
2
-
 3
3
-
 4
4
-
 5
5
-
 6
6
-
 7
7
-
 8
8
-
 9
9
-
 10
10
-
 11
11
-
 12
12
-
 13
13
-
 14
14
-
 15
15
-
 16
16
-
 17
17
-
 18
18
-
 19
19
-
 20
20
-
 21
21
-
 22
22
-
 23
23
-
 24
24
-
 25
25
-
 26
26
-
 27
27
-
 28
28
-
 29
29
-
 30
30
-
 31
31
-
 32
32
-
 33
33
-
 34
34
-
 35
35
-
 36
36
-
 37
37
-
 38
38
-
 39
39
-
 40
40


West Bend 87966 Manuel utilisateur
- Catégorie
- Mijoteuses
- Taper
- Manuel utilisateur
dans d''autres langues
- English: West Bend 87966 User manual
- español: West Bend 87966 Manual de usuario
Documents connexes
-
West Bend 84966 Manuel utilisateur
-
-
-
-
-
Focus Electrics 5-6 QUART SLOW COOKERS Manuel utilisateur
-
-
-
-