Oral-B PRO 5000 TRIZONE Instructions Manual
- Catégorie
- Brosses à dents électriques
- Taper
- Instructions Manual
Ce manuel convient également à

BLACK/WHITE 7000
5000-5550
5000-5550
PRO 5000-5550
Deep Sweep
TM
5000-5550
Oral
Oral-B
6
96846214_D36MHF_NA_S1.indd 196846214_D36MHF_NA_S1.indd 1 20.05.14 10:2120.05.14 10:21
Stapled booklet, 148 x 210mm, 36 pages (incl. 8 pages cover), 2/2c = black + PMS300u
CSS APPROVED Effective Date 5Jun2014 GMT - Printed 06Aug2014 Page 1 of 35

English 6
Español 16
Français 26
Internet:
www.oralb.com
www.oralb.ca
www.braun.com
www.service.braun.com
Braun GmbH
Frankfurter Strasse 145
61476 Kronberg
Germany/Allemagne/Alemania
Charger type 3757
Handle type 3764
Display type 3742
Tipo de cargador 3757
Tipo de mango 3764
Tipo de pantalla 3742
Type de chargeur 3757
Type de manche 3764
Type d’affichage 3742
96846214/VI-14
GB/E/F
96846214_D36MHF_NA_S2.indd 196846214_D36MHF_NA_S2.indd 1 04.06.14 14:3704.06.14 14:37
CSS APPROVED Effective Date 5Jun2014 GMT - Printed 06Aug2014 Page 2 of 35

6
b
e
f
g
h
a
Oral-B
m
n
i
j
k
l
A
C
24 h
set
h/min
AAA
AAA
set
AAA
AAA
B
set
h/min
h/min
set
c
d
Oral
-
B
4
96846214_D36MHF_NA_S4.indd 196846214_D36MHF_NA_S4.indd 1 16.04.14 12:0016.04.14 12:00
CSS APPROVED Effective Date 5Jun2014 GMT - Printed 06Aug2014 Page 3 of 35

2
4
3
0
s
e
c
3
0
s
e
c
3
0
s
e
c
3
0
s
e
c
4
5
s
e
c
4
5
s
e
c
4
5
s
e
c
4
5
s
e
c
Oral
-
B
Or
al
O
r
al
-
B
O
ra
l
-
B
6
7
5
1
3
O
ral
-
B
6
5
96846214_D36MHF_NA_S5.indd 196846214_D36MHF_NA_S5.indd 1 16.04.14 12:0016.04.14 12:00
CSS APPROVED Effective Date 5Jun2014 GMT - Printed 06Aug2014 Page 4 of 35

6
IMPORTANT SAFEGUARDS
Your Oral-B
®
toothbrush has been carefully designed to offer you and your family a unique
brushing experience that is both safe and effective.
Read all instructions before using.
DANGER
In order to reduce the risk of electrocution:
1. Do not place or store the charger where it can fall or be pulled into a tub or sink.
2. Do not place the charger in water or other liquid.
3. Do not reach for a charger that has fallen into water. Unplug immediately.
4. Do not use while bathing.
WARNING
To reduce the risk of burns, electrocution, fire or injury:
1. Close supervision is necessary when this product is used by, on, or near children or
invalids.
2. Use this product only for its intended use as described in this manual. Do not use
attachments not recommended by the manufacturer.
3. Keep cord away from heated surfaces.
4. Never drop the appliance or insert any object into any opening of the appliance.
5. Never operate this product if it has a damaged cord or plug, if it is not working properly,
if it has been dropped or damaged or if it has been dropped into water. If any of these
occur, please contact a service center and return the product for examination and repair.
IMPORTANT
1. Periodically check the cord for damage. If cord is damaged, take the charging unit to an
Oral-B Service Center. A damaged or non-functioning unit should no longer be used.
2. If the toothbrush handle is dropped, the brush head should be replaced before the next
use even if no damage is visible.
3. Do not touch the power plug with wet hands. This can cause an electric shock.
4. When unplugging, always hold the power plug instead of the cord.
5. Do not modify or repair the product. This may cause fire, electric shock or injury. Consult
your dealer for repairs or contact an Oral-B Service Center. Do not disassemble the
product except when disposing of the battery.
6. When taking out the battery for disposal, use caution not to short the positive (+) and
negative (–) terminals.
7. This product is not intended for use by children under age three.
8. This toothbrush is a personal care device and is not intended for use on multiple patients
in a dental practice or institution.
CAUTION
If you are undergoing treatment for any oral care condition, consult your dental professional
prior to use.
SAVE THESE INSTRUCTIONS
96846214_D36MHF_NA.indd 696846214_D36MHF_NA.indd 6 05.06.14 08:0605.06.14 08:06
CSS APPROVED Effective Date 5Jun2014 GMT - Printed 06Aug2014 Page 5 of 35

7
English
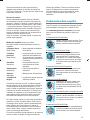
Important Information
• Your Oral-B 5000–7000 can be used with an
interactive wireless display (i) and/or with your
Smart Phone (find details under «Connecting
your toothbrush to your Smart Phone»).
• To avoid electromagnetic interference and/or
compatibility conflicts, deactivate the radio
transmission of your toothbrush handle (e) before
using it in restricted surroundings, such as
aircrafts or specially marked areas in hospitals.
• Deactivate radio transmission by simultaneously
pressing the on/off (c) and mode button (d) for
3 seconds until the radio transmission display (f)
goes off. Follow the same procedure to reacti-
vate transmission again.
• Persons with pacemakers should always keep
the toothbrush more than six inches (15 centi-
meters) from the pacemaker while turned on.
Anytime you suspect interference is taking
place, deactivate the radio transmission of your
toothbrush.
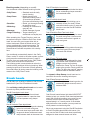
Description
a Brush head
b Pressure sensor light (red) / visual timer light
(green)
c On/off button
d Brushing mode button
e Handle
f Radio transmission display (with Bluetooth
®
wireless technology)
g Charge level display
h Charging unit (basic charger and brush head
compartment with protective cover)
i SmartGuide (depending on model)
j SmartGuide holder (depending on model)
k Wall mount (depending on model)
l Adhesive ring (depending on model)
m Travel case (depending on model)
n Travel charger pouch (depending on model)
Specification
For voltage specifications refer to the bottom of the
charging unit.
Connecting and charging
Your toothbrush has a waterproof handle, is electri-
cally safe and designed for use in the bathroom.
• Plug the charger (h) into an electrical outlet and
place the toothbrush handle (e) on the charging
unit.
• The flashing blue lights indicate that the toothbrush
is charging (picture 1, page 5); once it is fully
charged, the lights turn off. A full charge can take
up to 24 hours and enables up to ten days of
regular brushing (twice a day, 2 minutes).
Note: After deep discharge, the blue lights might
not flash immediately; it can take up to 10–15
minutes.
• If the rechargeable battery is low a blue light is
flashing on the charge level display (g) for some
seconds when turning your toothbrush on/off. If the
rechargeable battery is empty the motor will stop
and an orange light is flashing on the charge level
display; it will need a 40-minute charge before you
can use it for a 2-minute brushing.
• For everyday use, the toothbrush handle can be
stored on the charging unit to maintain it at full
power. Overcharging is impossible.
To maintain
the maximum capacity of the rechargeable battery,
unplug the charging unit and fully discharge the
handle with regular use at least every 6 months.
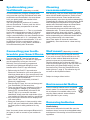
SmartGuide adjustments
(depending on model)
The SmartGuide (i) comes with a demonstration
mode. Deactivate this mode by removing the
compartment cover in the back (picture A, page 4)
and push the «set» or «h/min» button.
A flashing «12:00» indicates that you can now adjust
the clock time.
Note: If the SmartGuide display is blank before first
use (no active demonstration mode / no batteries
inserted) the batteries will need to be replaced/
inserted before continuing.
Batteries are supplied.
Clock Time
Press and hold the «set» button until «12h» is
displayed. By briefly pressing the «h/min» button,
you can toggle between «12h» or «24h» daytime
format. Push «set» to confirm your choice. Then
the hour digit starts flashing. Press the «h/min»
button until the right hour appears and confirm with
«set». Proceed same way to set both minute digits
(picture B, page 4).
96846214_D36MHF_NA.indd 796846214_D36MHF_NA.indd 7 05.06.14 08:0605.06.14 08:06
CSS APPROVED Effective Date 5Jun2014 GMT - Printed 06Aug2014 Page 6 of 35

8
SmartGuide Icons
(depending on model)
Displayed
Icon
Meaning
«Daily Clean» mode
«Deep Clean» mode
«Sensitive» mode
«Whitening» mode
«Massage» mode
«Tongue Cleaning» mode
Too much pressure is applied. Reduce
the brushing force.
«Quadrant circle»
Move to the next quadrant of your
mouth when the relevant segment
flashes.
You reached the dentist recommended
2-minute brushing time (3-minute
brushing time within the «Deep Clean»
mode).
After use your brushing time will be
rewarded with stars.
SmartGuide batteries are low. Change
batteries of the SmartGuide.
Using your toothbrush
Brushing technique
Wet brush head and apply any kind of toothpaste.
To avoid splashing, guide the brush head to your
teeth before switching on the appliance (picture 2,
page 5). When brushing your teeth with one of the
Oral-B oscillating-rotating brush heads guide the
brush head slowly from tooth to tooth, spending a few
seconds on each tooth surface (picture 3, page 5).
When using the Oral-B «Deep Sweep» brush head
place the toothbrush bristles against the teeth at a
slight angle towards the gumline. Apply light
pressure and start brushing in back and forth
motions, just like you would do with a manual
toothbrush (picture 4, page 5).
With any brush head start brushing the outsides,
then the insides and finally the chewing surfaces.
Brush all four quadrants of your mouth equally. You
may also consult your dentist or dental hygienist
about the right technique for you.
In the first days of using any electric toothbrush,
your gums may bleed slightly. In general, bleeding
should stop after a few days. Should it persist after
2 weeks, please consult your dentist or dental
hygienist. If you have sensitive teeth and gums,
Oral-B recommends using the «Sensitive» mode
(optional in combination with the Oral-B Sensitive
Gum Care brush head).
Timer
You can choose between «Professional» or
«2-Minute» timer.
The «2-Minute» timer signals with a short stuttering
sound and a green light (b) that the dentist recom-
mended 2-minute brushing time has been reached.
The «Professional» timer signals with a short
stuttering sound and a green light at 30-seconds
intervals to move to the next quadrant of your mouth
(45 seconds intervals within «Deep Clean» mode)
(picture 5, page 5). A long stuttering sound and a
green light indicate the end of the professionally
recommended 2-minute brushing time (3-minute
brushing time within «Deep Clean» mode.
The timer memorizes the elapsed brushing time,
even when the handle is briefly switched off during
brushing. The timer resets if pausing longer than
30 seconds or briefly pressing the mode button (d)
during pause.
Personalizing the timer
Your toothbrush comes with the «Professional»
timer activated. To change this, press and hold
the brushing mode button for 3 seconds until the
SmartGuide shows «:30» and «timer».
Briefly press the on/off button to switch to the
«2-Minute» timer. Push the mode button to confirm.
Pressure sensor
If you put excessive pressure on your teeth, the
red pressure sensor light (b) will light up (picture 5,
page 5). Additionally, when brushing in «Daily Clean»
or «Deep Clean» mode, the brushing mode will
change to the «Sensitive» mode. Periodically check
the operation of the pressure sensor by pressing
moderately on the brush head during use.
Note: In «Tongue Cleaning» mode the pressure
sensor is turned off.
96846214_D36MHF_NA.indd 896846214_D36MHF_NA.indd 8 05.06.14 08:0605.06.14 08:06
CSS APPROVED Effective Date 5Jun2014 GMT - Printed 06Aug2014 Page 7 of 35

9
Brushing modes (depending on model)
Your toothbrush offers different brushing modes:
«Daily Clean» – Standard mode for daily
mouth cleaning
«Deep Clean» – Mouth cleaning with
extended brushing time of
45 seconds per quadrant
(3 minute total brushing time)
«Sensitive» – Gentle, yet thorough cleaning
for sensitive areas
«Whitening» – Polishing for occasional or
everyday use
«Massage» – Gentle massage of gums
«Tongue Cleaning»
– Tongue cleaning for
occasional or everyday use
When operating the «Tongue Cleaning» mode, we
recommend using the «Sensitive Gum Care» brush
head. You can brush your tongue either with or
without toothpaste. Brush the whole area of your
tongue systematically in gentle movements. The
recommended brushing time is 20 seconds; the
SmartGuide will indicate completion with a smiley
face.
Your toothbrush automatically starts in the «Daily
Clean» mode. To switch to the other modes, succes-
sively press the mode button (picture 6, page 5).
To return from any mode back to the «Daily Clean»
mode, press and hold the mode button.
The brushing mode is memorized even when the
handle is briefly switched off during brushing. When
pausing longer than 30 seconds or briefly pressing
the mode button (d) during pause the brushing mode
resets to the «Daily Clean» mode.
Brush heads
Oral-B offers you a variety of different Oral-B brush
heads that fit your Oral-B toothbrush handle.
Our oscillating-rotating brush heads can be used
for tooth-by-tooth precision cleaning.
Oral-B CrossAction brush head
Our most advanced brush head.
Angled bristles for a precise clean.
Lifts and powers away plaque.
Oral-B Precision Clean brush head
provides effective and gentle cleaning
action for both teeth and gums.
The brush head cups each tooth with
longer and denser bristles and reach
deep between teeth at the same time.
Oral-B FlossAction brush head
features micropulse bristles that allow
for an outstanding plaque removal in
the interdental areas.
Oral-B ProWhite brush head
features a special polishing cup to
naturally whiten your teeth. Please
note that children under 12 years old
should not use the Oral-B ProWhite
brush head.
Oral-B Sensitive Gum Care brush head
provides thorough cleaning for sensi-
tive teeth and gums. It has an extra
soft bristle texture that is gentle on
teeth and gums.
Oral-B Ortho brush head
with special tufting pattern thoroughly
cleans and gently removes plaque
from teeth with braces.
Oral-B Power Tip brush head
The Power Tip is designed for clean-
ing between teeth as well as around
bridges, crowns and implants.
Position the Power Tip at a 45 degree
angle to the gumline. Slowly guide the
Power Tip along the gumline, pausing
between teeth for excellent results.
Our dynamic «Deep Sweep» brush head can be
used with all common brushing techniques.
Oral-B Deep Sweep brush head
features triple zone cleaning action for
outstanding plaque removal, even in
between teeth.
Oral-B brush heads feature light blue INDICATOR
®
bristles to help you monitor brush head replacement
need. With thorough brushing, twice a day for two
minutes, the blue color will fade halfway down
approximately in a 3-month period. If the bristles
splay before the color recedes, you may exert too
much pressure on teeth and gums.
We do not recommend using the Oral-B FlossAction
or Oral-B ProWhite brush head with braces. You
may use the Oral-B Ortho brush head, specifically
designed to clean around braces and wires.
96846214_D36MHF_NA.indd 996846214_D36MHF_NA.indd 9 05.06.14 08:0605.06.14 08:06
CSS APPROVED Effective Date 5Jun2014 GMT - Printed 06Aug2014 Page 8 of 35

10
Synchronizing your
toothbrush
(depending on model)
To avoid interference of display messages when
using more than one Oral-B toothbrush with radio
transmission and SmartGuide in the same house-
hold, you need to assign the handles to their
respective SmartGuide.
You can synchronize a maximum of 2 handles
with one SmartGuide. To do so, push the «h/min»
button in the battery compartment for at least
3 seconds.
The SmartGuide shows «L---». Turn on your handle
to start the synchronization process. It is finished
when «L-1-» is displayed. Turn off the handle. To
assign a second handle to the same SmartGuide turn
on the other handle until «L-2-» is displayed. After
having synchronized the second handle, «Full» will
be displayed. Exit the synchronization mode by
pressing the «h/min» or «set» button, otherwise it
will end automatically after 30 seconds.
Connecting your tooth-
brush to your Smart Phone
Download the Oral-B™ app for free from App
Store
(SM)
or Google Play™. The Oral-B™ app gives
you the opportunity to use your time more
efficiently, chart your brushing progress and
customize your toothbrush settings (for more
benefits see the Oral-B™ app instructions).
• Before using the Oral-B™ app make sure
Bluetooth is activated on your smart phone (for
directions please refer to your smart phone’s user
manual). Your toothbrush will appear in the list of
devices as: «Oral-B toothbrush».
Note: Oral-B™ app functionality is limited if
Bluetooth is deactivated.
• Start the Oral-B™ app. You can use the app and
your SmartGuide (i) at the same time.
• Once you start using your toothbrush by lifting it
off the plugged-in charger (h) or pressing any
button (c)/(d), it automatically connects to the
Oral-B™ app. If no connection has been
established, briefly press the mode button (d) on
your toothbrush handle and wait for a connection.
• Any further app instructions will be displayed on
your smart phone.
• Keep your smart phone in close proximity when
using it with your toothbrush handle. Make sure
the smart phone is safely positioned in a dry
place.
Note: Your smart phone must support Bluetooth 4.0
(or higher) in order to connect to your toothbrush
handle.
Cleaning
recommendations
After brushing, rinse your brush head under running
water with the handle switched on. Switch off and
remove the brush head. Clean handle and brush
head separately; wipe them dry before reassembling.
Disassemble the charging unit before cleaning. Brush
head compartment and protective cover are dish-
washer-safe. Both basic charger and SmartGuide
should be cleaned with a damp cloth only.
The removable inner part of the travel case (m) is
dishwasher-safe. The outer case should only be
wiped clean with a damp cloth (picture 7, page 5).
Make sure that travel case parts are completely dry
before reassembling and toothbrush/brush heads
are dry before storing in the travel case.
Note: Clean stains on the travel case surface
immediately. Store travel case in a clean and dry
place.
Wall mount (depending on model)
Use the adhesive ring (l) with the wall mount (k)
if you prefer to mount the SmartGuide on a wall,
mirror or other surface. Make sure the chosen
surface is clean and dry before adhering.
Stick the adhesive ring on the even side of the
wall mount and press it firmly to the wall. Wait 24h
before sliding the SmartGuide holder (j) into the
fixed wall mount. Place the SmartGuide into its
holder (picture C, page 4). The adhesive ring will
not work on dirt-repellent surfaces.
Subject to change without notice.
Environmental Notice
Product contains batteries and/or recyclable
electric waste. For environment protection
do not dispose in household waste, but for
recycling take to electric waste collection
points provided in your country.
Removing batteries
Handle battery
At the end of the product’s useful life, open the
handle as shown, remove the rechargeable battery
and dispose of it according to local environmental
regulations.
96846214_D36MHF_NA.indd 1096846214_D36MHF_NA.indd 10 05.06.14 08:0605.06.14 08:06
CSS APPROVED Effective Date 5Jun2014 GMT - Printed 06Aug2014 Page 9 of 35

11
Caution! Opening the handle will destroy the
appliance and invalidate the warranty.
SmartGuide batteries
Batteries may leak if empty or not used for a long
time. Avoid skin contact whilst handling leaking
batteries.
Keep away from children.
Do not swallow. If swallowed, seek medical advice
at once.
Remove fully discharged batteries immediately.
Replace all batteries at the same time.
Do not mix used and new batteries, different brands
or types. Do not disassemble, recharge or dispose
of in fire.
Important information on
Bluetooth
®
radio module
Although all indicated functions on the Bluetooth
device are supported, Oral-B does not ensure 100%
reliability in connection, and feature operation
consistency.
Operation performance and connection reliability are
direct consequences of each individual Bluetooth
device, software version, as well as the operating
system of those Bluetooth devices and company
security regulations implemented on the device.
Oral-B adheres to and strictly implements the
Bluetooth standard by which Bluetooth devices can
communicate and function in Oral-B toothbrushes.
However, if device manufacturers fail to implement
this standard, Bluetooth compatibility and features
will be further compromised and the user may
experience functional and feature-related issues.
Please note that the software on the Bluetooth device
can significantly affect compatibility and operation.
Satisfaction Guaranteed
or Your Money Back!
Try Oral-B for 60 days, starting from the day of
purchase. If you are not 100% satisfied, receive a
full refund via a pre-paid card. No questions asked.
For a full refund, please return your product along
with your name, address, contact phone number
and the original cash register receipt indicating
purchase price and date to the address below.
U.S. only:
Oral-B 60 Day Satisfaction Guarantee
4608 Appliance Drive
Suite 2
Belcamp, MD 21017
Canada only:
Attention: 60-Day Challenge
Braun MBG
PO Box 12060
Saint John, NB
E2L 5E7
Your Oral-B toothbrush must be returned in its
original packaging and be postmarked no later than
60 days after the date of purchase. Please allow 6–8
weeks for handling. The shipment cost to return the
product is the responsibility of the consumer.
Sorry: No refunds will be made for any Oral-B product
damaged by accident, neglect, unreasonable use or
lost in the post.
Terms and conditions apply. For further details
please contact our customer service.
Warranty replacement brush heads
Oral-B warranty will be voided if electric rechargeable
handle damage is found to be attributed to the use of
non-Oral-B replacement brush heads.
Oral-B does not recommend the use of non Oral-B
replacement brush heads.
• Oral-B has no control over the quality of non-
Oral-B replacement brush heads. Therefore,
we cannot ensure the cleaning performance of
non-Oral-B replacement brush heads, as commu-
nicated with the electric rechargeable handle at
time of initial purchase.
• Oral-B cannot ensure a good fit of non-Oral-B
replacement brush heads.
• Oral-B cannot predict the long-term effect of non-
Oral-B replacement brush heads on handle wear.
All Oral-B replacement brush heads carry the Oral-B
logo and meet Oral-B’s high quality standards.
Oral-B does not sell replacement brush heads or
handle parts under any other brand name.
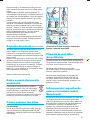
5 m
o
d
e
s
5
1
2
6
7
4
5
m
o
des
3
96846214_D36MHF_NA.indd 1196846214_D36MHF_NA.indd 11 05.06.14 08:0605.06.14 08:06
CSS APPROVED Effective Date 5Jun2014 GMT - Printed 06Aug2014 Page 10 of 35

12
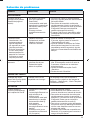
Trouble Shooting
Problem Possible reason Remedy
TOOTHBRUSH
Oral-B handle does not
operate with SmartGuide
(depending on model).
1. Synchronizing with
SmartGuide failed
2. Radio transmission is
deactivated; radio trans-
mission display (f) is
turned off.
3. Handle has no radio
transmission installed
1. Synchronize your toothbrush(es) (again).
Follow steps under «Synchronizing your
Toothbrush»
2. Activate the radio transmission by simulta-
neously pressing the on/off (c) and mode
button (d) for 3 seconds until the radio
transmission display (f) turns on.
3. Oral-B handle with radio transmission
installed can operate with SmartGuide only.
1. Short stuttering
sounds/flashing green
light every 30 seconds
(45 seconds in Deep
Clean mode)
2. Stuttering sound/
flashing green light only
after 2 minutes
(3 minutes in Deep
Clean mode)
1. «Professional timer»
activated
2. «2-Minute timer» activated
1. Set your timer to 2-Minute timer; follow
steps under «Personalizing the timer»
2. Set your timer to Professional timer
(stuttering sounds/flashing green light every
30 seconds); follow steps under
«Personalizing the timer»
Gums bleed slightly 1. May happen in first days of
usage
2. Brush head
3. Brushing mode
1. Bleeding should stop after a few days.
Should it persist after 2 weeks, please
consult your dentist or dental hygienist.
2. Try using the Oral-B «Sensitive» brush head.
3. Try using the «Sensitive» mode
BRUSH HEADS
Oral-B brush head does
not fit Oral-B handle
Oral-B brush head not
compatible with your handle
Oral-B brush heads that fit your Oral-B handle
do not fit «Pulsonic», «VitalitySonic», «Sonic
Complete», «CrossAction Power»
APP
Toothbrush does not
operate (properly) with
Oral-B app
1. Oral-B app is turned off.
2. Bluetooth is not activated
on your smart phone.
3. Radio transmission is
deactivated; radio
transmission display (f) is
turned off.
4. Connection to Bluetooth
has been lost.
5. Your smart phone does
not support Bluetooth 4.0
(or higher).
1. Turn on Oral-B app.
2. Activate Bluetooth on your smart phone;
described in its user manual.
3. Activate the radio transmission by
simultaneously pressing the on/off (c) and
mode button (d) for 3 seconds until the
radio transmission display (f) turns on.
4. Briefly press the mode button (d) to
re-connect.
Keep your smart phone in close proximity
when using it with the toothbrush handle.
5. Your smart phone must support Bluetooth
4.0 (or higher) in order to connect to your
toothbrush handle.
96846214_D36MHF_NA.indd 1296846214_D36MHF_NA.indd 12 05.06.14 08:0605.06.14 08:06
CSS APPROVED Effective Date 5Jun2014 GMT - Printed 06Aug2014 Page 11 of 35

13
FOR USA ONLY
Limited 2-Year Warranty
Oral-B warrants this appliance to be free of defects in material and workmanship for a
period of two years from the date of original purchase at retail.
If the appliance exhibits such a defect, Oral-B will, at its option, repair or replace it without
cost for parts and labor. The product must be carried in or shipped, prepaid and insured
(recommended), to an authorized Oral-B Service Center. Proof of date of original purchase
is required.
The cost to ship the product to an authorized Service Center is the responsibility of the
consumer, the cost to return the product to the consumer is the responsibility of Oral-B.
This warranty does not cover finishes or normal wear, nor does it cover damage resulting
from accident, misuse, dirt, water, tampering, unreasonable use, service performed or
attempted by unauthorized service agencies, failure to provide reasonable and necessary
maintenance, including recharging, or units that have been modified or used for commercial
purposes.
This appliance is equipped with a Bluetooth Smart approved radio module. Failure to
establish a Bluetooth Smart connection to specific smart phones is not covered under the
device guarantee, unless the Bluetooth radio module of this appliance is damaged. The
Bluetooth devices are warranted by their own manufacturers and not by Oral-B. Oral-B does
not influence or make any recommendations to device manufacturers, and therefore Oral-B
does not assume any responsibility for the number of compatible devices with our Bluetooth
systems.
Oral-B reserves the right, without any prior notice, to make any technical modifications or
changes to system implementation of device features, interface, and menu structure
changes that are deemed necessary to ensure that Oral-B systems function reliably.
ALL IMPLIED WARRANTIES, INCLUDING ANY IMPLIED WARRANTY OF MERCHANTABILITY
OR FITNESS FOR ANY PARTICULAR PURPOSE, ARE LIMITED IN DURATION TO TWO YEARS
FROM DATE OF ORIGINAL PURCHASE. IN NO EVENT WILL ORAL-B BE RESPONSIBLE FOR
CONSEQUENTIAL DAMAGES RESULTING FROM THE USE OF THIS PRODUCT.
Some states do not allow the exclusion or limitation of incidental or consequential damages,
so the above limitation may not apply to you. This warranty gives you specific legal rights,
and you may have other legal rights which vary from state to state.
How to obtain service in the USA
Should this product require service, please call 1-800-566-7252 to be referred to the
authorized Oral-B Service Center closest to you.
To obtain service:
A. Carry the product in to the authorized Oral-B Service Center of your choice or,
B. Ship the product to the authorized Oral-B Service Center of your choice. Pack the
product well. Ship the product prepaid and insured (recommended). Include a copy of
your proof of purchase to verify warranty coverage, if applicable.
To obtain original Oral-B replacement parts and accessories:
Contact an authorized Oral-B Service Center.
Please call 1-800-566-7252 to be referred to the authorized Oral-B Service Center closest
to you.
96846214_D36MHF_NA.indd 1396846214_D36MHF_NA.indd 13 05.06.14 08:0605.06.14 08:06
CSS APPROVED Effective Date 5Jun2014 GMT - Printed 06Aug2014 Page 12 of 35

14
To order original Oral-B replacement parts and accessories (including replacement brush
heads) by phone: Please call 1-800-566-7252.
To speak to an Oral-B Consumer Service Representative: Please call 1-800-566-7252.
Declaration of conformity
This appliance complies with part 15 of the FCC rules. Operation is subject to the following
two conditions: (1) this appliance may not cause harmful interference, and (2) this appliance
must accept any interference received, including interference that may cause undesired
operation.
Display unit: Tested to comply with FCC standards. FOR HOME OR OFFICE USE.
To change or modify any part of this appliance could void the authority to operate the
equipment.
This equipment has been tested and found to comply with the limits for a Class B digital
device, pursuant to Part 15 of the FCC Rules. These limits are designed to provide
reasonable protection against harmful interference in a residential installation. This
equipment generates, uses and can radiate radio frequency energy and, if not installed
and used in accordance with the instructions, may cause harmful interference to radio
communications. However, there is no guarantee that interference will not occur in a
particular installation. If this equipment does cause harmful interference to radio or
television reception, which can be determined by turning the equipment off and on, the user
is encouraged to try to correct the interference by one or more of the following measures:
– Reorient or relocate the receiving antenna.
– Increase the separation between the equipment and receiver.
– Connect the equipment into an outlet on a circuit different from that to which the receiver
is connected.
– Consult the dealer or an experienced radio/TV technician for help
96846214_D36MHF_NA.indd 1496846214_D36MHF_NA.indd 14 05.06.14 08:0605.06.14 08:06
CSS APPROVED Effective Date 5Jun2014 GMT - Printed 06Aug2014 Page 13 of 35

15
FOR CANADA ONLY
Limited 2-Year Warranty
In the event this appliance fails to function within the specified warranty period because of
defects in material or workmanship, and the consumer returns the unit to an authorized
service center, Braun Canada will, at its option either repair or replace the unit without
additional charge to the consumer. This warranty does not cover any product which has
been damaged by dropping, tampering, servicing performed or attempted by unauthorized
service agencies, misuse or abuse. This warranty excludes units which have been modified
or used for commercial purposes.
This appliance is equipped with a Bluetooth Smart approved radio module. Failure to
establish a Bluetooth Smart connection to specific smart phones is not covered under the
device guarantee, unless the Bluetooth radio module of this appliance is damaged. The
Bluetooth devices are warranted by their own manufacturers and not by Oral-B. Oral-B does
not influence or make any recommendations to device manufacturers, and therefore Oral-B
does not assume any responsibility for the number of compatible devices with our Bluetooth
systems.
Oral-B reserves the right, without any prior notice, to make any technical modifications or
changes to system implementation of device features, interface, and menu structure
changes that are deemed necessary to ensure that Oral-B systems function reliably.
To the extent allowed by law, Braun Canada shall not be responsible for loss of the product,
loss of time, inconvenience, commercial loss, special or consequential damages. The
provisions of this warranty are in addition to and not a modification of or subtraction from
the statutory warranties and other rights and remedies contained in applicable provincial
legislation.
How to obtain service in Canada
Should this product require service, please call 1-800-566-7252 to be referred to the
authorized Oral-B Service Center closest to you.
To obtain service:
A. Carry the product in to the authorized Oral-B Service Center of your choice or,
B. Ship the product to the authorized Oral-B Service Center of your choice. Pack the
product well. Ship the product prepaid and insured (recommended). Include a copy of
your proof of purchase to verify warranty coverage, if applicable.
To obtain original Oral-B replacement parts & accessories:
Contact an authorized Oral-B Service Center.
Please call 1-800-566-7252 to be referred to the authorized Oral-B Service Center closest
to you.
To speak to an Oral-B Service Representative:
Please call 1-800-566-7252.
Declaration of conformity
This device complies with Industry Canada licence-exempt RSS standard(s). Operation is
subject to the following two conditions: (1) this device may not cause interference, and (2)
this device must accept any interference, including interference that may cause undesired
operation of the device.
This Class B digital apparatus complies with Canadian ICES-003.
96846214_D36MHF_NA.indd 1596846214_D36MHF_NA.indd 15 05.06.14 08:0605.06.14 08:06
CSS APPROVED Effective Date 5Jun2014 GMT - Printed 06Aug2014 Page 14 of 35

16
MEDIDAS DE SEGURIDAD
Su cepillo dental Oral-B
®
ha sido diseñado cuidadosamente para ofrecerles a usted y a su
familia una exclusiva experiencia de cepillado segura y eficaz.
Lea todas las instrucciones antes de usar.
PELIGRO
Para disminuir el riesgo de electrocución:
1. No coloque ni guarde el cargador donde pudiera caerse a la bañera o al lavamanos.
2. No coloque el cargador en agua ni en otros líquidos.
3. Si el cargador se cae al agua, no trate de sacarlo. Desenchúfelo de inmediato.
4. No lo use mientras se baña o se ducha.
ADVERTENCIA
Para disminuir el riesgo de quemaduras, electrocución, incendio o lesiones:
1. Se requiere una cuidadosa supervisión mientras niños o personas minusválidas usan o están
cerca del producto.
2. Use este producto solamente para el propósito indicado tal como se describe en este manual.
No utilice accesorios que no estén recomendados por el fabricante.
3. Mantenga el cable alejado de las superficies calientes.
4. No deje caer el aparato ni le introduzca ningún objeto.
5. No use este producto si el enchufe o el cable están dañados, o si no funciona debidamente,
si se ha caído o dañado, o si se ha caído al agua. Ante cualquiera de estos eventos,
comuníquese con un centro de servicio técnico y envíe el producto para su revisión y
reparación.
IMPORTANTE
1. Revise el cable con frecuencia para detectar cualquier daño. Si el cable está dañado, lleve el
cargador a un centro de servicio Oral-B. No use el aparato si está dañado o deja de funcionar.
2. Si el mango del cepillo dental se cae, se debe cambiar el cabezal del cepillo antes de volver a
usarlo, incluso cuando a simple vista parezca no haber sufrido daño alguno.
3. No toque el enchufe con las manos mojadas, ya que puede sufrir una descarga eléctrica.
4. Para desenchufar el aparato, asegúrese de jalar del enchufe y no del cable.
5. No altere ni repare el producto, ya que puede provocar un incendio, una descarga eléctrica
o lesiones. Consulte con su distribuidor o comuníquese con el centro de servicio Oral-B para
obtener información sobre reparaciones. Solo desarme el producto para desechar la pila.
6. Al sacar la pila para desecharla, tenga cuidado de no causar un cortocircuito entre el polo
positivo (+) y el negativo (–).
7. Niños menores de tres años de edad no deben usar este producto.
8. Este cepillo dental es un aparato de cuidado personal y NO ha sido diseñado para el uso de
varios pacientes en un consultorio dental o el uso institucional.
PRECAUCIÓN
Si está bajo tratamiento por alguna enfermedad bucal, consulte a su profesional dental antes de
usar este producto.
GUARDE ESTAS INSTRUCCIONES
96846214_D36MHF_NA.indd 1696846214_D36MHF_NA.indd 16 05.06.14 08:0605.06.14 08:06
CSS APPROVED Effective Date 5Jun2014 GMT - Printed 06Aug2014 Page 15 of 35

17
Información importante
• Su cepillo Oral-B 5000–7000 se puede usar con
una pantalla inalámbrica interactiva (i) y/o con
su teléfono inteligente (los detalles se encuen-
tran en la sección «Cómo conectar el cepillo
dental con un teléfono móvil»).
• Para evitar la interferencia electromagnética y/o
conflictos de compatibilidad, desactive la trans-
misión radial del mango de su cepillo (e) antes
de usarlo en áreas restringidas, como aviones o
zonas especialmente designadas en hospitales.
• Para desactivar la transmisión radial del cepillo,
oprima el botón de encendido y apagado (c) y el
botón selector de modo (d) de manera simultá-
nea durante 3 segundos hasta que la pantalla
de transmisión radial (f) se apague. Realice el
mismo procedimiento para restablecer nueva-
mente la transmisión.
• Cuando el cepillo dental está encendido, las
personas con marcapasos siempre deben man-
tenerlo a una distancia mayor de seis pulgadas
(15 centímetros) del marcapasos. Si piensa que
existe alguna interferencia, desactive la trans-
misión radial del cepillo dental.
Descripción
a Cabezal del cepillo
b Luz del sensor de presión (roja)/luz del medidor
de tiempo (verde)
c Botón de encendido y apagado
d Botón de modos de cepillado
e Mango
f Pantalla de transmisión radial (con la tecnología
inalámbrica de Bluetooth
®
)
g Indicador de carga
h Cargador (cargador básico y compartimiento del
cabezal con cubierta protectora)
i Pantalla SmartGuide (según el modelo)
j Soporte de SmartGuide (según el modelo)
k Soporte de pared (según el modelo)
l Cinta adhesiva (según el modelo)
m Estuche portátil (según el modelo)
n Bolsa de estuche portátil (según el modelo)
Especificaciones
Para ver las especificaciones de voltaje, consulte el
texto que aparece en la parte inferior del cargador.
Cómo conectar y cargar
Este cepillo dental tiene un mango a prueba de
agua, no presenta riesgo de descarga eléctrica y
está diseñado para usarse en el cuarto de baño.
• Enchufe el cargador (h) a un tomacorriente y
coloque el mango del cepillo (e) en el cargador.
• Las luces azules parpadeantes indican que el
cepillo dental se está cargando (imagen 1,
página 5). Cuando concluye la carga, las luces
se apagan. La carga completa puede demorar
hasta 24 horas y rinde hasta 10 días de cepillado
regular (dos veces al día por 2 minutos cada vez).
Nota: Después de una descarga total, es posible
que las luces azules no parpadeen de inmediato,
es posible que demoren 10 a 15 minutos en
hacerlo.
• Si la pila recargable está baja, la luz indicadora de
carga azul parpadeará en la pantalla de nivel de
carga (g) durante algunos segundos cuando
encienda o apague el cepillo dental. Si la pila
recargable no tiene carga, el motor se detendrá y
parpadeará una luz indicadora de carga naranja
en la pantalla que muestra el nivel de carga;
deberá cargarlo durante 40 minutos antes de
usarlo para un cepillado de 2 minutos.
• Para usar el cepillo dental a diario, puede dejar el
mango colocado en el cargador a fin de mantener
la carga máxima. La pila nunca se sobrecargará.
A fin de mantener la carga máxima de la pila
recargable, desconecte el cargador y descargue
por completo el mango con el uso regular del
cepillo al menos una vez cada 6 meses.
Ajustes de la pantalla
SmartGuide
(según el modelo)
La pantalla SmartGuide (i) viene con un modo de
demostración. Para desactivar este modo, retire la
tapa del compartimiento de la pila que se encuentra
en la parte posterior (figura A, página 4) y oprima
el botón «set» o «h/min». La hora «12:00» que
parpadea en la pantalla le indica que puede ajustar
la hora del reloj.
Nota: Si la pantalla SmartGuide aparece en blanco
antes del primer uso (sin activar el modo de
demonstración / sin las pilas puestas) será
necesario reemplazar o insertar las pilas antes de
continuar.
Se incluyen las pilas.
Hora del reloj
Oprima el botón de configuración «set» y mantén-
galo presionado hasta que aparezca «12h». Si
oprime suavemente el botón «h/min», podrá alternar
entre el formato de reloj de «12h» o el de «24h»
horas. Oprima el botón de configuración «set» para
confirmar su elección. El dígito correspondiente a
la hora comenzará a parpadear. Oprima el botón
«h/min» hasta que aparezca la hora correcta y con-
firme con el botón de configuración «set». Proceda
de la misma manera para ajustar los dos dígitos de
los minutos (imagen B, página 4).
Español
96846214_D36MHF_NA.indd 1796846214_D36MHF_NA.indd 17 05.06.14 08:0605.06.14 08:06
CSS APPROVED Effective Date 5Jun2014 GMT - Printed 06Aug2014 Page 16 of 35

18
Iconos de la pantalla
SmartGuide
(según el modelo)
Icono en
pantalla
Significado
Modo «Limpieza diaria»
Modo «Limpieza profunda»
Modo «Sensible»
Modo «Blanqueado»
Modo «Masaje»
Modo «Limpieza de lengua»
Se está aplicando mucha presión.
Cepille con menos fuerza.
«Círculo de cuadrantes»
Cuando el segmento relevante parpa-
dee, pase al siguiente cuadrante de la
boca.
Alcanzó el tiempo de cepillado de
2 minutos que recomiendan los
dentistas (tiempo de cepillado de
3 minutos en el modo «Limpieza
profunda» (Deep Clean)).
Después de cada uso, su período de
cepillado será premiado con estrellas.
Las pilas de la pantalla SmartGuide
están bajas. Cambie las pilas de la
pantalla SmartGuide.
Cómo usar su cepillo
dental
Técnica de cepillado
Moje el cabezal y aplique cualquier tipo de pasta
dental. Para evitar salpicaduras, acerque el cabezal
a los dientes antes de encender el aparato (Imagen 2,
página 5). Al cepillar los dientes con uno de los
cabezales Oral-B giratorios oscilantes guíe el
cabezal lentamente de un diente a otro,
deteniéndose unos cuantos segundos en cada
diente (imagen 3, página 5).
Al cepillar los dientes con el cabezal Oral-B
«Deep Sweep» coloque las cerdas del cepillo dental
contra los dientes en un ligero ángulo inclinado en
dirección a las encías. Aplique un poco de presión
y comience el cepillado con movimientos de atrás
hacia adelante, como lo haría con un cepillo dental
manual (Imagen 4, página 5).
Con cualquier cabezal de cepillado, comience a
cepillar la cara exterior, luego la cara interior y
finalmente cepille las superficies de masticación.
Cepille los cuatro cuadrantes de la boca en forma
homogénea. También puede consultar a su dentista
o higienista dental para saber qué técnica es la
mejor para usted.
Durante los primeros días de uso de cualquier
cepillo dental eléctrico, las encías pueden sangrar
un poco. Por lo general, el sangrado debería
detenerse en pocos días. Si el sangrado continúa
al cabo de 2 semanas, consulte a su dentista o
higienista dental. Si tiene dientes o encías sensibles,
Oral-B le recomienda usar el modo «Sensible»
(Sensitive), (opcional en combinación con el cabezal
Sensible Oral-B para el cuidado de encías).
Medidor de tiempo
Puede seleccionar el medidor de tiempo Profesional
(«Professional») o el de 2 minutos («2-Minute»).
El medidor de tiempo de 2 minutos («2-Minute»)
emite un corto sonido intermitente y se enciende
una luz verde (b) indicando que se ha completado
el período de cepillado de 2 minutos.
El medidor de tiempo profesional («Professional»)
emite sonidos cortos intermitentes y una luz verde
en intervalos de 30 segundos para indicarle que
debe pasar al siguiente cuadrante de la boca
(intervalos de 45 segundos en el modo «Limpieza
profunda» (Deep Clean)) (imagen 5, página 5). Un
sonido largo intermitente y una luz verde indican
que alcanzó el tiempo de cepillado recomendado
profesionalmente de 2 minutos (tiempo de cepillado
de 3 minutos en el modo «Limpieza profunda»
(Deep Clean)).
El medidor de tiempo graba el tiempo de cepillado
transcurrido, incluso cuando se apaga el mango
brevemente durante el cepillado. Cuando se detiene
durante más de 30 segundos o se oprime breve-
mente el botón selector de modo (d) durante la
pausa, el medidor de tiempo se restablece.
Cómo personalizar el medidor de tiempo
El cepillo dental viene con el medidor de tiempo
«Professional» activado. Para cambiar este modo,
oprima el botón selector de modo de cepillado y
manténgalo presionado durante 3 segundos hasta
que «:30» y la palabra «timer» aparezcan en la
pantalla SmartGuide.
96846214_D36MHF_NA.indd 1896846214_D36MHF_NA.indd 18 05.06.14 08:0605.06.14 08:06
CSS APPROVED Effective Date 5Jun2014 GMT - Printed 06Aug2014 Page 17 of 35

19
Oprima brevemente el botón de encendido y
apagado para cambiar al medidor de tiempo de
2 minutos («2-Minute»). Oprima el botón selector de
modo para confirmar.
Sensor de presión
Si aplica demasiada presión sobre sus dientes,
se encenderá la luz roja del sensor de presión (b)
(imagen 5, página 5). Además, cuando cepille sus
dientes en el modo «Limpieza diaria» (Daily Clean)
o «Limpieza profunda» (Deep Clean), el modo de
cepillado cambiará al modo «Sensible» (Sensitive).
De vez en cuando, revise el funcionamiento del
sensor de presión al presionar con moderación el
cabezal del cepillo durante el uso.
Nota: En el modo «Limpieza lingual» el sensor de
presión está apagado.
Modos de cepillado (según el modelo)
Su cepillo dental le ofrece diferentes modos de
cepillado:
«Limpieza diaria» – Modo estándar de limpieza
(Daily Clean) bucal diaria.
«Limpieza – Limpieza bucal con tiempo
profunda» extendido de cepillado de
(Deep Clean) 45 segundos por cuadrante
(tiempo total de cepillado de
3 minutos).
«Sensible» – Limpieza delicada pero
(Sensitive) minuciosa de las zonas
sensibles.
«Blanqueado» – Pulido para uso diario u
(Whitening) ocasional.
«Masaje» – Masaje suave de las encías.
(Massage)
«Limpieza de – Limpieza de lengua para uso
lengua» ocasional o diario
Cuando esté usando el modo «Limpieza Lingual»
recomendamos usar el cabezal de cepillo «Sensible».
Puede cepillarse la lengua igualmente con o sin
pasta. Cepillar el área entera de la lengua sistemáti-
camente con suaves movimientos. El tiempo reco-
mendado de cepillado es de 20 segundos; la pan-
talla inalámbrica SmartGuide indicará que se ha
alcanzado ese tiempo con una cara sonriente.
Su cepillo dental comienza a funcionar automática-
mente en el modo «Limpieza diaria» (Daily Clean).
Para elegir otros modos, oprima sucesivamente el
botón selector de modo (imagen 6, página 5).
Para seleccionar nuevamente el modo «Limpieza
diaria» (Daily Clean), oprima el botón selector de
modo y manténgalo presionado.
El modo de cepillado queda grabado en la memoria,
incluso cuando se apaga el mango brevemente
durante el cepillado. Cuando se detiene durante
más de 30 segundos o se oprime brevemente
el botón selector de modo (d) durante la pausa,
el modo «Limpieza diaria» (Daily Clean) se
restablece.
Cabezales del cepillo
Oral-B le ofrece una variedad de cabezales Oral-B
que se adaptan al mango de su cepillo Oral-B.
Los cabezales giratorios oscilantes se pueden
usar para una limpieza de precisión diente por
diente.
El Cabezal Oral-B CrossAction
Nuestro cabezal más avanzado. Tiene
cerdas en ángulo para una limpieza
precisa. Levanta y elimina el sarro.
El cabezal Oral-B Precision Clean
proporciona una limpieza suave y
eficaz tanto para los dientes como
para las encías. El cabezal cubre
cada diente con cerdas más largas
y densas al mismo tiempo que llega
a las áreas más profundas entre los
dientes.
El cabezal Oral-B Oral-B FlossAction
cuenta con cerdas micropulse que
permiten la máxima eliminación
de la placa dental en las áreas inter-
dentales.
El cabezal Oral-B-B ProWhite
cuenta con un centro pulidor para
blanquear sus dientes de forma
natural. Niños menores de 12 años
no deben usar los cabezales Oral-B
ProWhite.
El cabezal Oral-B Sensible para el cuidado de encías
brinda una limpieza profunda en
dientes y encías sensibles. La textura
extra suave de sus cerdas no maltrata
los dientes ni las encías.
El cabezal Oral-B Oral-B Ortho
con penachos limpia completamente
y elimina suavemente la placa dental
de los dientes con frenos dentales.
96846214_D36MHF_NA.indd 1996846214_D36MHF_NA.indd 19 05.06.14 08:0605.06.14 08:06
CSS APPROVED Effective Date 5Jun2014 GMT - Printed 06Aug2014 Page 18 of 35

20
El cabezal Oral-B Power Tip
El cabezal Power Tip se diseñó para
limpiar entre los dientes y también
alrededor de puentes, coronas e
implantes. Coloque el cabezal Power
Tip en un ángulo de 45 grados del
borde de la encía. Guíe el cabezal
Power Tip lentamente a lo largo del
borde de la encía, haciendo una
pausa entre cada diente para obtener
resultados óptimos.
Nuestro cabezal «Deep Sweep» dinámico se puede
usar con todas las técnicas de cepillado regulares.
El cabezal Oral-B Deep Sweep
cuenta con una acción limpiadora de
tres zonas que permite la máxima
eliminación de la placa dental, aun
entre los dientes.
Los cabezales Oral-B cuentan con cerdas
indicadoras azules INDICATOR
®
para ayudarle a
saber cuándo es necesario reemplazar el cabezal.
Con un cepillado completo, dos veces al día durante
dos minutos, el color azul se desvanecerá hasta la
mitad en un periodo aproximado de 3 meses. Si las
cerdas se separan y se abren antes de que se
desvanezca el color, es posible que usted esté
ejerciendo demasiada presión sobre los dientes y
las encías.
No se recomienda usar los cabezales Oral-B
FlossAction u Oral-B ProWhite con frenos dentales.
Puede utilizar el cabezal Oral-B Ortho, la cual está
específicamente diseñada para limpiar alrededor de
frenos y alambres.
Sincronización del cepillo
dental
(según el modelo)
Para evitar interferencias de los mensajes en
pantalla cuando en el mismo hogar se use más de
un cepillo dental Oral-B con transmisión radial y una
pantalla SmartGuide en el mismo hogar, se deben
asignar los mangos a sus respectivas pantallas.
Puede sincronizar hasta 2 mangos con una pantalla
SmartGuide. Para hacerlo, oprima el botón «h/min»
del compartimento de pilas durante por lo menos
3 segundos.
En la pantalla SmartGuide aparecerá «L---».
Encienda el mango para comenzar el proceso de
sincronización, el cual se acaba cuando aparece
«L-1-» en pantalla. Apague el mango. Para asignar
un segundo mango a la misma pantalla SmartGuide,
encienda el otro mango hasta que aparezca «L-2-»
en pantalla. Una vez que se haya sincronizado el
segundo mango, la palabra «Full» (Lleno) aparecerá
en pantalla. Para salir del modo de sincronización,
presione el botón «h/min» o el botón de configura-
ción «set». Si no lo hace, finalizará automática-
mente después de 30 segundos.
Cómo conectar el cepillo
con un teléfono móvil
Descargue gratis la aplicación Oral-B™ de App
Store
(SM)
o Google Play™. La aplicación Oral-B™
ofrece la oportunidad de utilizar el tiempo de manera
más eficaz, ilustrar el progreso de su cepillado y
personalizar la configuración del cepillo dental (para
obtener más beneficios, consulte las instrucciones
de la aplicación Oral-B™).
• Antes de utilizar la aplicación Oral-B™ asegúrese
de tener activada la tecnología Bluetooth en el
teléfono móvil (si necesita instrucciones para
hacerlo, consulte el manual de usuario del
teléfono). El cepillo dental aparecerá en la lista de
dispositivos como: «Oral-B toothbrush» (cepillo
Oral-B).
Nota: Si la tecnología Bluetooth está desactivada,
la funcionalidad de la aplicación Oral-B™ es
limitada.
• Inicie la aplicación Oral-B™. Puede utilizar la
aplicación y la pantalla SmartGuide (i) al mismo
tiempo.
• Una vez que comience a utilizar el cepillo al
levantarlo del cargador conectado (h) o al oprimir
cualquier botón (c)/(d), se conecta automática-
mente a la aplicación Oral-B™. Si no se ha
establecido una conexión, oprima brevemente el
botón de modo (d) que se encuentra en el mango
del cepillo y espere a que se establezca una
conexión.
• Cualquier instrucción adicional de la aplicación
aparecerá en el teléfono móvil.
• Mantenga el teléfono móvil cerca cuando lo utilice
con el mango del cepillo dental. Asegúrese de
que el teléfono móvil se encuentre en una
posición segura y en un lugar seco.
Nota: El teléfono móvil debe ser compatible con la
tecnología Bluetooth 4.0 (o posterior) para
conectarse con el mango del cepillo.
Recomendaciones de
limpieza
Después de cepillarse, mantenga el mango encen-
dido y enjuague el cabezal del cepillo con agua
corriente. Apáguelo y retire el cabezal del cepillo.
96846214_D36MHF_NA.indd 2096846214_D36MHF_NA.indd 20 05.06.14 08:0605.06.14 08:06
CSS APPROVED Effective Date 5Jun2014 GMT - Printed 06Aug2014 Page 19 of 35

21
Limpie el mango y el cabezal del cepillo por sepa-
rado; séquelos bien antes de unir las piezas nueva-
mente.
Desensamble el cargador antes de limpiarlo. El
compartimiento del cabezal y la cubierta protectora
se pueden lavar en el lavaplatos. Limpie el cargador
básico y la pantalla SmartGuide solo con un paño
húmedo.
La parte interior del estuche portátil (m) puede
lavarse en un lavaplatos automático. El exterior del
estuche solo debe limpiarse con un paño húmedo
(imagen 7, página 5). Antes de volver a ensamblar el
estuche, compruebe que los elementos del estuche
estén completamente secos y que los cepillos
dentales/cabezales estén secos antes de
almacenarlos en el estuche.
Nota: Limpie de inmediato cualquier mancha de la
superficie del estuche portátil. Guarde el estuche
portátil en un lugar limpio y seco.
Soporte de pared (según el modelo)
Si prefiere montar la pantalla SmartGuide en una
pared, espejo u otra superficie, utilice la cinta
adhesiva (l) con el soporte de pared (k). Antes de
hacerlo, asegúrese de que la superficie elegida esté
limpia y seca.
Pegue la cinta adhesiva en el lado plano del montaje
de pared y presiónela firmemente contra la pared.
Espere 24 horas antes de deslizar el soporte de
SmartGuide (j) en el soporte de pared fijo. Coloque
la pantalla SmartGuide en su soporte (imagen C,
página 4). La cinta adhesiva no funcionará en super-
ficies repelentes a la suciedad.
Sujeto a cambios sin previo aviso.
Aviso acerca del medio
ambiente
Este producto contiene pilas y/o residuos
eléctricos reciclables. Con el fi n de proteger
el medio ambiente, le pedimos no deseche
este producto con la basura doméstica.
Para reciclar el producto, diríjase a los centros de
recolección de residuos eléctricos de su país.
Cómo extraer las pilas
Pila del mango
Al final de la vida útil del producto, abra el mango
como se muestra en el diagrama, saque la pila
recargable y deséchela según las normas ambien-
tales locales.
¡Precaución! Si abre el mango, destruirá el
aparato y anulará la garantía.
Pilas de la pantalla
SmartGuide
Las pilas pueden tener fugas si están descargadas o
no se usan por mucho tiempo. Cuando maneje pilas
con fugas, evite contacto con la piel.
Mantenga fuera del alcance de los niños.
No se debe ingerir. En caso de ingestión, solicite
atención médica de inmediato.
Retire las pilas descargadas por completo de
inmediato. Reemplace todas las pilas a la vez.
No mezcle pilas nuevas y usadas, de distintas
marcas o tipos. No desensamble, recargue ni las
deseche en llamas.
Información importante
sobre el módulo radial
Bluetooth
®
Aunque este producto es compatible con todas las
funciones indicadas en el dispositivo Bluetooth,
Oral-B no garantiza una conexión 100 % fiable ni el
funcionamiento consistente de las características.
El rendimiento operativo y la fiabilidad de la
conexión son consecuencias directas de cada
dispositivo Bluetooth individual, la versión del
software, así como el sistema operativo de dichos
dispositivos Bluetooth más las normas de seguridad
empresariales implementadas en el dispositivo.
5
m
o
d
e
s
5
1
2
6
7
4
5
m
o
des
3
96846214_D36MHF_NA.indd 2196846214_D36MHF_NA.indd 21 05.06.14 08:0605.06.14 08:06
CSS APPROVED Effective Date 5Jun2014 GMT - Printed 06Aug2014 Page 20 of 35
La page est en cours de chargement...
La page est en cours de chargement...
La page est en cours de chargement...
La page est en cours de chargement...
La page est en cours de chargement...
La page est en cours de chargement...
La page est en cours de chargement...
La page est en cours de chargement...
La page est en cours de chargement...
La page est en cours de chargement...
La page est en cours de chargement...
La page est en cours de chargement...
La page est en cours de chargement...
La page est en cours de chargement...
-
 1
1
-
 2
2
-
 3
3
-
 4
4
-
 5
5
-
 6
6
-
 7
7
-
 8
8
-
 9
9
-
 10
10
-
 11
11
-
 12
12
-
 13
13
-
 14
14
-
 15
15
-
 16
16
-
 17
17
-
 18
18
-
 19
19
-
 20
20
-
 21
21
-
 22
22
-
 23
23
-
 24
24
-
 25
25
-
 26
26
-
 27
27
-
 28
28
-
 29
29
-
 30
30
-
 31
31
-
 32
32
-
 33
33
-
 34
34


Oral-B PRO 5000 TRIZONE Instructions Manual
- Catégorie
- Brosses à dents électriques
- Taper
- Instructions Manual
- Ce manuel convient également à
dans d''autres langues
- English: Oral-B PRO 5000 TRIZONE
- español: Oral-B PRO 5000 TRIZONE
Documents connexes
-
Braun Black/White 7000, Pro 5000-5550, Deep Sweep 5000-5550 Manuel utilisateur
-
Oral-B IO7S WHITE ALABASTER Le manuel du propriétaire
-
Braun TRIACTION 3500 Manuel utilisateur
-
Oral-B Genius 9000 Manuel utilisateur
-
-
Oral-B IO Series 7S Blanc Le manuel du propriétaire
-
-
-
Braun IO8S BLACK ONYX Manuel utilisateur
-
Autres documents
-
Panasonic EWDL82 Le manuel du propriétaire
-
-
-
-
Braun IO Manuel utilisateur
-
-
-
-
-
Panasonic EW-DM81W503 Elektrozahnbürste Le manuel du propriétaire