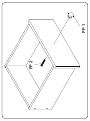
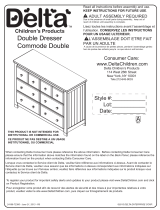
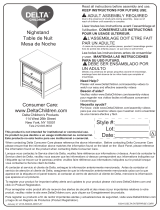
Delta Children Rowen 4 Drawer Dresser Assembly Instructions
- Taper
- Assembly Instructions

August 12, 2015-530030-25745-R0
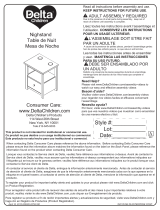
Dresser
Commode
Cómoda
©2015 DELTA ENTERPRISE CORP.
Consumer Care:
www.DeltaChildren.com
Delta Children’s Products
114 West 26th Street
New York, NY 10001
Tele.212-645-9033
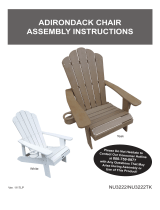
Need Help?
Please visit www.DeltaChildren.com/assembly-videos to
watch our easy and effective assembly videos
Besoin d’aide?
Veuillez visiter www.DeltaChildren.com/assembly-videos
pour regarder nos vidéos faciles et efficaces concernant
l’assemblage
Necesita ayuda?
Por favor, visite www.DeltaChildren.com/assembly-videos
para que vea nuestros videos que muestran como ensamblar
de una manera efectiva y fácil.
Style #:
Lot:
Date:
___________
___________
___________
A
REV
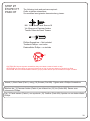
Read all instructions before assembly and use.
KEEP INSTRUCTIONS FOR FUTURE USE.
ADULT ASSEMBLY REQUIRED
Due to the presence of small parts during assembly, keep out of
reach of children until assembly is complete.
Lisez toutes les instructions avant l’assemblage et
l’utilisation. CONSERVEZ LES INSTRUCTIONS
POUR UN USAGE ULTERIEUR.
L’ASSEMBLAGE DOIT ETRE FAIT
PAR UN ADULTE
A cause de la presence de petites pieces, pendant l’assemblage gardez
hors de portee des enfants jusqu'a ce que celui-ci soit termine.
Lea todas las instrucciones antes de ensamblar
y usar. MANTENGA LAS INSTRUCCIONES
PARA SU USO FUTURO.
DEBE SER ENSAMBLADO POR
UN ADULTO
Debido a la presencia de piezas pequeñas durante el ensamblaje,
mantenga fuera del alcance de los niños hasta que complete el
ensamblaje.
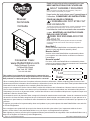
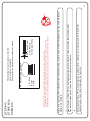
When contacting Delta Consumer Care please reference the above information. Before contacting Delta Consumer Care
please ensure that the information above matches the information found on the label on the Back Panel, please reference the
information found on the product when contacting Delta Consumer Care.
Lorsque vous contactez le Service client de Delta, veuillez faire référence aux informations ci-dessus. Avant de contacter le
Service client de Delta, veuillez vous assurer que les informations ci-dessus correspondent aux informations indiquées sur
l’étiquette qui se trouve sur le panneau arrière; veuillez faire référence aux informations indiquées sur le produit lorsque vous
contactez le Service client de Delta.
Al contactar al servicio al cliente de Delta, entregue la información anteriormente mencionada. Antes de contactar al servicio
de atención al cliente de Delta, asegúrese de que la información anteriormente mencionada calza con la que aparece en la
etiqueta en el panel trasero; al contactar al centro de atención al cliente de Delta, mencione la información que aparece en el
producto.
To register your product for important safety alerts and updates to your product please visit www.DeltaChildren.com and click
on Product Registration.
Pour enregistrer votre produit afin de recevoir des alertes de sécurité et des mises à jour importantes relatives à votre
produit, veuillez visiter le site www.DeltaChildren.com, puis cliquer sur Enregistrement de produits.
Para registrar su producto a fin de recibir importantes alertas y actualizaciones de seguridad, visite www.DeltaChildren.com y
haga clic en Registro de Productos (Product Registration).
This product is not intended for institutional or commercial use.
Ce produit ne pas destine a un usage institutionnel ou commercial.
Este producto no esta hecho para uso institucional o comercial.

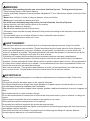
WARNING:
Serious or fatal crushing injuries can occur from furniture tip-over. To help prevent tip-over:
.
Place heaviest items in the lowest drawers.
.
Unless specifically designed to accommodate, do not set TV’s or other heavy objects on the top of this
product.
.
Never allow children to climb or hang on drawers, doors,or shelves.
.
Never open more than one drawer at a time.
Use of tip-over restraints may only reduce, but not eliminate, the risk of tip-over.
.
Always monitor your child’s activity when in the nursery.
.
Do not allow standing in drawers.
.
Do not allow standing on top of this product.
.
Accessory Items must be securely fastened to this product according to the instructions provided with
those items.
.
To avoid head injury, do not allow children to play underneath open drawers.
.
Do not leave drawers open when not in use.
AVERTISSEMENT:
Des blessures sérieuses ou mortelles dues à un écrasement peuvent survenir lorsqu’un meuble
.bascule. Pour prévenir ces accidents : Placez les articles les plus lourds dans les tiroirs inferieurs. .À
moins que spécifiquement conçu pour s'adapter, ne pas placer une télévision ou autre article très
lourd sur le dessus du meuble. .Ne jamais permettre à un enfant de grimper ou s’accrocher aux tiroirs,
portes ou étagères. .Ne jamais ouvrir plus d’un tiroir a la fois
L’utilisation du système anti-basculement peut seulement diminuer mais pas complètement
.éliminer le risque de basculement. Surveillez toujours l’activité de votre enfant lorsqu’il est dans sa
chambre. .Ne pas permettre à l’enfant de se mettre en position debout dans un tiroir. .Ne pas permettre
a l’enfant de se mettre debout sur le meuble. .Les accessoires doivent être convenablement fixés a ce
produit en accord avec les instructions donnés
avec ces accessoires. .Pour prévenir des blessures à la tête, ne pas permettre à un enfant de jouer
sous un tiroir ouvert. .Ne pas laisser les tiroirs ouverts lorsqu’ils ne sont pas utilisés.
ADVERTENCIA:
Pueden producirse lesiones graves o mortales por aplastamiento al volcarse muebles. Para evitar
vuelcos:
Coloque los artículos de mayor peso en los cajones inferiores.
No coloque televisiones ni ningún otro objeto pesado en la parte superior de este producto, a no ser
que esté específicamente diseñado para acomodarlo.
Nunca permita que los niños trepen sobre cajones, puertas o baldas de estantería ni que se cuelguen de
ellos.
Nunca abra más de un cajón al mismo tiempo.
El uso de herramientas de contención de vuelcos tan solo puede reducir, pero no eliminar, el riesgo de
vuelco.
Vigile siempre la actividad de su hijo cuando se encuentre en su cuarto.
No permita que nadie se ponga de pie en los cajones.
No permita que nadie se ponga de pie encima de este producto.
Los artículos accesorios deben ser fijados a este producto de forma segura según las instrucciones que
acompañan a dichos artículos.
Para evitar lesiones en la cabeza, no permita que los niños jueguen debajo de cajones abiertos.
No deje cajones abiertos si no los está utilizando.
2
La page est en cours de chargement...

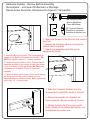
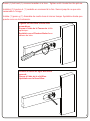
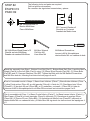
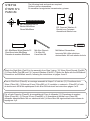
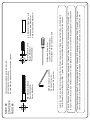
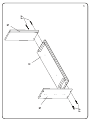
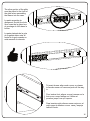
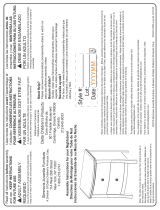
1. Insert the Dowels in the Rail into the holes in
the Post.
1. Insérer les chevilles dans le rail dans les
orifices dans le poteau.
1. Inserte los pasadores del Riel en los
agujeros del Poste.
2. Insert the Bolt into the slot. Turn clockwise with
fingers or the Ball End Screwdriver provided. DO
NOT fully tighten, leave 1/2” (12mm) exposed.
2. Insérez le boulon dans la fente. Tournez dans le
sens des aiguilles d’une montre à l’aide des doigts
ou de la tournevis à tête sphérique. Ne Pas serrer
complètement et laisser 12 mm (1/2 pouces)
exposés.
2. Inserte el perno en la ranura. Gírelo en el sentido
de las agujas del reloj con los dedos o con el
destornillador con cabeza de bola. NO lo apriete del
todo, deje 1/2" (12 mm) fuera.
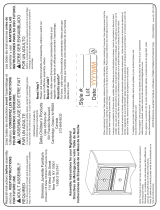
3. Slide the Crescent Washer over the
exposed bolt, behind the head of the bolt.
3. Glissez la rondelle en croissant sur
l'écrou exposé, derrière la tête de l'écrou.
3. Abrace la parte del Perno que quedó
fuera, debajo de la cabeza del mismo, con
la Arandela de media luna.
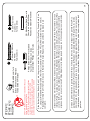
Hardware System - Review Before Assembly
Quincaillerie – Lire Avant D’effectuer Le Montage
Revise Antes De Armar- Elementos De Fijacion Y Ensamble
EE. Crescent Washer
Rondelle en Croissant
Arandela de Media Luna
4
BB. M6x60mm Bolt
Boulon M6x60mm
Perno M6x60mm

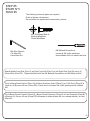
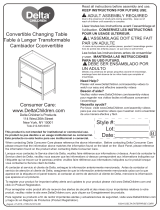
Install (1) bolt and (1) crescent washer at a time. Tighten until it looks like the picture.
Installez (1) boulon et (1) rondelle en croissant à la fois. Serrez jusqu'à ce que cela
ressemble à l'image.
Instale (1) perno y (1) Arandela de media luna al mismo tiempo. Apriételos hasta que
quede como en la ilustración.
Ensure all bolts are tight with Allen
wrench.
Serrez à l’aide de la clé Allen.
Apriételo con la llave Allen.
Tighten the bolt with the ball end
screwdriver.
Serrez à l’aide de la Tournevis à tête
sphérique.
Apriételo con el Destornillador hcon
cabeza de bola.
5

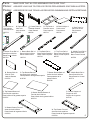
M. Back Weight x1
Poids arrière
Peso trasero
#25742
L. Back Panel x1
Panneau arrière
Panel trasero
#25734
R. Drawer Support x4
Support du tiroir
Soporte de la gaveta
#25738
W. Top Drawer Front x2
Avant du tiroir supérieur
Parte frontal de la gaveta superior
# 25739
N. Drawer Side x8
Côté du Tiroir
Lado de Gaveta
# 25735
S. Top Drawer Back x2
Arrière du tiroir supérieur
Parte posterior de la gaveta superior
# 25736
U. Top Drawer Bottom x2
Fond du tiroir supérieur
Parte inferior de la gaveta superior
# 25737
T. Bottom Drawer Back x2
Arrière du tiroir inférieur
Parte posterior de la
gaveta inferior
# 25740
V. Bottom Drawer Bottom x2
Fond du tiroir inférieur
Parte inferior de la gaveta inferior
# 25741
X. Bottom Drawer Front x2
Avant du tiroir inférieur
Parte frontal de la gaveta inferior
# 25743
6
Parts:
Pièces:
Piezas:
MAKE SURE THAT ALL PRE-ASSEMBLED PARTS ARE TIGHT.
ASSUREZ-VOUS QUE TOUTES LES PIÈCES PRÉLASSÂMES SONT BIEN AJUSTÉES.
ASEGÚRESE DE QUE TODAS LAS PIEZAS PRE-ENSAMBLADAS ESTÉN APRETADAS.
A. Left Side x1
Côté gauche
Lado izquierdo
#25724
B. Right Side x1
Côté droit
Lado derecho
#25725
D. Top Panel x1
Panneau avant
Panel superior
#25733
H. Top Front Rail x1
Barre Avant Supérieur
Barra Frontal Superior
#25727
F. Bottom Front Rail x1
BarreAvant Inférieur
BarraFrontal Inferior
#25729
E. Top Back Rail x1
Barre Arrière Supérieur
Barra Trasero Superior
#25730
J. Bottom Back Rail x1
Barre Arrière Inférieur
BarraTraseroInferior
#25732
G. Middle Front Rail x1
Barre Central Avant
Barra Frontal Central
#25728
K. Middle Back Rail x1
BarreCentral Arrière
BarraPosterior Central
C. Center Panel x1
Panneau Central
Panel Central
#25726
R1
R1
#25731
Top

7
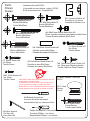
EE. Crescent Washer x6
Rondelle en Croissant
Arandela de Media Luna
Parts:
Pièces:
Piezas:
Hardware kits part# 25744
L'ensemble de quincaillerie - pièce n°25744
El kit de herramientas - Pieza #25744
BB. M6x60mm Bolt x11
Boulon M6x60mm
Perno M6x60mm
AA. M6x50mm Bolt x1
Boulon M6x50mm
Perno M6x50mm
DD. M6x30mm Bolt x12
Boulon M6x30mm
Perno M6x30mm
CC. M6x40mm Bolt x2
Boulon M6x40mm
Perno M6x40mm
M4 Allen Wrench
Clé Allen M4
Llave Allen M4
Phillips Screwdriver – Not included
Tournevis Phillips - non inclus
Destornillidor Phillips – no incluido
CAUTION: Do Not use a power screwdriver they can
cause screws to break or strip.
ATTENTION: Ne Pas utiliser un tournevis électrique
car les vis peuvent casser ou perdre leurs filets.
ATENCIÓN: No use un destornillador eléctrico ya que
puede causar que los tornillos se rompan o rueden.
JJ. 40mm Screw x20
Vis 40mm
Tornillo 40mm
FF. 25mm Screw x20
Vis 25mm
Tornillo 25mm
MM. 12mm Screw x24
Vis 12mm
Tornillo 12mm
HH.Φ9x9.5mm Plastic Barrel Nut x20
Écrou à portée cylindrique en plastique Φ9x9.5mm
Tuerca cilíndrica plástica Φ9x9.5mm
GG. Φ6x30mm Wood Dowel x8
Cheville en bois Φ6x30mm
Pasador de madera Φ6x30mm
KK. Φ8x30mm Wood Dowel x26
Cheville en bois Φ8x30mm
Pasador de madera Φ8x30mm
NN. 16mm Back Panel Screw x19
Vis 16mm pour Panneau Arrière
Tornillo 16mm de Panel Trasero
PP1. Knob
Bouton
Perilla
PP. Knob / Bouton / Perilla x6
#25723
PP2. Knob Screw
Vis de Bouton
Tornillo para Perilla
M4 Ballend Screwdriver
tournevis M4 à tête sphérique
destornillador M4 con cabeza de bola

BB. M6x60mm Bolt x1
Boulon M6x60mm
Perno M6x60mm
M4 Allen Wrench
Clé Allen M4
Llave Allen M4
CC. M6x40mm Bolt x2
Boulon M6x40mm
Perno M6x40mm
AA. M6x50mm Bolt x1
Boulon M6x50mm
Perno M6x50mm
8
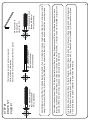
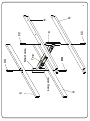
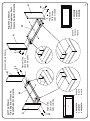
STEP #1
ÉTAPE N°1
PASO #1
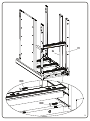
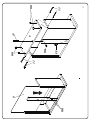
Attach Middle Front Rail (Part G), Middle Back Rail (Part K), Top Front Rail (Part H) and Top Back Rail (Part E) to Center panel (PartC)
using (1) 50mm bolt (Part AA), (1) 60mm bolt (Part BB) and (2) 40mm bolts (Part GG). Tighten bolts with M4 Allen wrench provided.
Fije la Barra Frontal Central (Pieza G), Barra Posterior Central (Pieza K), Barra Frontal Superior (Pieza H) y Barra Posterior Superior
(Pieza E) al Panel Central (Pieza C) utilizando (1)Perno 50mm (Pieza AA), (1) Pernos60 mm (Pieza BB) y (2) Pernos 40mm (Pieza
CC). Apriete todos los pernos utilizando la llave Allen M4 incluida.
Fixer le BarreCentral Avant (Pièce G), Barre Central Arrière (Pièce K), Barre Supérieur avant (Pièce H) et Barre Supérieur Arrière
(Pièce E) aux Panneau Central (Pièce C) à l’aide de (1) boulon de 50 mm (Pièce AA), (1) boulon de 60 mm (Pièce BB) et (2) boulons
de 40 mm (Pièce CC). Serrer les boulons à l’aide de la clé Allen M4 fournie.
The following tools and parts are required:
Outils et pièces nécessaires:
Se necesitan las siguientes herramientas y piezas:
La page est en cours de chargement...

EE. Crescent Washer x3
Rondelle en Croissant
Arandela de Media Luna
KK. Φ8x30mm Wood Dowel x12
Cheville en bois Φ8x30mm
Pasador de madera Φ8x30mm
M4 Allen Wrench
Clé Allen M4
Llave Allen M4
M4 Ballend Screwdriver
tournevis M4 à tête sphérique
destornillador M4 con cabeza de bola
BB. M6x60mm Bolt x3
Boulon M6x60mm
Perno M6x60mm
10
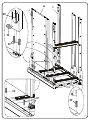
STEP #2
ÉTAPE N°2
PASO #2
The following tools and parts are required:
Outils et pièces nécessaires:
Se necesitan las siguientes herramientas y piezas:
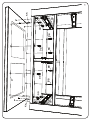
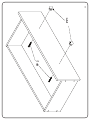
Attach the assembly from Step 1, Bottom Front Rail (Part F), Bottom Back Rail (Part J) and the Back
Weight (Part M) to the Left Side (Part A) using (12) 30mm Wood Dowels (Part KK), (3) 60mm Bolts
(Part BB) and (3) Crescent Washers (Part EE). Tighten the Bolts with the M4 Ballend Screwdriver
and M4 Allen wrench, following the instructions on pages 4 and 5.
Fixer le l’ensemble monté à l’étape 1, Barre Avant Inférieur (Pièce F), Barre Arrière Inférieur (Pièce
J) etles Poids arrière (Pièce M) au côté gauche (Pièce A) à l’aide de (12) Chevillesen bois 30mm
(PièceKK), (3) boulons 60 mm (Pièce BB), et (3) rondelles « croissant » (Pièce EE) à l’aide de
dutournevis M4 à tête sphériqueet la clé Allen M4 ensuivant les instructions pages 4 et 5.
Fije el ensamblaje del Paso 1, la Barra Frontal Inferior (Parte F), La Barra trasera Inferior (Parte J) y
PesoTrasero (Pieza M) al Lado Izquierdo (Pieza A) utilizando (12) Pasadores de madera 30mm
(Pieza KK),(3) Pernos 60 mm (Pieza BB) y (3) Arandelas de Media Luna (Pieza EE) utilizando el
destornillador M4 con cabeza de bola y la llave Allen M4 siguiendo las instrucciones de laspáginas 4
y 5.
La page est en cours de chargement...

DD. M6x30mm Bolt x2
Boulon M6x30mm
Perno M6x30mm
M4 Allen Wrench
Clé Allen M4
Llave Allen M4
M4 Ballend Screwdriver
tournevis M4 à tête sphérique
destornillador M4 con cabeza de bola
12
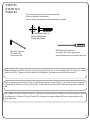
STEP #3
ÉTAPE N°3
PASO #3
The following tools and parts are required:
Outils et pièces nécessaires:
Se necesitan las siguientes herramientas y piezas:
Attach Middle Front Rail (Part G) and Top Front Rail (Part H) to the Left Side (Part A) using (2) 30mm
Bolts (Part DD). Tighten the Bolts with the M4 Ballend Screwdriver and M4 Allen wrench.
Fixer le Barre Central Avant (Pièce G) et Barre Supérieur Avant (Pièce H) au Côté Gauche (PièceA)
à l’aide de (2) Boulons 30 mm (Pièce DD) à l’aide de du tournevis M4 à tête sphériqueet la cléAllen
M4.
Fije la Barra Frontal Central (Pieza G) y La barra Frontal Superior (Pieza H) al Lado Izquierdo (Pieza
A) utilizando (2) Pernos 30 mm (Pieza DD) utilizando el destornillador M4 con cabeza debola y la
llave Allen M4.
La page est en cours de chargement...

EE. Crescent Washer x3
Rondelle en Croissant
Arandela de Media Luna
KK. Φ8x30mm Wood Dowel x12
Cheville en bois Φ8x30mm
Pasador de madera Φ8x30mm
M4 Allen Wrench
Clé Allen M4
Llave Allen M4
M4 Ballend Screwdriver
tournevis M4 à tête sphérique
destornillador M4 con cabeza de bola
BB. M6x60mm Bolt x3
Boulon M6x60mm
Perno M6x60mm
14
STEP #4
ÉTAPE N°4
PASO #4
The following tools and parts are required:
Outils et pièces nécessaires:
Se necesitan las siguientes herramientas y piezas:
Attach the Right Side (Part B) to the assembly from Step 3 using (12) 30mm Wood Dowels (PartKK),
(3) 60mm Bolts (Part BB) and (3) Crescent Washers (Part EE). Tighten the Bolts with the M4 Ballend
Screwdriver and M4 Allen wrench, following the instructions on pages 4 and 5.
Fixer le Côté Droit (Pièce B) au montage assemblé à l’étape 3 à l’aide de (12) Chevillesen bois
30mm (Pièce KK), (3) Boulons 60 mm (Pièce BB), et (3) rondelles « croissant » (Pièce EE) à l’aide
de dutournevis M4 à tête sphériqueet la clé Allen M4 ensuivant les instructions pages 4 et 5.
Fije el Lado Derecho (Pieza B) al ensamblaje del Paso 4 utilizando (12) Pasadores de madera
30mm (Pieza KK), (3) Pernos 60 mm (Pieza BB) y (3) Arandelas de Media Luna (Pieza EE)
utilizando eldestornillador M4 con cabeza de bola y la llave Allen M4 siguiendolas instrucciones de
laspáginas 4 y5.
La page est en cours de chargement...

DD. M6x30mm Bolt x2
Boulon M6x30mm
Perno M6x30mm
M4 Allen Wrench
Clé Allen M4
Llave Allen M4
M4 Ballend Screwdriver
tournevis M4 à tête sphérique
destornillador M4 con cabeza de bola
16
STEP #5
ÉTAPE N°5
PASO #5
The following tools and parts are required:
Outils et pièces nécessaires:
Se necesitan las siguientes herramientas y piezas:
Attach Middle Front Rail (Part G) and Top Front Rail (Part H) to the Right Side (Part B) using (2)
30mm Bolts (Part DD) . Tighten the Bolts with the M4 Ballend Screwdriver and M4 Allen wrench.
Fixer le BarreCentral Avant (Pièce G) et Barre Supérieur Avant (Pièce H) au Côté Droit (Pièce B) à
l’aide de (2) Boulons 30 mm (Pièce DD) à l’aide de du tournevis M4 à tête sphériqueet la cléAllen
M4.
Fije la Barra Frontal Central (Pieza G) y Barra Frontal Superior (Pieza H) al Lado Derecho (Pieza B)
utilizando (2) Pernos 30 mm (Pieza DD) utilizando el destornillador M4 con cabeza debola y la llave
Allen M4.
La page est en cours de chargement...

DD. M6x30mm Bolt x8
Boulon M6x30mm
Perno M6x30mm
BB. M6x60mm Bolt x4
Boulon M6x60mm
Perno M6x60mm
18
M4 Allen Wrench (included)
Clé Allen M4 (inclus)
Llave Allen M4 (incluido)
M4 Ballend Screwdriver
tournevis M4 à tête sphérique
destornillador M4 con cabeza de bola
KK. Φ8x30mm Wood Dowel x2
Cheville en bois Φ8x30mm
Pasador de madera Φ8x30mm
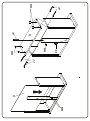
STEP #6
ÉTAPE N°6
PASO #6
The following tools and parts are required:
Outils et pièces nécessaires:
Se necesitan las siguientes herramientas y piezas:
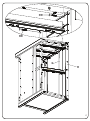
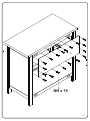
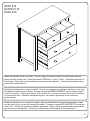
Attach the Top Panel (Part D) to the assembly from Step 5 using (2) 30mm Wood Dowels (Part KK), (8) 30mm Bolts
(PartDD) and (4) 60mm Bolts (Part BB) . Tighten the Bolts with the M4 Ballend Screwdriver and M4 Allen wrench.
Fixer le Panneau Avant (Pièce D) au montage assemblé à l’étape5 à l’aide de (2) Chevillesen bois 30mm (Pièce KK), (8)
Boulons 30 mm (Pièce DD), et (4) Boulons 60mm (Pièce BB) à l’aide de du tournevis M4 à tête sphériqueet la cléAllen M4.
Fije el Panel Superior(PiezaD) al ensamblaje del Paso 5 utilizando (2) Pasadores de madera 30mm (Pieza KK), (8) Pernos
30 mm (PiezaDD) y (4) Pernos 60 mm(Pieza BB) utilizando el destornillador M4 con cabeza de bola y la llave Allen M4.
La page est en cours de chargement...

STEP #7
ÉTAPE N°7
PASO #7
The following tools and parts are required:
Outils et pièces nécessaires:
Se necesitan las siguientes herramientas y piezas:
Attach (1) Back Panel (Part L) using (19) Screws (Part NN). Tighten with a Phillips Screwdriver
Attachez les (1) Panneau Arrière (Partie L) en utilisant les (19) Vis (Partie NN). Serrez avec
untournevis Phillips.
Fije (1) Panel trasero (Parte L) con ayuda de (19) Tornillos (Parte NN). Apriete con un destornillador
Phillips.
Phillips Screwdriver – Not included
Tournevis Phillips - non inclus
Destornillidor Phillips – no incluido
NN. 16mm Back Panel Screw x19
Vis 16mm pour Panneau Arrière
Tornillo 16mm de Panel Trasero
20
.
CAUTION: Do Not use a power screwdriver they can cause screws to break or strip.
ATTENTION: Ne Pas utiliser un tournevis électrique car les vis peuvent casser ou perdre leurs filets.
ATENCIÓN: No use un destornillador eléctrico ya que puede causar que los tornillos se rompan o rueden.
La page est en cours de chargement...

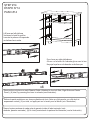
Assemble 1 Left Top Drawer and 1 Right Top Drawer as shown.
Attach the Drawer Sides (Part N) to the Top Drawer Fronts (Part W) with (4) 25mm Screws (Part FF). Grooves must align.
On the Left Top Drawer the wide side is on the left, on the Right Top Drawer, the wide side is on the right.
Assemblée une Tiroir supérieur Gauche y une tiroir supérieur droit.
Fixer les côtés des tiroirs (Pièces N) à l’avant du tiroir supérieur (Pièce W) à l’aide de (4) vis 25mm (Pièce FF). Les rainures
doivent être alignées. Sur le Tiroir Supérieur Gauche du côté large se trouve sur la gauche, Sur le Tiroir Supérieur Droit du
côté large se trouve sur la droite
Ensamble una Gaveta Superior Izquierda y una Gaveta Superior Derecha.
Fije los lados de la gaveta (Pieza N) a la parte frontal de la gaveta superior (Pieza W) utilizando (4) tornillos 25mm (Pieza
FF). Las ranuras deben alinearse. En la gaveta Superior Izquierda el lado grande está a la izquierda, en la gaveta Superior
derecha el lado grande está a la derecha.
Phillips Screwdriver – Not included
Tournevis Phillips - non inclus
Destornillidor Phillips – no incluido
CAUTION: Do Not use a power screwdriver they can cause screws to break or strip.
ATTENTION: Ne Pas utiliser un tournevis électrique car les vis peuvent casser ou perdre leurs filets.
ATENCIÓN: No use un destornillador eléctrico ya que puede causar que los tornillos se rompan o rueden.
22
STEP #8
ÉTAPE N°8
PASO #8
FF. 25mm SCREW x8
Vis 25mm
Tornillo 25mm

W
N
FF
FF
FF
FF
W
Right Top Drawer
Tiroir Supérieur Droit
Gaveta Superior Derecha
N
N
N
Left Top Drawer
Tiroir Supérieur Gauche
Gaveta Superior Izquierda
Wide Side
Côté Large
Lado Grande
groove/rainure/ranura
groove
rainure
ranura
groove
rainure
ranura
complete
complet
completo
Wide Side
Côté Large
Lado Grande
Narrow Side
Côté Étroit
Lado Pequeño
23
complete
complet
completo

FF. 25mm Screw x2
Vis 25mm
Tornillo 25mm
Phillips Screwdriver – Not included
Tournevis Phillips - non inclus
Destornillidor Phillips – no incluido
CAUTION: Do Not use a power screwdriver they can
cause screws to break or strip.
ATTENTION: Ne Pas utiliser un tournevis électrique
car les vis peuvent casser ou perdre leurs filets.
ATENCIÓN: No use un destornillador eléctrico ya que
puede causar que los tornillos se rompan o rueden.
GG. Φ6x30mm Wood Dowel x4
Cheville en bois Φ6x30mm
Pasador de madera Φ6x30mm
STEP #9
ÉTAPE N°9
PASO #9
HH. PLASTIC BARREL NUT x10
Écrous à Manchon en Plastique
Tuerca de Barril Plásticas
JJ. 40mm SCREW x10
Vis 40mm
Tornillo 40mm
.
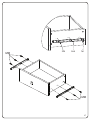
Slide Top Drawer Bottom (Part U) into the grooves. Install the Drawer Support (Part R) and Top Drawer Back
(Part S), using (2) Φ6x30mm Wood Dowels ( Part GG), (1) 25mm Screw (Part FF), (5) 40mm Screws (Part JJ)
and (5) Plastic Barrel Nuts (Part HH). Note: Grooves In Bottom Must Align. Repeat this step until both top draw-
ers are complete.
Glisser le fond du tiroir supérieur (Pièce U) dans les rainures. Installer le support du tiroir (Pièce R) et l’arrière du
tiroir supérieur (Pièce S), à l’aide de (2) Cheville en bois Φ6x30mm (Part GG), (1) vis 25mm (Pièce FF), (5) vis
40mm (Pièce JJ) et de (5) Écrous à portée cylindriques en plastique (Pièce HH). Remarque: Les rainures
inférieures doiventêtre alignées. Serrer avec un tournevis Phillips. Répéter cette étape jusqu’à ce que les 2 tiroirs
supérieurs soientmontés.
Deslice la parte inferior de la gaveta superior (Pieza U) hacia las ranuras. Instale el soporte de gaveta (Pieza R) y
parteposterior de la gaveta superior (Pieza S) utilizando (2) Pasadores de madera Φ6x30mm (Pieza GG), (1)
tornillo 25mm(Pieza FF) , (5) tornillos de 40 mm (Pieza JJ) y (5) tuercas cilíndricas plásticas (Pieza HH). Nota: Las
ranuras al inferior deben alinearse. Apriete utilizando un destornillador Phillips. Repita este paso hasta haber
completado las 2 gavetas.
24
La page est en cours de chargement...

Attach Knob (Part PP1) to Top Drawer Assembly using (1) KnobScrew (Part PP2). Repeat this step until both top drawers
are complete.
Fixer le bouton (Pièce PP1) au montage assemblé du tiroir supérieur à l’aide d’(1) vis de Bouton (Pièce PP2).
Répéter cette étape jusqu’à ce que les 2 tiroirs supérieurs soient montés.
Fije la perilla (Pieza PP1) al ensamblaje de la gaveta superior utilizando (1) tornillo para Perilla (Pieza PP2). Repita
este paso hasta haber completado las 2 gavetas.
PP1. Knob
Bouton
Perilla
PP. Knob / Bouton / Perilla x2
PP2. Knob Screw
Vis de Bouton
Tornillo para Perilla
CAUTION: Do Not use a power screwdriver they can cause screws to break or strip.
ATTENTION: Ne Pas utiliser un tournevis électrique car les vis peuvent casser ou perdre leurs filets.
ATENCIÓN: No use un destornillador eléctrico ya que puede causar que los tornillos se rompan o rueden.
STEP #10
ÉTAPE N°10
PASO #10
The following tools and parts are required:
Outils et pièces nécessaires:
Se necesitan las siguientes herramientas y piezas:
26
La page est en cours de chargement...

Phillips Screwdriver – Not included
Tournevis Phillips - non inclus
Destornillidor Phillips – no incluido
CAUTION: Do Not use a power screwdriver they can cause screws to break or strip.
ATTENTION: Ne Pas utiliser un tournevis électrique car les vis peuvent casser ou perdre leurs filets.
ATENCIÓN: No use un destornillador eléctrico ya que puede causar que los tornillos se rompan o rueden.
28
STEP #11
ÉTAPE N°11
PASO #11
FF. 25mm SCREW x8
Vis 25mm
Tornillo 25mm
Attach the Drawer Sides (Parts N) to the Bottom Drawer Front (Part X) with (4) 25mm Screws (Part
FF). Note: Grooves in Bottom must align. Tighten With Phillips Screwdriver. Repeat this step until
both bottom drawers are complete.
Fixer les côtés des tiroirs (Pièces N) à l’avant du tiroir inférieur (Pièce X) à l’aide de (4) vis 25mm
(Pièce FF). Remarque: Les rainures inférieures doivent être alignées. Serrer avec un tournevis
Phillips. Répéter cette étape jusqu’à ce que les 2 tiroirs inférieurs soient montés.
Fije los lados de la gaveta (Pieza N) a la parte frontal de la gaveta inferior (Pieza X) utilizando (4)
tornillos 25mm (Pieza FF). Nota: Las ranuras al inferior deben alinearse. Apriete utilizando un
destornillador Phillips. Repitaestepaso hasta haber completadolas 2 gavetasinferiores.
La page est en cours de chargement...

FF. 25mm Screw x2
Vis 25mm
Tornillo 25mm
Phillips Screwdriver – Not included
Tournevis Phillips - non inclus
Destornillidor Phillips – no incluido
CAUTION: Do Not use a power screwdriver they can
cause screws to break or strip.
ATTENTION: Ne Pas utiliser un tournevis électrique
car les vis peuvent casser ou perdre leurs filets.
ATENCIÓN: No use un destornillador eléctrico ya que
puede causar que los tornillos se rompan o rueden.
GG. Φ6x30mm Wood Dowel x4
Cheville en bois Φ6x30mm
Pasador de madera Φ6x30mm
30
STEP #12
ÉTAPE N°12
PASO #12
HH. PLASTIC BARREL NUT x10
Écrous à Manchon en Plastique
Tuerca de Barril Plásticas
JJ. 40mm SCREW x10
Vis 40mm
Tornillo 40mm
.
Slide Bottom Drawer Bottom (Part V) into the grooves. Install the Drawer Support (Part R) and Top Drawer Back (Part
T) , using (2) Φ6x30mm Wood Dowels ( Part GG), (1) 25mm Screw (Part FF), (5) 40mm Screws (Part JJ) and (5)
Plastic Barrel Nuts (Part HH). Note: Grooves In Bottom Must Align. Repeat this step until both top drawers are
complete.
Glisser le fond du tiroir inférieur (Pièce V) dans les rainures. Installer le support du tiroir (Pièce R) et l’arrière du tiroir
inférieur (Pièce T), à l’aide de (2) Cheville en bois Φ6x30mm (Part GG), (1) vis 25mm (Pièce FF), (5) vis 40mm (Pièce
JJ) et de (5) Écrous à portée cylindriques en plastique (Pièce HH). Remarque: Les rainures inférieures doiventêtre
alignées. Serrer avec un tournevis Phillips. Répéter cette étape jusqu’à ce que les 2 tiroirs supérieurs soientmontés.
Deslice la parte inferior de la gaveta inferior (Pieza V) hacia las ranuras. Instale el soporte de gaveta (Pieza R) y
parteposterior de la gaveta inferior (Pieza T) utilizando (2) Pasador de madera Φ6x30mm (Pieza GG), (1) tornillo
25mm(Pieza FF), (5) tornillos 40mm (Pieza JJ) y (5) tuercas cilíndricas plásticas (Pieza HH). Nota: Las ranuras al
inferior deben alinearse. Apriete utilizando un destornillador Phillips. Repita este paso hasta haber completado las 2
gavetas.
La page est en cours de chargement...

PP1. Knob
Bouton
Perilla
PP. Knob / Bouton / Perilla x4
PP2. Knob Screw
Vis de Bouton
Tornillo para Perilla
Attach (2) Knobs (Part PP1) to Bottom Drawer Assembly using (2) Knob Screws (Part PP2) Repeat this step until both Bottom
drawers are complete.
Fixer (2) boutons (Pièce PP1) au montage assemblé du tiroir inférieur à l’aide d’(2) vis de Bouton (Pièce PP2).
Répéter cette étape jusqu’à ce que les 2 tiroirs inférieur soient montés.
Fije (2) perillas (Pieza PP1) al ensamblaje de la gaveta inferior utilizando (2) tornillos para perilla (Pieza PP2).
Repita este paso hasta haber completado las 2 gavetas.
CAUTION: Do Not use a power screwdriver they can cause screws to break or strip.
ATTENTION: Ne Pas utiliser un tournevis électrique car les vis peuvent casser ou perdre leurs filets.
ATENCIÓN: No use un destornillador eléctrico ya que puede causar que los tornillos se rompan o rueden.
STEP #13
ÉTAPE N°13
PASO #13
The following tools and parts are required:
Outils et pièces nécessaires:
Se necesitan las siguientes herramientas y piezas:
32
La page est en cours de chargement...
La page est en cours de chargement...
La page est en cours de chargement...
La page est en cours de chargement...
La page est en cours de chargement...
La page est en cours de chargement...
La page est en cours de chargement...
-
 1
1
-
 2
2
-
 3
3
-
 4
4
-
 5
5
-
 6
6
-
 7
7
-
 8
8
-
 9
9
-
 10
10
-
 11
11
-
 12
12
-
 13
13
-
 14
14
-
 15
15
-
 16
16
-
 17
17
-
 18
18
-
 19
19
-
 20
20
-
 21
21
-
 22
22
-
 23
23
-
 24
24
-
 25
25
-
 26
26
-
 27
27
-
 28
28
-
 29
29
-
 30
30
-
 31
31
-
 32
32
-
 33
33
-
 34
34
-
 35
35
-
 36
36
-
 37
37
-
 38
38
-
 39
39


Delta Children Rowen 4 Drawer Dresser Assembly Instructions
- Taper
- Assembly Instructions
dans d''autres langues
- English: Delta Children Rowen 4 Drawer Dresser
- español: Delta Children Rowen 4 Drawer Dresser
Documents connexes
-
 Delta Children Delta Nighstand Assembly Instructions
-
 Delta Children Nolan End Table/Side Table for the Nursery Assembly Instructions
-
 Delta Children Chalet 6 Drawer Dresser Assembly Instructions
-
 Delta Children Lindsey Nightstand Assembly Instructions
-
 Delta Children Providence Bookcase Assembly Instructions
-
 Delta Children Universal 6 Assembly Instructions
-
 Delta Children Bennington Elite Bookcase Assembly Instructions
-
 Delta Children Madisson Nightstand Assembly Instructions
-
 Delta Children Elite Nightstand Assembly Instructions
-
 Delta Children Convertible Changing Unit Assembly Instructions