Kichler Lighting 44205PN Manuel utilisateur
- Taper
- Manuel utilisateur

Date Issued: 09/29/17 IS-44205-CB
INSTRUCTIONS
For Assembling and Installing Fixtures in Canada
Pour L’assemblage et L’installation Au Canada
Nous sommes là pour vous aider 866-558-5706
Heures : du lundi au vendredi, de 9h à 17h (heure de l’Est)
ATTENTION – RISQUE DE DÉCHARGES ÉLECTRIQUES -
Couper le courant au niveau du panneau du disjoncteur du
circuit principal ou de la boîte à fusibles principale avant de
procéder à l’installation.
13) Securexturetoceilingwithlockwashers[11]andlock-up
knobs[12].
14) Insertrecommendedbulbs(notsupplied).
15) Carefullyraiseglass[13]uptothexture.Passthesmaller
openingoverthebulbandsocket.Twisttheglassintothe
socketcup[14]tosecureglass(Donotover-tighten).
16) Threadlockupknobs[14]intotheholesintheglassholder[15]
tosecureglass(donotover-tighten).
17) Repeatstep16forremainingglass.
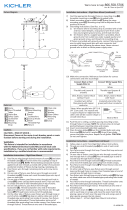
LOOP/LINK/LINK MOUNT
1) Followsteps1and2fromRigidStemMountInstructions.
2) Threadonesmallthreadedpipe[3]intoendofeachsmall
loop[15].
3) Passxturewirethroughrstloop.Threadonerstlooponto
endofeachlaststem.
4) Ononesideofxture,passxturewirethroughsecondloop
andthroughholeincanopy[4].Passthreadedpipeatendof
secondloopthroughholeincanopy.
5) Passxturewirethroughholeinlockwasher[5].Thread
lockwasherontoendofthreadedpipeprotrudingfrominside
canopy.
6) Passxturewirethroughholeinhexnut[6].Threadhexnutonto
endofthreadedpipe.
7) Onothersideofxture,passxturewirethroughsecondloop
andthroughholeincanopy.Passthreadedpipeatendofsec-
ondloopthroughholeincanopy.
8) Passxturewirethroughlooponendofsafetycable[7].Slip
looponsafetycableoverendofthreadedpipeprotrudingfrom
insideofcanopy.
9) Passxturewirethroughholeinlockwasher.Threadlockwash-
erontoendofthreadedpipeprotrudingfrominsidecanopy.
10)Passxturewirethroughholeinhexnut.Threadhexnutonto
endofthreadedpipe.
11)Attachlockinglink[17]tosmallloopatendofeachstemandto
eachlooponcanopy.
12)Followsteps7-17fromRigidStemMountInstructions.
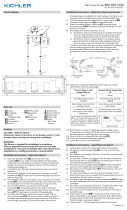
RIGID STEM MOUNT
1) Passwirethroughstems[1]andscrewstemsintocouplings[2]
ontopofxturebody.NOTE: Threadlockingcompoundmust
beappliedtoallstemthreadsasnotedwitharrowsymbolto
preventaccidentalrotationofxtureduringcleaning,relamp-
ing,etc.
2) Passxturewirethroughremainingstemsandscrewstems
together.
3) Oneachsideofxture,passxturewirethroughonesmall
threadedpipe[3].Screweachsmallthreadedpipeontotopof
stemoneachside.
4) Oneachsideofxture,passxturewiresthrougheachhole
incanopy[4].Lowercanopydowntowardsstems.Passeach
holeincanopyoverendofeachthreadedpipeontopof
stems.
5) Ononesideofxture,passxturewirethroughholein
lockwasher[5].Threadlockwasherontoendofthreadedpipe
protrudingfrominsidecanopy.Passxturewirethroughholein
hexnut[6].Threadhexnutontoendofthreadedpipe.
6) Onothersideofxture,passxturewirethroughlooponend
ofsafetycable[7].Sliplooponsafetycableoverendofthread-
edpipeprotrudingfrominsideofcanopy.Passxturewire
throughholeinlockwasher.Threadlockwasherontoendof
threadedpipeprotrudingfrominsidecanopy.Passxturewire
throughholeinhexnut.Threadhexnutontoendofthreaded
pipe.
7) TURNOFFPOWER.
IMPORTANT:Beforeyoustart,NEVERattemptanyworkwith-
outshuttingofftheelectricityuntiltheworkisdone.
a) Gotothemainfuse,orcircuitbreaker,boxinyourhome.
Placethemainpowerswitchinthe“OFF”position.
b) Unscrewthefuse(s),orswitch“OFF”thecircuitbreaker
switch(s),thatcontrolthepowertothextureorroomthat
youareworkingon.
c) Placethewallswitchinthe“OFF”position.Ifthextureto
bereplacedhasaswitchorpullchain,placethoseinthe
“OFF”position.
8) Atthecenterofthemountingstrap[8]areknockoutslots.
Removethesetthatmatchesyouroutletbox.
9) Securethemountingstraptotheoutletbox[9].
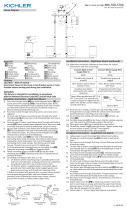
10) Groundinginstructions:(SeeIllus.AorB).
A) Onxtureswheremountingstrapisprovidedwithahole
andtworaisedimples.Wrapgroundwirefromoutletbox
aroundgreengroundscrew,andthreadintohole.
B) Onxtureswhereacuppedwasherisprovided.Put
groundwirefromoutletboxundercuppedwasherand
greengroundscrewandthreadscrewintoholeinmount-
ingstrap.
Ifxtureisprovidedwithgroundwire.Connectxtureground
wiretooutletboxgroundwirewithwireconnector,(notprovid-
ed)afterfollowingtheabovesteps.Neverconnectgroundwire
toblackorwhitepowersupplywires.
11) Makewireconnections.Referencechartbelowforcorrect
connectionsandwireaccordingly.
12) Pushxturetoceiling,carefullypassingmountingscrews
throughholesincanopy.NOTE:Becertainwiresdonotget
pinchedbetweenmountingstrapandcanopy.
GREEN GROUND
SCREW
CUPPED
WASHER
OUTLET BOX
GROUND
FIXTURE
GROUND
DIMPLES
WIRE CONNECTOR
OUTLET BOX
GROUND
GREEN GROUND
SCREW
FIXTURE
GROUND
A
B
Connect Black or
Red Supply Wire to:
Connect
White Supply Wire to:
Black White
*Parallel cord (round & smooth)
*Parallel cord (square & ridged)
Clear, Brown, Gold or Black
without tracer
Clear, Brown, Gold or Black
with tracer
Insulated wire (other than green)
with copper conductor
Insulated wire (other than green)
with silver conductor
*Note: When parallel wires (SPT I & SPT II)
are used. The neutral wire is square shaped
or ridged and the other wire will be round in
shape or smooth (see illus.)
Neutral Wire
9
3
2
1
►
►
►
►
13
5
6
RIGID STEM MOUNT
►
►
►
►
8
10
12
11
4
7
14
15
8
10
17
16
3
4
9
7
12
11
5
6
LOOP/LINK/LOOP MOUNT
9
3
2
1
►
►
►
►
13
5
6
RIGID STEM MOUNT
►
►
►
►
8
10
12
11
4
7
14
15
8
10
17
16
3
4
9
7
12
11
5
6
LOOP/LINK/LOOP MOUNT

Date Issued: 09/29/17 IS-44205-CB
INSTRUCTIONS
For Assembling and Installing Fixtures in Canada
Pour L’assemblage et L’installation Au Canada
Nous sommes là pour vous aider 866-558-5706
Heures : du lundi au vendredi, de 9h à 17h (heure de l’Est)
ATTENTION – RISQUE DE DÉCHARGES ÉLECTRIQUES -
Couper le courant au niveau du panneau du disjoncteur du
circuit principal ou de la boîte à fusibles principale avant de
procéder à l’installation.
MONTAGE DES LIENS EN BOUCLE/MAILLON
1) Suivre les étapes 1 à 2 des instructions de Montage sur tige
rigide.
2) Visserunpetittubeleté[3]surl’extrémitédechaquepetite
boucle [15].
3) Passerlelduluminaireparlapremièreboucle.Visserune
premièrebouclesurl’extrémitédechaquedernièretige.
4) Surundescôtésduluminaire,passerlelduluminaireparla
deuxièmebouclepuisparletroudanslecache[4]. Passer le
tubeletéàl’extrémitédeladeuxièmeboucleparletrousitué
danslecache.
5) Passerlelduluminaireparletrousituédanslarondellede
blocage [5].Visserlarondelledeblocagesurl’extrémitédu
tubeletésortantdel’intérieurducache.
6) Passerlelduluminaireparletrousituédansl’écrouhexago-
nal [6].Visserl’écrouhexagonalsurl’extrémitédutubeleté.
7) Surl’autrecôtéduluminaire,passerlelduluminaireparla
deuxièmebouclepuisparletroudanslecache.Passerletube
letéàl’extrémitédeladeuxièmeboucleparletroudansle
cache.
8) Passerlelduluminaireparlabouclesituéeàl’extrémitédu
câble de sécurité [7]. Passer une boucle sur câble de sécurité
surl’extrémitédutubeletésortantdel’intérieurducache.
9) Passerlelduluminaireparletrousituédanslarondellede
blocage.Visserlarondelledeblocagesurl’extrémitédutube
letésortantdel’intérieurducache.
10) Passerlelduluminaireparletrousituédansl’écrouhexago-
nal.Visserl’écrouhexagonalsurl’extrémitédutubeleté.
11) Attacherunmaillondeverrouillage[16] à une petite boucle à
l’extrémitédechaquetigeetsurchaqueboucleducache.
12) Suivre les étapes de 7 à 17 des instructions de Montage sur
tige rigide.
INSTALLATION SUR TIGE CANNELÉE
1) Acheminerlelduluminaireparlatigeetvisserlatigeen
hautduluminaire[1][2].REMARQUE:appliquerlefreinlet
surtouslesletsdelatigeindiquésparlesymbole(3)pour
empêcherlarotationaccidentelleduluminairependantle
nettoyage,remplacementdelampe,etc.
2) Acheminerlelduluminaireparlestigesrestantesetvisser
lestigesensemble.
3) Dechaquecôtéduluminaire,passerunlduluminaireparun
petittuyauleté[3].Vissertouslespetitstubesletéssurle
dessusdelatigedechaquecôté.
4) Dechaquecôtéduluminaire,passerleslsduluminaireà
traverschaquetroudanslecache[4].Abaisserlecachesur
lestiges.Passerchaquetroudanslecachesurl’extrémitéde
chaquetubeletésituéau-dessusdestiges.
5) Dechaquecôtéduluminaire,passerunlduluminaireparle
trou dans une rondelle de blocage [5]. Visser la rondelle de
blocagesurl’extrémitédutubeletésortantdel’intérieurdu
cache.Passerlelduluminaireparletrousituédansl’écrou
hexagonal[6].Visserl’écrouhexagonalsurl’extrémitédutube
leté.
6) Surl’autretubeleté,passerl’extrémitéducâbledesécu-
rité[7]
puislarondelledeblocagerestantesurl’extrémitédu
tubeleté.Visserl’écrouhexagonalsurletubeleté.
7) Couper le courant.
IMPORTANT: TOUJOURScouperl’électricitéavantdecom-
mencerletravail.
a) Localiserlecoffretàfusiblesouledisjoncteurdudomicile.
Mettrel’interrupteurprincipalenpositiond’Arrêt.
b) Dévisserleoulesfusibles(oumettreledisjoncteursur
Arrêt)quicontrôlentl’alimentationversleluminaireoula
piècedanslaquelleletravailesteffectué.
c) Mettrel’interrupteurmuralenpositiond’Arrêt.Sile
luminaireàremplacerestdotéd’uninterrupteuroud’une
chaîneconnectéeàl‘interrupteur,placercesélémentsen
positiond’Arrêt.
8) Aucentredelasangledemontage[9]sontdesmachinesà
sous.Retirezl’assemblagequicorrespondàvotreboîtede
sortie.
9) Visserlabarrettedemontageàlaboitedejonction[9].
10) Connecterlesls.Sereporterautableauci-dessouspourfaire
lesconnexions.
11) Pousserleluminaireversleplafondenpassantsoigneuse-
mentlesvisdemontageparlestrousdanslecache.
12) Fixerleluminairesécuritairementauplafondavecdes
rodelles de blocage [11]etboutonsdexation[12]..
13) Installerlesampoulesrecommandées(nonfournies).
14) Souleversoigneusementleverre[13]jusqu’auluminaire.
Passerlapluspetiteouverturesurl’ampouleetladouille.
15)Permetdeverrouillerlesboutons[14] dans les trous du sup-
port de verre [15]
poursécuriserleverre(nepastropserrer).
16) Répéterl’étape15pourl’autreverre.
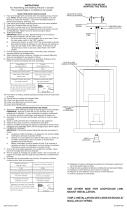
Connecter le fil noir ou
rouge de la boite
Connecter le fil blanc de la boîte
A Noir A Blanc
*Au cordon parallèle (rond et lisse)
*Au cordon parallele (à angles droits el strié)
Au bransparent, doré, marron, ou
noir sans fil distinctif
Au transparent, doré, marron, ou
noir avec un til distinctif
Fil isolé (sauf fil vert) avec
conducteur en cuivre
Fil isolé (sauf fil vert) avec
conducteur en argent
*Remarque: Avec emploi d’un fil paralléle
(SPT I et SPT II). Le fil neutre est á angles
droits ou strié et l’autre fil doit étre rond ou
lisse (Voir le schéma).
Fil Neutre
9
3
2
1
►
►
►
►
13
5
6
RIGID STEM MOUNT
►
►
►
►
8
10
12
11
4
7
14
15
8
10
17
16
3
4
9
7
12
11
5
6
LOOP/LINK/LOOP MOUNT
9
3
2
1
►
►
►
►
13
5
6
RIGID STEM MOUNT
►
►
►
►
8
10
12
11
4
7
14
15
8
10
17
16
3
4
9
7
12
11
5
6
LOOP/LINK/LOOP MOUNT
-
 1
1
-
 2
2


Kichler Lighting 44205PN Manuel utilisateur
- Taper
- Manuel utilisateur
dans d''autres langues
- English: Kichler Lighting 44205PN User manual