La page est en cours de chargement...

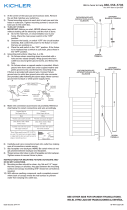
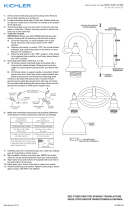
1) Assemble mounting screws to backpan using hexnut.
2) At the center of the backpan are knockout slots. Remove the set that
matches your outlet box.
3) Secure the backpan to the outlet box.
4) Anchor the backpan to the wall using the set of holes at each end of
xtureusingwoodscrews,togglebolts,plasticanchors,etc.
5) Turn off power.
IMPORTANT:Beforeyoustart,NEVERattemptanyworkwithout
shutting off the electricity until the work is done.
a)Gotothemainfuse,orcircuitbreaker,boxinyourhome.Placethe
main power switch in the “OFF” position.
b)Unscrewthefuse(s),orswitch“OFF”thecircuitbreakerswitch(s),
thatcontrolthepowertothextureorroomthatyouareworkingon.
c)Placethewallswitchinthe“OFF”position.Ifthexturetobe
replacedhasaswitchorpullchain,placethoseinthe“OFF”position.
6) Connectxturegroundwiretooutletboxgroundwirewithwireconnector.
Neverconnectgroundwiretoblackorwhitepowersupplywire.
7) Make wire connections (connectors not provided). Reference chart
below for correct connections and wire accordingly.
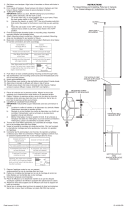
8) Carefully push wire connections back into outlet box making sure all
connections remain secure.
9) Slip faceplate over mounting screws and backpan.
NOTE: Be certain wires do not get pinched between backpan
and faceplate.
10) Secure faceplate to backpan using threaded balls.
11)Raiseglassuptoxture.Passholeinglassoversocket.
12) Thread socket ring onto socket. Tighten socket ring to secure glass in
place.(DONOTovertighten.)
1) Installerlesvisdemontagesurlepanneauarrièreàl’aidedel’écrou
hexagonal.
2) Aucentredupanneauarrièresetrouventdesfentesamovibles.Enlever
l’ensemblecorrespondantàvotreboîteàprises.
3) Visserlepanneauarrièresurlaboîteàprises.
4) Fixerlepanneauarrièreaumurenutilisantlesetdetroussurchacune
desextrémitésdesluminairesl’aidedesvisàbois,boulonsàailettes,
ancres en plastique etc.
5) Couper le courant.
IMPORTANT:TOUJOURScouperl’électricitéavantdecommencerle
travail.
a) Localiserlecoffretàfusiblesouledisjoncteurdudomicile.Mettre
l’interrupteurprincipalenpositiond’Arrêt.
b)Dévisserleoulesfusibles(oumettreledisjoncteursurArrêt)qui
contrôlentl’alimentationversleluminaireoulapiècedanslaquellele
travailesteffectué.
c)Mettrel’interrupteurmuralenpositiond’Arrêt.Sileluminaireà
remplacerestdotéd’uninterrupteuroud’unechaîneconnectéeà
l‘interrupteur,placercesélémentsenpositiond’Arrêt.
6) Avecl’attache-l,connecterleldemiseálaterreauld’alimentation
noirouáceluiquiestblanc.
7) Connecterlesls(connecteursnonfournis).Sereporterautableauci-
dessous pour faire les connexions.
8) Replacersoigneusementleslsdanslaboîteàprisesenveillantàce
quelesconnexionsnesoientpasdéconnectées.
9) Passerlaplaquedecontactsurlesvisdemontageetlepanneauarrière.
REMARQUE:Veilleràcequeleslsneseretrouventpascoincés
entrelepanneauarrièreetlaplaquefrontale.
10)Fixerlaplaquefrontaleaupanneauarrièreàl’aidedesboules.
11)Souleverleverrejusqu’auluminaire.Passerletroudansleverresurla
douille.
12)Serrerl’anneaudeladouillesurladouille.Resserrerl’anneaudela
douillepourbienxerleverre.(NEPASserreravecexcès).
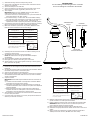
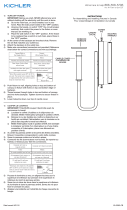
Connect Black or
Red Supply Wire to:
Connect
White Supply Wire to:
Black White
*Parallel cord (round & smooth) *Parallel cord (square & ridged)
Clear, Brown, Gold or Black
without tracer
Clear, Brown, Gold or Black
with tracer
Insulated wire (other than green)
with copper conductor
Insulated wire (other than green)
with silver conductor
*Note: When parallel wires (SPT I & SPT II)
are used. The neutral wire is square shaped
or ridged and the other wire will be round in
shape or smooth (see illus.)
Neutral Wire
DateIssued:4/20/12 IS-45424-CB
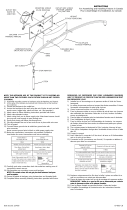
Connecter le fil noir ou
rouge de la boite
Connecter le fil blanc de la boîte
A Noir A Blanc
*Au cordon parallèle (rond et lisse)
*Au cordon parallele (à angles droits el strié)
Au bransparent, doré, marron, ou
noir sans fil distinctif
Au transparent, doré, marron, ou
noir avec un til distinctif
Fil isolé (sauf fil vert) avec
conducteur en cuivre
Fil isolé (sauf fil vert) avec
conducteur en argent
*Remarque: Avec emploi d’un fil paralléle
(SPT I et SPT II). Le fil neutre est á angles
droits ou strié et l’autre fil doit étre rond ou
lisse (Voir le schéma).
Fil Neutre
INSTRUCTIONS
For Assembling and Installing Fixtures in Canada
Pour L’assemblage et L’installation Au Canada
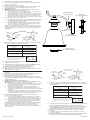
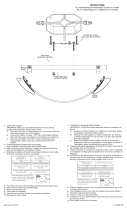
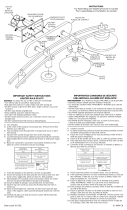
GLASS
VERRE
SOCKETRING
BAGUEDELADOUILLE
FACEPLATE
PLAQUEFRONTALE
BACKPAN
PANNEAUARRIÈRE
THREADEDBALL
BOULE
-
 1
1
-
 2
2


Kichler 45424NI Manuel utilisateur
- Taper
- Manuel utilisateur
- Ce manuel convient également à
dans d''autres langues
- English: Kichler 45424NI User manual
- español: Kichler 45424NI Manual de usuario
Documents connexes
Autres documents
-
Kichler Lighting 5367CH Manuel utilisateur
-
 Kichler Lighting 4931NI Manuel utilisateur
-
 Kichler Lighting 49117AZLED Manuel utilisateur
-
 Kichler Lighting 10620NILED Manuel utilisateur
-
 Kichler Lighting 5368CH Manuel utilisateur
-
 Kichler Lighting 10439NCHLED Manuel utilisateur
-
 Kichler Lighting 43363BK Manuel utilisateur
-
 Kichler Lighting 6464CH Manuel utilisateur
-
 Kichler Lighting 45087PNLED Manuel utilisateur
-
Kichler Lighting 45055NIL18 Manuel utilisateur


