
016155 R0120
www.chapinmfg.com
800-950-4458
DO NOT RETURN TO STORE. CALL
CHAPIN CUSTOMER SERVICE:
NO DEVUELVA A LA TIENDA.
LLAME A SERVICIO A CLIENTES DE CHAPIN:
NE PAS RETOURNER EN MAGASIN
APPELER LE SERVICE À LA CLIENTÈLE DE CHAPIN :
TOW BEHIND SPREADER
Remolque por detrás del distribuidor
Épandeur sur remorque
Not for use with lime products such as pelletized lime, lime powder and Agri lime.
No debe usarse con productos de cal, como pastillas de cal, cal en polvo o cal agrícola.
N’est pas approprié pour une utilisation avec les produits à base de chaux comme le calcaire sous forme de
granules, en poudre ou Agri.
150 lb.

Carefully Read These Instructions Before Use
IMPROPER USE OR FAILURE TO FOLLOW INSTRUCTIONS CAN RESULT IN PRODUCT FAILURE OR INJURIES.
FOR SAFE USE OF THIS PRODUCT YOU MUST READ AND FOLLOW ALL INSTRUCTIONS BEFORE USING.
- Do not allow anyone to operate the tow behind spreader without proper instructions
- Do not permit children to operate the tow behind spreader
- Wear protective eyewear and gloves when handling and applying lawn and garden chemicals
- Read the chemical label instructions and warnings for handling and applying the chemicals you plan to
spread – application settings provided are only a guideline
WARNING
Lea estas instrucciones atentamente antes de utilizarlo
EL USO INAPROPIADO O NO SEGUIR LAS INSTRUCCIONES PUEDE RESULTAR EN FALLAS DEL PRODUCTO O LESIONES. PARA USAR
ESTE PRODUCTO DE MANERA SEGURA DEBE LEER Y SEGUIR TODAS LAS INSTRUCCIONES ANTES DE USARLO.
- No permita que nadie opere el esparcidor a voleo sin las instrucciones apropiadas
- No permita que niños operen el esparcidor a voleo
- Use gafas de seguridad y guantes al manejar y aplicar sustancias químicas a patios y jardines
- Lea las instrucciones y advertencias químicas en la etiqueta respecto al manejo y aplicación de las sustancias que
planea esparcir – las configuraciones de aplicación proporcionadas son sólo una guía
ADVERTENCIA
Lisez attentivement ces instructions avant l’utilisation
UNE MAUVAISE UTILISATION, OU DE NE PAS SUIVRE LES INSTRUCTIONS PEUT, MENER À UNE DÉFAILLANCE DU PRODUIT OU
À DES BLESSURES. POUR UTILISER CE PRODUIT SANS DANGER, VOUS DEVEZ LIRE ET SUIVRE TOUTES LES INSTRUCTIONS
AVANT L’UTILISATION.
- Ne laissez personne utiliser l’épandeur centrifuge sans les instructions appropriées.
- Ne laissez aucun enfant utiliser l’épandeur centrifuge.
- Portez des lunettes de protection et des gants lors de la manipulation et l’application de produits chimiques pour
le gazon et le jardin
- Lisez les étiquettes d’instructions et d’avertissement des produits chimiques pour manipuler et appliquer les
produits chimiques que vous planifiez épandre – les paramètres d’applications fournis le sont à titre guide
AVERTISSEMENT
1

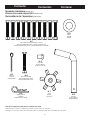
Spreader Hardware (Actual size)
Accesorios para esparcidor (tamaño real)
Quincaillerie de l’épandeur (taille réelle)
Contents:
Contenido:
Contenu:
Note: Not all components shown may be needed on your model
Nota: Puede que no todos los componentes mostrados sean necesarios en su modelo.
Remarque : Il se peut que certains des composants montrés ne soient pas requis pour l’assemblage de votre modèle.
H-8
Hitch Pin
Pin de enganche
Goupille d’attelage
H-3
Cotter Pin
Chaveta
Goupille fendue
H-6
Hairpin Cotter Pin
Chaveta R
Goupille fendue en épingle
H-2
Washer
Arandela
Rondelle
H-1
M6 x 40mm Hex Bolts and M6 Nylon Locknuts
Pernos hexagonales M6 x 40mm y contratuercas M6 de nylon
Boulons hexagonaux M6 x 40 mm et écrous auto-bloquants en nylon M6
H-4
M6 X 45mm Hex Bolt
Perno hexagonal M6 x 45mm
Boulon hexagonal M6 x 45 mm
H-5
Auger Nut
Tuerca de barreno
Écrou de vis sans n
H-7
Auger
Barreno
Vis sans n
2

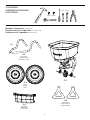
TOOLS NEEDED:
HERRAMIENTAS REQUERIDAS:
OUTILS REQUIS:
8 mm 10 mm
8 mm 10 mm
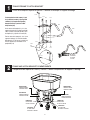
Spreader Components (Not Actual size)
Componentes de la esparcidor (no en tamaño real)
Composants de l’épandeur (taille non réelle)
C-1
C-3
C-5
3
C-2
Trailer Frame
Chasis de remolque
Cadre de la remorque
C-6
Rear Bafe
Bae posterior
Cloison arrière
C-4
Wheels
Ruedas
Roues
Hitch Brackets
Soporte de Gancho
Support D’attelage

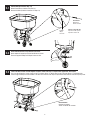
TRAILER FRAME TO HITCH BRACKET
Chasis de remolque a soporte de gancho / Cadre de la remorque au support d’attelage
11
Fasten together the trailer frames (C-1,and
C-2) to the hitch brackets (C-5) using 4 M6
x 40 bolts (H-1). Drop the hitch pin (H-8)
through brackets (C-5) and lock in with
hairpin cotter (H-6).
Una los marcos del remolque (C-1 y C-2) a los
soportes del gancho (C-5) usando 4 pernos M6
x 40 (H-1).Inserte la clavija del gancho (H-8) en
los soportes (C-5) y fíjela con la chaveta (H-6).
Fixer les cadres de la remorque (C-1 et C-2) aux
supports d’attelage (C-5) à l’aide de 4 boulons
M6 x 40 mm (H-1). Faire passer la cheville (H-8)
dans les supports (C-5) et verrouiller avec la
goupille bêta (H-6).
4
FRAME AND HITCH BRACKET COMMPONENTS
Componentes de Soporte de Chasis y Gancho / Cadre et Composantes du Support D’attelage
2
REMOVE BOLT
QUITAR PERNO
RETIREZ LE BOULON
LOOSEN BOLT
AFLOJAR PERNO
DESSERREZ LE BOULON
H-1
Assembled
Ensamblado
Assemblée
H-8
H-1
H-1
H-1
H-1
H-1
H-1
H-1
C-5
C-5
H-6
C-1
C-2
H-6
H-8
HITCH BRACKET
SOPORTE DE GANCHO
SUPPORT D’ATTELAGE
FRAME BRACKET
SOPORTE DE MARCO
SUPPORT DU CADRE
REMOVE BOLT
QUITAR PERNO
RETIREZ LE BOULON
LOOSEN BOLT
AFLOJAR PERNO
DESSERREZ LE BOULON
HITCH BRACKET
SOPORTE DE GANCHO
SUPPORT D’ATTELAGE
FRAME BRACKET
SOPORTE DE MARCO
SUPPORT DU CADRE

2.1
5
Rotate both hitch brackets to align the holes to the frame.
Gire los soportes del enganche para alinear los oricios con el marco.
Tournez les supports d’attelage an d’aligner les trous au cadre.
Fasten in the hitch brackets and frame together using bolts and nuts from step 2.1. Snug the frame support bolts, do not tighten.
Unir los soportes del enganche y el marco usando los pernos y las tuercas del paso 2.1. Apriete a mano los pernos de soporte del marco, no apriete demasiado.
Serrez les supports d’attelage et le cadre ensemble à l’aide des boulons et des écrous de l’étape 2.1 Ajustez les boulons de xation du cadre, mais ne pas trop serrer.
2.3
BOLT IN BRACKETS
COLOCAR LOS SOPORTES
SERREZ LES BOULONS DES SUPPORTS
Loosen
Aojar
Desserrez
Remove Bolt (Re-Install in Step 2.3).
Quitar Perno (Volver a instalar en el paso 2.3)
Retirez Le Boulon (L’installer à nouveau à l’étape 2.3)
2.2
Remove Bolt
Quitar Perno
Retirez le Boulon
Repeat on opposite side
Repetir en el lado opuesto
Répéter de l’autre côté

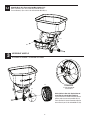
6
ASSEMBLE WHEELS
Ensamble las Ruedas / Assembler les Roues
3
Attach right tire to drive shaft. align the holes and
fasten in the tire using the M6 x 45 bolt (H-4).
Fije la rueda derecha al árbol de transmisión, alinee los
oricios y sujete la rueda con el perno M6 x 45 (H-4).
Fixez le pneu droit à l’arbre de transmission, alignez les
trous et serrez le pneu à l’aide du boulon M6 x 45 (H-4).
ASSEMBLED VIEW
VISTA DEL ENSAMBLADO
VUE ASSEMBLÉE
H-4
H-4
C-4
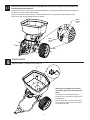
2.4
Mount Bafe (C-6) to Frame using two M6 x 40 bolts (H-1).
Monte el deector (C-6) al chasis usando dos pernos M6 x 40 (H-1).
Fixez le déecteur (C-6) au cadre à l’aide de deux boulons M6 x 40 (H-1).
H-1
H-1
H-1
H-1
C-6

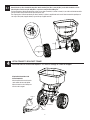
7
HITCH FRAME TO BRACKET FRAME
Marco del Gancho a Marco del Soporte / Le Cadre D’attelage au Cadre du Support
4
Align the hitch frame holes to the
bracket frame holes.
Alinee los oricios del marco del gancho
con los oricios del marco del soporte.
Alignez les trous du cadre d’attelage aux
trous du cadre du support.
Hole 1
Hole 1
Hole 2
Hole 2
Attach left tire to drive shaft all the way then attach washer (H-2). Use cotter pin (H-3) on the drive shaft hole to lock
wheel in place. Bend cotter pin with pliers, to prevent cotter pin from falling out.
Fije la rueda izquierda al árbol de transmisión hasta el tope, y luego coloque la arandela (H-2). Inserte la chaveta (H-3) en el oricio del árbol de transmisión
para jar la rueda en su lugar. Doble la chaveta para evitar que se caiga.
Fixez le pneu gauche à l’arbre de transmission puis xez la rondelle (H-2). Utilisez la goupille fendue sur le trou de l’arbre de transmission pour bloquer la
roue en place. Pliez (tordre) la goupille fendue (H-3) pour éviter que la goupille ne tombe.
3.1
H-2
H-3
H-3
Bend
H-2
C-4
C-4

8
Fasten the hitch frame and the bracket together using the M6 x 40 bolts (H-1) on each side. Tighten all bolts and nuts. Make sure to
fasten through lower bafe mounting slots.
Fije el marco del gancho al marco del soporte usando los pernos M6 x 40 (H-1) en cada lado. Apriete todos los pernos y tuercas. Asegúrese de
pasarlos por las ranuras de montaje del deector inferior.
Serrez le cadre d’attelage et le support ensemble à l’aide des boulons M6 x 40 (H-1) sur chaque côté. Serrez tous les boulons et écrous.
Veillez à visser à travers les fentes de xation inférieures du déecteur.
4.1
ATTACH AUGER
Sujetar Barreno / Attacher La Vis Sans Fin
Attach auger (H-7) onto impeller shaft. Fasten the
auger using the auger nut (H-5) with a 10mm socket
wrench.
Fije el barreno (H-7) al árbol del impulsor. Sujete el
barreno con la tuerca de barreno (H-5), usando una llave
de dado de 10 mm.
Attachez la vis sans n (H-7) à l’arbre de la roue. Serrez
la vis sans n (H-5) à l’aide de l’écrou de vis sans n avec
une clé à douilles de 10 mm.
H-5
H-7
5
GG
H-1
H-1
H-1
H-1
HOLE 1
ORIFICIO 1
TROU 1
HOLE 2
ORIFICIO 2
TROU 2

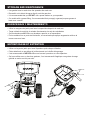
STORAGE AND MAINTENANCE
• Use garden hose to wash down the spreader after each use.
• Be careful not to direct the spray directly onto the gear box
• It is recommended that you DO NOT use a power washer on your spreader.
• On models with a grease tting, it’s recommended that you apply a general purpose grease at
least once a month.
ALMACENAJE Y MANTENIMIENTO
• Utilice la manguera de jardín para lavar la esparcidora después de cada uso.
• Tenga cuidado de no dirigir el rociador directamente a la caja de velocidades
• Se recomienda que NO utilice una lavadora a presión en su esparcidora.
• En los modelos con un punto de lubricación, se recomienda que aplique engrasante multiuso al
menos una vez al mes.
ENTREPOSAGE ET ENTRETIEN
• Utiliser un boyau de jardin pour laver l’épandeur après chaque utilisation.
• Faites attention à ne pas diriger le jet directement sur le boîtier d’engrenage
• Il est recommandé de NE PAS utiliser une laveuse à pression sur votre épandeur.
• Sur les modèles avec un bouchon graisseur, il est recommandé d’appliquer une graisse à usage
général au moins une fois par mois.
9

10
T
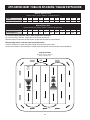
APPLICATION CHART / TABLA DE APLICACIÓN / TABLEAU D’APPLICATION
Sample Spread Pattern
Muestra del patrón de disribución
Modèle d’épandage type
For seed and fertilizer applications always follow manufacturer’s instructions.
Para usos con semilla y fertilizante, siempre siga las instrucciones del fabricante.
Respectez toujours les instructions du fabricant pour les applications de semences et de fertilisation.
Material: Weed and Feed
Material: Hierba y forraje / Matériel : Insecticide fertilisant
SETTING 1 2 3 4 5 6 7 8 9 10 11
LBS PER 1000 SQ. FT. 0.5 1.25 2 2.75 3.5 4.25 5 5.75 6.5 7 7.5
Material: Grass Seed
Material: Semillas de césped / Matériel : Semences de graminées
SETTING 1 2 3 4 5 6 7 8 9 10 11
LBS PER 1000 SQ. FT. - - 2 3 4 5.33 6.67 8 9.33 10.67 12
8 ft.
When spreading seed for a new lawn, repeat spread pattern below.
Al esparcir semillas para un nuevo jardín, repita el patrón de esparcido que aparece abajo.
Assurez-vous de répéter le motif d’épandage ci-dessous lorsque vous épandez des semences pour une nouvelle pelouse.
START
Inicio
Mise en
marche

CHAPIN INTERNATIONAL, INC. P.O. BOX 549 700 ELLICOTT ST. BATAVIA, NY 14021-0549
CHAPIN CUSTOMER SERVICE: 800-950-4458
Due to our ongoing product improvement process, product specifications may change without notice. U.S. and foreign patents pending.
1
2
3
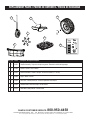
REPLACEMENT PARTS / PARTES DE REPUESTO / PIÈCES DE RECHANGE
Ref.# Qty Part No. Description / Descripción / Description
1 1 6-4661 Gear Box Assembly / Conjunto de la caja de engranes / Ensamble de la boîte de’engrenages
2 1 6-4662 Impeller / impulsor / Roue à ailettes
3 1 6-9015 Wheels w/hardware / Ruedas C/herrajes / Roues avec matériel (14” / 35.5cm)
4 1 6-9096 Auger / Taladro / Foreuse
5 1 6-9000 Rain Cover / Cubierta para lluvia / Couverture protectrice contre la pluie
6 1 6-9095 Hardware Blister / Bolsa de herrajes / Sac de matériel
7 1 6-9152 Rear Bafe / Bae posterior / Cloison arrière
Ref.#
Qty Part No. Description / Descripción / Description
5
6
4
7
-
 1
1
-
 2
2
-
 3
3
-
 4
4
-
 5
5
-
 6
6
-
 7
7
-
 8
8
-
 9
9
-
 10
10
-
 11
11
-
 12
12


dans d''autres langues
- English: Chapin 8620B User manual
- español: Chapin 8620B Manual de usuario