Haier HHX7030 Manuel utilisateur
- Catégorie
- Hottes
- Taper
- Manuel utilisateur

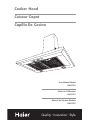
User Manual Model
HHX7030
Guide de l’Utilisateur
HHX7030
Manual del Usuario Modelo
HHX7030
Quality
n
Innovation
n
Style
Cooker Hood
Cuiseur Capot
Capilla De Cocina

English
1
SAFETY PRECAUTIONS
Warning! – To reduce the risk of fire, electric shock, or injury to persons, always
exercise basic safety precautions, including the following:
1. Read all instructions before using the appliance.
2. Use this appliance only for its intended purpose as described in this user
manual.
3. Do not use any accessories not recommended by the manufacturer.
4. This unit must be grounded.
5. Do not use this appliance for commercial uses.
6. Installation work and electrical wiring must be done by qualified technicians in
accordance with all applicable codes and standards, including fire-rated
construction.
7. Sufficient air is needed for proper exhausting of gases of fuel-burning
equipment through the flue (chimney) to prevent back drafting. Follow the
heating equipment manufacturer’s guidelines and safety standards such as those
published by the National Fire Protection Association (NFPA), and the American
Society for Heating, Refrigeration and Air Conditioning Engineers (ASHRAE),
and local code authorities.
8. When replacing an existing range hood with your new Haier Range Hood, turn
OFF the electrical power to the existing unit before removal.
9. Before servicing or cleaning the unit, turn the power OFF at the service panel
and if possible, lock the service panel to prevent power from being switched on
accidentally. When the service panel cannot be locked, securely fasten a
prominent warning device, such as a tag, to the service panel.
10. Do not repair or replace any part of the appliance or attempt any servicing.
Note: If for any reason this product requires service, we strongly recommend
that a certified technician perform the service.
11. When cutting or drilling into wall or ceiling, be careful not to damage existing
electrical wiring and other hidden utilities.
12. Ducted fans must always be vented to the outdoors.
To reduce the risk of range top grease fires:
1. Always turn the hood ON when cooking at high heat or when cooking flaming
foods.
2. Never leave cooking unattended at high settings. Boilovers cause smoking and
greasy spillovers that may ignite. Heat oils slowly on low or medium settings.
3. Use proper-sized pans that correspond to the size of the stove, and the amount
of food being cooked.

2
Thank you for using our Haier product.
This easy-to-use manual will guide you
in getting the best performance from
your Haier Range Hood.
Remember to record the model and
serial number. They are on a label in the
refrigerator.
Model number
Serial number
Date of purchase
Staple your receipt to your manual.
You will need it to obtain warranty service.
4. Clean ventilation fans frequently. Do not allow grease to accumulate on the fan
or the filter.
To reduce the risk of personal injury in the event of a range top grease fire:
1. NEVER pick up a flaming pan, as you may be injured.
2. DO NOT use water, including wet dishcloths or towels, to put out a fire. A
violent steam explosion may result.
3. Smother flames with a close-fitting lid, metal tray, or cookie sheet. Then turn
OFF the burner. BE CAREFUL TO AVOID BURNS! If the flames are not put out
immediately, evacuate and call the fire department.
4. Use an extinguisher only if:
a) You know that you have a Class ABC extinguisher and you already know
how to use it.
b) The fire is small and contained in the area where it started.
c) The fire department is being called.
d) You can fight the fire with your back to an exit.
CAUTION!
Important – Observe all governing codes and ordinances.
1. For general ventilation use only. Do not use this appliance to exhaust
hazardous or explosive materials and vapors.
2. To reduce the risk of fire, use only metal ductwork.
3. To avoid damage to motor or other components, keep drywall spray,
construction dust, etc. off the power unit.
4. Please read specification label on product for further information and
requirements.
SAVE THESE INSTRUCTIONS for Future Use
English

3
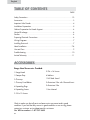
ACCESSORIES
Range Hood Accessories Provided:
1 Range Hood
1 Damper Flap
2 Chimneys
1 Chimney Fixed Bolster
6 Expanding Plugs
6 Expanding Screws
2 ST4 x 10 Screws
2 ST4 x 14 Screws
4 Washers
1 Drill Hole Stencil
2 Alunimium Filter with Charcoal Insert
2 Alunimium Filter
1 User Manual
Check to make sure that all parts and accessories are present and in good
condition. If you find that they are not in good condition or are missing, please
contact our customer service department for assistance.
Our Toll-Free number is 1-877-337-3639.
TABLE OF CONTENTS
PAGE
Safety Precautions..........................................................................................1-2
Accessories ......................................................................................................3
Important Safe Guards ......................................................................................4
Installation Preparation......................................................................................5
Cabinet Preparation for Hoods Support..............................................................6
Vertical Discharge ............................................................................................6
Ductless............................................................................................................6
Preparing Electrical Connections ........................................................................6
Wiring Diagrams..............................................................................................7
Installing Ductwork............................................................................................7
Hood Installation............................................................................................7-8
Use and Care ..................................................................................................9
Troubleshooting ..............................................................................................10
Limited Warranty ..........................................................................................11
English

4
IMPORTANT SAFEGUARDS
WARNING Disconnect the range hood from power supply before servicing.
WARNING To reduce the risk of fire or electric shock or injury to persons observe
the following:
a) Use this unit only in the manner intended by the manufacture. If you have
questions, contact the manufacture.
b) Before servicing or cleaning the unit, switch power to off at service panel and
lock the service disconnecting means to prevent power from being switched on
accidentally. When the service disconnecting means cannot be locked, securely
fasten a prominent warning device, such as a tag, to the service panel.
c) Installation work and electrical wiring must be done by qualified person(s) in
accordance with all applicable codes and standards, including fire-rated
construction.
d) Sufficient air is needed for proper combustion and exhausting of gases through
the flue (chimney) of fuel burning equipment to prevent back drafting. Follow the
heating equipment manufacture’s guide and safety standards, such as those
published by the National Fire Protection Association (NFPA) and the American
Society for Heating, Refrigeration and Air Conditioning Engineers (ASHRAE),
and the local code authorities..
e) When cutting or drilling into wall or ceiling, do not damage electrical wiring or
other hidden utilities.
CAUTION For general ventilating use only. Do not use to exhaust hazardous or
explosive materials or vapors.
CAUTION To reduce the risk of fire, use only metal ductwork.
CAUTION To reduce the risk of fire and to properly exhaust air, be sure to duct air
outside. Do not vent exhaust air into spaces within walls or ceilings, or
into attics, crawlspaces, or garages.
WARNING To reduce the risk of a range top grease fire:
a) Never leave surface units unattended at high settings. Boilovers cause smoking
and greasy spillovers that may ignite. Heat oils slowly on low or medium settings.
b) Always turn the hood ON when cooking at high heat or when cooking flaming
foods.
c) Clean ventilating fans frequently. Grease should not be allowed to accumulate on
fan or filter.
d) Always use proper pan size. Always use cookware appropriate for the size of the
surface element.
English

5
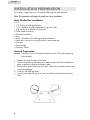
INSTALLATION PREPARATION
To install this range hood, you will need the following tools and materials:
Note: This procedure will require 2 people for easier installation.
Tools Needed for Installation
• Drill
• 1/8” Drill bit for drilling pilot holes
• 1-1/4” Wood bit for drilling electrical wiring access hole
• 3/8” Nut Driver or Ratchet with Extension
• Phillips head screwdriver
• Flat-head screwdriver
• Pliers
• Pencil, rule and level for marking range hood location
• Hand saw or jig saw for cutting the wall or cabinet openings
• Duct tape
• Electrical tape
• Connector Clamp
General Preparation
Caution! Please be sure to turn the electrical power switch OFF before beginning
the installation.
1. Remove the range hood from the carton.
2. Lay the range hood upside down on a table covered with either cardboard or
paper to prevent scratching the hood or table.
3. Remove the 2 grease filters from the hood. Place them somewhere safe so they
will not be damaged.
4. Install two 40 Watt light bulbs.
5. Turn the hood right side up so you can see the duct knockouts and mounting
holes.
English

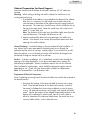
Cabinet Preparation for Hood Support
Mount the hood so that the bottom of the hood is between 24”-30” above the
stovetop.
Warning! When cutting or drilling into wall or cabinet, be careful not to cut
existing electrical wiring.
1. If the bottom of the cabinet is recessed above the bottom of the cabinet
door, then it is necessary to install wood strips on each side of the
recessed area on the bottom of the cabinet where the range hood will
be mounted. The wood strips should line up with the 4 keyhole slots on
the top of the range hood. Fasten the wood strips with wood screws
about 3” in from each end.
Note: The thickness of the wood strips should be slightly more than the
recessed dimension. The length should be cut to size.
2. Measure and mark the electrical wiring opening in the wall or the
cabinet. If the hood is to be vented, also mark and measure the duct
opening in the wall or cabinet.
Vertical Discharge – Vertical discharge is the only method of hood installation. If
your kitchen has an attic space above, the ducting may be run through the
cupboard and the attic to a roof cap. Another option, if your kitchen has a soffit
above the cabinet, is to run the duct up into the soffit and then discharge the air
horizontally through the outside wall to a wall cap.
Ductless – In ductless installations, air is vented back into the kitchen through the
opening in the range hood grille. If you do not anticipate heavy cooking, this
method may be preferable. Ductless installation requires the use of a charcoal
filters (included) to remove odors, which should be replaced at regular intervals
depending on use. Check with your local retailer or dealer for replacements.
Note: This charcoal filter is not dishwasher safe!
Preparation of Electrical Connections
Note: If replacing an existing hood, the electrical cable may need to be re-routed to
the desired position.
1. Determine the location of the electrical cable to connect to the range
hood. The preferred location for the electrical connector, vertical or
horizontal, will depend on the existing installation or ease of routing
wiring. All electrical connections must comply with national and local
codes. Transfer the location of the selected range hood knockouts to the
bottom of the cupboard or onto the wall, then cut or drill a hole to
allow for clearance of the electrical cable clamp. Be careful not to cut
into any hidden utilities, such as electrical wires.
6
English

7
Installing Ductwork
• Your new range hood will operate at the highest efficiency if the number of elbow
and the length of the duct are kept to a minimum. The back draft damper flap
attached to the damper frame assembly, which is supplied with the hood, does not
impede airflow significantly. You may leave this in place even if you install a wall
or roof cap with another back draft damper.
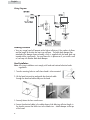
Hood Installation
Note: All wiring installation must comply with local and national electrical code
regulations.
1. Transfer mounting holes to wall where hood is to be mounted.
2. Lift the hood into position and guide the electrical cable
through the electrical cable clamp on the hood.
3. Securely fasten the four wood screws.
4. Secure the electrical cable in the cable clamp while allowing sufficient length in
the hood to connect the field wires to the hood wires. Attach damper to the top
of the hood.
Wiring Diagrams
English

8
5. Attach the ducting to the hood.
6. Temporary mount the stainless steel chimmey and mark the top.
7. Attach the mounting clamp to the wall with supplied screws.
8. Connect the chimmey to the mounting clamp.
English

9
USE AND CARE
Aluminum Filter
For highest efficiency, this filter should be removed and cleaned periodically. Soak
the filter in hot water and mild soap or detergent. Rinse thoroughly and repeat if
necessary. The aluminum filter may be cleaned in the dishwasher. Heavy grease
buildup may not be cleaned easily, thus the filter may need to be replaced.
Charcoal Filter
Inspect this filter periodically. This filter cannot be cleaned and must be replaced
when it becomes saturated. Check with your local retailer or dealer to purchase.
Light Bulb
Do not use light bulbs that are brighter than 40 watts.
Exterior Surface
Wipe the range hood exterior with a soft cloth and a mild detergent suitable for
painted surfaces. Do NOT use abrasive materials such as steel wool pads or
scouring powders.
Repair or Replacement Parts
Warning! Disconnect range hood from the electrical power supply before servicing.
All parts may be obtained from service centers authorized by Haier, or may be
ordered directly from Haier. When ordering parts, please specify the range hood
model number on the rating label, which is located on the inside of the range hood.
English

10
TROUBLE SHOOTING
Fan does not turn on (but light turns on)
This is probably due to either a defective fan switch or a burned-out fan motor.
Both can be replaced without removing the range hood from the wall or cabinet.
Use an ohm meter to determine which component is not working. If the ohm meter
reads that the fan switch has 0 ohms of resistance, then it is the motor that needs to
be replaced. If it reads anything other than zero, then the switch must be replaced.
Fan only runs at one speed
Please see instructions above for troubleshooting when your fan does not turn on
(but light turns on).
Fan circulates air, but does not vent outside
If air is blowing through the front vent openings, then your range hood has been
installed for ductless operation. In order to convert the system to vent outside, a
technician must install metal ductwork from the range hood through either an
outside wall or the roof.
If air is not blowing from the front vent openings, check inside the cabinet above the
range hood. If you see a metal duct leading away from the vent hood, then you
have a system that vents to the outdoors. If you do not see a duct, your unit may be
venting through the back wall.
Light does not turn on (but fan turns on)
This could be because the bulb has burned out. Try replacing the light bulb. If the
light still does not work, either the light switch or the lamp-holder socket is defective.
Both can be replaced without removing the range hood from the wall or cabinet.
Night light does not turn on
Please see above instructions for troubleshooting when the light that does not turn
on (but fan turns on).
Range hood does not turn on at all
First, check for a tripped circuit breaker or a blown fuse, since the range hood is
wired directly to your household electrical system.
NOTE: All work must be performed by a qualified and licensed technician!
English

11
This warranty covers all defects in
workmanship or materials for:
The mechanical and electrical parts (including
labor costs) contained in this Haier product, for
a period of 12 months, from the date of
purchase (for commercial or rental applications,
the warranty is 90 days).
You must keep and be able to provide your
original sales receipt as proof of the date of
purchase.
Who is covered?
The original retail purchaser of this Haier
product.
What will be done?
Haier will repair or replace, in your home, any
mechanical or electrical part, which proves
defective, in normal household use for a period
of 12 months.
How can you get service?
1. Contact your nearest Haier authorized
Service Center. For the name of the Service
Center nearest you, contact Haier at
(877) 337-3639.
2. All service must be performed by an
authorized Haier Service Center.
THIS WARRANTY COVERS UNITS WITHIN THE
CONTINENTAL UNITED STATES, CANADA AND
PUERTO RICO.
THIS WARRANTY DOES NOT COVER:
• Damages from improper installation
• Damages from shipping
• Damages from misuse, abuse, accident,
alteration, lack of proper care and
maintenance
• Damages from service by persons other than
an authorized dealer or service center
• Labor, service, transportation and shipping
charges for the removal of defective parts and
for installation of a replacement part, beyond
the initial 12-month period.
THIS LIMITED WARRANTY IS GIVEN IN LIEU OF
ALL OTHER WARRANTIES, EXPRESSED OR
IMPLIED, INCLUDING THE WARRANTIES OF
MERCHANTABILITY AND FITNESS FOR A
PARTICULAR PURPOSE.
The remedy provided in this warranty is
exclusive and is granted in lieu of all other
remedies. This warranty does not cover
incidental or consequential damages. Some
states do not allow the exclusion of incidental or
consequential damages, so this limitation may
not apply to you. Some states do not allow
limitations on how long an implied warranty
lasts, so this limitation may not apply to you.
This warranty gives you specific legal rights, and
you may also have other rights, which vary from
state to state.
LIMITED WARRANTY
English

Français
1
CONSIGNES DE SECURITE
Avertissement! Pour reduire le risque d’incendie, d’un shoc electrique, des
blessures personelles, exercez toujours les precautions de securite fondamentales
y compris les suivants.
1. Lisez toutes les instructions avant d’utiliser cet appareil
2. Utilisez cet appareil uniquement pour l’usage auquel il est destine comme indique
dans ce manuel d’utilisation
3. N’utilisez aucun accessoire qui n’est pas recommande par le fabricant
4. Cet unite doit etre mis a terre
5. N’employez pas cet appareil pour les usages commerciaux
6. N’employez pas cet unite avec aucun dispositif de commande de vitesse a semi-
conducteurs.
7. L’installation et le cablage electrique doivent etre faits par des techniciens
qualifies selon tous les codes et normes y compris la construction du feu evaluee
8. Assez d’air est necessaire pour epuiser le gaz de carburant brulant a travers le
conduit (cheminee) pour eviter le courant d’air
9. Quand vous remplacez une hotte avec une autre nouvelle hotte Haier, eteignez
le courant de l’unite existant avant le remplacement.
10. Avant d’entretenir ou de nettoyer l’unite, eteignez le courant de l’unite sur le
paneau de service et si possible, serrurez le panneau de service pour empecher
a la puissance de s’allumer par accident
11. Ne pas reparer, remplacer n’importe quelle partie de l’appareil et ne pas tenter
de fixer l’appareil vous meme.
Note: Si pour n’importe quelle raison cet appareil doit etre repare, on
recommande avec force qu’un technicien certifie execute le service
12. En coupant ou percant le mur ou plafond, faites attention a ne pas
endommager le cable electrique existant ou autres utilites caches.
13. Les conduits des ventilateurs doivent etre toujours ventilles vers le dehors.
Pour reduire le risque d’incendies de graisse:
1. Mettez toujours la hotte en marche en cuisinant a une chaleur elevee ou en
faisant cuire les nourritures flamboyantes.
2. Ne laissez jamais une cuisson a une chaleur elevee sans surveillance . Les
debordements causent de la fumee et les renversements graisseux peuvent causer
une incendie. Chauffez l’huile lentement sous un montage lent ou moyen.
3. Utilisez une casserole correspondante a la taille de la cuisiniere et a la quantite
de la nourriture qui doit etre cuisine
4. Nettoyez les ventilateurs de ventilation frequemment. Ne permettez pas a la
graisse de s’accumuler sur le ventilateur ou le filtre.

2
Pour reduire le risque d’une blessure au cas d’une incendie de graisse sur la
cuisiniere:
1. Ne relevez jamais une casserole flamboyante, vous pouvez vous blesser.
2. N’utilisez jamais de l’eau, y compris des serviettes mouillees pour eteindre une
incendie. Une explosion de vapeur violente peut resulter.
3. Etouffez le feu a l’aide d’un couvercle , d’un plateau en metal , puis eteignez les
bruleurs. Soyez prudents.. Evitez les brulures!!! Si les flammes ne s’eteignent pas
immediatement, evacuez vite et appelez les pompiers.
4. Utilisez un extincteur seulement si:
a ) Vous savez que vous avez un extincteur ABC et vous savez comment
l’utiliser.
b) L’incendie est petite et contenue dans le meme endroit ou ca a commencee.
c) Les pompiers ont ete appeles
d) Vous pouvez combattre le feu avec votre dos vers la sortie
Attention!!!!
Important. Observez tous les codes et ordennances regissants.
1. Pour une utilisation de ventilation generale seulement
2. Pour reduire le risque d’une incendie utilisez seulement des conduits en metal.
3. Pour eviter d’endommager le moteur ou autres composants , maintenez le jet de
cloison seche, la poussiere de construction,etc… hors de l’unite de puissance
4. Priere de lire les etiquettes de specification sur le produit pour des amples
d’information et les conditions.
CONSERVEZ CES INSTRUCTIONS
Staple your receipt to your manual.
You will need it to obtain warranty service.
Merci d’avoir achete un produit de
Haier. Ce manuel facile a consulter
vous aidera a utiliser au mieu votre
hotte cuisiniere Haier
N’oubliez pas d’enregistrer les numeros
de model et serie. Ils sont sur une
etiquette a l’arriere de votre unite.
Numéro de modèle
Numéro de série
Date d’achat
Français

3
TABLE DES MATIERES
Page
Consignes de Securite ..................................................................................1-2
Accessoires ......................................................................................................3
Gardes de Securite Importantes ........................................................................4
Preparation de l’installation ..............................................................................5
Qutils dont vous Aurez Besoin pour l’installation ................................................5
Preparation Generale........................................................................................5
Preparation de Placard pour Supporter la Hotte..................................................6
Preparation des Connexions Electriques..............................................................6
Diagrammes d’installion Electrique ....................................................................7
Installation des Conduits....................................................................................7
Installation de la Hotte ..................................................................................7-8
Soins et Nettoyage............................................................................................9
Depannage ....................................................................................................10
Information de la Garantie ..............................................................................11
ACCESSOIRES
Français
Les Accessoires de la Hotte Fournis:
1 Une hotte cuisiniere
1 Un Aileron Plus humide
2 Cheminées
1 Traversin Fixe De Cheminée
6 Prises D'Extension
6 Vis D'Extension
2 ST4 x 10 Vis
2 ST4 x 14 Vis
4 Rondelles
1 Pochoir De Trou De Foret
2 Filtre en aluminium, Filtre en charbon
2 Filtre en aluminium
1 Manuel d’utilisation
Assurez vous que toutes les parties et accessoires existent et en bonne condition. Si
les pieces manquent ou sont endommagees, contactez notre departement de service
pou n’importe quelle aide. Numero gratuit 1-877-337-3639.

4
GARDES DE SECURITE IMPORTANTES
Avertissement: Debranchez la hotte avant d’entretenir.
Avertissement: Pour reduire le risque d’incendie, des shocs electriques ou des
blessures personelles, veuillez respecter les consignes ci- dessous.
A) Utilisez cet unite uniquement pour l’usage auquel il est destine par le fabricant.
Si vous avez n’importe quelles questions, contactez le fabricant.
B) Avant de nettoyer ou d’entretenir votre hotte, eteignez le pouvoir au panneau de
service et verouillez le service pour assurez que le pouvoir ne s’allume pas
accidentellement. Si le service debranchant ne peut pas etre verouille , attachez
un appareil emissant avertissant comme une etiquette au panneau de service.
C) L’installation et le cablage electrique doivent etre faits par des personnes
qualifiees conformement a tous les codes et normes applicables y compris le feu
de construction evalue.
D) Il faut avoir assez d’air pour une propre combustion et pour l’echappement des
gases a travers le conduit ( la cheminee) de l’equipement des carburants brules
pour eviter le flux en arriere.Suivez les guides du fabricant d’equipement de
chauffage et les normes de suretes tels que ceux publies par l’Association de
Protection des Incendies Nationales (NFPA) ET par la Societe Americaine du
Chauffage, de la Refrigeration et l’air conditionant des ingenieurs (ASHRAE) et
les autorities locales des codes,
E) Quand vous coupez ou percez le plafond ou les murs, faites attention a ne pas
endommager l’insatallation electrique ou autres utilites caches.
Avertissement: Pour l’usage de ventilation seulement. N’utilisez pas l’echappement
hasardeux ou les les materiels explosifs ou vapeurs.
Avertissement: Pour reduire le risque d’incendie, utilisez des conduits en metal.
Avertissement: Pour reduire le risque d’incendie et pour echapper l’air proprement,
assurez vous que le conduit est vers le dehors. N’echappez pas l’air
dans des espaces sans murs ou plafonds, ou dans les greniers , des
crawlspaces ou garages.
Avertissement: Pour reduire le risque d’une incendie grasseuse sur la cuisiniere:
A) Ne laissez jamais des unites sous une haute flamme sans attention. Les
bouillonements causent de la fumee et le debordement grasseux peut causer une
incendie.. Chauffez l’huile doucement sous une flamme moyenne ou basse.
B) Mettez toujours la hotte en marche quand vous cuisinez sous une haute flamme
ou quand vous cuisinez de la nourriture fumante.
C) Nettoyez le entractes du ventilateur souvent . Il ne faut pas que la grasses’
accumule sur le ventilateur ou le filtre.
D) Utilisez toujours des poeles de propre grandeur. Utilisez toujours des casseroles
appropriees pour la quantitee de nourriture.
Français

5
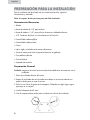
PREPARATIONS POUR L’INSTALLATION
Pour installer la Hotte, vous aurez besoin des outils et materiaux suivants.
Note: Ce procedes exigera 2 personnes pour une installation plus facile.
Outils dont vous aurez besoin pour l’installation
• Une perceuse
• Une perceuse meche de 1/8” pour forer des trous pilotes
• Une perceuse en bois de 1-1/4” pour forer l’ouverture d’acces electrique de
cablage
• 3/8" Chauffeur de Noix ou Augmente avec l'Extension
• Un tournevis Phillips
• Un tournevis plat
• Des pinces
• Un crayon, une regle , un nivel pour marquer la location de la hotte
• Une scie a main ou gabarit pour couper l’ouverture du mur ou du placard
• Une bande adhesive
• Une bande electrique
• Bride de connecteur
Preparation Generale:
Attention: Avant de commencer l’installation, priere de fermer tous les courants
electriques.
1. Enlevez la hotte de la boite en carton.
2. Placez la hotte sens dessous sur une table couverte en papier ou carton pour
eviter des rayures sur la table ou la hotte.
3. Enlevez les 3 filtres de graisse de la hotte. Placez les de cote pour ne pas etre
endommages.
4. Installez deux ampoules de 40 Watts.
5. Tournez le cote droit de la hotte vers le haut pour que vous puissiez voir le
knockout du conduit et les trous du montage.
Français

6
Preparation du Placard pour Supporter la Hotte
Montez la hotte de facon que le bas de la hotte est entre 24”-30” au dessus de la
cuisiniere.
Precautions! Quand vous coupez ou ferrez dans le placard ou mur, faites attention
a ne pas couper des fils electriques existants.
1. Si le bas du placard est encastre au dessus du bas de la porte du placard,
c’est necessaire d’installer des bandes de bois de chaque cote du secteur
encastre sur le bas du placard ou la hotte sera montee. Les bandes de bois
doivent etre alignees avec les 4trous de serrure des entailles situes au
sommet de la hotte. Attachez les bandes de bois avec les vis en bois environ
3” de chaque fin.
Note: l’epaisseur de la bande de bois doit etre un tout petit peu plus
epaisse que les dimensions encastrees. La longueur doit etre de meme taille.
2. Mesurez et marquez les ouvertures du fil electrique sur le mur ou le
placard. Si la hotte doit etre ventillee, mesurez et marquez l’ouverture du
conduit sur le mur ou le placard.
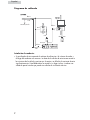
Decharge Vertical- Le decharge vertical est la plus commune methode d’installation
de la hotte. Si votre cuisine a un espace de grenier au dessus, le conduit peut etre
installe a travers le placard et le grenier jusqu’au toit. Un autre choix, si votre
cuisine a un soffit au dessus du placard, parcourez le conduit dans le soffit puis
dechargez l’air horizontalement a travers le mur exterieur. Pour un dechargement
vertical, enlevez A.
Sans Conduits- Pour installations sans conduits, l’air est ventille de nouveau dans la
cuisine a travers une ouverture dans la grille de la hotte. Si vous n’anticipez pas
une cuisson forte, cette methode est preferable. Installations sans conduits, exige
l’utilisation d’un filtre de charbon (inclus) pour faire disparaitre les odeurs qui doit
etre replace regulierement selon l’utilisation.. Demandez votre detaillant pour le
remplacement de la grille.
Note: Ce filtre ne doit pas etre utilise dans le lave-vaisselle.
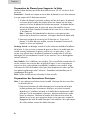
Preparations des Connextions Electriques
Note: Si vous replacez une hotte existante, le cable electrique doit etre remis dans
la direction desiree.
1. Determinez la location du cable electrique pour la connexion de la hotte.
La place preferee pour le connecteur electrique, vertical ou horizontal,
dependra sur l’installation existante ou la facilite de la remittance du cable
electrique. Tout le raccordement electrique doit etre conforme aux codes
locaux et nationaux. Transferez la location de la hotte choisie au bas du
placard ou sur le mur, puis coupez ou fercez un trou pour tenir compte du
degagement du colier du cable electrique. Faites attention de ne pas couper
des utilites cachees comme des cables electriques.
Français

7
Installation des conduits
• Votre nouvelle hotte operera sur une efficacite plus haute si le nombre de coudes
et la longueur des conduits sont au minimum. Le rabat arriere d’armotisseur
attaché a l’assemblee du cadre d’armotisseur, qui est fournie avec la hotte,
n’empeche pas le flux d’air significativement. Vous pouvez le laisser en place,
meme si vous installez une casquette sur le mur ou le toit avec un autre
armotisseur.
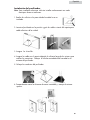
Installion de la Hotte
Note: Toute installation electrique doit etre installee
conformement aux codes electriques locaux et nationaux.
1. Transferez le montage des trous sur le mur ou la hotte va etre
placee.
2. Soulevez la hotte en position et dirigez le cable electrique a travers le serre-joint
de cable electrique sur la hotte.
3. Serrez les 4 vis en bois securement .
4. Fixez le cable electrique dans le serre-joint de cable tout en permettant une
longueur suffisante dans la hotte pour relier les fils aux fils de la hotte. Attachez
l’armotisseur au sommet de la hotte.
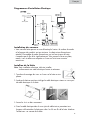
Diagrammes d’installation Electrique
Marron
Marron
Jaune/Vert
Marron
Blanc
Blanc
Blanc
Bleu
Rouge
Gris
Gris
Français

8
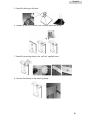
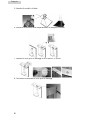
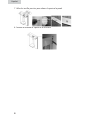
5. Attachez le conduit a la hotte.
6. Montez la cheminee d’acier temporairement et marquez le sommet.
7. Attachez le serre-joint du montage au mur avec les vis fournis.
8. Connectez la cheminee au serre joint du montage.
Français
La page est en cours de chargement...
La page est en cours de chargement...
La page est en cours de chargement...
La page est en cours de chargement...
La page est en cours de chargement...
La page est en cours de chargement...
La page est en cours de chargement...
La page est en cours de chargement...
La page est en cours de chargement...
La page est en cours de chargement...
La page est en cours de chargement...
La page est en cours de chargement...
La page est en cours de chargement...
La page est en cours de chargement...
La page est en cours de chargement...
La page est en cours de chargement...
-
 1
1
-
 2
2
-
 3
3
-
 4
4
-
 5
5
-
 6
6
-
 7
7
-
 8
8
-
 9
9
-
 10
10
-
 11
11
-
 12
12
-
 13
13
-
 14
14
-
 15
15
-
 16
16
-
 17
17
-
 18
18
-
 19
19
-
 20
20
-
 21
21
-
 22
22
-
 23
23
-
 24
24
-
 25
25
-
 26
26
-
 27
27
-
 28
28
-
 29
29
-
 30
30
-
 31
31
-
 32
32
-
 33
33
-
 34
34
-
 35
35
-
 36
36


Haier HHX7030 Manuel utilisateur
- Catégorie
- Hottes
- Taper
- Manuel utilisateur
dans d''autres langues
- English: Haier HHX7030 User manual
- español: Haier HHX7030 Manual de usuario
Documents connexes
-
Haier HHX7130 Manuel utilisateur
-
-
-
-
-
-
-
-