Black & Decker FP3300SKT Le manuel du propriétaire
- Catégorie
- Robots culinaires
- Taper
- Le manuel du propriétaire

12-CUP FOOD PROCESSOR
ROBOT CULINAIRE
DE 12 TASSES
FP3300SKT
+
+
+
+
+
+
+
+
+
+

2
• Read all instructions.
• The unit has a safety interlock system. The unit will
not operate unless the work bowl is securely locked
onto the base, the lid is securely locked onto the
large workbowl, and the large food pusher is in the
large feed chute. If the large food pusher comes out
of the large feed chute, the machine will shut off.
• To protect against risk of electrical shock, do not put base,
cord or plug in water or other liquid.
• Close supervision is necessary when any appliance is
used by or near children.
• Unplug from outlet when not in use, before putting
on or taking off parts, and before cleaning.
• Avoid contacting blades and moving parts.
• Do not operate any appliance with a damaged cord
or plug, or after the appliance malfunctions, or has
been dropped or damaged in any manner. Contact
the consumer service number listed in this manual.
This appliance has important markings on the plug
blade. The attachment plug or entire cordset (if plug
is molded onto cord) is not suitable for replacement.
If damaged, the appliance shall be replaced.
• The use of accessory attachments not recommended
or sold by this appliance manufacturer may cause
fire, electric shock, or injury.
• Do not use outdoors.
• Do not let cord hang over the edge of table or
counter, or touch hot surfaces.
• Keep hands and utensils away from moving blades
or discs while processing food to reduce the risk
of severe injury to persons or damage to the food
processor. A scraper may be used but must be used
only when the food processor is not running.
• Blades are sharp. Handle carefully.
• To reduce the risk of injury, never place blades
or discs on base without first putting workbowl
properly in place.
• Be certain the lid is securely locked in place before
operating appliance.
• Never feed food by hand. Always use food pusher.
• Do not place on or near a hot gas or electric burner
or in a heated oven.
• Do not attempt to defeat the lid interlock mechanism.
• Do not use appliance for other than intended use.
• This product is designed for household use only.
• Do not open lid until blade or disc stops completely.
• The maximum rated wattage for this product was
obtained with the dough-blade.
• This appliance is not intended for use by persons
(including children) with reduced physical, sensory
or mental capabilities, or lack of experience and
knowledge, unless they have been given supervision
or instruction concerning use of the appliance by a
person responsible for their safety.
• Children should be supervised to ensure that they
do not play with the appliance.
Note: Processing items with low moisture content may
dull the finish of the workbowl.
PLEASE READ AND SAVE THIS USE AND CARE BOOK.
IMPORTANT SAFEGUARDS.
When using electrical appliances, always follow basic safety precautions to reduce the risk of fire, electric
shock, and/or injury, including the following:
SAVE THESE INSTRUCTIONS.
This product is for household use only.
POLARIZED PLUG (120V models only)
This appliance has a polarized plug (one blade is
wider than the other). To reduce the risk of electric
shock, this plug is intended to t into a polarized
outlet only one way. If the plug does not t fully
into the outlet, reverse the plug. If it still does not
t, contact a qualied electrician. Do not attempt to
modify the plug in any way.
TAMPER-RESISTANT SCREW
Warning: This appliance is equipped with a
tamper-resistant screw to prevent removal of the
outer cover. To reduce the risk of re or electric
shock, do not attempt to remove the outer
cover. There are no user-serviceable parts inside.
Repair should be done only by authorized service
personnel.
ELECTRICAL CORD
1)
A short power-supply cord is provided to reduce
the risk resulting from becoming entangled in or
tripping over a longer cord.
2) Longer detachable power cords or extension
cords are available and may be used if care is
exercised in their use.
3) If a long detachable power-supply cord or
extension cord is used,
a) The marked electrical rating of the extension
cord should be at least as great as the electrical
rating of the appliance,
b) If the appliance is of the grounded type, the
extension cord should be a grounding-type
3-wire cord, and
c) The longer cord should be arranged so that it
will not drape over the countertop or tabletop
where it can be pulled on by children or tripped
over unintentionally.
Note: If the power cord is damaged, please call the
Customer Service line listed in these instructions.

3
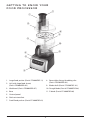
GETTING TO KNOW YOUR
FOOD PROCESSOR
1. Large food pusher (Part # FP3000FBS-11)
2. Lid (with large feed chute)
(Part # FP3000FBS-02)
3. Workbowl (Part # FP3000FBS-07)
4. Base
5. Control panel
6. Skid-resistant feet
7. Small food pusher (Part # FP3000FBS-01)
8. Reversible slicing/shredding disc
(Part # FP3200FBS-03)
9. Blade shaft (Part # FP3200FBS-10 )
10. Dough blade (Part # FP3000FBS-04)
11. S blade (Part # FP3000FBS-06)

4
HOW TO USE
This product is for household use only.
GETTING STARTED
• Remove all packing material, any stickers, and the plastic band around the
power plug.
• Remove and save literature.
• Please visit www.prodprotect.com/applica to register your warranty.
• Wash all removable parts as instructed in CARE AND CLEANING
section of this manual.
• CAUTION: Handle blades and discs very carefully. They are very sharp.
• Select a level dry countertop where the appliance is to be used allowing air space on
all sides to provide proper ventilation for the motor.
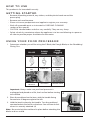
USING YOUR FOOD PROCESSOR
1. Determine whether you will be using the S Blade, the Dough Blade, or the Shredding/
Slicing Disc.
S BLADE
DOUGH
BLADE
Slicing/
Shredding
Disc
CHOP, PUREE,
MIX
KNEAD, MIX
SLICE, SHRED,
GRATE
HIGH SPEED
OR PULSE
LOW SPEED MEDIUM SPEED
Important: Always make sure your food processor is
unplugged and placed on a at, level surface before starting
to assemble.
2. Place the workbowl on the base, with the handle facing
forward at a 45 degree angle to the left.
3. Hold the bowl in place by the handle. Turn the workbowl
counterclockwise to lock it on the base. You will hear it click
when it is securely attached. (A)
Note: Be sure to lock the workbowl in place before attaching the
blades or discs and lid.
A

5
4. Attach your selected blade or disc to the blade shaft in the
bottom of the large workbowl (instructions for individual
discs/blades follow in this manual).
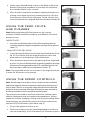
5. Place the lid on top of the workbowl, aligning the tabs and
locking it into place by turning counterclockwise. The lid is
locked when it clicks rmly into place. The lid will only lock
when the feed chute is aligned with the workbowl handle. (B)
USING THE FEED CHUTE
AND PUSHERS
Note: Before operating the food processor, be sure the
workbowl, blades and lid are properly assembled on the food
processor base.
LARGER FOODS
1. Insert the small food pusher inside of the large food pusher.
Use them together to guide ingredients through the large feed
chute. (C)
SMALLER FOODS OR LIQUIDS
1. Insert the large food pusher into the large feed chute of the
lid. (D) Push down until the large food pusher clicks into
place and rests at the bottom of the feed chute.
2. Place food to be processed in the opening of the large food
pusher. Use the small food pusher to guide ingredients through
the center of the large food pusher. The small food pusher can
be removed to add liquid or additional foods. (E)
Note: The large food pusher must remain in the large feed chute
in order for the processor to operate.
USING THE SPEED CONTROLS
Note: If the food processor does not run, make sure the workbowl
and lid are properly locked on the base and the large food pusher is
fully in place. There is an automatic safety lock that causes the food
processor to stop working if the large food pusher pops out and/or
the lid and workbowl are not properly locked in place.
The controls are located on the front of the base. See the speed
chart for food processing and speed recommendations. Various
speeds are used for chopping, mixing, and slicing/shredding. When
these functions are selected the processor will run continuously
until the OFF|PULSE button is pressed to stop. (F)
1. Plug in the appliance to turn it on.
2. Select low, medium or high speed depending on what task
you are completing. Press and release PULSE button to pulse.
B
C
D
E
F

6
3. To stop, press OFF|PULSE.
4. Always unplug the appliance when not in use.
PULSE LOW - SPEED 1 MED - SPEED 2 HIGH - SPEED 3
Use for precise
control when
chopping/mixing
Use for Mixing
Dough
(continuous processing)
Slicing and
Shredding
(continuous processing)
Chopping
and Mixing
(continuous processing)
Fresh herbs
Nuts
Bread crumbs
Meat
Bread dough
Crusts
Vegetables including
• potatoes
• onions
• cucumbers
• cabbage
• carrots
Fruit
Cheese
(freeze 30 min. prior)
Chocolate
Vegetables including
• potatoes
• onions
• cucumbers
Fruit
Bread crumbs
Meat
Sauces, Batters, Dips
USING THE REVERSIBLE SLICING/SHREDDING DISC
1. Lock the workbowl into position.
2. Place blade shaft onto center post in workbowl.
3. Insert your ngers in the 2 large round holes on the disc
with the desired side up (slicing or shredding) and place
disc onto blade shaft in workbowl (G). You may need to
rotate the disc slightly so it ts onto post.
4. Place lid on workbowl and lock into place by rotating counterclockwise.
5. Place food in feed chute and use food pusher to guide foods towards the slicing/
shredding disc.
6. Press MEDIUM speed button; press lightly but rmly on food pusher to guide food
through processor.
Note: Heavy pressure on the pusher does not speed the work; use the pusher only as a
guide. Let the processor do the work.
7. When nished, press OFF|PULSE and allow the disc to stop revolving and unplug
appliance before removing lid. Twist lid clockwise to unlock and remove.
G

7
8. Carefully remove slicing/shredding disc using the nger holes to lift straight up. Pull blade
shaft out of the workbowl. Unlock workbowl by turning it clockwise and lift o base.
9. Empty workbowl.
10. Unplug appliance when not in use.
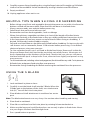
HELPFUL TIPS WHEN SLICING OR SHREDDING
• Before slicing round fruits and vegetables through the processor cut a thin slice from the
bottom so food will be more stable. Place food cut side down in the feed chute.
• Always remove seeds, core and pits before processing.
• Select foods that are rm and not over ripe.
• Remove the core from hard vegetables, such as cabbage.
• When slicing thinner vegetables cut them just short of the length of the feed chute;
stand them vertically in the feed chute so they are solidly packed and cannot turn or tilt.
• A few large pieces of food may remain on top of the disc after slicing or shredding. If
desired, cut these by hand and add to mixture.
• Soft and semi hard cheeses should be well chilled before shredding. For best results with
soft cheeses such as mozzarella, freeze 15-20 minutes before processing. Cut to t feed
chute and process using even pressure.
• To slice uncooked meat, cut or roll food to t the feed chute. Remove all visible fat.
Wrap and freeze food until hard to the touch but not solidly frozen, 30 minutes to 2
hours depending on the thickness of the food. Check to be sure you can still pierce
the food with the tip of a sharp knife. If not, allow to thaw slightly and process using
even pressure.
• To slice cooked meat, including salami and pepperoni, food should be very cold. Cut in pieces to
t feed chute and process food using rm, even pressure.
• Remove the slicing/shredding disc before removing the workbowl from the processor.
USING THE S BLADE
1. Lock workbowl in place on base.
2. Carefully insert the blade shaft into the S Blade. When the
S Blade gets to the bottom of the shaft, turn clockwise to
lock (H). You will feel it lock into place.
3. Place blade and shaft attachment in workbowl on center
post.
Note: The blade attachments are very sharp. Use caution when handling and storing.
4. Place food in workbowl.
5. Place lid on workbowl and lock into place by rotating lid counterclockwise.
6. Make sure the large and small food pushers are securely in place in food chute. Never
use your ngers to direct food through chute.
7. Press speed button to process.
H

8
8. To add food or liquid while processor is running, remove small food pusher and insert
through the feed chute. Replace small food pusher in chute.
9. When nished, press the OFF|PULSE button and allow blades to stop revolving before
removing lid. Twist lid clockwise to remove from the workbowl.
Important: Be sure S blade has completely stopped spinning
and unplug appliance before removing lid from processor.
10. To unlock workbowl, turn it clockwise and lift o base.
11. Carefully remove S blade by pulling blade shaft straight up
and empty workbowl.
Note: To remove S Blade from blade shaft, turn
counterclockwise and pull blade shaft out from bottom. (I)
12. Unplug appliance when not in use.
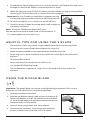
HELPFUL TIPS FOR USING THE S BLADE
• The processor works very quickly, watch carefully to avoid over-processing foods.
• For best results, process foods that are about the same size.
• When chopping cooked or raw meat, the food should be very cold.
• Processing nuts or other hard foods may scratch the surface nish on the inside of
the bowl.
• Do not overll the bowl.
• Never walk away from the processor while it is on.
• Use hot but NEVER boiling liquids.
• The workbowl has a capacity of 4 cups (32 oz.) for liquid and 10 cups (80 oz.) for
dry foods.
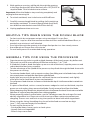
USING THE DOUGH BLADE
Important: The dough blade can only be used with the large workbowl. Only run the
processor on LOW speed when using the dough blade.
1. Lock large workbowl onto base.
2. Place dough blade on blade shaft and turn it clockwise to
lock it onto bottom of shaft. You will feel it lock into place.
(J) Push dough blade and shaft down onto center post in
workbowl until it is fully seated.
3. Insert all the dry ingredients into the workbowl.
4. Place cover on workbowl. Secure large and small food
pushers in feed chute and process on LOW speed.
I
J

9
5. With appliance running, add liquids through the opening
in the large food pusher. When nished, press OFF|PULSE to
stop the blade. Twist lid clockwise to remove.
Important: Allow the blade to stop revolving completely and
unplug before removing lid.
6. To unlock workbowl, turn it clockwise and lift o base.
7. Carefully remove dough blade by pulling shaft straight up
and empty workbowl. To remove dough blade from shaft,
turn blade counterclockwise and lift o the shaft (K).
8. Unplug appliance when not in use.
HELPFUL TIPS WHEN USING THE DOUGH BLADE
• For best results do not prepare recipes using more than 3½ cups our.
• Begin with 1 cup less than the maximum amount of our and add additional our, as
needed, once mixture is well blended.
• Pour liquid through the opening in the large food pusher in a slow steady stream.
• Knead dough no longer than one minute.
• Do not leave processor unattended during operation.
GENERAL TIPS FOR USING THE PROCESSOR
• Organize processing tasks to avoid multiple cleanups of the bowl; process dry before wet.
• The processor will be more ecient if lled no more than
1
/
2
to
2
/
3
full.
• If shredded, sliced or diced food piles up on one side of the bowl, stop the processor and
redistribute the food using a spatula.
• To take advantage of the speed of the processor, drop foods through the feed chute with
the processor running.
• To minimize slender foods, such as carrots or celery, from falling over in the feed chute, cut food
into several pieces and pack the feed chute with the food.
• Apply light pressure on the pusher for soft foods (berries and tomatoes) and slightly
more pressure for hard foods (onions and potatoes).
• Do not process foods that are so frozen or hard that the tip of a knife cannot be inserted into
the food.
• If a piece of hard food, such as a carrot, becomes wedged or stuck on the blade, stop the
processor and unplug, then remove the blade. Gently remove food from the blade.
• When chopping sticky dried fruits, place the fruits in the freezer for about 10 minutes and add a
little our or sugar to keep the pieces from sticking together.
• When preparing cake or cookie batter, use the S blade to cream fat and sugar rst and
add dry ingredients last. Place nuts and fruit on top of our mixture to prevent over
chopping. Process nuts and fruits using short pulses to blend with other ingredients.
• When using the slicing/shredding disc, do not let the food accumulate too high
(over
2
/
3
full); stop and empty the workbowl.
• Do not use the processor to:
- Grind coee beans, bones, grains or hard spices
- Liquefy fruits and vegetables
- Slice or chop warm meat
K

10
CARE AND CLEANING
This product contains no user serviceable parts. Refer service to a qualied service professional.
Important: Always unplug your processor from the outlet before cleaning.
CLEANING
Important: Blades are sharp. Handle blades and discs carefully.
• Completely disassemble processor parts before washing.
• Rinse parts immediately after processing for easier cleaning.
• Wipe base and feet with a damp cloth and dry thoroughly.
Stubborn spots can be removed by rubbing with a damp
cloth and a mild, nonabrasive cleaner. Do not immerse
base in liquid.
• All removable parts can be washed by hand. The removable
parts can be washed in the dishwasher, top rack only (L).
Hand-washing of plastic parts will help to maintain the food processor’s appearance.
• Some staining of parts may occur. If so, make a paste of 2 tablespoons of baking soda
and 1 tablespoon of water. Apply to stains and let stand overnight. Rinse and dry.
• Do not use rough scouring pads or cleansers on any plastic or metal parts.
• Do not allow blades or discs to soak in water for long periods of time.
• Remember to clean the internal shafts of the chopping blades. Use a brush to remove
any residual food particles.
• If you are having trouble closing the lid over the large workbowl, apply a small amount
of vegetable oil to the rim of the lid and workbowl. This should make the pieces work
more smoothly.
CLEANING TIPS
• For quick clean up, combine 1 cup warm water and a drop of liquid dish soap in the food
processor workbowl.
• Cover and process on MEDIUM speed for about 30 seconds.
• Discard liquid, rinse and dry parts thoroughly.
Important: Do not place the processor parts in boiling liquids.
L

11
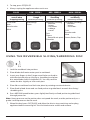
STORAGE
Store all the accessories in the food processor.
1. Lock workbowl into position on food processor base.
2. Carefully insert the blade shaft into the S Blade. When the S Blade gets to the bottom of
the shaft, turn clockwise to lock. You will feel it lock into place.
3. Insert the blade shaft, with S Blade attached, into the dough blade.
4. Place blades and shaft attachment in workbowl on center post.
5. Insert your ngers in the 2 large holes on the reversible slicing/shredding disc and place
disc onto blade shaft in workbowl.
6. Place lid on workbowl and lock into place by rotating lid clockwise.
7. Insert the large food pusher into the large feed chute of the lid.
8. Insert the small food pusher.
9. Wrap cord underneath unit and store.
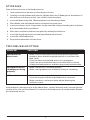
TROUBLESHOOTING
PROBLEM SOLUTION
Food Processor
doesn’t run
• Make sure the work bowl and lid are properly aligned and
locked in place and the large food pusher is inserted in the
feed chute.
• Check to make sure the food processor is plugged in.
• If you have a circuit breaker box, be sure the circuit is closed.
• Unplug the food processor, and then plug it back into the outlet.
Food processor not
shredding or slicing
properly
• Make sure the disc is installed properly.
• Make sure ingredients are suitable for slicing or shredding.
If lid won’t close • Make sure the disc is installed correctly.
• Try to close again with the large food pusher removed.
• Make sure there is no food or other object blocking the
interlock system.
If the problem is not due to one of the above items, see the “Warranty and Customer Service”
section of this Use and Care Manual. Do not return the food processor to the retailer. Retailers
do not provide service.

12
WARRANTY AND CUSTOMER
SERVICE INFORMATION
For support or any questions regarding your appliance, call the appropriate
800 number listed within this section. Please DO NOT return the product
to the place of purchase. Also, please DO NOT mail product back to
manufacturer, nor bring it to a service center. You may also want to consult
our Product Protection Center at www.prodprotect.com/applica.
Three-Year Limited Warranty
(Applies only in the United States and Canada)
What does my warranty cover?
• Your warranty covers any defect in material or workmanship provided; however, the
liability of Spectrum Brands Inc. will not exceed the purchase price of product.
How long is the warranty period?
• Your warranty extends three years from the date of original purchase with proof
of purchase.
What support does my warranty provide?
• Your warranty provides you with a reasonably similar replacement product that is
either new or factory refurbished.
How do you get support?
• Save your receipt as proof of date of sale.
• Visit the online service website at www.prodprotect.com/applica, or call toll-free
1-800-231-9786, for general warranty service.
• If you need parts or accessories, please call 1-800-738-0245.
What does my warranty not cover?
• Damage from commercial use
• Damage from misuse, abuse or neglect
• Products that have been modified in any way
• Products used or serviced outside the country of purchase
• Glass parts and other accessory items that are packed with the unit
• Shipping and handling costs associated with the replacement of the unit
• Consequential or incidental damages (Please note, however, that some states do
not allow the exclusion or limitation of consequential or incidental damages, so
this limitation may not apply to you.)
How does state law affect my warranty?
• This warranty gives you specific legal rights. You may also have other rights that
vary from state to state or province to province.

13
• Lire toutes les instructions.
• L’appareil est doté d’un système de verrouillage
de sécurité. L’appareil ne fonctionnera pas
si le bol n’est pas bien fixé au socle, si le
couvercle n’est pas bien fixé au grand bol et
si le grand poussoir d’aliments n’est pas dans
le grand orifice d’alimentation. Si le grand
poussoir d’aliments ressort du grand orifice
d’alimentation, l’appareil s’arrêtera.
• Afin d’éviter les risques de décharge électrique, ne
pas immerger le socle, le cordon ou la fiche dans
l’eau ou dans d’autres liquides.
• Exercer une étroite surveillance lorsque l’appareil
est utilisé à proximité d’un enfant ou lorsqu’un
enfant s’en sert.
• Débrancher l'appareil de la prise de courant
lorsqu'il n'est pas utilisé, avant d'installer ou de
retirer des pièces et avant de le nettoyer.
• Éviter tout contact avec les lames et les pièces
mobiles.
• Ne pas utiliser un appareil dont la fiche ou le
cordon sont abîmés, qui présente un problème
de fonctionnement, qui a été échappé ou qui
est endommagé de quelque façon que ce soit.
Communiquer avec le service à la clientèle en
composant le numéro indiqué dans le présent
guide. D’importantes indications figurent sur
la lame de la fiche de cet appareil. La fiche de
branchement ou l’ensemble du cordon (si la fiche
est moulée à même le cordon) ne peuvent pas être
remplacés. S’ils sont endommagés, l’appareil doit
être remplacé.
• L’utilisation d’accessoires non recommandés par le
fabricant présente des risques d’incendie, de choc
électrique ou de blessures.
• Ne pas utiliser l’appareil à l’extérieur.
• Ne pas laisser le cordon pendre du rebord d’une table
ou d’un comptoir, ou toucher les surfaces chaudes.
• Garder les mains et les ustensiles éloignés
des lames ou des disques mobiles pendant le
fonctionnement de l’appareil pour réduire les
risques de blessures graves ou de dommages au
robot culinaire. Une spatule peut être utilisée, mais
seulement lorsque le robot culinaire est arrêté.
• Les lames sont tranchantes. Les manipuler avec soin.
• Pour réduire les risques de blessures, ne jamais
installer les lames ou les disques sur la base
avant d’avoir bien fixé le bol en place.
• S’assurer que le couvercle est bien verrouillé
avant d’utiliser l’appareil.
• Ne jamais insérer les aliments avec les mains.
Toujours utiliser le poussoir d’aliments.
• Ne pas placer l’appareil sur un brûleur au gaz ou
électrique ou près d’un tel appareil, ni dans un
four chaud.
• Ne pas tenter de contourner le dispositif de
verrouillage du couvercle.
• N’utiliser cet appareil que pour les fonctions
auxquelles il est destiné.
• Cet appareil est conçu pour un usage domestique
seulement.
• Ne pas ouvrir le couvercle avant que la lame ou le
disque ne se soit pas immobilisé complètement.
• La puissance nominale maximale a été atteinte
avec la lame pétrisseuse.
• Cet appareil n’est pas conçu pour être utilisé par
des personnes (notamment des enfants) dont
les capacités physiques, sensorielles ou mentales
sont réduites ou qui manquent d’expérience ou
de connaissances, à moins qu’elles ne soient
supervisées ou dirigées par une personne
responsable de leur sécurité pendant l’utilisation.
• Exercer une étroite surveillance lorsque l’appareil
est utilisé par un enfant ou près d’un enfant.
• Il n'est pas recommandé de découper en dés du
fromage congelé ou d'autres produits congelés.
REMARQUE : Le traitement d’aliments à basse teneur
en humidité peut ternir le fini du bol.
Veuillez lire et conserver ce guide d’entretien et d’utilisation.
MISES EN GARDE IMPORTANTES.
Lorsqu’on utilise des appareils électriques, il faut toujours respecter certaines règles
de sécurité fondamentales, notamment les suivantes :

14
FICHE MISE À LA TERRE (Modèles de
120 V seulement)
Par mesure de sécurité, le produit comporte
une fiche mise à la terre qui n’entre que
dans une prise à trois trous. Il ne faut pas
neutraliser ce dispositif de sécurité. La
mauvaise connexion du conducteur de
terre présente des risques de secousses
électriques. Communiquer avec un
électricien certifié lorsqu’on se demande si la
prise est bien mise à la terre.
VIS INDESSERRABLE
AVERTISSEMENT : L’appareil est doté
d’une vis indesserrable empêchant
l’enlèvement du couvercle extérieur.
Pour réduire les risques d’incendie ou de
secousses électriques, ne pas tenter de
retirer le couvercle extérieur. L’utilisateur ne
peut pas remplacer les pièces de l’appareil.
En confier la réparation seulement au
personnel des centres de service autorisés.
CORDON
1. Le cordon d’alimentation de l’appareil
est court afin de minimiser les risques
d’enchevêtrement ou de trébuchement.
2. Lorsqu’on utilise un cordon
d’alimentation amovible ou de rallonge
plus long, il faut s’assurer que :
a.) la tension nominale du cordon
d’alimentation amovible ou de rallonge
soit au moins égale à celle de l’appareil,
et que;
b.) lorsque l’appareil est de type mis à la
terre, il faut utiliser un cordon de rallonge
mis à la terre à trois broches, et;
c.) le cordon plus long soit placé de sorte
qu’il ne soit pas étalé sur le comptoir ou
la table d’où des enfants pourraient le
tirer, ni placé de manière à provoquer un
trébuchement.
Remarque : Lorsque le cordon
d’alimentation est endommagé, il faut le
faire remplacer par du personnel qualifié
ou, en Amérique latine, par le personnel
d’un centre de service autorisé.
CARACTÉRISTIQUES DE SÉCURITÉ
CONSERVER CES MESURES
Cet appareil est conçu pour un usage domestique seulement.

15
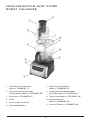
FAMILIARISATION AVEC VOTRE
ROBOT CULINAIRE
1. Grand poussoir d’aliments
(pièce nº FP3000FBS-11)
2. Couvercle (avec grand orifice
d’alimentation) (pièce nº FP3000FBS-02)
3. Bol (pièce nº FP3000FBS-07)
4. Socle
5. Panneau de commande
6. Pieds antidérapants
7. Petit poussoir d’aliments
(pièce nº FP3000FBS-01)
8. Disque éminceur/déchiqueteur
réversible (pièce nº FP3200FBS-03)
9. Tige de lame (pièce n° FP3200FBS-10)
10. Lame pétrisseuse
(pièce nº FP3000FBS-04)
11. Lame en S (pièce n° FP3000FBS-06)

16
UTILISATION
Cet appareil est conçu pour un usage domestique seulement.
POUR COMMENCER
• Retirer tout matériau d’emballage, toute étiquette et la bande de plastique entourant
la che.
• Retirer et conserver la documentation.
• Visiter le www.prodprotect.com/applica pour enregistrer la garantie.
• Laver toutes les pièces amovibles en suivant les directives de la section
ENTRETIEN ET NETTOYAGE du présent guide.
• MISE EN GARDE : Manipuler les lames et les disques avec grande précaution. Ils sont
très coupants.
• Choisir un comptoir sec et de niveau où utiliser l’appareil; laisser assez d’espace sur
tous les côtés pour assurer la ventilation adéquate du moteur.
UTILISATION DU ROBOT CULINAIRE
1. Choisir l’accessoire à utiliser : lame en S, lame pétrisseuse ou disque éminceur/déchiqueteur.
LAME EN S
LAME
PÉTRISSEUSE
Disque
éminceur/
déchiqueteur
HACHER,
RÉDUIRE
EN PURÉE,
MÉLANGER
PÉTRIR,
MÉLANGER
TRANCHER,
DÉCHIQUETER,
RÂPER
VITESSE
ÉLEVÉE OU
IMPULSION
BASSE VITESSE
MOYENNE
VITESSE
Important : Toujours s’assurer que le robot culinaire est
débranché et déposé sur une surface plane et de niveau avant de
commencer l’assemblage.
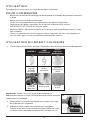
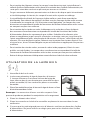
2. Placer le bol sur le socle, la poignée vers l’avant, à un angle
de 45 degrés vers la gauche.
3. Maintenir le bol en place en le tenant par la poignée.
Tourner le bol dans le sens antihoraire pour le xer au socle.
Un déclic se fera entendre lorsque le bol sera bien xé. (A)
A

17
Remarque : S’assurer de verrouiller le bol en place avant de xer
les lames ou les disques et de mettre le couvercle.
4. Insérer la lame ou le disque sélectionné sur la tige de lame
au fond du grand bol (les instructions pour les lames/
disques individuels gurent plus loin dans le présent guide).
5. Placer le couvercle sur le bol en alignant les taquets, puis
tourner dans le sens antihoraire pour le verrouiller. Le
couvercle est verrouillé en place lorsqu’un déclic se fait
entendre. Le couvercle ne sera verrouillé que si l’orice
d’alimentation et la poignée du bol sont alignés. (B)
UTILISATION DE L’ORIFICE
D’ALIMENTATION ET DES
POUSSOIRS
Remarque : Avant d’utiliser le robot culinaire, s’assurer que
le bol, les lames et le couvercle du bol sont correctement
assemblés sur le socle du robot culinaire.
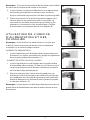
ALIMENTS DE GRANDE TAILLE
1. Insérer le petit poussoir d’aliments dans le grand poussoir
d’aliments. Les utiliser ensemble pour diriger les ingrédients
dans le grand orice d’alimentation. (C)
ALIMENTS DE PETITE TAILLE OU LIQUIDES
1. Insérer le grand poussoir d’aliments dans le grand orice
d’alimentation du couvercle. (D) Pousser vers le bas jusqu’à
ce que le grand poussoir d’aliments s’enclenche et repose
au fond de l’orice d’alimentation.
2. Placer les aliments dans l’ouverture du grand poussoir
d’aliments. Utiliser le petit poussoir d’aliments pour diriger
les ingrédients vers le centre du grand poussoir d’aliments.
Retirer le petit poussoir d’aliments pour ajouter du liquide
ou d’autres aliments. (E)
Remarque : Le grand poussoir d’aliments doit demeurer dans le
grand orice d’alimentation pour que le robot culinaire puisse
fonctionner.
B
C
D
E

18
UTILISATION DES COMMANDES DE VITESSE
Remarque : ISi le robot culinaire ne fonctionne pas, s’assurer que le bol et le couvercle sont
correctement xés au socle et que le grand poussoir d’aliments est bien en place. Un dispositif de
sécurité automatique interrompt le fonctionnement du robot culinaire si le grand poussoir d’aliments
est éjecté et/ou le couvercle et le bol ne sont pas correctement en place.
Les commandes sont situées à l’avant du socle. Consulter le
tableau des vitesses pour obtenir les recommandations relatives à
l’utilisation. Des vitesses diérentes sont utilisées pour le hachage,
le mélange, le tranchage et le déchiquetage. Lorsque ces fonctions
sont sélectionnées, le robot culinaire fonctionne continuellement
jusqu’à ce que le bouton OFF|PULSE (ARRÊT|IMPULSION) soit
pressé pour arrêter l’appareil. (F)
1. Brancher l’appareil pour le mettre en marche.
2. Sélectionner la vitesse basse, moyenne ou élevée en
fonction de la tâche à exécuter. Presser et relâcher le bouton
PULSE (IMPULSION) pour activer le mode d’impulsion.
3. Pour arrêter, appuyer sur OFF|PULSE (ARRÊT|IMPULSION).
4. Toujours débrancher l’appareil lorsqu’il ne sert pas.
IMPULSION BASSE VITESSE 1 MOYENNE VITESSE 2 HAUTE VITESSE 3
Pour un hachage/
mélange précis
Pour pétrir de la pâte
(traitement continu)
Pour émincer et
déchiqueter
(traitement continu)
Pour hacher
et mélanger
(traitement continu)
Fines herbes fraîches
Noix
Chapelure
Viande
Pâte à pain
Croûtes
Légumes tels que les
suivants :
• pommes de terre
• oignons
• concombres
• chou
• carottes
Fruits
Fromage
(préalablement
congelé pendant
30 min)
Chocolat
Légumes tels que les
suivants :
• pommes de terre
• oignons
• concombres
Fruits
Chapelure
Viande
Sauces, pâtes à frire,
trempettes
F

19
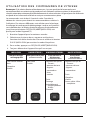
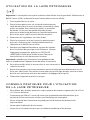
UTILISATION DU DISQUE
ÉMINCEUR/DÉCHIQUETEUR
1. Verrouiller le bol en place.
2. Insérer la tige de lame sur l’axe d’entraînement du bol.
3. Insérer les doigts dans les deux grands trous du disque
pour saisir ce dernier, face désirée vers le haut (pour
émincer ou déchiqueter), puis l’installer sur la tige de lame dans le bol (G). Il sera peut-
être nécessaire de tourner le disque légèrement pour bien le xer sur la tige.
4. Placer le couvercle sur le bol et le verrouiller en place en le tournant dans le sens
antihoraire.
5. Insérer les aliments dans l’orice d’alimentation et utiliser le poussoir d’aliments pour
diriger les aliments vers le disque éminceur/déchiqueteur.
6. Appuyer sur le bouton de sélection de MOYENNE vitesse (MEDIUM), puis appuyer
légèrement mais fermement sur le poussoir d’aliments pour faire passer les aliments
dans le robot culinaire.
Remarque : Exercer une grande pression sur le poussoir d’aliments n’accélère pas le travail;
utiliser le poussoir d’aliments comme guide uniquement. Laisser le robot culinaire faire le travail.
7. Une fois l’opération terminée, appuyer sur OFF|PULSE (ARRÊT|IMPULSION), attendre
que le disque cesse de tourner et débrancher l’appareil avant de retirer le couvercle.
Tourner le couvercle dans le sens horaire pour le déverrouiller et le retirer.
8. Utiliser les prises pour les doigts pour tirer soigneusement le disque éminceur/
déchiqueteur directement vers le haut de manière à le retirer. Retirer la tige de lame du
bol. Déverrouiller le bol en le tournant dans le sens horaire et le soulever pour le retirer
du socle.
9. Vider le bol.
10. Débrancher l’appareil quand il ne sert pas.
CONSEILS PRATIQUES POUR ÉMINCER
OU DÉCHIQUETER
• Avant de trancher des fruits et des légumes ronds avec le robot culinaire, enlever une
tranche mince au bas de l’aliment an de le rendre plus stable. Placer les aliments dans
l’orice d’alimentation, côté coupé vers le bas.
• Avant de traiter les aliments, toujours en retirer les graines, le noyau et les pépins.
• Choisir des fruits et légumes fermes qui ne sont pas trop mûrs.
• Retirer le cœur des légumes durs, tels que le chou.
G

20
• Pour trancher des légumes minces, les couper à une dimension tout juste inférieure à
celle de l’orice d’alimentation et les placer à la verticale dans l’orice d’alimentation, de
sorte qu’ils soient bien serrés et ne puissent pas tourner ou s’incliner.
• De gros morceaux d’aliments peuvent rester sur le dessus du disque après le tranchante
ou le déchiquetage. Au besoin, les couper à la main et les rajouter au mélange.
• Il est préférable de refroidir les fromages à pâte molle ou semi-ferme avant de les
déchiqueter. Pour obtenir de meilleurs résultats avec les fromages à pâte molle comme
la mozzarella, les congeler de 15 à 20 minutes avant l’opération. Les couper dans une
dimension correspondant à la taille de l’ouverture de l’orice d’alimentation et les insérer
en exerçant une pression uniforme.
• Pour trancher de la viande non cuite, la découper ou la rouler de ça façon à obtenir
des morceaux d’une dimension correspondant à la taille de l’ouverture de l’orice
d’alimentation. Retirer les morceaux de gras visibles. Emballer et les aliments et les
placer au congélateur jusqu’à ce qu’ils soient durs au toucher, mais pas jusqu’à ce qu’ils
soient complètement gelés; cela prendra de 30 minutes à 2 heures, selon l’épaisseur des
aliments. S’assurer de pouvoir percer l’aliment avec la pointe d’un couteau aiguisé. Si ce
n’est pas le cas, laisser l’aliment dégeler un peu et le trancher en appliquant une pression
uniforme.
• Pour trancher des viandes cuites, comme du salami et du pepperoni, il faut s’assurer
qu’elles sont très froides. Les couper dans une dimension correspondant à la taille de
l’ouverture de l’orice d’alimentation et les insérer en exerçant une pression uniforme.
• Retirer le disque éminceur/déchiqueteur avant d’enlever le bol du robot culinaire.
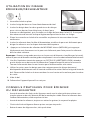
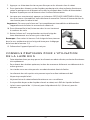
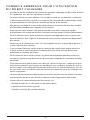
UTILISATION DE LA LAME EN S
1. Verrouiller le bol sur le socle.
2. Insérer avec précaution la tige de lame dans la lame en
S. Lorsque la lame en S se trouve à la base de la tige de
lame, tourner dans le sens horaire pour verrouiller les deux
pièces ensemble (H). Vous sentirez les pièces se verrouiller
ensemble.
3. Placer l’ensemble formé par la lame et la tige de lame sur l’axe
d’entraînement dans le bol.
Remarque : Les accessoires à lames sont très coupants. Faire
preuve de prudence pendant la manipulation et le rangement.
4. Placer les aliments dans le bol.
5. Placer le couvercle sur le bol et le verrouiller en place en le tournant dans le sens
antihoraire.
6. S’assurer que les petit et grand poussoirs d’aliments sont bien en place dans l’orice
d’alimentation. Ne jamais utiliser ses doigts pour pousser les aliments dans l’orice
d’alimentation.
H
La page est en cours de chargement...
La page est en cours de chargement...
La page est en cours de chargement...
La page est en cours de chargement...
La page est en cours de chargement...
La page est en cours de chargement...
La page est en cours de chargement...
La page est en cours de chargement...
-
 1
1
-
 2
2
-
 3
3
-
 4
4
-
 5
5
-
 6
6
-
 7
7
-
 8
8
-
 9
9
-
 10
10
-
 11
11
-
 12
12
-
 13
13
-
 14
14
-
 15
15
-
 16
16
-
 17
17
-
 18
18
-
 19
19
-
 20
20
-
 21
21
-
 22
22
-
 23
23
-
 24
24
-
 25
25
-
 26
26
-
 27
27
-
 28
28


Black & Decker FP3300SKT Le manuel du propriétaire
- Catégorie
- Robots culinaires
- Taper
- Le manuel du propriétaire
dans d''autres langues
Documents connexes
-
Black & Decker FP2700SC Manuel utilisateur
-
-
-
-
-
Black & Decker FP6010 Manuel utilisateur
-
-
-
Black & Decker Power Pro FP2650S Guide d'installation
-
Black & Decker Spacemaker CG800C Manuel utilisateur
Autres documents
-
 Black and Decker Appliances FP2500C Mode d'emploi
-
 Black and Decker Appliances FP6000 Mode d'emploi
-
Black and Decker Appliances FP4200BC Manuel utilisateur
-
Westinghouse WST2025ZE Manuel utilisateur
-
Ninja NF700 Series Le manuel du propriétaire
-
 Russell Hobbs FP3100RDR Le manuel du propriétaire
-
Morphy Richards Food Processor Manuel utilisateur


