
TQZH338-1
TY-ST05-S
TY-ST05-K
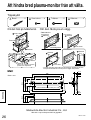
MODEL
Bottenplatta för Bred plasma-monitor
Monteringsanvisningar
Läs dessa anvisningar noggrant innan du monterar samman
dessa tillbehör.
Behåll häftet för framtida referens.
Sokkel til bredformat-plasmaskærm
Monteringsvejledning
Læs hele denne vejledning grundigt, inden du samler dette
tilbehør.
Gem vejledningen til brug i fremtiden.
Pedestal para Pantalla Panorámica
de Plasma
Instrucciones de instalación
Antes del instalar estos accesorios, lea cuidadosamente
estas instrucciones.
Guarde estas instrucciones para futuras referencias.
Piédestal pour l’Ecran plasma 16/9ème
Manuel d’installation
Avant d'essayer d'assembler ces accessoires, veuillez lire
ces instructions complètement.
Veuillez garder ce manuel pour une rèfèrence future.
Piedistallo per lo schermo al plasma-
16:9
Instruzioni per I’installazione
Prima di iniziare a montare questi accessori, siete pregati di leggere
interamente le presenti istruzioni.
Siete inolte pregati di conservare questo libro per future consultazioni.
Vloerstandaard voor Breedbeeld
Plasmadisplay Monitor
Installatiehandleiding
Lees deze handleiding zorgvuldig door alvorens u probeert deze
accessoires te monteren.
Bewaar de handleiding voor het geval dat u later iets wilt opzoeken.
Sockel für Plasmadisplay
Installationsanleitung
Vor der Installation lesen Sie bitte diese Anleitung sorgfältig
durch.
Diese Anleitung zum späteren Nachschlagen aufbewahren.
Pedestal for Wide Plasma Display
Installation Instructions
Before attempting to assemble these accessories, please
read these instructions completely.
Please retain this book for future reference.
English
Deutsch
Nederlands
Italiano
Français
Español
Svenska
Dansk

2

3

4
•
•
C Matsushita Electric Industrial Co., Ltd. 2001

5
English
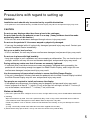
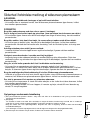
Precautions with regard to setting up
WARNING
Installation work should only be carried out by a qualified technician.
• If the pedestal is not installed correctly, the Wide Plasma Display may fall over and personal injury may result.
CAUTION
Do not use any displays other than those given in the catalogue.
Do not climb up onto the pedestal or use it as a step. (Young children should be made
particularly aware of this caution.)
• If the unit falls over or becomes damaged through misuse, injury may result.
Do not use the pedestal if it becomes warped or physically damaged.
• If you use the pedestal whilst it is physically damaged, personal injury may result. Contact your
nearest Panasonic Dealer immediately.
Set up on a stable, level surface.
• If this is not done, the unit may fall over and become damaged, and personal injury may result.
Do not use in places with high humidity.
• Long-term usage in such conditions can cause warping or deformation. This can lead to loss of
strength, and the unit may fall over and become damaged, and personal injury may result.
During setting-up, make sure that all screws are securely tightened.
• If sufficient care is not taken to ensure screws are properly tightened during assembly, the
pedestal will not be strong enough to support the Wide Plasma Display, and it might fall over
and become damaged, and personal injury may result.
Use the accessory fall-prevention brackets to secure the Wide Plasma Display.
• If the unit is knocked or children climb onto the pedestal with the Wide Plasma Display installed,
the Wide Plasma Display may fall over and personal injury may result.
Two people are required to install and remove the display.
• If two people are not present, the display may be dropped, and personal injury may result.
• Leave a space of at least 3
15
/16 inches (10 cm) at the top, left and right, at least 2
3
/8 inches (6
cm) at the bottom, and at least 2
49
/64 inches (7 cm) at the rear.
Notes on handling
1) If the unit is placed in direct sunlight or next to a stove, the light and heat may cause discoloration or deformation.
2) Cleaning
Wipe the unit with a dry cloth. If the unit is particularly dirty, clean it using a cloth soaked with water to which a
small amount of neutral detergent has been added, and then wipe with a dry cloth.
Do not use products such as solvents, thinner or household wax for cleaning, as they can damage the surface
coating.
(If using a chemically-treated cloth, follow the instructions supplied with the cloth.)
3) Do not attach sticky tape or labels, as they can make the surface of the pedestal dirty.

English
6
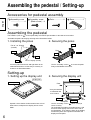
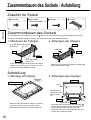
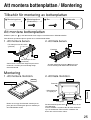
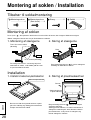
Assembling the pedestal / Setting-up
Assembly screw
...........................4
Assembly screw
(Black screw)....4
Pole ...................2 Base ..................1
Base
Pole
Pole
For 37˝ Display (Inside)
For 42˝, 50˝ Display
(Outside)
Insert the poles into the left and right holes in the
underside of the base so that they fit securely as
shown in the illustration above.
2. Securing the poles
Base
Pole
Pole
Front
Use the assembly screws to secure the poles
firmly to the bottom of the base.
Accessories for pedestal assembly
Assembling the pedestal
The numbers (such as ) in the explanatory text indicate part numbers in the table of accessories.
Setting-up
1. Installing the poles
1. Setting up the display unit
Display unit
Cloth or similar
Spread a clean cloth or similar material over a level
floor or base, and place the display unit on it face
down.
2. Securing the display unit
* Carry out work on
a horizontal and
level surface.
Display unit
Pole
Rear
Pedestal
Front
Nameplate
Use the assembly screws (Black screw) to
fasten securely.
Lift the display unit above the pedestal base, with
the back of the display unit on the same side as
the Nameplate. Then align the holes in the display
unit with the poles of the pedestal and lower the
display unit into place.
Assemble the poles correctly by referring to the illustrations below.

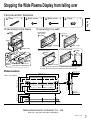
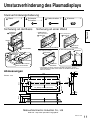
7
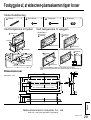
English
If securing to the base If securing to a wall
Front
Front
Black
screw
Band
Base
Wood
Worktop
Band
Wood
screw
Wood screw
Black
screw
Screw into the middle of the
back edge of a wood worktop.
Black screw
Clamp
Clamp
• Preparation
• Securing method
With speakers
With screw holes
(conventional product)
No speakers
Black screw
Clamp Clamp
Bracket mounting
screw
Fall-prevention brackets
* Use strong wire or chain which is commercially available to secure
the Wide Plasma Display to a solid area of the wall or a pillar.
Stopping the Wide Plasma Display from falling over
M0701-1091
Matsushita Electric Industrial Co., Ltd
Web Site : http://www.panasonic.co.jp/global/
Wood screw.....2Band ................2 Clamp ..............4Black screw .....4
Dimensions
29.8 (1
11
/64)
83 (3
17
/64)
119.8 (4
23
/32)
106 (4
11
/64)
194.8 (7
43
/64)
151 (5
15
/16)
320.3 (12
39
/64)
184.5 (7
17
/64)
125.5 (4
15
/16)
67.5 (2
21
/32)
17.5 (
11
/16)
6.5 (
1
/4)
62.5 (2
29
/64)
9.6 (
3
/8)
601 (23
21
/32) (When installing a 37˝ display)
684 (26
15
/16) (When installing a 42˝, 50˝ display)
806 (31
47
/64)
37 (1
29
/64)
688 (27
5
/64)
601 (23
21
/32)
Units : mm (inches)

English
(For U.S.A)
8
Warranty
Panasonic Consumer Electronics Company
Division of Matsushita Electric Corporation
of America
One Panasonic Way
Secaucaus, NJ
07094
RACKS AND STANDS
Panasonic Consumer Electronics Company or Panasonic Sales Company (collectively referred to as “the
warrantor” ), will replace parts in case of defects in materials or workmanship, free of change, in the USA or
Puerto Rico, for ten (10) days from the date of the original purchase.
In-warranty parts in the USA can be obtained during the warranty period be contacting:
Panasonic Services Company (PASC)
20421 84th Avenue South
Kent, Washington 98032
Tel.:1-800-833-9626
Fax.:1-800-237-9080
(6 am to 5 pm Monday-Friday; 6 am to 10:30 am Saturday; PST)
Service in Puerto Rico can be obtained during the warranty period by calling the telephone number listed above.
This warranty is extended only to the original purchaser. A purchase receipt or other proof of the original
purchase is required for replacement parts under the warranty.
This warranty only covers failures due to materials and workmanship and does not cover normal wear. The
warranty does not cover damages which occurred in shipment or failures which result from accidents, misuse,
abuse, neglect, mishandling, misapplication, faulty installation, set-up adjustments, improper maintenance,
alteration, line power surge, lightning damage, modification,or commercial use, such as hotel, office,
restaurant, or other business or rental use of the product, or damage that is attributable to acts of God.
LIMITS AND EXCLUSIONS
There are no express warranties except as listed above.
PANASONIC SHALL NOT BE LIABLE FOR INCIDENTAL OR CONSEQUENTIAL DAMAGE RESULTING
FROM THE USE OF THIS PRODUCT, OR ARISING OUT OF ANY BREACH OF THIS WARRANTY. ALL
EXPRESS AND IMPLIED WARRANTIES. INCLUDING THE WARRANTIES OF MERCHANTABILITY, ARE
LIMITED TO THE APPLICABLE WARRANTY PERIOD SET FORTH ABOVE.
Some states do not allow the exclusion or limitation of incidental or consequential damages, or limitations on
how long an implied warranty lasts, so the above exclusions or limitations may not apply to you.
This warranty gives you specific legal rights and you may also have other rights which vary from state to state.
If a problem with this product develops during or after the warranty period, you may contact your dealer or call
the number listed above.
If the problem is not handled to your satisfaction, then write to the Customer Satisfaction Center at the
Panasonic Consumer Electronics Company address indicated above.
Panasonic Sales Company, Division of
Matsushita Electric of Puerto Rico, Inc.
AVE. 65 de Infanteria, Km 9.5
San Gabriel Industrial Park
Carolina, Puerto Rico 00985

9
Deutsch
Vorsichtsmaßnahmen für die Aufstellung
WARNUNG
Die Installation darf nur von einem qualifizierten Fachmann ausgeführt werden.
• Falls der Sockel nicht richting installiert ist, kann das Plasmadisplay umfallen und dabei
Verletzungen verursachen.
VORSICHT
Nicht für Displays verwenden, die nicht in diesem Katalog aufgeführt sind.
Nicht auf den Sockel klettern oder den Sockel als Tritt verwenden. (Dies gilt besonders für
kleine Kinder.)
•
Beim Umfallen kann das Gerät beschädigt werden und es können Verletzungen verursacht werden.
Den Sockel nicht verwenden, falls er verzogen, gerissen oder gebrochen ist.
• Falls der Sockel in diesem Zustand verwendet wird, kann er noch mehr beschädigt werden und
dabei Verletzungen verursachen. Wenden Sie sich in diesem Fall an das Verkaufsgeschäft.
Auf einer stabilen, ebenen Fläche aufstellen.
• Auf einer instabilen Fläche kann das Gerät umfallen und dabei beschädigt werden oder
Verletzungen verursachen.
Nicht an Orten mit hoher Luftfeuchtigkeit verwenden.
• Bei längerer Verwendung unter solchen Bedingungen kann sich der Sockel verziehen und
verformen. Durch die verminderte Festigkeit kann das Gerät umfallen und dabei beschädigt
werden oder Verletzungen verursachen.
Beim Aufstellen kontrollieren, ob alle Schrauben richtig festgezogen sind.
• Falls beim Aufstellen nicht alle Schrauben richtig festgezogen werden, ist keine ausreichende
Tragfähigkeit für das Plasmadisplay gewährleistet. Das Gerät kann umfallen und beschädigt
werden oder es können Verletzungen verursacht werden.
Venwenden Sie zum Sichern des Plasmadisplays die mitgelieferte Halterung zur
Verhinderung des Umstürzens.
• Im Falle eines Erdbebens oder wenn Kinder auf den Sockel klettern, kann das Plasmadisplay
umstürzen und Verletzungen verursachen.
Für das Aufhängen und das Abnehmen des Displays sind zwei Personen notwendig.
• Falls nicht zwei Personen zur Verfügung stehen, kann das Display herunterfallen und
Verletzungen verursachen.
• Auf der Oberseite und links und rechts muß ein freier Abstand von mindestens 10 cm, auf der
Unterseite ein freier Abstand von mindestens 6 cm und auf der Rückseite ein freier Abstand
von mindestens 7 cm vorhanden sein.
Hinweise für die Handhabung
1) Bei der Aufstellung an einem Ort mit direkter Sonneneinstrahlung oder neben einer Heizung können
Verformungen und Verfärbungen auftreten.
2) Reinigung
Reinigen Sie das Gerät mit einem trockenen Tuch. Bei starker Verschmutzung können Sie das Tuch mit einer
verdünnten Reinigungsmittellösung anfeuchten. Reiben Sie das Gerät nach dem Reinigen mit einem anderen
Tuch trocken.
Verwenden Sie keine Lösungsmittel, Farbverdünner oder Reinigungswachs, weil die Oberfläche beschädigt
werden kann.
(Bei Verwendung von vorbehandelten Reinigungstücherm muß die Anwendungsanleitung des Tuchs genau
beachtet werden.)
3) Bringen Sie keine Kleber oder Klebebänder an, weil sie Spuren auf der Oberfläche des Sockels hinterlassen.

Deutsch
10
Zusammenbauen des Sockels / Aufstellung
Schraube
...........................4
Schraube
(Schwarze Schraube)
...4
Stange...............2 Platte ................1
Platte
Stange
Stange
für 37-Zoll-Display
(Innenseite)
für 42-Zoll-Display oder größer
(Außenseite)
Setzen Sie die Stangen richtig in die beidseitigen
Löcher auf der Unterseite des Sockels ein, wie in
der obenstehenden Abbildung gezeigt.
2. Befestigen der Stangen
Platte
Stange
Stange
Vorderseite
Befestigen Sie die Stangen mit den Schrauben
an der Unterseite der Platte.
Zubehör für Sockel
Zusammenbauen des Sockels
Im Text werden die Teile mit Nummern (wie z.B. ) bezeichnet, die den Nummern in der Zubehörtabelle entsprechen.
Aufstellung
1. Montieren der Stangen
1. Montage am Display
Display
Tuch oder ähnliches
Breiten Sie auf einer ebenen Fläche ein sauberes
Tuch aus und legen Sie das Display mit der
Bildschirmseite nach unten gerichtet darauf ab.
2. Befestigen des Displays
* FührenSie diese
Arbeiten auf einer
ebenen Fläche
aus.
Display
Stange
hinten
Sockel
Vorne
Namensschild
Verwenden Sie zum Befestigen die Schrauben .
Richten Sie das Display so aus, daß die Löcher
für die Stangen nach hinten gerichtet sind.
Richten Sie die Löcher auf die Stangen aus und
stecken Sie die Stangen hinein.
Setzen Sie deshalb die Stangen richtig ein, wie auf der nachstehenden Abbildung gezeigt.

Matsushita Electric Industrial Co., Ltd
Web Site : http://www.panasonic.co.jp/global/
11
Deutsch
Umsturzverhinderung des Plasmadisplays
Sicherung an der Basis Sicherung an einer Wand
Vorne
Vorne
Schwarze
schraube
Band
Platte
Band
Holzschraube
Holzschraube
Schwarze
schraube
In die Mitte des oberen
Bretts einschrauden.
Schwarze
Schraube
Klammer
Klammer
• Vordereitung
• Sicherungsmethode
Mit Lautsprechern
Mit Schraubenlöchern
(konventionelles Produkt)
Ohne Lautsprecher
Schwarze
Schraube
Klammer
Klammer
Halterungsschrauben
Sturzverhinderungshalterung
M0701-1091
Holzschraube ..2Band ................2 Klammer ..........4Schwarze
Schraube .........4
29.8
83
119.8
106
194.8
151
320.3
184.5
125.5
67.5
17.5
6.5
62.5
9.6
601 (Montage eines 37-Zoll-Display)
684 (Montage eines 42-Zoll-oder größeren Displays)
806
37
688
601
Abmessungen
Einheit : mm
* Verwenden Sie einen starken Draht oder eine Kette, um das
Plasmadisplay an einer festen Stelle an der Wand oder an einer
Säule zu sichern.

Nederlands
12
Voorzorgsmaatregelen bij opstelling
WAARSCHUWING
De installatiewerkzaamheden dienen uitsluitend door een deskundige monteur uitgevoerd te worden.
• Als de vloerstandaard niet correct wordt geïnstalleerd, bestaat de kans dat de Breedbeeld
Plasmadisplay Monitor omvalt, hetgeen letsel kan veroorzaken.
OPGELET
Gebruik geen andere displays dan in de catalogus staan aangegeven.
Niet op de vloerstandaard gaan staan of deze als opstapje gebruiken. (Kleine kinderen
dienen speciaal op dit punt attent gemaakt te worden.)
•
Als het toestel omver valt of door verkeerd gebruik beschadigd wordt, kan dit tot verwondingen leiden.
De vloerstandaard niet gebruiken als deze verbogen, gebarsten of anderszins beschadigd is.
•
Als u de vloerstandaard gebruikt wanneer deze beschadigd is, kan deze verder beschadigd raken,
hetgeen tot verwondingen kan leiden. Neem zo spoedig mogelijk contact op met uw Panasonic dealer.
Op een stabiele, horizontale ondergrond plaatsen.
• Als dit niet gebeurt, bestaat de kans dat het toestel omver valt en beschadigd wordt, hetgeen
tot verwondingen kan leiden.
Niet gebruiken op plaatsen met een hoge vochtigheid.
• Langdurig gebruik onder dergelijke omstandigheden kan kromtrekken en of vervorming
veroorzaken. Dit kan tot vermindering van de stevigheid leiden, waardoor het toestel omver kan
vallen en beschadigd kan raken, hetgeen tot verwondingen kan leiden.
Zorg er voor dat bij het opstellen alle schroeven goed vastgedraaid zijn.
•
Als er tijdens de montage niet voldoende op gelet wordt om alle schroeven goed vast te draaien, bestaat
de kans dat de vloerstandaard niet stevig genoeg is om de Breedbeeld Plasmadisplay Monitor te dragen,
waardoor het toestel omver kan vallen en beschadigd kan raken, hetgeen tot venwondingen kan leiden.
Gebruik de bijgeleverde kantelpreventiesteunen om de Breedbeeld Plasmadisplay Monitor vast te zetten.
• In het geval van een aardbeving of wanneer er kinderen op de vloerstandaard klimmen
wanneer de Breedbeeld Plasmadisplay Monitor daarop geplaatst is, bestaat de kans dat de
Breedbeeld Plasmadisplay Monitor omver valt, hetgeen tot venwondingen kan leiden.
Het installeren en verwijderen van de display dient door twee personen te worden uitgevoerd.
• Als dit niet door twee personen wordt uitgevoerd, bestaat de kans dat de display komt te vallen
en verwondingen veroorzaakt.
• Laat een ruimte open van tenminste 10 cm aan de bovenlinker-en rechterzijde, tenminste 6 cm
aan de onderzijnde en 7 cm aan de achterzijde.
Aanwijzingen betreffende onderhoud
1) Als de vloerstandaard in direct zonlicht wordt geplaatst of naast een warmte bron, kan door het licht en de hitte
verkleuring en/of vervorming ontstaan.
2) Reinigen
Veeg de vloerstandaard schoon met een droge doek. Als de vloerstandaard zeer vuil is, deze met water waaraan
een kleine hoeveelheid van een neutraal schoonmaakmiddel is toegevoegd reinigen en vervlolgens met een
droge doek afvegen.
Gebruik voor het reinigen geen producten zoals wasbenzine, terpentijn of meubelwas, aangezien deze het
materiaal kunnen aantasten.
(Volg bij gebruik van een chemisch reinigingsdoekje de bij het doekje geleverde instructies.)
3) Bevestig geen plakband of etiketten, aangezien de buitenzijde van de vloerstandaard daardoor onnerstelbaar vuil
kan worden.

13
Nederlands
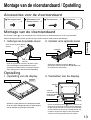
Monteer de opstaande steunen op correcte wijze aan de hand van onderstaande afbeeldingen.
Montage van de vloerstandaard / Opstelling
Steunplaat
Voor 37-inch display
(binnen)
Opstaande steun
Opstaande steun
Voor 42-inch of groter display
(buiten)
Steek de opstaande steunen in de linker en de
rechter openingen aan de onderkant van de
steunplaat en monteer deze stevig op hun plaats
zoals aangegeven in bovenstaande afbeelding.
2.
Vastzetten van de opstaande steunen
Steunplaat
Opstaande steun
Voorzijde
Opstaande steun
Gebruik de montageschroeven om de
opstaande steunen stevig aan de onderzijde van
de steunplaat te bevestigen.
Accessoires voor de vloerstandaard
Montage van de vloerstandaard
De nummers (zoals ) in de verklarende tekst verwijzen naar de onderdeelnummers in de accessoiretabel.
Opstelling
1.
Aanbrengen van de opstaande steunen
1. Opstelling van de display
Display
Doek of zacht materiaal
Spreid een schone deken of een soortgelijk materiaal
uit op een vlakke ondergrond of tafel en leg de display
met de voorzijde naar beneden er bovenop.
2. Vastzetten van de display
* Voer de
werkzaamheden
uit op een vlakke
ondergrond.
Display
Opstaande steun
Achterzijde
Vloerstandaard
Voorzijd
Model indicatie
Gebruik de montageschroeven (Zwarte schroef) om de
display stevig te bevestigen. Plaats de display zodanig dat
de zijde waar de gaten voor het insteken van de opstaande
steunen zichtbaar zijn zich aan de achterzijde bevindt. Lijn
vervolgens de gaten in de display uit met de opstaande
steunen en steek de opstaande steunen in de gaten.
Montageschroef
...........................4
Montageschroef
(Zwarte schroef )
...4
Opstaande steun
....2 Steunplaat .........1

Nederlands
14
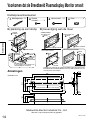
Voorkomen dat de Breedbeeld Plasmadisplay Monitor omvalt
Bij plaatsing op een tafeltje
Bij bevestiging aan de muur
Voorzijde
Voorzijde
Zwarte
schroef
Montagestrip
Steunplaat
Montagestrip
Houtschroef
Houtschroef
Zwarte
schroef
In het midden van de zijkant van
de plafondplaat schroeven.
Zwarte
schroef
Klem
Klem
• Voorbereiding
• Bevestigingsmethode
Met luidsprekers
Met schroefgaten
(conventioneel product)
Zonder luidsprekers
Zwarte schroef
Klem Klem
Bevestigingsschroef
Kantelpreventiesteunen
M0701-1091
Matsushita Electric Industrial Co., Ltd
Web Site : http://www.panasonic.co.jp/global/
Houtschroef .....2Montagestrip....2 Klem ................4Zwarte
schroef.............4
29.8
83
119.8
106
194.8
151
320.3
184.5
125.5
67.5
17.5
6.5
62.5
9.6
601 (Bij installatie van een 37-inch display)
684 (Bij installatie van een 42-inch of groter display)
806
37
688
601
Afmetingen
Eenheden
: mm
* Gebruik een stevige in de handel verkrijgbare kabel of ketting om de
Breedbeeld Plasmadisplay Monitor aan een solide gedeelte van een
muur of pilaar te bevestigen.

15
Italiano
Precauzioni da adottare per l’installazione
AVVERTENZA
Le operazioni di installazione vanno eseguite esclusivamente da personale qualificato.
• Se il piedistallo non è installato correttamente, Io schermo al plasma 16:9 può cadere e
procurare danni a cose o persone.
ATTENZIONE
Non utilizzare altri schermi diversi da quelli indicati nel catalogo.
Non salire sul piedistallo o utilizzarlo come gradino. (Prestare attenzione affinché nessun
bambino possa utilizzarlo come giocattolo.)
• Se l’unità cade o viene danneggiata per un cattivo uso, può procurare danni a cose e persone.
Non utilizzare il piedistallo qualora presenti deformazioni, fenditure o addirittura rotture.
• Se si utilizza un piedistallo danneggiato, può rappresentare un pericolo per l’incolumità
personale. Rivolgersi immediatamente al proprio rivenditore.
Posizionare su una superficie stabile e livellata.
• In caso contrario, I’unità può cadere e danneggiarsi, procurando eventuali danni a cose e
persone.
Non utilizzare in ambienti con un alto tasso di umidità.
• L’utilizzo per lunghi periodi in simili condizioni ambientali può causare la deformazione
dell’apparecchio e la conseguente perdita di resistenza, a danno dell’incolumità personale di chi
ne fa uso.
Durante l’installazione, accertarsi che tutte le viti siano fissate in modo appropriato.
• Qualora non venissero fissate correttamente durante il montaggio, il piedistallo non sarà in
grado di reggere lo schermo al plasma-16:9 che potrebbe cadere e danneggiarsi, procurando
eventuali danni a cose e persone.
Utilizzare le staffe accessorie anti-caduta per fissare lo schermo al plasma-16:9.
• Se si verifica un movimento tellurico oppure se i bambini si arrampicano sul piedistallo sul quale
è montato lo schermo al plasma-16:9, può cadere e procurare danni a cose e persone.
Per installare e rimuovere lo schermo sono richieste due persone.
• In caso contrario, si corre il rischio di far cadere lo schermo, procurando così danni a cose e
persone.
• Lasciare uno spazio di 10 cm o piú in alto, a destra e sinistra, 6 cm o piú in basso e 7 cm o piú
nella parte posteriore.
Note sulla manutenzione
1) Se l'unità è esposta alla luce solare diretta o è posizionata accanto ad una fonte di calore, possono verificarsi
deformazioni e scolorimento.
2) Pulizia
Pulire l'unità con un panno asciutto. Se l'unità fosse particolarmente sporca, pulirla utilizzando un panno inumidito
con acqua e una piccola quantità di detergente neutro, quindi asciugarla con un panno asciutto.
(Se si utilizza un panno trattato chimicamente, seguire le istruzioni fornite con il panno.)
3) Non attaccare adesivi o etichette, in quanto possono raccogliere polvere e corpi estranei a sporcare la superficie
del piedistallo.

Italiano
16
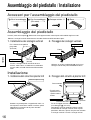
Assemblaggio del piedistallo / Installazione
Base
Sostegno verticale
Per schermo da 37 pollici
(Interno)
Sostegno verticale
Per schermo da 42 pollici o
più grande
(Estermo)
Inserire i sostegni verticali nei fori di destra e
sinistra, sotto la base, in modo che l’installazione
sia ben salda, facendo riferimento all’illustrazione
sotto.
2.
Fissaggio dei sostegni verticali
Base
Sostegno verticale
Fronte
Sostegno verticale
Utilizzare le viti di assemblaggio per fissare i
sostegni verticali alla parte inferiore della base.
Accessori per l’assemblaggio del piedistallo
Assemblaggio del piedistallo
I numeri (come ad esempio ) indicati nel testo rappresentano i numeri parte nella tabella degli accessori.
Installazione
1.
Installazione dei sostegni verticali
1.
Installazione dello schermo al plasma-16:9
Schermo al plasma-16:9
Panno o suppellettile simile
Stendere un panno pulito, o suppellettile simile, su
una superficie o una base stabile e livellata, quindi
appoggiarvi lo schermo con la parte anteriore
rivolta verso il basso.
2.
Fissaggio dello schermo al plasma-16:9
* Eseguire queste
operazioni su una
superficie stabile e
livellata.
Schermo al plasma-16:9
Parte
posteriore
Piedistallo
Parte anteriore
Etichetta con nome
Sostegno verticale
Per un fissaggio accurato, utilizzare le viti di
assemblaggio (vite nera).
Posizionare l’unità in modo da rivolgere i fori di
inserimento dei sostegni verticali verso la parte
posteriore. Allineare, quindi, i fori presenti sull’unità
ai sostegni verticali e inserire i sostegni nei fori.
Montare i sostegni verticali correttamente, facendo riferimento all’illustrazione sopra.
Vite di assemblaggio
...........................4
Vite di assemblaggio
(Vite nera).........4
Sostegno verticale
...2 Base ..................1

17
Italiano
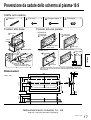
Prevenzione da cadute dello schermo al plasma-16:9
Fissato alla base Fissato ad una parete
Parte
anteriore
Parte
anteriore
Vite nera
Banda
Base
Band
Vite per
legno
Vite per legno
Vite nera
Avvitare al centro della
piastra sul bordo superiore.
Vite nera
Fermaglio
Fermaglio
• Installazione
• Metodo di sicurezza
Con altoparlanti
Con fori per viti
(prodotto comune)
Senza altoparlanti
Vite nera
Fermaglio
Fermaglio
Vite di fissaggio
delle staffe
Staffe anti-caduta
* Utilizzare un cavo o una catena resistente, disponibili in commercio,
per fissare lo schermo al plasma-16:9 ad un punto solido della parete
o del pilastro.
M0701-1091
Matsushita Electric Industrial Co., Ltd
Web Site : http://www.panasonic.co.jp/global/
Vite per legno ..2Banda ..............2 Fermaglio ........4Vite nera ..........4
29.8
83
119.8
106
194.8
151
320.3
184.5
125.5
67.5
17.5
6.5
62.5
9.6
601
(Quando s’installa uno schermo da 37 pollici)
684
(Quando si installa un display a 42 pollici o più grande)
806
37
688
601
Dimensioni
Unità : mm

Français
18
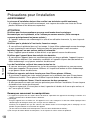
Précautions pour l’installation
AVERTISSEMENT
Les travaux d’installation doivent être confiés à un technicien qualifié seulement.
• Si le piédestal n’est pas installé correctement, ceci risquera de causer une chute de l’Ecran
plasma 16/9ème et des blessures corporelles.
ATTENTION
N’utilisez pas d’autres moniteurs que ceux mentionnés dans le catalogue.
Ne montez pas sur le piédestal, et ne l’utilisez pas comme marche. (Cette remarque
concerne principalement les jeunes enfants.)
• Si I’appareil tombe ou est endommagé à la suite d’une utilisation incorrecte, il y aura risque de
blessures.
N’utilisez pas le piédestal s’il est tordu, fissuré ou rompu.
• Si vous utilisez le piédestal alors qu’il est rompu, il risque d’être endommagé encore davantage,
et vous risqueriez de vous blesser. Adressez-vous dès que possible à votre revendeur.
Installez l’appareil sur une surface stable et horizontale.
• Sinon, I’appareil pourrait tomber et être abîmé, ce qui pourrait causer des blessures.
N’utilisez pas l’appareil dans des endroits très humides.
• Si vous utilisez l’appareil dans ces conditions pendant une longue période, I’appareil risquera
d’être tordu ou déformé. Ceci amoindrira sa solidité, et l’appareil risquera alors de tomber ou
d’être endommagé, ce qui pourra entraîner des blessures.
Lors de I’installation, veillez à bien serrer toutes les vis.
• Si vous ne serrez pas suffisamment les vis lors du montage, Ie piédestal ne sera pas assez
solide pour supporter I’Ecran plasma 16/9ème, et il risquera de tomber et d’être endommagé,
ce qui pourra causer des blessures.
Utilisez les supports anti-chute fournis pour fixer l’Ecran plasma 16/9ème.
• Si un séisme se produit ou si des enfants grimpent sur le piédestal alors que l’Ecran plasma
16/9ème est installé, I’Ecran plasma 16/9ème risque de tomber et de causer des blessures.
Pour poser ou déposer l’écran, il faut le concours de deux personnes.
• Si deux personnes au moins ne sont pas présentes pour effectuer l’installation, I’écran risquera
de tomber et de causer des blessures.
• Laissez un espace de 10 cm ou plus en haut, à gauche et à droite, de 6 cm ou plus en bas, et
de 7 cm ou plus à I’arrière.
Remarques concernant les manipulations
1) Si l’appareil est placé sous les rayons directs du soleil ou à proximité d’un appareil de chauffage, la lumière et la
chaleur risqueront de le décolorer ou de le déformer.
2) Nettoyage
Essuyez l’appareil avec un chiffon sec. Si l’appareil est très sale, nettoyez-le à l’aide d’un chiffon imprégné d’une
solution légère de détergent neutre, puis essuyez avec un chiffon sec.
N’utilisez pas de produits tels que des solvants, des diluants ou de la cire ménagère pour le nettoyage, car ces
produits risquent d’abîmer le revêtement de l’appareil.
(Si vous utilisez un chiffon traité chimiquement, suivez la notice d’utilisation du chiffon.)
3) Ne fixez pas de ruban adhésif ou d’étiquettes, car ils risquent de salir la surface du piédestal.

19
Français
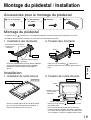
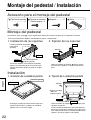
Montage du piédestal / Installation
Base
Montant
Pour l’écran de 37 pouces
(intérieur)
Pour un écran de 42 pouces
ou plus large
(extérieur)
Montant
Insérez les montants dans les trous gauche et droit du
dessous de la base de manière qu’ils s’engagent
parfaitement, comme indiqué sur l’illustration ci-
dessus.
2. Fixation des montants
Montant
Pole
Avant
Montant
Utilisez les vis de montage pour fixer les
montants solidement sur la partie inférieure de la
base.
Accessoires pour le montage du piédestal
Montage du piédestal
Les numéros (tels que ) figurant dans le texte d’explication indiquent les numéros de pièces dans le tableau des accessoires.
Installation
1. Installation des montants
1.
Installation de l’unité d’écran
Unité d’écran
Tissu ou objet équivalent
Placez un chiffon propre ou une feuille du même
type sur une base ou un plancher horizontal, et
mettez l’unité d’écran face vers le bas.
2. Fixation de l’unité d’écran
* Effectuez les travaux
sur une surface
horizontale.
Unité d’écran
Montant
Arrière
Piédestal
Avant
Plaque d’identification
Utilisez les vis de montage (vis noire) pour assurer
une fixation solide.
Placez I’unité d’écran de manière que le côté où les
trous d’insertion des montants sont visibles soit orienté
vers I’arrière. Ensuite, alignez les trous de l’unité d’écran
sur les montants, et insérez les montants dans les trous.
Assemblez correctement les montants en vous référant à l’illustration ci-dessous.
Vis de montage
...........................4
Vis de montage
(Vis noire) .........4
Montant .............2 Base ..................1

Français
20
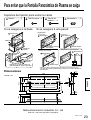
Pour éviter que l’Ecran plasma 16/9ème tombe
S’il est fixé à la base S’il est fixé au mur
Avant
Avant
Vis noire
Bande
Base
Bande
Vis à bois
Vis à bois
Vis noire
Vissez dans le milieu de la plaque
supérieure du bord de la plaque de plafond.
Vis noire
Attache
Attache
• Préparatifs
• Méthode de fixation
Avec les enceintes
Avec des trous de vis
(produit conventionnel)
Sans les enceintes
Vis noire
Attache
Attache
Vis de fixation
de support
Supports anti-chute
M0701-1091
Matsushita Electric Industrial Co., Ltd
Web Site : http://www.panasonic.co.jp/global/
Vis à bois.........2Bande ..............2 Attache ............4Vis noire ..........4
29.8
83
119.8
106
194.8
151
320.3
184.5
125.5
67.5
17.5
6.5
62.5
9.6
601 (Si vous installez un écran de 37 pouces)
684 (Si vous installez un écran de 42 pouces ou plus large)
806
37
688
601
Dimensions
Unités : mm
* Utilisez du fil métallique solide ou une chaîne en vente dans le
commerce pour fixer l’Ecran plasma 16/9ème sur une partie solide du
mur ou d’un pilier.
La page charge ...
La page charge ...
La page charge ...
La page charge ...
La page charge ...
La page charge ...
La page charge ...
La page charge ...
La page charge ...
La page charge ...
La page charge ...
La page charge ...
-
 1
1
-
 2
2
-
 3
3
-
 4
4
-
 5
5
-
 6
6
-
 7
7
-
 8
8
-
 9
9
-
 10
10
-
 11
11
-
 12
12
-
 13
13
-
 14
14
-
 15
15
-
 16
16
-
 17
17
-
 18
18
-
 19
19
-
 20
20
-
 21
21
-
 22
22
-
 23
23
-
 24
24
-
 25
25
-
 26
26
-
 27
27
-
 28
28
-
 29
29
-
 30
30
-
 31
31
-
 32
32


Panasonic TYST05S Mode d'emploi
- Taper
- Mode d'emploi
- Ce manuel convient également à
dans d''autres langues
- italiano: Panasonic TYST05S Istruzioni per l'uso
- español: Panasonic TYST05S Instrucciones de operación
- Nederlands: Panasonic TYST05S Handleiding
- dansk: Panasonic TYST05S Betjeningsvejledning
- 日本語: Panasonic TYST05S 取扱説明書
Documents connexes
-
Panasonic TYST50PX20 Manuel utilisateur
-
Panasonic TYST10H Manuel utilisateur
-
-
-
-
-
-
-
-